

As a mom, I totally get the challenge of finding dinner ideas that are both healthy and kid-approved. Let’s explore some smart options that check both boxes. Think cheesy cauliflower pizza bites and zucchini noodle spaghetti making an appearance on your dinner table. These dishes offer a nutritious spin on classics, ensuring mealtime is both fun and satisfying. Ready to find more creative ways to win over your kids’ taste buds?
Cheesy Cauliflower Pizza Bites
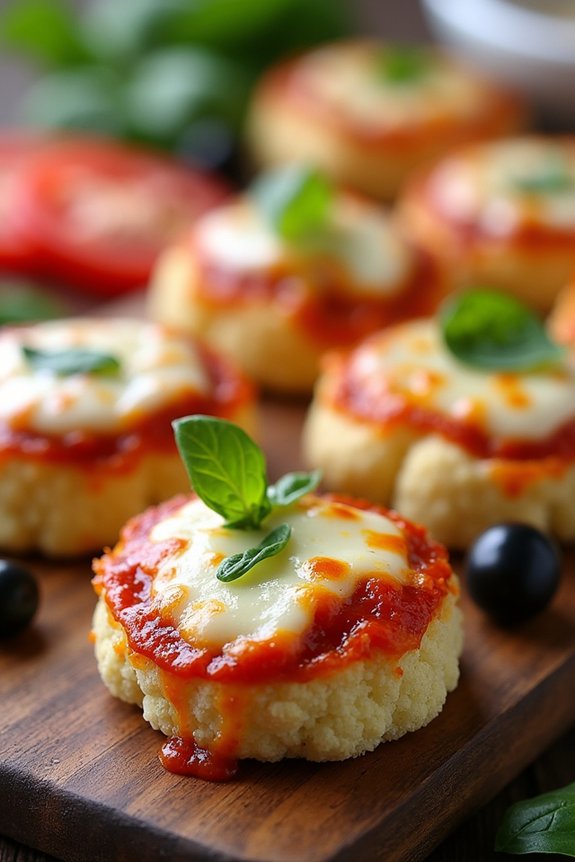
Cheesy Cauliflower Pizza Bites are a delightful and healthy twist on traditional pizza, perfect for kids and adults alike. These bite-sized treats are packed with flavor and nutrients, making them an ideal choice for a fun family dinner or a tasty snack. The star of the show is cauliflower, a versatile vegetable that serves as a nutritious alternative to flour-based dough. Not only are these bites gluten-free, but they also offer a lower-carb option without sacrificing the cheesy, savory goodness that pizza lovers crave.
The process of making Cheesy Cauliflower Pizza Bites is simple and engaging, making it a great opportunity for involving kids in the kitchen. By using cauliflower as the base, you create a crispy, cheesy crust that can be topped with your favorite pizza toppings. Whether you prefer classic pepperoni and mozzarella or want to experiment with various vegetables and cheeses, these pizza bites offer endless customization options. They’re sure to be a hit at the dinner table, encouraging even the pickiest eaters to enjoy their veggies in a fun and delicious way.
Ingredients (Serves 4-6):
- 1 large head of cauliflower
- 2 large eggs
- 1 ½ cups shredded mozzarella cheese
- ½ cup grated parmesan cheese
- 1 teaspoon dried Italian herbs (such as oregano and basil)
- ½ teaspoon garlic powder
- Salt and pepper to taste
- 1 cup marinara sauce
- Optional toppings: sliced pepperoni, sliced olives, chopped bell peppers, or any other preferred pizza toppings
Cooking Instructions:
- Prepare the Cauliflower: Preheat your oven to 400°F (200°C). Wash and cut the cauliflower into florets. Pulse the florets in a food processor until they reach a rice-like consistency. Alternatively, you can grate the cauliflower using a box grater.
- Cook the Cauliflower: Transfer the riced cauliflower to a microwave-safe bowl and microwave on high for about 4-5 minutes until tender. Allow it to cool slightly, then place it in a clean kitchen towel or cheesecloth and squeeze out as much moisture as possible. This step is vital to achieving a crispy texture.
- Make the Dough: In a large mixing bowl, combine the cauliflower, eggs, 1 cup of mozzarella cheese, parmesan cheese, Italian herbs, garlic powder, salt, and pepper. Mix well until all ingredients are thoroughly combined.
- Form the Bites: Line a baking sheet with parchment paper. Scoop tablespoon-sized portions of the cauliflower mixture onto the sheet, forming small mounds. Flatten each mound slightly to form a bite-sized circle.
- Bake the Bites: Place the baking sheet in the preheated oven and bake for 20-25 minutes or until the edges are golden brown and the tops are slightly crispy.
- Add Toppings: Remove the baking sheet from the oven. Spoon a small amount of marinara sauce onto each cauliflower bite, then sprinkle the remaining mozzarella cheese on top. Add any additional toppings of your choice.
- Final Bake: Return the baking sheet to the oven and bake for an additional 5-7 minutes, or until the cheese is melted and bubbly.
- Serve: Allow the Cheesy Cauliflower Pizza Bites to cool slightly before serving. Enjoy them warm as a fun and healthy pizza alternative!
Extra Tips:
For best results, verify that you squeeze out as much moisture as possible from the cooked cauliflower. This step is essential for achieving a crisp texture.
Consider using a pizza stone if you have one, as it can enhance the crispiness of the bites. Feel free to experiment with different cheese blends or toppings to suit your family’s taste preferences.
Additionally, these pizza bites can be made ahead of time and stored in the refrigerator or freezer for quick and easy reheating on busy weeknights.
Veggie-Packed Mini Meatloaves

Veggie-Packed Mini Meatloaves are a delightful and nutritious way to get your kids excited about dinner. These miniature meatloaves are filled with flavor and hidden vegetables, making them a perfect dinner choice for families seeking to incorporate more veggies into their meals. By blending lean ground meat with a variety of finely chopped vegetables, you not only enhance the nutritional value but also guarantee that the meatloaves remain moist and juicy.
Served with a side of mashed potatoes or steamed vegetables, these mini meatloaves are sure to become a family favorite. The beauty of this dish lies in its versatility and ease of preparation. By using muffin tins, you can create perfectly portioned mini meatloaves that cook faster than a traditional meatloaf. Plus, the individual servings make it easy for kids to enjoy a wholesome meal without any fuss.
This recipe is designed to serve 4-6 people, making it ideal for a family dinner or for meal prep. The combination of ground meat and vegetables also allows you to customize the flavors to suit your family’s preferences, guaranteeing that everyone leaves the table satisfied.
Ingredients (Serves 4-6):
- 1 pound lean ground beef or turkey
- 1 cup finely chopped carrots
- 1 cup finely chopped zucchini
- 1/2 cup finely chopped onions
- 1/2 cup breadcrumbs
- 1/4 cup grated Parmesan cheese
- 1 egg
- 1 tablespoon Worcestershire sauce
- 1 teaspoon garlic powder
- 1 teaspoon dried Italian herbs
- Salt and pepper to taste
- 1/2 cup ketchup (for topping)
Instructions:
- Preheat the Oven: Start by preheating your oven to 375°F (190°C), guaranteeing it’s ready for baking once your mini meatloaves are assembled.
- Prepare the Vegetables: Finely chop the carrots, zucchini, and onions. This can be done by hand or with a food processor to save time.
- Mix the Ingredients: In a large mixing bowl, combine the ground beef or turkey, chopped vegetables, breadcrumbs, Parmesan cheese, egg, Worcestershire sauce, garlic powder, Italian herbs, salt, and pepper. Use your hands or a spoon to mix until all ingredients are well incorporated.
- Shape the Mini Meatloaves: Lightly grease a muffin tin or line it with muffin liners. Divide the meat mixture evenly among the muffin cups, pressing down gently to form mini meatloaves.
- Add the Topping: Spoon a small amount of ketchup over the top of each mini meatloaf, spreading it evenly with the back of a spoon.
- Bake the Meatloaves: Place the muffin tin in the preheated oven and bake for 25-30 minutes, or until the meatloaves are cooked through and have an internal temperature of 160°F (71°C).
- Cool and Serve: Remove the tin from the oven and let the mini meatloaves cool for a few minutes before serving. Carefully remove them from the muffin tin using a spoon or small spatula.
Extra Tips: When making these Veggie-Packed Mini Meatloaves, feel free to experiment with different vegetables such as bell peppers or spinach for added nutrients and flavor. To guarantee even cooking, make sure the vegetables are finely chopped.
If you want to prepare these in advance, you can assemble the meatloaves and refrigerate them for up to 24 hours before baking. Serving them with a side of mashed potatoes or a green salad will complement the flavors beautifully and create a balanced meal.
Rainbow Veggie Stir-Fry
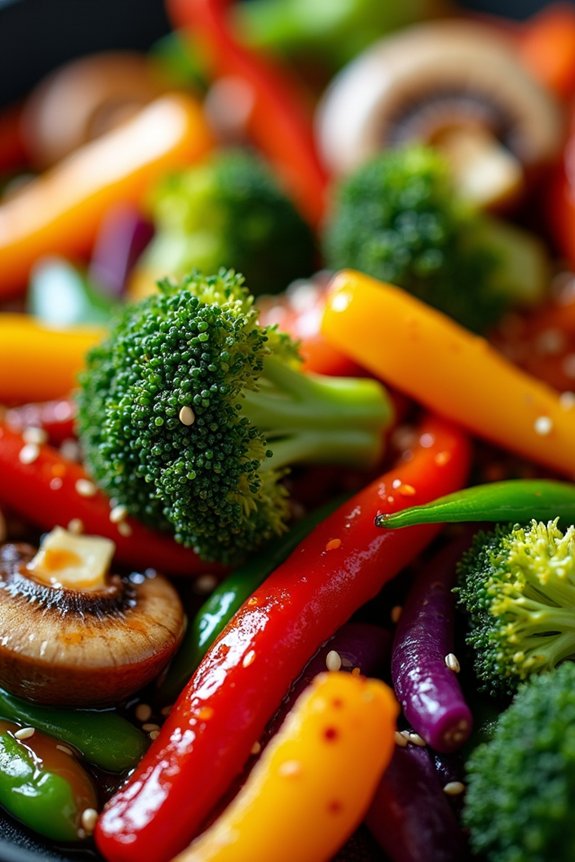
Rainbow Veggie Stir-Fry is a vibrant and nutritious dish that’s perfect for a healthy kid-friendly dinner. This colorful meal isn’t only pleasing to the eye but also packed with a variety of nutrients from the assortment of vegetables. Stir-frying is a quick cooking method that helps preserve the nutrients and crunchiness of the veggies, making it an ideal choice for busy weeknight dinners. Kids will love the rainbow of colors and the burst of flavors in each bite, and parents will appreciate how easy and fast this stir-fry comes together.
The beauty of Rainbow Veggie Stir-Fry lies in its versatility. You can customize it with your family’s favorite vegetables or use it as an opportunity to introduce new veggies to your kids. The key is to use a variety of colors to make the dish appealing and exciting. Serve it over a bed of brown rice or quinoa for a complete meal, or enjoy it on its own as a light and satisfying dinner. With a simple soy sauce-based dressing, this dish is sure to become a staple in your household, encouraging everyone to eat more vegetables.
Ingredients (Serving Size: 4-6 people):
- 2 tablespoons olive oil
- 1 red bell pepper, sliced
- 1 yellow bell pepper, sliced
- 1 cup broccoli florets
- 1 cup sugar snap peas
- 1 medium carrot, julienned
- 1 cup purple cabbage, thinly sliced
- 1 cup sliced mushrooms
- 3 cloves garlic, minced
- 1 tablespoon fresh ginger, minced
- 3 tablespoons low-sodium soy sauce
- 1 tablespoon honey or maple syrup
- 1 tablespoon rice vinegar
- 1 teaspoon sesame oil
- 1 tablespoon sesame seeds (optional)
- Cooked brown rice or quinoa, for serving
Instructions:
- Prepare the Ingredients: Begin by washing and slicing all the vegetables. Make sure to cut them into similar sizes to guarantee even cooking. Mince the garlic and ginger, and set all the prepared ingredients aside.
- Heat the Oil: Place a large skillet or wok over medium-high heat and add the olive oil. Allow it to heat up for about a minute until it begins to shimmer.
- Cook the Aromatics: Add the minced garlic and ginger to the hot oil. Stir them frequently for about 30 seconds until they become fragrant, being careful not to let them burn.
- Stir-Fry the Vegetables: Add the sliced bell peppers, broccoli, sugar snap peas, carrot, and mushrooms to the skillet. Stir-fry the vegetables for about 5-7 minutes, or until they’re tender-crisp. Keep stirring frequently to guarantee even cooking.
- Add the Cabbage: Stir in the purple cabbage and continue to cook for another 2-3 minutes, just until the cabbage is slightly softened.
- Prepare the Sauce: In a small bowl, whisk together the soy sauce, honey or maple syrup, rice vinegar, and sesame oil until well combined.
- Combine and Serve: Pour the sauce over the stir-fried vegetables and toss everything together to coat the veggies evenly. Cook for an additional 1-2 minutes to allow the flavors to meld. Sprinkle with sesame seeds, if using, and serve immediately over cooked brown rice or quinoa.
Extra Tips:
For an added protein boost, consider incorporating tofu, chicken, or shrimp into the stir-fry. You can marinate the protein in a bit of soy sauce and ginger before cooking.
If you prefer a bit of heat, add a pinch of red pepper flakes or a dash of hot sauce to the sauce mixture. To save time, prepare all your vegetables in advance and store them in the fridge until you’re ready to cook.
This dish is also great for using up any leftover vegetables you have on hand, so feel free to experiment with different combinations. Remember, the key to a great stir-fry is high heat and constant stirring, so keep those veggies moving in the pan!
Zucchini Noodle Spaghetti
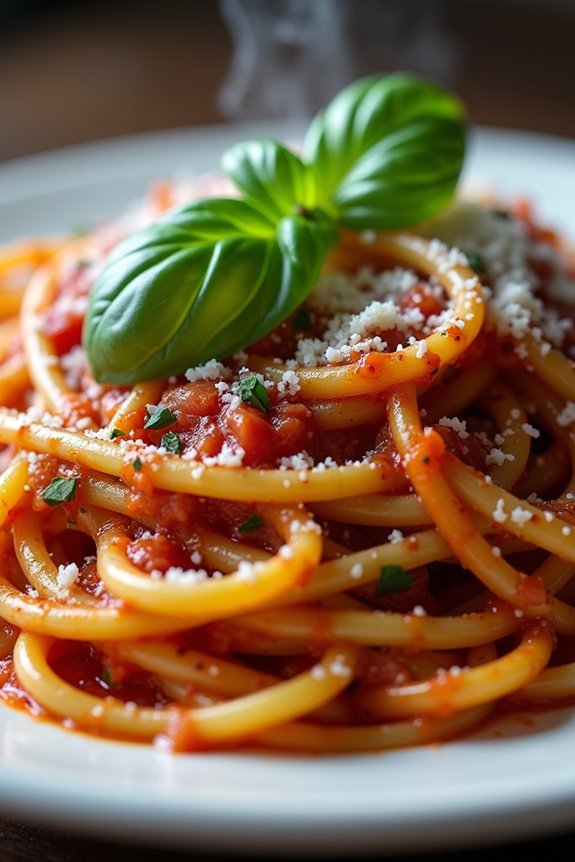
Zucchini Noodle Spaghetti is a delightful and healthy twist on the traditional spaghetti dish, perfect for a kid-friendly dinner. With zucchini noodles, or “zoodles,” as the star ingredient, this recipe isn’t only low in carbohydrates but also packed with nutrients.
It’s an excellent way to incorporate more vegetables into your child’s diet while still serving a meal that’s flavorful and satisfying. The zucchini noodles provide a fun texture that kids tend to enjoy, and when paired with a delicious homemade tomato sauce, this dish becomes a family favorite.
This recipe is suitable for a serving size of 4-6 people, making it ideal for a family dinner. The homemade tomato sauce, infused with garlic and herbs, complements the zucchini noodles perfectly. You can also add protein such as meatballs or grilled chicken to make it more substantial.
The dish is simple to prepare and can be on the table in under 30 minutes, making it a convenient option for busy weeknights.
Ingredients:
- 4 medium zucchinis
- 2 tablespoons olive oil
- 3 garlic cloves, minced
- 1 onion, finely chopped
- 1 can (28 ounces) crushed tomatoes
- 1 tablespoon tomato paste
- 1 teaspoon dried oregano
- 1 teaspoon dried basil
- Salt and pepper to taste
- Grated Parmesan cheese (optional)
- Fresh basil leaves for garnish (optional)
Instructions:
- Prepare the Zucchini Noodles: Start by washing the zucchinis thoroughly. Using a spiralizer, make noodles out of the zucchinis. If you don’t have a spiralizer, you can use a vegetable peeler to create thin strips resembling fettuccine. Set the zoodles aside.
- Make the Tomato Sauce: In a large pan, heat the olive oil over medium heat. Add the chopped onion and sauté until soft and translucent, about 5 minutes. Stir in the minced garlic and cook for another minute, being careful not to burn it.
- Add Tomatoes and Herbs: Pour in the crushed tomatoes and add the tomato paste, stirring to combine. Add the oregano, basil, and a pinch of salt and pepper. Let the sauce simmer for about 15 minutes, stirring occasionally, until it thickens slightly.
- Cook the Zoodles: In a separate large pan, heat a small amount of olive oil over medium-high heat. Add the zucchini noodles and sauté for 3-5 minutes, just until they begin to soften. Be careful not to overcook them as they can become mushy.
- Combine and Serve: Once the sauce has reached your desired consistency, add the zucchini noodles to the sauce, tossing gently to coat them evenly. Cook for an additional 2 minutes to allow the flavors to meld together.
- Garnish and Enjoy: Serve the zucchini noodle spaghetti immediately, topped with grated Parmesan cheese and fresh basil leaves if desired.
Extra Tips:
When cooking zucchini noodles, it’s important not to overcook them as they release water and can become soggy. If you prefer a firmer texture, lightly salt the zoodles after spiralizing and let them sit for about 10 minutes to draw out some of the moisture, then pat them dry before cooking.
Additionally, feel free to customize this dish with your child’s favorite vegetables or proteins to make it even more appealing and nutritious.
Chicken and Avocado Wraps

Chicken and avocado wraps are a delicious and nutritious option for a kid-friendly dinner. These wraps are packed with protein-rich chicken and creamy avocado, making them both satisfying and healthy. The combination of flavors and textures from the seasoned chicken, fresh vegetables, and smooth avocado creates a delightful meal that kids will love.
Plus, they’re easy to prepare and perfect for a busy weeknight dinner.
These wraps can be customized to suit your family’s taste preferences, allowing you to add various vegetables and sauces. Not only are they quick to prepare, but they also offer a great opportunity to involve kids in the kitchen. Let your little ones help assemble the wraps, encouraging them to try new flavors and take pride in their culinary creations.
This recipe serves 4-6 people, making it ideal for a family dinner or a small gathering.
Ingredients for 4-6 servings:
- 2 boneless, skinless chicken breasts
- 2 ripe avocados
- 1 tablespoon olive oil
- 1 teaspoon garlic powder
- 1 teaspoon paprika
- Salt and pepper to taste
- 1 cup cherry tomatoes, halved
- 1 cup shredded lettuce
- 1 small red onion, thinly sliced
- 6 large whole wheat tortillas
- 1/2 cup shredded cheese (optional)
- Juice of 1 lime
Cooking Instructions:
- Prepare the Chicken: Start by trimming any excess fat from the chicken breasts. Season both sides of the chicken breasts with garlic powder, paprika, salt, and pepper.
- Cook the Chicken: Heat the olive oil in a large skillet over medium heat. Add the chicken breasts and cook for about 6-7 minutes on each side, or until they’re fully cooked and reach an internal temperature of 165°F (75°C). Once cooked, remove the chicken from the skillet and let it rest for a few minutes before slicing it into thin strips.
- Prepare the Avocados: While the chicken is cooking, cut the avocados in half, remove the pit, and scoop the flesh into a bowl. Mash the avocado with a fork and add lime juice, a pinch of salt, and pepper to taste. Stir until well combined and set aside.
- Assemble the Wraps: Lay out the whole wheat tortillas on a clean surface. Spread a generous amount of the mashed avocado mixture onto each tortilla. Layer the sliced chicken, cherry tomatoes, shredded lettuce, and red onion on top. If using, sprinkle some shredded cheese over the fillings.
- Wrap and Serve: Fold in the sides of each tortilla and roll it up tightly to enclose the fillings. Secure with a toothpick if necessary. Cut the wraps in half and serve immediately.
Extra Tips:
For added flavor, consider marinating the chicken in a mixture of olive oil, lime juice, and your favorite herbs for at least 30 minutes before cooking. This will infuse the chicken with even more taste.
If you prefer a spicier kick, add a dash of hot sauce or a sprinkle of chili flakes to the avocado mixture. For a different twist, you can also try adding some sliced bell peppers or cucumber for extra crunch.
Finally, if you have picky eaters, let them choose their favorite ingredients to include in their wraps, making the meal more enjoyable for everyone.
Sweet Potato and Black Bean Tacos
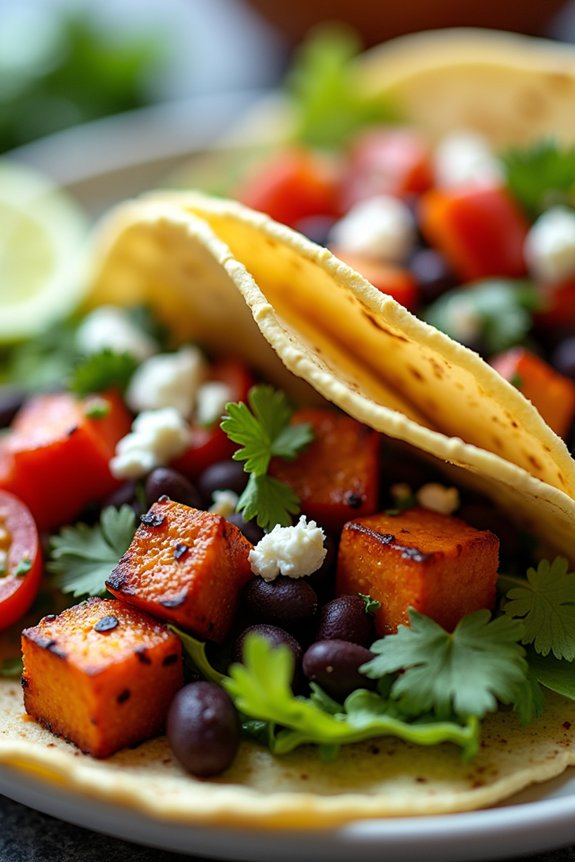
Sweet Potato and Black Bean Tacos are a delightful and nutritious choice for a family dinner that appeals to both kids and adults. These tacos aren’t only packed with flavor, but they also offer a good balance of carbohydrates, protein, and fiber, making them a healthy meal option.
The sweet potatoes bring a subtle sweetness that contrasts beautifully with the hearty black beans, while a simple blend of spices adds a touch of warmth and depth to the dish. The vibrant colors and the ability to customize each taco with a variety of toppings make this meal engaging and fun for kids, encouraging them to explore different flavors and textures.
This recipe is perfect for a serving size of 4-6 people, making it ideal for family dinners. Not only is this dish easy to prepare, but it also offers room for creativity with toppings, allowing each family member to tailor their tacos to their liking.
Whether you’re a seasoned cook or new to the kitchen, these Sweet Potato and Black Bean Tacos are simple to make and are sure to be a hit at the dinner table.
Ingredients:
- 3 medium sweet potatoes, peeled and diced
- 1 tablespoon olive oil
- 1 teaspoon ground cumin
- 1 teaspoon smoked paprika
- 1/2 teaspoon garlic powder
- Salt and pepper to taste
- 1 can (15 oz) black beans, drained and rinsed
- 1/4 cup water
- 12 corn tortillas
- 1 cup shredded lettuce
- 1 cup diced tomatoes
- 1/2 cup crumbled feta or cotija cheese
- 1/4 cup chopped fresh cilantro
- Lime wedges, for serving
Cooking Instructions:
- Preheat the Oven: Preheat your oven to 400°F (200°C). Line a baking sheet with parchment paper or lightly grease it with cooking spray.
- Prepare the Sweet Potatoes: In a large bowl, toss the diced sweet potatoes with olive oil, ground cumin, smoked paprika, garlic powder, salt, and pepper until evenly coated.
- Roast the Sweet Potatoes: Spread the seasoned sweet potatoes in an even layer on the prepared baking sheet. Roast in the preheated oven for 20-25 minutes, or until they’re tender and slightly caramelized, stirring halfway through the cooking time.
- Cook the Black Beans: While the sweet potatoes are roasting, heat a small saucepan over medium heat. Add the drained black beans and 1/4 cup of water. Stir occasionally and cook for about 5-7 minutes, or until the beans are heated through. Remove from heat and set aside.
- Warm the Tortillas: Wrap the corn tortillas in aluminum foil and warm them in the oven during the last 5 minutes of the sweet potato roasting time, or until they’re soft and pliable.
- Assemble the Tacos: To assemble the tacos, place a generous spoonful of roasted sweet potatoes and black beans onto each warm tortilla. Top with shredded lettuce, diced tomatoes, crumbled cheese, and chopped cilantro. Squeeze fresh lime juice over the top for added flavor.
- Serve: Serve the tacos immediately, with extra lime wedges on the side for squeezing.
Extra Tips:
For an extra layer of flavor, consider adding sliced avocado or a dollop of Greek yogurt or sour cream as additional toppings. If you prefer a bit of heat, sprinkle some chopped jalapeños or a dash of hot sauce to spice things up.
These tacos are also great for meal prep; simply store the components separately and assemble fresh tacos throughout the week. Additionally, if you have picky eaters, let them build their own tacos to encourage them to try new toppings.
Enjoy your delicious and healthy Sweet Potato and Black Bean Tacos!
Hidden Veggie Mac and Cheese
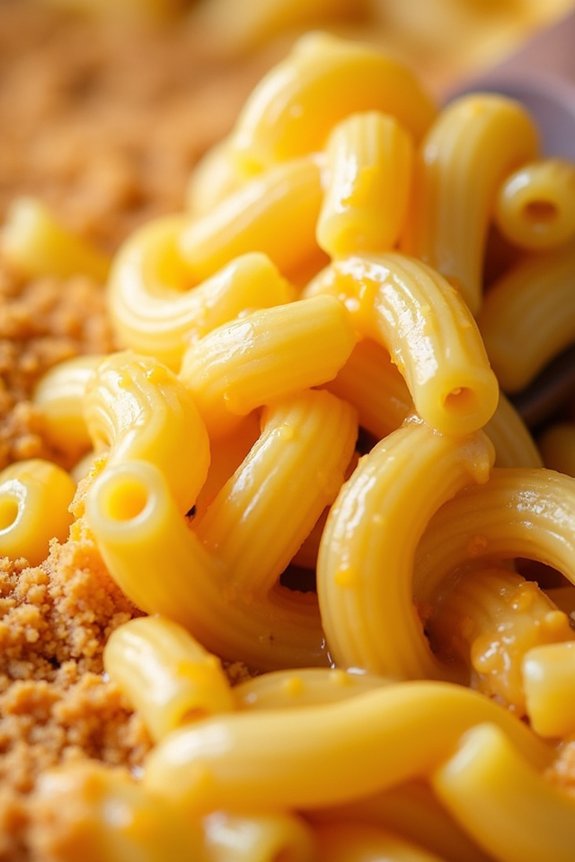
Hidden Veggie Mac and Cheese is a delicious twist on the classic comfort food that sneaks in extra nutrients without sacrificing flavor. Perfect for picky eaters, this dish incorporates vegetables like butternut squash and cauliflower, which blend seamlessly into the creamy cheese sauce. The result is a nutritious, kid-friendly meal that packs a punch of vitamins and minerals while still feeling indulgent. This recipe is ideal for busy weeknights when you want to serve something quick, easy, and wholesome.
Not only is Hidden Veggie Mac and Cheese a hit with kids, but adults will also appreciate the added depth of flavor and the creamy consistency. By using pureed vegetables, you create a sauce that’s both velvety smooth and naturally sweet, complementing the sharpness of the cheddar cheese. Plus, this recipe is versatile and can be customized with different types of pasta or additional veggies based on what you have on hand. It’s a fantastic way to guarantee your family gets their daily dose of vegetables in a meal everyone loves.
Ingredients (Serving Size: 4-6 people):
- 8 ounces elbow macaroni or pasta of choice
- 1 cup butternut squash, peeled and cubed
- 1 cup cauliflower florets
- 2 tablespoons unsalted butter
- 2 tablespoons all-purpose flour
- 2 cups milk
- 2 cups shredded sharp cheddar cheese
- 1 teaspoon garlic powder
- Salt and pepper to taste
- 1/4 cup grated parmesan cheese (optional)
- 1/2 cup breadcrumbs (optional for topping)
Cooking Instructions:
- Prepare the Vegetables: In a medium-sized pot, bring water to a boil and add the butternut squash and cauliflower. Cook for about 10-15 minutes, or until both are tender. Drain and transfer to a blender or food processor. Blend until smooth and set aside.
- Cook the Pasta: In a large pot, cook the pasta according to package instructions until al dente. Drain and set aside.
- Make the Cheese Sauce: In the same pot used for cooking the pasta, melt the butter over medium heat. Stir in the flour and cook for about 1 minute to form a roux. Gradually whisk in the milk, guaranteeing there are no lumps, and bring to a gentle simmer.
- Combine Ingredients: Once the milk mixture has thickened slightly, reduce the heat to low and stir in the pureed vegetables. Add the cheddar cheese, garlic powder, salt, and pepper. Stir continuously until the cheese is melted and the sauce is smooth.
- Mix with Pasta: Add the cooked pasta to the cheese sauce and stir until the pasta is evenly coated. If desired, transfer the mac and cheese to a baking dish.
- Optional Topping: If using, sprinkle the parmesan cheese and breadcrumbs over the top. Place under a broiler for a few minutes until the top is golden and crispy.
Extra Tips: To save time, you can use pre-cut butternut squash and cauliflower. For an extra creamy texture, use whole milk or a mix of milk and cream. Feel free to experiment with different types of cheese, such as mozzarella or gouda, for varied flavor profiles. If your kids are especially picky, you can add a bit of natural food coloring to enhance the cheesy color and mask the presence of veggies.
Quinoa and Turkey Stuffed Peppers
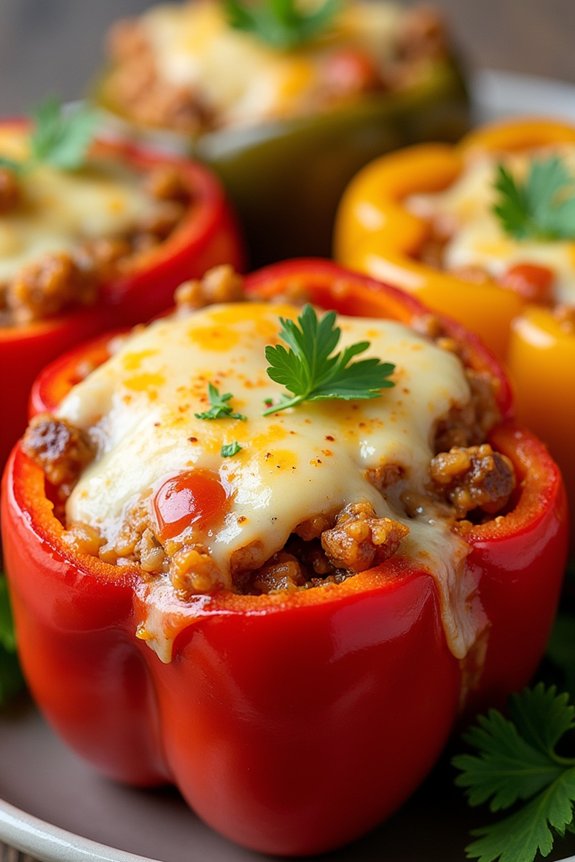
Quinoa and Turkey Stuffed Peppers are a delightful and nutritious option for a family dinner that everyone in the house can enjoy. This dish combines lean ground turkey with protein-rich quinoa, all nestled inside vibrant bell peppers. The combination of flavors from the savory turkey, the nutty quinoa, and the sweetness of the bell peppers creates a harmonious blend that’s both satisfying and healthy.
Not only is this meal packed with nutrients, but it’s also visually appealing, making it an excellent choice for introducing kids to new and exciting flavors.
These stuffed peppers are a versatile dish that can be easily adjusted to suit your family’s taste preferences. You can incorporate a variety of vegetables or spices to enhance the flavors, making it a perfect canvas for creativity in the kitchen. This recipe is designed to serve 4-6 people, making it ideal for a family dinner or even a small gathering. The preparation and cooking process is straightforward, allowing you to have a delicious meal on the table in no time.
Ingredients (Serves 4-6)
- 6 large bell peppers (any color)
- 1 cup uncooked quinoa
- 1 1/2 cups water or chicken broth
- 1 tablespoon olive oil
- 1 pound ground turkey
- 1 medium onion, finely chopped
- 3 cloves garlic, minced
- 1 teaspoon cumin
- 1 teaspoon paprika
- 1/2 teaspoon salt
- 1/4 teaspoon black pepper
- 1 can (14.5 oz) diced tomatoes, drained
- 1 cup shredded cheese (cheddar or mozzarella)
- 1/4 cup fresh parsley, chopped (optional for garnish)
Instructions
- Prepare the Quinoa: Rinse the quinoa under cold water. In a medium saucepan, combine the quinoa and water (or chicken broth). Bring to a boil, then reduce the heat to low, cover, and let it simmer for about 15 minutes or until the quinoa is fluffy and the liquid is absorbed. Remove from heat and set aside.
- Preheat the Oven: Preheat your oven to 375°F (190°C).
- Prepare the Bell Peppers: Cut the tops off the bell peppers and remove the seeds and membranes. Arrange them in a baking dish, cut side up.
- Cook the Turkey Mixture: In a large skillet, heat the olive oil over medium heat. Add the chopped onion and minced garlic, sautéing until the onion becomes translucent. Add the ground turkey, breaking it up with a spoon. Cook until the turkey is browned and cooked through.
- Season and Combine: Stir in the cumin, paprika, salt, and black pepper, mixing well. Add the drained diced tomatoes and cooked quinoa to the turkey mixture. Stir everything together until well combined.
- Stuff the Peppers: Spoon the turkey and quinoa mixture into each bell pepper, filling them generously.
- Bake the Peppers: Cover the baking dish with foil and bake in the preheated oven for 25 minutes. Then, remove the foil, sprinkle the shredded cheese on top of each pepper, and bake for an additional 10-15 minutes until the cheese is melted and bubbly.
- Serve: Remove the peppers from the oven and let them cool for a few minutes before serving. Garnish with fresh parsley if desired.
Extra Tips
When selecting bell peppers, opt for ones that are uniform in size so they cook evenly. If you have any leftover turkey and quinoa mixture, it can be stored in the refrigerator and used as a filling for wraps or as a topping for salads.
Feel free to experiment with different spices or add-ins like corn, black beans, or spinach to customize the dish to your family’s liking. Additionally, if you prefer a vegetarian option, simply substitute the ground turkey with your favorite vegetables or a plant-based protein alternative.
Salmon Fish Sticks With Sweet Potato Fries

If you’re looking for a nutritious and delicious meal that will appeal to both kids and adults, Salmon Fish Sticks with Sweet Potato Fries is a perfect choice. This dish combines the health benefits of salmon, rich in omega-3 fatty acids, with the crowd-pleasing appeal of crispy fish sticks.
Paired with sweet potato fries, which are lower on the glycemic index than regular potatoes, this meal is a flavorful and wholesome option for family dinners. Not only are these fish sticks easy to make, but they also offer a fun and interactive way for kids to get involved in the kitchen.
Salmon Fish Sticks with Sweet Potato Fries is an excellent option for busy weeknights or a fun weekend meal. The fish sticks are coated in a crunchy panko breadcrumb mix, providing a satisfying texture that contrasts beautifully with the tender salmon inside.
The sweet potato fries, seasoned with a hint of paprika and garlic powder, are baked to perfection, offering a healthy alternative to traditional fries. This dish isn’t only a treat for the taste buds but also packed with nutrients, ensuring that your family gets a balanced meal that everyone will love.
Ingredients (serving size: 4-6 people):
- 1 1/2 lbs salmon fillets, skin removed
- 2 large sweet potatoes
- 1 cup panko breadcrumbs
- 1/2 cup grated Parmesan cheese
- 2 eggs
- 1 cup all-purpose flour
- 1 teaspoon garlic powder
- 1 teaspoon paprika
- Salt and pepper to taste
- 2 tablespoons olive oil
- Cooking spray
Cooking Instructions:
- Preheat the Oven: Preheat your oven to 425°F (220°C). Line two baking sheets with parchment paper and lightly spray them with cooking spray.
- Prepare the Sweet Potatoes: Peel the sweet potatoes and cut them into thin fries, about 1/4 inch thick. In a large bowl, toss the sweet potato fries with olive oil, garlic powder, paprika, salt, and pepper until they’re evenly coated.
- Bake the Sweet Potato Fries: Arrange the fries in a single layer on one of the prepared baking sheets. Bake in the preheated oven for 25-30 minutes, flipping halfway through, until they’re golden and crispy.
- Prepare the Salmon: While the fries are baking, cut the salmon fillets into strips about 1 inch thick and 3 inches long. Season the salmon strips with a pinch of salt and pepper.
- Set Up the Dredging Station: Set up three shallow dishes. In the first dish, place the all-purpose flour. In the second dish, beat the eggs. In the third dish, mix the panko breadcrumbs and grated Parmesan cheese.
- Coat the Salmon Sticks: Dredge each salmon strip in the flour, shaking off any excess. Dip it into the beaten eggs, and then coat it with the panko-Parmesan mixture, pressing gently to adhere.
- Bake the Salmon Sticks: Arrange the coated salmon sticks on the second prepared baking sheet. Lightly spray them with cooking spray to help them crisp up. Bake for 12-15 minutes or until the salmon is cooked through and the coating is golden brown.
- Serve: Serve the salmon fish sticks with the sweet potato fries hot from the oven. Optionally, provide a side of ketchup, yogurt-based dip, or tartar sauce for dipping.
Extra Tips:
For extra crispiness, try placing the sweet potato fries and salmon sticks on a wire rack set over the baking sheets. This allows for better air circulation and even cooking.
When choosing salmon, opt for fresh, wild-caught fillets if possible, as they tend to have a richer flavor. If you want to add a touch of zest, consider incorporating lemon zest into the panko mixture for a revitalizing twist.
Finally, encourage kids to participate by letting them coat the salmon strips, making the cooking process a fun family activity.
Spinach and Cheese Quesadillas

Spinach and Cheese Quesadillas are a delightful and nutritious option for a kid-friendly dinner that doesn’t compromise on taste. This dish combines the creamy goodness of melted cheese with the mild, earthy flavor of spinach, all nestled inside a crispy tortilla shell. Not only are these quesadillas delicious, but they also offer a great way to sneak some greens into your child’s diet without any complaints. Perfect for busy weeknights, these quesadillas are quick to prepare and sure to be a hit with both kids and adults alike.
Quesadillas are incredibly versatile, allowing you to customize them to suit individual tastes. In this version, the combination of spinach and cheese provides a balance of flavors and nutrients. The spinach adds vitamins and minerals, while the cheese offers protein and calcium. Serve them with your favorite salsa or a dollop of sour cream for an added burst of flavor. This recipe will provide enough quesadillas for a serving size of 4-6 people, making it great for family dinners or small gatherings.
Ingredients for Spinach and Cheese Quesadillas (Serves 4-6):
- 8 large flour tortillas
- 2 cups fresh spinach leaves, washed and dried
- 2 cups shredded mozzarella cheese
- 1 cup shredded cheddar cheese
- 1 tablespoon olive oil
- Salt and pepper to taste
- Optional: Salsa or sour cream for serving
Cooking Instructions:
- Prepare the Spinach: Heat olive oil in a large skillet over medium heat. Add the spinach and sauté for 2-3 minutes until wilted. Season with salt and pepper. Remove the spinach from the skillet and set it aside.
- Assemble the Quesadillas: Lay four tortillas flat on a clean surface. Evenly divide the sautéed spinach and spread it over each tortilla. Sprinkle 1/2 cup of mozzarella and 1/4 cup of cheddar cheese over the spinach on each tortilla.
- Top and Prep for Cooking: Place another tortilla on top of each prepared tortilla with filling, creating a sandwich-like structure. Press down gently to secure the ingredients inside.
- Cook the Quesadillas: Heat a large non-stick skillet or griddle over medium heat. Carefully place a quesadilla onto the skillet. Cook for 3-4 minutes on each side, or until the tortillas are golden brown and the cheese has melted. Repeat this process for the remaining quesadillas.
- Serve: Once cooked, remove the quesadillas from the skillet and let them cool slightly before cutting into wedges. Serve warm with salsa or sour cream on the side if desired.
Extra Tips:
For an added burst of flavor, consider adding some sliced mushrooms or bell peppers to the spinach while sautéing. If you prefer a bit of spice, you may include a pinch of chili flakes or jalapeño slices.
To make the quesadillas even crispier, brush the outer side of each tortilla with a little olive oil before cooking. Additionally, keep an eye on the heat level; cooking over too high heat can burn the tortillas before the cheese has a chance to melt.
Enjoy your delicious and healthy Spinach and Cheese Quesadillas!
Broccoli and Cheese Stuffed Chicken Breasts
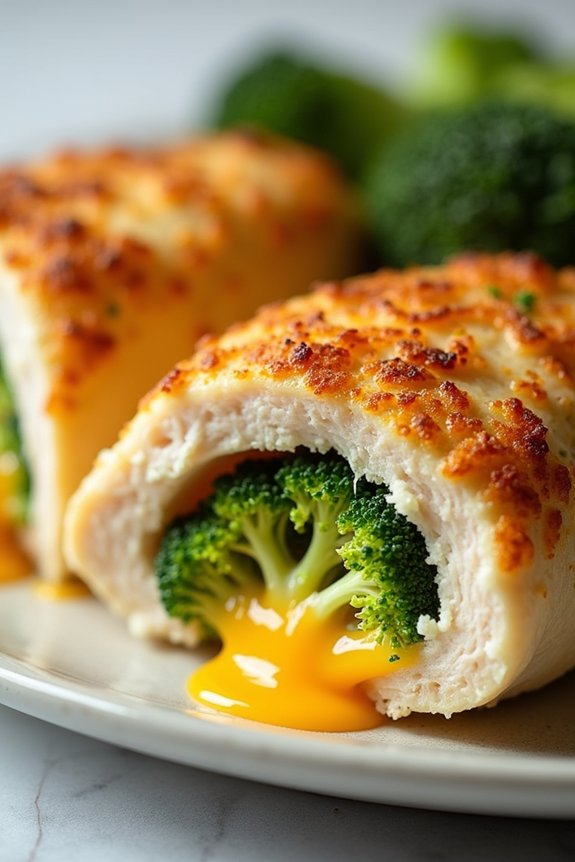
Broccoli and Cheese Stuffed Chicken Breasts make a nutritious and delicious dinner option that’s both kid-friendly and satisfying. This dish combines tender chicken breasts with a flavorful filling of broccoli and cheese, resulting in a meal that’s both healthy and appealing to young palates. The stuffed chicken breasts aren’t only packed with vitamins and minerals from the broccoli but also provide a good source of protein, making it an ideal choice for growing children.
Plus, the melted cheese adds a creamy richness that everyone will love. This recipe is perfect for a family dinner, serving 4-6 people, and can be accompanied by a simple side salad or roasted vegetables for a well-rounded meal. Whether you’re looking to sneak more veggies into your child’s diet or just want to try something new for dinner, these Broccoli and Cheese Stuffed Chicken Breasts are sure to become a household favorite.
Best of all, this dish is relatively easy to prepare, making it a great option for busy weeknights.
Ingredients:
- 4-6 boneless, skinless chicken breasts
- 2 cups broccoli florets, chopped
- 1 cup shredded cheddar cheese
- 1/2 cup cream cheese, softened
- 1 teaspoon garlic powder
- 1 teaspoon onion powder
- Salt and pepper to taste
- 2 tablespoons olive oil
- 1/2 cup chicken broth
Cooking Instructions:
- Preheat the Oven: Preheat your oven to 375°F (190°C) to get it ready for baking the chicken.
- Prepare the Filling: In a medium-sized bowl, combine the chopped broccoli, shredded cheddar cheese, cream cheese, garlic powder, onion powder, salt, and pepper. Mix well until the ingredients are fully combined and the broccoli is evenly coated with cheese.
- Prepare the Chicken Breasts: Using a sharp knife, carefully make a horizontal slit along the side of each chicken breast to create a pocket. Be careful not to cut all the way through.
- Stuff the Chicken: Stuff each chicken breast with an equal amount of the broccoli and cheese mixture. Be sure to press the filling in firmly, but not too tightly, to prevent it from spilling out during cooking.
- Secure the Chicken: Use toothpicks to secure the open edges of the chicken breasts, making sure the filling stays inside while cooking.
- Sear the Chicken: In a large oven-safe skillet, heat the olive oil over medium-high heat. Place the stuffed chicken breasts in the skillet and sear for about 3-4 minutes on each side, until golden brown.
- Bake the Chicken: Pour the chicken broth into the skillet to add moisture during baking. Transfer the skillet to the preheated oven and bake for 20-25 minutes, or until the chicken is cooked through and the internal temperature reaches 165°F (74°C).
- Rest and Serve: Remove the chicken from the oven and let it rest for a few minutes before slicing. This will help the juices redistribute and keep the chicken moist. Serve warm and enjoy!
Extra Tips:
For extra flavor, consider adding some freshly chopped herbs like parsley or basil to the broccoli and cheese mixture. If you don’t have an oven-safe skillet, you can transfer the seared chicken to a baking dish before adding the chicken broth and baking.
To guarantee even cooking, try to select chicken breasts of similar size and thickness. Finally, for those who prefer a bit of heat, a pinch of red pepper flakes can be added to the filling mixture.
Carrot and Chickpea Patties

Carrot and Chickpea Patties are a delicious and nutritious option for a kid-friendly dinner that sneaks in a variety of vegetables and protein. These patties aren’t only easy to make but also versatile, allowing you to serve them in numerous ways — as a main dish with sides, in a sandwich, or even as a snack.
The combination of sweet carrots and hearty chickpeas provides a satisfying texture and flavor that kids are sure to love. Plus, they’re baked rather than fried, making them a healthier option for the entire family.
Making Carrot and Chickpea Patties is a straightforward process that involves blending all the ingredients, forming patties, and baking them until golden and crispy. This recipe can easily be doubled if you’re feeding a larger crowd or if you want leftovers for lunch the next day.
It’s a great way to introduce kids to new flavors and textures while still offering them something familiar and comforting. Now, let’s gather our ingredients and get started on this delightful dish.
Ingredients (Serves 4-6)
- 2 cups chickpeas, cooked and drained
- 1 cup grated carrots
- 1/2 cup breadcrumbs
- 1/4 cup finely chopped onion
- 2 cloves garlic, minced
- 1 teaspoon ground cumin
- 1 teaspoon ground coriander
- 1/2 teaspoon salt
- 1/4 teaspoon black pepper
- 2 tablespoons fresh parsley, chopped
- 1 tablespoon lemon juice
- 2 tablespoons olive oil
- 1 egg
Cooking Instructions
- Preheat the Oven: Start by preheating your oven to 375°F (190°C). This guarantees that it reaches the right temperature by the time the patties are ready to be baked.
- Prepare the Mixture: In a large mixing bowl or food processor, combine the chickpeas, grated carrots, breadcrumbs, chopped onion, minced garlic, ground cumin, ground coriander, salt, and pepper. Blend until the mixture is well combined but still slightly chunky.
- Add Remaining Ingredients: Add the fresh parsley, lemon juice, olive oil, and egg to the chickpea mixture. Mix until everything is thoroughly combined and the mixture holds together well.
- Shape the Patties: Using your hands, form the mixture into small, round patties, each about 2-3 inches in diameter. The recipe should yield approximately 8-10 patties, depending on the size.
- Bake the Patties: Arrange the patties on a baking sheet lined with parchment paper. Bake in the preheated oven for 20-25 minutes, flipping halfway through, until they’re golden brown and firm to the touch.
- Serve: Once baked, remove the patties from the oven and let them cool slightly. Serve warm with a side of yogurt dip, in a pita, or alongside a fresh salad.
Extra Tips
For a firmer texture, you can refrigerate the patties for 30 minutes before baking, which helps them hold their shape better.
If you prefer a spicier kick, consider adding a pinch of cayenne pepper or a dash of hot sauce to the mixture. These patties can also be frozen after baking; simply cool them completely, store in an airtight container, and reheat in the oven when needed.
Adjust the seasoning to taste, especially if serving to younger children who may prefer a milder flavor.