

As a mom, I know how tricky it can be to whip up dinners that are both healthy and toddler-approved. We’ve all faced those mealtime struggles with little ones who have very specific tastes. Over time, I’ve gathered a collection of go-to meals that are nutritious and fun for kids to eat. From cheesy broccoli and chicken casseroles to banana and oatmeal pancakes, these recipes are sure to win over even the pickiest eaters. Ready to explore these delicious ideas?
Cheesy Broccoli and Chicken Casserole
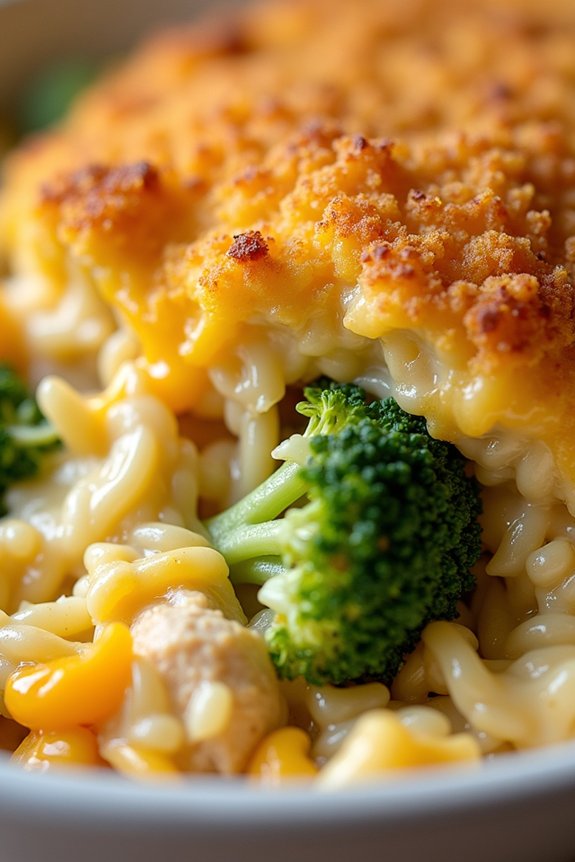
Indulge your little ones with a delightful Cheesy Broccoli and Chicken Casserole that combines tender chicken pieces, nutritious broccoli, and a creamy cheese sauce. This dish isn’t only easy to prepare but also packed with flavors that your toddlers will love. The creamy texture and cheesy goodness make it a comforting meal that appeals to both kids and adults alike.
It’s a great way to sneak in some greens while guaranteeing your children enjoy their meal. This casserole is perfect for busy weeknights or as a make-ahead meal that you can simply pop into the oven when needed. With a prep time of just 20 minutes and a cook time of 40 minutes, you’ll have a wholesome dinner ready in no time.
The recipe serves 4-6 people, making it ideal for family dinners or leftovers for the next day. Not only is it nutritious, but it’s also a great way to introduce new flavors and textures to your toddler’s diet.
Ingredients for 4-6 servings:
- 2 cups cooked chicken breast, diced
- 3 cups broccoli florets, steamed
- 2 cups shredded cheddar cheese
- 1 cup cooked rice
- 1 cup milk
- 1 can (10.5 oz) cream of chicken soup
- 1/2 teaspoon garlic powder
- 1/2 teaspoon onion powder
- 1/4 teaspoon black pepper
- 1/2 cup breadcrumbs
- 2 tablespoons butter, melted
Cooking Instructions:
- Preheat the Oven: Start by preheating your oven to 350°F (175°C) to guarantee it’s hot and ready for the casserole.
- Prepare the Baking Dish: Lightly grease a 9×13 inch baking dish with some butter or non-stick cooking spray to prevent sticking.
- Mix the Ingredients: In a large mixing bowl, combine the diced chicken, steamed broccoli, cooked rice, 1 1/2 cups of cheddar cheese, milk, cream of chicken soup, garlic powder, onion powder, and black pepper. Stir until all ingredients are well combined and evenly coated with the sauce.
- Assemble the Casserole: Pour the mixture into the prepared baking dish, spreading it out evenly. Sprinkle the remaining 1/2 cup of cheddar cheese over the top.
- Prepare the Topping: In a small bowl, mix the breadcrumbs with the melted butter until the crumbs are evenly coated. Sprinkle this mixture evenly over the casserole for a crunchy topping.
- Bake the Casserole: Place the baking dish in the preheated oven and bake for 30-40 minutes, or until the top is golden brown and the casserole is heated through.
- Cool and Serve: Let the casserole cool for a few minutes before serving. This will help the flavors meld together and make it easier to serve.
Extra Tips:
For added flavor, consider mixing in some grated Parmesan cheese with the breadcrumbs before sprinkling it on top. If you have picky eaters, try cutting the broccoli into smaller pieces to make them less noticeable.
This casserole can also be made ahead of time and refrigerated; simply add an extra 10 minutes to the baking time if cooking directly from the fridge. Additionally, feel free to substitute with other types of cheese or add in different veggies to suit your family’s taste. Enjoy the meal knowing it’s a nutritious choice for your little ones!
Mini Turkey Meatballs With Hidden Veggies

Creating meals that are both nutritious and appealing to toddlers can sometimes be a challenge. Mini Turkey Meatballs with Hidden Veggies offer a delightful solution that’s both fun and delicious for little ones. Packed with lean protein and a variety of vegetables, this dish guarantees that your toddler is receiving essential nutrients without even realizing it.
The meatballs are small enough for little fingers to handle easily, making them a perfect choice for family dinners or even a quick snack. This dish can be served on its own, paired with a side of pasta, or alongside a simple dipping sauce, making it versatile for different meal plans.
The hidden veggies add a burst of color and flavor, while the turkey provides a mild and tender base. Plus, these meatballs are easy to prepare and cook, making them an excellent option for busy parents looking to whip up a wholesome meal without spending hours in the kitchen.
Ingredients for 4-6 servings:
- 1 pound ground turkey
- 1/2 cup breadcrumbs
- 1/4 cup grated Parmesan cheese
- 1 egg
- 1/4 cup finely chopped spinach
- 1/4 cup grated carrot
- 1/4 cup finely chopped onion
- 1 clove garlic, minced
- 1 teaspoon dried Italian herbs
- Salt and pepper to taste
- 1 tablespoon olive oil
Cooking Instructions:
1. Preheat the Oven: Begin by preheating your oven to 400°F (200°C). This guarantees that your meatballs will cook evenly and develop a nice, golden-brown exterior.
2. Prepare the Mixture: In a large mixing bowl, combine the ground turkey, breadcrumbs, Parmesan cheese, egg, spinach, carrot, onion, garlic, and Italian herbs. Season the mixture with salt and pepper.
Use your hands to gently mix all the ingredients until well combined. Be careful not to overmix, as this can make the meatballs tough.
3. Shape the Meatballs: With your hands, shape the mixture into small balls, about one inch in diameter. This size is perfect for toddlers’ small mouths and helps in cooking evenly. You should get approximately 20-24 mini meatballs.
4. Cook the Meatballs: Heat olive oil in a large skillet over medium heat. Add the meatballs in batches, making sure not to overcrowd the pan. Cook for about 2-3 minutes on each side until they’re browned all over.
5. Bake the Meatballs: Transfer the browned meatballs to a baking sheet lined with parchment paper. Place them in the preheated oven and bake for 10-15 minutes or until they’re cooked through and reach an internal temperature of 165°F (74°C).
6. Serve: Once cooked, allow the meatballs to cool slightly before serving them to your toddler. Pair with a side of pasta, rice, or Serve with a favorite dipping sauce.
Extra Tips:
For a healthier version, you can substitute the breadcrumbs with oats or a gluten-free alternative if needed. Additionally, feel free to experiment with different veggies, like finely chopped bell peppers or zucchini, to keep the dish exciting and to utilize whatever you have on hand.
These meatballs also freeze well, so consider making a double batch and storing some for those days when you’re too busy to cook from scratch. Just thaw and reheat them in the oven or microwave before serving.
Veggie-Packed Mac and Cheese
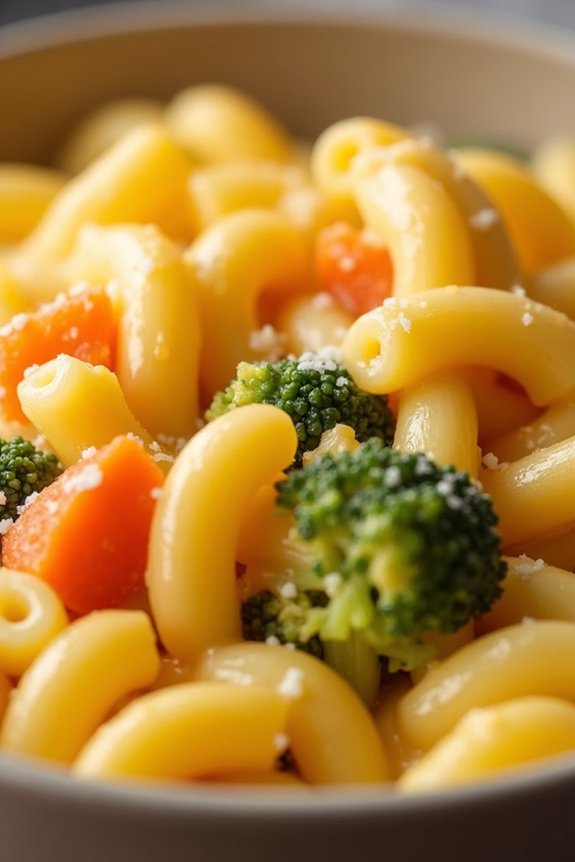
When it comes to toddler-friendly dinner ideas, Veggie-Packed Mac and Cheese is a delightful option that combines the creamy comfort of traditional mac and cheese with the nutritional benefits of various vegetables. This dish is perfect for picky eaters, as it disguises healthy veggies in a cheesy sauce that’s hard to resist.
Plus, it’s easy to make and can be customized with your family’s favorite vegetables, ensuring that even the adults at the table will enjoy it. This version of mac and cheese promises not only a burst of flavors but also an opportunity to introduce essential nutrients into your toddler’s diet.
The recipe cleverly incorporates pureed vegetables, making it a perfect option for those who struggle to get their little ones to eat their greens. Whether you’re looking for a quick weeknight meal or a dish that can be made ahead of time, Veggie-Packed Mac and Cheese is sure to become a staple in your household.
Ingredients (serving size: 4-6 people):
- 2 cups elbow macaroni
- 1 cup broccoli florets
- 1 cup carrots, chopped
- 1 cup cauliflower florets
- 2 tablespoons butter
- 2 tablespoons all-purpose flour
- 2 cups milk
- 2 cups shredded cheddar cheese
- 1/2 teaspoon garlic powder
- Salt and pepper to taste
Cooking Instructions:
1. Prepare the Pasta and Vegetables: Cook the elbow macaroni according to the package instructions until al dente. Drain and set aside.
Meanwhile, steam the broccoli, carrots, and cauliflower until they’re tender. Once cooked, blend the vegetables in a food processor until smooth, adding a little water if needed to achieve a puree consistency.
2. Make the Cheese Sauce****: In a large saucepan, melt the butter over medium heat. Stir in the flour and cook for about 1 minute, until the mixture is bubbling. Gradually whisk in the milk, ensuring there are no lumps, and continue to cook until the sauce thickens.
3. Combine Ingredients: Stir in the shredded cheddar cheese and garlic powder into the sauce, and mix until the cheese is completely melted and the sauce is smooth. Add the pureed vegetables and mix well.
4. Mix with Pasta: Combine the cooked macaroni with the veggie cheese sauce in the saucepan. Stir until the pasta is well-coated. Season with salt and pepper to taste.
5. Serve and Enjoy: Serve the Veggie-Packed Mac and Cheese warm, garnished with a sprinkle of extra cheese if desired.
Extra Tips: For an added layer of texture and flavor, consider topping the Veggie-Packed Mac and Cheese with a breadcrumb mixture before serving. Simply combine breadcrumbs with a bit of melted butter and sprinkle over the top, then bake in a preheated oven at 350°F (175°C) for about 10 minutes until golden brown.
This dish can also be made ahead of time and stored in the refrigerator, making it a convenient option for busy weeknights. Feel free to experiment with different vegetables to suit your toddler’s preferences or to use up what you have on hand.
Sweet Potato and Black Bean Quesadillas
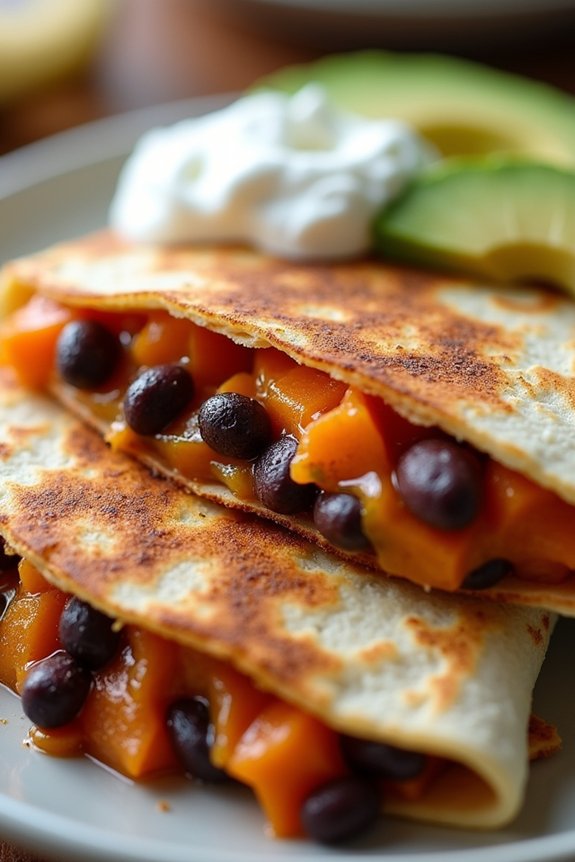
Sweet Potato and Black Bean Quesadillas are a delightful and nutritious meal that’s perfect for toddlers and the whole family. These quesadillas are packed with flavors, combining the natural sweetness of sweet potatoes with the hearty texture of black beans, making it an excellent choice for a kid-friendly dinner. Not only are they tasty, but they’re also easy to prepare, guaranteeing a stress-free cooking experience for parents looking to whip up a quick meal.
These quesadillas are versatile and can be customized to suit your toddler’s taste preferences. You can add ingredients such as cheese, avocado, or even a bit of mild salsa to enhance the flavor. This recipe serves 4-6 people, making it ideal for family dinners or playdates. The following list of ingredients and steps will guide you through creating this delicious dish.
Ingredients (for 4-6 servings):
- 2 medium sweet potatoes
- 1 can (15 oz) black beans, drained and rinsed
- 1 cup shredded cheddar cheese
- 1/2 teaspoon ground cumin
- 1/2 teaspoon paprika
- 1/2 teaspoon garlic powder
- Salt and pepper to taste
- 6 large flour tortillas
- 2 tablespoons olive oil
- Optional toppings: avocado, sour cream, mild salsa
Instructions:
- Prepare the Sweet Potatoes: Begin by peeling the sweet potatoes and cutting them into small cubes. Boil the cubed sweet potatoes in a pot of water for about 15 minutes, or until they’re soft and easily mashable.
- Mash and Season: Drain the cooked sweet potatoes and place them in a large mixing bowl. Mash them until smooth, then add the ground cumin, paprika, garlic powder, salt, and pepper. Mix well to guarantee the spices are evenly distributed.
- Add Black Beans: Gently fold in the drained black beans into the mashed sweet potatoes. Mix until well combined.
- Assemble the Quesadillas: Lay out the flour tortillas on a clean surface. Spread a generous amount of the sweet potato and black bean mixture on one half of each tortilla. Sprinkle shredded cheddar cheese over the mixture, then fold the tortilla in half to enclose the filling.
- Cook the Quesadillas: Heat a tablespoon of olive oil in a large skillet over medium heat. Place the folded quesadillas in the skillet and cook for about 3-4 minutes on each side, or until the tortillas are golden brown and the cheese has melted.
- Serve and Enjoy: Remove the quesadillas from the skillet and let them cool slightly. Cut them into wedges and serve warm. Optionally, you can top them with avocado slices, a dollop of sour cream, or mild salsa for added flavor.
Extra Tips:
When preparing Sweet Potato and Black Bean Quesadillas, it’s important to guarantee the sweet potatoes are cooked thoroughly and mashed well to create a smooth filling that’s easy for toddlers to eat.
If your child prefers a bit of crunch, you can add some finely chopped bell peppers or corn to the filling. Additionally, if you have leftover filling, it can be stored in the refrigerator for up to three days and used as a spread on sandwiches or as a dip with tortilla chips.
Adjust the amount of cheese or spices based on your family’s taste preferences to make this dish truly your own.
Spinach and Cheese Stuffed Shells
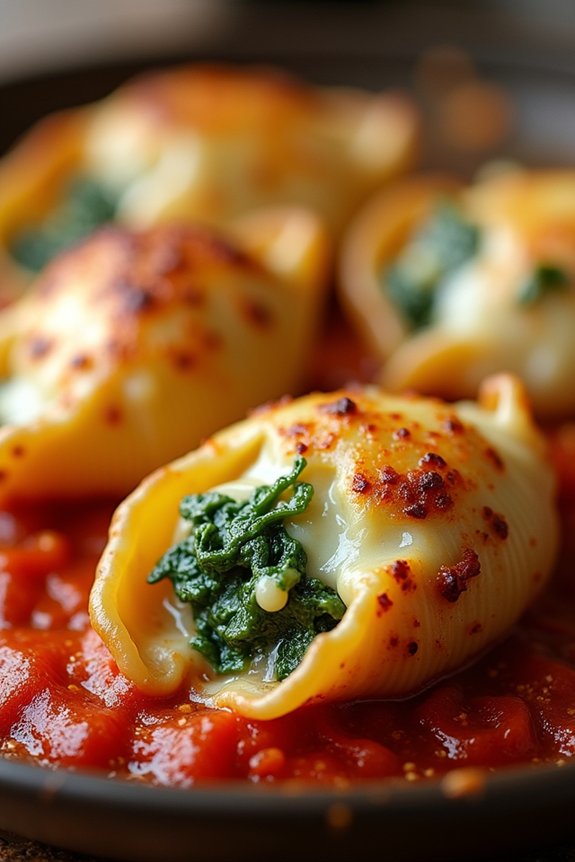
Spinach and Cheese Stuffed Shells are a delightful and nutritious option for a toddler-friendly dinner, combining the rich flavors of cheese with the health benefits of spinach. This dish isn’t only easy to prepare, but it also appeals to young taste buds with its creamy texture and mild flavors. Perfect for little hands to hold, these stuffed shells are sure to become a family favorite and can easily be adjusted to suit different dietary preferences by incorporating various types of cheese or adding additional veggies.
The beauty of Spinach and Cheese Stuffed Shells lies in their simplicity and versatility. You can prepare them in advance, making them an excellent choice for busy weeknights. Once baked, the shells have a lovely golden crust, with the cheese bubbling over the top, enticing even the pickiest eaters to give it a try.
Plus, this dish is an excellent way to sneak in some greens without your toddler even noticing. Serve it alongside a fresh salad or some steamed vegetables for a well-rounded meal.
Ingredients (Serves 4-6):
- 20 jumbo pasta shells
- 1 tablespoon olive oil
- 2 cloves garlic, minced
- 5 cups fresh spinach, chopped
- 1 cup ricotta cheese
- 1 cup mozzarella cheese, shredded
- 1/2 cup Parmesan cheese, grated
- 1 large egg
- 1/2 teaspoon salt
- 1/4 teaspoon black pepper
- 2 cups marinara sauce
- 1 teaspoon dried Italian herbs (optional)
Instructions:
- Preheat and Prepare: Preheat your oven to 375°F (190°C). Cook the jumbo pasta shells in a large pot of salted boiling water until al dente, according to the package instructions. Drain and set aside to cool slightly.
- Sauté Spinach: In a large skillet, heat the olive oil over medium heat. Add the minced garlic and sauté for about 1 minute until fragrant. Add the chopped spinach and cook until wilted, about 3-4 minutes. Remove from heat and let it cool.
- Mix Filling: In a large bowl, combine the ricotta cheese, 1/2 cup of the mozzarella cheese, Parmesan cheese, and the cooled spinach mixture. Add the egg, salt, and black pepper, and mix thoroughly until well combined.
- Stuff Shells: Carefully stuff each of the cooked pasta shells with the spinach and cheese mixture, about 1-2 tablespoons per shell, depending on their size.
- Assemble the Dish: Spread 1 cup of marinara sauce over the bottom of a 9×13-inch baking dish. Arrange the stuffed shells on top of the sauce in a single layer. Spoon the remaining marinara sauce over the shells.
- Add Cheese: Sprinkle the remaining 1/2 cup of mozzarella cheese over the top of the shells. If desired, sprinkle with dried Italian herbs for additional flavor.
- Bake: Cover the dish with aluminum foil and bake in the preheated oven for 25 minutes. Remove the foil and bake for an additional 10 minutes, or until the cheese is melted and bubbly.
- Serve: Allow the dish to cool slightly before serving. Enjoy the shells with a side of fresh vegetables or a simple salad.
Extra Tips:
For a richer flavor, consider using a mix of cheeses such as fontina or gouda in place of some of the mozzarella. If fresh spinach is unavailable, frozen spinach works well too; just make sure to thaw and drain it thoroughly before using.
You can also add finely chopped cooked chicken or ground turkey for extra protein. Preparing the dish a day in advance can help enhance the flavors, making it an ideal make-ahead meal. Remember to adjust the seasoning according to your family’s preference, especially when serving toddlers.
Easy Baked Salmon Nuggets

Easy Baked Salmon Nuggets are a delightful and nutritious option for toddlers, combining the health benefits of salmon with a fun and easy-to-eat format. These nuggets aren’t only rich in omega-3 fatty acids, which are essential for brain development, but they also offer a mild flavor that’s appealing to young taste buds. The recipe is designed to be simple, guaranteeing that even busy parents can prepare this wholesome meal with ease.
By baking rather than frying, these salmon nuggets remain a healthy choice, with a crispy exterior and tender interior that toddlers will love. This recipe is perfect for serving 4-6 people, making it an ideal choice for family dinners or meal prepping for the week. With a few basic ingredients and straightforward steps, you can whip up these delectable nuggets in no time.
Ingredients (serving size: 4-6 people):
- 1 pound fresh salmon fillet
- 1 cup breadcrumbs
- 1/2 cup grated Parmesan cheese
- 2 tablespoons fresh parsley, chopped
- 1 teaspoon garlic powder
- 1/2 teaspoon salt
- 1/4 teaspoon black pepper
- 2 eggs
- 1 tablespoon lemon juice
- 1 tablespoon olive oil
Instructions:
- Prepare the Salmon: Preheat your oven to 400°F (200°C). Line a baking sheet with parchment paper. Remove the skin from the salmon fillet and cut the salmon into small, nugget-sized pieces, approximately 1-inch cubes.
- Mix the Coating: In a shallow bowl, combine the breadcrumbs, grated Parmesan cheese, chopped parsley, garlic powder, salt, and black pepper. Stir the mixture until all the ingredients are evenly mixed.
- Prepare the Egg Wash: In another bowl, beat the eggs and add the lemon juice. Mix well to combine.
- Coat the Nuggets: Dip each salmon piece into the egg mixture, making sure it’s fully coated. Then, roll it in the breadcrumb mixture, pressing gently to guarantee the coating adheres well.
- Arrange on Baking Sheet: Place the coated salmon nuggets on the prepared baking sheet. Drizzle the olive oil evenly over the top of the nuggets to help them crisp up while baking.
- Bake: Place the baking sheet in the preheated oven and bake for 12-15 minutes or until the salmon is cooked through and the coating is golden brown. You may want to turn the nuggets halfway through the baking time to guarantee even cooking.
- Serve: Allow the salmon nuggets to cool slightly before serving them to your toddler. They can be enjoyed on their own or with a side of your child’s favorite dipping sauce.
Extra Tips:
When selecting salmon, opt for a fresh, high-quality fillet for the best flavor and texture. If fresh salmon isn’t available, you can use frozen salmon, but make sure it’s completely thawed before preparation.
To guarantee even cooking, try to cut the salmon pieces into uniform sizes. If you prefer a gluten-free option, substitute the breadcrumbs with gluten-free breadcrumbs or crushed cornflakes.
Finally, these nuggets can be stored in an airtight container in the refrigerator for up to 3 days or frozen for up to 2 months, making them a convenient option for quick toddler meals.
Beef and Veggie Stir-Fry
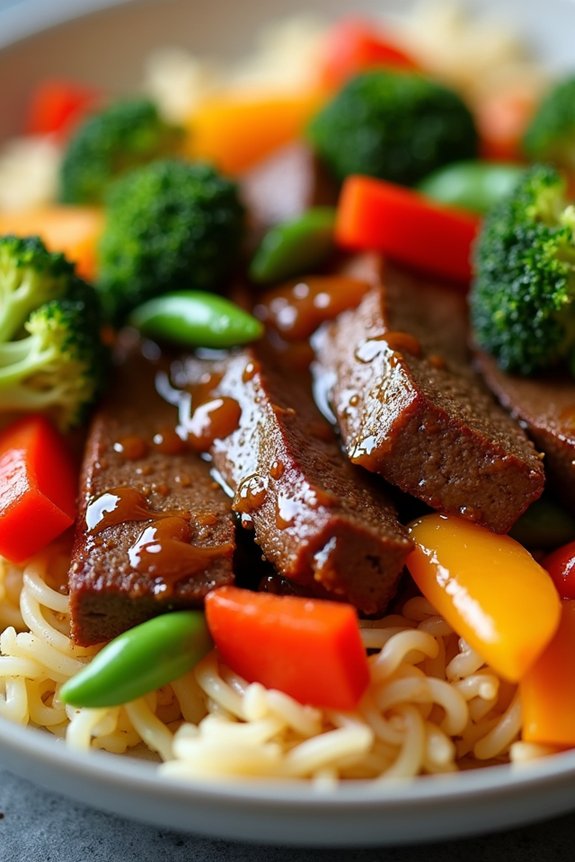
Beef and Veggie Stir-Fry is a perfect toddler-friendly dinner that combines the savory flavors of tender beef with the crunchy textures of fresh vegetables. This dish isn’t only nutritious but also colorful and visually appealing, making it an exciting meal for little ones.
The recipe is designed to be quick and easy, allowing you to whip up a delicious dinner in no time. The stir-fry uses minimal seasoning, letting the natural flavors of the ingredients shine through while guaranteeing that it’s gentle on young taste buds.
Preparing a Beef and Veggie Stir-Fry provides a great opportunity to introduce toddlers to a variety of vegetables and protein-rich beef in a fun and inviting way. The dish is versatile, allowing you to customize the vegetables based on what’s in season or what your child prefers.
Serve it over a bed of rice or noodles to make it a complete, satisfying meal. Designed to serve 4-6 people, this recipe is perfect for family dinners or for guaranteeing there are leftovers for another day.
Ingredients:
- 1 pound beef sirloin, thinly sliced
- 2 tablespoons vegetable oil
- 1 cup broccoli florets
- 1 cup bell peppers, sliced (any color)
- 1 cup carrots, thinly sliced
- 1 cup snap peas
- 3 tablespoons soy sauce
- 1 tablespoon honey
- 2 cloves garlic, minced
- 1 teaspoon ginger, minced
- 1 tablespoon cornstarch
- 1/4 cup water
- Cooked rice or noodles for serving
Instructions:
- Prep the Vegetables: Start by washing and slicing all the vegetables. Cut the broccoli into small florets, slice the bell peppers, and thinly slice the carrots. Snap peas can be used whole if they’re small; otherwise, slice them lengthwise.
- Marinate the Beef: In a bowl, combine the thinly sliced beef with 1 tablespoon of soy sauce, 1 tablespoon of vegetable oil, and the minced garlic and ginger. Let it marinate for at least 10 minutes to absorb the flavors.
- Make the Sauce: In a small bowl, mix the remaining soy sauce, honey, cornstarch, and water. Stir until the cornstarch has completely dissolved and set aside.
- Cook the Beef: Heat 1 tablespoon of vegetable oil in a large skillet or wok over medium-high heat. Add the marinated beef and stir-fry for about 3-4 minutes until it’s browned and cooked through. Remove the beef from the skillet and set aside.
- Stir-Fry the Vegetables: In the same skillet, add a little more oil if necessary, then add the broccoli, bell peppers, carrots, and snap peas. Stir-fry for about 5 minutes, or until the vegetables are tender-crisp.
- Combine Everything: Return the cooked beef to the skillet with the vegetables. Stir the sauce once more and pour it over the beef and vegetables. Cook for another 2 minutes, stirring frequently, until the sauce has thickened and everything is evenly coated.
- Serve: Serve the Beef and Veggie Stir-Fry over a bed of cooked rice or noodles, making sure to include a good mix of beef and vegetables in each serving.
Extra Tips:
When preparing this dish, verify that all ingredients are prepped and ready before you start cooking, as stir-frying happens quickly.
You can substitute any of the vegetables with what you have on hand or what your child prefers. For added flavor, consider garnishing the dish with sesame seeds or chopped green onions.
If you prefer a more pronounced flavor, you can add a splash of low-sodium soy sauce before serving. Remember to slice the beef thinly against the grain for maximum tenderness.
Creamy Avocado Pasta
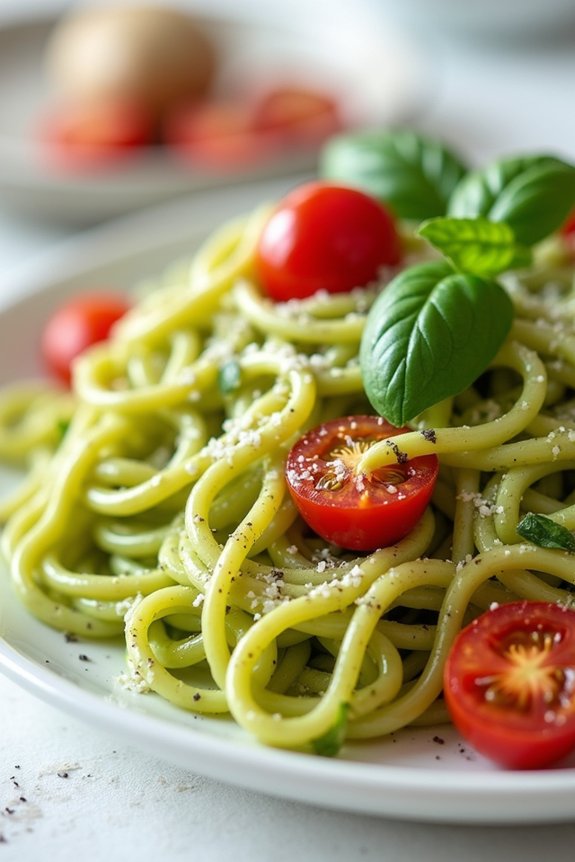
Searching for a nutritious and delicious meal that even the pickiest toddler will enjoy? Search no more than Creamy Avocado Pasta. This dish combines the creamy texture of avocados with the classic comfort of pasta, resulting in a meal that’s not only satisfying but also packed with healthy fats and nutrients.
Avocados are rich in vitamins and essential fatty acids that are vital for growing children, while the pasta provides necessary carbohydrates to keep them energized throughout the day. The smooth and velvety avocado sauce clings to each strand of pasta, making every bite a flavorful delight.
The subtle flavors are kid-friendly, and the dish can be customized with additional toppings like grated cheese or cherry tomatoes to suit your toddler’s taste preferences. This recipe is quick to prepare, taking only about 20 minutes from start to finish, making it a perfect choice for busy weeknights when time is of the essence.
Ingredients for 4-6 servings:
- 12 ounces of pasta (spaghetti, fettuccine, or your choice)
- 2 ripe avocados
- 2 cloves of garlic
- 1/4 cup fresh basil leaves
- 2 tablespoons fresh lemon juice
- 1/4 cup olive oil
- Salt and pepper to taste
- Optional: Grated Parmesan cheese for topping
- Optional: Cherry tomatoes, halved, for garnish
Cooking Instructions:
- Cook the Pasta: In a large pot, bring water to a boil and add a pinch of salt. Add the pasta and cook according to the package instructions until al dente. Once cooked, reserve 1 cup of pasta water and drain the rest. Set the pasta aside.
- Prepare the Avocado Sauce: While the pasta is cooking, cut the avocados in half, remove the pits, and scoop the flesh into a blender or food processor. Add the garlic cloves, fresh basil leaves, lemon juice, olive oil, salt, and pepper. Blend until smooth and creamy. If the sauce is too thick, add a bit of the reserved pasta water until you reach your desired consistency.
- Combine Pasta and Sauce: Return the drained pasta to the pot. Pour the avocado sauce over the pasta, and toss until the pasta is fully coated. Add more pasta water if needed to guarantee the sauce evenly covers the pasta.
- Serve and Garnish: Divide the pasta among plates or bowls. Optionally, top with grated Parmesan cheese and garnish with cherry tomatoes for a pop of color and added flavor. Serve immediately while warm.
Extra Tips:
When selecting avocados, make sure they’re ripe but not overly soft to guarantee a creamy sauce. Ripe avocados will give slightly when gently pressed.
If you prefer a slightly tangy flavor, consider adding a bit more lemon juice to the sauce. This recipe is versatile, so feel free to add or swap ingredients based on your toddler’s preferences, such as incorporating a handful of spinach for extra nutrients or using whole grain pasta for added fiber.
Enjoy this nutritious, toddler-friendly meal!
Zucchini and Corn Fritters

Zucchini and Corn Fritters are a delightful and nutritious dinner option for toddlers. These fritters are packed with vitamins and minerals from the zucchini, and the sweet corn adds a touch of natural sweetness that kids love. The soft texture makes them easy for little ones to chew and digest, while the vibrant colors make the dish visually appealing.
Not only are these fritters toddler-friendly, but they also make a great addition to a family meal, guaranteeing everyone in the household can enjoy the same delicious dish.
These fritters are simple to prepare and cook, making them a convenient choice for busy weeknights. They can be served as a main dish or a side, and they pair well with a variety of dips like yogurt or a mild tomato sauce. With a crispy exterior and soft, flavorful interior, Zucchini and Corn Fritters are sure to become a family favorite.
Here’s how you can prepare this tasty dish for 4-6 people.
Ingredients:
- 2 medium zucchinis
- 1 cup of corn kernels (fresh, canned, or frozen)
- 2 eggs
- 1 cup all-purpose flour
- 1/2 cup grated Parmesan cheese
- 1/4 cup chopped fresh parsley
- 2 cloves garlic, minced
- Salt and pepper to taste
- Olive oil for frying
Cooking Instructions:
- Prepare the Zucchini: Start by washing the zucchinis thoroughly. Grate the zucchinis using a box grater and place them in a clean kitchen towel. Squeeze out as much moisture as possible to prevent the fritters from becoming soggy.
- Mix the Ingredients: In a large mixing bowl, combine the grated zucchini, corn kernels, eggs, flour, Parmesan cheese, parsley, minced garlic, salt, and pepper. Stir the mixture until all ingredients are well combined and form a thick batter.
- Heat the Oil: In a large skillet, heat about 2 tablespoons of olive oil over medium heat. Confirm the oil is hot before adding the batter to achieve a crispy texture.
- Cook the Fritters: Using a spoon, drop heaping tablespoons of the batter into the skillet, flattening them slightly with the back of the spoon. Cook each fritter for about 3-4 minutes on each side or until golden brown and cooked through.
- Drain and Serve: Once cooked, transfer the fritters to a paper towel-lined plate to drain any excess oil. Serve the fritters warm with your choice of dips.
Extra Tips:
To make sure your fritters hold together well, be sure to squeeze out as much liquid as possible from the zucchini. If the batter seems too wet, you can add a little more flour to help bind the ingredients.
Adjust the seasoning according to your toddler’s taste preference, and consider adding a pinch of baking powder for slightly puffier fritters. If you have leftover fritters, they can be stored in an airtight container in the refrigerator for up to two days and reheated in the oven for a quick meal.
Chicken and Vegetable Skewers
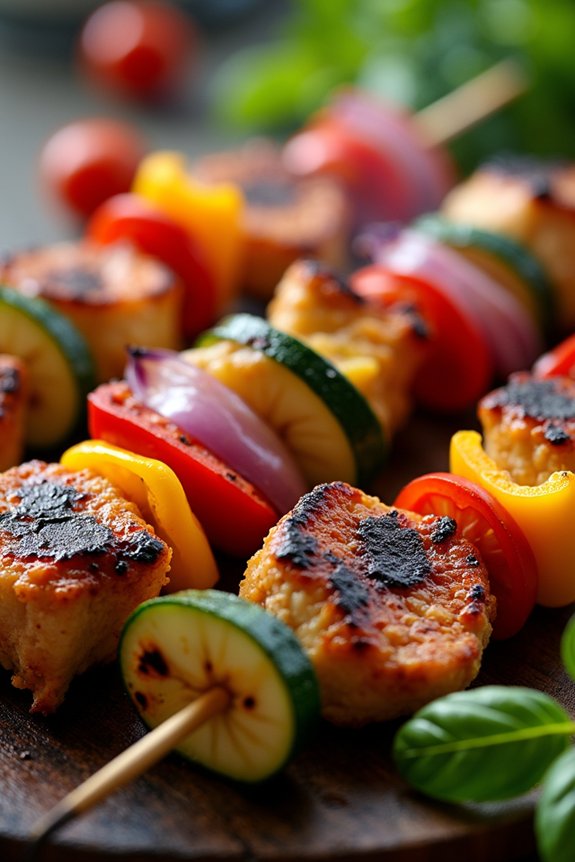
Chicken and vegetable skewers are a perfect toddler-friendly dinner option that combines colorful vegetables and tender chicken, making mealtime both fun and nutritious. These skewers aren’t only visually appealing but also packed with flavors that will satisfy even the pickiest of eaters. The combination of juicy chicken and a variety of vegetables provides a balanced meal that’s easy to eat with little hands, and the skewering process can be a fun activity to involve your toddler in the kitchen.
Making these skewers is simple and allows for customization based on your child’s preferences or any vegetables you have on hand. You can prepare the skewers ahead of time and have them ready for grilling or baking, making this recipe ideal for busy parents. The following recipe serves 4-6 people and is sure to be a hit at your family’s dinner table.
Ingredients:
- 2 large chicken breasts, cut into 1-inch cubes
- 1 red bell pepper, cut into 1-inch pieces
- 1 yellow bell pepper, cut into 1-inch pieces
- 1 zucchini, sliced into 1/2-inch rounds
- 1 red onion, cut into large chunks
- 1 cup cherry tomatoes
- 2 tablespoons olive oil
- 1 tablespoon lemon juice
- 1 teaspoon dried oregano
- 1 teaspoon garlic powder
- Salt and pepper to taste
- Wooden or metal skewers
Cooking Instructions:
- Prepare the Skewers: If using wooden skewers, soak them in water for at least 30 minutes to prevent them from burning. This step can be skipped if you’re using metal skewers.
- Marinate the Chicken: In a large bowl, combine the olive oil, lemon juice, dried oregano, garlic powder, salt, and pepper. Add the chicken cubes to the bowl and toss well to make certain the chicken is evenly coated in the marinade. Let the chicken marinate for at least 15 minutes to enhance the flavor.
- Assemble the Skewers: Alternate threading the marinated chicken cubes and the assorted vegetables onto the skewers. Confirm that each skewer has a balanced mix of chicken and vegetables for even cooking and visual appeal.
- Cook the Skewers: Preheat your grill or oven to medium-high heat. If grilling, place the skewers on the grill and cook for about 10-12 minutes, turning occasionally, until the chicken is cooked through and the vegetables are slightly charred. If using the oven, place the skewers on a baking sheet and bake at 400°F (200°C) for 15-20 minutes, or until the chicken is fully cooked and the vegetables are tender.
- Serve and Enjoy: Once cooked, remove the skewers from the heat and let them cool slightly before serving. These skewers can be served as they’re or with a side of rice or quinoa for a more substantial meal.
Extra Tips:
For a more flavorful experience, consider marinating the chicken overnight in the refrigerator. This will allow the flavors to penetrate deeper for more succulent and tasty chicken.
Adjust the vegetable selection based on what your toddler likes or what’s in season. It’s also a good idea to cut the vegetables and chicken into similar-sized pieces to make certain even cooking.
Finally, make sure the skewers aren’t overcrowded, allowing heat to circulate and cook everything evenly.
Lentil and Veggie Sloppy Joes

Lentil and Veggie Sloppy Joes are a delightful twist on the classic sloppy joes, making them perfect for toddlers and the whole family. Packed with protein-rich lentils and a medley of colorful vegetables, this dish isn’t only nutritious but also fun to eat. It’s a great way to introduce little ones to new flavors and textures while ensuring they get plenty of vitamins and minerals.
The blend of spices creates a savory and slightly sweet sauce that will have your kids asking for seconds. This dish is also incredibly versatile and can be adapted to suit different dietary needs or preferences. You can serve it on whole-grain buns for a more traditional approach, or try it over rice or pasta for a gluten-free option.
The recipe is designed to make enough for 4-6 servings, making it ideal for family dinners or meal prep for the week. Plus, it’s straightforward to prepare, allowing you to spend more time enjoying dinner with your family.
Ingredients (Serves 4-6):
- 1 cup dried lentils, rinsed and drained
- 2 cups vegetable broth
- 1 tablespoon olive oil
- 1 onion, finely chopped
- 1 red bell pepper, diced
- 1 carrot, grated
- 2 cloves garlic, minced
- 1 cup tomato sauce
- 2 tablespoons tomato paste
- 2 tablespoons soy sauce
- 1 tablespoon apple cider vinegar
- 1 tablespoon brown sugar
- 1 teaspoon smoked paprika
- 1/2 teaspoon cumin
- Salt and pepper to taste
- Whole-grain buns, for serving
Instructions:
- Cook the Lentils: In a medium saucepan, combine the lentils and vegetable broth. Bring to a boil, then reduce the heat to low and cover. Simmer for about 20-25 minutes, or until the lentils are tender and have absorbed most of the liquid. Drain any excess liquid and set aside.
- Sauté the Vegetables: In a large skillet, heat the olive oil over medium heat. Add the onion, bell pepper, and carrot. Sauté for about 5 minutes, or until the vegetables are soft. Add the garlic and cook for another 1-2 minutes until fragrant.
- Prepare the Sauce: Stir in the tomato sauce, tomato paste, soy sauce, apple cider vinegar, brown sugar, smoked paprika, and cumin. Mix well to combine all the ingredients.
- Combine and Simmer: Add the cooked lentils to the skillet with the vegetable mixture. Stir everything together until well combined. Let the mixture simmer for about 10 minutes, allowing the flavors to meld together. Season with salt and pepper to taste.
- Serve: Spoon the lentil and veggie mixture onto the whole-grain buns. Serve warm and enjoy!
Extra Tips: When cooking for toddlers, consider finely chopping or grating the vegetables to make them more palatable and easier to chew. You can also adjust the seasoning levels to suit your child’s taste preferences, perhaps starting with half the suggested amount of spices and gradually increasing as they get used to the flavors.
If you find the mixture too thick, you can add a bit of water or additional tomato sauce to reach your desired consistency.
Cauliflower Crust Mini Pizzas

Introducing a fun and nutritious dinner option, perfect for little ones: Cauliflower Crust Mini Pizzas! These delightful mini pizzas are a clever way to incorporate more vegetables into your toddler’s diet while satisfying their love for pizza. The cauliflower crust is a healthier alternative to traditional dough, providing essential nutrients like vitamins C and K, fiber, and antioxidants.
These mini pizzas are easy to make and customizable with your toddler’s favorite toppings, making them an exciting meal to prepare together. Not only are Cauliflower Crust Mini Pizzas a hit with toddlers, but they also make a great meal for the entire family. With a serving size of 4-6 people, this recipe guarantees everyone gets to enjoy these bite-sized, cheesy delights.
Prepare to begin on a culinary adventure as you introduce your child to the joys of creating their own pizzas, complete with a tasty cauliflower base that’s sure to have them asking for more.
Ingredients for 4-6 Servings:
- 1 large head of cauliflower
- 2 large eggs
- 1 cup shredded mozzarella cheese
- 1/4 cup grated Parmesan cheese
- 1/2 teaspoon dried oregano
- 1/2 teaspoon garlic powder
- 1/2 teaspoon salt
- 1/4 teaspoon black pepper
- 1 cup pizza sauce
- 1 cup additional mozzarella cheese (for topping)
- Assorted toppings (e.g., sliced bell peppers, olives, mushrooms, or mini pepperoni)
Cooking Instructions:
- Preheat and Prepare Cauliflower: Preheat your oven to 400°F (200°C). Chop the cauliflower into florets and pulse them in a food processor until they resemble rice grains.
- Cook Cauliflower Rice: Transfer the cauliflower rice to a microwave-safe bowl and microwave for about 5 minutes until soft. Let it cool slightly, then transfer it to a clean kitchen towel and squeeze out as much moisture as possible. This step is essential to guarantee a crispy crust.
- Mix the Crust Ingredients: In a large mixing bowl, combine the drained cauliflower rice with eggs, 1 cup of shredded mozzarella cheese, Parmesan cheese, oregano, garlic powder, salt, and pepper. Mix well until a dough-like consistency forms.
- Form Mini Pizza Crusts: Line a baking sheet with parchment paper. Scoop about 1/4 cup of the cauliflower mixture onto the sheet and press into a small circle, about 1/4 inch thick. Repeat with the remaining mixture, leaving some space between each mini crust.
- Bake the Crusts: Place the baking sheet in the preheated oven and bake for 15-20 minutes, or until the edges are golden and the crusts are firm to the touch.
- Add Toppings: Remove the crusts from the oven and spread a spoonful of pizza sauce over each. Sprinkle additional mozzarella cheese on top, followed by your choice of toppings.
- Final Bake: Return the pizzas to the oven and bake for an additional 5-10 minutes, or until the cheese is melted and bubbly.
Extra Tips:
To guarantee the cauliflower crusts hold together well, make sure to remove as much moisture as possible from the cauliflower rice. You can make the crusts in advance and store them in the refrigerator for up to 3 days or freeze them for a quick meal later on.
When choosing toppings, opt for ones that are easy for toddlers to chew and enjoy, such as finely chopped vegetables or mini pepperoni. Encourage your toddlers to participate in the topping process, letting them pick what they want on their pizzas for a personalized touch.
Quinoa and Veggie Stuffed Peppers
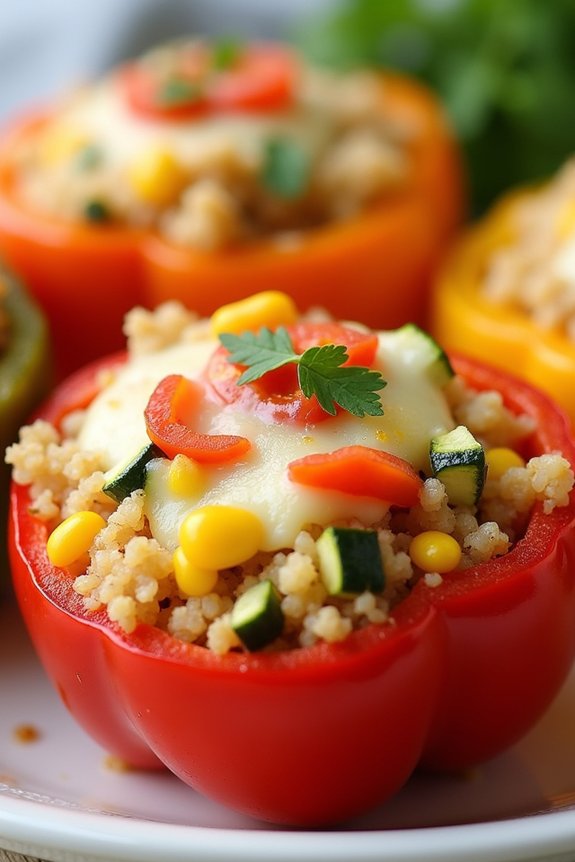
Quinoa and Veggie Stuffed Peppers are a delightful and nutritious dinner option that’s perfect for toddlers. This dish combines the wholesome goodness of quinoa with colorful bell peppers and a medley of vegetables, creating a meal that isn’t only visually appealing but also packed with essential nutrients.
The soft texture of quinoa and the tender peppers make it easy for little ones to enjoy, while the variety of flavors will keep them interested in each bite.
Cooking Quinoa and Veggie Stuffed Peppers is simple and can be a fun activity to involve your toddler in the kitchen. By allowing them to help with tasks like washing the vegetables or mixing the ingredients, you can engage their curiosity and help them develop a love for healthy eating.
This dish can also be easily customized by adding different vegetables or incorporating cheese, making it versatile for adapting to various dietary preferences or restrictions.
Ingredients for 4-6 Servings:
- 6 medium-sized bell peppers (choose a mix of colors)
- 1 cup quinoa, rinsed
- 2 cups vegetable broth
- 1 tablespoon olive oil
- 1 medium onion, chopped
- 2 cloves garlic, minced
- 1 medium zucchini, diced
- 1 cup cherry tomatoes, halved
- 1 cup corn kernels (fresh, frozen, or canned)
- 1 teaspoon dried oregano
- 1 teaspoon dried basil
- Salt and pepper to taste
- 1 cup shredded mozzarella or cheddar cheese (optional)
- Fresh parsley or cilantro for garnish (optional)
Cooking Instructions:
- Preheat the Oven: Preheat your oven to 375°F (190°C).
- Prepare the Bell Peppers: Slice the tops off the bell peppers and remove the seeds and membranes. Lightly oil a baking dish and arrange the peppers upright in the dish.
- Cook the Quinoa: In a medium saucepan, bring the vegetable broth to a boil. Add the rinsed quinoa, cover, and reduce the heat to low. Cook for about 15 minutes or until the quinoa has absorbed all the liquid. Remove from heat and fluff with a fork.
- Sauté the Vegetables: In a large skillet, heat the olive oil over medium heat. Add the chopped onion and garlic, sautéing until the onion becomes translucent. Add the diced zucchini, cherry tomatoes, and corn. Cook for an additional 5 minutes, stirring occasionally.
- Mix the Filling: In a large bowl, combine the cooked quinoa with the sautéed vegetables. Add the dried oregano, dried basil, salt, and pepper. Mix well to guarantee all the ingredients are evenly distributed.
- Stuff the Peppers: Spoon the quinoa and vegetable mixture into each bell pepper, packing it tightly. If desired, sprinkle cheese on top of each stuffed pepper.
- Bake: Cover the baking dish with foil and bake in the preheated oven for 30 minutes. Remove the foil and bake for an additional 10-15 minutes, or until the peppers are tender and the cheese is melted and bubbly.
- Garnish and Serve: Remove from the oven and let cool slightly before serving. Garnish with fresh parsley or cilantro if desired.
Extra Tips:
When selecting bell peppers, choose ones that can stand upright easily, guaranteeing they hold the filling without toppling over.
If you prefer a softer pepper, you can pre-bake the peppers for about 10 minutes before stuffing them. For additional protein, you can also add cooked ground turkey or chicken to the quinoa mixture.
This dish can be made ahead of time and stored in the refrigerator for up to two days before baking. If your toddler isn’t a fan of certain vegetables, feel free to substitute with their favorites to make the meal more appealing.
Cottage Pie With Mashed Sweet Potatoes

Cottage Pie with Mashed Sweet Potatoes is a delightful twist on the classic comfort dish, perfect for pleasing both toddlers and adults. The dish combines a savory, seasoned ground meat filling with a creamy layer of mashed sweet potatoes, creating a satisfying meal that balances flavors and textures.
This recipe isn’t only delicious but also packed with nutrients, making it an ideal choice for a family dinner that everyone will enjoy. The sweet potatoes add a natural sweetness and vibrant color, which can be more appealing to toddlers.
Meanwhile, the savory meat and vegetable filling provides protein and vitamins essential for growing children. This Cottage Pie is a wonderful way to introduce young ones to a variety of textures and flavors while keeping mealtime fun and nutritious.
Let’s explore the ingredients and steps needed to create this scrumptious dish for 4-6 people.
Ingredients:
- 2 lbs sweet potatoes
- 1 tablespoon olive oil
- 1 medium onion, diced
- 2 cloves garlic, minced
- 1 lb ground beef or turkey
- 1 cup carrots, diced
- 1 cup peas (fresh or frozen)
- 1 tablespoon tomato paste
- 1 cup beef or vegetable broth
- 1 teaspoon Worcestershire sauce
- Salt and pepper to taste
- 1/2 cup milk
- 2 tablespoons butter
- 1 teaspoon dried thyme
Cooking Instructions:
- Prepare the Sweet Potatoes: Peel and chop the sweet potatoes into even chunks. Place them in a large pot, cover with water, and bring to a boil. Cook for about 15 minutes or until they’re tender. Drain and set aside.
- Cook the Meat Filling: In a large skillet, heat the olive oil over medium heat. Add the diced onion and minced garlic, and sauté for about 2 minutes until the onion is translucent.
- Brown the Meat: Add the ground beef or turkey to the skillet. Cook until the meat is browned, breaking it up with a spoon as it cooks. Drain any excess fat.
- Add Vegetables and Seasoning: Stir in the diced carrots, peas, and tomato paste. Cook for another 5 minutes, then add the broth, Worcestershire sauce, salt, pepper, and thyme. Allow the mixture to simmer for about 10 minutes until the vegetables are tender and the sauce has thickened.
- Mash the Sweet Potatoes: In a bowl, combine the cooked sweet potatoes with butter and milk. Mash until smooth and creamy. Season with salt to taste.
- Assemble the Pie: Preheat your oven to 375°F (190°C). In a baking dish, spread the meat and vegetable mixture evenly. Top with the mashed sweet potatoes, smoothing them out with a spatula.
- Bake the Pie: Place the baking dish in the oven and bake for about 25 minutes, or until the top is slightly golden and the filling is bubbling around the edges.
Extra Tips:
To make the dish even more toddler-friendly, consider finely grating or pureeing the vegetables before adding them to the meat mixture. This guarantees that picky eaters won’t detect any lumps or chunks they mightn’t like.
Additionally, you can substitute the ground meat with lentils for a vegetarian version that’s equally tasty and nutritious. Always allow the pie to cool slightly before serving, as this will help the layers set and make it easier to serve neat portions.
Banana and Oatmeal Pancakes

Banana and oatmeal pancakes are a delightful and nutritious breakfast option that your toddler will love. These pancakes combine the natural sweetness of ripe bananas with the wholesome goodness of oats, making them a perfect choice for a healthy meal.
They’re soft, fluffy, and easy for little hands to pick up, encouraging your toddler to self-feed. The simplicity of the recipe also makes it a great choice for busy parents looking for a quick and healthy breakfast option.
These pancakes aren’t only tasty but also packed with essential nutrients. Bananas provide a good source of potassium and vitamin C, while oats are rich in fiber and help keep your toddler feeling full and satisfied.
This recipe is free from refined sugar, making it a guilt-free indulgence for the whole family. Enjoy these Banana and Oatmeal Pancakes as a breakfast treat or a delicious snack any time of the day.
Ingredients (Serves 4-6):
- 2 ripe bananas
- 2 cups rolled oats
- 1 cup milk (dairy or non-dairy)
- 2 eggs
- 1 teaspoon baking powder
- 1 teaspoon vanilla extract
- 1/2 teaspoon cinnamon
- 1/4 teaspoon salt
- Butter or oil for cooking
Cooking Instructions:
1. Prepare the Batter: Begin by mashing the ripe bananas in a large mixing bowl until smooth. Add the eggs, milk, and vanilla extract to the mashed bananas, and whisk together until well combined.
2. Mix Dry Ingredients: In a separate bowl, combine the rolled oats, baking powder, cinnamon, and salt. Stir these dry ingredients together to guarantee the baking powder and spices are evenly distributed.
3. Combine Wet and Dry Ingredients: Gradually add the dry ingredients into the banana mixture, stirring until a thick batter forms. Allow the batter to rest for about 5 minutes; this will help the oats absorb some of the liquid and thicken the batter.
4. Heat the Pan: Place a non-stick skillet or griddle over medium heat. Add a small amount of butter or oil to the pan to prevent sticking.
5. Cook the Pancakes: Pour a small ladleful of batter onto the skillet to form a pancake. Cook for about 2-3 minutes, or until you see bubbles forming on the surface. Flip the pancake and cook for another 2 minutes, or until golden brown.
Repeat the process with the remaining batter.
6. Serve: Once all the pancakes are cooked, serve them warm. You can top them with sliced bananas, a drizzle of honey, or a sprinkle of cinnamon if desired.
Extra Tips:
For a smoother texture, consider blending the oats into a finer consistency before mixing them with the other ingredients. This can be done using a food processor or blender.
Additionally, these pancakes can be made ahead of time and stored in an airtight container in the refrigerator for up to two days. Reheat them in a toaster or microwave for a quick and easy breakfast option.
Finally, feel free to get creative with toppings; fresh fruits, yogurt, or a dollop of nut butter can enhance both flavor and nutrition.