

Navigating a hectic schedule and still wanting to serve nutritious meals can feel overwhelming. I totally get it! That’s why I’ve gathered a list of 15 quick and healthy dinner recipes perfect for busy families. Each dish is designed to please your taste buds while being time-efficient. Let’s get inspired to bring some delicious, vibrant meals to the table.
Quick Lemon Garlic Shrimp Pasta

Quick Lemon Garlic Shrimp Pasta is a delightful dish that combines the zesty brightness of lemon with the aromatic allure of garlic, creating a savory and satisfying meal perfect for busy weeknights.
This dish isn’t only quick to prepare, taking just 20 minutes from start to finish, but it also balances simplicity with flavor, making it a hit with family members of all ages. The succulent shrimp add a touch of elegance, while the pasta serves as the perfect canvas to absorb the luscious sauce, ensuring every bite is a burst of flavorful goodness.
Whether you’re a seasoned cook or a beginner in the kitchen, this recipe is straightforward and forgiving, allowing room for personalization to suit your family’s tastes.
Pair it with a fresh green salad or a loaf of crusty bread for a complete meal that’s both nourishing and comforting. Ideal for serving a group of 4-6 people, this Quick Lemon Garlic Shrimp Pasta will become a staple in your weeknight meal rotation.
Ingredients:
- 1 pound of shrimp, peeled and deveined
- 12 ounces of spaghetti or linguine
- 4 cloves garlic, minced
- 1/4 cup fresh lemon juice
- Zest of 1 lemon
- 1/4 cup olive oil
- 1/4 teaspoon red pepper flakes (optional)
- Salt and black pepper to taste
- 1/4 cup freshly chopped parsley
- Grated Parmesan cheese for serving (optional)
Instructions:
- Cook the Pasta: Start by bringing a large pot of salted water to a boil. Add the pasta and cook according to package instructions until al dente. Reserve 1/2 cup of the pasta water, then drain the pasta and set aside.
- Prepare the Shrimp: While the pasta is cooking, heat the olive oil in a large skillet over medium-high heat. Add the minced garlic and red pepper flakes (if using) and sauté for about 1 minute until fragrant, being careful not to burn the garlic.
- Cook the Shrimp: Add the shrimp to the skillet and season with salt and black pepper. Cook, stirring occasionally, until the shrimp are pink and opaque, about 3-4 minutes.
- Make the Sauce: Add the lemon juice and lemon zest to the skillet, stirring to combine with the shrimp and garlic. Let it simmer for 1 minute.
- Combine Pasta and Sauce: Add the cooked pasta and reserved pasta water to the skillet. Toss everything together until the pasta is well coated with the sauce. If the pasta appears dry, add more pasta water 1 tablespoon at a time until desired consistency is reached.
- Finish and Serve: Stir in the freshly chopped parsley. Taste and adjust seasoning with more salt, pepper, or lemon juice if necessary. Serve immediately, garnished with grated Parmesan cheese if desired.
Extra Tips:
For added flavor, consider marinating the shrimp in a little olive oil, garlic, and lemon juice for 15-20 minutes before cooking.
If you’re looking to add more vegetables, consider tossing in some fresh spinach or cherry tomatoes when you add the pasta to the skillet. These will add both color and nutrients, further enhancing the dish.
Finally, make sure not to overcook the shrimp; they should be pink and slightly curled when done, ensuring they remain juicy and tender.
Speedy Chicken Stir-Fry With Veggies
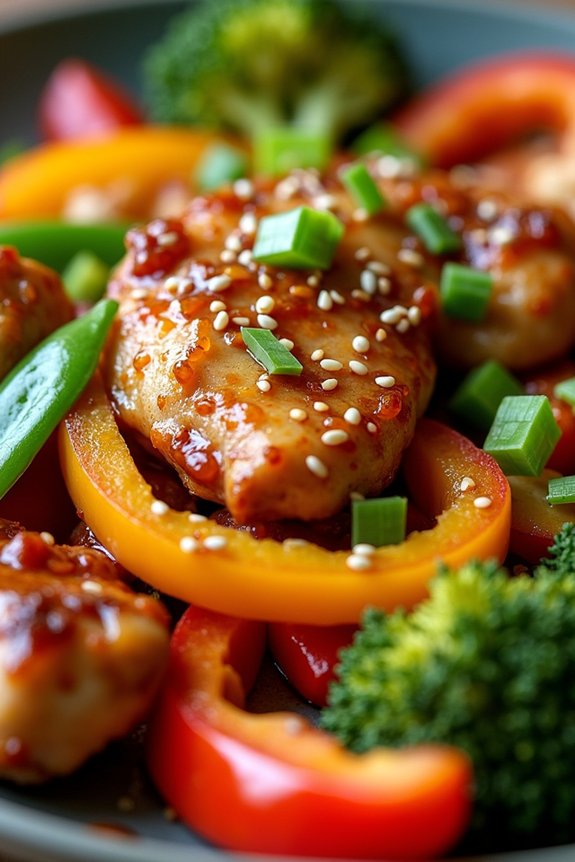
For those nights when time is short but the desire for a wholesome meal is strong, this Speedy Chicken Stir-Fry With Veggies is a lifesaver. This dish brings together tender morsels of chicken and a colorful array of fresh vegetables, all enveloped in a flavorful sauce that takes just minutes to whip up.
It’s a perfect choice for families looking to enjoy a healthy, satisfying dinner without spending hours in the kitchen.
This stir-fry isn’t only quick to prepare but also flexible. You can easily swap out vegetables for whatever you have in your fridge, making it a great way to use up leftover produce. The combination of lean protein and vibrant veggies guarantees that the meal is both nutritious and filling, while the quick cooking time retains the freshness and crunch of the vegetables.
Ideal for 4-6 people, this dish will likely become a staple in your weekly meal rotation.
Ingredients (Serves 4-6):
- 1.5 pounds of boneless, skinless chicken breast, thinly sliced
- 2 tablespoons vegetable oil
- 1 red bell pepper, sliced
- 1 yellow bell pepper, sliced
- 1 cup broccoli florets
- 1 cup snap peas
- 2 cloves garlic, minced
- 1 tablespoon fresh ginger, minced
- 1/4 cup soy sauce
- 2 tablespoons oyster sauce
- 1 tablespoon cornstarch
- 1/4 cup chicken broth
- Salt and pepper to taste
- Cooked rice or noodles (optional, for serving)
- Sliced green onions and sesame seeds for garnish
Cooking Instructions:
- Prepare the Sauce: In a small bowl, mix together soy sauce, oyster sauce, cornstarch, and chicken broth. Stir until the cornstarch is fully dissolved and set aside.
- Cook the Chicken: Heat 1 tablespoon of vegetable oil in a large pan or wok over medium-high heat. Add the sliced chicken and season with salt and pepper. Stir-fry for 4-5 minutes until the chicken is cooked through and slightly golden. Remove the chicken from the pan and set aside.
- Stir-Fry the Vegetables: In the same pan, add the remaining tablespoon of oil. Add the garlic and ginger, stir-frying for about 30 seconds until fragrant. Then, add the bell peppers, broccoli, and snap peas. Stir-fry for 3-4 minutes until the vegetables are bright and just tender.
- Combine Ingredients: Return the cooked chicken to the pan with the vegetables. Pour the prepared sauce over the top. Stir everything together and cook for an additional 2-3 minutes, allowing the sauce to thicken and coat the chicken and vegetables evenly.
- Serve: Remove from heat and serve immediately over cooked rice or noodles, if desired. Garnish with sliced green onions and sesame seeds for added flavor and texture.
Extra Tips:
To make sure the chicken cooks quickly and evenly, make sure to slice it thinly and uniformly.
It’s also important to have all your ingredients prepped and ready before you start cooking, as the stir-frying process happens quickly.
If you prefer a spicier dish, consider adding a pinch of red pepper flakes or a dash of hot sauce to the sauce mixture.
Finally, remember that the key to a great stir-fry is high heat and constant stirring; this helps keep the vegetables crisp and the chicken tender.
20-Minute Turkey Taco Lettuce Wraps

Minute Turkey Taco Lettuce Wraps are a perfect quick and healthy dinner option for busy families. This dish combines lean ground turkey with a flavorful taco seasoning, all wrapped up in crisp lettuce leaves. The result is a delicious, low-carb meal that’s packed with protein and fresh ingredients. It’s a great way to enjoy the flavors of a traditional taco without the extra calories from tortillas.
The beauty of this dish is in its simplicity and versatility. You can easily customize the toppings according to your family’s preferences, making it a hit for both kids and adults. Plus, it only takes 20 minutes to prepare, which means you can have a nutritious meal on the table in no time. Whether you’re looking to add more vegetables to your diet or simply want a quick dinner solution, these Minute Turkey Taco Lettuce Wraps are bound to satisfy.
Ingredients (Serves 4-6):
- 1 lb ground turkey
- 1 tablespoon olive oil
- 1 packet taco seasoning mix
- 1/4 cup water
- 2 heads of butter or Romaine lettuce, leaves separated
- 1 cup cherry tomatoes, quartered
- 1/2 cup shredded cheese (cheddar or Mexican blend)
- 1/2 cup salsa
- 1/4 cup sour cream
- 1 avocado, diced
- Salt and pepper to taste
Cooking Instructions:
- Prepare the Ingredients: Start by washing and drying the lettuce leaves thoroughly. Set them aside to use as the wraps. Quarter the cherry tomatoes, grate the cheese if it’s not pre-shredded, and dice the avocado.
- Cook the Turkey: In a large skillet, heat the olive oil over medium-high heat. Add the ground turkey and cook until it’s browned and fully cooked through, about 5-7 minutes. Break up the turkey with a spatula as it cooks to guarantee even browning.
- Add Seasoning: Once the turkey is cooked, sprinkle the taco seasoning over the meat. Add 1/4 cup of water to the skillet. Stir well to combine the seasoning with the turkey, making sure all the meat is coated. Let it simmer for about 2-3 minutes until the sauce thickens slightly.
- Assemble the Wraps: Take a lettuce leaf and spoon a portion of the turkey mixture into the center. Top with a few pieces of cherry tomato, a sprinkle of cheese, a dollop of salsa, a small spoonful of sour cream, and a few pieces of diced avocado.
- Serve: Arrange the wraps on a platter or individual plates and serve immediately. Provide extra toppings on the side so everyone can customize their own wraps.
Extra Tips:
When selecting lettuce for the wraps, opt for larger leaves that are sturdy enough to hold the fillings without tearing. Butter lettuce is a great choice due to its slightly curved shape, but Romaine can also work well.
If you want to add more flavor to the turkey, consider adding chopped onions or bell peppers while cooking. For a spicier kick, use a hot taco seasoning mix or add some chopped jalapeños.
These wraps are perfect for a quick and healthy dinner but also make excellent leftovers for lunch the next day.
Fast and Flavorful Salmon With Asparagus
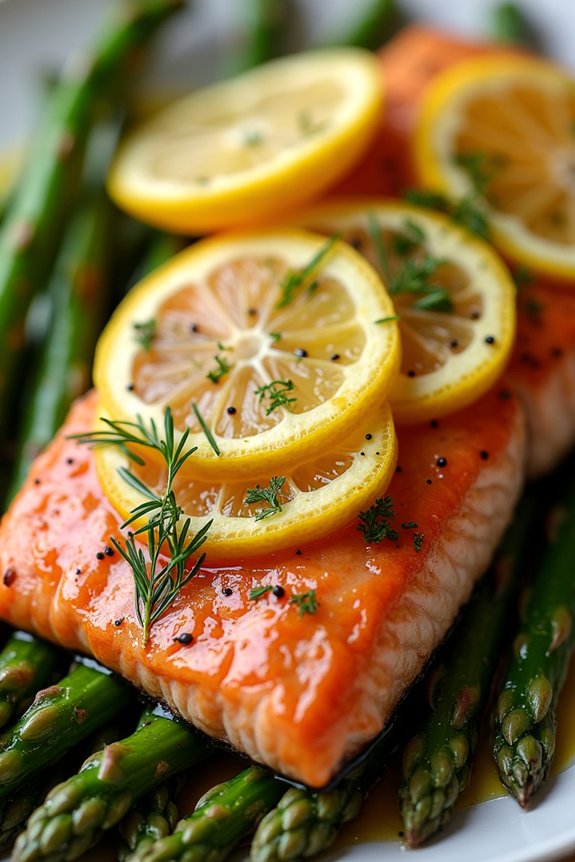
In today’s busy world, preparing a healthy yet delicious meal for your family can often feel like an intimidating task. However, this Fast and Flavorful Salmon With Asparagus recipe is here to change that perception. Perfect for a weeknight dinner, this dish is both nutritious and satisfying, combining heart-healthy salmon with tender asparagus.
Not only is it quick and easy to make, but it also bursts with fresh, vibrant flavors that the whole family will love. With a preparation time of just 20 minutes, you can have a wholesome meal on the table without any stress. The combination of juicy salmon fillets and crisp asparagus spears creates a delightful contrast in texture, while a simple seasoning of lemon, garlic, and herbs elevates the dish to a new level.
This recipe serves 4-6 people, making it a great option for family dinners or when you have guests over.
Ingredients (serves 4-6):
- 4-6 salmon fillets (about 6 oz each)
- 1 lb asparagus, trimmed
- 2 tablespoons olive oil
- 3 cloves garlic, minced
- 1 lemon, sliced
- 1 teaspoon salt
- 1/2 teaspoon black pepper
- 1 tablespoon fresh dill, chopped (optional)
- Lemon wedges for serving
Cooking Instructions:
- Preheat the Oven: Start by preheating your oven to 400°F (200°C). This guarantees that the oven is hot enough to cook the salmon and asparagus quickly and evenly.
- Prepare the Baking Sheet: Line a large baking sheet with parchment paper or lightly grease it with olive oil to prevent sticking.
- Season the Salmon: Place the salmon fillets on one side of the prepared baking sheet. Drizzle 1 tablespoon of olive oil over the salmon and sprinkle with minced garlic, salt, and black pepper. Lay a few lemon slices on top of each fillet for flavor.
- Prepare the Asparagus: On the other side of the baking sheet, arrange the asparagus spears. Drizzle with the remaining tablespoon of olive oil and season with salt and pepper. Toss gently to coat the asparagus evenly.
- Bake: Place the baking sheet in the preheated oven and bake for 12-15 minutes, depending on the thickness of the salmon fillets. The salmon should be opaque and flake easily with a fork, and the asparagus should be tender yet still crisp.
- Garnish and Serve: Once cooked, remove the baking sheet from the oven. Garnish the salmon with fresh dill if desired. Serve immediately with additional lemon wedges on the side for squeezing over the dish.
Extra Tips:
For ideal flavor, choose fresh, high-quality salmon and asparagus. If you prefer a bit of a kick, add a pinch of red pepper flakes to the asparagus before cooking.
Additionally, you can substitute dill with other fresh herbs like parsley or basil, depending on your taste preferences. Avoid overcooking the salmon to keep it moist and tender.
Finally, if you want to make the meal more substantial, consider serving it with a side of quinoa or whole-grain rice.
Healthy Caprese Chicken Skillet

The Healthy Caprese Chicken Skillet is a flavorful, easy-to-make dish that embodies the fresh and vibrant flavors of a classic Caprese salad. This dish is perfect for a quick weeknight dinner, taking only 20 minutes to prepare, yet it still offers a satisfying and wholesome meal for the entire family.
With tender chicken breast as the base, topped with juicy tomatoes, creamy mozzarella, and fragrant basil, this skillet meal is both nutritious and delicious. The combination of these fresh ingredients not only makes for an eye-catching presentation but also guarantees a burst of flavor in every bite.
Designed to serve 4-6 people, this dish is a great option for feeding a family or having leftovers for the next day’s lunch. The simplicity of the ingredients means you won’t have to spend too much time grocery shopping, and most items may already be in your kitchen pantry.
The Healthy Caprese Chicken Skillet not only prioritizes health with its lean protein and fresh vegetables but also leaves plenty of room for customization to suit your family’s tastes and dietary needs.
Ingredients:
- 4 boneless, skinless chicken breasts
- Salt and pepper to taste
- 2 tablespoons olive oil
- 1 teaspoon Italian seasoning
- 2 cups cherry tomatoes, halved
- 1 cup mozzarella balls (or sliced mozzarella cheese)
- 1/4 cup balsamic glaze
- A handful of fresh basil leaves
- 2 cloves garlic, minced
Instructions:
- Prepare the Chicken: Begin by seasoning the chicken breasts with salt, pepper, and Italian seasoning. Make sure the seasoning is evenly distributed on both sides of the chicken.
- Cook the Chicken: Heat the olive oil in a large skillet over medium-high heat. Once the oil is hot, add the chicken breasts to the skillet. Cook each side for about 5-6 minutes, or until the chicken is golden brown and cooked through. Remove the chicken from the skillet and set it aside on a plate.
- Sauté the Garlic and Tomatoes: In the same skillet, add the minced garlic and sauté for about 1 minute until it’s fragrant. Then, add the halved cherry tomatoes and a pinch of salt. Cook for 2-3 minutes until the tomatoes begin to soften.
- Combine Ingredients: Return the cooked chicken breasts to the skillet, nestling them among the tomatoes. Add the mozzarella balls or slices on top of the chicken. Cover the skillet with a lid and allow the cheese to melt slightly, which should take about 2 minutes.
- Finish with Balsamic and Basil: Drizzle the balsamic glaze over the chicken and tomatoes. Scatter fresh basil leaves over the top just before serving for a burst of aroma and flavor.
Extra Tips:
For those looking to enhance the flavor further, consider adding a splash of white wine or chicken broth to deglaze the skillet after removing the chicken and before sautéing the garlic. This will lift any caramelized bits from the skillet, adding depth to the dish.
Additionally, verify the mozzarella is fresh for peak creaminess and taste. If you’re in a pinch, regular tomatoes can substitute cherry tomatoes, and dried basil can replace fresh basil, although the latter will provide a more vibrant flavor.
Serve this Caprese Chicken Skillet with a side of crusty bread or a light salad for a complete meal.
Vegetable and Quinoa Stuffed Bell Peppers
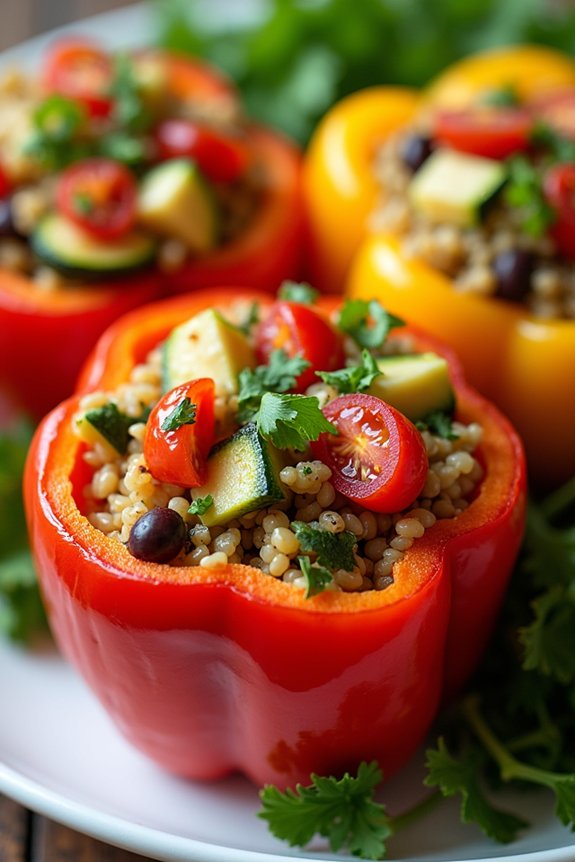
Vegetable and Quinoa Stuffed Bell Peppers are a delightful and nutritious dish that’s perfect for family dinners. This recipe combines colorful bell peppers with a flavorful filling of quinoa, vegetables, and spices, delivering a meal that’s both satisfying and health-conscious. The filling is packed with protein and fiber, making it a wholesome choice that will keep everyone feeling full and energized.
This dish can be prepared in just 20 minutes, making it an excellent option for busy weeknights when you need something quick and delicious. The versatility of this recipe means you can easily adapt it to your family’s preferences. Feel free to substitute or add vegetables to the filling, or even include some cheese for an extra layer of flavor.
The bell peppers not only serve as a vibrant and edible vessel for the filling but also add a sweet and slightly tangy taste that complements the other ingredients perfectly. Whether you’re looking to introduce more plant-based meals into your diet or simply want to try something new, these Vegetable and Quinoa Stuffed Bell Peppers are sure to please.
Ingredients (Serves 4-6):
- 6 large bell peppers
- 1 cup quinoa
- 2 cups vegetable broth
- 1 tablespoon olive oil
- 1 medium onion, chopped
- 2 cloves garlic, minced
- 1 zucchini, diced
- 1 cup cherry tomatoes, halved
- 1 can (15 oz) black beans, drained and rinsed
- 1 teaspoon cumin
- 1 teaspoon paprika
- Salt and pepper to taste
- 1/4 cup fresh cilantro, chopped
Cooking Instructions:
- Prepare the Quinoa: Rinse the quinoa under cold water. In a medium saucepan, combine the quinoa and vegetable broth. Bring to a boil, then reduce heat to low, cover, and let simmer for about 15 minutes or until the liquid is absorbed and the quinoa is fluffy.
- Prepare the Bell Peppers: While the quinoa is cooking, preheat your oven to 375°F (190°C). Cut the tops off the bell peppers and remove the seeds and membranes. Place the peppers in a baking dish, standing upright.
- Cook the Vegetables: In a large skillet, heat the olive oil over medium heat. Add the chopped onion and minced garlic, sautéing until the onion becomes translucent. Add the zucchini and cherry tomatoes, cooking until they soften.
- Mix the Filling: Add the cooked quinoa to the skillet with the vegetables. Stir in the black beans, cumin, paprika, salt, and pepper. Mix well until all ingredients are combined and heated through.
- Stuff the Peppers: Spoon the quinoa and vegetable mixture into each bell pepper, filling them generously. Place the stuffed peppers in the preheated oven and bake for about 10 minutes, until the peppers are tender but still firm.
- Garnish and Serve: Remove from the oven and garnish with fresh chopped cilantro. Serve warm and enjoy!
Extra Tips:
To guarantee even cooking, choose bell peppers that are roughly the same size. If you’d like a bit of extra flavor, consider adding a sprinkle of cheese on top of each stuffed pepper before baking.
You can also prepare the filling in advance and store it in the refrigerator for up to two days, making this dish even quicker to assemble on a busy night. If you prefer a spicier dish, add a pinch of chili flakes or a diced jalapeño to the filling.
Simple Beef and Broccoli Stir-Fry
When time is tight, but you still want to provide a nutritious and delicious meal for your family, this Simple Beef and Broccoli Stir-Fry is a perfect choice.
This dish combines tender strips of beef with crisp broccoli, all coated in a savory sauce that comes together quickly for a satisfying dinner. With just 20 minutes from start to finish, it’s a fantastic way to guarantee your family is getting a balanced meal without spending hours in the kitchen.
Not only is this stir-fry quick and easy, but it’s also versatile. You can serve it over steamed rice, quinoa, or noodles, or even enjoy it on its own for a low-carb option. The ingredients are simple and often found in most pantries, making it a budget-friendly option as well.
Whether you’re feeding a family of four or a slightly larger group, this recipe can be scaled easily to suit your needs.
Ingredients (serving size: 4-6 people):
- 1 pound beef flank steak, thinly sliced
- 3 cups broccoli florets
- 3 tablespoons vegetable oil, divided
- 3 cloves garlic, minced
- 1 tablespoon fresh ginger, minced
- 1/4 cup soy sauce
- 2 tablespoons oyster sauce
- 1 tablespoon cornstarch
- 1/4 cup water
- 1 tablespoon sesame oil
- Salt and pepper, to taste
- Cooked rice or noodles, for serving (optional)
Instructions:
- Prepare the Beef:
- In a small bowl, mix the soy sauce, oyster sauce, cornstarch, and water until smooth. Add the thinly sliced beef to the mixture, confirming each piece is coated. Let it marinate while you prepare the other ingredients.
- Blanch the Broccoli:
- Bring a pot of water to a boil. Add the broccoli florets and blanch for about 2 minutes until they’re bright green and slightly tender. Drain immediately and set aside.
- Sauté Aromatics:
- In a large skillet or wok, heat 2 tablespoons of vegetable oil over medium-high heat. Add the minced garlic and ginger, and sauté for about 30 seconds until fragrant.
- Cook the Beef:
- Increase the heat to high. Add the marinated beef to the skillet, spreading it out in a single layer. Cook for about 3-4 minutes, turning the pieces occasionally, until the beef is browned and cooked through.
- Combine Ingredients:
- Push the beef to one side of the skillet. Add the remaining tablespoon of vegetable oil and the broccoli to the empty side of the pan. Stir-fry for another 2 minutes, allowing the broccoli to absorb some of the flavors.
- Finish with Sauce:
- Drizzle sesame oil over the stir-fry and toss everything together, confirming the beef and broccoli are evenly coated with the sauce. Adjust seasoning with salt and pepper to taste.
- Serve:
- Serve hot over cooked rice or noodles, or enjoy on its own for a lighter option.
Extra Tips:
When slicing the beef, make sure to cut against the grain to assure tenderness.
If you have time, marinate the beef for longer, up to 30 minutes, to enhance the flavor. For added crunch, you can top the stir-fry with toasted sesame seeds or chopped green onions.
If you prefer a thicker sauce, mix a little more cornstarch with water and add it to the skillet during step 6, allowing it to cook until the sauce thickens to your liking.
Zucchini Noodles With Pesto and Cherry Tomatoes

Zucchini Noodles With Pesto and Cherry Tomatoes is a delicious and healthy dinner option perfect for busy families looking to prepare a nutritious meal in just 20 minutes. This dish combines the fresh, crisp texture of zucchini noodles with the vibrant flavors of homemade or store-bought pesto and the sweetness of cherry tomatoes.
It’s not only quick to prepare but also packed with vitamins and nutrients, making it a great choice for those who want to enjoy a light yet satisfying meal. The zucchini noodles, also known as “zoodles,” serve as a low-carb alternative to traditional pasta, making this dish ideal for those who are health-conscious or following a gluten-free diet.
The pesto adds a creamy and aromatic element, while the cherry tomatoes provide a burst of freshness and color. Together, these ingredients create a delightful and wholesome meal that can be enjoyed by the entire family. This recipe serves 4-6 people and can be easily adjusted to suit your taste preferences.
Ingredients:
- 4 medium zucchinis
- 1 cup cherry tomatoes, halved
- 1 cup basil pesto (homemade or store-bought)
- 3 tablespoons olive oil
- 2 cloves garlic, minced
- Salt and pepper, to taste
- 1/4 cup grated Parmesan cheese
- Optional: Pine nuts for garnish
Instructions:
- Prepare the Zucchini Noodles: Begin by washing the zucchinis thoroughly. Using a spiralizer, create zucchini noodles, or “zoodles.” If you don’t have a spiralizer, you can use a julienne peeler or a regular vegetable peeler to create thin strips.
- Sauté the Garlic: Heat the olive oil in a large skillet over medium heat. Add the minced garlic and sauté for about 1 minute, or until fragrant. Be careful not to burn the garlic.
- Cook the Zucchini Noodles: Add the zucchini noodles to the skillet with the garlic. Toss them gently to coat in the oil. Cook for about 3-4 minutes, stirring occasionally, until the noodles are slightly tender but still have a bit of crunch. Don’t overcook as they can become mushy.
- Add the Pesto and Tomatoes: Lower the heat and add the pesto to the skillet, stirring to combine with the zucchini noodles. Then, add the halved cherry tomatoes and season with salt and pepper to taste. Cook for an additional 1-2 minutes, or until the tomatoes are slightly softened.
- Serve and Garnish: Transfer the zucchini noodles with pesto and cherry tomatoes to serving plates. Sprinkle with grated Parmesan cheese and, if desired, garnish with pine nuts for an extra crunch.
Extra Tips: When making Zucchini Noodles With Pesto and Cherry Tomatoes, it’s important to not overcrowd the pan when cooking the zucchini noodles. If necessary, cook them in batches to promote even cooking.
Additionally, you can customize the dish by adding cooked chicken, shrimp, or tofu for extra protein. If you prefer a bit of heat, add a pinch of red pepper flakes while sautéing the garlic. Enjoy this quick, healthy meal with a side salad or crusty bread for a complete dining experience.
Instant Pot Tomato Basil Soup
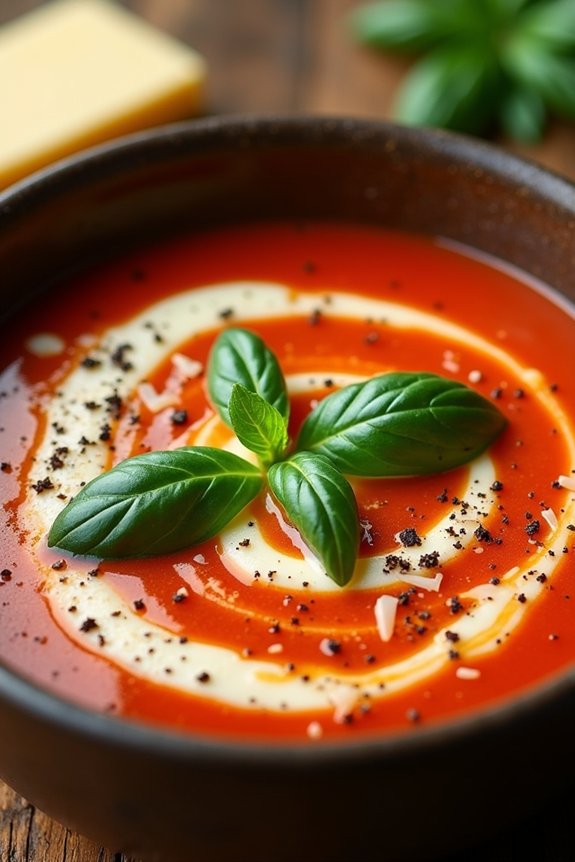
Instant Pot Tomato Basil Soup is a delightful and healthy meal that can be whipped up quickly, making it perfect for busy families looking to enjoy a wholesome dinner without spending hours in the kitchen. This comforting soup is brimming with the rich flavors of ripe tomatoes and fresh basil, providing a culinary experience that soothes the soul and pleases the palate.
The Instant Pot markedly reduces the cooking time, allowing you to enjoy all the depth of flavor that comes from slow-simmered soups in a fraction of the time. Ideal for a serving size of 4-6 people, this recipe is a lifesaver on hectic weeknights when you crave something warm and nourishing.
It’s also versatile enough to pair beautifully with crusty bread, a grilled cheese sandwich, or a fresh salad, making it an adaptable main course or a delightful starter. With its vibrant color and aromatic herbs, Instant Pot Tomato Basil Soup is sure to be a hit with every member of the family.
Ingredients:
- 2 tablespoons olive oil
- 1 medium onion, chopped
- 3 cloves garlic, minced
- 2 (28-ounce) cans whole peeled tomatoes
- 1 cup vegetable broth
- 1 teaspoon salt
- 1/2 teaspoon black pepper
- 1/2 teaspoon sugar
- 1/2 cup fresh basil leaves, chopped
- 1/2 cup heavy cream or coconut milk (optional)
- Grated Parmesan cheese, for serving (optional)
Cooking Instructions:
- Prepare the Instant Pot: Set your Instant Pot to the sauté function and add the olive oil. Once the oil is hot, add the chopped onions and sauté for about 3-4 minutes until they become translucent.
- Add Garlic: Stir in the minced garlic and continue to sauté for another minute until the garlic is fragrant. Be careful not to let it burn.
- Add Tomatoes and Broth: Pour in the canned tomatoes with their juices, using a spoon to break them up a bit. Add the vegetable broth, salt, black pepper, and sugar. Stir everything together to combine.
- Cook the Soup: Secure the lid on the Instant Pot and set it to the manual or pressure cook setting on high pressure for 10 minutes.
- Release Pressure: Once the cooking time is complete, allow the pressure to release naturally for about 5 minutes before performing a quick release to let out any remaining steam.
- Blend the Soup: Carefully open the lid and use an immersion blender to puree the soup until it reaches your desired consistency. If you don’t have an immersion blender, you can transfer the soup in batches to a blender, then return it to the pot.
- Add Basil and Cream: Stir in the fresh basil and heavy cream or coconut milk, if using, and let the soup warm through for another couple of minutes on the sauté setting.
- Serve: Ladle the soup into bowls and top with grated Parmesan cheese if desired. Serve hot with your choice of sides.
Extra Tips:
For a deeper flavor, you can roast fresh tomatoes in the oven before adding them to the Instant Pot. Simply cut them in half, drizzle with olive oil, and roast at 400°F for about 25-30 minutes.
Adding a pinch of red pepper flakes during cooking can also give the soup a nice kick. If you prefer a chunkier texture, blend only half of the soup. Remember to adjust the seasoning at the end, as the flavors can change after blending and adding cream.
Easy Black Bean and Corn Quesadillas

Easy Black Bean and Corn Quesadillas are a perfect option for families looking for a quick and healthy dinner that can be prepared in just 20 minutes.
These quesadillas are packed with protein and fiber, thanks to the black beans and corn, and are incredibly satisfying. Whether you’re a busy parent or simply someone who wants to enjoy a delicious meal without spending hours in the kitchen, this recipe is sure to become a family favorite.
Not only are these quesadillas easy to make, but they’re also customizable to suit your family’s taste preferences. You can add your favorite vegetables, adjust the spices to your liking, or even throw in some cooked chicken or beef for added protein.
With just a few simple ingredients, you’ll have a wholesome meal on the table that everyone will love.
Ingredients (serves 4-6):
- 6 large flour tortillas
- 1 can (15 oz) black beans, drained and rinsed
- 1 cup frozen or canned corn, drained
- 1 cup shredded cheddar cheese
- 1 cup shredded Monterey Jack cheese
- 1 small red onion, finely chopped
- 1 tablespoon olive oil
- 1 teaspoon ground cumin
- 1/2 teaspoon chili powder
- Salt and pepper to taste
- Fresh cilantro, chopped (optional)
- Sour cream and salsa for serving (optional)
Cooking Instructions:
- Prepare the Filling: In a large mixing bowl, combine the black beans, corn, red onion, cumin, chili powder, salt, and pepper. Mix well until all ingredients are evenly distributed.
- Preheat the Pan: Heat the olive oil in a large non-stick skillet over medium heat. Confirm the skillet is hot enough for the tortillas to crisp quickly without burning.
- Assemble the Quesadillas: Place a tortilla flat on a clean surface. Spread a portion of the bean and corn mixture evenly over half of the tortilla. Sprinkle a generous amount of cheddar and Monterey Jack cheese over the mixture. Fold the tortilla in half to enclose the filling.
- Cook the Quesadillas: Carefully place the folded quesadilla in the preheated skillet. Cook for 2-3 minutes on each side, or until the tortilla is golden brown and the cheese has melted. Use a spatula to gently press down to confirm even cooking.
- Repeat: Remove the cooked quesadilla from the skillet and keep warm. Repeat the process with the remaining tortillas and filling.
- Serve: Once all the quesadillas are cooked, cut them into wedges. Garnish with fresh cilantro if desired. Serve hot with sour cream and salsa on the side.
Extra Tips:
For an even more flavorful experience, consider adding chopped jalapeños or a splash of lime juice to the filling mixture.
You can also experiment with different types of cheese to find your family’s favorite combination. If you prefer a crispy texture, apply a thin layer of butter to the outside of the tortillas before cooking.
Finally, to save even more time, you can prepare the filling mixture in advance and store it in the refrigerator, making dinner prep even quicker on busy nights.
Garlic Butter Tilapia With Steamed Veggies

Garlic Butter Tilapia With Steamed Veggies is a delectable and nutritious meal perfect for families looking to prepare a quick dinner in just 20 minutes. This dish combines the mild, flaky taste of tilapia with the rich, savory flavor of garlic butter, complemented by a side of fresh steamed vegetables.
It’s an ideal choice for a healthy dinner that doesn’t compromise on flavor or satisfaction. This recipe serves 4-6 people, making it perfect for a family meal. Tilapia, being a lean protein, pairs wonderfully with the vibrant freshness of steamed veggies such as broccoli, carrots, and snap peas.
This combination not only delights the palate but also provides a balanced meal rich in essential nutrients, vitamins, and minerals. Enjoy a restaurant-quality meal at home that requires minimal effort and delivers maximum taste.
Ingredients:
- 4-6 tilapia fillets
- 2 tablespoons olive oil
- 4 tablespoons unsalted butter
- 6 cloves garlic, minced
- 1 lemon, juiced
- Salt and pepper to taste
- 1 teaspoon paprika
- 1 pound of fresh broccoli florets
- 1 cup of sliced carrots
- 1 cup of snap peas
- Optional: fresh parsley for garnish
Cooking Instructions:
- Prepare the Tilapia: Rinse the tilapia fillets under cold water and pat them dry with paper towels. Season both sides with salt, pepper, and paprika.
- Make Garlic Butter: In a small saucepan over medium heat, melt the butter. Add the minced garlic and sauté for about 1-2 minutes until fragrant. Stir in the lemon juice and remove from heat.
- Cook the Tilapia: Heat olive oil in a large skillet over medium-high heat. Once hot, place the seasoned tilapia fillets in the skillet. Cook for about 3-4 minutes on each side or until the fish is opaque and flakes easily with a fork.
- Steam the Vegetables: While the tilapia is cooking, bring a pot of water to boil for steaming. Place broccoli florets, sliced carrots, and snap peas in a steamer basket over the boiling water. Cover and steam for about 5-7 minutes until the vegetables are tender-crisp.
- Combine and Serve: Once the tilapia is cooked, remove it from the skillet. Drizzle the garlic butter sauce over the fish. Serve the tilapia with the steamed vegetables on the side. Optionally, garnish with freshly chopped parsley for added flavor and color.
Extra Tips:
For the best results, always use fresh or previously frozen and thoroughly thawed tilapia fillets. If you prefer a bit of heat, add a pinch of red pepper flakes to the garlic butter sauce.
When steaming the vegetables, be careful not to overcook them; they should be tender yet still retain a slight crunch for the best texture and taste. Feel free to experiment with different vegetables based on your family’s preferences or seasonal availability. Enjoy this quick and healthy dinner with a crisp green salad or a side of whole grain rice for a complete meal.
20-Minute Lentil Curry
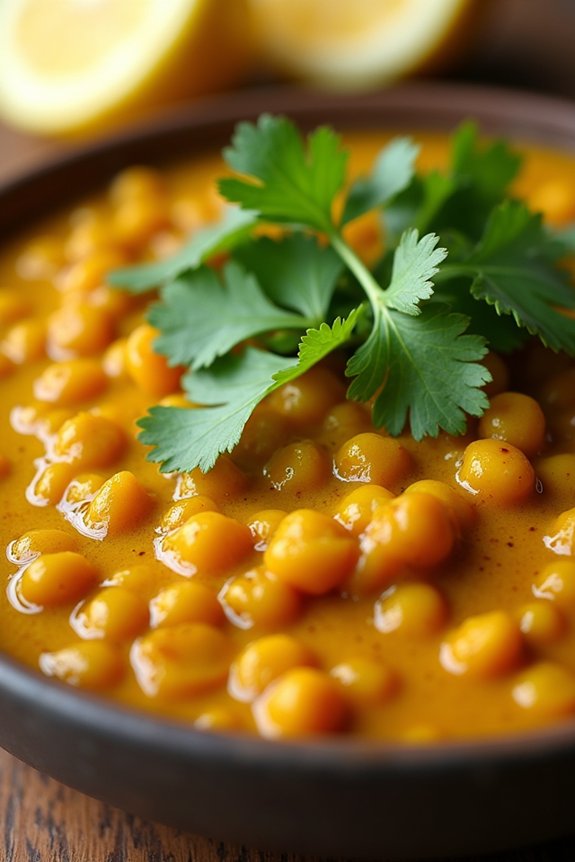
Looking for a healthy and delicious meal that won’t take up your entire evening? This Minute Lentil Curry is perfect for busy families who want to enjoy a nutritious dinner without spending hours in the kitchen. Packed with protein-rich lentils and flavorful spices, this curry isn’t only quick to prepare but also satisfying and comforting.
Ideal for serving 4-6 people, this dish can be easily adjusted to fit your family’s taste preferences by tweaking the level of spices or adding your favorite vegetables.
This Minute Lentil Curry is a one-pot wonder that comes together in just 20 minutes, making it an excellent choice for a weeknight dinner. The combination of aromatic spices and creamy coconut milk creates a rich, flavorful sauce that perfectly complements the hearty lentils.
Serve it with a side of warm naan bread or over a bed of steamed rice for a complete and fulfilling meal. Let’s plunge into the recipe!
Ingredients (serving size: 4-6 people):
- 1 cup dried lentils, rinsed and drained
- 1 tablespoon olive oil
- 1 medium onion, finely chopped
- 2 cloves garlic, minced
- 1 tablespoon ginger, minced
- 1 tablespoon curry powder
- 1 teaspoon ground cumin
- 1 teaspoon ground coriander
- 1/2 teaspoon turmeric
- 1/2 teaspoon red chili flakes (optional)
- 1 can (14 oz) coconut milk
- 1 can (14 oz) diced tomatoes
- 2 cups vegetable broth
- Salt and pepper to taste
- Fresh cilantro, chopped (for garnish)
- Lemon wedges (for serving)
Cooking Instructions:
- Prepare the Base: Heat the olive oil in a large pot over medium heat. Add the chopped onion and sauté for about 3 minutes until it becomes translucent. Stir in the minced garlic and ginger, cooking for an additional minute until fragrant.
- Add the Spices: Sprinkle in the curry powder, ground cumin, ground coriander, turmeric, and red chili flakes (if using). Stir well to coat the onion mixture with the spices, allowing the flavors to bloom for about 1 minute.
- Cook the Lentils: Add the rinsed lentils to the pot, followed by the coconut milk, diced tomatoes, and vegetable broth. Stir everything together, making sure the lentils are well submerged in the liquid.
- Simmer the Curry: Bring the mixture to a gentle simmer, and cover the pot. Reduce the heat to low and let it cook for about 15 minutes, stirring occasionally, until the lentils are tender and the curry has thickened.
- Season and Serve: Taste the curry and add salt and pepper as needed. Ladle the curry into bowls, garnish with fresh cilantro, and serve with lemon wedges on the side. Enjoy with naan or rice.
Extra Tips:
For a creamier texture, you can blend a portion of the cooked lentils before serving. This will give the curry a thicker consistency.
If you prefer a milder curry, reduce the amount of red chili flakes or omit them entirely. Feel free to add vegetables like spinach, peas, or bell peppers for extra nutrition and color.
This curry also stores well in the refrigerator for up to three days, making it a great choice for meal prep.
Honey Soy Glazed Chicken Thighs
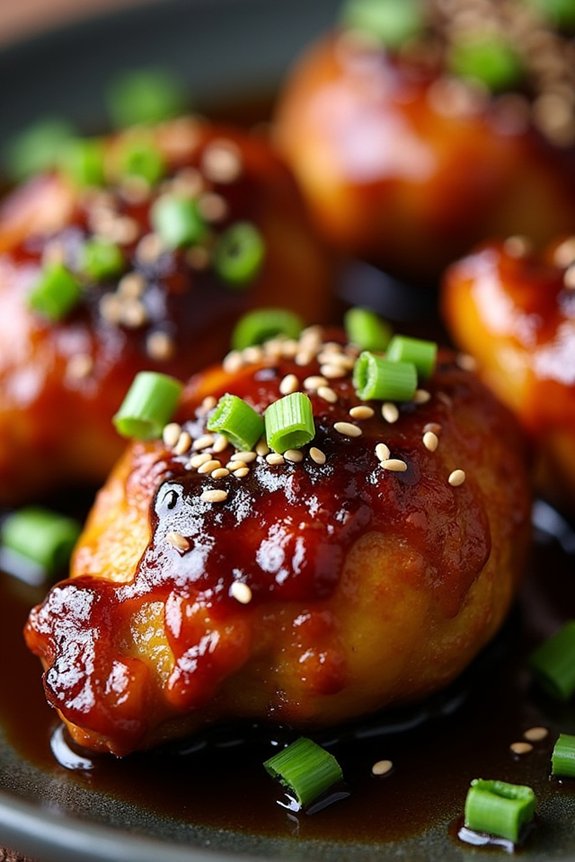
Honey Soy Glazed Chicken Thighs is a delicious and quick meal that brings a perfect balance of sweet and savory flavors to your dinner table. This recipe is ideal for busy families who want a wholesome, tasty meal without spending too much time in the kitchen. The chicken thighs are marinated in a delectable honey-soy sauce, then cooked to perfection, resulting in tender, juicy meat with a sticky glaze that everyone will love.
This dish isn’t only quick to prepare but also requires minimal ingredients, making it a budget-friendly option for weeknight dinners. Pair it with steamed rice and a side of vegetables for a complete meal that satisfies both taste and nutrition. Ready in just 20 minutes, Honey Soy Glazed Chicken Thighs will quickly become a family favorite, perfect for any night of the week.
Ingredients for 4-6 servings:
- 8 boneless, skinless chicken thighs
- 1/2 cup soy sauce
- 1/4 cup honey
- 2 tablespoons olive oil
- 1 tablespoon rice vinegar
- 1 tablespoon minced garlic
- 1 teaspoon grated ginger
- 1/4 teaspoon black pepper
- 2 tablespoons sesame seeds (optional garnish)
- 2 tablespoons chopped green onions (optional garnish)
Cooking Instructions:
- Prepare the Marinade: In a medium bowl, combine the soy sauce, honey, olive oil, rice vinegar, minced garlic, grated ginger, and black pepper. Whisk the ingredients together until they’re well blended.
- Marinate the Chicken: Place the chicken thighs in a large resealable plastic bag or a shallow dish. Pour the marinade over the chicken, making certain each piece is well coated. Seal the bag or cover the dish and let it marinate in the refrigerator for at least 10 minutes. If you have more time, marinate for up to 2 hours for deeper flavor.
- Heat the Pan: Set a large skillet over medium-high heat. Once the pan is hot, remove the chicken from the marinade, letting excess drip off, and place the thighs in the skillet. Reserve the marinade for later use.
- Cook the Chicken: Sear the chicken thighs for about 3-4 minutes on each side, or until they develop a golden-brown crust. Reduce the heat to medium if the pan starts to get too hot.
- Add the Marinade: Pour the reserved marinade into the skillet with the chicken. Allow it to simmer for an additional 5-7 minutes, flipping the chicken occasionally, until the sauce thickens and glazes the chicken.
- Check Doneness: Verify the chicken is cooked through by checking that the internal temperature reaches 165°F (75°C). If needed, cook for a few more minutes.
- Serve: Once done, remove the chicken from the skillet and let it rest for a couple of minutes. Garnish with sesame seeds and chopped green onions if desired. Serve with steamed rice and your choice of vegetables.
Extra Tips:
For best results, use fresh ginger and garlic instead of powdered versions to enhance the flavors of the dish. If you prefer a spicier kick, add a pinch of red pepper flakes to the marinade.
To avoid overcooking, keep an eye on the chicken as it can cook quickly, especially if the pan is too hot. Finally, if you have time, marinate the chicken overnight in the refrigerator for an even more intense flavor profile.
One-Pan Lemon Herb Chicken and Couscous
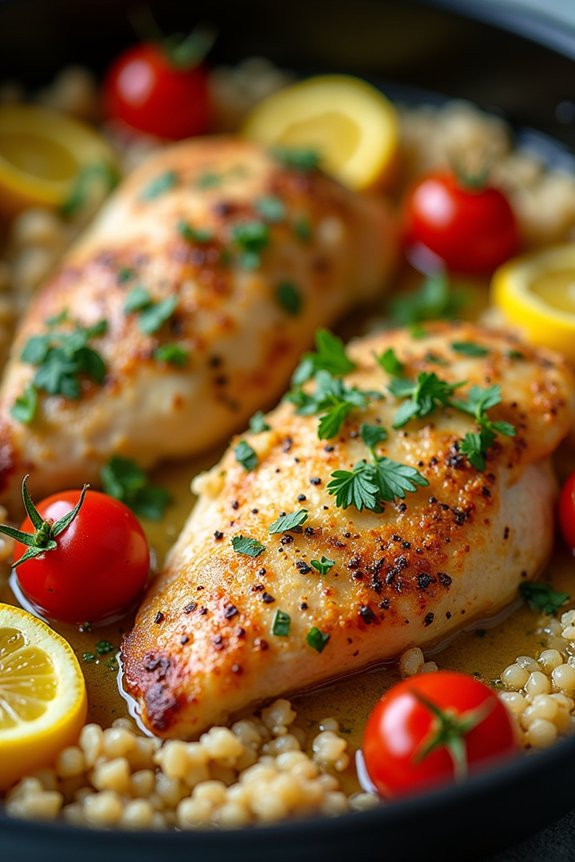
Enjoy a delightful and healthy meal with this One-Pan Lemon Herb Chicken and Couscous recipe, perfect for busy weeknights. This dish isn’t only quick to prepare but also packed with flavor and nutrition, making it an ideal choice for families looking to enjoy a wholesome dinner without spending hours in the kitchen.
The combination of tender chicken, aromatic herbs, and zesty lemon infused with fluffy couscous creates a satisfying and balanced meal that everyone will love. Designed to serve 4-6 people, this recipe uses simple, fresh ingredients you likely already have at home.
The one-pan method makes cleanup a breeze, allowing more time to relax and enjoy your evening. Whether you’re a seasoned cook or a beginner, this recipe is straightforward and sure to become a family favorite. With minimal effort, you’ll be able to put a delicious and healthy dinner on the table in just 20 minutes.
Ingredients:
- 4 boneless, skinless chicken breasts
- 1 tablespoon olive oil
- 2 cloves garlic, minced
- 1 teaspoon dried oregano
- 1 teaspoon dried thyme
- 1 teaspoon salt
- 1/2 teaspoon black pepper
- 1 lemon, zested and juiced
- 1 1/2 cups chicken broth
- 1 cup couscous
- 1 cup cherry tomatoes, halved
- 1/4 cup fresh parsley, chopped
Cooking Instructions:
- Prepare the Chicken: Begin by seasoning the chicken breasts with salt, pepper, oregano, and thyme. Verify each breast is evenly coated with the spices for maximum flavor.
- Sear the Chicken: Heat the olive oil in a large pan over medium-high heat. Add the chicken breasts and cook for about 5 minutes on each side, or until they’re golden brown. Remove the chicken from the pan and set aside.
- Sauté the Garlic: In the same pan, add the minced garlic and sauté for about 1 minute until fragrant. Be careful not to burn the garlic, as it can turn bitter.
- Add Liquids and Couscous: Pour in the chicken broth and lemon juice, scraping the bottom of the pan to release any browned bits. Bring the mixture to a simmer, then stir in the couscous and cherry tomatoes.
- Cook the Couscous: Return the chicken breasts to the pan, nestling them into the couscous mixture. Cover the pan with a lid and reduce the heat to low. Cook for about 10 minutes, or until the couscous is tender and the chicken is cooked through.
- Finish and Serve: Once everything is cooked, remove the pan from the heat. Sprinkle lemon zest and chopped parsley over the dish as a fresh garnish. Serve the chicken and couscous warm, verifying each serving includes plenty of the delicious broth.
Extra Tips:
For added flavor, consider marinating the chicken in the lemon juice and herbs for a few hours before cooking. This step isn’t necessary but can enhance the dish’s flavor profile.
If you prefer a bit more spice, try adding a pinch of red pepper flakes when sautéing the garlic. Additionally, feel free to substitute the couscous with whole wheat or pearl couscous for a heartier texture.
Quick Veggie-Packed Fried Rice

Quick Veggie-Packed Fried Rice is a delightful and nutritious dish that can be whipped up in just 20 minutes, making it an ideal choice for busy families looking to enjoy a healthy dinner together. This dish is loaded with vibrant vegetables and flavorful seasonings, providing a delicious and satisfying meal that everyone will love.
Not only is it quick to prepare, but it’s also a great way to use up leftover rice and veggies, minimizing food waste and maximizing flavor. Perfect for a family of 4 to 6, this Quick Veggie-Packed Fried Rice is both a time-saver and a nutritious choice.
The combination of vegetables provides a variety of vitamins and minerals, while the rice and eggs offer energy-sustaining carbohydrates and protein. Whether you’re a seasoned chef or a novice in the kitchen, this recipe is easy to follow and delivers a wholesome meal that can be customized to suit your family’s taste preferences.
Ingredients (serving size: 4-6 people):
- 4 cups of cooked jasmine rice (preferably day-old)
- 2 tablespoons of vegetable oil
- 1 medium onion, diced
- 2 cloves of garlic, minced
- 1 cup of carrots, diced
- 1 cup of frozen peas
- 1 cup of bell peppers, diced
- 3 eggs, beaten
- 3 tablespoons of soy sauce
- 2 tablespoons of oyster sauce
- 1 tablespoon of sesame oil
- 1/4 cup of green onions, sliced
- Salt and pepper to taste
Instructions:
- Prepare the Ingredients: Confirm all vegetables are cleaned, peeled, and diced. If using day-old rice, break up any clumps to guarantee it cooks evenly.
- Heat the Oil: In a large wok or skillet, heat the vegetable oil over medium-high heat until shimmering.
- Cook the Aromatics: Add the diced onion and minced garlic to the hot oil. Stir-fry for 2-3 minutes until the onion becomes translucent and fragrant.
- Add Veggies: Toss in the diced carrots, bell peppers, and frozen peas. Stir frequently and cook for an additional 4-5 minutes, allowing the vegetables to become tender-crisp.
- Scramble the Eggs: Push the vegetables to one side of the pan. Pour the beaten eggs into the empty side. Let the eggs sit for a minute, then scramble them until fully cooked.
- Combine Rice and Sauces: Add the cooked rice to the pan, mixing well with the vegetables and eggs. Pour in the soy sauce, oyster sauce, and sesame oil, stirring to guarantee the rice is evenly coated.
- Finish and Season: Continue stir-frying the mixture for another 2-3 minutes until everything is well-combined and heated through. Season with salt and pepper to taste.
- Garnish and Serve: Remove from heat, garnish with sliced green onions, and serve hot.
Extra Tips: For best results, use day-old rice as it’s drier and less sticky, making it ideal for fried rice. Feel free to customize this recipe by adding your favorite vegetables or protein like chicken, shrimp, or tofu.
Adjust the soy sauce and oyster sauce according to your taste preference, and consider adding a dash of chili sauce for a spicy kick. Enjoy experimenting with different flavors to make this dish truly your own!