

As the chilly winter evenings settle in, there’s nothing more comforting than sharing a warm, hearty meal with family. Classic dishes like beef stew, creamy chicken soup, and cheesy baked ziti have a special way of bringing us all together. I adore exploring simple recipes that fill our bellies and warm our hearts. Are you ready to make your winter dinners truly memorable? Let’s embark on this culinary journey and create cherished family moments together.
Classic Beef Stew
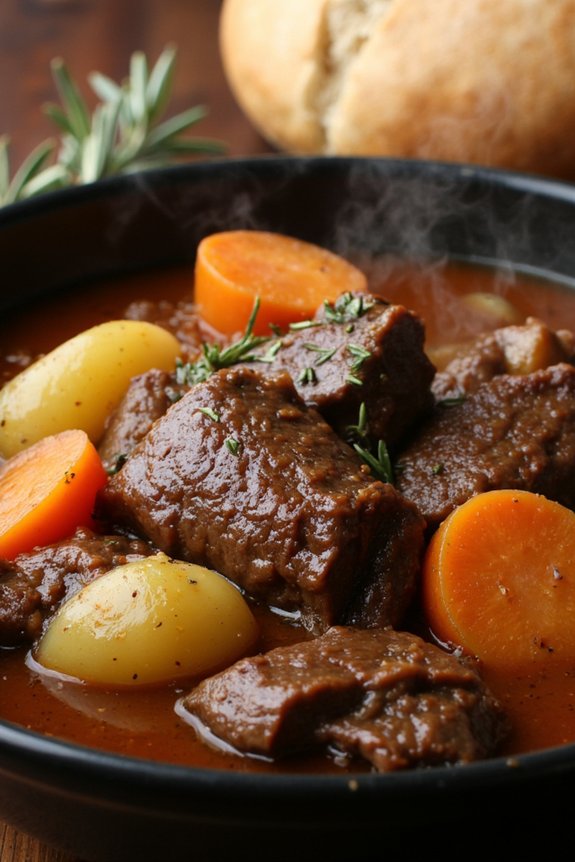
As the cold winter months set in, there’s nothing quite as comforting and satisfying as a hearty bowl of classic beef stew. This time-honored dish is perfect for family dinners, offering a rich blend of flavors that warm the soul. Made with tender chunks of beef, root vegetables, and aromatic herbs, this stew is slow-cooked to perfection, ensuring that every bite is bursting with savory goodness.
Whether you’re gathered around the table or enjoying a quiet evening at home, this beef stew is sure to become a winter favorite.
The beauty of a classic beef stew lies in its simplicity and versatility. With just a few fresh ingredients and some patience, you can create a dish that not only nourishes but also brings people together. This recipe is designed to serve 4-6 people, making it ideal for family meals or entertaining guests.
The combination of beef, vegetables, and a rich broth creates a symphony of flavors that will keep everyone coming back for seconds. Perfect for a cold winter evening, this stew is best served with crusty bread or over a bed of creamy mashed potatoes.
Ingredients (for 4-6 servings):
- 2 lbs beef chuck, cut into 1-inch cubes
- 3 tablespoons all-purpose flour
- 2 tablespoons olive oil
- 1 large onion, chopped
- 3 cloves garlic, minced
- 4 cups beef broth
- 1 cup red wine (optional)
- 2 tablespoons tomato paste
- 1 teaspoon dried thyme
- 1 teaspoon dried rosemary
- 2 bay leaves
- 4 large carrots, peeled and sliced
- 3 large potatoes, peeled and diced
- 1 cup frozen peas
- Salt and pepper to taste
Cooking Instructions:
- Prepare the Beef: Begin by seasoning the beef cubes with salt and pepper. Dust them with flour, ensuring each piece is well-coated. This will help to thicken the stew later.
- Brown the Beef: In a large pot or Dutch oven, heat the olive oil over medium-high heat. Add the beef cubes in batches, ensuring not to overcrowd the pot. Brown the meat on all sides, about 5 minutes per batch. Remove the beef and set aside.
- Sauté the Aromatics: In the same pot, add the chopped onion and minced garlic. Sauté for about 3-4 minutes until the onion becomes translucent and fragrant.
- Deglaze the Pot: Pour in the red wine, if using, and scrape up any brown bits from the bottom of the pot. This adds depth of flavor to the stew.
- Add Liquids and Seasonings: Stir in the tomato paste, then return the beef to the pot. Add the beef broth, thyme, rosemary, and bay leaves. Bring the mixture to a simmer.
- Simmer the Stew: Reduce the heat to low, cover the pot, and let the stew simmer gently for about 1.5 to 2 hours, or until the beef is tender. Stir occasionally to prevent sticking.
- Add Vegetables: Add the carrots and potatoes to the pot. Continue to simmer for an additional 30-40 minutes, or until the vegetables are tender.
- Finish with Peas: Stir in the frozen peas and let them heat through for about 5 minutes. Adjust seasoning with salt and pepper to taste.
- Serve: Remove the bay leaves and discard. Ladle the stew into bowls and serve hot, with crusty bread or mashed potatoes on the side.
Extra Tips:
For a deeper flavor, consider making this stew a day ahead and letting it rest in the refrigerator overnight. The flavors meld beautifully, making it even tastier the next day.
If you prefer a thicker stew, mash some of the potatoes against the side of the pot before adding the peas. Additionally, if you’re short on time, a pressure cooker or slow cooker can be used to speed up the cooking process without compromising the rich taste.
Enjoy this comforting classic beef stew as a perfect antidote to chilly winter evenings.
Creamy Chicken and Wild Rice Soup

As the winter chill sets in, there’s nothing more comforting than a hearty bowl of soup to warm you up from the inside out. This Creamy Chicken and Wild Rice Soup is the perfect addition to your family dinner repertoire. Its rich, creamy texture and savory flavors make it a surefire hit with both kids and adults alike. Packed with tender chunks of chicken, wholesome wild rice, and a medley of vegetables, this soup isn’t only delicious but also nourishing, making it a wonderful choice for those cold winter evenings.
The beauty of this dish lies in its simplicity and the way it brings together the flavors of the season. With just a little prep work and some time on the stove, you can create a meal that’s as satisfying as it’s heartwarming. Whether you’re serving it as a starter or as the main course, this Creamy Chicken and Wild Rice Soup is guaranteed to become a family favorite. Gather your ingredients and get ready to enjoy a bowl of pure comfort.
Ingredients (Serves 4-6):
- 2 tablespoons butter
- 1 medium onion, chopped
- 2 cloves garlic, minced
- 3 medium carrots, diced
- 2 celery stalks, diced
- 1 cup wild rice
- 6 cups chicken broth
- 2 cups cooked chicken, shredded
- 1 teaspoon dried thyme
- 1 teaspoon salt
- 1/2 teaspoon black pepper
- 1 cup heavy cream
- 2 tablespoons all-purpose flour
- 2 tablespoons fresh parsley, chopped (optional for garnish)
Cooking Instructions:
- Sauté the Vegetables: In a large pot, melt the butter over medium heat. Add the chopped onion, garlic, carrots, and celery. Sauté for about 5 minutes, until the vegetables are soft and the onions are translucent.
- Cook the Rice: Stir in the wild rice, ensuring it’s well coated with the butter. Add the chicken broth and bring the mixture to a boil. Once boiling, reduce the heat to low, cover the pot, and let it simmer for about 40-45 minutes, or until the rice is tender.
- Add the Chicken and Seasonings: Add the shredded chicken, thyme, salt, and black pepper to the pot. Stir to combine, allowing the chicken to heat through in the simmering broth.
- Thicken the Soup: In a separate small bowl, whisk together the heavy cream and flour until smooth. Gradually pour this mixture into the soup, stirring constantly. Allow the soup to simmer for an additional 5-10 minutes until it thickens to your desired consistency.
- Serve and Garnish: Once the soup is ready, ladle it into bowls and garnish with fresh parsley if desired. Serve hot and enjoy!
Extra Tips:
For a richer flavor, consider using homemade chicken broth instead of store-bought. If you’re short on time, you can use pre-cooked rotisserie chicken to speed up the preparation process.
This soup can be stored in the refrigerator for up to 3 days, but keep in mind that it will thicken as it sits. Simply add a splash of chicken broth or water when reheating to achieve the desired consistency.
Ultimately, feel free to experiment with additional herbs and spices to tailor the soup to your family’s preferences.
Cheesy Baked Ziti

Cheesy Baked Ziti is the perfect comfort food for those chilly winter nights when you’re looking for something warm, hearty, and satisfying. This classic Italian-American dish combines ziti pasta with a rich tomato sauce, creamy ricotta, and gooey melted cheese, all baked to perfection.
It’s a family favorite that’s not only delicious but also relatively easy to prepare, making it an ideal choice for a cozy family dinner. This dish is versatile and can be adapted to suit your tastes by adding different types of cheese, meats, or vegetables.
Whether you’re serving a large family gathering or a simple weekday dinner, Cheesy Baked Ziti is sure to impress. The combination of flavors and textures is comforting and irresistible, making it a dish that everyone will love.
Ingredients (Serves 4-6):
- 1 pound ziti pasta
- 1 tablespoon olive oil
- 1 medium onion, diced
- 3 cloves garlic, minced
- 1 pound ground beef or Italian sausage
- 1 (24-ounce) jar marinara sauce
- 1 teaspoon dried oregano
- 1 teaspoon dried basil
- Salt and pepper to taste
- 1 cup ricotta cheese
- 2 cups shredded mozzarella cheese
- 1/2 cup grated Parmesan cheese
- Fresh parsley, chopped (for garnish)
Cooking Instructions:
- Preheat the Oven: Preheat your oven to 375°F (190°C). This guarantees that your dish will bake evenly.
- Cook the Pasta: Bring a large pot of salted water to a boil. Add the ziti pasta and cook until al dente, according to package instructions. Drain the pasta and set aside.
- Prepare the Sauce: In a large skillet, heat the olive oil over medium heat. Add the diced onion and minced garlic, sautéing until the onion is translucent. Add the ground beef or sausage, cooking until browned and fully cooked. Drain any excess fat.
- Combine Ingredients: Stir in the marinara sauce, oregano, basil, salt, and pepper. Let the sauce simmer for about 10 minutes to allow the flavors to meld together.
- Assemble the Dish: In a large mixing bowl, combine the cooked ziti, ricotta cheese, half of the mozzarella cheese, and the meat sauce. Mix well to verify the pasta is fully coated with the sauce and cheese.
- Layer in Baking Dish: Spread half of the pasta mixture into a 9×13 inch baking dish. Sprinkle with half of the remaining mozzarella cheese and half of the Parmesan cheese. Repeat the layers with the remaining pasta mixture and cheeses.
- Bake: Cover the baking dish with aluminum foil and bake in the preheated oven for 20 minutes. Remove the foil and bake for an additional 10-15 minutes, or until the top is bubbly and golden brown.
- Garnish and Serve: Remove from the oven and let it cool slightly. Garnish with freshly chopped parsley before serving.
Extra Tips: For an extra flavorful dish, consider adding a splash of red wine to the meat sauce while it’s simmering. You can also substitute the ground beef or sausage with ground turkey or a mix of vegetables for a lighter or vegetarian version.
If you like a bit of heat, add a pinch of red pepper flakes to the sauce. Make sure to let the baked ziti rest for a few minutes before serving to allow the layers to set and make it easier to serve. Enjoy your cozy winter meal!
Slow Cooker Pulled Pork Tacos

These tacos aren’t only delicious but also versatile. You can easily customize the toppings to suit your family’s preferences, making it a fun and interactive meal for everyone.
Serve the tacos with classic toppings like shredded cabbage, diced onions, fresh cilantro, and a squeeze of lime, or get creative with your favorite add-ons. Pair these tacos with a side of rice, beans, or a fresh salad to complete the meal and enjoy a delightful winter dinner that everyone will love.
Ingredients (Serves 4-6):
- 3-4 lbs pork shoulder (also known as pork butt)
- 1 tablespoon olive oil
- 1 tablespoon chili powder
- 1 teaspoon cumin
- 1 teaspoon paprika
- 1 teaspoon garlic powder
- 1 teaspoon onion powder
- 1 teaspoon salt
- 1/2 teaspoon black pepper
- 1/4 teaspoon cayenne pepper (optional, for heat)
- 1 cup chicken broth
- 1/2 cup orange juice
- 2 tablespoons apple cider vinegar
- 12-18 small corn tortillas
- Toppings: shredded cabbage, chopped onions, fresh cilantro, lime wedges, and sour cream (optional)
Cooking Instructions:
- Prepare the Pork: Begin by patting the pork shoulder dry with paper towels. In a small bowl, mix together the chili powder, cumin, paprika, garlic powder, onion powder, salt, black pepper, and cayenne pepper. Rub this spice mixture all over the pork shoulder, ensuring it’s well-coated.
- Sear the Meat: Heat the olive oil in a large skillet over medium-high heat. Add the pork shoulder and sear on all sides until browned, about 2-3 minutes per side. This step is important for locking in the juices and adding depth of flavor to the meat.
- Slow Cook the Pork: Transfer the seared pork to a slow cooker. Pour the chicken broth, orange juice, and apple cider vinegar over the pork. Cover and cook on low for 8-10 hours or on high for 4-6 hours, until the pork is tender and easily pulls apart with a fork.
- Shred the Pork: Once cooked, remove the pork from the slow cooker and place it on a large cutting board. Use two forks to shred the pork into bite-sized pieces, discarding any excess fat. Return the shredded pork to the slow cooker and mix it with the juices to keep it moist and flavorful.
- Warm the Tortillas: While the pork is absorbing the juices, warm the corn tortillas. This can be done by heating them in a dry skillet over medium heat for about 30 seconds on each side, or wrapping them in foil and heating them in a preheated oven at 350°F (175°C) for about 10 minutes.
- Assemble the Tacos: Serve the shredded pork on the warmed tortillas. Top each taco with your choice of shredded cabbage, chopped onions, fresh cilantro, and a squeeze of lime. Add sour cream or any additional toppings if desired.
Extra Tips: For an even deeper flavor, marinate the pork shoulder in the spice mixture overnight in the refrigerator before cooking.
If you prefer a spicier taco, feel free to increase the cayenne pepper or add sliced jalapeños as a topping. Additionally, if you’re short on time, you can skip the searing step, although it does enhance the overall flavor of the dish.
Finally, consider doubling the recipe and freezing half of the pork for a quick and easy meal on another busy winter night.
Hearty Vegetable Chili

As winter settles in and the days grow colder, few things are as comforting as a steaming bowl of hearty vegetable chili. This dish is perfect for family dinners, as it combines warmth, flavor, and nutrition all in one pot. The rich, savory base is loaded with a colorful medley of vegetables, beans, and spices, making it a satisfying meal that’s both nourishing and delicious.
Whether you’re a seasoned vegetarian or simply looking to incorporate more plant-based meals into your diet, this vegetable chili is certain to become a winter staple in your household.
The beauty of this chili lies in its versatility. Feel free to customize it with your favorite vegetables or whatever you have on hand. The recipe offers a perfect balance of spices that can be adjusted to suit your taste, whether you prefer it mild or with a bit of a kick.
Serve this hearty chili with crusty bread, over a bed of rice, or simply on its own. It’s a dish that not only warms the body but also brings the family together around the dinner table, creating cherished memories during the chilly months.
Ingredients (Serves 4-6):
- 2 tablespoons olive oil
- 1 large onion, diced
- 2 cloves garlic, minced
- 1 red bell pepper, diced
- 1 green bell pepper, diced
- 2 medium carrots, diced
- 2 stalks celery, diced
- 1 zucchini, diced
- 1 can (14 oz) diced tomatoes
- 1 can (14 oz) kidney beans, drained and rinsed
- 1 can (14 oz) black beans, drained and rinsed
- 1 cup corn kernels (fresh, frozen, or canned)
- 3 tablespoons tomato paste
- 2 teaspoons ground cumin
- 2 teaspoons chili powder
- 1 teaspoon smoked paprika
- 1/2 teaspoon cayenne pepper (optional, adjust to taste)
- Salt and pepper to taste
- 2 cups vegetable broth
- 1 tablespoon lime juice
- Fresh cilantro, chopped (optional, for garnish)
Cooking Instructions:
- Prepare the Vegetables: Begin by washing and dicing all the fresh vegetables: onion, garlic, bell peppers, carrots, celery, and zucchini. Confirm they’re roughly the same size for even cooking.
- Sauté the Aromatics: Heat the olive oil in a large pot over medium heat. Add the diced onion and garlic, sautéing for about 2-3 minutes until the onion becomes translucent and fragrant.
- Add the Vegetables: Incorporate the diced bell peppers, carrots, celery, and zucchini into the pot. Stir well and cook for another 5-7 minutes until the vegetables begin to soften.
- Spice it Up: Stir in the tomato paste, ground cumin, chili powder, smoked paprika, and cayenne pepper. Mix thoroughly to coat the vegetables with the spices, allowing them to toast slightly for enhanced flavor.
- Combine the Beans and Tomatoes: Add the diced tomatoes, kidney beans, black beans, and corn kernels to the pot. Stir to combine all the ingredients evenly.
- Simmer the Chili: Pour in the vegetable broth, stirring to guarantee everything is well mixed. Bring the chili to a gentle boil, then reduce the heat to low and let it simmer uncovered for about 30 minutes. Stir occasionally, allowing the flavors to meld together.
- Adjust the Seasoning: Taste the chili and season with salt, pepper, and lime juice. Adjust the cayenne pepper if you prefer more heat. Let it simmer for an additional 5 minutes to blend the flavors.
- Serve and Garnish: Once the chili is ready, serve it hot in bowls. Garnish with fresh cilantro if desired, and enjoy!
Extra Tips:
For a thicker chili, mash some of the beans with a fork or potato masher before adding them to the pot. This will give the chili a heartier texture.
If you prefer a more liquid consistency, add additional vegetable broth or water as needed. This chili can also be made in advance and tastes even better the next day, allowing the flavors to deepen overnight.
Store leftovers in an airtight container in the refrigerator for up to 3 days, or freeze for up to a month for a convenient future meal.
Chicken Pot Pie

When the winter chill sets in, there’s nothing quite like a homemade Chicken Pot Pie to warm you up and bring the family together around the dinner table. This classic comfort dish combines tender chunks of chicken, hearty vegetables, and a creamy, savory sauce all encased in a flaky, golden pie crust.
It’s a perfect meal for those cold evenings, offering both nourishment and a sense of nostalgia that can transport you back to cozy family dinners of the past.
Chicken Pot Pie isn’t only delicious but also versatile, allowing you to customize the filling with your family’s favorite vegetables or even incorporate leftover chicken to save time. The rich, buttery pastry complements the hearty filling, creating a balanced and satisfying dish that appeals to both kids and adults alike.
Whether you’re an experienced home cook or a beginner looking to impress, this recipe provides a straightforward approach to crafting a memorable meal.
Ingredients (Serves 4-6):
- 2 cups cooked chicken, diced
- 1 cup carrots, diced
- 1 cup peas
- 1 cup potatoes, diced
- 1/2 cup celery, diced
- 1/3 cup butter
- 1/3 cup all-purpose flour
- 1/2 teaspoon salt
- 1/4 teaspoon black pepper
- 1/4 teaspoon onion powder
- 1 3/4 cups chicken broth
- 2/3 cup milk
- 2 unbaked pie crusts (store-bought or homemade)
Instructions:
- Preheat the Oven: Set your oven to 425°F (220°C) to guarantee it’s hot and ready for baking by the time you’re done preparing the filling.
- Prepare the Filling: In a large saucepan, melt the butter over medium heat. Add the diced carrots, peas, potatoes, and celery, cooking until they start to soften, about 5 minutes.
- Thicken the Sauce: Stir the flour, salt, pepper, and onion powder into the vegetable mixture, creating a roux. Gradually whisk in the chicken broth and milk, cooking and stirring continuously until the mixture thickens and comes to a gentle boil.
- Add the Chicken: Incorporate the cooked chicken into the sauce, stirring until evenly distributed. Remove the saucepan from heat and set aside.
- Assemble the Pie: Place one of the pie crusts into a 9-inch pie pan, ensuring it covers the bottom and sides. Pour the chicken and vegetable mixture into the crust. Cover with the second pie crust, sealing the edges and cutting slits in the top to allow steam to escape.
- Bake the Pie: Place the assembled pie in the preheated oven and bake for 30 to 35 minutes, or until the crust is golden brown and the filling is bubbling.
- Cool and Serve: Once baked, remove the pie from the oven and let it cool for at least 10 minutes before serving. This resting time helps the filling set up slightly, making it easier to slice and serve.
Extra Tips:
For a richer flavor, consider adding a splash of white wine to the vegetable mixture before thickening the sauce. If you prefer a more herbaceous flavor, fresh thyme or rosemary can be added to the filling.
When making the pie crust from scratch, guarantee all ingredients are cold to achieve a flakier texture. Finally, if you’re short on time, rotisserie chicken is a great shortcut to have the dinner ready even faster without compromising on taste.
Sausage and Potato Casserole

As the winter chill sets in, there’s nothing quite as comforting as a hearty casserole to warm both the body and soul. Enter the Sausage and Potato Casserole, a dish that seamlessly combines savory sausages with earthy potatoes, all enveloped in rich, creamy sauce. This casserole not only fills the home with a mouth-watering aroma but also brings together flavors that are sure to please the whole family.
Perfect for a cozy family dinner, this dish is both satisfying and easy to prepare, making it a go-to recipe for busy winter evenings.
This casserole is a delightful medley of textures and flavors, with tender potatoes and crispy sausage pieces mingling in a creamy, cheesy sauce. The dish is versatile, allowing for the inclusion of additional vegetables or spices based on personal preference. It’s designed to serve 4-6 people, making it ideal for family gatherings or even for enjoying leftovers the next day.
Whether you’re a seasoned cook or a novice in the kitchen, this recipe is straightforward and forgiving, guaranteeing a delicious outcome every time.
Ingredients (Serves 4-6):
- 1 pound of sausages (Italian or your choice)
- 4 large potatoes, peeled and thinly sliced
- 1 medium onion, finely chopped
- 2 cloves of garlic, minced
- 2 cups of shredded cheddar cheese
- 1 cup of milk
- 1 cup of heavy cream
- 2 tablespoons of butter
- 2 tablespoons of all-purpose flour
- Salt and pepper to taste
- 1 teaspoon of dried thyme
- 1 teaspoon of smoked paprika
- Olive oil for cooking
Cooking Instructions:
- Preheat the Oven: Start by preheating your oven to 375°F (190°C). This guarantees that the casserole will bake evenly and develop a golden, bubbly top.
- Prepare the Sausages: In a large skillet, heat a drizzle of olive oil over medium heat. Add the sausages and cook until browned on all sides and cooked through, about 10 minutes. Remove from the skillet, slice them into rounds, and set aside.
- Cook the Onions and Garlic: In the same skillet, add the chopped onion and minced garlic. Sauté until the onions become translucent and fragrant, approximately 5 minutes.
- Make the Sauce: Reduce the heat to low, add the butter to the skillet, and let it melt. Stir in the flour to form a roux, cooking for about 1 minute. Gradually whisk in the milk and cream, making sure no lumps form. Continue stirring until the sauce thickens.
- Season the Sauce: Add the shredded cheddar cheese to the sauce, stirring until melted and smooth. Season with salt, pepper, thyme, and smoked paprika. Mix well to combine.
- Assemble the Casserole: In a greased casserole dish, layer half of the potato slices. Top with half of the sausage slices and half of the onion-garlic mixture. Pour over half of the cheese sauce. Repeat the layers with the remaining ingredients.
- Bake the Casserole: Cover the dish with foil and bake in the preheated oven for 45 minutes. Remove the foil and bake for an additional 15 minutes, or until the potatoes are tender and the top is golden brown.
- Let it Rest: Once baked, allow the casserole to rest for 10 minutes before serving. This helps the layers set and makes serving easier.
Extra Tips:
For an additional flavor boost, consider adding a dash of nutmeg to the cheese sauce or sprinkling some chopped fresh herbs, such as parsley or chives, over the top before serving.
If you prefer a bit of a kick, a pinch of red pepper flakes can be added to the sauce. Also, feel free to experiment by adding additional vegetables like bell peppers or spinach for a more colorful and nutritious meal.
Finally, if you don’t have heavy cream on hand, you can substitute with half-and-half for a lighter version.
Mushroom and Spinach Risotto
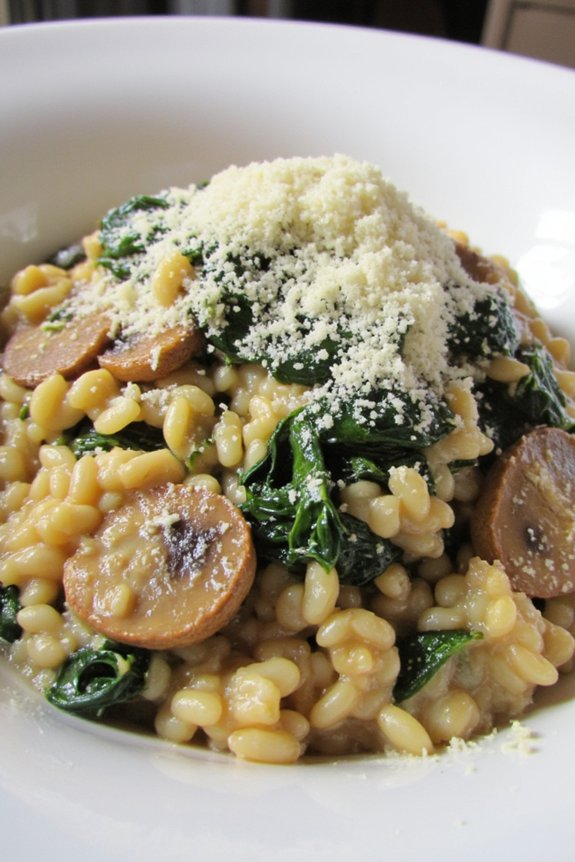
As the temperatures drop and winter’s chill sets in, there’s nothing quite like a warm, creamy bowl of risotto to comfort and nourish. This Mushroom and Spinach Risotto is a perfect family dinner recipe for the colder months. The rich, earthy flavors of mushrooms combined with the fresh, vibrant taste of spinach create a harmonious dish that isn’t only satisfying but also nutritious.
This risotto is elevated with the addition of Parmesan cheese, which adds a delicate creaminess and depth of flavor to the dish. For those evenings when you want to enjoy a comforting homemade meal with your family, this Mushroom and Spinach Risotto is an ideal choice.
The process of making risotto requires a bit of patience and care, as the rice absorbs the broth slowly, developing its signature creamy texture. This recipe serves 4-6 people, making it perfect for a family gathering or a cozy dinner with friends. Gather around the table and savor this delicious winter warmer together.
Ingredients (Serving Size: 4-6 people):
- 2 tablespoons olive oil
- 1 onion, finely chopped
- 2 cloves garlic, minced
- 250g (about 8.8 ounces) Arborio rice
- 150ml (about 5 ounces) dry white wine
- 750ml (about 25 ounces) vegetable broth, kept warm
- 250g (about 8.8 ounces) mushrooms, sliced
- 100g (about 3.5 ounces) fresh spinach
- 50g (about 1.7 ounces) grated Parmesan cheese
- Salt and pepper to taste
- 1 tablespoon butter
- Fresh parsley, chopped, for garnish (optional)
Cooking Instructions:
1. Prepare the Ingredients:
Begin by gathering and measuring all your ingredients. This guarantees a smooth cooking process. Heat the vegetable broth in a separate saucepan and keep it warm over low heat.
2. Sauté the Aromatics:
In a large pan, heat the olive oil over medium heat. Add the finely chopped onion and sauté until translucent, about 5 minutes. Stir in the minced garlic and cook for an additional 1 minute until fragrant.
3. Toast the Rice:
Add the Arborio rice to the pan with the onions and garlic. Stir continuously for about 2-3 minutes, allowing the rice to become slightly translucent at the edges.
4. Deglaze with Wine:
Pour in the white wine and stir until the wine is mostly absorbed by the rice. This step adds depth and complexity to the dish.
5. Add Broth Gradually:
Begin adding the warm vegetable broth, one ladleful at a time, stirring frequently. Allow each addition of broth to be absorbed before adding the next. This gradual process helps the rice release its starches, creating a creamy texture.
6. Cook the Vegetables:
In a separate pan, melt the butter and sauté the sliced mushrooms until they’re golden brown. Add the mushrooms to the risotto halfway through the broth addition process.
7. Incorporate Spinach:
Once the rice is al dente and creamy, stir in the fresh spinach. Cook until the spinach is wilted and evenly distributed throughout the risotto.
8. Finish with Cheese:
Remove the risotto from heat and stir in the grated Parmesan cheese. Season with salt and pepper to taste.
9. Serve:
Serve the Mushroom and Spinach Risotto immediately, garnished with freshly chopped parsley if desired.
Extra Tips:
When making risotto, patience is key. Stirring frequently helps release the rice’s starches, creating that signature creamy consistency.
Always use warm broth, as adding cold liquid can disrupt the cooking process and affect the texture. If you prefer a richer flavor, consider substituting some of the vegetable broth with chicken broth.
You can also experiment with different types of mushrooms for varied flavors and textures. Enjoy your risotto with a side of crusty bread or a light salad for a complete meal.
Beef and Broccoli Stir-Fry

When the winter chill sets in, there’s nothing more comforting than a warm, hearty meal. Beef and Broccoli Stir-Fry is a perfect family dinner recipe that brings together savory flavors and crisp vegetables in a quick and satisfying dish. This classic Asian-inspired meal combines tender strips of beef with fresh broccoli, all coated in a rich, flavorful sauce that will have your family asking for seconds.
It’s not only delicious but also nutritious, providing a good balance of protein and vegetables. This recipe is designed to serve 4-6 people, making it an ideal choice for a family dinner. It’s a quick meal to prepare on a busy weeknight, requiring minimal ingredients and cooking time.
The key to this dish is in the preparation of the ingredients and the timing of each step, making certain the beef remains tender and the broccoli maintains its vibrant color and crunch. Let’s plunge into the recipe to create a delightful winter meal that your family will love.
Ingredients (Serves 4-6):
- 1 pound beef sirloin or flank steak, thinly sliced
- 4 cups broccoli florets
- 3 tablespoons vegetable oil
- 3 cloves garlic, minced
- 1 tablespoon fresh ginger, minced
- 1/4 cup soy sauce
- 1/4 cup oyster sauce
- 2 tablespoons cornstarch
- 1/4 cup beef broth or water
- 1 tablespoon brown sugar
- 1 teaspoon sesame oil
- Salt and pepper to taste
- Cooked rice for serving
Cooking Instructions:
- Prepare the Beef: Start by slicing the beef into thin strips against the grain. This helps it cook quickly and stay tender. In a medium bowl, combine the beef strips with 1 tablespoon of soy sauce, 1 tablespoon of cornstarch, and a pinch of salt and pepper. Mix well and set aside to marinate for about 15-20 minutes.
- Prepare the Sauce: In a small bowl, mix together the remaining soy sauce, oyster sauce, beef broth, brown sugar, and 1 tablespoon of cornstarch. Stir until the cornstarch is fully dissolved and the mixture is smooth.
- Cook the Broccoli: Heat 1 tablespoon of vegetable oil in a large skillet or wok over medium-high heat. Add the broccoli florets and stir-fry for about 3-4 minutes until they’re bright green and just tender-crisp. Remove the broccoli from the pan and set aside.
- Cook the Beef: In the same skillet, add another tablespoon of vegetable oil. Once hot, add the marinated beef in a single layer. Cook for about 2-3 minutes on each side until the beef is browned and cooked through. Remove the beef from the pan and set aside with the broccoli.
- Combine and Sauce: Add the remaining tablespoon of oil to the skillet, along with the minced garlic and ginger. Stir-fry for about 30 seconds until fragrant. Return the cooked beef and broccoli to the skillet, then pour the sauce mixture over the top. Stir everything together, making certain the beef and broccoli are well-coated with the sauce.
- Finish and Serve: Allow the stir-fry to cook for another 2-3 minutes, stirring frequently, until the sauce thickens and everything is heated through. Drizzle with sesame oil before serving. Serve the Beef and Broccoli Stir-Fry over a bed of cooked rice.
Extra Tips:
For the best results, make sure your pan or wok is hot before adding the ingredients. This ensures a proper sear on the beef and helps maintain the vibrant color of the broccoli.
If you prefer a bit of heat, consider adding a dash of red pepper flakes or a splash of chili oil to the sauce. Additionally, cutting the broccoli into uniform florets ensures even cooking.
If you’re short on time, you can prep the ingredients ahead of time and store them in the fridge until you’re ready to cook. Enjoy your warm, comforting meal!
Stuffed Bell Peppers

As the temperatures drop and the days grow shorter, there’s nothing quite like gathering around the table with family for a hearty meal that warms both the body and spirit. Stuffed Bell Peppers are a classic dish that offers a colorful presentation and is packed with savory flavors. This recipe is perfect for a cozy winter evening, providing a delicious blend of textures and tastes that will please everyone at the table.
With a combination of seasoned ground meat, rice, and vegetables, these stuffed peppers aren’t only nutritious but also a satisfying comfort food that’s simple to prepare. This recipe makes enough to serve 4-6 people, making it an ideal choice for a family dinner. The bell peppers serve as natural bowls, filled to the brim with a tasty mixture that’s both filling and aesthetically pleasing.
Whether you choose to serve these as a main dish or as a hearty side, they’re sure to become a winter favorite. So, put on your apron, gather around the kitchen, and let’s plunge into the culinary delight of Winter Comfort Stuffed Bell Peppers.
Ingredients:
- 6 large bell peppers (any color of choice)
- 1 pound ground beef or turkey
- 1 cup cooked rice (white or brown)
- 1 medium onion, diced
- 2 cloves garlic, minced
- 1 can (14.5 ounces) diced tomatoes
- 1 cup shredded cheddar cheese
- 1 teaspoon dried oregano
- 1 teaspoon dried basil
- Salt and pepper to taste
- 2 tablespoons olive oil
- 1 cup chicken or vegetable broth
Cooking Instructions:
- Prepare the Bell Peppers: Preheat your oven to 375°F (190°C). Cut the tops off the bell peppers and remove the seeds and membranes. Lightly brush the outside of each pepper with olive oil and place them upright in a baking dish.
- Cook the Filling: In a large skillet over medium heat, add the remaining olive oil and sauté the diced onion and minced garlic until fragrant and translucent, about 3-4 minutes. Add the ground beef or turkey to the skillet, breaking it apart with a spatula, and cook until browned. Drain any excess fat.
- Combine Ingredients: Stir in the cooked rice, diced tomatoes (with their juice), dried oregano, dried basil, salt, and pepper. Allow the mixture to simmer for 5 minutes to blend the flavors.
- Stuff the Peppers: Spoon the meat and rice mixture evenly into each of the prepared peppers. Pour the chicken or vegetable broth into the bottom of the baking dish, around the peppers, to help steam them while cooking.
- Bake: Cover the baking dish with aluminum foil and place it in the preheated oven. Bake for 30 minutes. Remove the foil and sprinkle shredded cheddar cheese over the top of each pepper. Return to the oven and bake for an additional 10-15 minutes, or until the cheese is melted and bubbly.
- Serve: Allow the peppers to cool slightly before serving. Use a large spoon to carefully transfer each stuffed pepper to a plate. Enjoy your Winter Comfort Stuffed Bell Peppers with a side salad or crusty bread.
Extra Tips:
For an added layer of flavor, you can incorporate a splash of Worcestershire sauce or soy sauce into the filling mixture. If you’re looking to make this dish vegetarian, swap the meat for a plant-based alternative or additional veggies such as mushrooms or zucchini.
Leftovers can be stored in an airtight container in the refrigerator for up to three days, and they reheat beautifully in the microwave or oven. Adjust the seasoning to your family’s preference, and feel free to experiment with different cheese varieties for a unique twist!
Lemon Herb Roasted Chicken
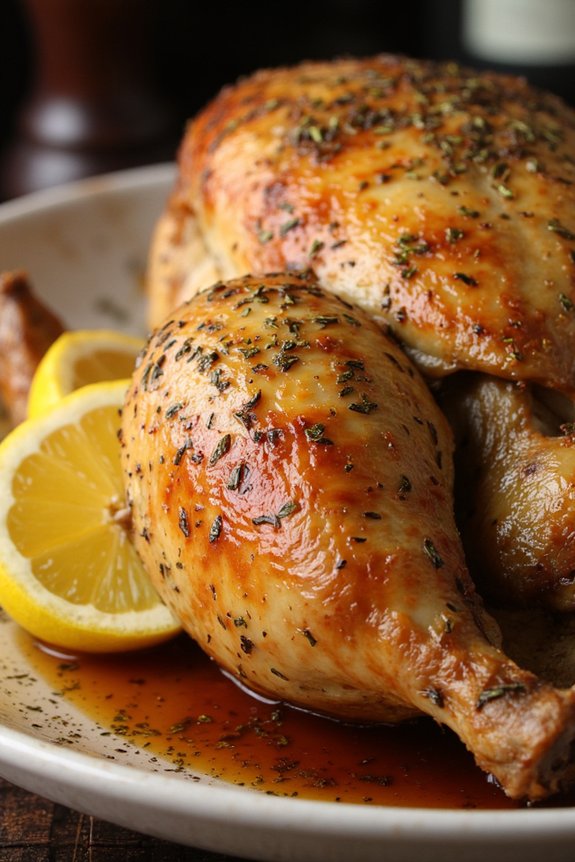
As the winter chill sets in, there’s nothing quite as comforting as a warm, savory meal shared with loved ones. Lemon Herb Roasted Chicken is a perfect centerpiece for a cozy family dinner during the colder months. This dish combines the fresh, zesty flavor of lemon with the aromatic goodness of herbs, resulting in a succulent chicken that’s both juicy and flavorful. The citrusy notes brighten up the dish, while the herbs provide a depth of flavor that complements the natural richness of the chicken.
Not only is this Lemon Herb Roasted Chicken delicious, but it’s also relatively simple to prepare, making it an ideal recipe for a family meal. Whether you’re hosting a special occasion or simply gathering around the table for a weeknight dinner, this recipe is sure to impress. The following ingredients will provide enough for 4-6 people, guaranteeing everyone gets a generous helping of this delectable dish.
Ingredients (serving size: 4-6 people):
- 1 whole chicken (4-5 pounds)
- 2 lemons
- 1/4 cup olive oil
- 3 cloves garlic, minced
- 2 teaspoons salt
- 1 teaspoon black pepper
- 2 teaspoons dried thyme
- 1 teaspoon dried rosemary
- 1 teaspoon dried oregano
- 1 tablespoon fresh parsley, chopped
- 1/2 cup chicken broth
- 2 tablespoons butter, melted
Cooking Instructions:
- Preheat the Oven: Start by preheating your oven to 425°F (220°C). This temperature will help guarantee that the chicken skin turns out crispy while the inside remains juicy.
- Prepare the Chicken: Remove any giblets from the chicken cavity and pat the chicken dry with paper towels. Drying the skin helps it become crispier during roasting.
- Make the Herb Mixture: In a small bowl, mix together the olive oil, minced garlic, salt, black pepper, dried thyme, rosemary, and oregano. This will form a fragrant herb paste.
- Season the Chicken: Rub the herb mixture all over the chicken, making sure to cover both the outside and under the skin. This guarantees the chicken is flavorful throughout.
- Add Lemon and Broth: Slice one lemon and place the slices inside the chicken cavity. Squeeze the juice of the second lemon over the chicken for extra zest. Pour the chicken broth into the roasting pan to keep the chicken moist during cooking.
- Roast the Chicken: Place the chicken in a roasting pan, breast side up. Roast in the preheated oven for about 1 1/2 hours, or until the internal temperature reaches 165°F (75°C) when measured at the thickest part of the thigh.
- Baste and Finish: Halfway through roasting, baste the chicken with the juices from the pan. In the last 10 minutes, brush the chicken with melted butter to enhance the golden color and flavor.
- Rest the Chicken: Once fully cooked, remove the chicken from the oven and let it rest for about 10-15 minutes before carving. This allows the juices to redistribute, making the chicken tender and juicy.
Extra Tips:
For an even more flavorful chicken, you can marinate it in the herb mixture for up to 24 hours before roasting. If you prefer a more intense lemon flavor, add additional lemon slices around the chicken in the roasting pan.
Additionally, using a meat thermometer guarantees that the chicken is cooked to perfection without drying it out. If you find the skin browning too quickly, tent the chicken loosely with aluminum foil.
Finally, serve with roasted vegetables or a side salad for a complete meal that highlights the freshness of the herbs and the warmth of the roasted chicken.
Pasta Primavera
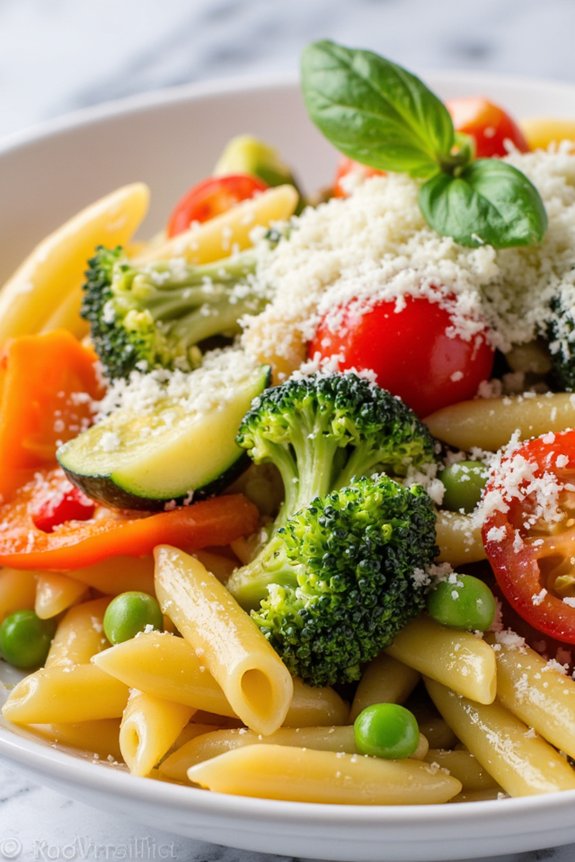
Pasta Primavera is an ideal winter dish that brings a burst of color and flavor to your family dinner table. Known for its vibrant vegetables and light, creamy sauce, this dish is more than just a feast for the eyes; it’s a comforting and satisfying meal perfect for the colder months.
With a mix of seasonal vegetables, this recipe not only tastes delicious but provides essential nutrients to help keep your immune system strong during winter.
This recipe serves 4-6 people and is perfect for a cozy family dinner. The combination of seasonal vegetables such as broccoli, bell peppers, and carrots, paired with al dente pasta and a light sauce, makes for a wholesome and nourishing meal. The richness of Parmesan cheese and the brightness of fresh herbs add depth and complexity to the dish, making it a family favorite that you’ll want to cook again and again.
Ingredients:
- 12 oz (340 g) penne pasta
- 2 tablespoons olive oil
- 1 small onion, thinly sliced
- 2 cloves garlic, minced
- 1 small broccoli head, cut into florets
- 1 red bell pepper, thinly sliced
- 2 carrots, julienned
- 1 zucchini, sliced
- 1 cup cherry tomatoes, halved
- 1 cup frozen peas
- 1 teaspoon dried Italian herbs
- Salt and pepper, to taste
- 1 cup heavy cream
- 1 cup grated Parmesan cheese
- Fresh basil or parsley, for garnish
Cooking Instructions:
- Cook the Pasta: Begin by cooking the penne pasta in a large pot of salted boiling water until al dente, according to package instructions. Drain and set aside.
- Sauté the Vegetables: In a large skillet over medium heat, add olive oil. Once hot, add the sliced onion and garlic, sautéing for 2-3 minutes until the onion becomes translucent.
- Add the Vegetables: Add the broccoli florets, red bell pepper, carrots, zucchini, and cherry tomatoes to the skillet. Cook for about 5-7 minutes until the vegetables start to soften. Stir in the frozen peas and dried Italian herbs, cooking for another 2 minutes. Season with salt and pepper to taste.
- Prepare the Sauce: Pour the heavy cream into the skillet with the vegetables and mix well. Allow the cream to come to a gentle simmer, stirring occasionally. Let it cook for about 3 minutes until it slightly thickens.
- Combine Pasta and Sauce: Add the cooked pasta to the skillet, tossing everything together until the pasta is well coated in the creamy sauce. Stir in the grated Parmesan cheese, continuing to mix until the cheese is melted and the sauce is smooth.
- Garnish and Serve: Remove from heat and garnish with freshly chopped basil or parsley. Serve immediately for the best flavor and texture.
Extra Tips:
To enhance the flavor of this Pasta Primavera, consider roasting the vegetables beforehand to add a smoky depth to the dish.
You can also substitute different seasonal vegetables or add protein such as grilled chicken or shrimp for variation. Be sure to taste and adjust the seasoning as needed, and serve with extra Parmesan cheese on the side for those who like a bit more indulgence.
Additionally, if you prefer a lighter version, you can replace heavy cream with half-and-half or use a non-dairy alternative.
Shepherd’s Pie

Shepherd’s Pie is a classic comfort food, perfect for warming up on a cold winter’s evening. Traditionally hailing from the British Isles, this dish combines a savory meat filling with a creamy mashed potato topping. The base layer is made with ground lamb—hence the name “shepherd’s” pie—though many variations use beef or turkey. The meat is cooked with onions, carrots, peas, and corn in a rich gravy, then topped with fluffy mashed potatoes and baked until golden brown and bubbling.
The beauty of Shepherd’s Pie lies in its hearty, wholesome ingredients, making it an ideal family dinner. It’s a dish that not only satisfies your taste buds but also nourishes your soul. The combination of textures and flavors—from the savory meat filling to the buttery mashed potatoes—make it a crowd-pleaser for all ages.
Whether you’re serving it for a Sunday dinner or a cozy midweek meal, Shepherd’s Pie is sure to become a staple in your winter recipe rotation.
Ingredients (Serves 4-6):
- 1 tablespoon olive oil
- 1 onion, finely chopped
- 2 cloves garlic, minced
- 1 pound ground lamb (or beef/turkey)
- 2 carrots, diced
- 1 cup peas (fresh or frozen)
- 1 cup corn kernels (fresh or frozen)
- 2 tablespoons all-purpose flour
- 1 cup beef stock
- 2 tablespoons tomato paste
- 1 teaspoon Worcestershire sauce
- Salt and pepper to taste
- 4 cups mashed potatoes
- 2 tablespoons butter
- 1/4 cup milk
- 1/2 cup shredded cheddar cheese (optional)
- Fresh parsley, chopped (for garnish)
Cooking Instructions:
- Preheat the Oven: Begin by preheating your oven to 400°F (200°C).
- Cook the Vegetables and Meat: In a large skillet, heat the olive oil over medium heat. Add the chopped onion and garlic, and sauté until the onion is translucent. Add the ground lamb (or beef/turkey) and cook until browned, breaking it up with a spoon as it cooks.
- Add Vegetables: Stir in the diced carrots, peas, and corn to the meat mixture. Cook for an additional 5 minutes, allowing the vegetables to soften slightly.
- Make the Gravy: Sprinkle the flour over the meat and vegetable mixture, stirring well to coat. Gradually add the beef stock, stirring constantly to avoid lumps. Mix in the tomato paste and Worcestershire sauce. Allow the mixture to simmer for 10 minutes, or until the sauce has thickened. Season with salt and pepper to taste.
- Prepare the Mashed Potatoes: In a separate pot, heat the mashed potatoes, adding butter and milk to achieve a creamy consistency. If desired, mix in the shredded cheddar cheese for extra flavor.
- Assemble the Pie: Transfer the meat mixture into a baking dish, spreading it evenly. Gently spoon the mashed potatoes over the meat, smoothing the top with a spatula. Use a fork to create texture on the surface, which will enhance browning.
- Bake: Place the baking dish in the preheated oven and bake for 25-30 minutes, or until the mashed potatoes are golden brown and the filling is bubbling.
- Garnish and Serve: Remove the Shepherd’s Pie from the oven and let it cool for a few minutes. Garnish with freshly chopped parsley before serving.
Extra Tips:
For the best results, make sure the mashed potatoes are well-seasoned before topping the pie. You can make the mashed potatoes ahead of time, or use leftovers for convenience.
If you prefer a crispier potato topping, brush a little melted butter over the surface before baking. Feel free to customize the filling by adding other vegetables like mushrooms or bell peppers.
This dish can also be prepared in advance and refrigerated, then baked just before serving, making it a perfect make-ahead meal for busy winter evenings.