

I am thrilled to share with you a collection of chicken breast recipes that have become beloved staples in my home. From creamy Garlic Parmesan Chicken to zesty Lemon Herb Grilled Chicken, each dish is sure to make dinner a special occasion. Every recipe brings something unique to the table, and I’ve included a few personal tips to enhance them further. Could one of these become your family’s new favorite meal? Let’s find out together!
Creamy Garlic Parmesan Chicken

Creamy Garlic Parmesan Chicken is a delightful and comforting dish that’s perfect for a family dinner. This recipe combines tender chicken breast with a rich, creamy sauce made from garlic and Parmesan cheese. The creamy sauce envelops the chicken, creating a dish that’s both satisfying and flavorful. The combination of garlic and Parmesan adds depth to the taste, making it irresistible and sure to become a family favorite.
The dish is perfect for a serving size of 4-6 people, making it ideal for gatherings or a cozy family meal. The recipe is straightforward and doesn’t require any complex cooking skills, making it perfect even for beginner cooks. The creamy garlic Parmesan sauce pairs beautifully with pasta or mashed potatoes, making it a versatile main course. With just a few ingredients and a bit of time, you can have a delicious, restaurant-quality meal on your table.
Ingredients (for 4-6 people):
- 4 boneless, skinless chicken breasts
- Salt and pepper to taste
- 2 tablespoons olive oil
- 4 cloves garlic, minced
- 1 cup chicken broth
- 1 cup heavy cream
- 1 cup grated Parmesan cheese
- 1 teaspoon Italian seasoning
- 2 tablespoons chopped fresh parsley
Cooking Instructions:
- Prepare the Chicken: Season the chicken breasts with salt and pepper on both sides. In a large skillet, heat the olive oil over medium-high heat. Add the chicken breasts and cook them for about 6-7 minutes on each side until they’re golden brown and cooked through. Remove the chicken from the skillet and set aside.
- Make the Garlic Sauce: In the same skillet, add the minced garlic and sauté for about 1 minute until fragrant. Be careful not to burn the garlic.
- Create the Creamy Sauce: Add the chicken broth to the skillet, scraping up any browned bits from the bottom of the pan. Stir in the heavy cream, Parmesan cheese, and Italian seasoning. Stir constantly until the cheese has melted and the sauce is smooth and creamy.
- Combine with Chicken: Return the cooked chicken breasts to the skillet, turning them to coat in the creamy sauce. Reduce the heat to low and let the chicken simmer in the sauce for about 5 minutes, allowing the flavors to meld together.
- Garnish and Serve: Sprinkle the chopped fresh parsley over the chicken and sauce. Serve immediately with your choice of pasta or mashed potatoes, ensuring each serving gets plenty of the creamy garlic Parmesan sauce.
Extra Tips:
For the best results, use freshly grated Parmesan cheese, as pre-grated varieties may not melt as smoothly into the sauce. If you prefer a thicker sauce, let it simmer a little longer to reduce.
Alternatively, for a lighter version, you can substitute half of the heavy cream with half-and-half. Make sure to adjust salt and pepper according to your taste preferences. Adding a splash of white wine before the chicken broth can add an extra depth of flavor to the sauce.
Honey Mustard Glazed Chicken
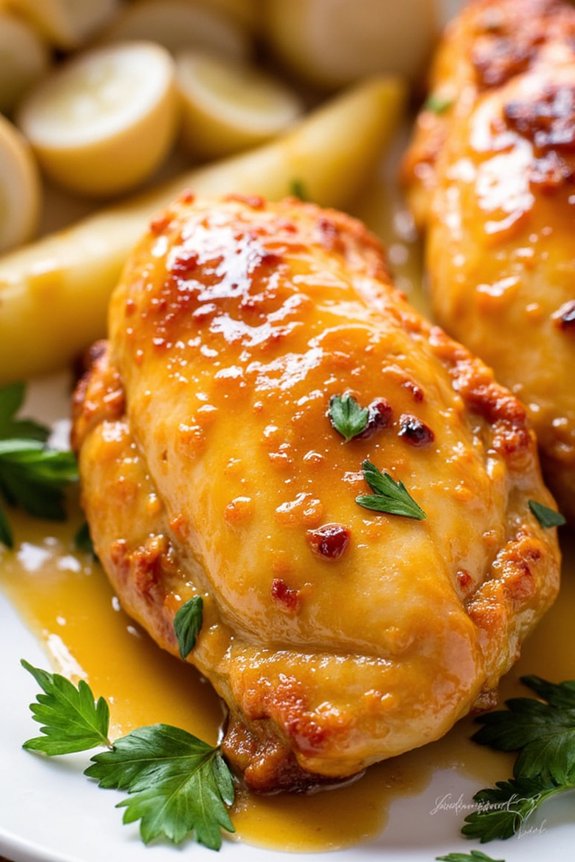
Honey Mustard Glazed Chicken is a delightful dish that combines the savory flavor of chicken breast with the sweet and tangy notes of honey and mustard. This dish is perfect for a family dinner, offering a delicious combination of tastes that will satisfy both adults and children alike.
The glaze creates a luscious coating that keeps the chicken moist and flavorful, making it a standout on your dinner table. With its vibrant golden hue and aromatic appeal, Honey Mustard Glazed Chicken is sure to become a family favorite.
The recipe is straightforward, requiring only a handful of ingredients and minimal preparation time. The key to achieving the perfect balance of flavors lies in the glaze, which blends honey, mustard, and a hint of garlic for depth.
Whether served with a side of roasted vegetables or atop a bed of fluffy rice, this dish provides a wholesome and satisfying meal that can be enjoyed by families of all sizes. Here’s how you can prepare this delightful dish for 4-6 people.
Ingredients:
- 4-6 boneless, skinless chicken breasts
- 1/3 cup honey
- 1/3 cup Dijon mustard
- 2 tablespoons olive oil
- 2 teaspoons garlic powder
- Salt and pepper to taste
- 2 tablespoons fresh lemon juice
- Fresh parsley for garnish (optional)
Cooking Instructions:
- Preheat the Oven: Start by preheating your oven to 375°F (190°C). This guarantees that the chicken cooks evenly and the glaze caramelizes perfectly.
- Prepare the Glaze: In a medium bowl, whisk together the honey, Dijon mustard, olive oil, garlic powder, lemon juice, and a pinch of salt and pepper. Mix until well combined, creating a smooth and aromatic glaze.
- Season the Chicken: Place the chicken breasts on a baking sheet lined with parchment paper or lightly greased. Season each piece with a little salt and pepper to enhance the natural flavors of the chicken.
- Apply the Glaze: Using a brush or spoon, generously coat each chicken breast with the honey mustard glaze. Make sure to cover both sides for maximum flavor.
- Bake the Chicken: Transfer the baking sheet to the preheated oven and bake for 25-30 minutes. Halfway through cooking, flip the chicken breasts and reapply the glaze to guarantee they remain moist and flavorful.
- Check for Doneness: The chicken is ready when it reaches an internal temperature of 165°F (74°C) and the glaze has caramelized to a golden brown. Remove from the oven and let it rest for a few minutes to retain the juices.
- Garnish and Serve: Before serving, sprinkle fresh parsley over the chicken for a pop of color and additional flavor. Serve hot with your choice of sides.
Extra Tips:
For best results, allow the chicken to marinate in the glaze for at least 30 minutes before baking. This allows the flavors to penetrate the meat, making it juicier and more flavorful.
If you prefer a spicier kick, consider adding a teaspoon of crushed red pepper flakes to the glaze. Additionally, using chicken thighs instead of breasts can add extra richness and juiciness to the dish. Remember to adjust the cooking time accordingly if using different cuts of chicken.
Lemon Herb Grilled Chicken
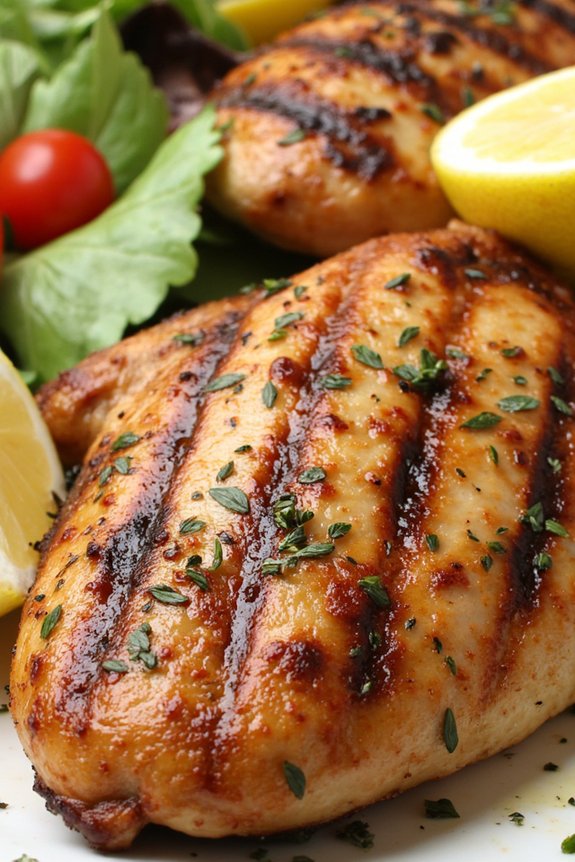
Lemon Herb Grilled Chicken is a delightful family dinner recipe that brings together the zesty flavors of lemon, the aromatic touch of fresh herbs, and the satisfying taste of perfectly grilled chicken breast. This dish is a great way to enjoy a healthy, protein-packed meal that’s both light and flavorful.
The combination of lemon juice and herbs creates a marinade that not only infuses the chicken with flavor but also helps to keep it tender and juicy while it grills. Perfect for a family meal, this recipe serves 4-6 people and is ideal for those warm summer evenings when you want something simple yet delicious.
Pair it with a fresh salad or some grilled vegetables to make a complete and balanced meal. The following recipe outlines the ingredients you’ll need and provides step-by-step instructions to guarantee your Lemon Herb Grilled Chicken comes out perfectly every time.
Ingredients (serves 4-6):
- 4 boneless, skinless chicken breasts
- 1/4 cup olive oil
- 1/4 cup fresh lemon juice
- Zest of 1 lemon
- 3 cloves garlic, minced
- 1 tablespoon fresh thyme leaves
- 1 tablespoon fresh rosemary, chopped
- 1 teaspoon salt
- 1/2 teaspoon black pepper
- Lemon wedges for serving (optional)
Cooking Instructions:
- Prepare the Marinade: In a medium-sized bowl, whisk together the olive oil, lemon juice, lemon zest, minced garlic, thyme leaves, chopped rosemary, salt, and black pepper. This will create a flavorful marinade for the chicken.
- Marinate the Chicken: Place the chicken breasts in a shallow dish or a resealable plastic bag. Pour the marinade over the chicken, guaranteeing each piece is well coated. Seal the bag or cover the dish with plastic wrap and refrigerate for at least 30 minutes, or up to 2 hours for more intense flavor.
- Preheat the Grill: Preheat your grill to medium-high heat. If using a charcoal grill, prepare the coals until they’re covered with white ash.
- Grill the Chicken: Remove the chicken from the marinade, letting any excess drip off. Place the chicken breasts on the grill and cook for about 6-8 minutes on each side, or until the internal temperature reaches 165°F (75°C) and the chicken is no longer pink in the center.
- Rest the Chicken: Once cooked, transfer the chicken to a cutting board and let it rest for 5 minutes. This allows the juices to redistribute, guaranteeing the chicken remains juicy.
- Serve: Slice the grilled chicken and serve with lemon wedges on the side for an extra burst of citrus. Enjoy your Lemon Herb Grilled Chicken with your choice of side dishes.
Extra Tips:
To guarantee your chicken breasts remain juicy and flavorful, avoid overcooking them on the grill. Use a meat thermometer to check for doneness, aiming for an internal temperature of 165°F (75°C).
Additionally, if you prefer a deeper herb flavor, you can add more fresh herbs to the marinade or sprinkle some over the chicken just before serving. For added convenience, this recipe can be prepared in advance by marinating the chicken the night before and storing it in the refrigerator until you’re ready to grill.
Chicken Alfredo Pasta
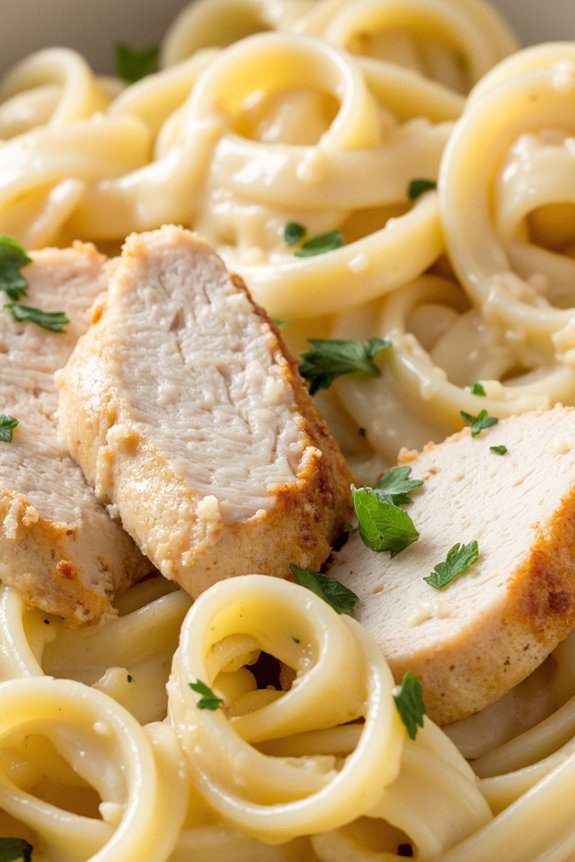
Chicken Alfredo Pasta is a classic and comforting dish that brings together the rich creaminess of Alfredo sauce with the succulent texture of chicken breast. This family-friendly recipe is perfect for a cozy dinner, bringing a touch of Italian flair to your table.
The combination of tender pasta, juicy chicken, and a velvety sauce makes it an irresistible choice for any evening. With its simple preparation and delightful flavors, this dish is sure to become a favorite among your family members.
In this recipe, chicken breast is sliced and cooked until perfectly tender, then combined with pasta and a homemade Alfredo sauce made from scratch. The addition of Parmesan cheese and garlic infuses the dish with a savory depth of flavor, while the creaminess of the sauce provides a satisfying richness.
This recipe serves 4-6 people, making it ideal for a family gathering or a dinner party with friends. Let’s explore the ingredients and steps needed to create this delicious Chicken Alfredo Pasta at home.
Ingredients:
- 4 boneless, skinless chicken breasts
- 12 ounces fettuccine or your choice of pasta
- 2 tablespoons olive oil
- 4 cloves garlic, minced
- 1 cup heavy cream
- 1 cup whole milk
- 1 cup grated Parmesan cheese
- Salt and pepper to taste
- 2 tablespoons unsalted butter
- Fresh parsley, chopped (for garnish)
Instructions:
- Prepare the Chicken: Start by seasoning the chicken breasts with salt and pepper on both sides. Heat the olive oil in a large skillet over medium-high heat. Add the chicken breasts and cook for 6-7 minutes on each side, or until they’re golden brown and cooked through. Remove the chicken from the skillet and set aside to rest.
- Cook the Pasta: While the chicken is cooking, bring a large pot of salted water to a boil. Add the pasta and cook according to package instructions until al dente. Drain and set aside.
- Make the Alfredo Sauce: In the same skillet used for the chicken, melt the butter over medium heat. Add the minced garlic and sauté for about 1 minute until fragrant. Pour in the heavy cream and milk, stirring to combine. Bring the mixture to a gentle simmer.
- Add Cheese and Thicken: Gradually add the grated Parmesan cheese to the sauce, stirring continuously until the cheese is melted and the sauce thickens. Season with salt and pepper to taste.
- Combine Ingredients: Slice the cooked chicken into strips. Add the drained pasta and sliced chicken to the sauce, tossing everything together until the pasta and chicken are fully coated with the sauce.
- Serve: Divide the Chicken Alfredo Pasta among serving plates. Garnish with freshly chopped parsley for a touch of color and additional flavor.
Extra Tips:
- Make sure not to overcook the chicken; it should be juicy and tender to complement the creamy sauce. Use a meat thermometer to verify it reaches an internal temperature of 165°F.
- For a lighter version, you can substitute half-and-half for the heavy cream, but keep in mind this might affect the sauce’s thickness.
- If you prefer a thicker sauce, let it simmer a bit longer after adding the cheese, or consider adding a tablespoon of flour while sautéing the garlic.
- Feel free to add vegetables like broccoli or spinach to the pasta for extra nutrition and color.
Stuffed Spinach and Cheese Chicken
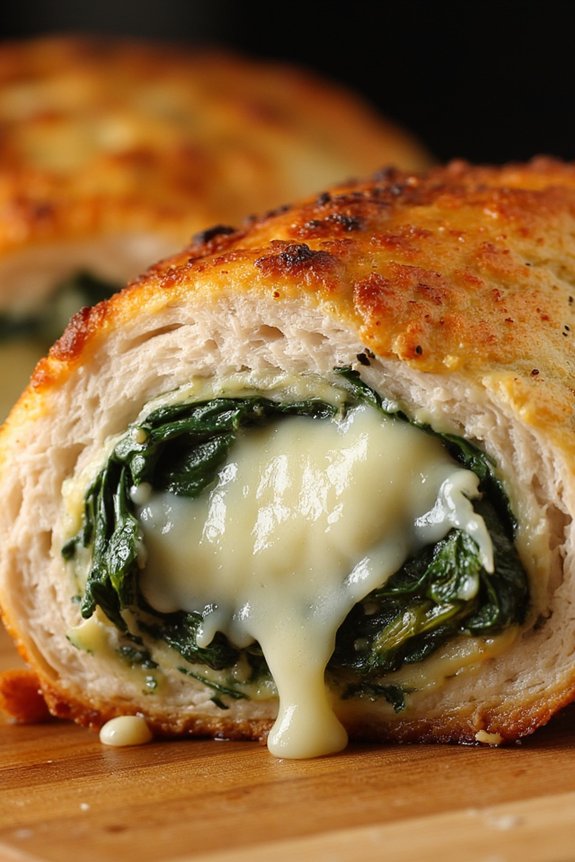
Stuffed Spinach and Cheese Chicken is a delightful dish that combines succulent chicken breast with a rich and creamy filling of spinach and cheese. This recipe is perfect for a family dinner, providing a gourmet experience with minimal effort. The combination of the juicy chicken and the flavorful stuffing makes it a favorite for both adults and kids. Plus, it’s a great way to incorporate some greens into your meal!
This dish not only looks impressive but is also a great source of protein and nutrients. The preparation is straightforward, and the result is a delicious, satisfying meal that will leave everyone asking for seconds. Whether you’re a seasoned cook or a beginner in the kitchen, this recipe is easy to follow and guarantees a mouthwatering result every time.
Ingredients for 4-6 servings:
- 4 large chicken breasts
- 2 cups fresh spinach, chopped
- 1 cup mozzarella cheese, shredded
- 1/2 cup cream cheese, softened
- 1/4 cup grated Parmesan cheese
- 2 cloves garlic, minced
- 1 tablespoon olive oil
- 1 teaspoon Italian seasoning
- 1 teaspoon salt
- 1/2 teaspoon black pepper
- Toothpicks or kitchen twine
Cooking Instructions:
- Preheat the Oven: Start by preheating your oven to 375°F (190°C). This will make sure that it’s ready to bake the chicken once everything is assembled.
- Prepare the Filling: In a mixing bowl, combine the chopped spinach, mozzarella cheese, cream cheese, Parmesan cheese, and minced garlic. Mix until all ingredients are well incorporated.
- Prepare the Chicken: Take each chicken breast and cut a pocket into the side, being careful not to cut all the way through. This will create space for the stuffing.
- Stuff the Chicken: Fill each pocket with the spinach and cheese mixture. Use toothpicks or kitchen twine to secure the edges, making sure the filling doesn’t spill out during cooking.
- Season the Chicken: Rub the chicken breasts with olive oil, then sprinkle with Italian seasoning, salt, and black pepper, making sure they’re evenly coated.
- Bake the Chicken: Place the stuffed chicken breasts in a baking dish and cover with foil. Bake in the preheated oven for 25-30 minutes, or until the chicken is cooked through and no longer pink inside.
- Finish and Serve: Remove the foil and bake for an additional 5-10 minutes to allow the tops to brown slightly. Once done, remove from the oven and let rest for a few minutes before serving.
Extra Tips:
To make sure the chicken is cooked perfectly, use a meat thermometer to check that the internal temperature reaches 165°F (74°C). For added flavor, consider adding sun-dried tomatoes or sautéed mushrooms to the stuffing.
If you’re looking for a crispy top, sprinkle some extra Parmesan cheese on top of the chicken during the last few minutes of baking. This dish pairs wonderfully with a side of roasted vegetables or a fresh garden salad.
BBQ Chicken Sliders
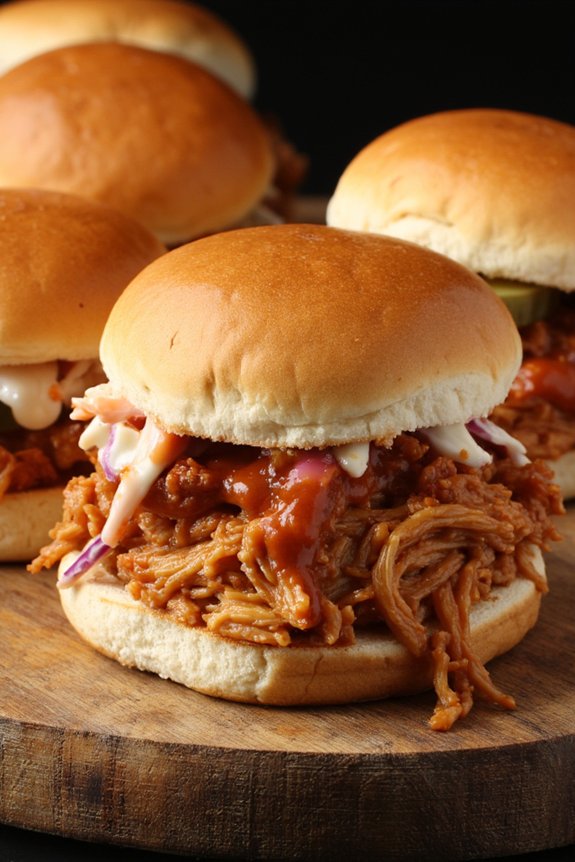
BBQ Chicken Sliders are a delightful addition to any family dinner, combining the smoky sweetness of barbecue sauce with tender, juicy chicken breast served on soft slider buns. These sliders are perfect for both casual gatherings and special occasions, offering a burst of flavor in every bite. The combination of slow-cooked chicken and tangy BBQ sauce creates a mouthwatering dish that’s easy to prepare and sure to please everyone at the table.
What makes these sliders stand out is their simplicity and versatility. You can prep the chicken ahead of time, making this dish ideal for busy weeknights or when you’re hosting a gathering. They’re also customizable, allowing you to add your favorite toppings, such as coleslaw, pickles, or cheese, to suit your taste preferences.
Whether served as a main course or as a delicious appetizer, these BBQ Chicken Sliders are bound to become a family favorite.
Ingredients for 4-6 servings:
- 2 pounds boneless, skinless chicken breasts
- 1 cup barbecue sauce
- 1 tablespoon olive oil
- 1 teaspoon garlic powder
- 1 teaspoon onion powder
- 1/2 teaspoon paprika
- Salt and pepper to taste
- 12 slider buns
- Optional toppings: coleslaw, pickles, sliced cheese
Cooking Instructions:
- Prepare the Chicken: Start by preheating your oven to 375°F (190°C). Rinse the chicken breasts under cold water and pat them dry with paper towels. Season both sides of the chicken with garlic powder, onion powder, paprika, salt, and pepper.
- Cook the Chicken: Heat the olive oil in a large oven-safe skillet over medium-high heat. Once the oil is hot, add the chicken breasts and sear them for about 2-3 minutes on each side, until they’re golden brown.
- Bake the Chicken: Pour 1/2 cup of barbecue sauce over the chicken breasts, ensuring they’re well coated. Cover the skillet with a lid or aluminum foil and transfer it to the preheated oven. Bake for 25-30 minutes, or until the chicken is cooked through and reaches an internal temperature of 165°F (74°C).
- Shred the Chicken: Remove the chicken from the oven and let it cool for a few minutes. Using two forks, shred the chicken into bite-sized pieces. Mix in the remaining 1/2 cup of barbecue sauce, making sure the chicken is evenly coated.
- Assemble the Sliders: Slice the slider buns in half and toast them lightly if desired. Place a generous amount of the shredded BBQ chicken on the bottom half of each bun. Add any optional toppings like coleslaw, pickles, or cheese, then place the top bun over the chicken.
- Serve and Enjoy: Arrange the sliders on a serving platter and serve while warm. Enjoy these delicious BBQ Chicken Sliders with a side of chips or a fresh salad.
Extra Tips:
For the best flavor, consider marinating the chicken breasts in the barbecue sauce mixture for a few hours or overnight before cooking. This will allow the flavors to penetrate deeper into the meat.
If you prefer a spicier kick, add a dash of hot sauce or a pinch of cayenne pepper to the barbecue sauce. For a fun twist, try using different types of barbecue sauces, such as honey BBQ or smoky chipotle, to diversify the flavor profile of your sliders.
Crispy Oven-Baked Chicken Tenders

Crispy Oven-Baked Chicken Tenders are a delightful family dinner option that combines the juicy tenderness of chicken breast with a satisfyingly crispy coating. This dish is perfect for busy weeknights, as it requires minimal preparation and delivers maximum flavor. By baking instead of frying, these chicken tenders are a healthier alternative to traditional fried chicken, while still offering that irresistible crunch that everyone loves.
The secret to achieving the perfect crispiness lies in the combination of panko breadcrumbs and a few simple seasonings, which coat the chicken tenders and bake to a golden perfection. Served with your choice of dipping sauces, such as ranch, honey mustard, or spicy ketchup, these chicken tenders are sure to be a hit with both children and adults alike. Ideal for a serving size of 4-6 people, this recipe is easy to adjust for larger gatherings or family meals.
Ingredients:
- 1.5 pounds of chicken breast, cut into tenders
- 1 cup all-purpose flour
- 2 large eggs
- 1 tablespoon milk
- 2 cups panko breadcrumbs
- 1 teaspoon garlic powder
- 1 teaspoon onion powder
- 1 teaspoon paprika
- 1/2 teaspoon salt
- 1/2 teaspoon black pepper
- Cooking spray
Cooking Instructions:
- Preheat the Oven: Start by preheating your oven to 400°F (200°C). Line a baking sheet with parchment paper or aluminum foil for easy cleanup, and lightly spray with cooking spray to prevent sticking.
- Prepare the Coating Stations: Set up three shallow dishes or bowls. In the first dish, place the all-purpose flour. In the second dish, whisk together the eggs and milk until well combined. In the third dish, combine the panko breadcrumbs with garlic powder, onion powder, paprika, salt, and black pepper.
- Coat the Chicken Tenders: Take each chicken tender and dredge it first in the flour, making sure it’s fully coated. Shake off any excess flour and then dip it into the egg mixture, coating it evenly. Finally, press the chicken tender into the breadcrumb mixture, ensuring a thorough coating on all sides.
- Arrange and Bake: Place the coated chicken tenders onto the prepared baking sheet, leaving space between each tender to guarantee even cooking. Lightly spray the tops of the chicken tenders with cooking spray to help them crisp up in the oven.
- Bake to Perfection: Bake the chicken tenders in the preheated oven for 20-25 minutes, or until they’re golden brown and cooked through. The internal temperature should reach 165°F (74°C). For extra crispiness, you can turn on the broiler for the final 2-3 minutes of cooking, keeping a close eye to prevent burning.
- Serve and Enjoy: Remove from the oven and let the chicken tenders cool for a few minutes before serving. Pair them with your favorite dipping sauces for a complete meal.
Extra Tips:
For the best results, use fresh chicken breast tenders or slice your own from whole chicken breasts for consistent sizes. If you prefer a spicier kick, consider adding a pinch of cayenne pepper to the breadcrumb mixture.
For added flavor, you can also marinate the chicken tenders in buttermilk for a few hours before coating them. This not only adds flavor but also tenderizes the meat. Finally, if you’re cooking for a larger crowd, you can easily double the ingredients and bake on multiple trays.
Chicken Marsala
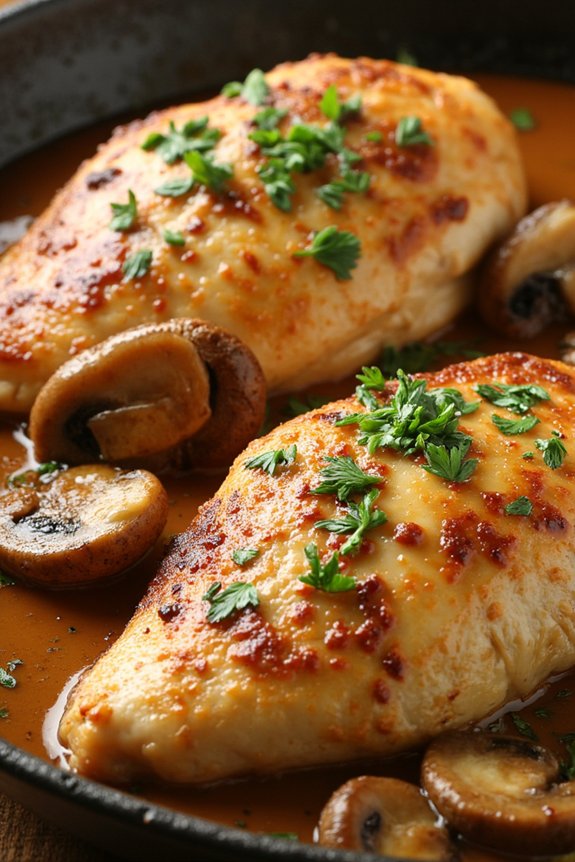
Chicken Marsala is a classic Italian-American dish that combines the rich flavors of Marsala wine with tender chicken breast, resulting in a savory and slightly sweet sauce. This dish is perfect for a family dinner, offering a sophisticated yet comforting meal that everyone will love. The use of chicken breast makes it a healthy choice, while the addition of mushrooms and herbs adds depth and complexity to the flavor.
Preparing Chicken Marsala at home is surprisingly simple, and with a few key ingredients, you can create a restaurant-quality dish in your own kitchen. The chicken is first seared to create a golden crust, and then simmered in a luxurious sauce made from Marsala wine, mushrooms, and butter. By following the instructions below, you can effortlessly create a delicious meal for 4-6 people.
Ingredients:
- 4-6 boneless, skinless chicken breasts
- Salt and pepper to taste
- 1 cup all-purpose flour
- 4 tablespoons olive oil
- 1 cup sliced mushrooms
- 2 cloves garlic, minced
- 1 cup Marsala wine
- 1 cup chicken broth
- 4 tablespoons unsalted butter
- 2 tablespoons chopped fresh parsley
Cooking Instructions:
- Prepare the Chicken: Begin by pounding the chicken breasts to an even thickness of about 1/2 inch. This guarantees they cook evenly. Season both sides with salt and pepper.
- Dredge in Flour: Place the flour in a shallow dish. Dredge each chicken breast in the flour, shaking off any excess. This will help create a crispy exterior when cooked.
- Sear the Chicken: In a large skillet, heat the olive oil over medium-high heat. Add the chicken breasts and cook for about 4-5 minutes on each side, or until golden brown. Remove the chicken from the skillet and set aside.
- Cook the Mushrooms and Garlic: In the same skillet, add the sliced mushrooms and cook for about 5 minutes, or until they’re browned and tender. Add the minced garlic and cook for an additional 1 minute, stirring frequently to prevent burning.
- Deglaze with Marsala Wine: Pour the Marsala wine into the skillet, using a wooden spoon to scrape up any browned bits from the bottom. Bring the mixture to a simmer, allowing the wine to reduce by half.
- Add Chicken Broth and Butter: Stir in the chicken broth and return the chicken breasts to the skillet. Add the butter, allowing it to melt and combine with the sauce. Cook for an additional 10 minutes, or until the chicken is cooked through and the sauce has thickened slightly.
- Finish with Parsley: Remove the skillet from the heat and sprinkle the chopped parsley over the chicken. Serve the Chicken Marsala hot, with the sauce spooned over the top.
Extra Tips:
For the best results, use a good quality Marsala wine, as it greatly influences the flavor of the sauce. If you prefer a thicker sauce, consider adding a teaspoon of cornstarch mixed with a little water toward the end of cooking. Additionally, feel free to add a splash of cream for a richer sauce. Serve Chicken Marsala with pasta, mashed potatoes, or crusty bread to soak up the delicious sauce.
Thai Peanut Chicken Stir-Fry
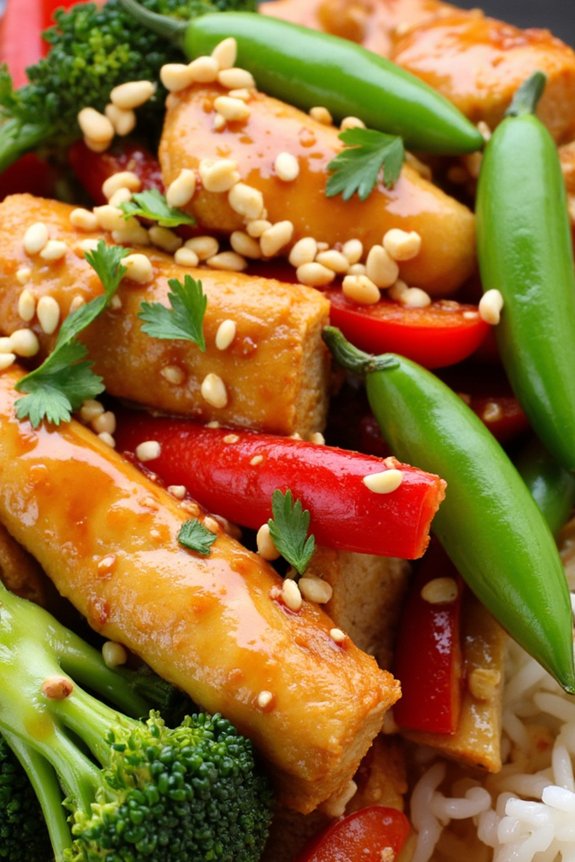
This recipe is designed to serve 4-6 people, making it an ideal choice for a family gathering or a dinner with friends.
It’s relatively quick to prepare, allowing you to enjoy a homemade meal without spending hours in the kitchen. The combination of colorful vegetables not only adds visual appeal but also enhances the nutritional profile of the dish.
Whether you’re a seasoned cook or a beginner, this Thai Peanut Chicken Stir-Fry is sure to impress with its simplicity and depth of flavor.
Ingredients:
- 1.5 pounds of boneless, skinless chicken breast
- 1 cup of unsweetened coconut milk
- 1/2 cup of natural peanut butter
- 3 tablespoons soy sauce
- 2 tablespoons fish sauce
- 2 tablespoons lime juice
- 2 tablespoons brown sugar
- 1 tablespoon red curry paste
- 2 tablespoons vegetable oil
- 1 red bell pepper, sliced
- 1 cup of broccoli florets
- 1 cup of snap peas
- 3 cloves of garlic, minced
- 1 tablespoon fresh ginger, grated
- 1/2 cup of roasted peanuts, chopped
- Fresh cilantro for garnish
- Cooked jasmine rice, to serve
Cooking Instructions:
- Prepare the Chicken: Slice the chicken breasts into thin strips. This will guarantee they cook quickly and evenly. Set aside.
- Make the Peanut Sauce: In a medium bowl, whisk together the coconut milk, peanut butter, soy sauce, fish sauce, lime juice, brown sugar, and red curry paste until smooth. This will form the base of your flavorful sauce.
- Cook the Chicken: Heat 1 tablespoon of vegetable oil in a large skillet or wok over medium-high heat. Add the chicken strips and cook for about 5-6 minutes, or until they’re golden brown and cooked through. Remove the chicken from the skillet and set aside.
- Stir-Fry the Vegetables: In the same skillet, add the remaining tablespoon of vegetable oil. Sauté the garlic and ginger for about 30 seconds until fragrant. Add the red bell pepper, broccoli, and snap peas. Stir-fry for 3-4 minutes until the vegetables are tender-crisp.
- Combine and Simmer: Return the cooked chicken to the skillet. Pour the peanut sauce over the chicken and vegetables. Stir well to combine all ingredients. Let it simmer for 2-3 minutes, allowing the flavors to meld and the sauce to thicken slightly.
- Serve: Transfer the stir-fry to a serving platter. Sprinkle with chopped peanuts and fresh cilantro. Serve hot alongside cooked jasmine rice.
Extra Tips:
When preparing the vegetables, try to cut them into uniform sizes to guarantee even cooking.
If you prefer a spicier dish, you can add sliced chili peppers to the stir-fry or increase the amount of red curry paste in the sauce.
To save time, you can make the peanut sauce a day ahead and store it in the refrigerator. Just give it a good stir before using it in the recipe.
Additionally, if you have any dietary restrictions, feel free to substitute tamari for soy sauce or use a low-sodium version to control the salt content.
Enjoy your Thai Peanut Chicken Stir-Fry with family and friends for a delightful dinner experience!
Chicken and Broccoli Casserole
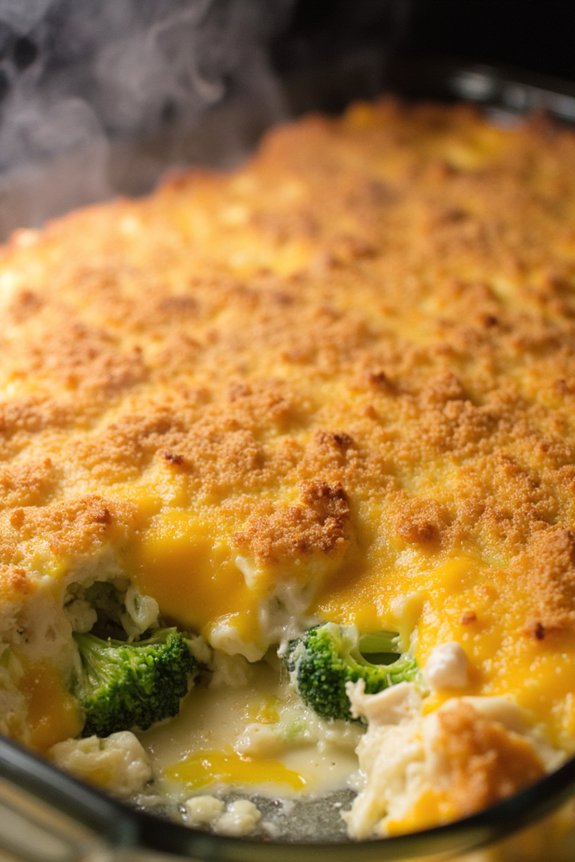
Chicken and Broccoli Casserole is a comforting and hearty meal that’s perfect for a family dinner. This dish combines tender pieces of chicken breast with fresh broccoli florets, all smothered in a creamy, cheesy sauce. It’s then baked to perfection, resulting in a bubbly and golden-brown topping that’s bound to please everyone at the table. Not only is it delicious, but it’s also a great way to incorporate more vegetables into your family’s diet while still enjoying a satisfying meal.
This casserole isn’t only easy to prepare but also allows for some flexibility with ingredients based on personal preferences or dietary needs. You can make this dish ahead of time and simply pop it in the oven when you’re ready to cook, making it an ideal option for busy weeknights. The combination of flavors and textures will have your family asking for seconds, and it’s a guaranteed crowd-pleaser for any occasion.
Ingredients (Serves 4-6):
- 3 cups cooked chicken breast, diced
- 4 cups broccoli florets
- 1 can (10.5 oz) cream of chicken soup
- 1 cup sour cream
- 1 cup shredded cheddar cheese
- 1 teaspoon garlic powder
- 1 teaspoon onion powder
- 1/2 teaspoon salt
- 1/2 teaspoon black pepper
- 1 cup breadcrumbs
- 2 tablespoons melted butter
Cooking Instructions:
- Preheat Oven: Start by preheating your oven to 350°F (175°C). This will guarantee it’s hot enough to bake your casserole evenly.
- Prepare Broccoli: Steam the broccoli florets until they’re just tender but still bright green. This should take about 5 minutes. Once done, set them aside to cool slightly.
- Mix the Sauce: In a large mixing bowl, combine the cream of chicken soup, sour cream, garlic powder, onion powder, salt, and pepper. Stir until the mixture is well combined and smooth.
- Combine Ingredients: Add the cooked chicken and steamed broccoli to the sauce mixture. Stir until all the ingredients are well coated with the creamy sauce.
- Assemble the Casserole: Transfer the mixture into a greased 9×13-inch baking dish. Spread it out evenly across the dish.
- Add Cheese and Topping: Sprinkle the shredded cheddar cheese evenly over the top of the casserole. In a small bowl, mix the breadcrumbs with the melted butter, then sprinkle this mixture over the cheese layer.
- Bake: Place the casserole in the preheated oven and bake for 25-30 minutes, or until the top is golden brown and the edges are bubbling.
- Cool and Serve: Allow the casserole to cool for about 5 minutes before serving. This will help the dish set slightly and make it easier to serve.
Extra Tips:
For added flavor, consider using a sharp cheddar cheese, which will give the dish a richer taste. You can also mix in other vegetables like mushrooms or bell peppers for a more varied texture and flavor profile.
If you prefer a crispy topping, broil the casserole for the last 2-3 minutes of cooking, but keep a close eye on it to prevent burning. This dish can be made ahead and refrigerated for up to 24 hours before baking, making it an excellent option for meal prep.
Baked Caprese Chicken
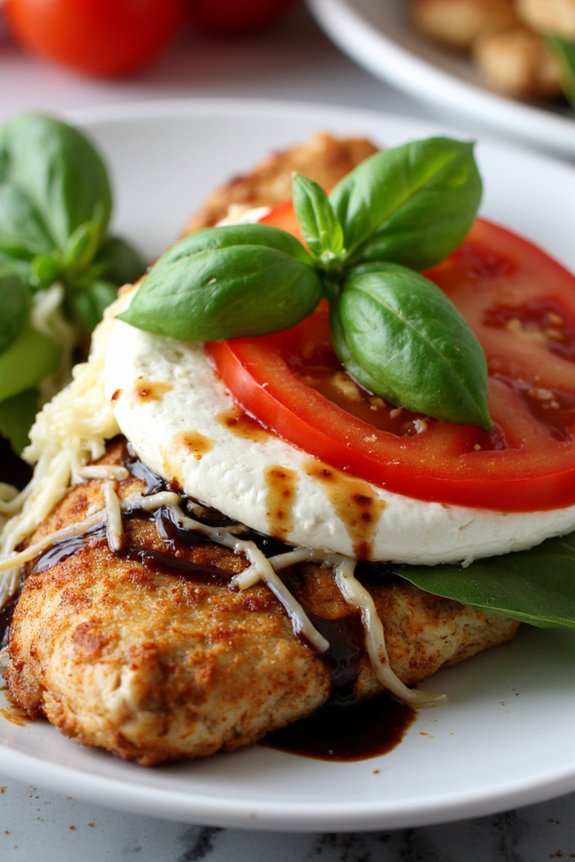
Ingredients (serving size: 4-6 people):
- 4-6 boneless, skinless chicken breasts
- Salt and pepper to taste
- 2 tablespoons olive oil
- 2 teaspoons Italian seasoning
- 3 large ripe tomatoes, sliced
- 8 ounces fresh mozzarella, sliced
- Fresh basil leaves
- 2 tablespoons balsamic glaze
Cooking Instructions:
- Preheat the Oven: Begin by preheating your oven to 400°F (200°C). This guarantees that it’s at the right temperature when you’re ready to bake the chicken.
- Prepare the Chicken: Place the chicken breasts on a cutting board. Season both sides with salt, pepper, and Italian seasoning. This step adds flavor to the chicken, enhancing the dish.
- Sear the Chicken: Heat the olive oil in a large oven-safe skillet over medium-high heat. Add the chicken breasts and sear for about 2-3 minutes on each side, until golden brown. This step helps to lock in the juices and flavor.
- Assemble the Caprese Topping: Once the chicken is seared, top each breast with slices of tomato and mozzarella. Make sure the toppings are evenly distributed for consistent flavor.
- Bake the Chicken: Transfer the skillet to the preheated oven. Bake for 15-20 minutes, or until the chicken is cooked through and the cheese is melted and bubbly.
- Finish with Basil and Balsamic Glaze: Remove the chicken from the oven and top with fresh basil leaves. Drizzle with balsamic glaze for a finishing touch that brings all the flavors together.
Extra Tips:
For the best results, use fresh mozzarella and vine-ripened tomatoes, as they provide the most flavor.
If you don’t have a balsamic glaze, you can make a quick version by reducing balsamic vinegar with a bit of sugar until it thickens.
Be sure to let the chicken rest for a few minutes before serving to allow the juices to redistribute, making each bite juicy and tender.
Enjoy your Baked Caprese Chicken with a side salad or some roasted vegetables for a complete meal.
Spicy Buffalo Chicken Wraps

Spicy Buffalo Chicken Wraps are a delicious and easy-to-make meal that’s perfect for family dinners. This dish combines tender chicken breast with the bold flavors of buffalo sauce, all wrapped up in a soft tortilla. The heat from the buffalo sauce is balanced by the cool, creamy ranch dressing, making it a crowd-pleaser for both spicy food lovers and those who prefer milder flavors.
With its simple preparation and flavorful ingredients, this recipe is guaranteed to become a staple in your dinner rotation. These wraps aren’t only packed with flavor but also versatile enough to suit different dietary preferences. You can easily adjust the level of spiciness by varying the amount of buffalo sauce, or even try a different sauce altogether for a unique twist.
Whether you’re serving them for a casual family meal or a fun gathering with friends, Spicy Buffalo Chicken Wraps are bound to impress. Serve them with a side of crunchy veggies or a simple salad to complete the meal.
Ingredients (Serves 4-6):
- 2 lbs boneless, skinless chicken breasts
- 1 cup buffalo sauce
- 1 tablespoon olive oil
- 1 teaspoon garlic powder
- 1 teaspoon onion powder
- Salt and pepper to taste
- 6 large flour tortillas
- 1 cup shredded lettuce
- 1 cup diced tomatoes
- 1 cup shredded cheddar cheese
- ½ cup ranch dressing
Cooking Instructions:
- Prepare the Chicken: Start by preheating your oven to 400°F (200°C). Place the chicken breasts on a baking sheet lined with parchment paper. Drizzle olive oil over the chicken and season with garlic powder, onion powder, salt, and pepper. Confirm the chicken is evenly coated.
- Bake the Chicken: Place the baking sheet in the preheated oven and bake for 20-25 minutes, or until the chicken is cooked through and no longer pink in the center. Use a meat thermometer to check that the internal temperature reaches 165°F (74°C).
- Shred the Chicken: Once cooked, remove the chicken from the oven and let it rest for 5 minutes. Use two forks to shred the chicken into bite-sized pieces.
- Coat with Buffalo Sauce: In a large bowl, combine the shredded chicken with the buffalo sauce. Toss until all the chicken pieces are well-coated with the sauce.
- Assemble the Wraps: Lay out the flour tortillas flat on a clean surface. In the center of each tortilla, add a portion of the buffalo chicken, followed by shredded lettuce, diced tomatoes, shredded cheddar cheese, and a drizzle of ranch dressing.
- Wrap and Serve: Fold in the sides of the tortilla over the filling, then roll it up from the bottom to create a wrap. Slice each wrap in half and serve immediately.
Extra Tips:
When making Spicy Buffalo Chicken Wraps, consider using a rotisserie chicken for a quicker preparation time. Simply shred the pre-cooked chicken and mix it with buffalo sauce.
If you prefer a milder version, use less buffalo sauce or opt for a mild buffalo wing sauce. Additionally, you can add other fillings like sliced avocado or cucumber for extra texture and flavor.
For a crispier wrap, you can lightly grill or toast the wraps in a skillet before serving. Remember to adjust the seasoning according to your taste preferences, and enjoy your delicious homemade wraps!
Chicken and Rice Pilaf

Chicken and Rice Pilaf is a delightful and comforting dish that combines tender chicken breast with fragrant rice and a blend of aromatic spices. It’s a versatile meal that can be served on a casual family dinner night or as an impressive dish for guests. The chicken is cooked to perfection, while the rice absorbs all the delicious flavors, resulting in a satisfying and hearty meal. This recipe is perfect for serving a family of 4-6 people, making it ideal for a cozy dinner gathering.
The key to a successful Chicken and Rice Pilaf is in the layering of flavors and the careful cooking of each component. The warm spices, such as cumin and cinnamon, infuse the dish with an inviting aroma, while the addition of vegetables like peas and carrots adds a pop of color and nutrition. This dish not only tastes great but also looks vibrant and inviting on the dinner table.
Follow this recipe to create a delicious and heartwarming meal that your family will love.
Ingredients (serving size: 4-6 people):
- 4 boneless, skinless chicken breasts
- 2 cups long-grain white rice
- 1 medium onion, finely chopped
- 2 cloves garlic, minced
- 1 carrot, diced
- 1 cup frozen peas
- 3 1/2 cups chicken broth
- 2 tablespoons olive oil
- 1 teaspoon ground cumin
- 1/2 teaspoon ground cinnamon
- Salt and pepper, to taste
- 1/4 cup fresh parsley, chopped (for garnish)
Cooking Instructions:
- Prepare the Chicken: Season the chicken breasts with salt and pepper on both sides. Heat 1 tablespoon of olive oil in a large skillet over medium-high heat. Add the chicken breasts and cook for about 5-7 minutes on each side, or until they’re golden brown and cooked through. Remove the chicken from the skillet and set aside.
- Sauté the Vegetables: In the same skillet, add the remaining tablespoon of olive oil. Add the chopped onion, garlic, and diced carrot. Sauté for about 3-4 minutes until the onion becomes translucent and the carrots start to soften.
- Add the Spices and Rice: Stir in the ground cumin and cinnamon, and cook for an additional 1 minute until the spices become fragrant. Add the rice to the skillet, stirring well to coat the rice with the oil and spices.
- Cook the Pilaf: Pour in the chicken broth and bring the mixture to a gentle boil. Reduce the heat to low, cover the skillet with a lid, and let it simmer for about 15-20 minutes, or until the rice is tender and has absorbed the broth.
- Add Peas and Chicken: Once the rice is cooked, gently stir in the frozen peas. Slice the cooked chicken breasts into bite-sized pieces and add them back to the skillet. Cover and cook for an additional 5 minutes, or until the peas are heated through.
- Finish and Serve: Remove the skillet from the heat and let it sit, covered, for a few minutes. Fluff the rice with a fork and garnish with freshly chopped parsley before serving.
Extra Tips:
To guarantee the chicken remains juicy and tender, avoid overcooking it in the initial step. You can also marinate the chicken breasts with a bit of lemon juice and additional spices for a few hours before cooking to enhance the flavor.
If you prefer a more vibrant pilaf, feel free to add other vegetables like bell peppers or corn. For a richer flavor, consider using a mix of chicken broth and a splash of white wine when cooking the rice.
Teriyaki Chicken Skewers
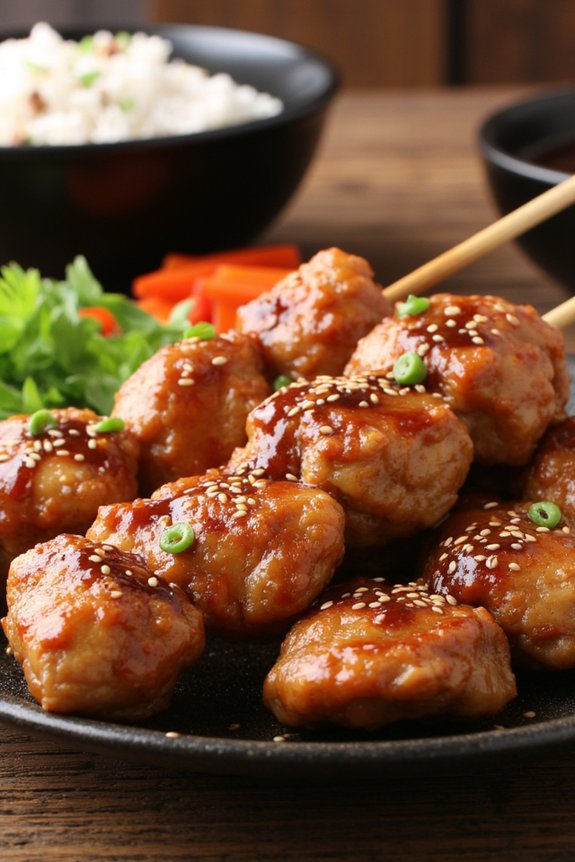
Teriyaki Chicken Skewers are a delightful and flavorful dish that brings together the savory and sweet elements of teriyaki sauce with the tender juiciness of chicken breast. This recipe is perfect for a family dinner as it’s both easy to prepare and a crowd-pleaser. The skewers can be served with a side of steamed rice and vegetables, making it a well-rounded meal that everyone will enjoy.
The key to achieving the best flavor is to marinate the chicken for an adequate amount of time, allowing the teriyaki sauce to infuse the meat with its rich taste. The skewers aren’t only delicious but also fun to eat, making them an excellent choice for family gatherings or casual dinners.
The combination of grilled chicken with the sticky, caramelized glaze of the sauce creates an irresistible dish that’s both visually appealing and mouth-watering. Whether you’re an experienced cook or a beginner, this recipe is straightforward and guarantees a satisfying result.
Ingredients for 4-6 People:
- 4 boneless, skinless chicken breasts
- 1 cup soy sauce
- 1 cup water
- 1/2 cup brown sugar
- 1/4 cup honey
- 1 tablespoon minced garlic
- 1 tablespoon grated fresh ginger
- 2 tablespoons cornstarch
- 1/4 cup cold water (for cornstarch slurry)
- 1 tablespoon sesame oil
- 2 tablespoons sesame seeds
- 6-8 bamboo skewers, soaked in water for 30 minutes
Cooking Instructions:
- Prepare the Marinade: In a medium saucepan, combine soy sauce, water, brown sugar, honey, minced garlic, and grated ginger. Stir the mixture over medium heat until the sugar is dissolved.
- Thicken the Sauce: In a small bowl, mix cornstarch with 1/4 cup cold water to form a slurry. Gradually add this slurry to the saucepan, stirring constantly until the sauce thickens. Remove from heat and stir in sesame oil.
- Marinate the Chicken: Cut the chicken breasts into 1-inch cubes. Place the chicken cubes in a large bowl or a zip-lock bag and pour half of the prepared teriyaki sauce over the chicken. Reserve the remaining sauce for basting and serving. Marinate the chicken in the refrigerator for at least 1 hour, preferably overnight.
- Prepare the Skewers: Preheat your grill to medium-high heat. Thread the marinated chicken pieces onto the soaked bamboo skewers, leaving a small gap between each piece to guarantee even cooking.
- Grill the Chicken Skewers: Place the skewers on the preheated grill. Cook for about 10-15 minutes, turning occasionally and basting with the reserved teriyaki sauce until the chicken is cooked through and has a nice glaze.
- Garnish and Serve: Once the chicken is done, sprinkle the skewers with sesame seeds. Serve the skewers hot, alongside any remaining teriyaki sauce for extra flavor.
Extra Tips:
When preparing Teriyaki Chicken Skewers, remember to soak your bamboo skewers in water for at least 30 minutes before using them. This prevents them from burning on the grill.
Additionally, if you’re short on time, you can prepare the marinade and chicken the night before and let it marinate overnight. This not only saves time but also enhances the flavor.
When grilling, try to maintain a consistent heat to avoid burning the sugar in the sauce. Finally, always use a meat thermometer to verify the chicken reaches an internal temperature of 165°F for safe consumption.