

When planning family dinners, I find myself drawn to fish recipes that are both light and satisfying. I vividly recall the first time I baked cod with Mediterranean vegetables—my kids actually asked for seconds. Moments like these truly make cooking a joy. From zesty lemon herb tilapia to crispy fish tacos, these dishes are as enjoyable to prepare as they are to eat. Ready to explore more?
Zesty Lemon Herb Tilapia
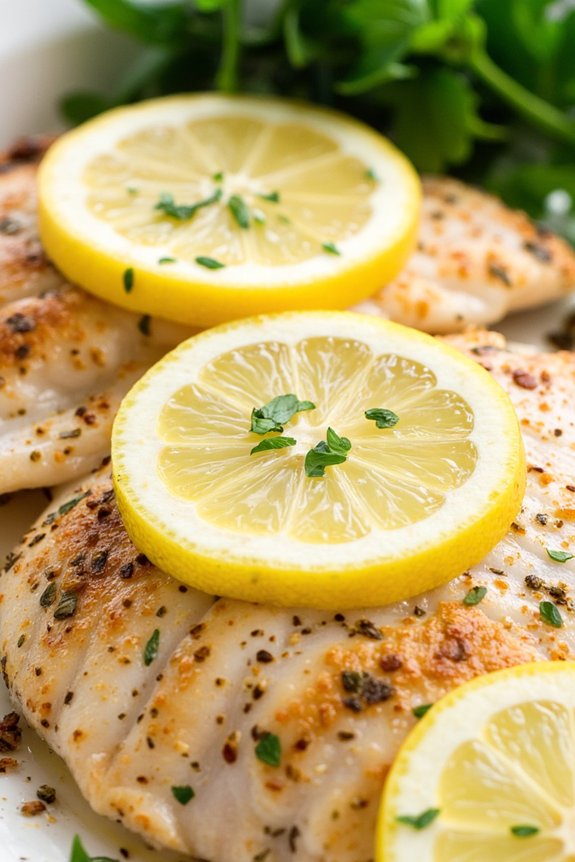
Tilapia is a versatile and mild-flavored fish that pairs beautifully with a variety of seasonings. This Zesty Lemon Herb Tilapia recipe is perfect for a light family dinner, combining the fresh taste of lemon with the earthy aroma of herbs to create a delightful and flavorful dish.
Whether you’re cooking for a small family or a gathering of friends, this dish is sure to please everyone’s palate with its invigorating and zesty flavors. This recipe serves 4-6 people, making it ideal for family dinners or small get-togethers.
The preparation is simple and quick, allowing you to spend more time with your loved ones rather than in the kitchen. With just a few fresh ingredients, you can create a healthy and satisfying meal that not only tastes great but also looks impressive on the dinner table.
Ingredients:
- 4-6 tilapia fillets
- 3 tablespoons olive oil
- 2 lemons (1 for juice, 1 for slices)
- 3 cloves garlic, minced
- 1 teaspoon dried oregano
- 1 teaspoon dried thyme
- 1 teaspoon dried parsley
- Salt and pepper to taste
- Fresh parsley for garnish (optional)
Cooking Instructions:
- Preheat the oven: Start by preheating your oven to 400°F (200°C). This guarantees that the oven is at the right temperature when you’re ready to bake the fish.
- Prepare the baking dish: Drizzle 1 tablespoon of olive oil onto a baking dish large enough to hold all the tilapia fillets in a single layer. This will prevent the fish from sticking to the dish.
- Season the tilapia: In a small bowl, mix together the remaining 2 tablespoons of olive oil, minced garlic, dried oregano, dried thyme, dried parsley, salt, and pepper. Place the tilapia fillets in the baking dish, and use a brush or spoon to evenly coat each fillet with the herb mixture.
- Add lemon: Squeeze the juice of one lemon over the seasoned tilapia fillets. Slice the other lemon into thin rounds and place them on top of the fish. This not only infuses the fish with lemon flavor but also adds a decorative touch.
- Bake the tilapia: Place the baking dish in the preheated oven and bake for 12-15 minutes, or until the fish is opaque and flakes easily with a fork. The cooking time may vary based on the thickness of the fillets, so keep an eye on them to prevent overcooking.
- Garnish and serve: Once cooked, remove the tilapia from the oven and let it rest for a few minutes. Garnish with fresh parsley, if desired, and serve immediately with your choice of sides.
Extra Tips:
For the best results, choose fresh tilapia fillets that are consistent in size to guarantee even cooking. If you prefer a bit of heat, you can add a pinch of red pepper flakes to the herb mixture.
Additionally, consider serving the Zesty Lemon Herb Tilapia with a side of steamed vegetables or a fresh garden salad for a complete and nutritious meal. If you’re using frozen tilapia, make sure to thaw it completely and pat it dry before seasoning. This will help the seasonings adhere better and guarantee the fish bakes evenly.
Savory Teriyaki Salmon
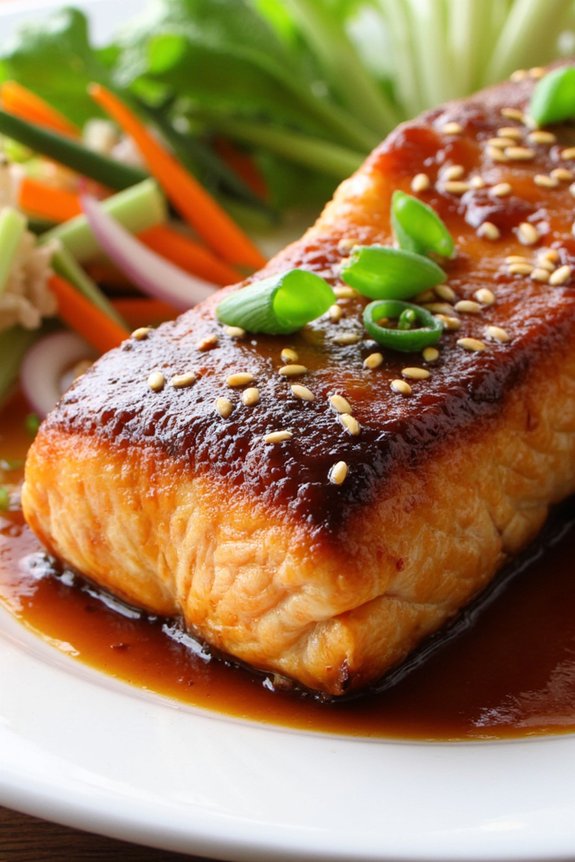
Savory Teriyaki Salmon is a delightful dish that perfectly balances the rich flavors of salmon with the sweet and savory notes of teriyaki sauce. This recipe is ideal for a light family dinner, providing a nutritious and flavorful meal that everyone will enjoy.
With its quick preparation time and simple ingredients, Savory Teriyaki Salmon makes for a convenient and delicious option for those busy weeknights. The tender, flaky salmon is glazed with a homemade teriyaki sauce that caramelizes beautifully in the oven or on the stovetop, creating a mouthwatering dish that pairs well with steamed vegetables or a fresh salad.
Whether you’re a seasoned cook or just starting out in the kitchen, this recipe is easy to follow and guarantees great results. The key to achieving the perfect Savory Teriyaki Salmon lies in marinating the fish adequately, allowing the flavors to fully penetrate and enhance the natural taste of the salmon.
This recipe serves 4-6 people, making it a wonderful choice for a family meal or a small gathering.
Ingredients for Savory Teriyaki Salmon (Serves 4-6):
- 4-6 salmon fillets (about 6 ounces each)
- 1/2 cup soy sauce
- 1/4 cup brown sugar
- 1/4 cup honey
- 1 tablespoon rice vinegar
- 1 tablespoon sesame oil
- 2 cloves garlic, minced
- 1 teaspoon grated fresh ginger
- 1 tablespoon cornstarch
- 1 tablespoon water
- 1 tablespoon sesame seeds (optional, for garnish)
- Sliced green onions (optional, for garnish)
Cooking Instructions:
- Prepare the Marinade: In a small bowl, whisk together the soy sauce, brown sugar, honey, rice vinegar, sesame oil, minced garlic, and grated ginger until the sugar is dissolved.
- Marinate the Salmon: Place the salmon fillets in a shallow dish or a resealable plastic bag. Pour the marinade over the salmon, ensuring each piece is well-coated. Cover the dish or seal the bag and refrigerate for at least 30 minutes to 1 hour to allow the flavors to infuse.
- Preheat the Oven: If baking, preheat your oven to 400°F (200°C). Line a baking sheet with parchment paper or lightly oil it to prevent sticking.
- Prepare the Teriyaki Sauce: In a small saucepan over medium heat, bring the reserved marinade to a gentle simmer. In a separate small bowl, mix the cornstarch with water to create a slurry. Slowly add the slurry to the simmering marinade, stirring constantly until the sauce thickens to a desired consistency.
- Cook the Salmon: Remove the salmon from the marinade, discarding any excess liquid. Place the fillets skin-side down on the prepared baking sheet. Brush the thickened teriyaki sauce over the top of each fillet. Bake in the preheated oven for 12-15 minutes, or until the salmon is cooked through and flakes easily with a fork.
- Garnish and Serve: Once cooked, remove the salmon from the oven and let it rest for a few minutes. Garnish with sesame seeds and sliced green onions if desired. Serve hot alongside your choice of steamed vegetables or a fresh salad.
Extra Tips: When selecting salmon for this dish, opt for fresh, high-quality fillets for the best flavor and texture. If you prefer a more intense ginger flavor, you can increase the amount of ginger in the marinade.
For those who enjoy a bit of heat, consider adding a pinch of red pepper flakes to the marinade. If you’re grilling the salmon instead of baking, be sure to oil the grill grates to prevent sticking. Finally, always keep an eye on the salmon while cooking to avoid overcooking, as it can become dry quickly.
Garlic Butter Shrimp Scampi
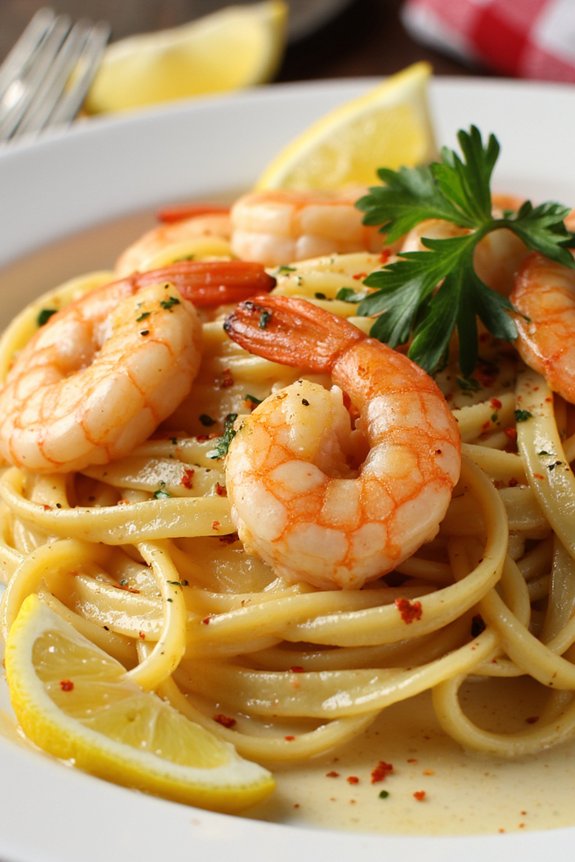
Garlic Butter Shrimp Scampi is a delicious and easy-to-make dish that’s perfect for a light family dinner. This meal combines succulent shrimp with a rich and flavorful garlic butter sauce, making it a crowd-pleaser for both adults and kids. The recipe is quick to prepare, taking only about 20 minutes from start to finish, making it an excellent choice for busy weeknights.
The dish features a harmonious blend of garlic, lemon, and parsley, which complements the natural sweetness of the shrimp. Served over a bed of pasta or with crusty bread, Garlic Butter Shrimp Scampi is a versatile meal that can be easily adjusted to suit your family’s taste preferences. Whether you’re hosting a small gathering or simply preparing a comforting meal for your loved ones, this recipe is sure to impress.
Ingredients (Serves 4-6 people):
- 1.5 pounds large shrimp, peeled and deveined
- 8 ounces linguine or spaghetti
- 4 tablespoons unsalted butter
- 3 tablespoons olive oil
- 4 cloves garlic, minced
- 1/2 teaspoon red pepper flakes (optional)
- 1/4 cup dry white wine or chicken broth
- Juice of 1 lemon
- Salt and freshly ground black pepper, to taste
- 1/4 cup freshly chopped parsley leaves
- Lemon wedges, for serving
Cooking Instructions:
- Prep the Shrimp and Pasta: Begin by bringing a large pot of salted water to a boil. Cook the linguine or spaghetti according to the package instructions until al dente. Drain the pasta and set aside.
- Sauté the Garlic: In a large skillet, heat the olive oil and 2 tablespoons of butter over medium heat. Once the butter has melted, add the minced garlic and red pepper flakes (if using). Sauté for about 1 minute, or until the garlic is fragrant, being careful not to burn it.
- Cook the Shrimp: Add the shrimp to the skillet in a single layer. Season with salt and black pepper. Cook for 2-3 minutes on each side, or until the shrimp is pink and opaque. Remove the shrimp from the skillet and set aside.
- Make the Sauce: In the same skillet, add the remaining 2 tablespoons of butter. Pour in the white wine or chicken broth and lemon juice. Allow the mixture to simmer for about 2 minutes, scraping up any browned bits from the bottom of the skillet.
- Combine and Serve: Return the shrimp to the skillet, tossing to coat them in the sauce. Add the cooked pasta and chopped parsley, tossing everything together until well combined. Adjust seasoning with additional salt and pepper if needed. Serve immediately with lemon wedges on the side.
Extra Tips:
For a richer flavor, consider using a combination of butter and olive oil for sautéing. This blend helps prevent the butter from burning while providing a luscious taste.
If you prefer a little more heat, feel free to adjust the amount of red pepper flakes to your liking. Additionally, if you have time, marinate the shrimp in a bit of olive oil, lemon juice, and garlic for about 15 minutes before cooking to enhance the flavor.
Finally, if you don’t have white wine on hand, chicken broth is an excellent substitute that maintains the dish’s depth of flavor.
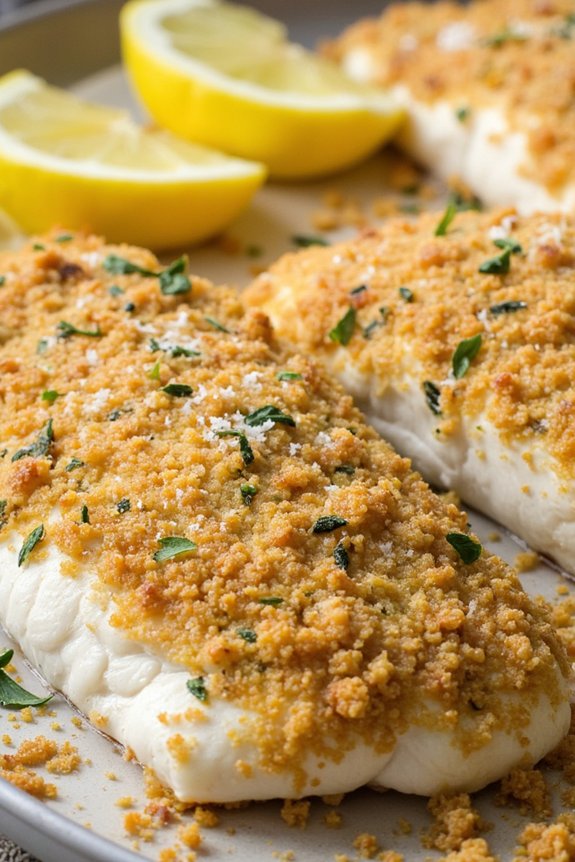
Baked Cod With Mediterranean Vegetables
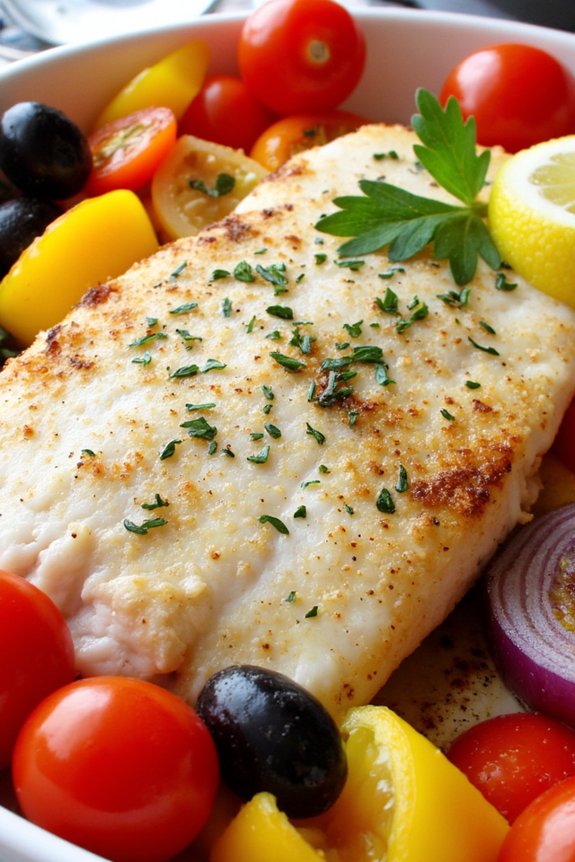
Baked Cod With Mediterranean Vegetables is a delightful and healthy dish that combines the tender flakiness of cod with a vibrant array of Mediterranean-style vegetables. This recipe is perfect for a light family dinner, offering a harmonious blend of flavors and nutrients that will satisfy everyone at the table. The combination of tomatoes, bell peppers, and olives with aromatic herbs creates a colorful and aromatic base that perfectly complements the mild taste of the cod.
This dish isn’t only delicious but also easy to prepare, making it an ideal choice for busy weeknights. The ingredients are simple and fresh, and the baking process allows the flavors to meld together beautifully while retaining the nutritional benefits. Serve it with a side of crusty bread or a fresh salad for a complete meal that’s both nourishing and satisfying.
Ingredients (Serves 4-6):
- 4-6 cod fillets (about 150-200g each)
- 2 tablespoons olive oil
- 1 lemon, sliced
- 1 lemon, juiced
- 2 cloves garlic, minced
- 1 teaspoon dried oregano
- 1 teaspoon dried thyme
- Salt and pepper to taste
- 2 cups cherry tomatoes, halved
- 1 red bell pepper, sliced
- 1 yellow bell pepper, sliced
- 1 red onion, sliced
- 1/2 cup pitted Kalamata olives
- 1/4 cup chopped fresh parsley
Cooking Instructions:
- Preheat the Oven: Preheat your oven to 400°F (200°C). This guarantees the oven is hot enough to properly bake the cod and vegetables for ideal flavor and texture.
- Prepare the Baking Dish: Lightly grease a large baking dish with a tablespoon of olive oil. This prevents sticking and adds flavor to the base of the dish.
- Season the Cod: Place the cod fillets in the baking dish. Drizzle them with the remaining olive oil and lemon juice. Sprinkle the minced garlic, oregano, thyme, salt, and pepper evenly over the fillets. Arrange lemon slices on top for added zest.
- Add the Vegetables: Around the cod fillets, add the cherry tomatoes, bell peppers, onion, and olives. Mix the vegetables gently to coat them in the seasoning and oil.
- Bake the Dish: Place the baking dish in the preheated oven and bake for 20-25 minutes, or until the cod is opaque and flakes easily with a fork. The vegetables should be tender and slightly caramelized.
- Garnish and Serve: Once baked, remove the dish from the oven and sprinkle with fresh parsley. Serve immediately, making sure each serving includes a portion of cod and the colorful vegetables.
Extra Tips:
When selecting cod fillets, choose those that are firm and have a mild scent, indicating freshness. If fresh cod is unavailable, frozen fillets can be used; just make sure they’re fully thawed before cooking.
Experiment with different vegetables such as zucchini or eggplant for extra variety. For added depth of flavor, consider using fresh herbs if available. Finally, adjust seasoning to taste, keeping in mind that the olives will contribute a natural saltiness.
Crispy Fish Tacos With Cabbage Slaw

Crispy Fish Tacos With Cabbage Slaw is a delightful dish that makes for a light and invigorating family dinner. This recipe combines the flaky texture of pan-fried fish with the crunch of cabbage slaw, all wrapped in warm corn tortillas. It’s a perfect balance of flavors and textures, ideal for those seeking a healthier alternative without compromising on taste. The tacos are complemented with a zesty lime crema, adding a tangy kick that enhances the overall dish.
Perfect for a serving size of 4-6 people, these tacos aren’t only easy to prepare but also quick to cook, making them an excellent choice for a weeknight meal. The recipe caters to both seasoned cooks and those new to the kitchen, guaranteeing that everyone can enjoy this delicious, nutritious meal. Pair these tacos with your favorite salsa or guacamole for an added layer of flavor.
Ingredients:
- 1 ½ pounds of white fish fillets (such as cod or tilapia)
- 1 cup all-purpose flour
- 1 teaspoon paprika
- ½ teaspoon garlic powder
- ½ teaspoon salt
- ½ teaspoon black pepper
- 2 large eggs
- 2 cups panko breadcrumbs
- Vegetable oil for frying
- 12 small corn tortillas
- 2 cups shredded cabbage (red or green)
- 1/4 cup chopped cilantro
- 1 jalapeño, seeded and finely chopped
- Juice of 2 limes
- 1/2 cup mayonnaise
- 1/4 cup sour cream
- Salt and pepper to taste
Instructions:
- Prepare the Fish: Pat the fish fillets dry with a paper towel, then cut them into strips about 1 inch wide. Set aside.
- Set Up Dredging Station: In a shallow dish, combine the flour, paprika, garlic powder, salt, and pepper. In a second dish, beat the eggs until smooth. In a third dish, place the panko breadcrumbs.
- Coat the Fish: Dip each fish strip first in the flour mixture, making sure it’s fully coated, then into the eggs, and finally into the panko breadcrumbs, pressing lightly to guarantee the breadcrumbs adhere.
- Fry the Fish: Heat about 1/2 inch of vegetable oil in a large skillet over medium-high heat. Once hot, add the fish strips in batches, being careful not to overcrowd the pan. Fry for about 3-4 minutes on each side, or until golden brown and crispy. Remove and drain on paper towels.
- Make the Cabbage Slaw: In a large bowl, combine the shredded cabbage, cilantro, jalapeño, and juice of one lime. Toss to combine and season with salt and pepper to taste.
- Prepare the Lime Crema: In a small bowl, mix the mayonnaise, sour cream, and juice of the remaining lime. Stir until smooth and season with salt and pepper.
- Warm the Tortillas: Heat the tortillas in a dry skillet over medium heat for about 30 seconds on each side until warm and pliable.
- Assemble the Tacos: Place a few strips of fried fish in each tortilla, top with a generous amount of cabbage slaw, and drizzle with lime crema. Serve immediately.
Extra Tips:
For the best results, make sure the oil is properly heated before frying the fish to achieve maximum crispiness. You can test the oil by dropping in a small breadcrumb; if it sizzles immediately, the oil is ready.
Additionally, consider using a fish spatula to carefully turn the fish strips without breaking them. For a little extra heat, leave the seeds in the jalapeño or add a dash of hot sauce to the lime crema. Enjoy the tacos with a side of fresh lime wedges for squeezing over the top just before eating.
Pan-Seared Trout With Almond Crust
Pan-Seared Trout With Almond Crust is an elegant yet simple dish perfect for a light family dinner. The combination of tender trout with a crunchy almond crust provides a delightful contrast in texture, while the subtle flavors of the fish are enhanced by the nutty profile of the almonds. This recipe isn’t only delicious but also quick to prepare, making it an ideal choice for a weeknight meal or a special occasion dinner.
The key to this recipe is the almond crust, which adds both flavor and a satisfying crunch. The trout is first coated in a mixture of ground almonds and seasonings, then pan-seared to achieve a golden, crispy exterior while keeping the fish moist and tender inside. This dish pairs beautifully with a simple salad or a side of steamed vegetables, allowing the flavors of the trout to shine.
Here’s how you can prepare Pan-Seared Trout With Almond Crust for 4-6 people.
Ingredients:
- 4-6 trout fillets, skin-on
- 1 cup almonds, finely ground
- 1/4 cup all-purpose flour
- 2 large eggs
- 2 tablespoons milk
- Salt and pepper, to taste
- 2 tablespoons olive oil
- 2 tablespoons butter
- Lemon wedges, for serving
- Fresh parsley, chopped, for garnish
Instructions:
- Prepare the Almond Crust Mixture: In a shallow dish, combine the finely ground almonds with the all-purpose flour, salt, and pepper. Mix well to guarantee the seasonings are evenly distributed. This will form the crunchy coating for the trout.
- Set Up the Dredging Station: In another shallow dish, whisk together the eggs and milk until thoroughly combined. This egg wash will help the almond mixture adhere to the fish fillets.
- Coat the Trout Fillets: Pat the trout fillets dry with paper towels to remove any excess moisture. Dip each fillet into the egg mixture, ensuring it’s fully coated. Then, press the fillet into the almond-flour mixture, pressing gently to guarantee a good coating on all sides.
- Heat the Pan: In a large skillet, heat the olive oil and butter over medium heat. The combination of oil and butter helps achieve a crispy crust while adding flavor.
- Cook the Trout: Carefully place the coated trout fillets, skin-side down, into the hot skillet. Cook for about 3-4 minutes on each side, or until the crust is golden brown and the fish is cooked through. The fish should flake easily with a fork.
- Serve: Transfer the cooked trout to a serving platter. Squeeze fresh lemon juice over the fillets and garnish with chopped parsley. Serve immediately with additional lemon wedges on the side.
Extra Tips:
To guarantee the trout fillets cook evenly, make sure they’re of similar thickness. If some fillets are thicker, you may need to cook them a bit longer to guarantee they’re done.
Additionally, avoid overcrowding the pan, as this can lead to steaming rather than searing. Cook the fillets in batches if necessary, keeping the first batch warm in a low oven while you finish cooking the rest.
For an even crispier crust, you can toast the ground almonds lightly before mixing with the flour.
Grilled Mahi Mahi With Pineapple Salsa
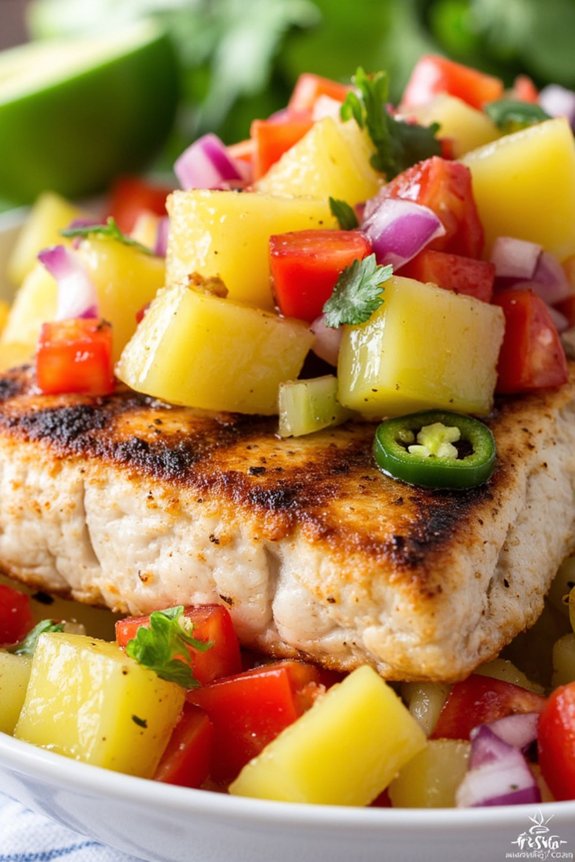
Grilled Mahi Mahi With Pineapple Salsa is a flavorful and invigorating dish that’s perfect for a light family dinner. The mahi mahi, a firm and mild-tasting fish, is grilled to perfection, providing a slightly smoky flavor that complements the sweet and tangy pineapple salsa. This dish isn’t only delicious but also nutritious, offering a healthy dose of protein and vitamins.
The pineapple salsa adds a burst of color and flavor, making it not only a feast for the taste buds but also a visually appealing addition to your dinner table. This recipe is designed to serve 4-6 people, making it ideal for a family meal or a small gathering. The combination of the grilled fish and the fresh salsa creates a dish that’s satisfying yet light, making it perfect for warmer evenings or when you’re in the mood for something fresh and tasty.
The simplicity of the preparation allows the natural flavors of the ingredients to shine through, creating a harmonious balance between the savory fish and the sweet, juicy pineapple salsa.
Ingredients (Serves 4-6):
- 4-6 mahi mahi fillets (about 6 ounces each)
- Salt and pepper to taste
- 2 tablespoons olive oil
- 1 pineapple, peeled, cored, and diced
- 1 red bell pepper, diced
- 1/2 red onion, finely chopped
- 1/4 cup fresh cilantro, chopped
- 1 jalapeño, seeded and finely chopped
- Juice of 2 limes
- 1 tablespoon honey
- 1 teaspoon garlic powder
Cooking Instructions:
- Prepare the Grill: Preheat the grill to medium-high heat. Clean the grill grates thoroughly to prevent the fish from sticking.
- Season the Fish: Pat the mahi mahi fillets dry with a paper towel. Brush both sides of the fillets with olive oil and season generously with salt, pepper, and garlic powder.
- Make the Pineapple Salsa: In a large bowl, combine the diced pineapple, red bell pepper, red onion, cilantro, and jalapeño. Add the lime juice and honey, then mix well. Adjust seasoning with salt and pepper to taste. Set aside to allow the flavors to meld.
- Grill the Mahi Mahi: Place the seasoned fillets on the hot grill. Grill each side for about 4-5 minutes, or until the fish is cooked through and has nice grill marks. The fish should be opaque and flake easily with a fork.
- Serve: Remove the mahi mahi from the grill and let it rest for a couple of minutes. Serve each fillet with a generous scoop of pineapple salsa on top. Garnish with additional cilantro if desired.
Extra Tips:
When grilling mahi mahi, it’s essential to confirm that your grill is properly preheated to avoid the fish sticking. If you’re using a charcoal grill, ensure that the coals are evenly distributed to maintain consistent heat.
If fresh pineapple is unavailable, canned pineapple can be used, but be sure to drain it well to avoid excess moisture in the salsa. Additionally, adjust the heat of the salsa by adding more or less jalapeño according to your preference.
For an extra layer of flavor, you can add a pinch of cumin to the salsa. Enjoy this delightful dish with a side of steamed rice or a fresh green salad.
Spicy Cajun Catfish
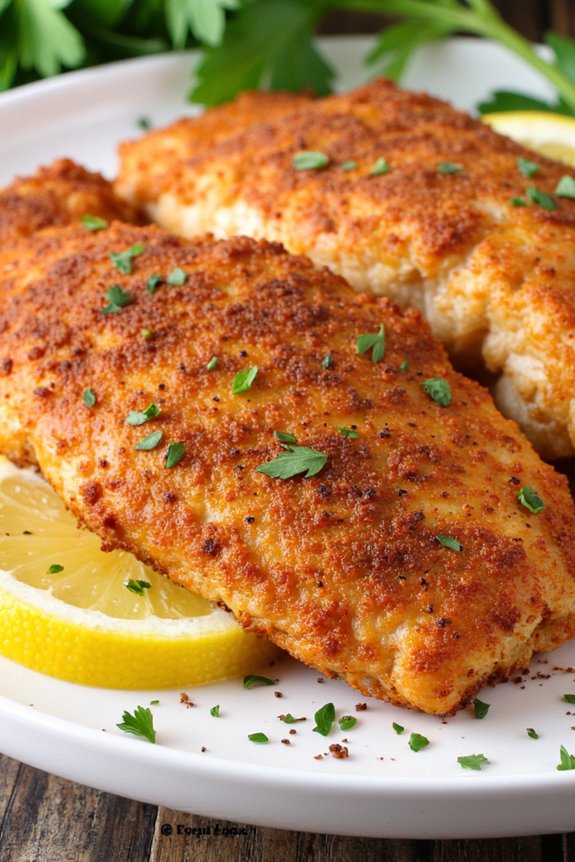
Catfish is a versatile fish that absorbs flavors well, making it perfect for this spicy Cajun recipe. To keep the meal light and healthy, the fish is pan-seared instead of fried, preserving its juicy texture while keeping the calories in check.
Pair this dish with a side of steamed vegetables or a fresh salad for a complete meal that everyone will love. Whether you’re a seasoned chef or a beginner in the kitchen, this recipe is straightforward and certain to impress your family and friends.
Ingredients (Serves 4-6):
- 4-6 catfish fillets
- 3 tablespoons Cajun seasoning
- 1 teaspoon garlic powder
- 1 teaspoon onion powder
- 1 teaspoon paprika
- 1/2 teaspoon salt
- 1/2 teaspoon black pepper
- 2 tablespoons olive oil
- 1 lemon, sliced into wedges
- Fresh parsley for garnish
Cooking Instructions:
- Prepare the Fish: Rinse the catfish fillets under cold water and pat them dry with paper towels. This helps to remove any excess moisture, guaranteeing the seasoning sticks well to the fish.
- Season the Fillets: In a small bowl, combine the Cajun seasoning, garlic powder, onion powder, paprika, salt, and black pepper. Evenly sprinkle this spice mixture over both sides of the catfish fillets, pressing gently to ensure the spices adhere.
- Heat the Oil: In a large skillet, heat the olive oil over medium-high heat. Make sure the oil is hot before adding the fish to achieve a nice sear.
- Cook the Catfish: Place the seasoned catfish fillets in the skillet. Cook each side for 4-5 minutes or until the fish flakes easily with a fork and has a golden-brown crust.
- Serve and Garnish: Once cooked, remove the fillets from the skillet and transfer them to a serving platter. Garnish with fresh parsley and serve with lemon wedges on the side for an added zest.
Extra Tips:
For best results, guarantee your catfish fillets are of even thickness to promote even cooking. If you prefer a milder spice level, adjust the amount of Cajun seasoning to suit your taste.
Additionally, this dish pairs beautifully with a side of creamy coleslaw or roasted potatoes if you’re looking to add a bit more substance to the meal. Remember to preheat your skillet to guarantee the fish sears properly, locking in the flavors and juices. Enjoy your light and spicy Cajun Catfish dinner!
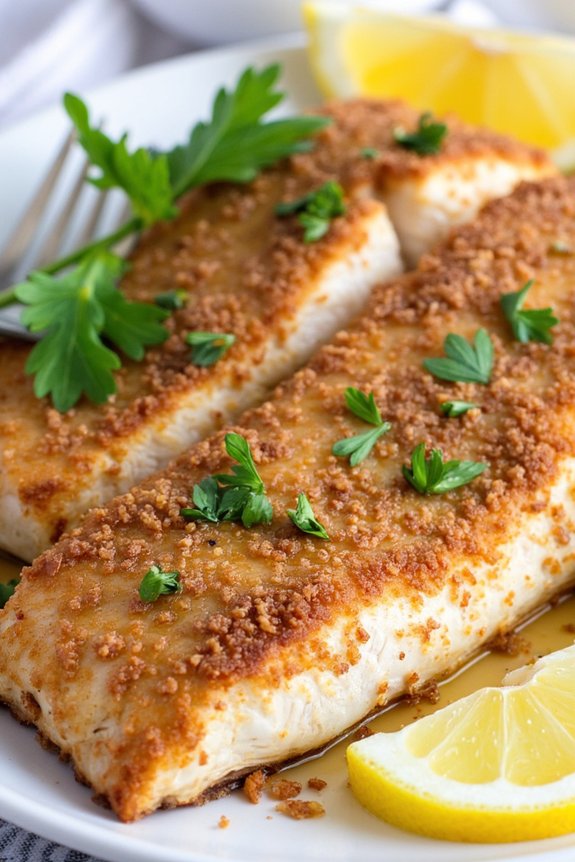
Herb-Crusted Baked Halibut
Herb-Crusted Baked Halibut is a delightful and healthy meal perfect for a light family dinner. This dish combines the mild, sweet flavor of halibut with a fragrant, herb-infused crust that adds both texture and taste. The result is a mouthwatering entrée that’s both nutritious and satisfying. The herb crust not only enhances the flavor of the fish but also aids in keeping it moist and tender while baking.
This recipe is easy to prepare and requires minimal ingredients, making it a great choice for busy weeknights. It’s an excellent way to introduce more fish into your diet, and the aromatic herbs provide a fresh and vibrant flavor profile. Serve this Herb-Crusted Baked Halibut with a side of seasonal vegetables or a light salad to complete the meal. The following recipe serves 4-6 people and can be prepared in under an hour.
Ingredients for 4-6 servings:
- 4-6 halibut fillets (about 6 oz each)
- 1 cup breadcrumbs
- 1/4 cup grated Parmesan cheese
- 2 tablespoons chopped fresh parsley
- 1 tablespoon chopped fresh dill
- 1 tablespoon chopped fresh thyme
- 2 cloves garlic, minced
- Zest of 1 lemon
- Salt and pepper to taste
- 3 tablespoons olive oil
- Lemon wedges for serving
Cooking Instructions:
- Preheat the Oven: Preheat your oven to 400°F (200°C), making sure it’s hot enough to cook the fish evenly and help form a nice crust.
- Prepare the Herb Crust: In a medium bowl, combine the breadcrumbs, Parmesan cheese, parsley, dill, thyme, garlic, lemon zest, salt, and pepper. Mix well to confirm even distribution of the herbs and cheese throughout the breadcrumbs.
- Coat the Halibut Fillets: Pat the halibut fillets dry with paper towels to remove any excess moisture. Brush the top of each fillet with olive oil, then press the herb mixture onto the top side of each fillet, making sure of a thick, even coating.
- Bake the Fish: Place the coated fillets on a baking sheet lined with parchment paper. Bake in the preheated oven for 12-15 minutes, or until the fish is opaque and flakes easily with a fork. The crust should be golden brown and crispy.
- Serve: Once cooked, remove the halibut from the oven and let it rest for a few minutes before serving. Serve with lemon wedges on the side for an added burst of freshness.
Extra Tips:
For the best results, always use fresh herbs and freshly grated Parmesan cheese, as they provide a more robust flavor than their dried or pre-grated counterparts.
If you find the crust isn’t browning as much as you’d like, you can switch the oven to broil for the last minute or two, but keep a close eye on it to prevent burning.
Additionally, if halibut isn’t available, other white fish like cod or haddock can be used as a substitute. Adjust the cooking time slightly, depending on the thickness of the fillets.
Thai-Style Coconut Fish Curry

Thai-Style Coconut Fish Curry is a delightful dish that combines the rich, creamy texture of coconut milk with the vibrant flavors of Thai spices. This dish is perfect for a light family dinner, as it’s both satisfying and healthful. The use of fresh fish guarantees that the curry is packed with protein, while the blend of spices like ginger, lemongrass, and chili peppers creates a harmonious taste that’s both fragrant and flavorful.
This curry pairs well with jasmine rice or noodles, making it a versatile option for any evening meal.
To make this curry, you’ll start by selecting a fresh, firm white fish such as cod, halibut, or snapper. The fish is briefly marinated in lime juice and a touch of salt to enhance its natural flavors before being gently simmered in a coconut milk-based sauce. The sauce is infused with traditional Thai ingredients like fish sauce, kaffir lime leaves, and fresh herbs, which balance the richness of the coconut milk.
This easy-to-follow recipe will guide you through creating a dish that isn’t only delicious but also a feast for the eyes with its vibrant colors.
Ingredients (Serves 4-6)
- 1.5 lbs of fresh white fish fillets (cod, halibut, or snapper)
- 2 tablespoons lime juice
- 1 tablespoon salt
- 2 tablespoons vegetable oil
- 1 onion, finely chopped
- 2 cloves garlic, minced
- 1 tablespoon fresh ginger, grated
- 1-2 Thai red chili peppers, sliced
- 1 stalk of lemongrass, finely chopped
- 1 can (13.5 oz) coconut milk
- 1 tablespoon fish sauce
- 1 teaspoon sugar
- 4-5 kaffir lime leaves
- 1 cup cherry tomatoes, halved
- Fresh cilantro, for garnish
- Jasmine rice or noodles, for serving
Cooking Instructions
- Marinate the Fish: Cut the fish fillets into large chunks. In a bowl, combine the lime juice and salt, then add the fish pieces. Gently toss to coat and set aside for 15 minutes to allow the flavors to meld.
- Prepare the Aromatics: Heat the vegetable oil in a large pan over medium heat. Add the chopped onion and sauté until translucent, about 5 minutes. Stir in the garlic, ginger, chili peppers, and lemongrass, cooking for an additional 2 minutes until fragrant.
- Make the Curry Base: Pour the coconut milk into the pan with the aromatics, stirring to combine. Add the fish sauce, sugar, and kaffir lime leaves. Bring the mixture to a gentle simmer, allowing the flavors to blend for about 5 minutes.
- Cook the Fish: Add the marinated fish chunks to the curry base. Gently simmer for 7-10 minutes until the fish is cooked through and flakes easily with a fork. Stir in the halved cherry tomatoes and cook for an additional 2 minutes.
- Garnish and Serve: Remove the pan from heat. Garnish the curry with fresh cilantro leaves. Serve hot over jasmine rice or alongside noodles, allowing the curry sauce to soak into the grains.
Extra Tips
When preparing Thai-Style Coconut Fish Curry, consider using freshly squeezed lime juice for the marinade to enhance the dish’s brightness.
Adjust the number of chili peppers based on your preferred spice level; for a milder dish, remove the seeds before slicing. If kaffir lime leaves are unavailable, substitute with a little extra lime zest to mimic their unique flavor.
Finally, make sure not to overcook the fish, as it should remain tender and moist within the curry sauce.