

As someone who loves grilling, I can’t wait to share my favorite smoky family dinner recipes that are always a hit at our gatherings. Picture honey garlic chicken thighs sizzling over the flames, or juicy barbecue ribs with a perfect smoky crust. These recipes bring a delightful mix of flavors that keep everyone coming back for seconds. Curious about what else is on the menu? Let’s explore the smoky goodness together!
Grilled Honey Garlic Chicken Thighs
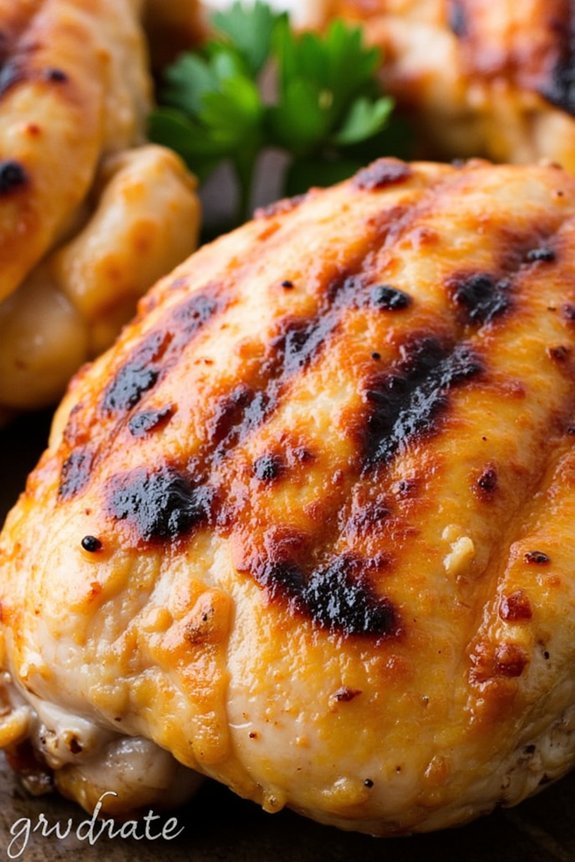
Grilled Honey Garlic Chicken Thighs are the perfect combination of sweet and savory, making them a fantastic choice for a family dinner on the grill. The rich flavor of the honey combined with the aromatic garlic creates a marinade that not only tenderizes the chicken but also caramelizes beautifully when grilled.
This dish is a crowd-pleaser, offering a delightful balance of flavors that can be enjoyed by both adults and children alike. Whether you’re hosting a summer barbecue or simply looking to switch up your weekly dinner routine, these chicken thighs are certain to impress.
The key to achieving perfectly grilled honey garlic chicken thighs lies in the marinade and the grilling process. Allowing the chicken to marinate properly guarantees that the flavors penetrate deeply, resulting in juicy and flavorful meat.
Grilling adds a smoky char that complements the sweetness of the honey and the aromatic garlic, creating a dish that’s both visually appealing and delicious. This recipe serves 4-6 people, making it ideal for a family meal or a small gathering with friends.
Ingredients:
- 8 bone-in, skin-on chicken thighs
- 1/2 cup honey
- 1/4 cup soy sauce
- 6 cloves garlic, minced
- 1 tablespoon apple cider vinegar
- 1 tablespoon olive oil
- 1 teaspoon ground black pepper
- 1/2 teaspoon salt
- 1/2 teaspoon red pepper flakes (optional)
- Fresh parsley for garnish (optional)
Instructions:
- Prepare the Marinade: In a mixing bowl, combine honey, soy sauce, minced garlic, apple cider vinegar, olive oil, black pepper, salt, and red pepper flakes. Stir well until all ingredients are thoroughly mixed to form a smooth marinade.
- Marinate the Chicken: Place the chicken thighs in a large resealable plastic bag or a shallow dish. Pour the marinade over the chicken, guaranteeing every piece is well-coated. Seal the bag or cover the dish with plastic wrap. Refrigerate for at least 1 hour, but preferably 4-6 hours, to allow the flavors to develop.
- Preheat the Grill: Preheat your grill to medium-high heat, approximately 375°F (190°C). If using a charcoal grill, ensure the coals are evenly distributed for consistent cooking.
- Grill the Chicken: Remove the chicken from the marinade, allowing any excess to drip off, and place the thighs on the grill skin-side down. Grill for 6-8 minutes on each side, or until the internal temperature reaches 165°F (74°C) and the skin is crispy and caramelized.
- Rest and Serve: Once cooked, remove the chicken from the grill and let it rest for a few minutes to allow the juices to redistribute. Garnish with fresh parsley if desired, and serve hot.
Extra Tips:
To guarantee your chicken thighs are extra juicy, try not to flip them too often on the grill. Allowing them to cook thoroughly on one side before turning will help develop a nice crust and lock in moisture.
If you prefer a spicier kick, feel free to increase the amount of red pepper flakes in the marinade. Additionally, using a meat thermometer will help you achieve the perfect internal temperature without overcooking. Enjoy your meal with a side of grilled vegetables or a fresh salad for a complete family dinner.
Smoky Barbecue Ribs
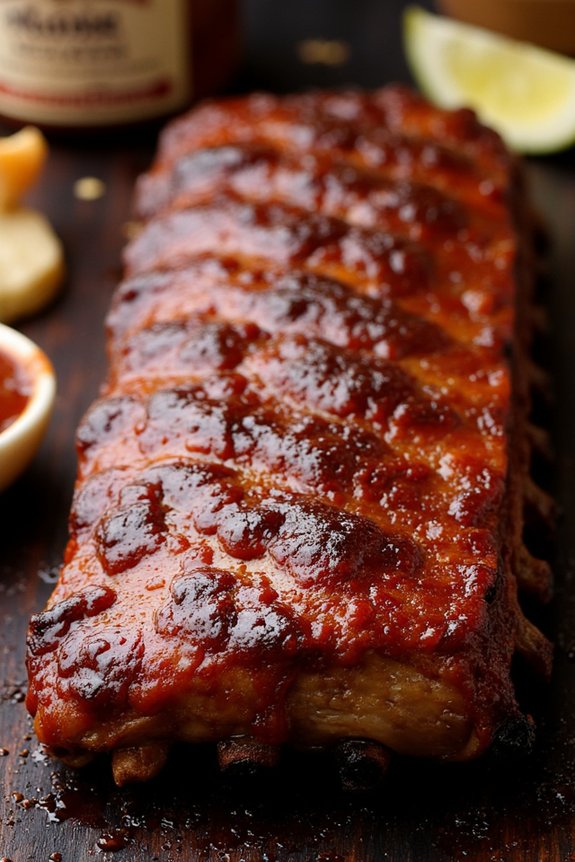
When it comes to family dinners that bring everyone together, few dishes can compete with the allure of smoky barbecue ribs fresh off the grill. This recipe combines the rich flavors of a homemade barbecue rub with the unmistakable taste of perfectly grilled ribs.
Whether you’re hosting a summer gathering or simply enjoying a weekend meal with loved ones, these smoky barbecue ribs are bound to be a hit.
The secret to achieving that perfect blend of smokiness and tenderness lies in the preparation and grilling technique. By marinating the ribs with a flavorful rub and cooking them slowly over indirect heat, you can guarantee that every bite is juicy and packed with flavor.
Get ready to impress your family and friends with this delightful dish that serves 4-6 people.
Ingredients:
- 2 full racks of pork ribs (baby back or spare ribs)
- 1/4 cup brown sugar
- 2 tablespoons paprika
- 1 tablespoon garlic powder
- 1 tablespoon onion powder
- 1 tablespoon chili powder
- 1 teaspoon black pepper
- 1 teaspoon salt
- 1/2 teaspoon cayenne pepper (adjust to taste)
- 1 cup barbecue sauce
- 1/4 cup apple cider vinegar
- 1/4 cup honey
Instructions:
- Prepare the Ribs:
- Begin by removing the membrane from the back of the ribs. This step is essential as it helps the seasoning penetrate the meat and prevents the ribs from being chewy.
- Rinse the ribs under cold water and pat dry with paper towels.
- Make the Rub:
- In a small bowl, combine the brown sugar, paprika, garlic powder, onion powder, chili powder, black pepper, salt, and cayenne pepper.
- Rub the mixture generously over both sides of the ribs, guaranteeing they’re well-coated.
- Marinate:
- Place the ribs in a large resealable plastic bag or wrap them tightly in plastic wrap.
- Refrigerate for at least 2 hours, preferably overnight, to allow the flavors to meld.
- Preheat the Grill:
- Set up your grill for indirect grilling. If using a charcoal grill, light the coals and arrange them on one side. For a gas grill, turn on half of the burners.
- Preheat the grill to a temperature of about 250°F (120°C).
- Grill the Ribs:
- Place the ribs on the cooler side of the grill, bone side down.
- Close the lid and cook for about 2.5 to 3 hours, maintaining a steady temperature.
- Turn the ribs every 30 minutes, basting with a mixture of apple cider vinegar and honey to keep them moist.
- Apply the Barbecue Sauce:
- During the last 30 minutes of cooking, brush the ribs generously with barbecue sauce.
- Continue to cook until the sauce is caramelized and the ribs are tender.
- Rest and Serve:
- Remove the ribs from the grill and let them rest for 10 minutes before slicing.
- Serve with additional barbecue sauce on the side.
Extra Tips:
To guarantee perfect smoky barbecue ribs, consider using wood chips for added flavor. Soak them in water for at least 30 minutes, then place them directly on the coals or in a smoker box if using a gas grill.
This will enhance the smokiness of the ribs. Additionally, remember to monitor the grill temperature closely to prevent the ribs from drying out. If you prefer a spicier kick, feel free to increase the cayenne pepper in the rub or add a dash of hot sauce to the barbecue sauce.
Charred Vegetable Skewers
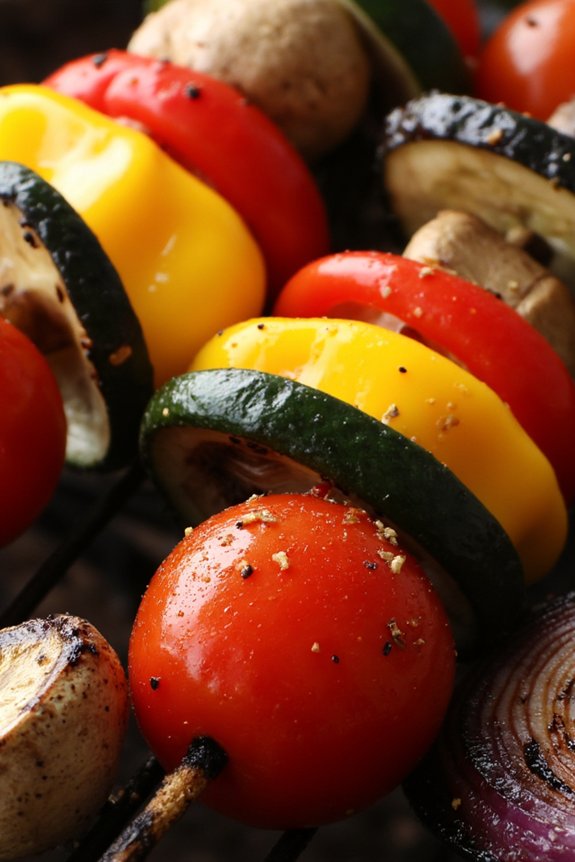
Charred Vegetable Skewers are a delightful and healthy addition to any family dinner cooked on the grill. These skewers aren’t only visually appealing, with their vibrant colors, but also packed with flavor. The process of grilling enhances the natural sweetness of the vegetables while adding a smoky char that complements any main course.
Perfect for vegetarians or as a side dish, these skewers are versatile and can be customized to suit different tastes by varying the vegetables or adding your favorite herbs and spices.
Grilling vegetables on skewers is a great way to get everyone involved in the cooking process. Kids can help assemble the skewers, and guests can choose their preferred combination of vegetables. These skewers are easy to prepare and can be marinated ahead of time, allowing you to focus on other elements of your meal or enjoy a leisurely evening with family and friends.
With this recipe, you’ll have a delicious, nutritious dish that’s sure to be a hit at your next family dinner.
Ingredients for 4-6 people:
- 2 red bell peppers
- 2 yellow bell peppers
- 2 zucchinis
- 1 red onion
- 1 pint cherry tomatoes
- 8 oz button mushrooms
- 1/4 cup olive oil
- 2 tablespoons balsamic vinegar
- 3 cloves garlic, minced
- Salt and pepper to taste
- 1 teaspoon dried oregano
- 1 teaspoon dried thyme
- Wooden or metal skewers
Instructions:
- Preparation: Soak wooden skewers in water for at least 30 minutes to prevent them from burning on the grill. If using metal skewers, this step isn’t necessary. Preheat your grill to medium-high heat.
- Chop Vegetables: Cut the bell peppers and zucchinis into 1-inch pieces. Peel and cut the red onion into similar-sized chunks. Clean the mushrooms by brushing them off with a damp cloth. Leave the cherry tomatoes whole.
- Make Marinade: In a large bowl, whisk together olive oil, balsamic vinegar, minced garlic, salt, pepper, oregano, and thyme. This marinade will add a delightful flavor to the vegetables while also helping them char nicely on the grill.
- Marinate Vegetables: Add the prepared vegetables to the bowl with the marinade. Toss them well to verify they’re evenly coated. Allow them to marinate for at least 15-20 minutes, or up to 2 hours for a more intense flavor.
- Assemble Skewers: Thread the marinated vegetables onto the skewers, alternating types to create a colorful pattern. This not only looks appealing but also guarantees an even distribution of flavors.
- Grill Skewers: Place the skewers on the preheated grill. Cook for about 10-15 minutes, turning occasionally, until the vegetables are tender and have a nice char. Be careful not to overcook, as the vegetables should remain slightly crisp.
- Serve: Once done, remove the skewers from the grill and let them cool slightly before serving. They can be enjoyed warm or at room temperature.
Extra Tips:
When selecting vegetables for your skewers, try to choose ones that have similar cooking times to guarantee even grilling. If you prefer a different flavor profile, consider adding fresh herbs like basil or rosemary to the marinade.
For a touch of spice, a pinch of red pepper flakes can be included. Additionally, if you’re serving these skewers as a main dish, consider pairing them with a grain like quinoa or couscous for a complete meal.
Grilled Pineapple Pork Chops
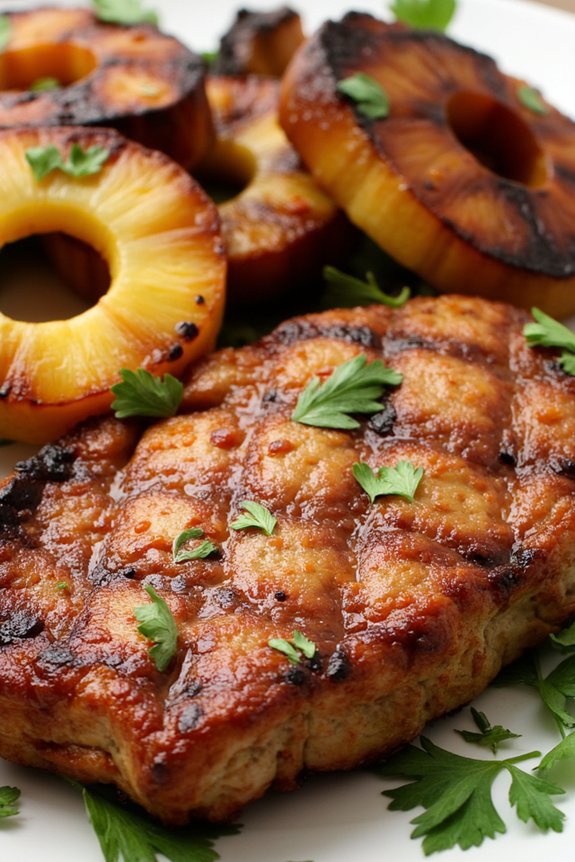
Grilling is a fantastic way to infuse rich, smoky flavors into your meals, and Grilled Pineapple Pork Chops are no exception. This dish combines the sweetness of pineapple with the savory taste of perfectly seasoned pork chops, creating a harmonious blend that’s sure to delight your taste buds.
Whether you’re planning a family dinner or a casual gathering with friends, this recipe is both easy to prepare and satisfying, making it an excellent choice for any occasion.
The key to achieving the perfect Grilled Pineapple Pork Chops lies in the marination process and the grilling technique. Marinating the pork chops not only tenderizes the meat but also allows the flavors to deeply penetrate, resulting in a juicy and flavorful bite.
Paired with the charred sweetness of grilled pineapple slices, this dish is a tropical treat that brings a taste of summer to your dinner table, no matter the season.
Ingredients for 4-6 servings:
- 4-6 bone-in or boneless pork chops, about 1 inch thick
- 1 fresh pineapple, peeled, cored, and sliced into rings
- 1/4 cup soy sauce
- 1/4 cup olive oil
- 1/4 cup brown sugar
- 2 tablespoons apple cider vinegar
- 2 cloves garlic, minced
- 1 teaspoon ground ginger
- 1 teaspoon black pepper
- 1/2 teaspoon salt
- Fresh cilantro or parsley for garnish (optional)
Cooking Instructions:
1. Prepare the Marinade:
In a medium-sized bowl, combine the soy sauce, olive oil, brown sugar, apple cider vinegar, minced garlic, ground ginger, black pepper, and salt. Whisk the ingredients together until the brown sugar is fully dissolved and the mixture is well-blended.
2. Marinate the Pork Chops:
Place the pork chops in a large resealable plastic bag or a shallow dish. Pour the marinade over the pork chops, making certain they’re evenly coated. Seal the bag or cover the dish with plastic wrap and refrigerate for at least 1 hour, or overnight for best results.
3. Preheat the Grill:
Preheat your grill to medium-high heat, around 375°F to 400°F. Confirm the grill grates are clean and lightly oiled to prevent the pork from sticking.
4. Grill the Pork Chops:
Remove the pork chops from the marinade, allowing any excess to drip off. Place the pork chops on the grill and cook for about 6-8 minutes per side, depending on thickness, until they reach an internal temperature of 145°F. Avoid moving them too much to develop nice grill marks.
5. Grill the Pineapple:
While the pork chops are grilling, place the pineapple rings on the grill. Cook them for about 2-3 minutes per side or until they’re slightly caramelized and have grill marks.
6. Serve:
Once cooked, remove the pork chops and pineapple slices from the grill. Let the pork rest for a few minutes before serving. Arrange the pork chops on a platter, top with grilled pineapple rings, and garnish with fresh cilantro or parsley if desired.
Extra Tips:
For an even more flavorful dish, consider adding a pinch of cayenne pepper to the marinade for a hint of spiciness. If you don’t have access to fresh pineapple, canned pineapple rings can be used as a substitute. Just be sure to drain them well before grilling.
Finally, to guarantee even cooking, try to select pork chops that are of similar thickness. This will help them cook uniformly and avoid any pieces being over or undercooked.
Flame-Kissed Shrimp Tacos
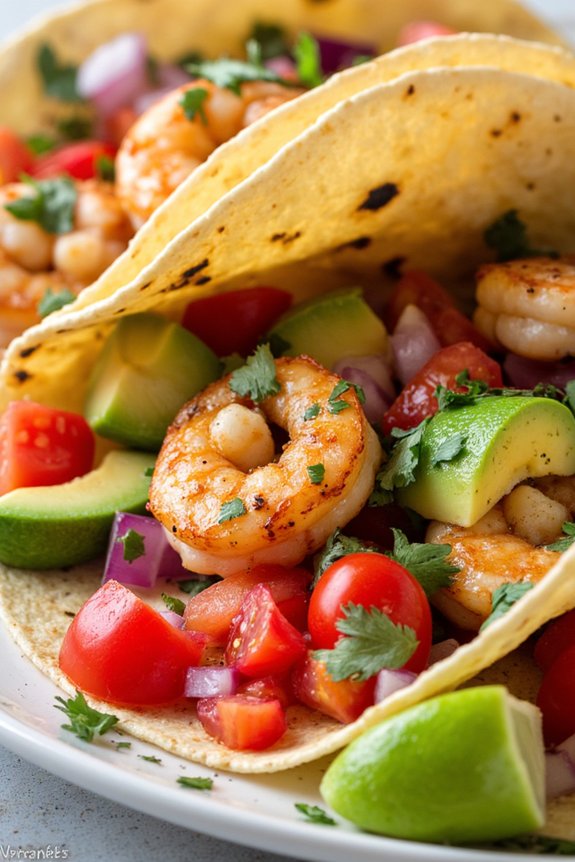
Flame-Kissed Shrimp Tacos are a delightful twist on the classic taco, perfect for a family dinner cooked entirely on the grill. This dish combines the smoky flavor of flame-grilled shrimp with the fresh, zesty toppings that make tacos a beloved staple. The shrimp are marinated to perfection with a blend of spices and lime juice, infusing them with a vibrant flavor that’s elevated by the grilling process.
Once cooked, these shrimp are nestled into warm tortillas and topped with a medley of fresh ingredients for a meal that’s both satisfying and invigorating. Ideal for serving a group of 4-6 people, these tacos aren’t only delicious but also quick and easy to prepare, making them a great choice for any family gathering.
With just a few simple ingredients and the magic of a grill, you can create a meal that will impress and delight your loved ones. Whether you’re hosting a casual backyard gathering or a special family dinner, Flame-Kissed Shrimp Tacos are sure to be a hit.
Ingredients (Serves 4-6):
- 1 1/2 pounds large shrimp, peeled and deveined
- 2 tablespoons olive oil
- 2 tablespoons lime juice
- 1 tablespoon chili powder
- 1 teaspoon garlic powder
- 1 teaspoon ground cumin
- Salt and pepper to taste
- 12 small corn or flour tortillas
- 1/2 cup chopped fresh cilantro
- 1 cup diced tomatoes
- 1/2 cup diced red onion
- 1 ripe avocado, sliced
- Lime wedges for serving
Cooking Instructions:
- Prepare the Marinade: In a large bowl, combine the olive oil, lime juice, chili powder, garlic powder, ground cumin, salt, and pepper. Stir until well mixed. Add the shrimp to the bowl and toss them in the marinade until they’re well coated. Cover and refrigerate for at least 15 minutes to allow the flavors to meld.
- Preheat the Grill: While the shrimp are marinating, preheat your grill to medium-high heat. If you’re using a charcoal grill, light the coals and let them burn until they’re covered with a light layer of ash.
- Grill the Shrimp: Once the grill is hot, place the shrimp on skewers (if desired, to make grilling easier) or directly onto the grill grates. Cook the shrimp for about 2-3 minutes on each side, or until they’re pink and opaque. Be careful not to overcook them as they can become rubbery.
- Warm the Tortillas: While the shrimp are grilling, warm the tortillas on the grill for about 30 seconds on each side. This will make them more pliable and enhance their flavor.
- Assemble the Tacos: Once the shrimp are cooked, remove them from the grill and let them cool slightly. Place a few shrimp into each tortilla and top with chopped cilantro, diced tomatoes, red onion, and avocado slices. Serve with lime wedges on the side for an extra burst of freshness.
Extra Tips:
For the best flavor, consider marinating the shrimp for up to an hour if time allows. When grilling, use a grilling basket if you’re concerned about the shrimp falling through the grates. This also makes turning the shrimp much easier.
For a spicier kick, add a pinch of cayenne pepper to the marinade or serve with a hot sauce on the side. Finally, make sure that all your toppings are prepped and ready before you start grilling, as the shrimp cook quickly, and you’ll want to assemble and serve the tacos while everything is warm.
Smoky Black Bean Burgers
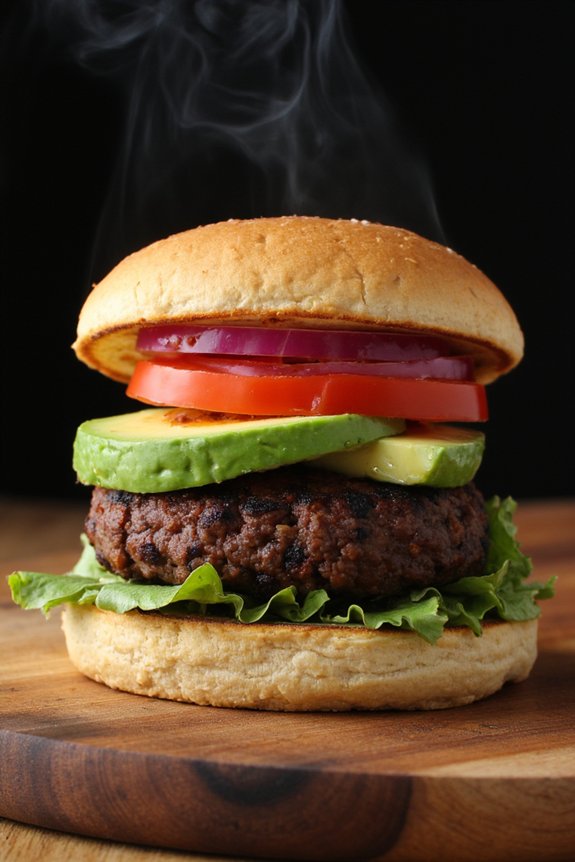
Smoky Black Bean Burgers are a delicious and healthy alternative to traditional meat burgers, perfect for a family dinner on the grill. These burgers are packed with flavor, thanks to the combination of black beans and spices that give them a hearty and smoky taste. They aren’t only satisfying and filling but also rich in protein and fiber, making them an ideal choice for vegetarians and meat-lovers alike.
Grilling these burgers adds an extra layer of smokiness, enhancing their robust flavors and making them a delightful addition to any summer cookout.
Creating Smoky Black Bean Burgers is a straightforward process that involves blending cooked black beans with a variety of ingredients to form a flavorful patty. The mixture is then shaped into patties and grilled to perfection, resulting in a crispy exterior and a tender interior.
You can serve these burgers on toasted buns with your favorite toppings like avocado, lettuce, and tomato, or even enjoy them on their own with a side of grilled vegetables. This recipe will serve 4-6 people, making it perfect for a family meal or a small gathering.
Ingredients:
- 2 cans (15 oz each) black beans, rinsed and drained
- 1 small red onion, finely chopped
- 2 cloves garlic, minced
- 1 cup breadcrumbs
- 1 tablespoon ground cumin
- 1 tablespoon smoked paprika
- 1 teaspoon chili powder
- 1/2 teaspoon salt
- 1/4 teaspoon black pepper
- 1 large egg (or flax egg for vegan option)
- 2 tablespoons olive oil
- 6 burger buns
- Optional toppings: avocado slices, lettuce, tomato slices, onion rings, cheese
Cooking Instructions:
- Prepare the Black Bean Mixture: In a large mixing bowl, mash the black beans with a fork or potato masher until they form a thick paste, leaving some beans partially intact for texture.
- Combine Ingredients: Add the chopped red onion, minced garlic, breadcrumbs, ground cumin, smoked paprika, chili powder, salt, and black pepper to the mashed beans. Stir well until all ingredients are combined.
- Bind the Mixture: Crack the egg (or prepare a flax egg by mixing 1 tablespoon of flaxseed meal with 2.5 tablespoons of water and letting it sit for 5 minutes) and add it to the bean mixture. Mix thoroughly to guarantee the egg is evenly distributed, which will help bind the patties.
- Shape the Patties: Divide the mixture into 4-6 equal portions and shape each portion into a patty, about 1/2 inch thick. Place the patties on a plate or baking sheet.
- Preheat the Grill: Preheat your grill to medium-high heat (about 375-400°F). Brush the grates with olive oil to prevent sticking.
- Grill the Patties: Place the patties on the grill and cook for 4-5 minutes on each side, or until they’ve a nice char and are heated through. If using cheese, add it to the patties in the last minute of grilling to melt.
- Toast the Buns: While the patties are grilling, place the burger buns on the grill for about 1-2 minutes until they’re lightly toasted.
- Assemble the Burgers: Place each patty on a toasted bun and top with your choice of optional toppings such as avocado, lettuce, tomato, and onion rings.
Extra Tips:
For the best results, verify the black bean mixture isn’t too wet, as excess moisture can cause the patties to fall apart. If needed, add more breadcrumbs to achieve the right consistency.
Additionally, you can prepare the patties ahead of time and refrigerate them for up to a day before grilling, allowing the flavors to meld and the patties to firm up. Experiment with different spices and toppings to personalize your Smoky Black Bean Burgers to your taste.
Grilled Sausage and Peppers
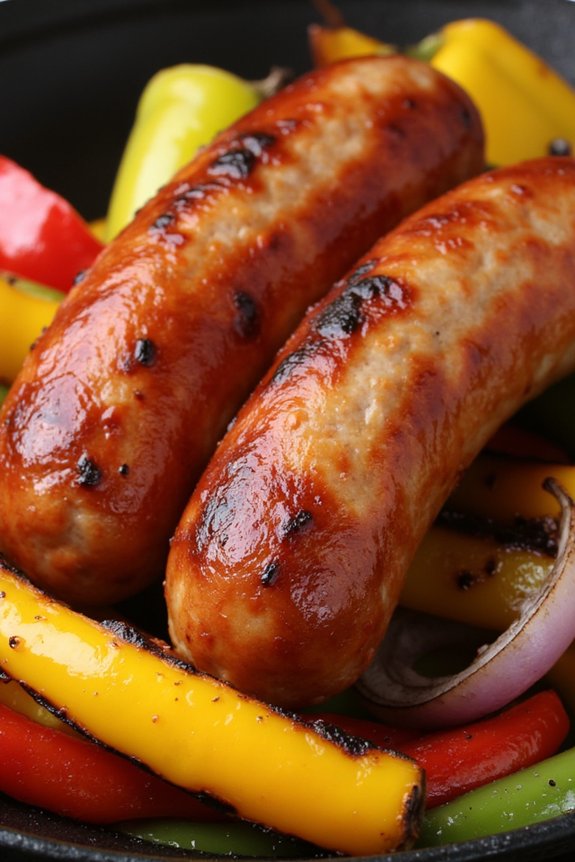
Grilled Sausage and Peppers is a classic dish that’s perfect for family dinners, especially when cooked on the grill. The combination of juicy sausages and vibrant bell peppers creates a symphony of flavors that’s both satisfying and easy to prepare. This recipe is great for a casual outdoor gathering or a weeknight meal, offering a delightful smoky taste that only grilling can provide.
The beauty of this dish lies in its simplicity and the capacity to customize it according to your taste preferences. By using a variety of peppers and high-quality sausages, you can create a meal that’s both visually appealing and delicious. This recipe serves 4-6 people, making it ideal for family dinners or entertaining guests. Follow the instructions below to bring this delightful dish to your table.
Ingredients:
- 6 Italian sausages (mild or spicy)
- 3 bell peppers (red, yellow, green)
- 1 large red onion
- 2 tablespoons olive oil
- Salt and pepper to taste
- 4 cloves garlic, minced
- 1 tablespoon balsamic vinegar
- 1 teaspoon dried oregano
- 6 hoagie rolls (optional)
Cooking Instructions:
- Preheat the Grill: Start by preheating your grill to medium-high heat, around 375-400°F (190-200°C). This will guarantee that the sausages cook evenly and the peppers roast to perfection.
- Prepare the Vegetables: Slice the bell peppers and red onion into strips. Place them in a large mixing bowl, and add the minced garlic, olive oil, balsamic vinegar, oregano, salt, and pepper. Toss everything together until the vegetables are well-coated.
- Grill the Sausages: Place the sausages on the grill. Cook them for about 15-20 minutes, turning occasionally, until they’re browned and cooked through.
- Grill the Vegetables: While the sausages are cooking, use a grill basket or a sheet of aluminum foil to grill the peppers and onions. Place them on the grill and cook for about 10-15 minutes, stirring occasionally, until they’re slightly charred and tender.
- Assemble the Dish: Once everything is cooked, remove the sausages and vegetables from the grill. If you’re using hoagie rolls, you can toast them on the grill for about 1-2 minutes. Place a sausage in each roll and top with a generous portion of grilled peppers and onions.
Extra Tips:
When cooking Grilled Sausage and Peppers, it’s important to keep an eye on the grill temperature to prevent burning. If you prefer, you can use a mix of sweet and hot sausages to cater to different taste preferences.
Feel free to experiment with other spices or herbs to enhance the flavor profile. Additionally, if you want to make the dish more substantial, consider serving it with a side of grilled potatoes or a fresh green salad. With these tips, you’ll have a delicious and memorable family dinner ready in no time.
BBQ Chicken Pizza on the Grill

Grilling isn’t just for burgers and steaks; it’s also an excellent way to make pizza with a deliciously smoky flavor. BBQ Chicken Pizza on the Grill is a perfect family dinner recipe that combines the savory taste of grilled chicken with the tangy sweetness of BBQ sauce, all topped with gooey cheese. The grill gives the crust a perfect crispness and infuses the toppings with a delightful smoky aroma, making it a hit for both kids and adults.
This recipe is ideal for a family gathering or a casual outdoor dinner, serving 4-6 people. Not only does it bring everyone together to enjoy a meal, but it also allows you to enjoy the beautiful weather while cooking outside. The key to this dish is starting with a good pizza dough, quality BBQ sauce, and using fresh ingredients to enhance the flavors. Once you try BBQ Chicken Pizza on the Grill, it will likely become a staple in your family’s meal rotation.
Ingredients (Serving Size: 4-6 people):
- 1 lb pizza dough
- 1 cup BBQ sauce
- 2 cups cooked chicken breast, shredded
- 1 red onion, thinly sliced
- 2 cups mozzarella cheese, shredded
- 1/2 cup cheddar cheese, shredded
- 1/4 cup fresh cilantro, chopped
- Olive oil for brushing
- Cornmeal for dusting
Cooking Instructions:
- Prepare the Grill: Preheat your grill to medium-high heat. If you’re using a charcoal grill, arrange the coals on one side to create direct and indirect heat zones.
- Prepare the Dough: Roll out the pizza dough on a lightly floured surface until it reaches your desired thickness. Dust a pizza peel or the back of a baking sheet with cornmeal to prevent sticking.
- Grill the Chicken: If your chicken isn’t pre-cooked, grill the chicken breasts until thoroughly cooked, about 6-7 minutes per side. Let it rest before shredding.
- Prepare the Pizza Base: Lightly brush one side of the pizza dough with olive oil and place it oiled-side down on the grill over direct heat. Grill for about 2-3 minutes until grill marks appear and the dough puffs up slightly.
- Add Toppings: Remove the grilled dough from the grill and place it on a flat surface, grilled-side up. Spread a generous layer of BBQ sauce over the crust. Evenly distribute the shredded chicken, sliced red onion, mozzarella, and cheddar cheese over the top.
- Finish Grilling: Transfer the topped pizza back to the grill, placing it over the indirect heat side. Close the grill lid and cook for about 5-7 minutes, or until the cheese is melted and bubbly.
- Serve: Carefully remove the pizza from the grill. Sprinkle fresh cilantro over the top. Slice and serve immediately, enjoying the smoky flavors and gooey cheese.
Extra Tips:
For an even crisper crust, make sure your grill is hot before adding the dough. If you’re using a charcoal grill, maintaining even heat might require adding more coals as needed. Always monitor the pizza closely to avoid burning.
If you prefer a spicier kick, consider adding sliced jalapeños or a sprinkle of red pepper flakes. Finally, feel free to experiment with different cheeses or add other toppings like bell peppers or mushrooms to suit your family’s taste preferences.
Perfectly Grilled Corn on the Cob
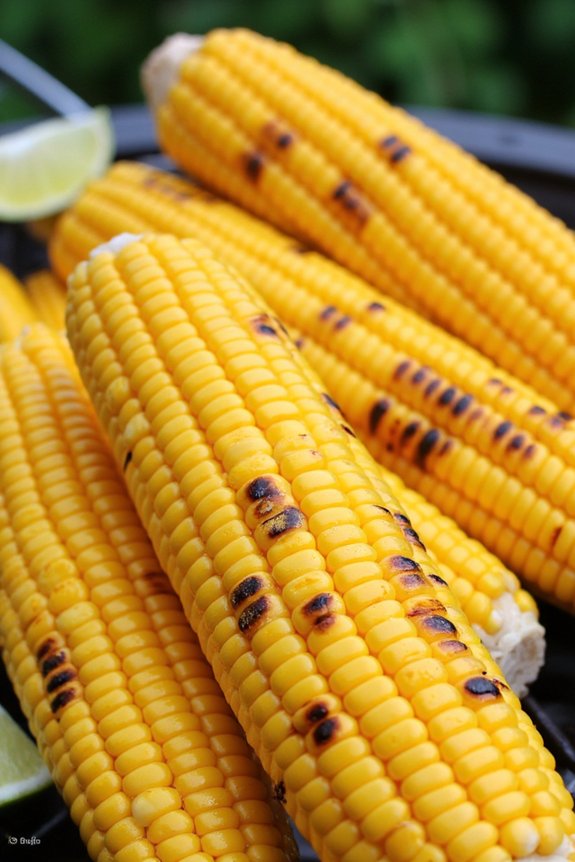
Grilling corn on the cob is a delightful way to bring out its natural sweetness and add a smoky flavor that complements any family dinner. Whether you’re hosting a backyard barbecue or simply want to enjoy a summer favorite, perfectly grilled corn on the cob is a must-have. The smoky aroma and slightly charred kernels make it a crowd-pleaser, and with just a few simple ingredients, you can transform your corn into a delicious side dish that everyone will love.
This recipe is designed for a serving size of 4-6 people, making it ideal for family gatherings or casual get-togethers.
The key to achieving that perfect grill on the cob is in the preparation and cooking technique. By soaking the corn beforehand, you guarantee that the kernels stay juicy and tender while grilling. A touch of butter and seasoning adds richness and depth of flavor, enhancing the natural sweetness of the corn. Follow the steps below to create a dish that’s sure to become a staple at your family dinners.
Ingredients for 4-6 servings:
- 6 ears of corn, husked
- 6 tablespoons unsalted butter, softened
- Salt, to taste
- Black pepper, to taste
- Optional: garlic powder, paprika, or herbs for additional seasoning
- Optional: lime wedges for serving
Cooking Instructions:
- Preheat the Grill: Start by preheating your grill to medium-high heat, around 400°F (200°C). This will guarantee that the corn cooks evenly and develops a nice char without burning.
- Soak the Corn (Optional): If you prefer juicier corn, soak the husked ears in cold water for about 15 minutes. This step helps prevent the corn from drying out on the grill.
- Season the Corn: Pat the corn dry with paper towels. Spread a tablespoon of softened butter over each ear of corn, making sure to cover all sides. Season generously with salt and black pepper. If desired, add additional seasonings like garlic powder, paprika, or herbs for extra flavor.
- Grill the Corn: Place the buttered and seasoned corn directly on the grill grates. Grill for about 10-15 minutes, turning the corn every 2-3 minutes. You should see char marks on the kernels, and the corn should be tender when pierced with a fork.
- Serve: Once grilled to perfection, remove the corn from the grill and let it cool slightly. Serve with lime wedges on the side for an added burst of freshness, if desired.
Extra Tips:
For the best results, choose fresh corn with bright green husks and plump kernels. If you want to experiment with flavors, try adding a sprinkle of cheese or a drizzle of honey after grilling.
Additionally, keeping an eye on the corn while grilling and turning it frequently helps prevent over-charring. Finally, remember that grilled corn is best served immediately to enjoy the full depth of its smoky flavor and tender texture.
Smoky Portobello Mushroom Burgers
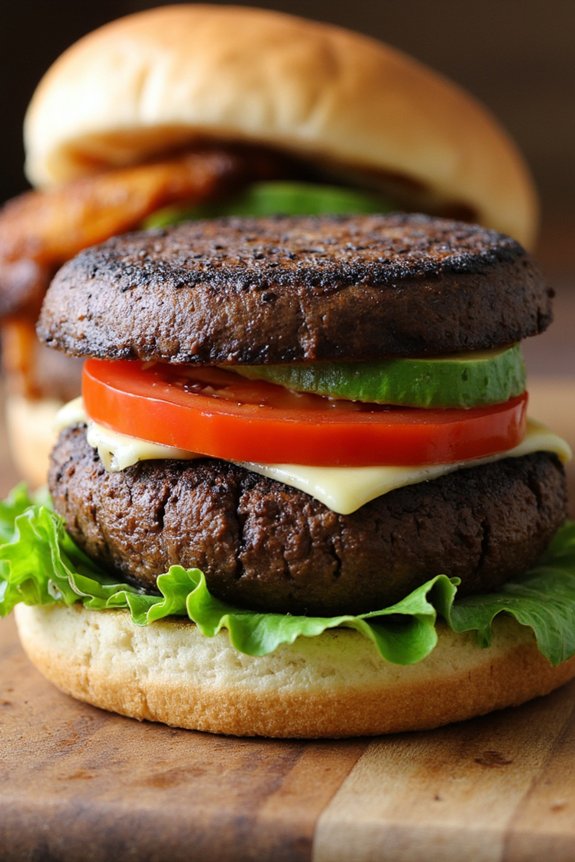
Smoky Portobello Mushroom Burgers are the perfect addition to any family dinner on the grill. These hearty mushroom caps serve as a delicious and satisfying alternative to traditional beef burgers, making them ideal for vegetarians or anyone looking to add more plant-based meals to their diet.
By grilling the mushrooms, you infuse them with a smoky flavor that enhances their natural umami taste, delivering a rich and savory experience with each bite. Pair these burgers with your favorite toppings and a toasted bun for a meal that’s bound to please everyone at the table.
Grilling these Portobello mushrooms brings out their natural juices and provides a delightful char that complements the robust marinade they’re soaked in. The marinade, consisting of balsamic vinegar, olive oil, and a blend of spices, adds depth and complexity to the flavor profile.
To complete the meal, consider serving these burgers with a fresh side salad or grilled vegetables, creating a wholesome and balanced dinner perfect for outdoor dining. Whether you’re a seasoned griller or a novice, these Smoky Portobello Mushroom Burgers are easy to prepare and destined to impress.
Ingredients for 4-6 servings:
- 4-6 large Portobello mushroom caps
- 1/4 cup balsamic vinegar
- 1/4 cup olive oil
- 2 tablespoons soy sauce
- 2 cloves garlic, minced
- 1 teaspoon smoked paprika
- 1 teaspoon dried oregano
- 1/2 teaspoon salt
- 1/4 teaspoon black pepper
- 4-6 hamburger buns
- Optional toppings: lettuce, tomato slices, onion rings, cheese, avocado
Cooking Instructions:
- Prepare the Marinade: In a small bowl, whisk together the balsamic vinegar, olive oil, soy sauce, minced garlic, smoked paprika, dried oregano, salt, and black pepper. This mixture will serve as the marinade for the mushrooms.
- Marinate the Mushrooms: Place the Portobello mushroom caps in a shallow dish or a large resealable plastic bag. Pour the marinade over them, guaranteeing each mushroom is well coated. Let them marinate for at least 30 minutes at room temperature, or up to 2 hours in the refrigerator for more intense flavor.
- Preheat the Grill: While the mushrooms are marinating, preheat your grill to medium-high heat (approximately 375-400°F). If using a charcoal grill, ensure the coals are evenly distributed for consistent cooking.
- Grill the Mushrooms: Remove the mushrooms from the marinade, allowing any excess to drip off, and place them on the grill cap side down. Grill for about 5-7 minutes on each side, or until they’re tender and have developed nice grill marks.
- Toast the Buns: During the last few minutes of grilling, place the hamburger buns on the grill, cut side down, and toast them until lightly browned.
- Assemble the Burgers: Once the mushrooms are done, remove them from the grill and let them rest for a couple of minutes. Assemble the burgers by placing a grilled Portobello mushroom on each bun, and add your choice of toppings like lettuce, tomato, onion, cheese, or avocado.
Extra Tips:
When grilling Portobello mushrooms, it’s important not to over-marinate them as they can become too soft and lose their texture.
Also, guarantee your grill grates are well-oiled to prevent the mushrooms from sticking. For additional flavor, consider adding a slice of your favorite cheese during the last minute of grilling, allowing it to melt over the mushroom cap.
If you’re preparing for a larger group, the recipe can easily be doubled, and feel free to get creative with the toppings to cater to different tastes.
Grilled Lemon Herb Salmon
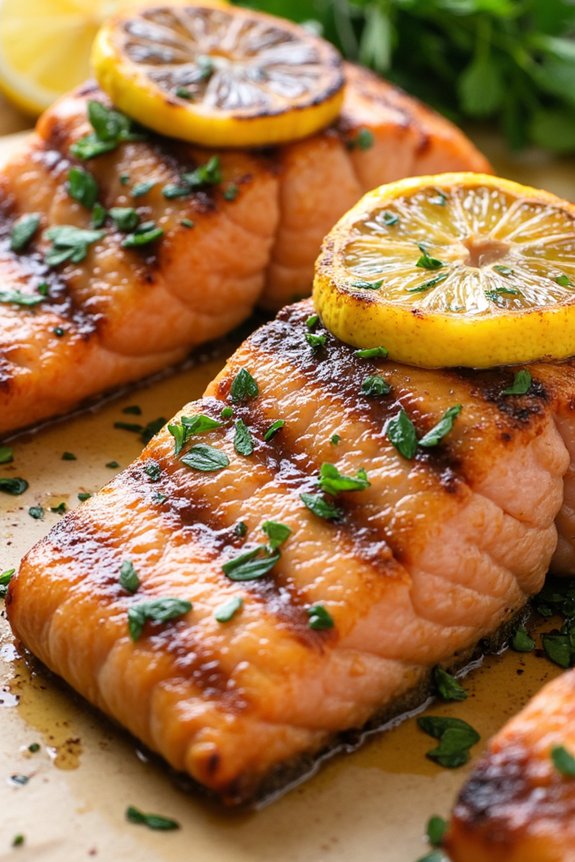
Grilled Lemon Herb Salmon is a delightful and healthy dish perfect for a family dinner on the grill. This recipe combines the fresh, zesty flavors of lemon with a blend of aromatic herbs to enhance the natural richness of the salmon. It’s an ideal way to enjoy a nutritious meal that feels indulgent, yet light and satisfying.
The grilling process imparts a subtle smokiness to the fish, making it a crowd-pleaser for all ages. The preparation is straightforward and can be completed in under an hour, making it suitable for a weeknight meal or a relaxed weekend gathering.
The key to this dish is marinating the salmon to allow the flavors to meld, guaranteeing each bite is packed with taste. Paired with grilled vegetables or a fresh salad, Grilled Lemon Herb Salmon becomes a wholesome, complete meal that can easily cater to 4-6 people.
Ingredients (serving size: 4-6 people):
- 4 salmon fillets (approximately 6-8 ounces each)
- 2 lemons (one for juice, one for slices)
- 3 tablespoons olive oil
- 2 tablespoons fresh dill, chopped
- 2 tablespoons fresh parsley, chopped
- 2 cloves garlic, minced
- Salt and pepper to taste
- Lemon zest from 1 lemon
- Optional: 1 teaspoon crushed red pepper flakes
Cooking Instructions:
- Prepare the Marinade: In a small bowl, combine the juice of one lemon, olive oil, fresh dill, parsley, minced garlic, lemon zest, salt, and pepper. Mix well to form a marinade.
- Marinate the Salmon: Place the salmon fillets in a shallow dish or resealable plastic bag. Pour the marinade over the salmon, making sure each fillet is well coated. Seal the bag or cover the dish and refrigerate for at least 30 minutes, allowing the flavors to infuse the fish.
- Preheat the Grill: While the salmon is marinating, preheat your grill to medium-high heat (about 400°F/200°C). Clean and oil the grates to prevent sticking.
- Grill the Salmon: Once the grill is hot, place the marinated salmon fillets skin-side down on the grill. Cook for about 4-5 minutes on each side, or until the salmon is cooked through and flakes easily with a fork. Avoid overcooking to maintain the salmon’s moisture and tenderness.
- Add Lemon Slices: During the last minute of grilling, place lemon slices on top of each fillet for an extra burst of citrus flavor.
- Serve: Remove the salmon from the grill and let it rest for a couple of minutes. Serve hot with additional lemon wedges on the side for squeezing.
Extra Tips:
To guarantee your Grilled Lemon Herb Salmon is perfectly cooked, keep an eye on the internal temperature of the fish. It should reach 145°F (63°C) for safe consumption.
If you’re using a charcoal grill, place the salmon directly over the coals for a few minutes to get those beautiful grill marks, then move them to indirect heat to finish cooking.
Fire-Roasted Stuffed Bell Peppers
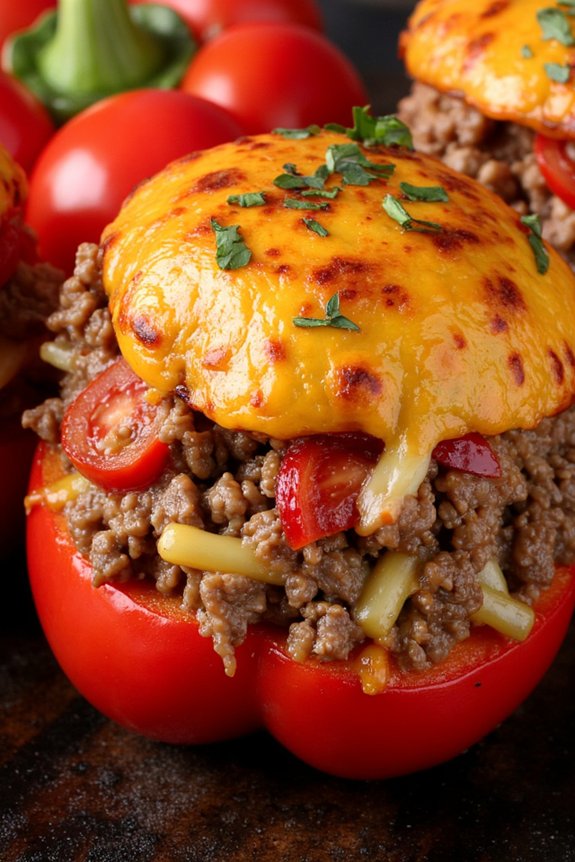
Fire-roasted stuffed bell peppers are a delicious and visually appealing dish perfect for a family dinner on the grill. These colorful peppers are filled with a savory mixture of seasoned ground meat, rice, and vegetables, then cooked over an open flame to impart a delightful smoky flavor. The combination of textures and tastes makes them a satisfying meal that can be enjoyed on a warm evening outdoors.
Plus, they’re versatile enough to accommodate different dietary preferences and can be easily adapted to be vegetarian or vegan.
Preparing fire-roasted stuffed bell peppers is a straightforward process that involves preparing the filling, stuffing the peppers, and grilling them to perfection. The key to a successful dish lies in selecting fresh, firm bell peppers and guaranteeing the filling is well-seasoned.
Once the peppers are stuffed, they’re grilled until the peppers are tender and slightly charred, and the filling is thoroughly cooked. This recipe serves 4-6 people, making it ideal for a family gathering or a small dinner party.
Ingredients (serves 4-6):
- 6 large bell peppers
- 1 pound ground beef or turkey
- 1 cup cooked rice
- 1 small onion, diced
- 2 cloves garlic, minced
- 1 cup diced tomatoes (canned or fresh)
- 1 cup shredded cheese (cheddar or mozzarella)
- 1 teaspoon dried oregano
- 1 teaspoon paprika
- Salt and pepper to taste
- 2 tablespoons olive oil
Cooking Instructions:
- Prepare the Peppers: Slice the tops off the bell peppers and remove the seeds and membranes. Rinse them thoroughly and set aside.
- Cook the Filling: Heat olive oil in a skillet over medium heat. Add the diced onion and minced garlic, cooking until the onion becomes translucent. Add the ground meat and cook until browned. Stir in the diced tomatoes, cooked rice, oregano, paprika, salt, and pepper. Let the mixture simmer for 5 minutes to allow the flavors to meld.
- Stuff the Peppers: Once the filling is ready, carefully spoon it into each of the prepared bell peppers. Pack the filling tightly, and then top each pepper with a generous amount of shredded cheese.
- Preheat the Grill: Preheat your grill to medium-high heat, around 375-400°F (190-200°C). If using a charcoal grill, guarantee the coals are evenly distributed.
- Grill the Peppers: Place the stuffed peppers directly on the grill grates. Close the grill lid and cook for 20-25 minutes, or until the peppers are tender and slightly charred, and the cheese has melted and is bubbly.
- Serve: Carefully remove the peppers from the grill and let them cool slightly before serving.
Extra Tips:
For an even smokier flavor, consider adding a handful of wood chips to the grill. If you prefer a vegetarian version, substitute the ground meat with black beans or lentils, and consider adding additional vegetables like corn or zucchini to the filling.
To guarantee the peppers cook evenly, try to select peppers of similar size and shape. Finally, if you find the peppers are charring too quickly, move them to a cooler part of the grill or reduce the heat slightly.