

Finding family dinners that are dairy-free yet creamy can feel like a delightful adventure. I’ve been loving recipes like creamy avocado pasta and coconut milk chicken curry. These meals have truly transformed our dinner times and even won over the pickiest eaters in the house. If you’re seeking meals that feel indulgent without any dairy, you’ll definitely want to explore the rest of these satisfying recipes. Let’s make mealtime both delicious and dairy-free!
Creamy Avocado Pasta
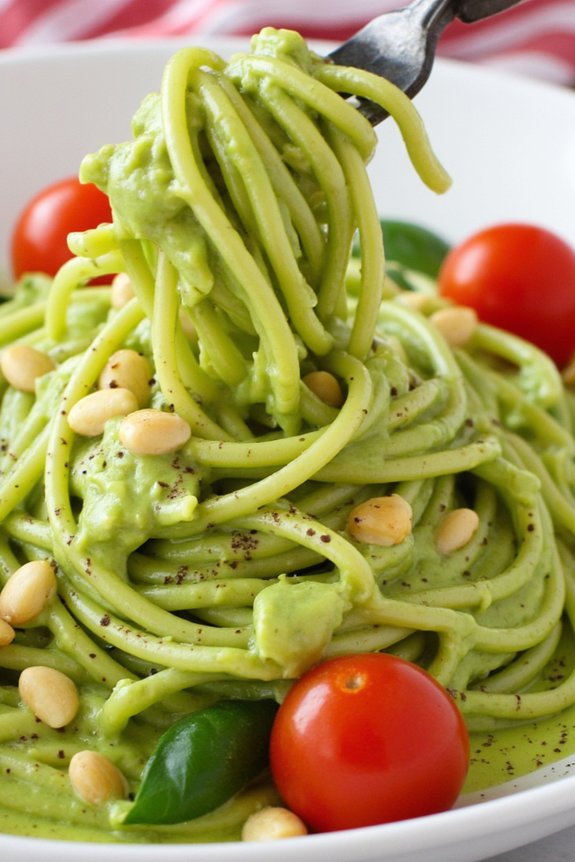
Creamy Avocado Pasta is a delightful, dairy-free alternative for those who crave a rich and satisfying pasta dish without the use of cream or cheese. This recipe uses ripe avocados to create a velvety sauce that coats the pasta beautifully, offering a fresh, vibrant flavor profile. The natural creaminess of the avocado combined with the zest of lemon and the aromatic presence of garlic creates a dish that isn’t only delicious but also quick and easy to prepare.
Perfect for a family dinner, Creamy Avocado Pasta can be whipped up in under 30 minutes, making it an ideal choice for busy weeknights. The dish isn’t only nutritious, thanks to the healthy fats and vitamins from the avocados, but also filling and comforting. The recipe serves 4-6 people, guaranteeing there’s enough to go around the table, leaving everyone satisfied.
Ingredients (Serves 4-6):
- 12 ounces of pasta (spaghetti, linguine, or your choice)
- 2 ripe avocados
- 2 tablespoons fresh lemon juice
- 2 cloves garlic, minced
- 1/4 cup fresh basil leaves
- 1/4 cup olive oil
- Salt, to taste
- Black pepper, to taste
- Optional: cherry tomatoes and pine nuts for garnish
Cooking Instructions:
- Cook the Pasta: Begin by bringing a large pot of salted water to a boil. Add the pasta and cook according to the package instructions until al dente. Reserve about 1 cup of pasta water, then drain the pasta and set it aside.
- Prepare the Avocado Sauce: While the pasta is cooking, cut the avocados in half, remove the pits, and scoop the flesh into a blender or food processor. Add the lemon juice, minced garlic, basil leaves, and olive oil. Blend the mixture until smooth and creamy.
- Season the Sauce: Taste the avocado sauce and add salt and black pepper as desired. If the sauce is too thick, add a little of the reserved pasta water, one tablespoon at a time, until you reach your desired consistency.
- Combine Pasta and Sauce: Return the drained pasta to the pot. Pour the avocado sauce over the pasta and toss well to coat every strand evenly. If needed, add more pasta water to help the sauce adhere better to the pasta.
- Serve: Transfer the creamy avocado pasta to serving bowls or a large platter. If desired, garnish with sliced cherry tomatoes and a sprinkle of pine nuts for extra texture and flavor. Serve immediately.
Extra Tips:
To guarantee the best flavor, use ripe avocados that yield slightly to gentle pressure. Overripe avocados can have a bitter taste that might affect the dish.
If you’re a fan of spice, consider adding a pinch of red pepper flakes to the sauce for a subtle kick. Additionally, this dish is best served fresh, as the avocado sauce can discolor if left to sit for too long. If you have leftovers, store them in an airtight container in the refrigerator and consume within a day.
Coconut Milk Chicken Curry

Coconut Milk Chicken Curry is a delightful and creamy dish perfect for family dinners, offering a rich blend of flavors without the need for dairy. This dish combines tender chicken pieces with aromatic spices, all simmered in luscious coconut milk to create a comforting meal that everyone will enjoy.
Whether you’re a fan of Indian cuisine or just looking to spice up your dinner routine, this curry is sure to please. The mixture of spices, the warmth of ginger and garlic, and the subtle sweetness of coconut milk make this a truly satisfying dish.
This recipe is perfect for serving 4-6 people, making it ideal for a family gathering or a meal prep option for the week. The preparation is straightforward, and with a little attention to detail, you can create a restaurant-quality curry right in your own kitchen.
Gather your ingredients, follow the steps, and enjoy a delicious, dairy-free family dinner that’s both nourishing and flavorful.
Ingredients:
- 2 pounds boneless, skinless chicken thighs or breasts, cut into bite-sized pieces
- 2 tablespoons coconut oil
- 1 large onion, chopped
- 3 cloves garlic, minced
- 1 tablespoon fresh ginger, grated
- 2 teaspoons ground cumin
- 2 teaspoons ground coriander
- 1 teaspoon turmeric powder
- 1 teaspoon garam masala
- 1 teaspoon red chili powder (adjust to taste)
- 1 can (14 ounces) coconut milk
- 1 cup chicken broth
- 1 tablespoon tomato paste
- Salt to taste
- Fresh cilantro, chopped for garnish
- Cooked basmati rice or naan for serving
Instructions:
- Prepare the Chicken: Start by cutting the chicken into bite-sized pieces. Season the chicken with a little salt and set aside. This helps to infuse flavor into the chicken right from the beginning.
- Sauté Aromatics: In a large pan or skillet, heat the coconut oil over medium heat. Add the chopped onions and sauté until they become translucent, about 5 minutes. Stir in the minced garlic and grated ginger, cooking for another 1-2 minutes until fragrant.
- Add Spices: Lower the heat slightly and add the cumin, coriander, turmeric, garam masala, and red chili powder to the pan. Stir continuously to make sure the spices don’t burn, about 1 minute.
- Cook Chicken: Increase the heat back to medium and add the chicken pieces to the pan. Stir well to coat the chicken with the spice mixture. Cook until the chicken is browned on all sides, about 5-7 minutes.
- Simmer Curry: Pour in the coconut milk, chicken broth, and tomato paste. Stir well to combine all ingredients. Bring the mixture to a gentle simmer, then reduce the heat to low. Cover the pan and let it simmer for 20-25 minutes, allowing the chicken to cook through and the flavors to meld.
- Adjust Seasoning: After simmering, taste the curry and add salt as needed. If you’d like more heat, you can add additional chili powder at this stage.
- Serve: Once the curry is ready, garnish with freshly chopped cilantro. Serve hot with cooked basmati rice or naan, allowing everyone to enjoy the delicious sauce.
Extra Tips:
When cooking Coconut Milk Chicken Curry, it’s important to adjust the spice level according to your family’s preferences. If you prefer a milder curry, reduce the amount of chili powder or choose a milder variety.
For a creamier texture, you can add a second can of coconut milk or a splash of coconut cream. Be sure to stir the curry occasionally while it simmers to prevent sticking and make certain of even cooking.
Finally, this curry tastes even better the next day, so consider making it ahead of time for an even more flavorful meal. Enjoy your dairy-free culinary journey!
Cashew Alfredo Sauce With Zucchini Noodles
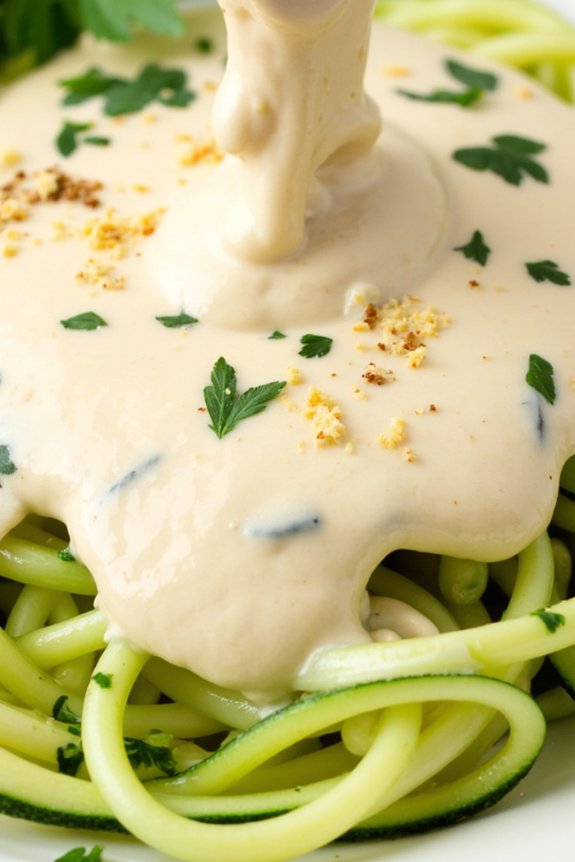
Cashew Alfredo Sauce with Zucchini Noodles is a delightful and healthy alternative to traditional pasta dishes, perfect for those looking to enjoy a dairy-free meal. This dish combines the rich, creamy texture of a cashew-based Alfredo sauce with the fresh, light taste of zucchini noodles, making it a perfect option for a family dinner that caters to a variety of dietary needs.
The cashew Alfredo sauce is incredibly smooth and flavorful, offering a nutty richness that complements the freshness of the zucchini noodles beautifully. This recipe is designed to serve 4-6 people, making it ideal for a family gathering or a cozy dinner with friends.
The zucchini noodles provide a low-carb, gluten-free base that allows the sauce to shine. By opting for zucchini noodles, you add a vegetable component to the meal, enhancing its nutritional value. The sauce is seasoned with garlic, lemon juice, and nutritional yeast, which provides a cheesy flavor without the use of dairy products. Preparing this dish is straightforward and quick, so you can spend more time enjoying the company of your loved ones.
Ingredients:
- 4 medium zucchinis
- 1 1/2 cups raw cashews (soaked for at least 2 hours or overnight)
- 3/4 cup water
- 2 tablespoons olive oil
- 3 cloves garlic, minced
- 1/4 cup nutritional yeast
- 2 tablespoons lemon juice
- Salt and pepper to taste
- Fresh parsley for garnish (optional)
Cooking Instructions:
- Prepare the Zucchini Noodles: Wash the zucchinis thoroughly and cut off the ends. Using a spiralizer, create zucchini noodles. If you don’t have a spiralizer, you can use a vegetable peeler to create long ribbons of zucchini. Set the noodles aside.
- Soak the Cashews: Drain and rinse the soaked cashews. Soaking softens the cashews, making them easier to blend and facilitating a smoother sauce.
- Blend the Sauce: In a blender, combine the soaked cashews, water, olive oil, minced garlic, nutritional yeast, lemon juice, salt, and pepper. Blend until the mixture is smooth and creamy. Adjust the seasonings to taste if necessary.
- Cook the Zucchini Noodles: In a large skillet, heat a small amount of olive oil over medium heat. Add the zucchini noodles and sauté for 2-3 minutes until they’re just tender, but still slightly crisp. Avoid overcooking to prevent them from becoming mushy.
- Combine the Noodles and Sauce: Lower the heat and pour the cashew Alfredo sauce over the zucchini noodles in the skillet. Toss gently to combine and heat through for another 1-2 minutes.
- Serve: Divide the zucchini noodles with cashew Alfredo sauce among plates. Garnish with freshly chopped parsley if desired and serve immediately.
Extra Tips:
For the best results, verify the zucchini is fresh and firm to maintain the desired texture of the noodles. If you prefer a thicker sauce, reduce the amount of water slightly when blending the cashew mixture.
Additionally, if you have leftovers, store the sauce and noodles separately to prevent the noodles from becoming soggy. Reheat the sauce gently on the stove before combining with freshly sautéed zucchini noodles for a quick meal.
Experiment with adding other seasonings or vegetables such as roasted red pepper or spinach to enhance the flavor profile and nutritional content of your dish.
Dairy-Free Creamy Tomato Basil Soup
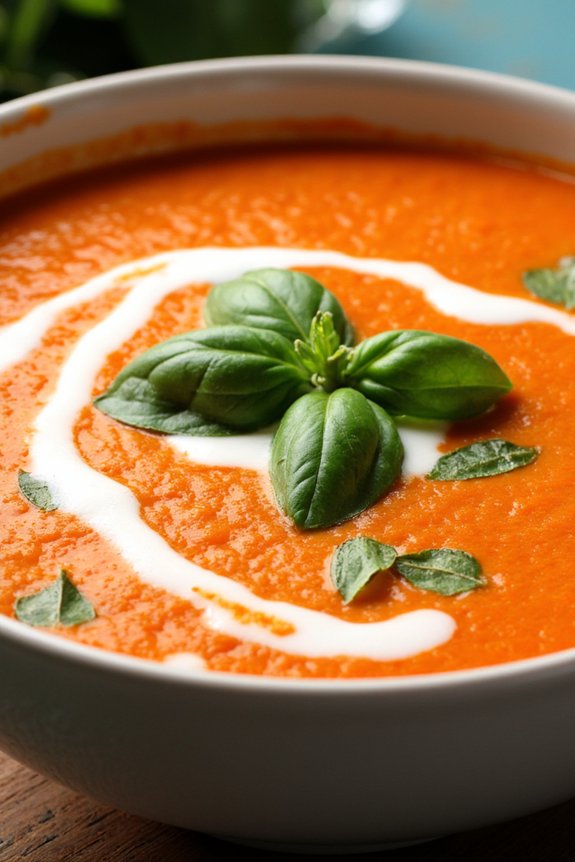
Dairy-Free Creamy Tomato Basil Soup is a comforting and delicious dish that’s perfect for family dinners, especially when you want a warm, filling meal without any dairy. This soup combines the rich flavors of ripe tomatoes and fresh basil with a creamy texture achieved without the use of traditional dairy products. The result is a delightful, velvety soup that’s both vegan-friendly and satisfying for everyone at the table.
Creating this soup involves simmering tomatoes with aromatic vegetables and herbs, and then blending everything together to create a smooth, luscious consistency. The addition of coconut milk offers a creamy, luxurious texture that complements the tangy sweetness of the tomatoes. The fresh basil not only adds a burst of flavor but also a fragrant aroma that will fill your kitchen. This recipe serves 4-6 people, making it perfect for a cozy family gathering or a casual dinner with friends.
Ingredients:
- 2 tablespoons olive oil
- 1 medium onion, chopped
- 3 cloves garlic, minced
- 2 cans (28 ounces each) whole tomatoes, with juice
- 1 cup vegetable broth
- 1 can (13.5 ounces) coconut milk
- 1 tablespoon balsamic vinegar
- 1 teaspoon sugar
- Salt and pepper to taste
- 1/4 cup fresh basil leaves, chopped, plus more for garnish
Instructions:
- Sauté the Aromatics: Heat the olive oil in a large pot over medium heat. Add the chopped onion and minced garlic, and sauté until the onion becomes translucent and the garlic is fragrant, about 5 minutes.
- Add Tomatoes and Broth: Pour in the canned whole tomatoes with their juices and vegetable broth. Use a wooden spoon to break up the tomatoes into smaller pieces, allowing them to cook evenly.
- Simmer the Soup: Bring the mixture to a simmer and let it cook for about 20 minutes, allowing the flavors to meld together. Stir occasionally to prevent sticking.
- Blend the Soup: Remove the pot from heat and let cool slightly. Use an immersion blender to puree the soup until smooth. If using a countertop blender, blend in batches to avoid overfilling.
- Add Creaminess: Return the blended soup to the pot. Stir in the coconut milk, balsamic vinegar, and sugar. Season with salt and pepper to taste. Simmer for an additional 5 minutes to heat through.
- Finish with Basil: Stir in the chopped fresh basil just before serving to preserve its vibrant flavor and color. Ladle the soup into bowls and garnish with additional basil leaves if desired.
Extra Tips:
For an even richer flavor, consider roasting the tomatoes before adding them to the pot. Simply halve fresh tomatoes, drizzle with olive oil, and roast in the oven until caramelized. This step will add a depth of flavor that enhances the soup.
Additionally, adjust the seasoning to your taste preferences; a pinch of red pepper flakes can add a nice bit of heat if desired. Finally, this soup can be made ahead of time and reheated, which allows the flavors to deepen and meld together overnight.
Cauliflower and White Bean Soup
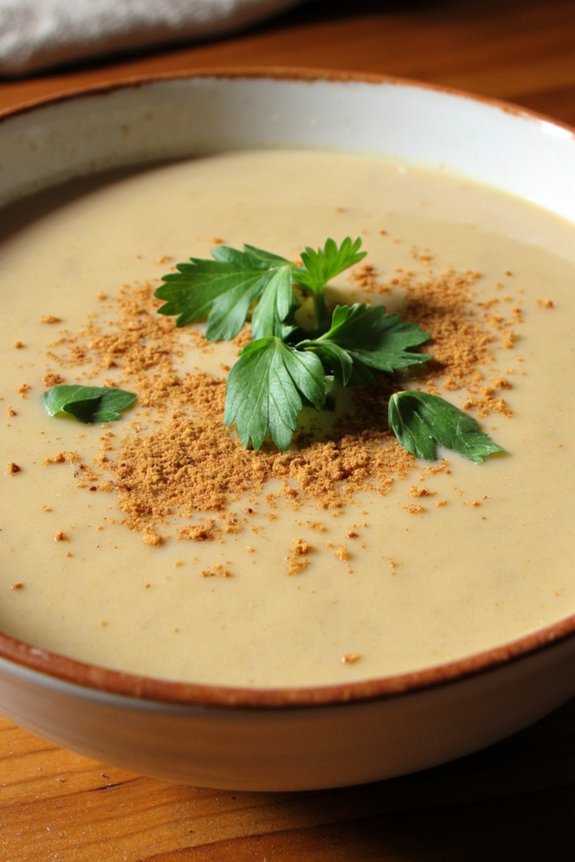
This hearty and nourishing Cauliflower and White Bean Soup is perfect for a family dinner, especially if you’re looking for a comforting dish without dairy. The creamy texture comes from blending the cauliflower and white beans, creating a rich and satisfying soup without the need for cream.
It’s a great option for those following a dairy-free diet, and it’s packed with flavor from fresh herbs and spices. This recipe serves 4-6 people and uses simple ingredients that you likely already have in your pantry. The soup is easy to prepare, making it an excellent choice for both a weeknight meal and a special family gathering.
Whether you’re a seasoned cook or a beginner, this dish will surely impress your family and friends with its delicious taste and creamy texture.
Ingredients:
- 1 large head of cauliflower, chopped
- 2 cans (15 oz each) of white beans, drained and rinsed
- 1 medium onion, chopped
- 3 cloves garlic, minced
- 4 cups vegetable broth
- 2 tablespoons olive oil
- 1 teaspoon dried thyme
- 1/2 teaspoon ground cumin
- Salt and pepper to taste
- Fresh parsley, chopped (for garnish)
Instructions:
- Prepare the Vegetables: Begin by washing and chopping the cauliflower into small florets. Chop the onion and mince the garlic to have them ready for cooking.
- Sauté the Onion and Garlic: In a large pot, heat the olive oil over medium heat. Add the chopped onion and sauté until it becomes translucent, about 5 minutes. Stir in the minced garlic and cook for an additional 1-2 minutes until fragrant.
- Add the Cauliflower and Seasonings: Add the cauliflower florets to the pot, along with the dried thyme, ground cumin, salt, and pepper. Stir to combine and let the cauliflower cook for about 5 minutes, allowing it to absorb the flavors.
- Add the Beans and Broth: Pour in the vegetable broth and add the drained and rinsed white beans. Bring the mixture to a boil, then reduce the heat to low and let it simmer for about 20 minutes, or until the cauliflower is tender.
- Blend the Soup: Using an immersion blender, blend the soup directly in the pot until it reaches a smooth consistency. If you don’t have an immersion blender, you can carefully transfer the soup to a blender in batches and blend until smooth.
- Adjust Seasoning and Serve: Taste the soup and adjust the seasoning with more salt and pepper if needed. Serve hot, garnished with freshly chopped parsley for a pop of color and added flavor.
Extra Tips: For an even creamier texture, you can add a splash of almond milk or coconut milk before blending. If you prefer a chunkier soup, blend only part of the mixture and leave some of the beans and cauliflower whole.
This soup can also be made ahead of time and stored in the refrigerator for up to three days, making it a convenient option for meal prep. When reheating, you might need to add a little extra broth or water to achieve your desired consistency.
Vegan Mushroom Stroganoff
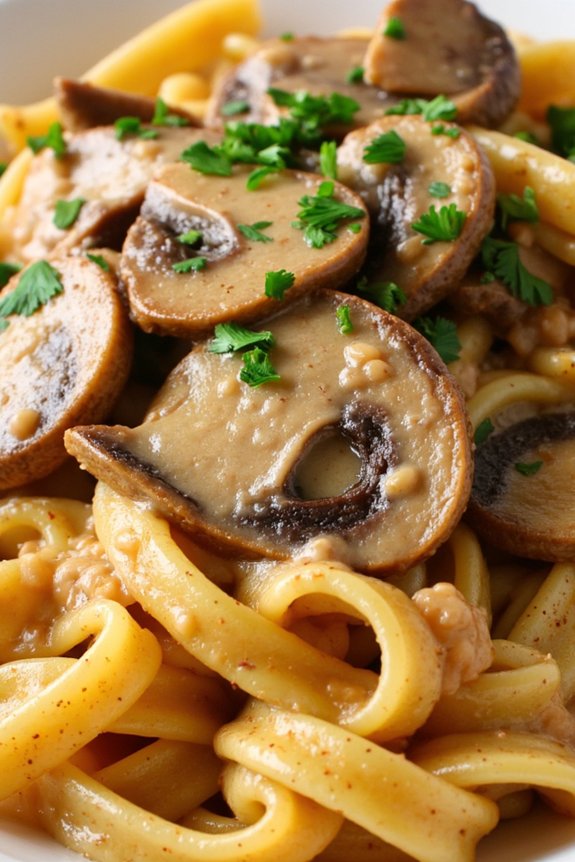
Vegan Mushroom Stroganoff is a comforting, creamy, and hearty dish perfect for family dinners without any dairy! This recipe is a plant-based twist on the classic Russian dish, making it suitable for those who are lactose intolerant or following a vegan diet. The rich and savory flavors of the mushrooms and the creamy sauce guarantee that it remains satisfying and delicious, while the use of plant-based ingredients keeps it healthy and accessible.
This Vegan Mushroom Stroganoff is easy to prepare and makes for a perfect weeknight meal. It doesn’t require any fancy ingredients and can be whipped up in under an hour. The combination of mushrooms, onions, garlic, and a touch of paprika gives the dish its distinctive flavor, while a vegan sour cream substitute creates that signature creamy texture. Serve it over pasta or rice to complete this hearty meal that can easily serve 4-6 people.
Ingredients:
- 2 tablespoons olive oil
- 1 large onion, diced
- 3 cloves garlic, minced
- 1 pound mushrooms, sliced
- 1 tablespoon soy sauce
- 1 teaspoon smoked paprika
- 1/4 teaspoon black pepper
- 1 cup vegetable broth
- 1 cup canned coconut milk or almond milk
- 2 tablespoons cornstarch
- 2 tablespoons water
- 1 cup vegan sour cream
- 12 ounces pasta (such as fettuccine or penne)
- Salt, to taste
- Fresh parsley, chopped (for garnish)
Instructions:
- Cook the Pasta: Begin by bringing a large pot of salted water to a boil. Add your choice of pasta and cook according to package instructions until al dente. Drain and set aside.
- Sauté the Aromatics: In a large skillet, heat the olive oil over medium heat. Add the diced onion and sauté for about 5 minutes, or until the onion becomes translucent. Stir in the minced garlic and cook for an additional minute until fragrant.
- Cook the Mushrooms: Add the sliced mushrooms to the skillet. Cook for about 8-10 minutes, stirring occasionally, until the mushrooms are browned and have released their moisture.
- Season and Simmer: Stir in the soy sauce, smoked paprika, and black pepper. Pour in the vegetable broth and coconut milk, bringing the mixture to a gentle simmer. Allow it to cook for 5-7 minutes, letting the flavors meld together.
- Thicken the Sauce: In a small bowl, mix the cornstarch with water to create a slurry. Slowly pour the slurry into the skillet, stirring constantly, until the sauce thickens to your desired consistency.
- Add the Vegan Sour Cream: Reduce the heat to low and gently fold in the vegan sour cream. Mix well until the sauce is smooth and creamy. Taste and adjust the seasoning with salt as needed.
- Combine and Serve: Add the cooked pasta to the skillet and toss until it’s well coated with the sauce. Serve the Vegan Mushroom Stroganoff warm, garnished with fresh parsley.
Extra Tips:
For an even richer flavor, consider using a mix of different mushroom varieties such as cremini, shiitake, and portobello. If you prefer a nutty flavor, cashew cream can be a great substitute for coconut milk.
Additionally, if you find the sauce is too thick, you can thin it out with a little additional vegetable broth. Don’t forget to taste and adjust the seasoning at the end, as the flavor can vary depending on the type of mushrooms and vegan sour cream used.
Enjoy this dish with a side salad or steamed vegetables for a complete meal!
Sweet Potato and Chickpea Stew
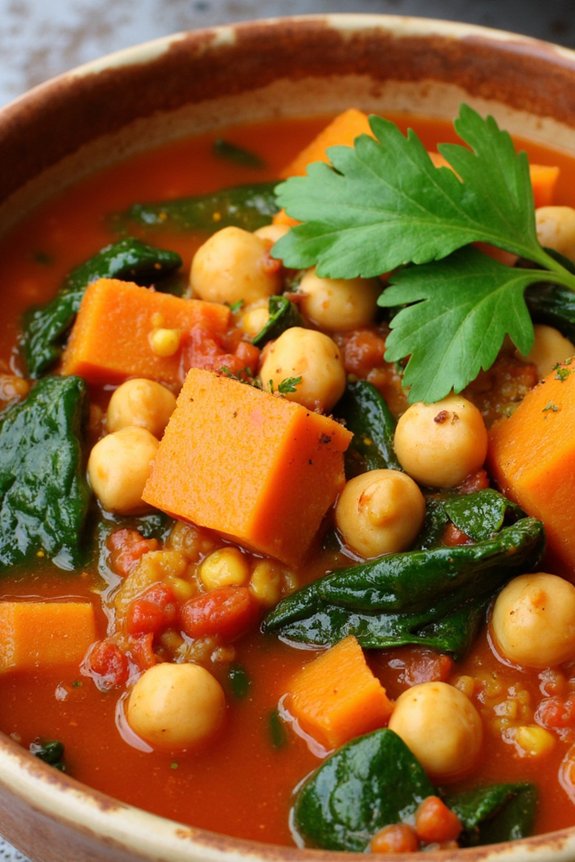
This Sweet Potato and Chickpea Stew is a hearty and flavorful dish perfect for family dinners. It’s packed with nourishing ingredients and seasoned to perfection, making it a comforting meal for everyone. The combination of sweet potatoes and chickpeas provides a wonderful texture, while spices like cumin and coriander add depth to the flavor profile. Best of all, this stew is completely dairy-free, so it’s suitable for those with dietary restrictions or preferences.
The stew isn’t only delicious but also incredibly easy to prepare, making it an ideal choice for busy weeknights. With a few simple ingredients and spices, you can create a warm and satisfying meal that will be loved by adults and kids alike. Serve it with a side of rice or some crusty bread to soak up the delicious broth, and you have a complete meal that’s both nutritious and filling.
Ingredients (Serves 4-6):
- 2 tablespoons olive oil
- 1 large onion, diced
- 3 cloves garlic, minced
- 2 medium sweet potatoes, peeled and cubed
- 2 (15-ounce) cans chickpeas, drained and rinsed
- 1 (14-ounce) can diced tomatoes
- 4 cups vegetable broth
- 1 teaspoon ground cumin
- 1 teaspoon ground coriander
- 1/2 teaspoon turmeric
- 1/2 teaspoon smoked paprika
- Salt and black pepper to taste
- 1 cup fresh spinach leaves
- 1 tablespoon fresh lemon juice
- 1/4 cup fresh cilantro, chopped
Instructions:
- Sauté Aromatics: Heat olive oil in a large pot over medium heat. Add the diced onion and sauté for about 5 minutes, or until it becomes translucent. Stir in the minced garlic and cook for an additional 1 minute until fragrant.
- Add Main Ingredients: Add the cubed sweet potatoes, chickpeas, diced tomatoes, and vegetable broth to the pot. Stir well to combine all the ingredients.
- Season the Stew: Sprinkle the cumin, coriander, turmeric, smoked paprika, salt, and black pepper over the mixture. Stir to guarantee the spices are evenly distributed.
- Simmer the Stew: Bring the stew to a boil, then reduce the heat to low. Cover the pot and let it simmer for about 25-30 minutes, or until the sweet potatoes are tender.
- Finish with Greens and Lemon: Stir in the fresh spinach leaves and let them wilt for about 2-3 minutes. Add the lemon juice and stir to combine.
- Garnish and Serve: Turn off the heat and garnish the stew with fresh cilantro. Serve hot with your choice of rice or crusty bread.
Extra Tips:
For added depth of flavor, consider roasting the sweet potatoes before adding them to the stew. This can enhance their natural sweetness and add a slight caramelized note to the dish.
If you prefer a thicker stew, you can mash some of the sweet potatoes after cooking or add a little cornstarch mixed with water to thicken the broth.
Also, feel free to customize the stew by adding other vegetables like bell peppers or carrots, or by adjusting the spices to suit your taste preferences.
Butternut Squash Risotto

Butternut Squash Risotto is a creamy, flavorful dish perfect for a family dinner without the use of any dairy products. This recipe substitutes traditional ingredients with plant-based alternatives to achieve the same rich and comforting texture associated with classic risotto. The butternut squash adds a natural sweetness and a vibrant hue, making this dish as visually appealing as it’s delicious.
With a blend of aromatic herbs and a hint of nutritional yeast, this risotto offers a depth of flavor that will satisfy both vegans and non-vegans alike. Preparing this Butternut Squash Risotto involves gently cooking Arborio rice in a savory broth until it reaches a creamy consistency. The roasted squash is pureed and folded into the risotto, infusing it with its delightful taste and velvety texture.
This dish can be served as a standalone main course or as a side dish, and is perfect for a cozy family dinner or a special occasion. With a serving size of 4-6 people, this risotto is sure to be a hit at your next gathering.
Ingredients:
- 1 medium butternut squash, peeled and cubed
- 2 tablespoons olive oil
- Salt and pepper to taste
- 1 onion, finely chopped
- 2 cloves garlic, minced
- 1 1/2 cups Arborio rice
- 1/2 cup white wine (optional)
- 5 cups vegetable broth, kept warm
- 1/4 cup nutritional yeast
- 1 teaspoon dried thyme
- Fresh parsley, chopped, for garnish
Instructions:
- Roast the Squash: Preheat your oven to 400°F (200°C). Toss the cubed butternut squash with 1 tablespoon of olive oil, salt, and pepper. Spread it evenly on a baking sheet and roast for about 25-30 minutes, or until tender. Set aside to cool slightly, then puree half of the squash in a blender or food processor.
- Sauté Aromatics: In a large saucepan, heat the remaining tablespoon of olive oil over medium heat. Add the chopped onion and garlic, sautéing until the onion becomes translucent and fragrant, about 5 minutes.
- Toast the Rice: Add the Arborio rice to the saucepan and stir well, making sure each grain is coated with the oil. Cook for about 2 minutes until the edges of the rice become translucent.
- Add Wine: If using, pour in the white wine, stirring constantly until it’s fully absorbed by the rice.
- Cook the Risotto: Gradually add the warm vegetable broth, one ladle at a time, stirring frequently. Allow each addition to be absorbed before adding the next. Continue this process for about 18-20 minutes, or until the rice is al dente and creamy.
- Incorporate Squash and Seasoning: Stir in the pureed butternut squash, nutritional yeast, and thyme. Cook for an additional 2 minutes, making sure everything is well combined. Gently fold in the remaining roasted squash cubes.
- Finish and Serve: Taste and adjust seasoning with salt and pepper. Serve the risotto warm, garnished with chopped fresh parsley.
Extra Tips:
For the best results, choose a butternut squash that’s firm and has a deep, uniform color. When adding the broth, patience is key; slowly incorporating the liquid guarantees the rice releases its starches, resulting in a creamy texture.
If you prefer a more pronounced squash flavor, feel free to puree all of the roasted squash. Nutritional yeast gives the risotto a cheesy flavor, making up for the absence of dairy. Adjust the amount to suit your taste preferences.
Finally, if you wish to add a bit more richness, consider stirring in a tablespoon of vegan butter at the end of cooking.
Creamy Garlic Shrimp With Coconut Milk

Creamy Garlic Shrimp With Coconut Milk is a delicious and dairy-free dish that offers a delightful blend of flavors. This recipe combines succulent shrimp with the rich and creamy texture of coconut milk, enhanced by the aromatic essence of garlic.
It’s a versatile dish perfect for family dinners or special occasions, delivering a taste that’s both comforting and exotic. Coconut milk provides a wonderful alternative to traditional cream, making this dish suitable for those who are lactose intolerant or simply looking to reduce dairy in their diet.
The preparation of Creamy Garlic Shrimp With Coconut Milk is straightforward, making it an ideal choice for a quick yet elegant meal. The shrimp are cooked to perfection, guaranteeing they remain tender and juicy, while the coconut milk sauce is infused with garlic and other spices to create a harmonious blend of flavors.
This dish can be served over rice, pasta, or alongside steamed vegetables for a complete meal that satisfies the whole family. Now, let’s gather the ingredients and get started on this delightful dairy-free recipe that serves 4-6 people.
Ingredients:
- 1 ½ pounds large shrimp, peeled and deveined
- 1 tablespoon olive oil
- 4 cloves garlic, minced
- 1 can (13.5 oz) coconut milk
- 1 tablespoon lime juice
- 1 teaspoon ground paprika
- 1 teaspoon salt
- ½ teaspoon black pepper
- 1 tablespoon fresh cilantro, chopped (optional)
- Cooked rice or pasta for serving
Instructions:
- Prepare the Shrimp: Rinse the shrimp under cold water and pat them dry with paper towels. Set them aside.
- Heat the Oil: In a large skillet, heat the olive oil over medium heat until it shimmers.
- Cook the Garlic: Add the minced garlic to the skillet and sauté for about 1 minute, or until fragrant. Be careful not to let it burn.
- Add the Shrimp: Place the shrimp in the skillet in a single layer. Cook them for 2-3 minutes on one side until they start to turn pink.
- Make the Sauce: Flip the shrimp and pour in the coconut milk. Stir in the lime juice, paprika, salt, and pepper. Bring the mixture to a gentle simmer.
- Simmer the Dish: Reduce the heat to low and let the shrimp cook in the simmering coconut milk sauce for an additional 4-5 minutes until they’re fully cooked through and the sauce has slightly thickened.
- Finish and Serve: Sprinkle the chopped cilantro over the shrimp if using. Serve the creamy garlic shrimp over cooked rice or pasta, guaranteeing each serving is topped with plenty of sauce.
Extra Tips:
To guarantee the best texture, don’t overcook the shrimp; they should be opaque and firm to the touch when done. If you prefer a bit more heat, consider adding a pinch of red pepper flakes along with the paprika.
For a thicker sauce, you can simmer it a bit longer or add a teaspoon of cornstarch mixed with a tablespoon of water to the sauce. Fresh lime juice adds a bright flavor, so use fresh rather than bottled if possible. Enjoy your meal with a side of steamed vegetables for added nutrition and color.
Dairy-Free Chicken Pot Pie
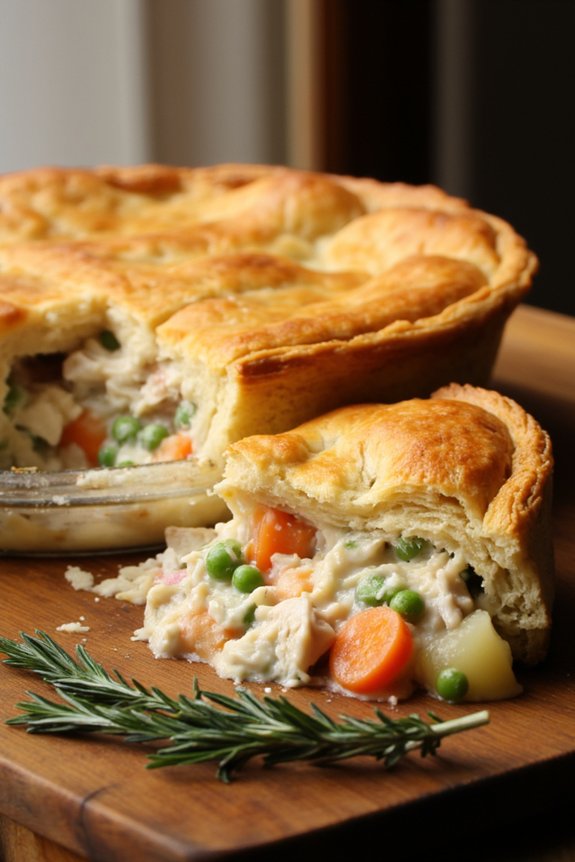
If you’re looking for a comforting family dinner that everyone can enjoy, this Dairy-Free Chicken Pot Pie is the perfect choice. This recipe captures all the traditional flavors of a classic pot pie but without any dairy products, making it suitable for those with lactose intolerance or dairy allergies.
The creamy filling and flaky crust come together to create a hearty meal that will satisfy even the pickiest eaters. This dish is ideal for serving a family of 4-6 people, providing generous portions that are perfect for a cozy dinner.
The dish features tender chunks of chicken, fresh vegetables, and a rich, savory sauce all encased in a golden, dairy-free pastry crust. The secret to the creamy filling lies in the use of non-dairy milk alternatives and a flavorful broth, which guarantees that no taste is sacrificed in this comforting classic.
Whether you’re serving it on a weeknight or as a special weekend meal, this Dairy-Free Chicken Pot Pie is sure to be a hit at your family dinner table.
Ingredients (for 4-6 servings):
- 2 cups cooked and shredded chicken
- 1 cup diced carrots
- 1 cup frozen peas
- 1 cup diced potatoes
- 1/2 cup diced celery
- 1 small onion, chopped
- 2 cloves garlic, minced
- 1/4 cup all-purpose flour
- 2 cups chicken broth
- 1 cup unsweetened almond milk or coconut milk
- 1 teaspoon dried thyme
- 1 teaspoon dried parsley
- Salt and pepper to taste
- 2 tablespoons olive oil
- 1 package (2 sheets) dairy-free puff pastry, thawed
Instructions:
- Prepare the Filling: In a large skillet, heat olive oil over medium heat. Add onions, garlic, celery, and carrots to the skillet and sauté for about 5 minutes, until the vegetables begin to soften.
- Cook the Potatoes: Add the diced potatoes to the skillet and cook for another 5 minutes. Season the mixture with thyme, parsley, salt, and pepper.
- Make the Sauce: Sprinkle the flour over the vegetables, stirring constantly for about 1 minute until the flour is well incorporated. Slowly pour in the chicken broth and almond milk, stirring continuously to prevent lumps. Bring the mixture to a simmer and cook until it thickens, about 5-7 minutes.
- Combine Ingredients: Add the shredded chicken and peas to the skillet, stirring to combine all ingredients thoroughly. Remove from heat and set aside.
- Preheat the Oven: Preheat your oven to 400°F (200°C).
- Assemble the Pot Pie: Roll out one sheet of the thawed puff pastry and fit it into the bottom of a pie dish. Pour the chicken and vegetable filling into the pastry-lined dish.
- Add the Top Crust: Roll out the second sheet of puff pastry and place it over the filling. Trim any excess pastry and seal the edges by pressing them together with a fork.
- Bake the Pot Pie: Make a few slits in the top of the pastry to allow steam to escape. Place the pie in the preheated oven and bake for 25-30 minutes, or until the crust is golden brown and crispy.
- Cool Before Serving: Remove the pot pie from the oven and let it cool for a few minutes before serving.
Extra Tips:
To guarantee your Dairy-Free Chicken Pot Pie has a perfectly crispy crust, make sure the puff pastry is well-chilled before you begin assembling the pie. This will help it rise and become flaky during baking.
Additionally, you can customize the filling by adding your favorite vegetables or substituting the chicken with turkey for a different flavor. For a richer taste, consider using a combination of almond milk and coconut milk to achieve the desired creaminess in the sauce. Enjoy your meal with a simple side salad for a complete and satisfying family dinner.
Dairy-Free Creamy Broccoli Soup
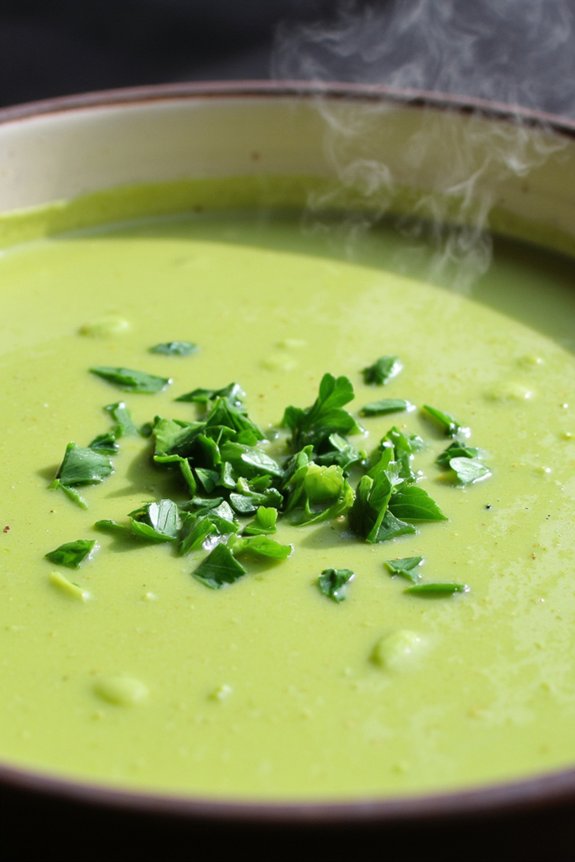
Dairy-Free Creamy Broccoli Soup is a comforting and nutritious dish perfect for a family dinner. This recipe offers a velvety, rich soup that’s free from dairy but brimming with flavor and creamy texture. The combination of fresh broccoli, aromatic vegetables, and a hint of coconut milk creates a delightful balance that everyone at the table can enjoy, whether they follow a dairy-free diet or not.
This soup is easy to prepare and makes for a perfect starter or a light meal on its own. It’s packed with vitamins and minerals from the broccoli and other vegetables, and it’s made even more satisfying with the addition of non-dairy milk alternatives that give it a creamy texture without the use of cream. This recipe serves 4-6 people, making it ideal for a family gathering or for having leftovers for the following day.
Ingredients:
- 2 tablespoons olive oil
- 1 medium onion, chopped
- 2 cloves garlic, minced
- 4 cups broccoli florets
- 1 large carrot, chopped
- 1 stalk celery, chopped
- 4 cups vegetable broth
- 1 cup canned coconut milk
- 1 teaspoon dried thyme
- Salt and pepper to taste
- Optional: fresh herbs for garnish (such as parsley or chives)
Instructions:
- Prepare the Vegetables: Begin by washing and chopping all the vegetables. Chop the onion, mince the garlic, and cut the broccoli into florets. Chop the carrot and celery as well.
- Sauté Aromatics: In a large pot, heat the olive oil over medium heat. Add the chopped onion and sauté until it becomes translucent, about 3-5 minutes. Add the minced garlic and sauté for an additional minute until fragrant.
- Cook the Vegetables: Add the broccoli florets, chopped carrot, and celery to the pot. Stir to combine with the onions and garlic. Cook for about 5 minutes, allowing the vegetables to begin softening.
- Simmer the Soup: Pour in the vegetable broth and add the dried thyme. Bring the mixture to a boil, then reduce the heat to low and let it simmer for 15-20 minutes, until the vegetables are tender.
- Blend the Soup: Once the vegetables are soft, use an immersion blender to puree the soup directly in the pot until smooth. Alternatively, transfer the soup in batches to a blender and blend until creamy.
- Add Coconut Milk: Return the soup to the pot if using a blender. Stir in the coconut milk until well combined. Heat through for an additional 5 minutes without bringing it to a boil.
- Season and Serve: Taste the soup and add salt and pepper to your liking. Serve hot, garnished with fresh herbs if desired.
Extra Tips: For an even smoother texture, strain the blended soup through a sieve before adding the coconut milk. If you prefer a thicker soup, add a peeled and diced potato along with the other vegetables. For a bit of spice, consider adding a pinch of cayenne pepper or a teaspoon of curry powder during the sautéing step. If you’re not a fan of coconut milk, almond or oat milk are excellent alternatives to maintain the creamy consistency.
Creamy Chickpea and Spinach Curry
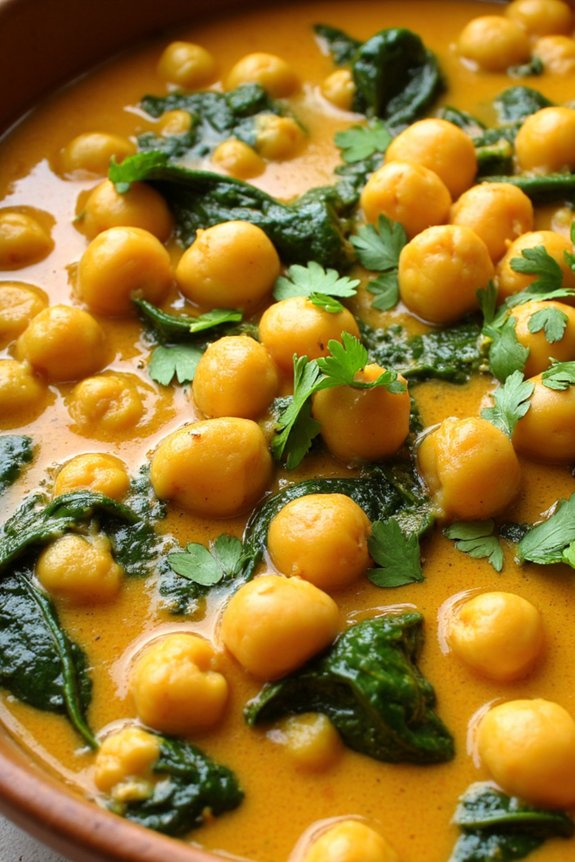
Creamy Chickpea and Spinach Curry is a delightful, dairy-free dish that combines the rich flavors of spices with the wholesome goodness of chickpeas and spinach. Perfect for a family dinner, this curry isn’t only satisfying but also packed with nutrients. The creamy texture is achieved without the use of dairy, making it a suitable meal for those with dietary restrictions. The balance of spices creates a warm and inviting aroma that will fill your kitchen and entice your taste buds.
This recipe is designed to serve 4-6 people, making it ideal for family gatherings or meal prepping for the week. The chickpeas provide a hearty base, while the spinach adds a vibrant color and subtle flavor. The coconut milk lends a luscious creaminess to the curry, ensuring each bite is flavorful and fulfilling. By following these instructions, you can create a delicious and nutritious meal that’s sure to become a favorite in your household.
Ingredients:
- 2 tablespoons olive oil
- 1 large onion, finely chopped
- 3 cloves garlic, minced
- 1 tablespoon fresh ginger, grated
- 1 tablespoon curry powder
- 1 teaspoon ground cumin
- 1 teaspoon ground coriander
- 1/2 teaspoon turmeric powder
- 1/4 teaspoon cayenne pepper (optional, for heat)
- 2 (15-ounce) cans chickpeas, drained and rinsed
- 1 (14-ounce) can coconut milk
- 1 (14-ounce) can diced tomatoes
- 5 ounces fresh spinach
- Salt and pepper to taste
- Fresh cilantro, chopped (for garnish)
- Cooked rice or naan bread, for serving
Cooking Instructions:
- Prepare Aromatics: Heat the olive oil in a large pot over medium heat. Add the chopped onion and sauté for about 5 minutes until it becomes translucent. Stir in the minced garlic and grated ginger, and cook for another minute until fragrant.
- Spice it Up: Add the curry powder, ground cumin, ground coriander, turmeric powder, and cayenne pepper (if using) to the pot. Stir well to coat the onions, garlic, and ginger with the spices, cooking for about 2 minutes to release their flavors.
- Add the Chickpeas: Pour the drained and rinsed chickpeas into the pot, stirring to combine with the spice mixture. Cook for 3-4 minutes to allow the chickpeas to absorb some of the flavors.
- Create the Curry Base: Add the coconut milk and diced tomatoes to the pot. Stir to incorporate all the ingredients. Bring the mixture to a gentle simmer, and let it cook for about 10-15 minutes, allowing the flavors to meld together.
- Incorporate the Spinach: Add the fresh spinach to the pot, stirring until it wilts into the curry. This should take about 2-3 minutes. Season the curry with salt and pepper to taste.
- Finish and Serve: Once the spinach is wilted and the curry is well mixed, remove from heat. Garnish with freshly chopped cilantro. Serve the Creamy Chickpea and Spinach Curry hot, alongside cooked rice or naan bread.
Extra Tips:
For an even creamier texture, you can blend a portion of the chickpeas with some of the coconut milk before adding it to the pot. This will enhance the creaminess without using dairy.
Adjust the spice level by varying the amount of cayenne pepper to suit your preference. This curry can also be made ahead of time and tastes even better the next day, as the flavors continue to develop.
If you prefer a thicker curry, let it simmer a bit longer to reduce the liquid. Enjoy your meal with a squeeze of fresh lemon juice for added brightness.
Dairy-Free Pesto Pasta With Sun-Dried Tomatoes
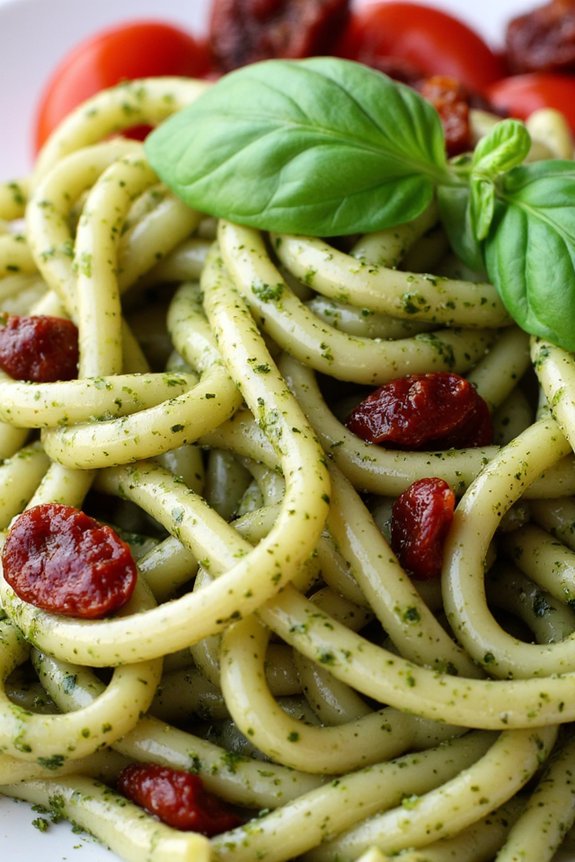
Indulge in the vibrant and rich flavors of this Dairy-Free Pesto Pasta with Sun-Dried Tomatoes, a delightful dish that combines the freshness of homemade pesto with the savory goodness of sun-dried tomatoes. Perfect for family dinners, this recipe offers a creamy texture without any dairy, making it suitable for those with dietary restrictions.
The pesto is made with nutrient-packed ingredients that provide a burst of flavor, ensuring every bite is a delicious experience. This dish isn’t only easy to prepare but also incredibly satisfying, making it a favorite for busy weeknights or casual gatherings.
The combination of al dente pasta, aromatic basil pesto, and tangy sun-dried tomatoes creates a harmonious balance of flavors that will have everyone coming back for seconds. With its vibrant green color and enticing aroma, this Dairy-Free Pesto Pasta is sure to impress both family and friends.
Ingredients (Serves 4-6):
- 16 oz (450g) pasta of choice (e.g., penne, fusilli)
- 1 cup fresh basil leaves
- 1/2 cup pine nuts
- 2 cloves garlic
- 1/2 cup olive oil
- 1/4 cup nutritional yeast
- Salt and pepper to taste
- 1 cup sun-dried tomatoes, sliced
- 1/4 cup reserved pasta water
Cooking Instructions:
- Cook the Pasta: Bring a large pot of salted water to a boil. Add the pasta and cook according to the package instructions until al dente. Reserve 1/4 cup of pasta water, then drain the pasta and set aside.
- Prepare the Pesto: In a food processor, combine basil leaves, pine nuts, garlic, nutritional yeast, salt, and pepper. Pulse until the mixture is finely chopped. With the processor running, slowly drizzle in the olive oil until the pesto is smooth and creamy.
- Combine Ingredients: In a large skillet, add the cooked pasta and sun-dried tomatoes. Pour the pesto over the pasta and add the reserved pasta water. Toss everything together over medium heat until the pasta is evenly coated with the pesto and the sun-dried tomatoes are distributed throughout.
- Adjust Seasoning: Taste the pasta and adjust the seasoning as needed with additional salt and pepper. If the pesto is too thick, add a little more pasta water until the desired consistency is reached.
- Serve: Transfer the pasta to a serving dish, garnish with additional fresh basil if desired, and serve immediately.
Extra Tips:
When making the pesto, feel free to adjust the ratios of the ingredients to suit your taste preferences. If you prefer a nuttier flavor, increase the amount of pine nuts. For a more garlicky punch, add an extra clove of garlic.
Additionally, you can substitute the pine nuts with walnuts or almonds for a different flavor profile. When selecting sun-dried tomatoes, opt for those packed in oil for a more intense flavor and softer texture.
Finally, this dish can be made a little ahead of time and served at room temperature, making it a versatile option for any occasion.
Creamy Quinoa and Vegetable Bake

Creamy Quinoa and Vegetable Bake is a delightful, dairy-free dish that combines the nutty flavor of quinoa with the vibrant tastes of seasonal vegetables. This recipe is perfect for a family dinner, offering a hearty and nutritious meal without the need for dairy products. The creamy texture is achieved through the use of coconut milk, which provides a rich and luscious base for the dish, while the vegetables add a variety of textures and flavors, making this bake both satisfying and wholesome.
This dish isn’t only easy to prepare but also highly customizable, allowing you to use whatever vegetables you have on hand. The quinoa serves as a complete protein source, making this a balanced meal for vegetarians and vegans alike. Whether you’re looking to accommodate a dairy-free diet or simply want to try something new, this Creamy Quinoa and Vegetable Bake is sure to become a family favorite.
Ingredients (serving size: 4-6 people):
- 1 cup quinoa
- 2 cups vegetable broth
- 1 tablespoon olive oil
- 1 onion, chopped
- 2 garlic cloves, minced
- 1 red bell pepper, diced
- 1 zucchini, sliced
- 1 cup broccoli florets
- 1 cup cherry tomatoes, halved
- 1 can (13.5 oz) coconut milk
- 2 tablespoons nutritional yeast
- 1 teaspoon dried oregano
- 1 teaspoon dried basil
- Salt and pepper to taste
- 1/4 cup chopped fresh parsley for garnish
Cooking Instructions:
- Prepare Quinoa: Rinse 1 cup of quinoa under cold water using a fine mesh strainer. In a medium saucepan, combine the rinsed quinoa with 2 cups of vegetable broth. Bring to a boil over medium-high heat, then reduce the heat to low, cover, and simmer for about 15 minutes or until the quinoa is cooked and the liquid is absorbed. Remove from heat and set aside.
- Sauté Vegetables: In a large skillet, heat 1 tablespoon of olive oil over medium heat. Add the chopped onion and sauté for about 3 minutes until it becomes translucent. Stir in the minced garlic and cook for an additional minute.
- Add Vegetables: Add the diced red bell pepper, sliced zucchini, broccoli florets, and cherry tomatoes to the skillet. Cook for 5-7 minutes, stirring occasionally, until the vegetables are tender yet still crisp.
- Combine Ingredients: Preheat your oven to 375°F (190°C). In a large mixing bowl, combine the cooked quinoa, sautéed vegetables, and coconut milk. Stir in the nutritional yeast, dried oregano, dried basil, salt, and pepper, mixing until well combined.
- Bake: Transfer the mixture to a lightly greased baking dish. Spread it out evenly and place in the preheated oven. Bake for 20-25 minutes, or until the top is slightly golden and the bake is heated through.
- Serve: Once baked, remove from the oven and allow it to cool slightly. Garnish with chopped fresh parsley before serving.
Extra Tips: To guarantee the best flavor, use fresh, seasonal vegetables whenever possible. Feel free to substitute or add other vegetables such as spinach, mushrooms, or carrots based on availability and personal preference. If you prefer a little spice, consider adding a pinch of red pepper flakes to the vegetable sauté. Finally, for an extra crunch, you can top the bake with breadcrumbs or crushed nuts before baking.
Coconut Milk Mac and Cheese

Ideal for those who are lactose intolerant or simply looking to explore alternative ingredients, this recipe is simple to prepare and sure to please a crowd. Coconut Milk Mac and Cheese isn’t only delicious but also an excellent way to introduce more plant-based ingredients into your family’s diet.
Ingredients (serving size: 4-6 people):
- 12 oz elbow macaroni
- 2 tablespoons olive oil
- 3 tablespoons all-purpose flour
- 2 cups canned coconut milk (full fat)
- 1 cup vegetable broth
- 1/3 cup nutritional yeast
- 1 teaspoon garlic powder
- 1 teaspoon onion powder
- 1 teaspoon Dijon mustard
- Salt and pepper to taste
- 1 cup breadcrumbs (optional topping)
- 2 tablespoons chopped fresh parsley (optional garnish)
Cooking Instructions:
- Cook the Macaroni: Begin by bringing a large pot of salted water to a rolling boil. Add the elbow macaroni and cook according to package instructions until al dente. Drain the pasta and set aside.
- Prepare the Sauce: In a large saucepan, heat the olive oil over medium heat. Add the all-purpose flour and stir continuously for about 1 minute to create a roux.
- Add Coconut Milk and Broth: Gradually whisk in the coconut milk and vegetable broth, ensuring there are no lumps. Continue to whisk until the mixture thickens, about 5 minutes.
- Season the Sauce: Stir in the nutritional yeast, garlic powder, onion powder, and Dijon mustard. Season with salt and pepper to taste. Allow the sauce to simmer on low heat for an additional 5 minutes to enhance the flavors.
- Combine Pasta and Sauce: Add the cooked macaroni to the sauce and stir until the pasta is thoroughly coated.
- Optional Topping: If desired, top the mac and cheese with breadcrumbs. To do this, preheat your oven to 350°F (175°C). Transfer the mac and cheese to a baking dish, sprinkle breadcrumbs evenly over the top, and bake for about 15 minutes until the breadcrumbs are golden brown.
- Serve: Remove from the oven and let it cool for a few minutes. Garnish with fresh parsley before serving.
Extra Tips:
When making Coconut Milk Mac and Cheese, it’s important to use full-fat coconut milk to achieve the creamiest sauce possible.
If you’re preparing this dish ahead of time, you can store it in the fridge for up to two days. Reheat gently on the stovetop, adding a splash of coconut milk if needed to restore creaminess.
Adjust seasoning to your taste, and feel free to add in other spices or herbs such as smoked paprika or thyme for a unique twist. Enjoy this dairy-free delight with a side salad or steamed vegetables for a complete meal.