

Getting kids to eat their veggies can be a challenge, but I’ve discovered some colorful, tasty vegetarian dinner recipes that work wonders. Think cheesy spinach and ricotta stuffed shells or a vibrant rainbow veggie stir-fry with tofu. These dishes are not only bursting with nutrients but are also a visual delight. Ready to explore more kid-approved meals that make dinner fun? Let’s get cooking!
Cheesy Spinach and Ricotta Stuffed Shells

Cheesy Spinach and Ricotta Stuffed Shells are a delightful vegetarian dish that combines the rich creaminess of ricotta cheese with the earthy goodness of spinach, all wrapped up in tender pasta shells. This recipe makes for a comforting and satisfying meal that’s perfect for family dinners. The combination of cheeses, spinach, and marinara sauce creates a flavorful and indulgent dish that even meat-eaters will love.
It’s a great way to incorporate more vegetables into your diet while enjoying a hearty, cheesy meal.
Preparing Cheesy Spinach and Ricotta Stuffed Shells is both fun and rewarding. The process involves filling large pasta shells with a delicious spinach and cheese mixture, covering them with marinara sauce, and baking them to perfection. This dish is perfect for serving 4-6 people and can easily be doubled for larger gatherings.
It’s a versatile recipe that allows for customization with different herbs and spices to suit your family’s taste preferences.
Ingredients for 4-6 servings:
- 20-24 jumbo pasta shells
- 2 cups marinara sauce
- 1 cup ricotta cheese
- 1 cup shredded mozzarella cheese
- 1/2 cup grated Parmesan cheese
- 10 ounces fresh spinach, wilted and chopped
- 1 large egg
- 2 cloves garlic, minced
- 1 teaspoon dried Italian seasoning
- Salt and pepper to taste
- Fresh basil leaves for garnish (optional)
Cooking Instructions:
- Preheat the Oven: Preheat your oven to 375°F (190°C) to prepare for baking the stuffed shells.
- Cook the Pasta Shells: Bring a large pot of salted water to a boil. Add the jumbo pasta shells and cook them until they’re al dente, following the package instructions. Drain the pasta and set it aside to cool slightly.
- Prepare the Spinach: In a large skillet, sauté the minced garlic over medium heat until fragrant. Add the fresh spinach and cook until wilted. Remove from heat, let cool, then chop the spinach coarsely.
- Make the Filling: In a large mixing bowl, combine the ricotta cheese, 1/2 cup of mozzarella cheese, 1/4 cup of Parmesan cheese, the chopped spinach, egg, Italian seasoning, salt, and pepper. Mix thoroughly until all ingredients are well combined.
- Fill the Shells: Carefully fill each cooked pasta shell with the spinach and ricotta mixture using a spoon or piping bag. Confirm each shell is generously stuffed.
- Assemble the Dish: Spread a thin layer of marinara sauce at the bottom of a baking dish. Arrange the filled shells in the dish in a single layer. Pour the remaining marinara sauce over the top of the shells.
- Add Cheese and Bake: Sprinkle the remaining mozzarella and Parmesan cheese over the top of the shells. Cover the baking dish with aluminum foil and bake in the preheated oven for 25 minutes. Remove the foil and bake for an additional 10-15 minutes, or until the cheese is bubbly and golden.
- Garnish and Serve: Once cooked, remove the dish from the oven and let it cool slightly. Garnish with fresh basil leaves if desired, and serve warm.
Extra Tips:
For an added depth of flavor, consider incorporating a pinch of nutmeg into the ricotta mixture, as it complements the spinach nicely. If you prefer a bit of heat, a dash of red pepper flakes can be added to the marinara sauce.
When filling the shells, using a piping bag or a zip-top bag with the corner snipped off can make the process cleaner and quicker. Be sure to cover the shells completely with sauce before baking to prevent them from drying out.
Finally, this dish can be prepared ahead of time and refrigerated until ready to bake, making it an excellent option for busy weeknights or entertaining guests.
Rainbow Veggie Stir-Fry With Tofu
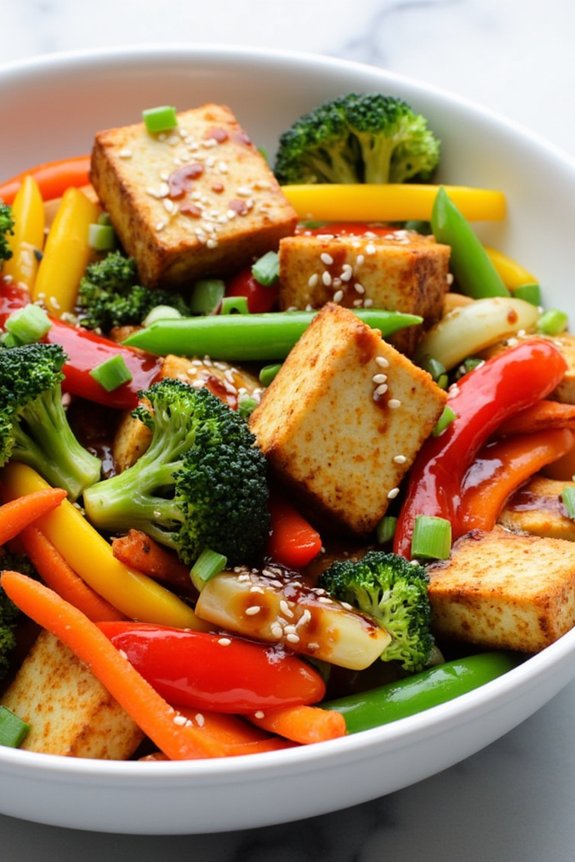
Rainbow Veggie Stir-Fry With Tofu is a vibrant and nutritious dish that’s perfect for a family dinner. This colorful meal is packed with fresh vegetables and protein-rich tofu, making it a satisfying and healthy option for vegetarians and anyone looking to incorporate more plant-based meals into their diet.
The medley of bell peppers, carrots, broccoli, and snap peas offers a wealth of vitamins and minerals, while the tofu adds a hearty texture and flavor that complements the array of vegetables.
The beauty of this dish lies not only in its eye-catching colors but also in its simplicity and speed. With just a few steps and some basic ingredients, you can have a delicious meal on the table in less than 30 minutes. The stir-fry sauce ties everything together with its savory, slightly sweet, and umami-rich flavor, making each bite a delightful experience.
This recipe serves 4-6 people, making it perfect for a cozy family dinner or a small gathering of friends.
Ingredients (Serving Size: 4-6):
- 1 block (14 ounces) of firm tofu, pressed and cubed
- 2 tablespoons vegetable oil, divided
- 1 red bell pepper, sliced
- 1 yellow bell pepper, sliced
- 1 cup broccoli florets
- 1 cup snap peas
- 2 medium carrots, julienned
- 3 cloves garlic, minced
- 1 tablespoon freshly grated ginger
- 1/4 cup soy sauce
- 2 tablespoons hoisin sauce
- 1 tablespoon rice vinegar
- 1 tablespoon sesame oil
- 1 tablespoon cornstarch mixed with 2 tablespoons water
- Cooked rice or noodles, for serving (optional)
- Sesame seeds and chopped green onions, for garnish
Cooking Instructions:
- Prepare the Tofu: Begin by pressing the tofu to remove excess moisture. Cut the tofu into 1-inch cubes. Heat 1 tablespoon of vegetable oil in a large non-stick skillet over medium-high heat. Add the tofu cubes and cook until all sides are golden brown, about 8-10 minutes. Remove tofu from the skillet and set aside.
- Sauté the Vegetables: In the same skillet, add the remaining tablespoon of vegetable oil. Add the minced garlic and grated ginger, sauté for about 30 seconds until fragrant. Add the sliced bell peppers, broccoli florets, snap peas, and julienned carrots. Stir-fry the vegetables for 5-7 minutes until they’re tender-crisp.
- Make the Sauce: In a small bowl, whisk together the soy sauce, hoisin sauce, rice vinegar, and sesame oil. Pour this sauce over the vegetables, stirring to combine.
- Thicken the Sauce: Add the cornstarch mixture to the skillet. Stir continuously until the sauce thickens, about 2 minutes.
- Combine Everything: Return the browned tofu to the skillet, tossing gently to coat the tofu and vegetables with the sauce. Cook for an additional 2-3 minutes to heat the tofu through.
- Serve: Serve the Rainbow Veggie Stir-Fry over cooked rice or noodles, if desired. Garnish with sesame seeds and chopped green onions before serving.
Extra Tips:
To guarantee your tofu is crispy, make sure to press it well to remove as much moisture as possible before cooking. You can also experiment with different vegetables according to what you have on hand or what’s in season.
For added flavor, consider incorporating a splash of lime juice or a sprinkle of chili flakes for some heat. If you prefer a gluten-free option, substitute tamari for soy sauce. This versatile recipe allows for plenty of customization to suit your taste preferences.
Sweet Potato and Black Bean Tacos
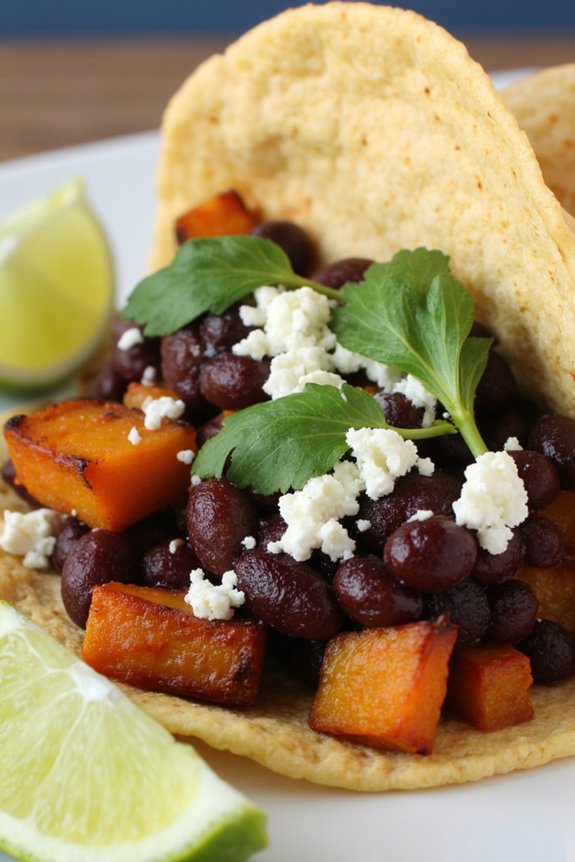
Sweet Potato and Black Bean Tacos are a delicious and satisfying vegetarian option that can be enjoyed by the whole family. These tacos combine the natural sweetness of roasted sweet potatoes with the hearty texture of black beans, creating a perfect balance of flavors and textures. Packed with nutrients and bursting with vibrant colors, this dish isn’t only a feast for the taste buds but also a treat for the eyes.
The combination of spices used in this recipe enhances the natural flavors of the ingredients, making each bite a delightful experience. Perfect for a family dinner, these tacos are easy to prepare and can be customized with your favorite toppings, such as avocado, fresh cilantro, or a squeeze of lime juice.
The recipe is designed to be both nutritious and satisfying, making it an ideal choice for those looking to incorporate more plant-based meals into their diet. Whether you’re a seasoned vegetarian or simply exploring meatless options, Sweet Potato and Black Bean Tacos are sure to become a favorite in your household.
Ingredients (Serves 4-6):
- 3 medium sweet potatoes, peeled and diced
- 2 tablespoons olive oil
- 1 teaspoon ground cumin
- 1 teaspoon smoked paprika
- 1/2 teaspoon chili powder
- Salt and pepper to taste
- 1 can (15 ounces) black beans, drained and rinsed
- 1/4 cup chopped red onion
- 1 clove garlic, minced
- 8-10 small corn tortillas
- 1/2 cup crumbled feta cheese (optional)
- 1/4 cup chopped fresh cilantro
- Lime wedges for serving
Instructions:
- Preheat the Oven: Set your oven to 400°F (200°C) and allow it to preheat while you prepare the ingredients.
- Prepare the Sweet Potatoes: In a large bowl, toss the diced sweet potatoes with olive oil, ground cumin, smoked paprika, chili powder, salt, and pepper. Make sure the sweet potatoes are evenly coated with the spices.
- Roast the Sweet Potatoes: Spread the seasoned sweet potatoes in a single layer on a baking sheet. Roast in the preheated oven for 25-30 minutes, or until they’re tender and starting to caramelize at the edges. Stir them halfway through to guarantee even cooking.
- Prepare the Black Bean Mixture: While the sweet potatoes are roasting, heat a small skillet over medium heat. Add a splash of olive oil, then sauté the chopped red onion and minced garlic until the onion is translucent and fragrant, about 3-4 minutes.
- Combine the Beans: Add the drained black beans to the sautéed onions and garlic. Stir to combine and heat through for another 2-3 minutes. Season with salt and pepper to taste.
- Assemble the Tacos: Warm the corn tortillas either by wrapping them in a damp cloth and microwaving for 30 seconds, or by heating them briefly in a dry skillet. Fill each tortilla with a spoonful of roasted sweet potatoes and a spoonful of the black bean mixture.
- Add Toppings: Top the tacos with crumbled feta cheese if using, a sprinkle of fresh cilantro, and a squeeze of lime juice. Additional toppings can include sliced avocado or a dollop of sour cream.
Extra Tips:
When making Sweet Potato and Black Bean Tacos, it’s important to make sure that the sweet potatoes are cut to uniform size to promote even cooking. If you prefer a bit of heat, consider adding a chopped jalapeño to the black bean mixture or sprinkling some red pepper flakes over the sweet potatoes before roasting.
For a gluten-free option, make sure to use corn tortillas. Finally, these tacos pair wonderfully with a side of Mexican rice or a fresh green salad for a complete meal. Enjoy experimenting with different toppings and flavors to make this dish uniquely yours!
Creamy Tomato Basil Soup With Grilled Cheese Dippers

Creamy Tomato Basil Soup With Grilled Cheese Dippers is the ultimate comfort food combination, perfect for a cozy family dinner. This dish combines the rich flavors of ripe tomatoes and fresh basil in a creamy soup, paired with crispy, gooey grilled cheese sandwiches that are perfect for dipping. The soup is incredibly easy to make, requiring only a handful of ingredients and minimal preparation time.
The grilled cheese dippers add a delightful contrast in texture, making each bite a satisfying experience. Whether you’re serving it as a main course or a starter, this recipe is sure to be a hit with both kids and adults alike.
This dish is ideal for a family gathering or a casual weeknight meal, serving 4-6 people. The creamy tomato basil soup can be prepared in advance and reheated before serving, allowing you to focus on grilling the cheese dippers just before mealtime. The balance of flavors, with the sweetness of the tomatoes, the aromatic basil, and the creamy consistency, makes this soup a versatile choice throughout the year.
The grilled cheese dippers, made with your choice of bread and cheese, aren’t only delicious but also customizable to suit everyone’s taste preferences.
Ingredients:
- 2 tablespoons olive oil
- 1 medium onion, chopped
- 3 cloves garlic, minced
- 2 (28-ounce) cans whole peeled tomatoes
- 2 cups vegetable broth
- 1 cup heavy cream
- 1/4 cup fresh basil leaves, chopped
- Salt and pepper to taste
- 8 slices of bread (sourdough, white, or whole wheat)
- 2 cups shredded cheese (cheddar, mozzarella, or your choice)
- 4 tablespoons butter
Cooking Instructions:
- Prepare the Soup Base:
- In a large pot over medium heat, add the olive oil and sauté the chopped onion until translucent, about 5 minutes. Add the minced garlic and cook for an additional 1 minute until fragrant.
- Cook the Tomatoes:
- Add the whole peeled tomatoes and their juices to the pot. Break the tomatoes apart with a spoon as they cook. Stir in the vegetable broth and bring the mixture to a simmer. Let it cook for about 15-20 minutes, allowing the flavors to meld together.
- Blend and Season the Soup:
- Use an immersion blender to puree the soup until smooth, or carefully transfer the mixture to a blender in batches. Return the blended soup to the pot. Stir in the heavy cream and chopped basil, then season with salt and pepper to taste. Keep the soup warm on low heat.
- Prepare the Grilled Cheese Dippers:
- Butter one side of each slice of bread. Place half of the slices, buttered side down, on a skillet over medium heat. Top each with a generous amount of shredded cheese, then place the remaining slices of bread on top, buttered side up.
- Grill the Sandwiches:
- Cook the sandwiches until the bread is golden brown and the cheese is melted, about 3-4 minutes per side. Remove from the skillet and let them cool slightly before slicing each sandwich into strips for dipping.
- Serve:
- Ladle the creamy tomato basil soup into bowls and serve with the grilled cheese dippers on the side.
Extra Tips:
For an extra depth of flavor, you can roast fresh tomatoes instead of using canned ones. Simply cut them in half, drizzle with olive oil, sprinkle with salt and pepper, and roast in the oven at 400°F (200°C) for about 30 minutes before adding them to the soup.
Additionally, you can experiment with different cheeses to find your family’s favorite combination for the grilled cheese dippers. Don’t forget to taste and adjust the seasoning of the soup before serving, as the acidity of tomatoes can vary. Enjoy this classic pairing with a side salad for a complete meal.
Veggie-Packed Zucchini Lasagna

Zucchini lasagna is a delightful and nutritious twist on the classic Italian dish, perfect for vegetarian family dinners. This version replaces traditional pasta sheets with thin slices of zucchini, offering a low-carb alternative that doesn’t compromise on flavor. Packed with a variety of vegetables, this dish isn’t only satisfying but also a great way to incorporate more greens into your meal.
The combination of gooey cheese, tangy tomato sauce, and layers of seasoned vegetables makes for a comforting and hearty dish that even non-vegetarians will love.
Preparing veggie-packed zucchini lasagna is a straightforward process that involves layering zucchini slices with a rich vegetable filling and creamy ricotta cheese. This dish is ideal for serving 4-6 people, making it perfect for family gatherings or a casual dinner with friends.
By using fresh vegetables like bell peppers, mushrooms, and spinach, along with herbs and spices, you’ll create a vibrant and flavorful meal that’s sure to please the whole family. Let’s explore the ingredients and steps necessary to bring this delicious dish to life.
Ingredients (Serves 4-6):
- 4 medium zucchinis
- 1 tablespoon olive oil
- 1 onion, chopped
- 2 cloves garlic, minced
- 1 red bell pepper, diced
- 1 cup mushrooms, sliced
- 2 cups fresh spinach
- 1 can (15 oz) tomato sauce
- 1 teaspoon dried basil
- 1 teaspoon dried oregano
- Salt and pepper to taste
- 1 cup ricotta cheese
- 1 egg
- 2 cups shredded mozzarella cheese
- 1/2 cup grated Parmesan cheese
Cooking Instructions:
- Prepare the Zucchini: Preheat your oven to 375°F (190°C). Wash the zucchinis and slice them lengthwise into thin strips, about 1/8 inch thick. Lay them out on a baking sheet and sprinkle with a little salt. Let them sit for 10-15 minutes to release excess moisture, then pat dry with a paper towel.
- Cook the Vegetables: In a large skillet, heat the olive oil over medium heat. Add the chopped onion and garlic, sautéing until the onion is translucent. Stir in the red bell pepper and mushrooms, cooking until they’re soft. Add the spinach and cook until wilted. Pour in the tomato sauce and season with basil, oregano, salt, and pepper. Let the mixture simmer for about 10 minutes.
- Prepare the Ricotta Mixture: In a bowl, combine the ricotta cheese with the egg. Mix well and set aside.
- Assemble the Lasagna: In a 9×13 inch baking dish, spread a thin layer of the vegetable sauce. Lay a layer of zucchini slices over the sauce. Spread half of the ricotta mixture over the zucchini, followed by a layer of vegetable sauce and a sprinkle of mozzarella cheese. Repeat the layers, finishing with a layer of zucchini topped with the remaining mozzarella and Parmesan cheese.
- Bake the Lasagna: Cover the dish with aluminum foil and bake in the preheated oven for 30 minutes. Remove the foil and bake for an additional 15 minutes, or until the cheese is bubbly and golden brown. Allow the lasagna to cool for about 10 minutes before slicing and serving.
Extra Tips:
When making zucchini lasagna, it’s essential to reduce the moisture content of the zucchini slices to avoid a watery dish. Salting the zucchini slices and letting them sit helps draw out excess water, ensuring a firmer texture.
You can also grill or bake the zucchini slices briefly before assembling the lasagna for even better results. Feel free to customize the vegetable filling by adding your favorite veggies, such as eggplant or kale, to suit your taste preferences. Enjoy experimenting with different herbs and spices to enhance the flavors of this versatile dish.
Kid-Friendly Vegetable Curry
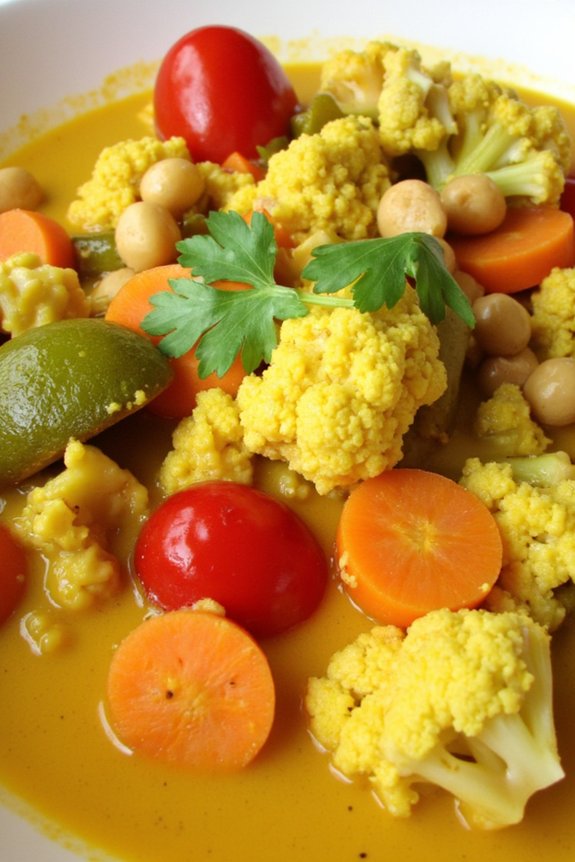
When it comes to family dinners, a delightful and nutritious option is the Kid-Friendly Vegetable Curry. This dish is perfect for introducing children to the vibrant flavors of curry without overwhelming their taste buds with too much spice. The combination of mild spices, creamy coconut milk, and a variety of colorful vegetables makes it an appealing and healthy choice for both kids and adults. Not only is it a feast for the eyes, but it also provides essential nutrients that growing children need.
This vegetarian curry is versatile and can be tailored to suit your family’s preferences. You can easily swap out vegetables based on seasonality or what’s available in your pantry. The dish is also gluten-free and can be made vegan by confirming all your ingredients are plant-based. Serve it with a side of rice or warm naan bread to soak up the delicious sauce, and you’ll have a complete meal that everyone will enjoy.
Ingredients for 4-6 servings:
- 2 tablespoons vegetable oil
- 1 onion, finely chopped
- 2 garlic cloves, minced
- 1 tablespoon fresh ginger, grated
- 1 tablespoon mild curry powder
- 1 teaspoon ground cumin
- 1 teaspoon ground coriander
- 1 can (14 oz) coconut milk
- 2 tablespoons tomato paste
- 2 cups mixed vegetables (such as carrots, peas, bell peppers, and potatoes), chopped
- 1 cup cauliflower florets
- 1 cup chickpeas, drained and rinsed
- Salt and pepper to taste
- Fresh cilantro, chopped (for garnish)
- Cooked rice or naan bread (for serving)
Cooking Instructions:
- Prepare the Aromatics: Heat the vegetable oil in a large pan over medium heat. Add the chopped onion and sauté for about 5 minutes until it becomes translucent. Stir in the minced garlic and grated ginger, cooking for an additional 1-2 minutes until fragrant.
- Add the Spices: Sprinkle in the mild curry powder, ground cumin, and ground coriander. Stir well to coat the onions and allow the spices to toast for about 1 minute, enhancing their flavors.
- Create the Curry Base: Pour in the coconut milk and add the tomato paste. Stir to combine all the ingredients thoroughly. Allow the mixture to come to a gentle simmer.
- Incorporate the Vegetables: Add the chopped mixed vegetables, cauliflower florets, and chickpeas to the curry base. Stir to confirm everything is well coated with the sauce. Season with salt and pepper to taste.
- Simmer the Curry: Cover the pan and let the curry simmer for about 20-25 minutes, or until the vegetables are tender and cooked through. Stir occasionally to prevent sticking and confirm even cooking.
- Finish and Serve: Once the vegetables are tender, taste the curry and adjust the seasoning if necessary. Remove from heat and garnish with freshly chopped cilantro. Serve hot with cooked rice or naan bread on the side.
Extra Tips:
When making Kid-Friendly Vegetable Curry, consider the preferences of your family. If your children are particularly sensitive to spices, you might want to start with less curry powder and gradually add more to taste.
Additionally, for a creamier texture, you can blend a portion of the cooked vegetables before serving. This not only thickens the sauce but also hides some of the veggies from picky eaters.
Finally, leftovers can be stored in an airtight container in the fridge for up to three days, making it a great option for meal prep or quick lunches.
Broccoli and Cheese Quesadillas

Broccoli and Cheese Quesadillas are a delightful and nutritious option for a vegetarian family dinner, combining the wholesome goodness of broccoli with the creamy richness of cheese. This dish is perfect for a quick weeknight meal that satisfies both adults and children.
The quesadillas are crispy on the outside with a gooey, cheesy filling, making them an irresistible treat for everyone at the table. Not only are they easy to make, but they also offer a clever way to incorporate more vegetables into your family’s diet.
These quesadillas are versatile, allowing you to customize them with various types of cheeses and additional ingredients like onions or bell peppers if desired. The recipe is straightforward and requires minimal preparation, guaranteeing you spend less time in the kitchen and more time enjoying the meal with your loved ones.
Best of all, this dish can be served with a variety of sides such as salsa, guacamole, or a fresh salad to make it a complete meal.
Ingredients for 4-6 servings:
- 8 large flour tortillas
- 2 cups broccoli florets, chopped
- 2 cups shredded cheddar cheese
- 1 cup shredded mozzarella cheese
- 1 small onion, finely chopped (optional)
- 1 tablespoon olive oil
- Salt and pepper to taste
- Butter or cooking spray for the tortillas
Cooking Instructions:
- Prepare the Broccoli: Start by steaming the broccoli florets until they’re tender but still bright green, which should take about 5-7 minutes. Once cooked, drain any excess water and set aside to cool slightly.
- Sauté the Onion: In a skillet, heat the olive oil over medium heat. Add the chopped onion, and sauté until translucent, about 3-4 minutes. If you aren’t using onion, you can skip this step.
- Combine Ingredients: In a large bowl, mix the steamed broccoli with the sautéed onions (if using), cheddar cheese, and mozzarella cheese. Season the mixture with salt and pepper to taste.
- Assemble the Quesadillas: Lay a tortilla flat on a clean surface. Spread a generous amount of the broccoli and cheese mixture over half of the tortilla, then fold the other half over to cover the filling.
- Cook the Quesadillas: Heat a non-stick skillet over medium heat and lightly grease with butter or cooking spray. Place the folded quesadilla in the skillet and cook for 3-4 minutes on each side, or until the tortilla is golden brown and the cheese is melted. Repeat with the remaining tortillas and filling.
- Serve: Once cooked, slice each quesadilla into wedges and serve immediately with your choice of salsa, guacamole, or a fresh side salad.
Extra Tips:
When making Broccoli and Cheese Quesadillas, feel free to experiment with different types of cheese such as Monterey Jack or pepper jack for a spicier kick.
If you prefer a creamier filling, consider adding a small amount of cream cheese or sour cream to the mixture. For a more robust flavor, you can also add a pinch of garlic powder or smoked paprika.
To guarantee the tortillas get perfectly crispy, avoid overfilling them and make sure the skillet is hot before adding the quesadillas. Enjoy your meal with a revitalizing beverage for a satisfying dining experience.
Mini Veggie Pizzas With Homemade Sauce

If you’re looking for a delightful and healthy family dinner option, these Mini Veggie Pizzas With Homemade Sauce are sure to be a hit. They’re perfect for a night in and can be customized to suit everyone’s taste buds, making them both versatile and fun to prepare.
The homemade sauce is rich in flavor and enhances the natural taste of the fresh vegetables, creating a balanced and satisfying meal. Each mini pizza is a colorful, bite-sized creation that isn’t only delicious but also a great way to get kids involved in the kitchen.
This recipe is designed to serve 4-6 people, making it ideal for small gatherings or family dinners. The homemade sauce is a simple yet flavorful addition that complements the array of vegetables beautifully.
These mini pizzas are baked to perfection, providing a crispy base with a tender interior, topped with your choice of vibrant veggies and a generous sprinkle of cheese. Whether you’re a seasoned chef or a beginner, this recipe is straightforward and guaranteed to yield delicious results every time.
Ingredients
- 6 mini pizza bases or pita breads
- 1 cup tomato sauce
- 2 tablespoons olive oil
- 1 teaspoon dried oregano
- 1 teaspoon dried basil
- 1 clove garlic, minced
- 1 small onion, finely chopped
- 1 red bell pepper, diced
- 1 green bell pepper, diced
- 1 cup mushrooms, sliced
- 1 cup cherry tomatoes, halved
- 1 cup mozzarella cheese, shredded
- Salt and pepper to taste
- Fresh basil leaves for garnish
Cooking Instructions
1. Prepare the Sauce: In a medium saucepan, heat the olive oil over medium heat. Add the minced garlic and finely chopped onion, sautéing until they become translucent and fragrant.
Stir in the tomato sauce, dried oregano, and dried basil. Allow the sauce to simmer for about 10 minutes, stirring occasionally. Season with salt and pepper to taste, then set aside to cool slightly.
2. Preheat the Oven: Preheat your oven to 400°F (200°C). Line a baking sheet with parchment paper.
3. Prepare the Pizza Bases: Place the mini pizza bases or pita breads on the prepared baking sheet. Spread a generous amount of the homemade sauce over each base, ensuring an even layer.
4. Add the Veggie Toppings****: Evenly distribute the diced red and green bell peppers, sliced mushrooms, and halved cherry tomatoes over the sauce on each pizza base.
Customize your toppings based on preference, ensuring a balanced distribution of ingredients.
5. Add Cheese: Sprinkle a generous amount of shredded mozzarella cheese over the veggie-topped pizzas. For a more indulgent option, you can add a mix of other cheeses like cheddar or parmesan.
6. Bake the Pizzas: Place the baking sheet in the preheated oven and bake for 10-15 minutes, or until the cheese is melted and bubbly, and the edges of the bases are golden brown.
7. Garnish and Serve: Once baked, remove the pizzas from the oven and allow them to cool slightly. Garnish with fresh basil leaves before serving. Enjoy your homemade mini veggie pizzas warm.
Extra Tips
For an extra crispy base, you can lightly brush the edges of the pizza bases with olive oil before adding the sauce and toppings.
If you prefer a spicy kick, consider adding a pinch of red pepper flakes to the sauce or as a garnish. These mini veggie pizzas are also a great way to use up any leftover vegetables you may have in the fridge, so feel free to get creative with your toppings.
Finally, if you’re short on time, store-bought pizza dough or pre-made sauce can be used as a convenient alternative without sacrificing much flavor.
Crunchy Veggie Sushi Rolls
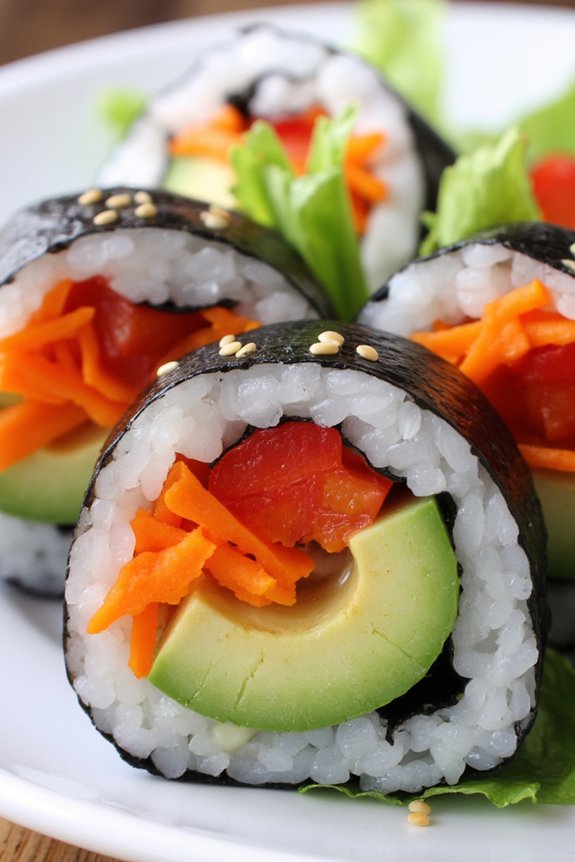
Crunchy Veggie Sushi Rolls are a delightful and healthy twist on traditional sushi, making them perfect for a vegetarian family dinner. These rolls are packed with a vibrant mix of fresh vegetables, offering a satisfying crunch with every bite. By using a variety of colorful veggies and pairing them with seasoned sushi rice, you create a dish that’s not only visually appealing but also rich in nutrients.
Whether you’re a seasoned sushi maker or a beginner, these rolls are easy to prepare and will surely impress your family and guests.
The key to making these Crunchy Veggie Sushi Rolls is to focus on the freshness and quality of the ingredients. By carefully selecting crisp vegetables and properly preparing the sushi rice, you guarantee that each roll is bursting with flavor.
The addition of a crispy element, such as toasted sesame seeds or tempura crumbs, adds an exciting texture that complements the softness of the rice and the crunch of the vegetables. This dish is perfect for a light dinner or a fun family activity where everyone can participate in rolling their own sushi.
Ingredients for 4-6 servings:
- 2 cups sushi rice
- 2 1/2 cups water
- 1/4 cup rice vinegar
- 2 tablespoons sugar
- 1 teaspoon salt
- 6 sheets of nori (seaweed)
- 1 cucumber, julienned
- 1 carrot, julienned
- 1 avocado, sliced
- 1 red bell pepper, julienned
- 1 cup of sprouts (such as alfalfa or radish)
- 1/4 cup toasted sesame seeds
- Soy sauce for dipping
- Optional: pickled ginger and wasabi for serving
Instructions:
- Prepare the sushi rice: Rinse the sushi rice under cold water until the water runs clear. Combine the rice and water in a pot and bring to a boil. Once boiling, reduce the heat to low, cover, and simmer for 15 minutes. Remove from heat and let it sit for another 10 minutes, covered.
- Season the rice: In a small bowl, mix the rice vinegar, sugar, and salt until dissolved. Transfer the cooked rice to a large bowl and gently fold in the vinegar mixture with a wooden spatula. Allow the rice to cool to room temperature.
- Prepare the vegetables: While the rice is cooling, julienne the cucumber, carrot, and red bell pepper. Slice the avocado and have the sprouts ready.
- Assemble the sushi rolls: Place a bamboo sushi mat on a clean surface and lay a sheet of nori on top, shiny side down. Spread a thin layer of sushi rice over the nori, leaving a 1-inch border at the top.
- Add the fillings: Arrange a line of cucumber, carrot, bell pepper, avocado, and sprouts across the center of the rice. Sprinkle with toasted sesame seeds for extra crunch.
- Roll the sushi: Using the bamboo mat, carefully roll the nori over the fillings, applying gentle pressure to keep the roll tight. Seal the edge with a little water if necessary.
- Slice and serve: Use a sharp knife to cut the roll into 6-8 pieces. Serve with soy sauce, pickled ginger, and wasabi on the side.
Extra Tips:
To make the sushi rolling process easier, keep a small bowl of water nearby to dip your fingers in—this will prevent the rice from sticking to your hands.
If you prefer an added crunch, consider including tempura crumbs or panko in the filling. It’s also helpful to practice rolling with a bamboo mat to achieve a tight and even roll.
Quinoa and Veggie Stuffed Peppers
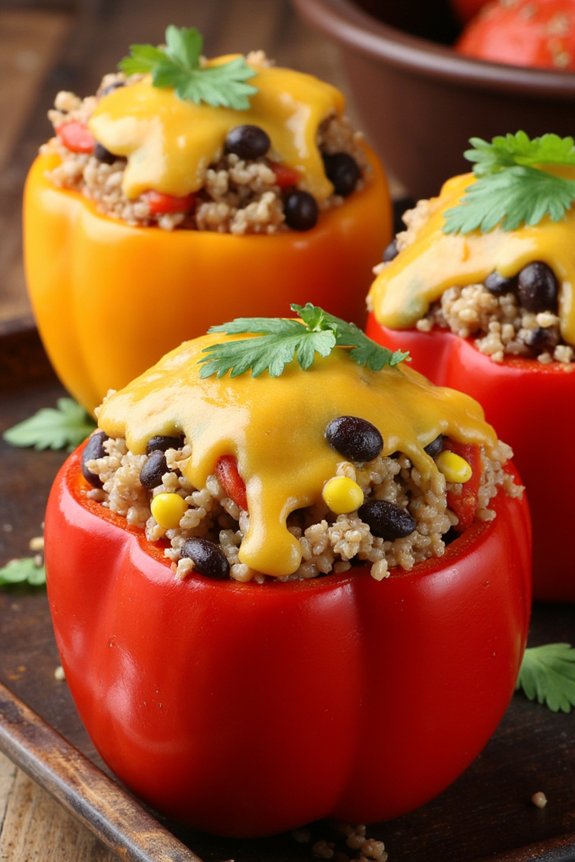
Quinoa and Veggie Stuffed Peppers are a delicious and nutritious option for a family dinner that everyone will love. This dish isn’t only packed with protein from the quinoa but also bursts with flavor from a medley of colorful vegetables. With the vibrant peppers serving as a natural baking dish, this meal is both visually appealing and satisfying. It’s a perfect way to enjoy a meatless meal that’s filling and wholesome.
The beauty of Quinoa and Veggie Stuffed Peppers lies in their versatility. You can easily customize the stuffing to suit your family’s taste preferences or dietary needs. Whether you’re a seasoned vegetarian or simply looking to incorporate more plant-based meals into your diet, this recipe is a great choice. The combination of quinoa, beans, and veggies guarantees a balanced meal that provides essential nutrients, making it an excellent option for a weeknight dinner or a special occasion.
Ingredients (Serves 4-6):
- 6 large bell peppers (any color)
- 1 cup quinoa
- 2 cups vegetable broth
- 1 can (15 oz) black beans, drained and rinsed
- 1 cup corn kernels (fresh, frozen, or canned)
- 1 cup diced tomatoes
- 1 small onion, diced
- 2 cloves garlic, minced
- 1 teaspoon ground cumin
- 1 teaspoon smoked paprika
- 1 cup shredded cheddar cheese (or vegan cheese option)
- Salt and pepper to taste
- Fresh cilantro for garnish (optional)
- Olive oil
Cooking Instructions:
- Prepare the Quinoa: Rinse the quinoa under cold water using a fine mesh sieve. In a medium saucepan, combine the quinoa and vegetable broth, bringing it to a boil over medium-high heat. Reduce the heat to low, cover, and simmer for about 15 minutes or until the quinoa is cooked and the broth is absorbed. Fluff with a fork and set aside.
- Preheat the Oven: Preheat your oven to 375°F (190°C).
- Prepare the Peppers: Slice the tops off the bell peppers and remove the seeds and membranes. Lightly brush the outside of the peppers with olive oil and place them upright in a baking dish.
- Cook the Vegetables: In a large skillet over medium heat, add a drizzle of olive oil. Sauté the onion and garlic until the onion becomes translucent. Add the corn, black beans, diced tomatoes, cumin, and smoked paprika. Cook for about 5 minutes, stirring occasionally, until the mixture is heated through and fragrant.
- Mix the Stuffing: In a large bowl, combine the cooked quinoa with the vegetable mixture. Stir in half of the shredded cheese and season with salt and pepper to taste.
- Stuff the Peppers: Spoon the quinoa and vegetable mixture into each of the prepared bell peppers, pressing gently to pack the mixture. Sprinkle the remaining cheese on top of each stuffed pepper.
- Bake the Peppers: Cover the baking dish with aluminum foil and bake in the preheated oven for 25 minutes. Remove the foil and continue to bake for another 10-15 minutes, or until the peppers are tender and the cheese is bubbly and golden.
- Serve: Remove from the oven and let cool slightly before serving. Garnish with fresh cilantro if desired.
Extra Tips:
For a spicier version, consider adding diced jalapeños to the stuffing or a dash of hot sauce. If you prefer softer peppers, precook them by steaming or boiling for a few minutes before stuffing.
This dish can also be made ahead by preparing the stuffing a day in advance and refrigerating it, then stuffing and baking the peppers when ready to serve. Feel free to experiment with different types of cheese or additional vegetables like zucchini or mushrooms to suit your taste.
Enjoy your Quinoa and Veggie Stuffed Peppers with a side salad or some crusty bread for a complete meal.
Classic Margherita Flatbread

The Classic Margherita Flatbread is a delightful twist on the traditional pizza, offering a lighter and more refined version of the beloved Italian classic. This dish combines the simplicity of fresh ingredients with the rich flavors of mozzarella, tomatoes, and basil, creating a harmonious balance that appeals to both children and adults.
Perfect for a family dinner, this flatbread isn’t only easy to make but also a fun way to involve everyone in the preparation process. With its crisp crust and melty cheese, it’s sure to be a hit at the dinner table.
This recipe yields enough servings for 4-6 people, making it an ideal option for a cozy family meal or a casual gathering with friends. The beauty of the Margherita Flatbread lies in its simplicity, allowing the quality of each ingredient to shine through.
Whether you’re a seasoned cook or a beginner in the kitchen, this recipe is straightforward and rewarding, offering a delicious outcome that promises to satisfy everyone’s taste buds.
Ingredients:
- 2 pre-made flatbread crusts
- 2 cups fresh mozzarella cheese, sliced
- 2-3 medium tomatoes, thinly sliced
- 1/4 cup fresh basil leaves
- 2 tablespoons olive oil
- 1 teaspoon garlic powder
- Salt and pepper to taste
- Balsamic glaze (optional)
Cooking Instructions:
- Preheat the Oven: Start by preheating your oven to 425°F (220°C). This guarantees that the flatbread crust becomes perfectly crispy and the cheese melts evenly.
- Prepare the Flatbreads: Place the flatbread crusts on a baking sheet lined with parchment paper. This will prevent the crust from sticking and make for easy cleanup.
- Add Olive Oil and Seasoning: Brush each flatbread with a tablespoon of olive oil. Sprinkle garlic powder, salt, and pepper evenly over the surface to enhance the flavor.
- Layer the Ingredients: Arrange the sliced mozzarella evenly across each flatbread, leaving a small border around the edges. Follow with the tomato slices, ensuring they cover the cheese nicely.
- Bake the Flatbreads: Place the baking sheet in the preheated oven and bake for 12-15 minutes, or until the cheese is bubbly and the crust is golden brown.
- Add Fresh Basil: Remove the flatbreads from the oven and immediately scatter fresh basil leaves over the top. The heat from the flatbread will gently wilt the basil, releasing its aromatic oils.
- Serve and Enjoy: Optionally, drizzle with balsamic glaze for an added touch of sweetness before slicing and serving.
Extra Tips: For an even crispier crust, consider baking the flatbread directly on the oven rack instead of on a baking sheet. If you prefer a bit of spice, add a pinch of red pepper flakes to the seasoning mix.
Also, let the flatbreads sit for a minute after baking before slicing; this allows the cheese to set slightly, making it easier to cut and serve. Enjoy experimenting with different cheeses or adding extra toppings like olives or roasted red peppers for a personalized twist on this classic recipe.
Colorful Veggie and Cheese Enchiladas

Colorful Veggie and Cheese Enchiladas are a perfect family dinner option that combines vibrant vegetables with gooey cheese wrapped in soft tortillas. This dish isn’t only delicious but also visually appealing with its array of colors from different vegetables, making it an enticing meal for both kids and adults.
It’s a great way to incorporate more veggies into your diet while enjoying the warmth and comfort of homemade enchiladas. These enchiladas are filled with a variety of sautéed vegetables such as bell peppers, zucchini, and corn, mixed with a blend of cheeses for a rich and satisfying taste. The entire dish is then covered in a flavorful enchilada sauce and baked to perfection.
It serves 4-6 people, making it ideal for family dinners or gatherings. Whether you’re a seasoned vegetarian or just looking to reduce your meat intake, this recipe is sure to become a family favorite.
Ingredients (serving size: 4-6 people):
- 12 corn tortillas
- 2 tablespoons olive oil
- 1 red bell pepper, diced
- 1 green bell pepper, diced
- 1 zucchini, diced
- 1 cup corn kernels (fresh or frozen)
- 1 small red onion, diced
- 2 cups shredded cheese (cheddar or Monterey Jack)
- 1 tablespoon chili powder
- 1 teaspoon cumin
- Salt and pepper to taste
- 2 cups enchilada sauce
- Fresh cilantro for garnish (optional)
- Sour cream for serving (optional)
Instructions:
- Preheat the Oven: Start by preheating your oven to 375°F (190°C). This guarantees that it’s at the right temperature once you’re ready to bake the enchiladas.
- Sauté the Vegetables: In a large skillet, heat the olive oil over medium heat. Add the red and green bell peppers, zucchini, corn, and red onion. Sauté for about 5-7 minutes until the vegetables are tender but still crisp. Season with chili powder, cumin, salt, and pepper. Stir well to combine and remove from heat.
- Prepare the Tortillas: Warm the corn tortillas in the microwave or on a dry skillet for a few seconds to make them pliable.
- Assemble the Enchiladas: Spread about 1/2 cup of enchilada sauce evenly on the bottom of a 9×13 inch baking dish. Spoon a generous amount of the vegetable mixture down the center of each tortilla, sprinkle with cheese, and roll it up tightly. Place the rolled tortillas seam-side down in the prepared baking dish.
- Add Sauce and Cheese: Pour the remaining enchilada sauce over the rolled tortillas, making sure to cover them completely. Sprinkle the remaining shredded cheese over the top.
- Bake: Place the baking dish in the preheated oven and bake for 20-25 minutes or until the cheese is melted and bubbly.
- Garnish and Serve: Remove from the oven and let cool for a few minutes. Garnish with fresh cilantro if desired. Serve with a dollop of sour cream on top or on the side.
Extra Tips: When making these enchiladas, feel free to customize the filling with your favorite seasonal vegetables or whatever you have on hand. If you prefer spicier flavors, add a chopped jalapeño to the vegetable mix or use a spicy enchilada sauce.
For a gluten-free version, verify that your tortillas and enchilada sauce are certified gluten-free. Additionally, these enchiladas can be prepared in advance and stored in the refrigerator for up to a day before baking, making them a convenient option for busy weeknights.