

I’ve explored countless vegetarian dishes, and I’ve found 13 family dinner recipes that everyone will adore. Picture creamy spinach and ricotta stuffed shells or a hearty vegetable and lentil shepherd’s pie, perfect for warming the heart. From zesty black bean tacos to comforting cheesy casseroles, these meals are bursting with flavor and nutrition. Wondering what else made the cut? Let’s explore these delicious possibilities together!
Creamy Spinach and Ricotta Stuffed Shells

Creamy Spinach and Ricotta Stuffed Shells is a delightful vegetarian dish that combines the smoothness of ricotta cheese with the earthy flavors of spinach, all enveloped in tender pasta shells. This recipe is perfect for family dinners, offering a hearty and satisfying meal that even non-vegetarians will love.
The rich creaminess of the ricotta filling, complemented by a robust tomato sauce, makes this dish a comforting yet elegant choice for any occasion. Ideal for serving 4-6 people, this dish isn’t only delicious but also quite straightforward to prepare. The stuffed shells can be made ahead of time and stored in the refrigerator, making it a convenient option for busy weeknights or special family gatherings.
By following this recipe, you’ll be able to create a dish that bursts with flavor and satisfies everyone’s taste buds.
Ingredients (Serving Size: 4-6 people):
- 20 jumbo pasta shells
- 2 cups ricotta cheese
- 1 cup shredded mozzarella cheese
- 1/2 cup grated Parmesan cheese
- 2 cups fresh spinach, chopped
- 2 cloves garlic, minced
- 1 tablespoon olive oil
- 1 egg
- 1/2 teaspoon salt
- 1/4 teaspoon ground black pepper
- 1/4 teaspoon nutmeg
- 3 cups marinara sauce
- Fresh basil leaves, for garnish (optional)
Cooking Instructions:
- Prepare the Pasta Shells: Bring a large pot of salted water to a boil. Add the jumbo pasta shells and cook until al dente, according to the package instructions. Drain and set aside to cool slightly.
- Sauté the Spinach: In a large skillet, heat the olive oil over medium heat. Add the minced garlic and sauté for about 1 minute until fragrant. Add the chopped spinach and cook until wilted, approximately 3-4 minutes. Remove from heat and let it cool.
- Make the Ricotta Filling: In a large mixing bowl, combine the ricotta cheese, sautéed spinach, half of the mozzarella cheese, half of the Parmesan cheese, egg, salt, black pepper, and nutmeg. Mix well until all ingredients are fully incorporated.
- Stuff the Shells: Preheat your oven to 375°F (190°C). Spread 1 cup of marinara sauce over the bottom of a 9×13-inch baking dish. Carefully fill each pasta shell with the ricotta and spinach mixture, then arrange them in the baking dish.
- Assemble and Bake: Pour the remaining marinara sauce over the stuffed shells. Sprinkle the rest of the mozzarella and Parmesan cheeses evenly on top. Cover the dish with aluminum foil and bake in the preheated oven for 25 minutes. Remove the foil and bake for an additional 10-15 minutes, or until the cheese is bubbly and golden.
- Serve: Remove from the oven and let cool for a few minutes before serving. Garnish with fresh basil leaves if desired.
Extra Tips:
For best results, make sure the pasta shells are cooked al dente, as they’ll continue to cook in the oven. You can prepare the spinach and ricotta mixture a day in advance to save time.
If you prefer a spicier dish, consider adding a pinch of red pepper flakes to the ricotta mixture. Additionally, this dish can be made gluten-free by using gluten-free pasta shells.
Leftovers can be stored in an airtight container in the refrigerator for up to three days, making it a great meal prep option.
Hearty Vegetable and Lentil Shepherd’s Pie
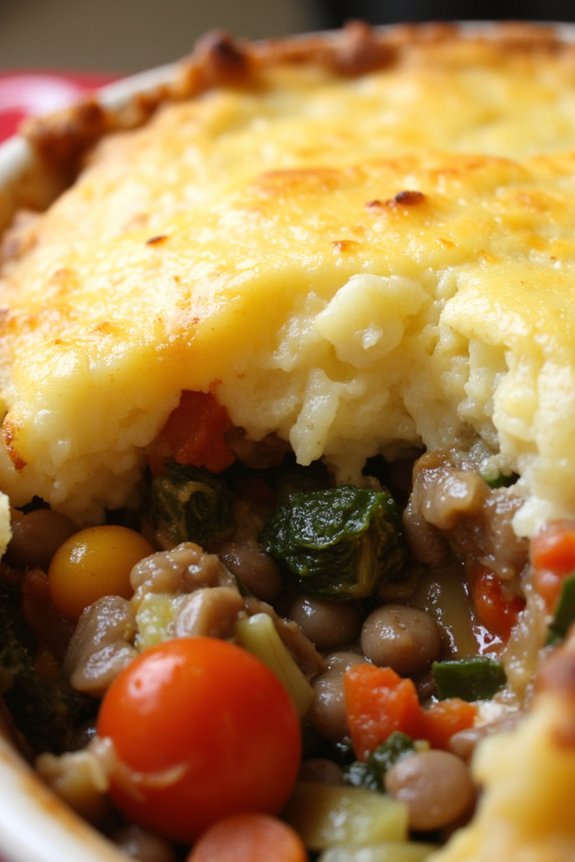
Hearty Vegetable and Lentil Shepherd’s Pie is a delightful twist on the traditional shepherd’s pie, offering a wholesome and nutritious meal that’s perfect for a family dinner. This vegetarian version uses a hearty mix of vegetables and protein-packed lentils, creating a filling and satisfying dish that everyone will enjoy.
The creamy mashed potato topping beautifully complements the savory vegetable and lentil filling, making it a comfort food classic that’s sure to warm hearts and bellies.
This dish isn’t only delicious but also incredibly nutritious. Lentils are a great source of protein and fiber, while the variety of vegetables provides essential vitamins and minerals. The recipe is easy to prepare and can be made ahead of time, making it an ideal choice for busy weeknights or leisurely weekend dinners.
Whether you’re a vegetarian or simply looking to incorporate more plant-based meals into your diet, this Hearty Vegetable and Lentil Shepherd’s Pie is sure to become a family favorite.
Ingredients (Serves 4-6 people):
- 2 tablespoons olive oil
- 1 large onion, diced
- 2 cloves garlic, minced
- 2 carrots, diced
- 2 celery stalks, diced
- 1 red bell pepper, diced
- 1 zucchini, diced
- 1 cup mushrooms, chopped
- 1 teaspoon dried thyme
- 1 teaspoon dried rosemary
- 1 teaspoon smoked paprika
- 1 cup green or brown lentils, rinsed and drained
- 2 cups vegetable broth
- 1 tablespoon tomato paste
- Salt and pepper to taste
- 4 large potatoes, peeled and quartered
- 1/2 cup milk (or plant-based milk)
- 2 tablespoons butter (or plant-based butter)
- 1/4 cup grated Parmesan cheese (optional)
Cooking Instructions:
- Prepare the Filling: Heat the olive oil in a large skillet over medium heat. Add the diced onion and sauté until translucent, about 5 minutes. Stir in the garlic, carrots, celery, red bell pepper, zucchini, and mushrooms. Cook for another 5-7 minutes until the vegetables start to soften.
- Season and Simmer: Add the dried thyme, rosemary, and smoked paprika to the skillet, stirring to combine. Add the lentils, vegetable broth, and tomato paste. Bring the mixture to a boil, then reduce the heat to low and cover. Let it simmer for 25-30 minutes, or until the lentils are tender and the liquid has been mostly absorbed. Season with salt and pepper to taste.
- Prepare the Mashed Potatoes: While the filling is simmering, place the potatoes in a large pot and cover with water. Bring to a boil and cook until the potatoes are tender, about 15-20 minutes. Drain the potatoes and return them to the pot. Add the milk, butter, and Parmesan cheese (if using), and mash until smooth and creamy. Season with salt and pepper to taste.
- Assemble the Pie: Preheat your oven to 375°F (190°C). Spread the lentil and vegetable mixture evenly in a baking dish. Top with the mashed potatoes, spreading them out to cover the filling completely.
- Bake: Place the baking dish in the preheated oven and bake for 20-25 minutes, or until the top is golden and slightly crispy.
- Serve: Remove from the oven and let it cool for a few minutes before serving. Enjoy your hearty vegetable and lentil shepherd’s pie with a side salad or some crusty bread.
Extra Tips:
For a creamier mashed potato topping, you can add an extra splash of milk or a dollop of sour cream. If you prefer a cheesy crust, sprinkle some additional grated cheese on top of the mashed potatoes before baking.
This dish can also be customized with your favorite vegetables or herbs, making it versatile and adaptable to your family’s preferences. If you’re short on time, you can prepare the filling a day in advance and store it in the refrigerator, then assemble and bake the pie the next day.
Zesty Black Bean and Corn Tacos
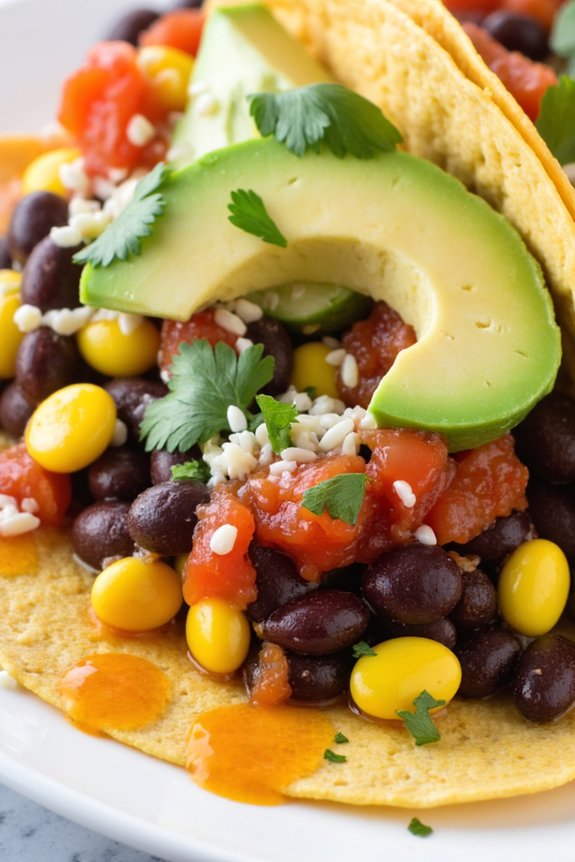
If you’re searching for a vibrant and satisfying vegetarian meal, seek no further than these Zesty Black Bean and Corn Tacos. Perfect for a family dinner, this dish combines the hearty flavors of black beans with the sweet crunch of corn, all wrapped in a warm tortilla. The zesty lime and cilantro elevate the dish, providing a fresh, tangy kick that pairs beautifully with the spices.
These tacos aren’t only delicious but are also quick and easy to prepare, making them a great option for busy weeknights.
These tacos are packed with nutrients, thanks to the fiber-rich black beans and vitamin-laden corn, making them a healthy choice for everyone in the family. Whether you’re a seasoned vegetarian or simply seeking to incorporate more plant-based meals into your diet, these Zesty Black Bean and Corn Tacos are sure to please.
Serve them with your favorite toppings such as avocado, salsa, or cheese, and watch as they quickly become a family favorite.
Ingredients (Serves 4-6):
- 1 tablespoon olive oil
- 1 medium onion, diced
- 2 cloves garlic, minced
- 1 teaspoon cumin
- 1 teaspoon chili powder
- 1 can (15 oz) black beans, drained and rinsed
- 1 cup corn kernels (fresh, canned, or frozen)
- Salt and pepper to taste
- Juice of 1 lime
- 1/4 cup fresh cilantro, chopped
- 8-12 small corn tortillas
- Optional toppings: avocado, salsa, shredded cheese, sour cream
Cooking Instructions:
- Prepare the Ingredients: Begin by gathering all your ingredients. Dice the onion, mince the garlic, and chop the cilantro. If using canned corn, verify it’s drained; if using frozen, thaw it.
- Sauté the Aromatics: In a large skillet over medium heat, add the olive oil. Once hot, add the diced onion and sauté for about 3-4 minutes until translucent. Add the minced garlic and cook for an additional minute until fragrant.
- Season the Mixture: Stir in the cumin and chili powder, allowing them to coat the onions and garlic evenly. Cook for another minute to let the spices bloom.
- Add the Beans and Corn: Add the black beans and corn to the skillet. Stir well to combine and cook for about 5-7 minutes, allowing the flavors to meld together. Season with salt and pepper to taste.
- Finish with Freshness: Remove the skillet from the heat and stir in the lime juice and chopped cilantro. Mix thoroughly to guarantee the lime and cilantro are well distributed.
- Warm the Tortillas: In a separate pan, warm the corn tortillas over medium heat for about 30 seconds on each side, or until they’re pliable.
- Assemble the Tacos: Spoon the black bean and corn mixture into each tortilla. Add your choice of toppings, such as avocado slices, salsa, shredded cheese, or a dollop of sour cream.
Extra Tips:
For a spicier version, consider adding a diced jalapeño or a pinch of cayenne pepper along with the other spices. If you prefer a smokier flavor, swap out the chili powder for smoked paprika.
To save time, you can prepare the black bean and corn mixture ahead of time and reheat it just before serving. This dish is also versatile; feel free to add other vegetables like bell peppers or zucchini for extra nutrition and color.
Enjoy these tacos with a side of Mexican rice or a fresh salad for a well-rounded meal.
Classic Margherita Pizza With Fresh Basil

Classic Margherita Pizza With Fresh Basil is a timeless favorite that brings the vibrant flavors of Italy to your dinner table. This vegetarian dish is all about simplicity and the quality of ingredients. The key components include a crisp pizza crust, rich tomato sauce, creamy mozzarella cheese, and aromatic fresh basil. Perfect for a family dinner, this recipe will delight everyone with its fresh and authentic taste.
Whether you’re a seasoned cook or a beginner, this Margherita Pizza is straightforward to make and promises to be a hit with all ages.
The beauty of a Margherita Pizza lies in its balance of flavors and textures. The crust provides a firm base with a satisfying crunch, while the tomato sauce adds a tangy sweetness. The mozzarella melts into a creamy layer, and the fresh basil leaves impart a subtle peppery aroma that elevates the entire dish.
Enjoy this pizza with a simple side salad or a glass of wine for a complete meal. This recipe serves 4-6 people, making it perfect for a family gathering or a casual dinner with friends.
Ingredients:
- 1 pound pizza dough
- 1 cup tomato sauce
- 12 ounces fresh mozzarella cheese, sliced
- 1/4 cup fresh basil leaves
- 2 tablespoons olive oil
- Salt and pepper to taste
- Flour for dusting
Cooking Instructions:
- Preheat the Oven: Preheat your oven to 475°F (245°C). If you have a pizza stone, place it in the oven to heat up as well. The high temperature is essential for achieving a crispy crust.
- Prepare the Dough: On a lightly floured surface, roll out the pizza dough into a 12-inch circle. If the dough resists stretching, let it rest for a few minutes before trying again.
- Assemble the Pizza: Transfer the rolled-out dough onto a pizza peel or an inverted baking sheet sprinkled with a little flour or cornmeal. Spread the tomato sauce evenly over the surface, leaving a small border for the crust.
- Add Cheese and Basil: Arrange the slices of mozzarella cheese over the sauce. Tear the basil leaves into smaller pieces and scatter them over the cheese. Drizzle the olive oil over the top, and season with a pinch of salt and pepper.
- Bake the Pizza: Carefully slide the pizza onto the preheated pizza stone or baking sheet. Bake for 10-12 minutes, or until the crust is golden brown and the cheese is bubbly and slightly browned.
- Serve: Remove the pizza from the oven and let it cool for a minute. Slice and serve hot for the best experience.
Extra Tips:
For the best results, use fresh, high-quality ingredients. Fresh mozzarella and basil make a significant difference in flavor.
If you don’t have a pizza stone, a regular baking sheet can work, but the crust may not be as crisp. To prevent the dough from sticking, make sure your work surface and the pizza peel are well-dusted with flour.
If you prefer a spicier kick, consider adding a sprinkle of red pepper flakes before serving. Enjoy your homemade Classic Margherita Pizza With Fresh Basil!
Flavorful Chickpea and Sweet Potato Curry
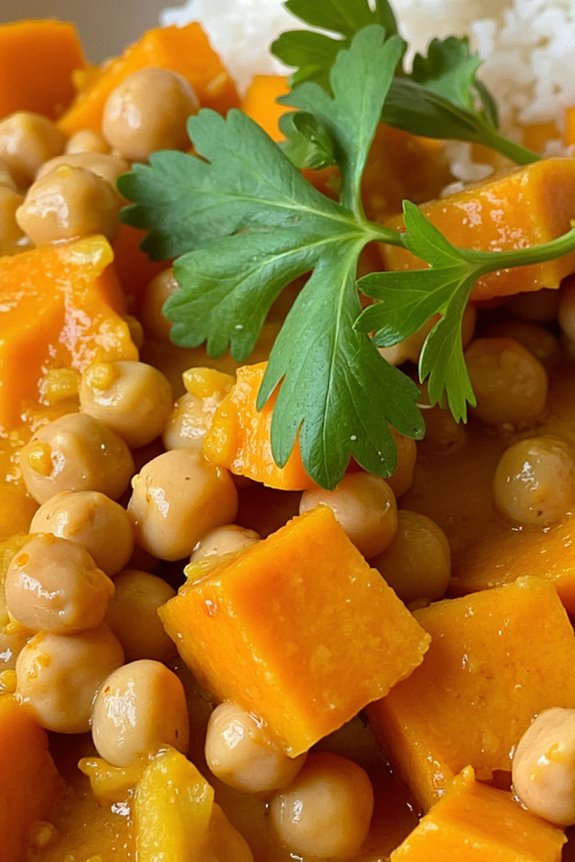
Looking for a delicious and hearty vegetarian meal that will satisfy the whole family? This Flavorful Chickpea and Sweet Potato Curry is the perfect dish. Packed with protein-rich chickpeas and nutrient-dense sweet potatoes, this curry isn’t only filling but also rich in flavors that will leave everyone asking for seconds.
The combination of aromatic spices, creamy coconut milk, and fresh herbs creates a comforting and vibrant dish that’s perfect for any occasion, from a casual family dinner to a special gathering.
This curry is easy to prepare and can be made in under an hour, making it ideal for busy weeknights. It’s a one-pot wonder that saves on washing up time while delivering a complex and satisfying taste. Serve it with steamed rice or warm naan bread to soak up the delicious sauce.
Not only is it vegetarian, but it’s also gluten-free and can be made vegan by ensuring the stock used is plant-based. Let’s explore the ingredients and steps needed to create this mouthwatering meal for 4-6 people.
Ingredients:
- 2 tablespoons vegetable oil
- 1 large onion, finely chopped
- 3 cloves garlic, minced
- 1 tablespoon fresh ginger, grated
- 2 teaspoons ground cumin
- 2 teaspoons ground coriander
- 1 teaspoon turmeric powder
- 1 teaspoon garam masala
- 1/2 teaspoon cayenne pepper (optional, for heat)
- 2 medium sweet potatoes, peeled and cubed
- 1 can (400g) chickpeas, drained and rinsed
- 1 can (400ml) coconut milk
- 1 cup vegetable stock
- Salt and pepper, to taste
- Juice of 1 lime
- Fresh cilantro leaves, for garnish
Instructions:
1. Prepare the Aromatics:
In a large pot, heat the vegetable oil over medium heat. Add the chopped onion and sauté until it becomes translucent, about 5 minutes. Stir in the minced garlic and grated ginger, cooking for an additional 1-2 minutes until fragrant.
2. Spice it Up:
Add the ground cumin, ground coriander, turmeric powder, garam masala, and cayenne pepper to the pot. Stir well to coat the onion mixture with the spices, cooking for another minute to release their aromas.
3. Add Vegetables and Chickpeas:
Toss in the cubed sweet potatoes and chickpeas, stirring to combine with the spice mixture. Cook for about 2-3 minutes to let the flavors meld together.
4. Simmer the Curry:
Pour in the coconut milk and vegetable stock, stirring everything together. Season with salt and pepper to taste. Bring the mixture to a gentle boil, then reduce the heat to low, cover, and let it simmer for 20-25 minutes or until the sweet potatoes are tender and the sauce has thickened slightly.
5. Finish with Lime and Cilantro:
Once the curry is done, squeeze in the lime juice and give it a final stir. Adjust the seasoning if necessary. Remove from heat and garnish with fresh cilantro leaves before serving.
Extra Tips:
For a richer flavor, consider roasting the sweet potatoes before adding them to the curry. This will add a caramelized sweetness that enhances the overall taste.
If you prefer a thicker curry, you can mash some of the sweet potatoes against the side of the pot before serving. Feel free to adjust the spice level to your liking by increasing or decreasing the cayenne pepper.
This curry can also be made a day ahead, as the flavors develop beautifully overnight.
Cheesy Broccoli and Cauliflower Casserole

Cheesy Broccoli and Cauliflower Casserole is a delightful vegetarian dish that brings together the classic combination of broccoli and cauliflower in a rich and creamy cheese sauce.
This casserole is perfect for a family dinner, offering a comforting and flavorful experience that even the pickiest eater will enjoy. The blend of vegetables with melted cheese creates a hearty dish that’s perfect as a main course or side dish.
This casserole isn’t only delicious but also easy to prepare, making it an ideal choice for busy weeknights or a special occasion. It’s a great way to incorporate more vegetables into your diet without compromising on taste.
The dish is baked until golden and bubbly, making it an irresistible addition to your dinner table. Serve it hot, and watch it disappear as everyone reaches for seconds.
Ingredients (Serves 4-6):
- 1 head of broccoli, cut into florets
- 1 head of cauliflower, cut into florets
- 2 cups shredded cheddar cheese
- 1 cup milk
- 2 tablespoons all-purpose flour
- 2 tablespoons butter
- 1 teaspoon garlic powder
- 1 teaspoon onion powder
- Salt and pepper to taste
- 1/2 cup breadcrumbs
- 2 tablespoons grated Parmesan cheese
- Olive oil for drizzling
Cooking Instructions:
- Prepare the Vegetables:
- Preheat your oven to 375°F (190°C). Bring a large pot of salted water to a boil. Add the broccoli and cauliflower florets and blanch them for about 3-4 minutes until they’re just tender. Drain and set aside.
- Make the Cheese Sauce:
- In a saucepan over medium heat, melt the butter. Stir in the flour and cook for about 1 minute until it forms a paste. Gradually whisk in the milk, ensuring there are no lumps.
- Continue to cook, stirring constantly, until the sauce thickens. Remove from heat and stir in the shredded cheddar cheese, garlic powder, onion powder, salt, and pepper until the cheese is melted and the sauce is smooth.
- Assemble the Casserole:
- In a large baking dish, combine the blanched broccoli and cauliflower. Pour the cheese sauce over the vegetables, ensuring they’re well-coated.
- Add the Topping:
- In a small bowl, mix together the breadcrumbs and grated Parmesan cheese. Sprinkle this mixture evenly over the top of the casserole. Drizzle a little olive oil over the breadcrumbs to help them brown.
- Bake the Casserole:
- Place the baking dish in the preheated oven and bake for 25-30 minutes, or until the top is golden brown and the cheese sauce is bubbling. Remove from the oven and let it cool for a few minutes before serving.
Extra Tips:
For a little extra flavor, you can add a pinch of nutmeg to the cheese sauce. Make sure to taste the sauce before pouring it over the vegetables to adjust the seasoning as needed.
If you prefer a bit of a crunch, consider adding chopped nuts, such as almonds or walnuts, to the breadcrumb topping. This casserole can be prepared a day in advance and stored in the refrigerator. Simply bake it when you’re ready to serve.
Savory Eggplant Parmesan Bake

Experience a classic Italian favorite with a delightful vegetarian twist by preparing a Savory Eggplant Parmesan Bake. This dish highlights the rich, earthy flavors of eggplant layered with a tangy marinara sauce and a golden, cheesy crust. Perfect for a family dinner, this recipe serves 4-6 people and is sure to become a staple in your vegetarian meal rotation.
The preparation involves lightly breading and baking slices of eggplant before layering them with a robust marinara sauce and a blend of mozzarella and Parmesan cheese. The result is a comforting, hearty bake that’s both satisfying and delicious. The eggplant, once cooked, becomes tender and flavorful, melding beautifully with the sauce and cheese for a dish that’s as pleasing to the palate as it’s to the eye.
Ingredients (serves 4-6):
- 2 large eggplants
- 1 cup all-purpose flour
- 4 large eggs
- 2 cups breadcrumbs
- 1 teaspoon dried oregano
- 1 teaspoon garlic powder
- 1 teaspoon salt
- 1/2 teaspoon black pepper
- 2 cups marinara sauce
- 2 cups shredded mozzarella cheese
- 1 cup grated Parmesan cheese
- 1/4 cup fresh basil leaves, chopped
- Olive oil for drizzling
Instructions:
- Preheat the Oven: Start by preheating your oven to 375°F (190°C). This guarantees that it’s at the right temperature by the time you’re ready to bake the dish.
- Prepare the Eggplant: Slice the eggplants into 1/4-inch thick rounds. Set up a breading station with three shallow dishes: one with flour, one with beaten eggs, and one with breadcrumbs mixed with oregano, garlic powder, salt, and pepper.
- Bread the Eggplant: Dip each eggplant slice first in the flour, shaking off the excess, then into the egg, and finally coat with the breadcrumb mixture. Verify each slice is evenly coated.
- Bake the Eggplant: Arrange the breaded eggplant slices on a baking sheet lined with parchment paper. Drizzle lightly with olive oil. Bake in the preheated oven for about 25 minutes, flipping halfway, until golden brown and tender.
- Layer the Bake: In a 9×13-inch baking dish, spread a thin layer of marinara sauce on the bottom. Place a single layer of baked eggplant slices over the sauce. Sprinkle with mozzarella and Parmesan cheese. Repeat the layers until all ingredients are used, finishing with a generous layer of cheese on top.
- Bake the Casserole: Cover the dish with foil and bake for 25 minutes. Remove the foil and bake for an additional 10-15 minutes, or until the cheese is bubbly and golden brown on top.
- Garnish and Serve: Remove from the oven and let it cool for a few minutes. Sprinkle with fresh basil before serving for a burst of flavor.
Extra Tips: For a crispier texture, you can fry the breaded eggplant slices in olive oil until golden brown before baking. If you prefer a lighter version, try using panko breadcrumbs for a lighter, airier crust.
To add more depth of flavor to the marinara sauce, you can sauté some minced garlic and onion in olive oil before adding the sauce. This dish pairs wonderfully with a side salad or a serving of garlic bread. Enjoy your meal fresh from the oven for the best cheesy, melty experience!
Spicy Thai Peanut Noodles With Veggies
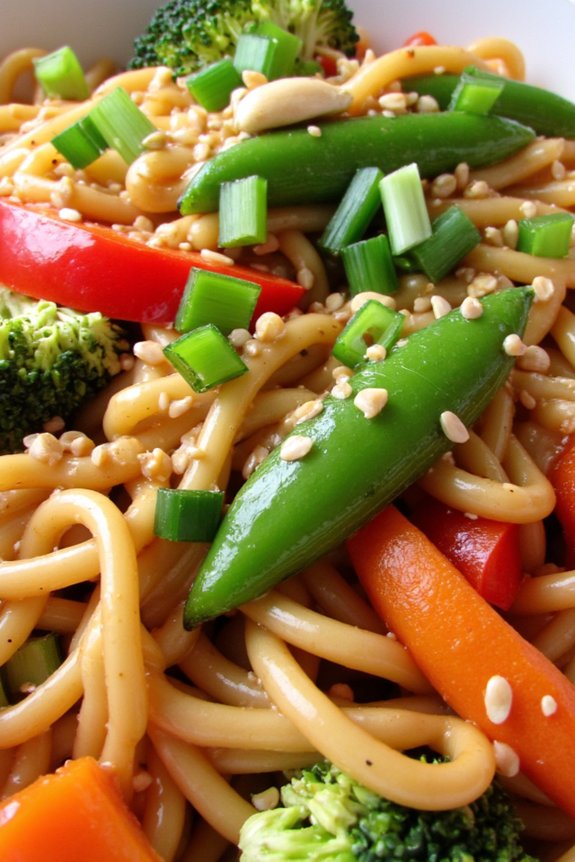
Spicy Thai Peanut Noodles with Veggies is a delightful fusion of flavors that combines the rich creaminess of peanut sauce with the vibrant crunch of fresh vegetables. This dish is perfect for a vegetarian family dinner, providing a hearty and satisfying meal that everyone will enjoy. The combination of spicy, sweet, and savory notes in the sauce, along with the medley of colorful veggies, makes it a feast for both the eyes and the taste buds.
As a versatile dish, Spicy Thai Peanut Noodles can be customized to suit your family’s preferences. You can adjust the level of spiciness to your liking or swap out vegetables based on what’s in season or available in your pantry. This recipe serves 4-6 people, making it ideal for family gatherings or a cozy dinner at home. Below, you’ll find a list of ingredients and step-by-step instructions to create this delicious dish.
Ingredients for 4-6 servings:
- 12 ounces of rice noodles
- 1 tablespoon of vegetable oil
- 1 red bell pepper, thinly sliced
- 1 cup of shredded carrots
- 1 cup of broccoli florets
- 1 cup of sugar snap peas
- 1/2 cup of chopped green onions
- 1/4 cup of chopped fresh cilantro
- 1/4 cup of chopped peanuts
- 2 tablespoons of sesame seeds
For the Peanut Sauce:
- 1/2 cup of creamy peanut butter
- 1/4 cup of soy sauce
- 2 tablespoons of lime juice
- 2 tablespoons of honey or maple syrup
- 1 tablespoon of sriracha or chili sauce (adjust to taste)
- 1 tablespoon of grated fresh ginger
- 2 cloves of garlic, minced
- 1/4 cup of warm water
Cooking Instructions:
- Prepare the Noodles: Start by cooking the rice noodles according to the package instructions. Drain them and set aside, tossing them with a bit of oil to prevent sticking.
- Make the Peanut Sauce: In a medium bowl, whisk together the peanut butter, soy sauce, lime juice, honey or maple syrup, sriracha, ginger, garlic, and warm water until smooth. Adjust the consistency by adding more water if needed to achieve a pourable sauce.
- Sauté the Vegetables: In a large pan or wok, heat the vegetable oil over medium-high heat. Add the red bell pepper, carrots, broccoli, and sugar snap peas. Stir-fry the vegetables for about 5-7 minutes, or until they’re just tender but still crisp.
- Combine the Ingredients: Reduce the heat to medium and add the cooked noodles to the pan with the vegetables. Pour the peanut sauce over the noodles and vegetables. Toss everything together until the noodles and vegetables are well coated in the sauce.
- Garnish and Serve: Remove from heat and garnish with chopped green onions, cilantro, peanuts, and sesame seeds. Serve immediately, enjoying the dish warm.
Extra Tips:
For an even more protein-rich version, consider adding tofu or edamame. If you want to enhance the flavor, you can roast the peanuts and sesame seeds beforehand to bring out their natural oils.
Also, feel free to experiment with other vegetables you have on hand, such as spinach or baby corn, to add more variety to the dish. Finally, if you find the sauce too thick, gradually add more warm water until it reaches your desired consistency. Enjoy your homemade Spicy Thai Peanut Noodles with Veggies!
Mediterranean Quinoa and Vegetable Pilaf

Mediterranean Quinoa and Vegetable Pilaf is a delightful vegetarian dish that combines the earthy flavors of quinoa with a vibrant selection of Mediterranean-inspired vegetables. This recipe is perfect for a family dinner, offering a healthy and satisfying meal that’s both nourishing and flavorful. The quinoa serves as a hearty base, while the colorful array of vegetables adds texture and taste, making it a visually appealing and delicious dish.
This pilaf is versatile enough to complement any meal or stand alone as a main course. It’s packed with protein, fiber, and essential nutrients, making it an excellent choice for those seeking a wholesome vegetarian option. With its aromatic spices and herbs, this dish will transport your taste buds to the sunny coasts of the Mediterranean. It’s simple to prepare and comes together in under an hour, making it perfect for busy weeknights or a leisurely family dinner.
Ingredients (Serves 4-6):
- 1 cup quinoa, rinsed
- 2 cups vegetable broth or water
- 2 tablespoons olive oil
- 1 medium onion, chopped
- 2 cloves garlic, minced
- 1 red bell pepper, chopped
- 1 zucchini, diced
- 1 cup cherry tomatoes, halved
- 1 teaspoon ground cumin
- 1 teaspoon dried oregano
- Salt and pepper to taste
- 1/4 cup chopped fresh parsley
- 1/4 cup crumbled feta cheese (optional)
- Juice of 1 lemon
Cooking Instructions:
- Prepare the Quinoa: In a medium saucepan, bring the vegetable broth or water to a boil over medium-high heat. Add the rinsed quinoa, reduce the heat to low, cover, and let it simmer for 15-20 minutes, or until the quinoa is tender and has absorbed all the liquid. Fluff with a fork and set aside.
- Sauté the Aromatics: In a large skillet, heat the olive oil over medium heat. Add the chopped onion and sauté for about 3-4 minutes until it becomes translucent. Stir in the minced garlic and cook for an additional minute until fragrant.
- Cook the Vegetables: Add the chopped red bell pepper and diced zucchini to the skillet. Sauté for about 5-7 minutes, or until the vegetables are tender. Stir in the cherry tomatoes and cook for another 2 minutes.
- Season the Pilaf: Sprinkle the ground cumin and dried oregano over the vegetables. Season with salt and pepper to taste. Stir well to make certain the spices are evenly distributed throughout the vegetables.
- Combine with Quinoa: Add the cooked quinoa to the skillet with the vegetables. Gently stir to combine all the ingredients, making sure that the quinoa is well mixed with the vegetables and spices.
- Finish with Fresh Ingredients: Remove the skillet from the heat. Stir in the chopped fresh parsley and optional crumbled feta cheese. Squeeze the juice of one lemon over the pilaf and mix well.
- Serve: Transfer the Mediterranean Quinoa and Vegetable Pilaf to a serving dish and serve warm. Enjoy as a main course or as a side dish to complement other Mediterranean-inspired dishes.
Extra Tips:
For an added depth of flavor, consider toasting the quinoa in the skillet with a bit of olive oil before cooking it with the broth or water. This will give the quinoa a nutty taste that enhances the overall flavor of the dish.
If you prefer a bit of heat, add a pinch of red pepper flakes while sautéing the vegetables. You can also personalize the pilaf by incorporating other vegetables such as eggplant or spinach, depending on what you have available.
Crunchy Veggie Stir-Fry With Tofu
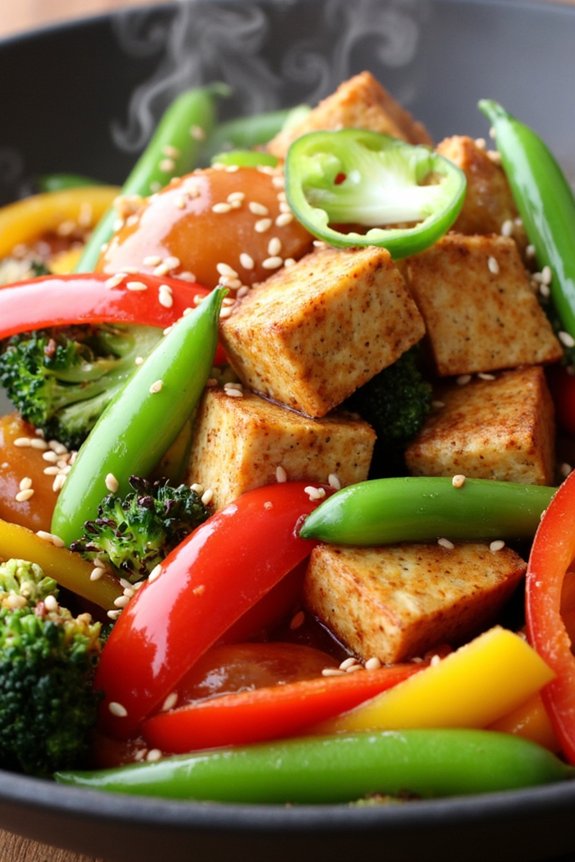
Crunchy Veggie Stir-Fry With Tofu is a delightful and vibrant dish, perfect for a family dinner that caters to both vegetarians and those looking to enjoy a healthy, plant-based meal. This dish combines a variety of colorful, fresh vegetables with protein-rich tofu, all brought together in a savory and slightly sweet sauce. The quick cooking time guarantees that the veggies retain their crunchy texture and the tofu absorbs the flavors beautifully, making it a satisfying and nourishing meal.
Whether you’re new to vegetarian cooking or a seasoned cook looking for a new recipe to add to your repertoire, this stir-fry is sure to impress.
The beauty of this Crunchy Veggie Stir-Fry With Tofu lies in its versatility and simplicity. You can easily adapt the vegetables to suit whatever you have on hand, making it an ideal recipe for using up leftover produce. The tofu provides a hearty and filling base, while the sauce, made with soy sauce, ginger, and garlic, adds depth and flavor.
This recipe serves 4-6 people, making it perfect for a family gathering or a dinner party with friends. Serve it over steamed rice or noodles for a complete meal that’s both wholesome and delicious.
Ingredients (Serves 4-6):
- 1 block (14 oz) firm tofu, drained and cubed
- 2 tablespoons soy sauce
- 1 tablespoon cornstarch
- 3 tablespoons vegetable oil, divided
- 1 red bell pepper, sliced
- 1 yellow bell pepper, sliced
- 1 cup broccoli florets
- 1 cup sugar snap peas
- 1 carrot, julienned
- 1 small onion, sliced
- 3 cloves garlic, minced
- 1 tablespoon fresh ginger, grated
- 2 tablespoons soy sauce (for the sauce)
- 1 tablespoon hoisin sauce
- 1 tablespoon rice vinegar
- 1 teaspoon sesame oil
- Salt and pepper to taste
- Sesame seeds and sliced green onions for garnish
Cooking Instructions:
- Prepare the Tofu: Start by pressing the tofu to remove excess moisture. Wrap the tofu block in a clean kitchen towel and place a heavy object on top. After 15 minutes, cut the tofu into cubes. Toss the cubes in a bowl with 2 tablespoons of soy sauce and the cornstarch until evenly coated.
- Cook the Tofu: Heat 1 tablespoon of vegetable oil in a large skillet or wok over medium-high heat. Add the tofu cubes and cook until they’re golden brown on all sides, about 8-10 minutes. Remove the tofu from the skillet and set aside.
- Sauté the Vegetables: In the same skillet, add the remaining 2 tablespoons of vegetable oil. Add the onion, garlic, and ginger, sautéing for about 2 minutes until fragrant. Then, add the bell peppers, broccoli, sugar snap peas, and carrot. Stir-fry the vegetables for 5-7 minutes until they’re just tender but still crisp.
- Combine and Serve: Return the tofu to the skillet with the vegetables. In a small bowl, whisk together the remaining 2 tablespoons of soy sauce, hoisin sauce, rice vinegar, and sesame oil. Pour this sauce over the tofu and vegetables, tossing to combine. Cook for another 2 minutes to heat through. Season with salt and pepper to taste.
- Garnish and Serve: Transfer the stir-fry to a serving dish and garnish with sesame seeds and sliced green onions. Serve immediately over steamed rice or noodles.
Extra Tips:
For an even crispier tofu, consider baking it in the oven at 400°F for 25-30 minutes before adding it to the stir-fry. Additionally, feel free to swap out vegetables based on seasonal availability or personal preference; zucchini, mushrooms, or bok choy can make great additions.
To save time, you can prepare the sauce and chop the vegetables ahead of time, allowing you to quickly assemble the dish when you’re ready to cook.
Homestyle Vegetarian Chili With Beans

Homestyle Vegetarian Chili With Beans is a comforting and hearty dish that’s perfect for feeding a family. This chili is packed full of flavor, using a variety of spices and fresh vegetables to create a warm and satisfying meal. It’s not only nutritious and filling but also easy to prepare, making it an ideal option for busy weeknight dinners.
The recipe is versatile, allowing you to adjust the level of spiciness to suit your family’s taste preferences. This vegetarian chili features a mix of beans, which provide a rich source of protein, along with colorful bell peppers, tomatoes, and corn. The combination of these ingredients creates a vibrant and delicious dish that even meat lovers will enjoy.
Serve it with a side of crusty bread or over a bowl of rice for a complete meal. This recipe serves 4-6 people, ensuring there’s enough to go around, and possibly even some leftovers for the next day.
Ingredients:
- 2 tablespoons olive oil
- 1 large onion, diced
- 2 cloves garlic, minced
- 1 red bell pepper, diced
- 1 green bell pepper, diced
- 2 carrots, diced
- 1 zucchini, diced
- 1 can (15 oz) black beans, drained and rinsed
- 1 can (15 oz) kidney beans, drained and rinsed
- 1 can (15 oz) corn, drained
- 2 cans (15 oz each) diced tomatoes
- 2 tablespoons tomato paste
- 2 teaspoons chili powder
- 1 teaspoon ground cumin
- 1 teaspoon smoked paprika
- Salt and pepper to taste
- 1 cup vegetable broth
- 1 tablespoon lime juice
- Fresh cilantro for garnish
Cooking Instructions:
- Prepare the Vegetables: Begin by heating two tablespoons of olive oil in a large pot over medium heat. Add the diced onion and minced garlic, sautéing until the onion becomes translucent, about 3-4 minutes.
- Add the Peppers and Carrots: Stir in the diced red and green bell peppers and carrots. Cook for another 5 minutes, stirring occasionally, until the vegetables start to soften.
- Incorporate the Zucchini: Add the diced zucchini to the pot and continue to cook for 2-3 minutes, allowing it to mix well with the other vegetables.
- Mix in the Beans and Corn: Next, add the black beans, kidney beans, and corn. Stir everything together, ensuring the beans are well distributed throughout the mixture.
- Add Tomatoes and Seasonings: Pour in the diced tomatoes along with their juices and the tomato paste. Stir in the chili powder, ground cumin, smoked paprika, salt, and pepper. Mix well to combine all the flavors.
- Simmer the Chili: Pour in the vegetable broth and bring the mixture to a boil. Once boiling, reduce the heat and let it simmer for about 20-25 minutes, stirring occasionally, until the chili thickens and the flavors meld together.
- Finish and Serve: Stir in the lime juice just before serving to add a fresh zing to the chili. Garnish with fresh cilantro and serve hot.
Extra Tips: For a spicier chili, consider adding a pinch of cayenne pepper or a diced jalapeño along with the other vegetables. If you prefer a thicker chili, you can mash some of the beans with a fork or potato masher before adding them to the pot.
This recipe can also be made in advance and tastes even better the next day as the flavors have more time to develop. Additionally, feel free to customize the recipe by adding other vegetables or beans you have on hand.
Fresh Caprese Salad With Balsamic Glaze
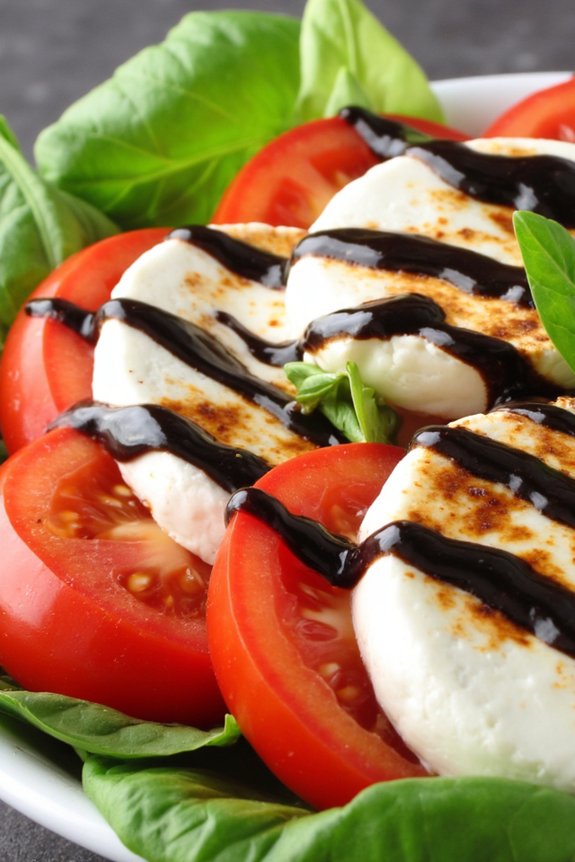
The Fresh Caprese Salad With Balsamic Glaze is a delightful and vibrant dish that celebrates the flavors of summer. Perfect for a family dinner, this salad combines the rich creaminess of fresh mozzarella with the juicy sweetness of ripe tomatoes and the aromatic freshness of basil leaves. The addition of a tangy balsamic glaze elevates the salad, adding a sophisticated touch that will satisfy both the eyes and palate.
This dish isn’t only visually appealing but also incredibly simple to prepare, making it an excellent choice for both novice and experienced cooks. Caprese salad is a traditional Italian appetizer that can easily be transformed into a main course by adding complementary ingredients like avocado or grilled vegetables.
However, in its classic form, it stands as a proof of the beauty of simplicity in cooking. The key to an exceptional Caprese salad lies in the quality of the ingredients. Opt for the freshest mozzarella, vine-ripened tomatoes, and fragrant basil to guarantee that each bite is a burst of flavor. The balsamic glaze, with its sweet and tangy notes, ties everything together, making this a memorable dish for your family dinner table.
Ingredients (Serves 4-6):
- 3 large ripe tomatoes
- 16 oz fresh mozzarella
- 1 cup fresh basil leaves
- 2 tablespoons extra-virgin olive oil
- Salt and freshly ground black pepper to taste
- 1/2 cup balsamic glaze
Cooking Instructions:
- Prepare the Ingredients: Begin by washing the tomatoes and basil leaves thoroughly. Pat them dry with a clean towel. Slice the tomatoes and mozzarella into 1/4-inch thick rounds. This ensures even distribution and allows each ingredient to shine.
- Assemble the Salad: On a large serving platter, arrange the tomato and mozzarella slices alternately. Tuck whole basil leaves between the slices, creating a visually appealing pattern. This layering not only enhances the presentation but also guarantees that each bite has a balanced taste.
- Season the Salad: Drizzle the extra-virgin olive oil evenly over the arranged ingredients. Sprinkle salt and freshly ground black pepper to taste. These seasonings enhance the natural flavors of the tomatoes and mozzarella, adding depth to the salad.
- Add the Balsamic Glaze: Finally, drizzle the balsamic glaze over the top of the salad. Be generous but careful not to overpower the other flavors. The glaze should add a hint of sweetness and tanginess that complements the dish.
- Serve: Serve the salad immediately, or chill it in the refrigerator for up to 30 minutes if you prefer a cooler dish. This allows the flavors to meld together beautifully.
Extra Tips:
For an even more flavorful experience, consider using heirloom tomatoes, which offer a variety of colors and tastes. If you find that the balsamic glaze is too thick, you can thin it out with a bit of water or additional olive oil.
Additionally, if you prefer a warm variation, lightly grill the mozzarella slices before assembling the salad. This will add a delicious smoky flavor and a unique texture to your Caprese salad. Enjoy your meal with a side of crusty bread to soak up any leftover juices.
Creamy Mushroom Risotto With Parmesan
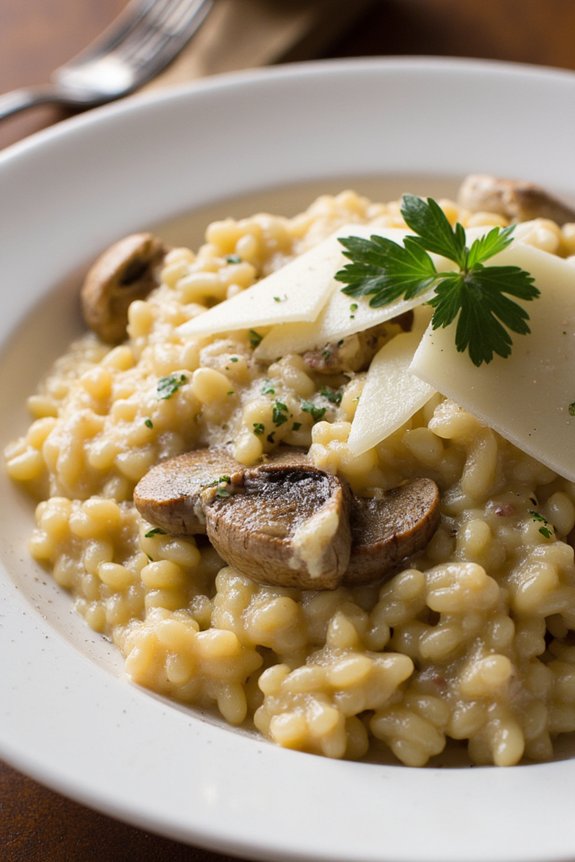
Creamy Mushroom Risotto With Parmesan is a delightful vegetarian dish that combines the earthy flavors of mushrooms with the rich creaminess of risotto. This Italian classic is perfect for family dinners, offering a comforting and satisfying meal that’s both delicious and elegant.
Risotto requires a bit of attention and patience, but the end result is well worth the effort, with each bite offering a burst of flavor and a velvety texture.
The key to a successful risotto is using the right type of rice, such as Arborio, Carnaroli, or Vialone Nano, which are known for their high starch content, giving the dish its signature creaminess. The addition of Parmesan cheese not only adds depth of flavor but also enhances the creamy texture that makes risotto so irresistible.
Whether you’re a seasoned cook or a novice in the kitchen, this Creamy Mushroom Risotto With Parmesan will surely become a family favorite.
Ingredients (Serves 4-6):
- 2 tablespoons olive oil
- 1 small onion, finely chopped
- 2 cloves garlic, minced
- 300g Arborio rice
- 200ml dry white wine
- 1 liter vegetable stock, kept warm
- 300g mixed mushrooms, sliced
- 50g butter
- 100g Parmesan cheese, grated
- Salt and pepper to taste
- Fresh parsley, chopped (for garnish)
Cooking Instructions:
- Preparation of Ingredients: Begin by preparing all your ingredients. Finely chop the onion and mince the garlic. Slice the mushrooms and keep the vegetable stock warm in a separate pot on low heat.
- Sauté Onion and Garlic: In a large deep pan, heat the olive oil over medium heat. Add the chopped onion and sauté until it becomes translucent, approximately 5 minutes. Add the minced garlic and cook for an additional 1 minute until fragrant.
- Toast the Rice: Add the Arborio rice to the pan, stirring continuously for about 2 minutes until the rice is well-coated with oil and slightly toasted.
- Deglaze with Wine: Pour in the dry white wine, stirring constantly until the wine is completely absorbed by the rice.
- Cook with Stock: Begin adding the warm vegetable stock to the rice, one ladle at a time. Stir frequently and allow each addition to be absorbed before adding the next. This process should take about 18-20 minutes, and the rice should be tender yet slightly al dente.
- Cook the Mushrooms: In a separate pan, melt half of the butter over medium heat. Add the sliced mushrooms, cooking until they’re golden and have released their moisture. Season with salt and pepper.
- Combine and Finish: Once the rice is cooked, stir in the cooked mushrooms along with the remaining butter. Add the grated Parmesan cheese, stirring until the risotto is creamy and well-combined. Adjust seasoning with salt and pepper to taste.
- Serve: Remove from heat and let the risotto sit for a minute. Garnish with freshly chopped parsley before serving.
Extra Tips:
For the best texture and flavor, always use warm stock—it helps the rice cook evenly and absorb the liquid more efficiently.
Stirring frequently is key to releasing the starches from the rice, which contributes to the creaminess of the risotto. If you prefer a more intensely flavored dish, consider using a mix of wild mushrooms or adding a dash of truffle oil just before serving for an extra layer of richness.
Enjoy your Creamy Mushroom Risotto With Parmesan with a glass of your favorite white wine for a complete dining experience.