

There’s something special about gathering with family for a smoky BBQ feast on a fun weekend. The scent of smoky ribs fills the air, while the sizzle of grilled skewers adds to the excitement. Each dish, from classic ribs to a delightful grilled peach dessert pizza, offers a unique twist on tradition. These mouthwatering recipes are perfect for making memories around the table. Ready to explore some delicious BBQ ideas?
Classic Smoky BBQ Ribs
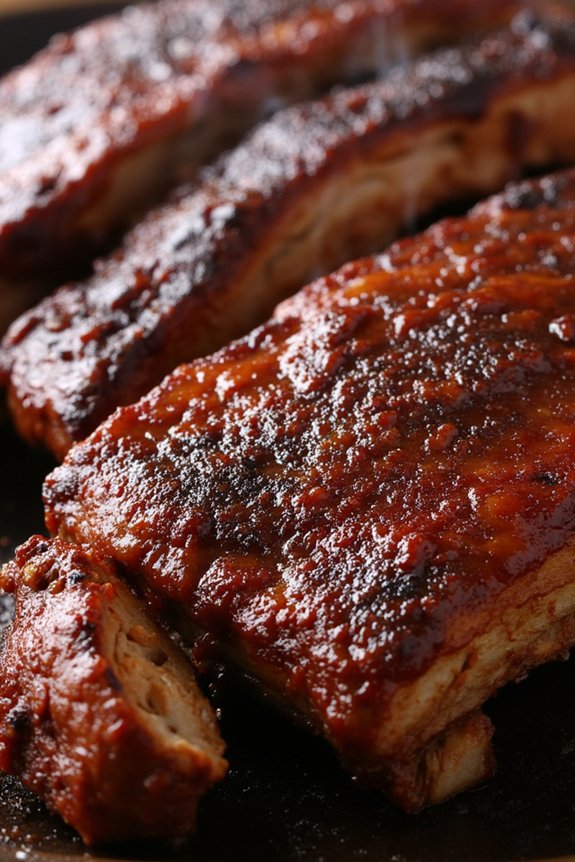
There’s nothing quite like sinking your teeth into a beautifully smoked rack of ribs on a summer evening. Classic Smoky BBQ Ribs are the epitome of comfort food, offering a perfect balance of sweet, smoky, and savory flavors that make them a family favorite at any BBQ dinner. The secret to achieving that mouthwatering taste lies in the slow cooking process and the perfect blend of spices in the dry rub, paired with a smoky barbecue sauce that caramelizes as it cooks.
To make these ribs truly unforgettable, you’ll start by selecting high-quality pork ribs, preferably baby back or spare ribs, which are known for their tenderness and flavor. The preparation involves applying a dry rub overnight to allow the flavors to penetrate the meat, followed by a slow smoking process to achieve that classic smoky taste. The final touch is a generous coating of barbecue sauce, which gives the ribs a sticky, caramelized finish that will have everyone coming back for seconds.
Ingredients (serves 4-6):
- 2 racks of pork ribs (baby back or spare ribs)
- 1/4 cup brown sugar
- 2 tablespoons smoked paprika
- 1 tablespoon garlic powder
- 1 tablespoon onion powder
- 1 teaspoon ground black pepper
- 1 teaspoon salt
- 1/2 teaspoon cayenne pepper
- 1 cup apple juice
- 1 cup barbecue sauce
- 1/4 cup apple cider vinegar
Cooking Instructions:
- Prepare the Ribs: Begin by removing the membrane from the back of the ribs for better flavor absorption. Rinse the ribs under cold water and pat them dry with paper towels.
- Apply the Dry Rub: In a bowl, mix together the brown sugar, smoked paprika, garlic powder, onion powder, black pepper, salt, and cayenne pepper. Generously rub this mixture over both sides of the ribs. Wrap the ribs in plastic wrap and refrigerate for at least 4 hours, preferably overnight.
- Preheat the Smoker: Set your smoker to 225°F (107°C). If you don’t have a smoker, you can use a charcoal grill or oven, adding wood chips for a smoky flavor.
- Prepare the Ribs for Smoking: Remove the ribs from the fridge and let them come to room temperature. Place them on the smoker rack, bone side down. Pour 1/2 cup of apple juice and 1/4 cup of apple cider vinegar into a spray bottle.
- Smoke the Ribs: Smoke the ribs for about 3 hours. Every hour, spritz the ribs with the apple juice and vinegar mixture to keep them moist and enhance the flavor.
- Wrap and Continue Cooking: After 3 hours, remove the ribs and wrap them tightly in aluminum foil. Before sealing the foil, pour a little apple juice over the ribs. Return the wrapped ribs to the smoker and cook for an additional 2 hours.
- Apply the BBQ Sauce: After 2 hours, remove the foil and brush the ribs generously with barbecue sauce. Place them back on the smoker (unwrapped) and cook for another hour, allowing the sauce to caramelize.
- Check for Doneness: The ribs are done when they’re tender and the meat easily pulls away from the bone. Use a meat thermometer to verify the internal temperature reaches 190°F (88°C).
- Rest and Serve: Let the ribs rest for 10-15 minutes before slicing and serving. This allows the juices to redistribute, guaranteeing each bite is juicy and flavorful.
Extra Tips:
For an even smokier flavor, consider using wood chips like hickory, mesquite, or applewood in your smoker. Soak the chips in water for at least 30 minutes before adding them to the smoker.
Additionally, if you prefer a spicier kick, increase the cayenne pepper in the dry rub or add a few drops of hot sauce to the barbecue sauce.
Grilled Honey Garlic Chicken Skewers
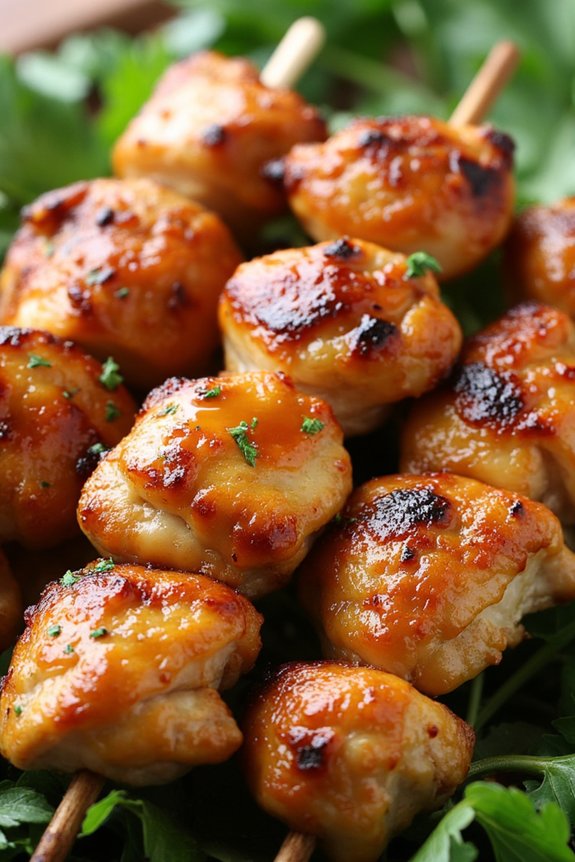
Grilled Honey Garlic Chicken Skewers are a delightful addition to any BBQ family dinner. The combination of succulent chicken pieces marinated in a sweet and savory honey garlic sauce creates a mouthwatering flavor that everyone will love. Perfectly grilled to achieve a slightly charred exterior, these skewers are both juicy and tender on the inside. They’re easy to prepare and make for an ideal main course or even an appetizer for your outdoor gatherings.
The balance of flavors in these skewers comes from a simple yet delicious marinade that infuses the chicken with a rich taste. The honey adds a touch of sweetness, while the garlic provides a savory depth that complements the smokiness from the grill. These skewers aren’t only a feast for the taste buds but also a visually appealing dish that adds vibrant colors to your BBQ spread. Serve them with your choice of side dishes like grilled vegetables, a fresh salad, or a hearty potato dish for a complete family meal.
Ingredients (serving size: 4-6 people):
- 2 pounds boneless, skinless chicken breasts
- 1/3 cup honey
- 1/4 cup soy sauce
- 2 tablespoons olive oil
- 4 cloves garlic, minced
- 1 tablespoon apple cider vinegar
- 1 teaspoon ground black pepper
- 1/2 teaspoon salt
- Skewers (wooden or metal)
- Fresh parsley for garnish (optional)
Cooking Instructions:
- Prepare the Chicken: Begin by cutting the chicken breasts into 1-inch cubes, making sure they’re uniform in size for even cooking. Set the chicken aside in a large mixing bowl.
- Make the Marinade: In a separate bowl, whisk together the honey, soy sauce, olive oil, minced garlic, apple cider vinegar, black pepper, and salt until well combined.
- Marinate the Chicken: Pour the marinade over the chicken pieces, making sure each piece is well coated. Cover the bowl with plastic wrap and refrigerate for at least 2 hours, or overnight for maximum flavor.
- Soak the Skewers: If using wooden skewers, soak them in water for at least 30 minutes before grilling to prevent them from burning.
- Preheat the Grill: Preheat your grill to medium-high heat, around 400°F (200°C). Lightly oil the grill grates to prevent sticking.
- Assemble the Skewers: Thread the marinated chicken pieces onto the skewers, leaving a small space between each piece to make certain of even cooking.
- Grill the Skewers: Place the skewers on the preheated grill. Cook for about 12-15 minutes, turning occasionally, until the chicken is cooked through and has a nice charred appearance. The internal temperature should reach 165°F (74°C).
- Serve and Garnish: Remove the skewers from the grill and let them rest for a few minutes. Garnish with fresh parsley if desired, and serve hot with your choice of sides.
Extra Tips:
To enhance the flavor, consider adding a sprinkle of crushed red pepper flakes to the marinade if you enjoy a bit of heat. For a smokier taste, you can add a dash of smoked paprika.
When grilling, make certain the grill is hot before placing the skewers on it; this helps achieve those beautiful grill marks and locks in the juices. If you’re short on time, a quick 30-minute marinade will still yield delicious results, but the longer you marinate, the better the flavor.
Always use a meat thermometer to guarantee the chicken is thoroughly cooked without overcooking it, keeping it juicy and tender.
BBQ Pulled Pork Sandwiches
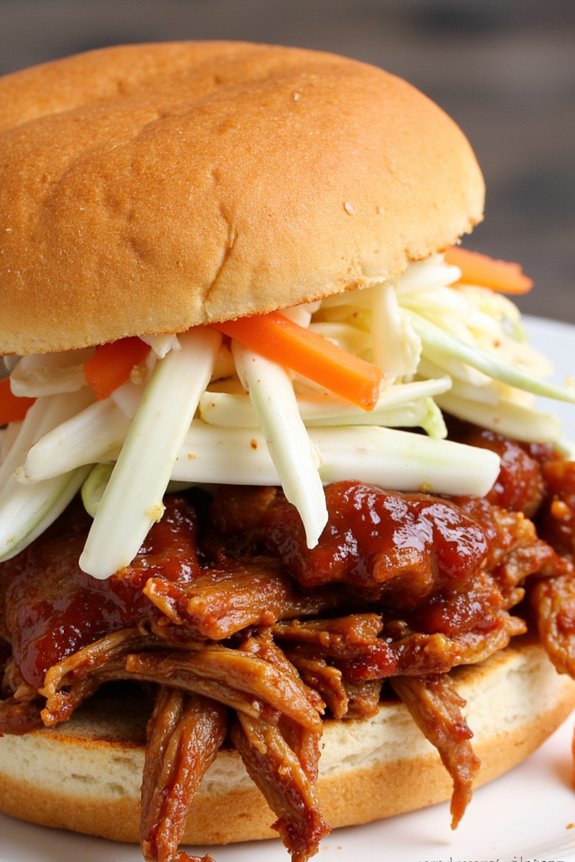
BBQ Pulled Pork Sandwiches are a classic and satisfying meal perfect for any family gathering. With tender, slow-cooked pork shoulder that’s meticulously shredded and slathered in tangy BBQ sauce, these sandwiches are a true delight. Served on a soft bun and paired with your favorite coleslaw, they offer a combination of flavors and textures that are savory, sweet, and satisfying.
Whether you’re hosting a backyard BBQ or a cozy family dinner, these sandwiches are sure to impress your guests and become a staple in your culinary repertoire.
The secret to perfect BBQ Pulled Pork Sandwiches lies in the low and slow cooking process that allows the pork to become incredibly tender and flavorful. You’ll need a few hours for cooking, but the result is well worth the wait. The following recipe is designed to serve 4-6 people, making it an ideal choice for a family meal or a small gathering. Gather your ingredients and follow the steps below to create this mouthwatering dish.
Ingredients (Serves 4-6):
- 3 pounds pork shoulder (also known as pork butt)
- 1 tablespoon smoked paprika
- 1 tablespoon garlic powder
- 1 tablespoon onion powder
- 1 teaspoon salt
- 1 teaspoon black pepper
- 1 cup BBQ sauce
- 1/2 cup apple cider vinegar
- 1/2 cup chicken broth
- 6 hamburger buns
- Optional: Coleslaw for topping
Cooking Instructions:
- Prepare the Pork: Rinse the pork shoulder under cold water and pat it dry with paper towels. Trim any excess fat if necessary.
- Season the Pork: In a small bowl, mix together the smoked paprika, garlic powder, onion powder, salt, and black pepper. Rub this spice mixture all over the pork shoulder, ensuring it’s evenly coated.
- Set Up the Cooking Vessel: Place the seasoned pork shoulder into a slow cooker. Add the apple cider vinegar and chicken broth to the cooker, which will help to keep the pork moist during cooking.
- Cook the Pork: Cover the slow cooker and set it to cook on low for 8-10 hours, or until the pork is tender and easily pulls apart with a fork. Alternatively, you can cook on high for 4-5 hours, but the low setting results in more tender meat.
- Shred the Pork: Once cooked, remove the pork from the slow cooker and place it on a large cutting board. Using two forks, shred the pork into bite-sized pieces. Discard any large pieces of fat.
- Mix with BBQ Sauce: Transfer the shredded pork back into the slow cooker. Add the BBQ sauce and stir well to coat all of the pork. Let it cook on low for an additional 30 minutes to allow the flavors to meld.
- Assemble the Sandwiches: Toast the hamburger buns if desired. Spoon a generous amount of the BBQ pulled pork onto the bottom half of each bun. Top with coleslaw if using, and then place the top half of the bun over the pork.
- Serve: Serve the sandwiches warm with your favorite sides, such as potato salad, corn on the cob, or baked beans.
Extra Tips:
For an added depth of flavor, consider searing the pork shoulder on all sides in a hot skillet before placing it in the slow cooker. This will create a tasty crust that enhances the overall dish.
If you prefer a spicier sandwich, add a pinch of cayenne pepper to the spice rub or mix some hot sauce into the BBQ sauce. Additionally, you can experiment with different types of buns such as brioche or pretzel buns for added variety.
Smoky Grilled Vegetable Medley
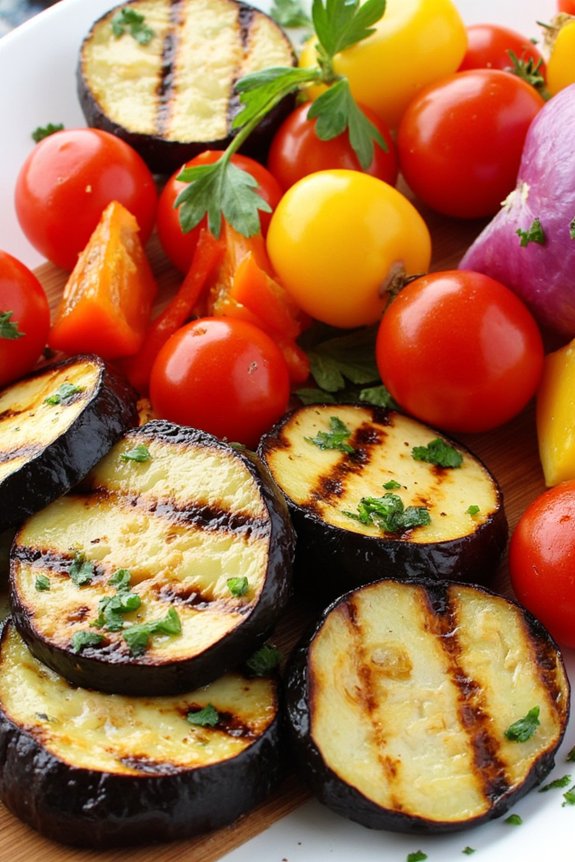
Elevate your BBQ family dinner with a Smoky Grilled Vegetable Medley that complements any grilled meats or stands boldly on its own as a delicious vegetarian delight. This colorful dish brings together a vibrant array of vegetables, each infused with a subtle smokiness from the grill, creating a symphony of flavors that will please every palate at your gathering.
Perfect for a warm summer evening, this medley highlights the natural sweetness and crispness of the vegetables, enhanced by a light marinade that adds depth without overpowering the inherent flavors.
The key to a successful Smoky Grilled Vegetable Medley lies in selecting the freshest produce and grilling them to perfection. This dish is versatile enough to accommodate a variety of seasonal vegetables, so feel free to adjust according to availability.
The following recipe provides a balanced mix of textures and tastes, resulting in a dish that’s both healthy and satisfying. Designed to serve 4-6 people, this recipe guarantees that everyone gets a generous helping of these smoky, char-grilled delights.
Ingredients:
- 2 medium zucchinis, sliced
- 1 large red bell pepper, cut into chunks
- 1 large yellow bell pepper, cut into chunks
- 1 large eggplant, sliced into rounds
- 1 red onion, cut into wedges
- 1 cup cherry tomatoes, whole
- 3 tablespoons olive oil
- 2 tablespoons balsamic vinegar
- 2 teaspoons smoked paprika
- Salt and black pepper to taste
- 2 cloves garlic, minced
- Fresh parsley, chopped, for garnish
Instructions:
- Prepare the Vegetables: Wash all the vegetables thoroughly. Slice the zucchinis and eggplant into uniform rounds, cut the bell peppers into large chunks, and slice the red onion into wedges. Leave the cherry tomatoes whole to prevent them from falling through the grill grates.
- Make the Marinade: In a large mixing bowl, combine the olive oil, balsamic vinegar, smoked paprika, minced garlic, salt, and black pepper. Whisk the ingredients together until well blended.
- Marinate the Vegetables: Add the prepared vegetables to the bowl with the marinade. Toss until all the vegetables are evenly coated with the mixture. Allow them to marinate for at least 20 minutes to absorb the flavors.
- Preheat the Grill: While the vegetables are marinating, preheat your grill to medium-high heat (approximately 400°F/200°C). Clean the grill grates thoroughly and lightly oil them to prevent sticking.
- Grill the Vegetables: Place the marinated vegetables on the grill, arranging them in a single layer. Cook each side for about 3-5 minutes, or until you see nice grill marks and the vegetables are tender. Be sure to turn the vegetables carefully to guarantee even cooking.
- Serve: Once grilled to perfection, transfer the vegetables to a serving platter. Garnish with freshly chopped parsley and serve hot as a side dish or a main course for a light meal.
Extra Tips:
When grilling vegetables, it’s important to keep a close eye on them to prevent overcooking. Vegetables should be tender yet maintain a slight crunch for the ideal texture.
If you prefer a more intense smoky flavor, consider adding a handful of soaked wood chips to the grill. For added convenience, you can use a grill basket, which makes turning the vegetables easier and prevents smaller pieces from falling through the grates.
Feel free to experiment with different herbs and spices to customize the flavor profile to your liking.
Spicy BBQ Shrimp Skewers

Spicy BBQ Shrimp Skewers make the perfect addition to any family barbecue, offering a burst of flavors that are both savory and fiery. These skewers aren’t only easy to prepare but also cook quickly, making them an ideal choice for a crowd. The combination of juicy shrimp marinated in a bold, spicy sauce, grilled to perfection, creates a delicious dish that’s sure to impress both adults and children alike.
Whether you’re hosting a summer grill party or enjoying a casual family dinner, these skewers will add a touch of excitement to your menu.
The key to making these shrimp skewers truly special lies in the marinade, which is a blend of spices, citrus, and a hint of sweetness. The shrimp are allowed to soak up these flavors before being threaded onto skewers and char-grilled, resulting in a smoky, spicy, and slightly tangy taste.
As you prepare for your gathering, you’ll find that these shrimp skewers aren’t only a breeze to make but also a delightful treat that will have everyone reaching for seconds.
Ingredients (serves 4-6 people):
- 2 pounds large shrimp, peeled and deveined
- 3 tablespoons olive oil
- 3 cloves garlic, minced
- 1 teaspoon smoked paprika
- 1 teaspoon cayenne pepper
- 1 teaspoon ground cumin
- 1 teaspoon salt
- 1 tablespoon brown sugar
- Juice of 1 lime
- 2 tablespoons freshly chopped cilantro
- Skewers (if using wooden skewers, soak them in water for 30 minutes prior to grilling)
Cooking Instructions:
- Prepare the Marinade: In a large mixing bowl, combine olive oil, minced garlic, smoked paprika, cayenne pepper, ground cumin, salt, brown sugar, and lime juice. Whisk the ingredients together until well blended.
- Marinate the Shrimp: Add the peeled and deveined shrimp to the marinade, making certain each piece is thoroughly coated. Cover the bowl with plastic wrap and let the shrimp marinate in the refrigerator for at least 30 minutes, allowing the flavors to meld.
- Preheat the Grill: While the shrimp is marinating, preheat your grill to medium-high heat. If using a charcoal grill, make sure the coals are hot and have a light coating of white ash before cooking.
- Thread the Shrimp: Once marinated, carefully thread the shrimp onto skewers. If using wooden skewers, make sure they’re soaked in water to prevent burning.
- Grill the Skewers: Place the shrimp skewers on the preheated grill. Cook for 2-3 minutes on each side, or until the shrimp are opaque and have grill marks. Be careful not to overcook, as shrimp can become rubbery.
- Garnish and Serve: Remove the skewers from the grill and sprinkle with freshly chopped cilantro. Serve immediately, alongside lime wedges for an extra burst of freshness.
Extra Tips:
For best results, choose shrimp that are large enough to stay juicy while cooking. Adjust the amount of cayenne pepper to your preference for spice, or omit it entirely for a milder version.
Always preheat the grill to guarantee even cooking and prevent sticking. If you’re looking to add a bit more zest, consider adding a dash of hot sauce to the marinade. Finally, these skewers pair wonderfully with a side of grilled vegetables or a fresh salad for a complete meal.
Sweet and Tangy BBQ Chicken Wings
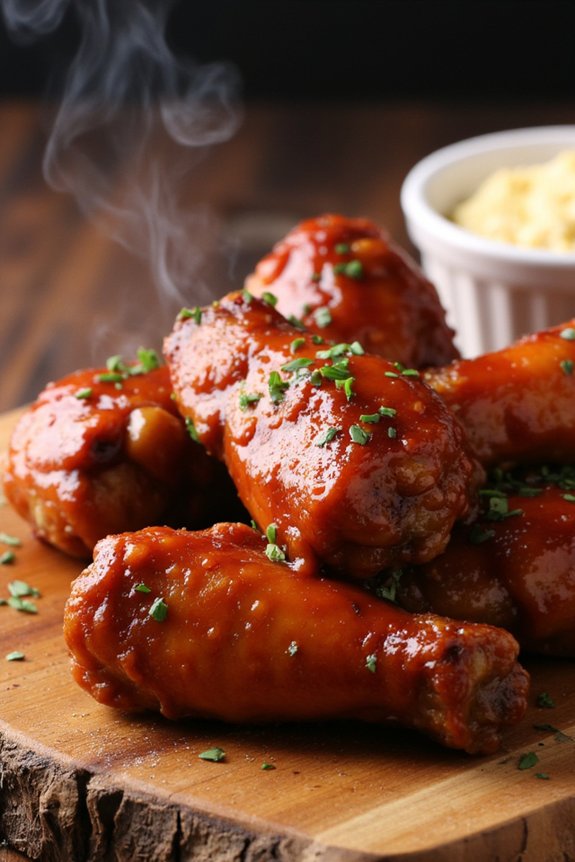
Sweet and Tangy BBQ Chicken Wings are the perfect addition to any family dinner or backyard gathering. The combination of sweet and tangy flavors, along with the smoky aroma from the grill, makes these wings irresistible.
Whether you’re hosting a summer BBQ or looking for a crowd-pleasing appetizer, these wings are bound to be a hit. The recipe involves marinating the chicken wings in a flavorful sauce, grilling them to perfection, and then coating them with an additional layer of the sweet and tangy sauce to guarantee every bite is packed with flavor.
The key to achieving the perfect balance of sweetness and tanginess lies in the sauce. You can make the sauce from scratch or use your favorite store-bought BBQ sauce as a base, enhancing it with additional ingredients like honey, vinegar, and spices to tailor it to your taste.
The result is succulent chicken wings that are slightly crispy on the outside but juicy and tender on the inside. This recipe serves 4-6 people, making it ideal for a small group or family meal.
Ingredients (serves 4-6):
- 3 pounds of chicken wings
- 1 cup BBQ sauce
- 1/4 cup honey
- 2 tablespoons apple cider vinegar
- 1 tablespoon soy sauce
- 1 teaspoon garlic powder
- 1 teaspoon onion powder
- 1/2 teaspoon smoked paprika
- Salt and pepper, to taste
- Cooking spray or oil for the grill
Cooking Instructions:
- Prepare the Marinade: In a large mixing bowl, combine the BBQ sauce, honey, apple cider vinegar, soy sauce, garlic powder, onion powder, smoked paprika, salt, and pepper. Mix well until all ingredients are fully incorporated.
- Marinate the Chicken Wings: Place the chicken wings in a large resealable plastic bag or container. Pour half of the marinade over the wings, making certain they’re well-coated. Seal and refrigerate for at least 2 hours, or overnight for best results.
- Preheat the Grill: Before cooking, preheat your grill to medium-high heat. Lightly oil the grill grates or spray with cooking spray to prevent sticking.
- Cook the Wings: Remove the wings from the marinade, letting any excess drip off. Place the wings on the preheated grill. Cook for about 20-25 minutes, turning occasionally, until the wings are golden brown and cooked through, with an internal temperature of 165°F (74°C).
- Apply Additional Sauce: During the last 5 minutes of grilling, brush the wings with the remaining marinade to enhance the flavor and achieve a sticky glaze.
- Serve and Enjoy: Once cooked, remove the wings from the grill and let them rest for a few minutes. Serve hot, either as an appetizer or main dish, with extra sauce on the side if desired.
Extra Tips: For an extra layer of flavor, consider adding a pinch of cayenne pepper or chili flakes to the marinade if you prefer a bit of heat.
Additionally, to guarantee even cooking, arrange the wings in a single layer on the grill without overcrowding. This allows for proper air circulation and helps achieve a crispy exterior. If you don’t have a grill, these wings can also be baked in the oven at 400°F (200°C) for about 25-30 minutes, turning halfway through.
Smoky BBQ Beef Brisket
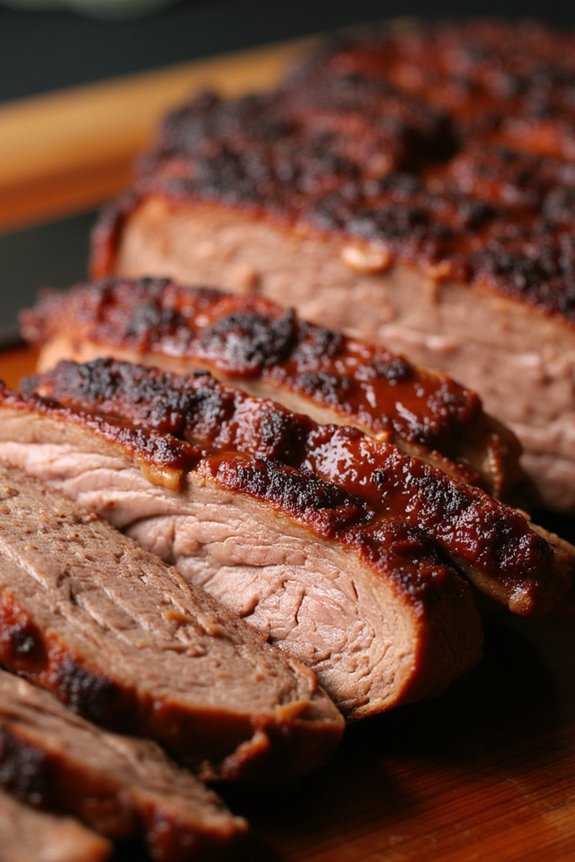
If you’re aiming to impress your family with a delicious BBQ dinner, seek no further than Smoky BBQ Beef Brisket. This tender, flavorful dish is perfect for a family gathering, offering a rich, smoky taste that will have everyone coming back for seconds.
The key to a successful brisket lies in the slow cooking process, allowing the meat to absorb the flavors of the spices and the smokiness from the BBQ. Whether you’re a seasoned pitmaster or a BBQ novice, this recipe will guide you through the steps to create a mouthwatering meal that will be the highlight of your family dinner.
Preparing Smoky BBQ Beef Brisket requires a bit of patience, but the results are well worth the wait. The dish starts with a well-seasoned, marinated brisket that’s slow-cooked to perfection.
The combination of spices, herbs, and a hint of sweetness from a homemade BBQ sauce meld together, creating a symphony of flavors. Whether cooked on a grill or in the oven, this brisket becomes tender and juicy, making it an ideal centerpiece for your BBQ family dinner.
Follow this recipe and savor the deliciousness of homemade Smoky BBQ Beef Brisket with family and friends.
Ingredients (serving size: 4-6 people):
- 4 to 6 pounds beef brisket
- 2 tablespoons olive oil
- 1 tablespoon salt
- 1 tablespoon black pepper
- 2 tablespoons smoked paprika
- 1 tablespoon garlic powder
- 1 tablespoon onion powder
- 1 teaspoon cayenne pepper
- 1 cup beef broth
- 1 cup BBQ sauce (store-bought or homemade)
- 2 tablespoons apple cider vinegar
- 1 tablespoon Worcestershire sauce
- 1 tablespoon brown sugar
Cooking Instructions:
- Prepare the Brisket: Begin by trimming the brisket of excess fat, leaving about 1/4 inch of fat on the surface for flavor. Pat dry with paper towels.
- Season the Brisket: In a small bowl, mix together salt, black pepper, smoked paprika, garlic powder, onion powder, and cayenne pepper. Rub the olive oil over the brisket, then evenly coat the brisket with the spice mixture. Confirm all sides are covered for maximum flavor.
- Marinate the Brisket: Place the seasoned brisket in a large dish or resealable plastic bag. Let it marinate in the refrigerator for at least 4 hours, preferably overnight, to allow the flavors to penetrate the meat.
- Preheat the Oven or Grill: If using an oven, preheat to 300°F (150°C). If using a grill, set it up for indirect cooking and preheat to 250°F (121°C).
- Cook the Brisket: Place the brisket on a large piece of aluminum foil on a baking sheet or directly on the grill. Pour the beef broth around the brisket and tightly wrap the foil, sealing the edges. If using a grill, place the brisket over indirect heat. Cook for 4-5 hours or until the internal temperature reaches 190°F (88°C).
- Prepare the BBQ Sauce: While the brisket is cooking, combine the BBQ sauce, apple cider vinegar, Worcestershire sauce, and brown sugar in a small saucepan. Heat over medium heat until the sugar has dissolved and the sauce is well combined.
- Finish the Brisket: Once the brisket reaches the desired temperature, carefully unwrap the foil and brush the brisket with the prepared BBQ sauce. Return to the oven or grill without the foil for an additional 30 minutes, allowing the sauce to caramelize and form a flavorful crust.
- Rest and Serve: Remove the brisket from the heat and let it rest for at least 20 minutes before slicing. Serve with additional BBQ sauce on the side.
Extra Tips:
For the best results, verify that the brisket is cooked low and slow to break down the connective tissues, resulting in tender, juicy meat.
If you’re using a grill, consider adding wood chips to enhance the smoky flavor. Keep a close eye on the temperature of the grill or oven, as consistent heat is essential for even cooking.
Finally, remember to let the brisket rest before slicing; this allows the juices to redistribute, confirming every slice is moist and flavorful.
Grilled Pineapple and Jalapeño Salsa
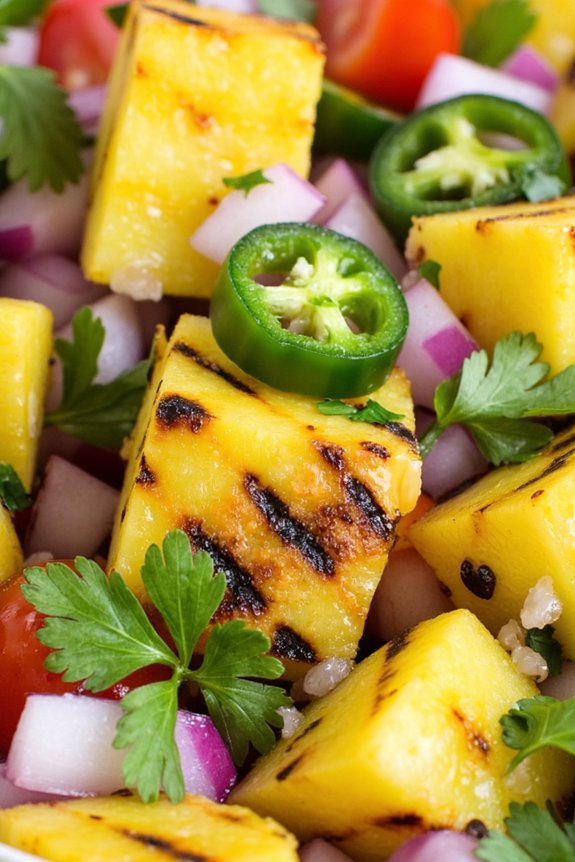
Grilled Pineapple and Jalapeño Salsa is a delightful and fiery addition to any BBQ family dinner. The combination of sweet pineapple and spicy jalapeños creates a revitalizing yet bold flavor profile that perfectly complements grilled meats and vegetables.
This salsa isn’t only easy to prepare but also adds a vibrant pop of color to your table, making it a hit with both kids and adults. Whether you serve it with chips as an appetizer or as a topping for grilled chicken or fish, this salsa is sure to elevate your BBQ experience.
The smoky flavor from grilling the pineapple and jalapeños enhances their natural sweetness and heat, creating a well-balanced dish that’s perfect for summer gatherings. The tangy lime juice and fresh cilantro add a zesty finish, while the red onion provides a hint of sharpness.
This recipe is designed to serve 4-6 people, making it an ideal side dish for a small family gathering. Prepare to impress your guests with this simple yet delicious Grilled Pineapple and Jalapeño Salsa.
Ingredients (Serves 4-6):
- 1 whole pineapple, peeled, cored, and cut into rings
- 2 fresh jalapeños, halved and seeded
- 1 red onion, finely chopped
- Juice of 2 limes
- 1/4 cup fresh cilantro, chopped
- Salt to taste
- Pepper to taste
- Olive oil for grilling
Cooking Instructions:
1. Prepare the Grill:
Preheat your grill to medium-high heat. Confirm the grates are clean and lightly oil them to prevent sticking.
2. Grill the Pineapple and Jalapeños:
Lightly brush the pineapple rings and jalapeño halves with olive oil. Place them on the grill. Grill the pineapple for about 3-4 minutes per side until they’ve nice grill marks and are slightly caramelized. Grill the jalapeños for about 2 minutes per side until they’re slightly charred.
3. Chop the Ingredients:
Once grilled, remove the pineapple and jalapeños from the grill and let them cool slightly. Dice the pineapple into small chunks and finely chop the jalapeños. Be cautious with the jalapeños to prevent transferring heat to your eyes or face.
4. Mix the Salsa:
In a large bowl, combine the grilled pineapple, chopped jalapeños, red onion, lime juice, and cilantro. Stir well to confirm all ingredients are evenly mixed.
5. Season the Salsa:
Add salt and pepper to taste. Adjust the lime juice or cilantro if needed to suit your taste preference.
6. Serve:
Transfer the salsa to a serving dish and let it sit for at least 10 minutes before serving. This allows the flavors to meld together beautifully.
Extra Tips:
For a less spicy version, consider using one jalapeño or removing more of the seeds, as they contain most of the heat.
If you prefer an even smokier flavor, try grilling the red onion slices before chopping them. You can also add a diced avocado for a creamy texture or a splash of your favorite hot sauce for additional heat.
Remember that the salsa can be made a few hours in advance and will taste even better as the flavors develop over time. Store any leftovers in an airtight container in the refrigerator for up to two days.
BBQ Glazed Portobello Mushrooms

BBQ Glazed Portobello Mushrooms make for a delightful and hearty vegetarian option that’s perfect for a family dinner. Their meaty texture and ability to absorb flavors make portobello mushrooms an ideal choice for grilling. With a tangy BBQ glaze, these mushrooms become a savory centerpiece that will satisfy everyone at the table.
Whether you’re hosting a summer barbecue or simply craving a delicious plant-based meal, this recipe is bound to be a hit. This dish is simple to prepare and requires only a few ingredients, making it an easy addition to any BBQ menu. The mushrooms are marinated in a flavorful BBQ sauce, allowing them to soak up all the deliciousness before being grilled to perfection.
Serve them as a main course or as a side dish alongside other BBQ favorites, and enjoy the rich, smoky taste that these BBQ Glazed Portobello Mushrooms bring to the table.
Ingredients (Serves 4-6):
- 6 large portobello mushrooms
- 1 cup BBQ sauce
- 2 tablespoons olive oil
- 2 tablespoons balsamic vinegar
- 2 cloves garlic, minced
- Salt and pepper to taste
- Fresh parsley, chopped (optional for garnish)
Cooking Instructions:
- Prepare the Mushrooms: Clean the portobello mushrooms by gently wiping them with a damp paper towel to remove any dirt. Remove the stems and use a spoon to gently scrape out the gills from the underside of the caps.
- Make the Marinade: In a bowl, combine the BBQ sauce, olive oil, balsamic vinegar, minced garlic, salt, and pepper. Mix well until all ingredients are thoroughly combined.
- Marinate the Mushrooms: Place the cleaned portobello mushrooms in a large resealable plastic bag or a shallow dish. Pour the marinade over the mushrooms, ensuring they’re well-coated. Seal the bag or cover the dish and refrigerate for at least 30 minutes to allow the flavors to meld.
- Preheat the Grill: While the mushrooms are marinating, preheat your grill to medium-high heat. Ensure the grates are clean and lightly oiled to prevent sticking.
- Grill the Mushrooms: Remove the mushrooms from the marinade and place them on the preheated grill, gill side up. Grill for about 5-7 minutes per side, basting occasionally with any remaining marinade, until the mushrooms are tender and have developed grill marks.
- Serve and Garnish: Once cooked, transfer the mushrooms to a serving platter. Optionally, garnish with freshly chopped parsley for a pop of color and added freshness. Serve hot as a main dish or side.
Extra Tips:
For the best flavor, try to marinate the mushrooms for at least an hour or even overnight if possible. This will allow the BBQ glaze to really permeate the mushrooms, enhancing their taste.
Additionally, if you don’t have access to a grill, you can also cook these mushrooms in a grill pan on the stovetop or roast them in the oven at 400°F (200°C) until tender. Experiment with different types of BBQ sauce to find your favorite flavor profile, and don’t be afraid to add a sprinkle of your favorite spices to the marinade for an extra kick.
Smoky BBQ Baked Beans

Smoky BBQ Baked Beans are a quintessential side dish that perfectly complements any BBQ family dinner. With their rich and hearty flavors, these beans are slow-cooked to perfection, allowing the smoky and savory notes to meld beautifully.
This dish isn’t only easy to prepare but also requires minimal ingredients, making it an ideal choice when you’re looking to impress without much fuss. Whether you’re hosting a summer cookout or a cozy indoor gathering, these beans are sure to be a crowd-pleaser, offering a delightful balance of sweetness and smokiness.
When it comes to preparing Smoky BBQ Baked Beans, the secret lies in the combination of quality ingredients and a bit of patience. By starting with canned beans, you save time while still achieving that classic homemade taste.
The addition of smoked bacon and a blend of spices enhances the depth of flavor, while molasses and brown sugar add just the right touch of sweetness. This recipe serves 4-6 people, making it perfect for a family meal or small gathering. Let’s plunge into the recipe and create this mouth-watering dish.
Ingredients:
- 4 cups canned navy beans, drained and rinsed
- 6 slices smoked bacon, chopped
- 1 medium onion, diced
- 1 green bell pepper, diced
- 3 cloves garlic, minced
- 1/2 cup BBQ sauce
- 1/4 cup ketchup
- 1/4 cup molasses
- 1/4 cup brown sugar
- 1 tablespoon yellow mustard
- 1 tablespoon Worcestershire sauce
- 1 teaspoon smoked paprika
- 1/2 teaspoon ground black pepper
- Salt to taste
Cooking Instructions:
- Preheat the Oven: Begin by preheating your oven to 350°F (175°C). This will guarantee your beans cook evenly and develop a lovely crust on top.
- Cook the Bacon: In a large skillet over medium heat, cook the chopped bacon until it’s crispy. This should take about 5-7 minutes. Once cooked, remove the bacon and set it aside on a paper towel to drain, leaving about 2 tablespoons of bacon fat in the skillet.
- Sauté Vegetables: Add the diced onion and green bell pepper to the skillet with the bacon fat. Sauté them for about 5 minutes, or until the onion becomes translucent and the bell pepper softens. Add the minced garlic and cook for another minute until fragrant.
- Mix the Sauce: In a large mixing bowl, combine the BBQ sauce, ketchup, molasses, brown sugar, mustard, Worcestershire sauce, smoked paprika, black pepper, and salt. Stir until well blended.
- Combine Everything: Add the drained navy beans, cooked bacon, and sautéed vegetables to the sauce mixture. Stir everything together until the beans are evenly coated with the sauce.
- Bake: Transfer the mixture to a baking dish, spreading it out evenly. Cover the dish with aluminum foil and bake in the preheated oven for 45 minutes. Remove the foil and bake for an additional 15 minutes, allowing the top to caramelize slightly.
- Serve: Once baked, remove the beans from the oven and let them cool for a few minutes before serving. Enjoy your Smoky BBQ Baked Beans with your favorite BBQ main dishes.
Extra Tips: For an extra smoky flavor, consider adding a few drops of liquid smoke to the sauce mixture. If you prefer a spicier kick, include a chopped jalapeño pepper or a dash of cayenne pepper.
Also, these beans can be prepared a day in advance and reheated, which will allow the flavors to develop even more. Just make sure to store them in an airtight container in the refrigerator.
Grilled Corn on the Cob With Herb Butter
Grilled Corn on the Cob With Herb Butter is a classic and flavorful dish perfect for a BBQ family dinner. This recipe combines the natural sweetness of fresh corn with the rich, savory flavors of homemade herb butter. Grilling the corn allows it to develop a smoky char, which pairs beautifully with the aromatic herb butter, creating a mouthwatering side dish that’s certain to be a hit at any gathering.
Whether you’re hosting a summer cookout or enjoying a cozy family dinner, this dish is simple to prepare and offers a delightful taste of the season.
To make this dish, you’ll need fresh ears of corn and a selection of herbs to create a delicious and fragrant butter. The herb butter can be prepared in advance, allowing the flavors to meld together and intensify. Grilling the corn on the cob enhances its natural sweetness and adds a delightful texture that complements the creamy herb butter.
With a few simple steps, you’ll have a crowd-pleasing side dish that pairs well with a variety of main courses, from grilled meats to vegetarian dishes.
Ingredients for 4-6 servings:
- 6 ears of corn, husked
- 1/2 cup unsalted butter, softened
- 2 tablespoons fresh parsley, finely chopped
- 1 tablespoon fresh chives, finely chopped
- 1 tablespoon fresh basil, finely chopped
- 1 teaspoon garlic powder
- 1 teaspoon salt
- 1/2 teaspoon black pepper
- 1/2 teaspoon paprika
- Olive oil, for brushing
Instructions:
- Prepare the Herb Butter: In a medium bowl, combine the softened butter, parsley, chives, basil, garlic powder, salt, black pepper, and paprika. Mix until well blended. Spoon the mixture onto a piece of plastic wrap and roll it into a log. Refrigerate for at least 30 minutes to allow the flavors to meld.
- Preheat the Grill: Heat your grill to medium-high heat. Make sure the grates are clean and lightly oiled to prevent sticking.
- Prepare the Corn: Brush each ear of corn with olive oil to guarantee they don’t stick to the grill and to help them brown nicely.
- Grill the Corn: Place the corn directly on the grill. Cook for about 10-15 minutes, turning every few minutes, until the corn is charred and tender. The kernels should be bright yellow and slightly browned.
- Serve with Herb Butter: Remove the corn from the grill and transfer it to a serving platter. Slice the herb butter log into rounds and place a piece on each ear of corn. The heat from the corn will melt the butter, coating it with delicious herb flavors.
Extra Tips:
For an added twist, you can experiment with different herbs and spices to customize the herb butter to your liking. Consider adding a splash of lime juice or a sprinkle of Parmesan cheese for extra zest and flavor.
If you prefer a spicier kick, add a pinch of cayenne pepper to the herb butter. When selecting corn, opt for ears that are firm and have bright green husks with fresh silk. This guarantees the corn is fresh and will provide the best flavor when grilled.
Enjoy your Grilled Corn on the Cob With Herb Butter as a delightful accompaniment to your BBQ feast!
BBQ Bacon-Wrapped Jalapeño Poppers

BBQ Bacon-Wrapped Jalapeño Poppers are a fantastic appetizer that combines the smoky flavor of bacon with the spicy heat of jalapeños, all balanced by a creamy cheese filling.
Perfect for a family BBQ dinner, these poppers are sure to be a hit with their irresistible combination of flavors and textures. Whether you’re hosting a casual cookout or a more formal gathering, these poppers will add a delicious kick to your menu.
The recipe is simple yet impressive, making it an excellent choice for both novice and experienced cooks alike. The preparation involves only a few ingredients, but the result is a mouthwatering treat that your guests will find hard to resist.
With the option to customize the level of heat by adjusting the amount of jalapeño seeds used, you can tailor these poppers to suit the taste preferences of your family and friends.
Ingredients (Serves 4-6)
- 12 fresh jalapeño peppers
- 8 ounces cream cheese, softened
- 1 cup shredded cheddar cheese
- 1 teaspoon garlic powder
- 1 teaspoon onion powder
- 12 slices of bacon
- 1/2 cup BBQ sauce
Cooking Instructions
- Prepare the Jalapeños: Begin by washing the jalapeños thoroughly. Slice each jalapeño in half lengthwise and remove the seeds and membranes to reduce the heat, unless you prefer them extra spicy.
- Make the Cheese Filling: In a mixing bowl, combine the softened cream cheese, shredded cheddar cheese, garlic powder, and onion powder. Mix until well blended and creamy.
- Stuff the Jalapeños: Spoon the cheese mixture into each jalapeño half, filling them generously but ensuring the mixture doesn’t overflow.
- Wrap with Bacon: Take a slice of bacon and wrap it around each stuffed jalapeño half, securing it with a toothpick if necessary. This will help keep the bacon in place while cooking.
- Preheat the Grill: Preheat your grill to medium-high heat, approximately 375°F (190°C).
- Grill the Poppers: Place the bacon-wrapped jalapeño poppers on the grill, ensuring they’re spaced evenly. Grill for about 15-20 minutes, turning occasionally, until the bacon is crispy and the jalapeños are tender.
- Add BBQ Sauce: During the last 5 minutes of grilling, brush each popper with BBQ sauce. This will add a sweet and tangy glaze to the poppers.
- Serve: Once done, remove the poppers from the grill and let them cool for a few minutes before serving. They can be served warm or at room temperature.
Extra Tips
When preparing the jalapeños, it’s a good idea to wear gloves to protect your hands from the capsaicin, which can irritate your skin.
If you’re looking to add a bit more variety, consider mixing in some chopped cooked bacon into the cheese filling for an extra burst of flavor.
Additionally, you can experiment with different types of cheese, such as pepper jack or mozzarella, to create your unique flavor profile.
Finally, make sure to monitor the grill closely, as the bacon can become crispy very quickly.
Smoky BBQ Tofu Skewers
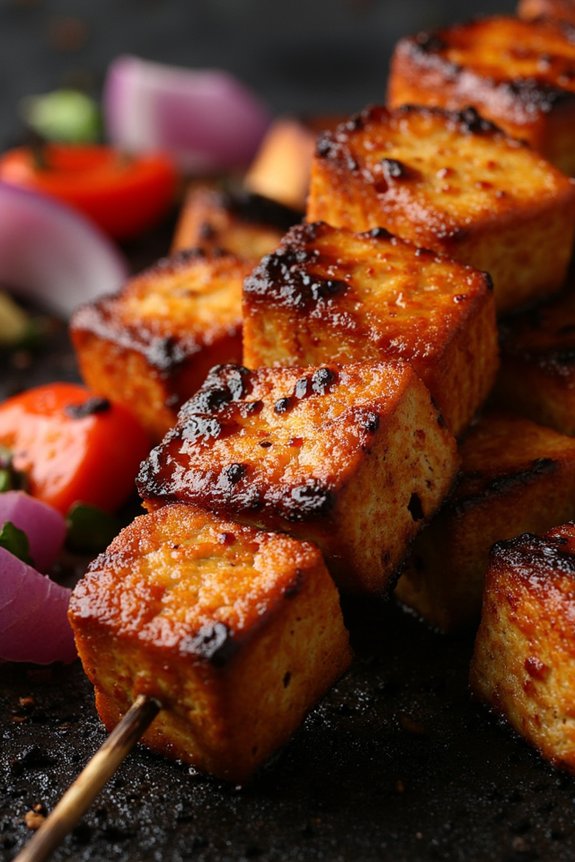
Smoky BBQ Tofu Skewers are a delightful plant-based twist on a classic barbecue favorite, perfect for any family dinner gathering. These skewers are marinated in a rich, smoky BBQ sauce that infuses the tofu with a deep, savory flavor. Grilled to perfection, they offer a satisfying texture and a delicious char that pairs wonderfully with a variety of side dishes. Ideal for both vegetarians and non-vegetarians alike, these skewers can easily become the star of your BBQ spread.
To make this dish, you’ll need firm tofu, which is known for its ability to absorb flavors and maintain structure when grilled. The BBQ sauce can be homemade or store-bought, depending on your preference. This versatile dish can be served with grilled vegetables, a fresh salad, or even some tangy coleslaw. Prepare to impress your family with these tasty skewers that are both healthy and full of flavor.
Ingredients (Serves 4-6):
- 2 blocks of firm tofu (about 14 oz each)
- 1 cup BBQ sauce
- 2 tablespoons olive oil
- 1 tablespoon soy sauce
- 1 tablespoon smoked paprika
- 2 teaspoons garlic powder
- 1 teaspoon onion powder
- Salt and pepper, to taste
- Wooden or metal skewers
Cooking Instructions:
- Prepare the Tofu: Drain and press the tofu blocks to remove excess moisture. To press, wrap the tofu in a clean kitchen towel or paper towels and place a heavy object on top, such as a skillet. Leave for about 20 minutes.
- Cut the Tofu: Once pressed, cut the tofu into 1-inch cubes. This size is ideal for skewering and grilling.
- Make the Marinade: In a mixing bowl, combine the BBQ sauce, olive oil, soy sauce, smoked paprika, garlic powder, onion powder, salt, and pepper. Mix well until all ingredients are thoroughly combined.
- Marinate the Tofu: Place the tofu cubes in a shallow dish or a resealable plastic bag. Pour the marinade over the tofu, guaranteeing all pieces are coated. Let the tofu marinate for at least 1 hour in the refrigerator, or overnight for a deeper flavor.
- Preheat the Grill: Preheat your grill to medium-high heat. If using wooden skewers, soak them in water for about 30 minutes beforehand to prevent burning.
- Assemble the Skewers: Thread the marinated tofu cubes onto the skewers, leaving a small space between each piece for even cooking.
- Grill the Skewers: Place the skewers on the preheated grill. Cook for about 10-15 minutes, turning occasionally, until the tofu is heated through and has nice grill marks. Brush with additional BBQ sauce during grilling for extra flavor.
- Serve: Remove the skewers from the grill and serve immediately. Pair with your favorite sides or enjoy as a standalone dish.
Extra Tips:
When preparing Smoky BBQ Tofu Skewers, it’s significant to press the tofu well to guarantee it crisps up nicely on the grill. If you’re short on time, you can speed up the marinating process by using a vacuum-sealed marinade technique.
Additionally, feel free to add vegetables like bell peppers or red onions to the skewers for added texture and flavor. Ultimately, monitor the grill closely to prevent the skewers from burning, especially if you’re using wooden skewers. Enjoy your delicious BBQ creation!
Grilled Peach and Berry Dessert Pizza

Grilled Peach and Berry Dessert Pizza is a delightful way to end a BBQ family dinner. This sweet treat combines the smoky flavor of a grilled pizza crust with the natural sweetness of fresh peaches and berries. The combination of juicy peaches, tart berries, and a creamy spread creates a mouthwatering dessert that’s both invigorating and satisfying.
It’s a perfect summer dessert that will impress your guests and leave them asking for more. This dessert pizza isn’t only delicious but also simple to make, making it an ideal choice for a relaxed outdoor gathering. The process involves grilling the pizza crust to perfection, then topping it with a creamy base and a medley of fresh fruits.
The use of seasonal fruits like peaches and berries adds a touch of color and freshness, while the grilling gives the crust a nice, crispy texture. Perfect for serving 4-6 people, this recipe promises to be a hit at your next family BBQ.
Ingredients:
- 1 pre-made pizza dough (or store-bought pizza crust)
- 1 cup ricotta cheese
- 2 tablespoons honey
- 1 teaspoon vanilla extract
- 3 ripe peaches, sliced
- 1 cup mixed berries (such as blueberries, raspberries, or blackberries)
- 2 tablespoons melted butter
- 1 tablespoon sugar
- Mint leaves for garnish (optional)
Cooking Instructions:
- Prepare the Grill: Preheat your grill to medium-high heat. Make sure the grates are clean and lightly oiled to prevent sticking.
- Prepare the Dough: Roll out the pizza dough on a floured surface to your desired thickness. If using a pre-made crust, confirm it’s ready for grilling by brushing it with a little olive oil.
- Grill the Crust: Place the pizza dough directly on the grill grates. Grill for about 2-3 minutes until the bottom is golden brown and has grill marks. Flip the crust and grill the other side for another 2-3 minutes. Remove from grill and set aside.
- Prepare the Ricotta Spread: In a bowl, mix together ricotta cheese, honey, and vanilla extract until smooth and creamy.
- Assemble the Pizza: Spread the ricotta mixture evenly over the grilled pizza crust. Arrange the sliced peaches and mixed berries on top of the ricotta spread.
- Grill the Assembled Pizza: Brush the edges of the crust with melted butter, then sprinkle sugar over the entire pizza. Return the pizza to the grill and cook for an additional 2-3 minutes, just until the fruit is slightly warmed.
- Garnish and Serve: Remove the pizza from the grill. Garnish with fresh mint leaves if desired. Slice and serve immediately.
Extra Tips:
When grilling the pizza, keep a close eye on the crust to prevent burning, as grill temperatures can vary. If you prefer a sweeter dessert, feel free to drizzle additional honey over the top before serving.
For a touch of crunch, consider adding a handful of chopped nuts, such as almonds or pecans, on top of the fruit. This dessert is best enjoyed fresh off the grill, but you can prepare the ricotta mixture and slice the fruits ahead of time for a quicker assembly.