

Family dinners have a way of wrapping us in a cozy embrace. There’s just something magical about gathering around the table with loved ones. Classic recipes like a tender pot roast or hearty lasagna instantly bring warmth and nostalgia. These dishes tell stories and create lasting memories. Let’s explore twelve timeless recipes that turn an ordinary dinner into something truly special. Which one will you try first?
Classic Pot Roast With Vegetables

Classic Pot Roast With Vegetables is a timeless dish that brings comfort and warmth to the dining table. This hearty meal combines tender beef, flavorful broth, and a medley of vegetables, creating a dish that’s both satisfying and nourishing. Perfect for family gatherings or a cozy Sunday supper, this traditional recipe has been passed down through generations, guaranteeing that each bite is filled with rich flavors and tender textures.
The beauty of a pot roast lies in its simplicity and the way it transforms humble ingredients into a feast that pleases the palate. The beef is slowly braised until it’s melt-in-your-mouth tender, while the vegetables soak up the savory juices, making every bite a delightful experience. This Classic Pot Roast With Vegetables isn’t only a delicious meal but also a reminder of the comforting power of home-cooked food.
Ingredients (serving size: 4-6 people):
- 3 to 4 pounds beef chuck roast
- Salt and pepper, to taste
- 2 tablespoons olive oil
- 1 large onion, chopped
- 4 cloves garlic, minced
- 4 cups beef broth
- 2 tablespoons tomato paste
- 1 teaspoon dried thyme
- 1 teaspoon dried rosemary
- 3 bay leaves
- 4 large carrots, peeled and cut into chunks
- 3 large potatoes, peeled and quartered
- 2 stalks celery, chopped
Cooking Instructions:
- Prepare the Roast: Season the beef chuck roast generously with salt and pepper on all sides. This step is essential for building the flavor base of the dish.
- Sear the Meat: In a large Dutch oven or heavy-bottomed pot, heat the olive oil over medium-high heat. Once hot, add the roast and sear on all sides until a deep brown crust forms, about 4-5 minutes per side. Remove the roast from the pot and set aside.
- Sauté the Aromatics: Reduce the heat to medium and add the chopped onion to the pot. Sauté until translucent, about 5 minutes. Add the minced garlic and cook for an additional minute until fragrant.
- Build the Flavor: Stir in the tomato paste, thyme, rosemary, and bay leaves into the pot, cooking for about 1-2 minutes. This will help release the herbs’ essential oils and deepen the flavor.
- Deglaze the Pot: Pour in the beef broth, scraping up any browned bits from the bottom of the pot. This will add extra flavor to the broth.
- Braise the Roast: Return the seared roast to the pot, making sure it’s mostly submerged in the liquid. Bring the broth to a simmer, cover the pot, and reduce the heat to low. Allow the roast to braise for about 3 hours, or until it’s fork-tender.
- Add the Vegetables: At the 2-hour mark, add the carrots, potatoes, and celery to the pot. Make sure they’re evenly distributed around the roast. Continue cooking for an additional hour, or until the vegetables are tender.
- Serve: Remove the bay leaves and discard. Slice the roast against the grain and serve with the vegetables and a generous ladle of the flavorful broth.
Extra Tips:
For the best results, make sure that the beef is seared properly, as this step adds depth to the dish. If the pot roast is too tough, extend the cooking time, as it may need additional time to break down the collagen.
Feel free to add other root vegetables, such as turnips or parsnips, for added flavor. Leftovers can be stored in the refrigerator for up to 3 days, and the flavors will continue to develop, making it even more delicious as time goes on.
Hearty Chicken and Dumplings
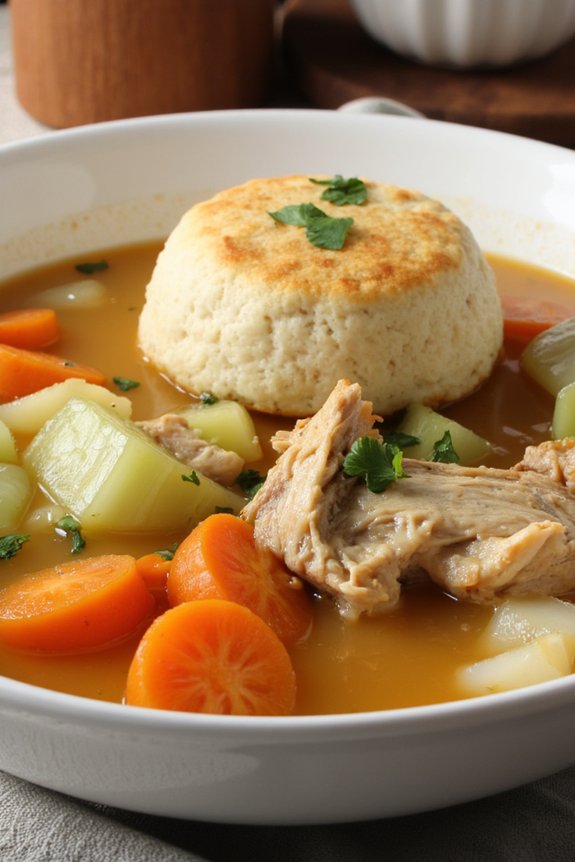
Chicken and dumplings is a classic comfort food dish that has been warming family tables for generations. This hearty recipe brings together tender, juicy pieces of chicken with fluffy, melt-in-your-mouth dumplings, all swimming in a rich, flavorful broth. Simple yet satisfying, chicken and dumplings is perfect for those chilly evenings when you crave something warm and nourishing.
It’s a dish that speaks of home, love, and tradition, often becoming a beloved staple in family meal rotations. The beauty of chicken and dumplings lies in its simplicity and versatility. While it may seem like a humble dish, the layers of flavor created from simmering chicken with aromatic vegetables and herbs create a complex and comforting meal.
The dumplings, made from a simple dough, cook directly on top of the simmering broth, absorbing the flavors and becoming delectably soft. This recipe serves 4-6 people, making it ideal for family dinners or gatherings with friends.
Ingredients:
- 4 chicken thighs, bone-in and skin-on
- Salt and pepper to taste
- 2 tablespoons olive oil
- 1 onion, diced
- 3 carrots, sliced
- 3 celery stalks, sliced
- 3 cloves garlic, minced
- 6 cups chicken broth
- 1 teaspoon dried thyme
- 1 teaspoon dried rosemary
- 1 bay leaf
- 2 cups all-purpose flour
- 1 tablespoon baking powder
- 1 teaspoon salt (for dumplings)
- 1 cup milk
- 1/4 cup unsalted butter, melted
- Fresh parsley, chopped, for garnish
Cooking Instructions:
- Prepare the Chicken: Season the chicken thighs with salt and pepper. In a large pot or Dutch oven, heat the olive oil over medium-high heat. Add the chicken thighs, skin side down, and sear until the skin is golden brown, about 5 minutes per side. Remove the chicken and set aside.
- Cook the Vegetables: In the same pot, add the diced onion, carrots, and celery. Sauté for about 5 minutes or until the vegetables are softened. Add the minced garlic and cook for another minute until fragrant.
- Simmer the Broth: Return the chicken to the pot, then add the chicken broth, thyme, rosemary, and bay leaf. Bring to a boil, then reduce to a simmer. Cover and let cook for about 20 minutes, or until the chicken is cooked through and tender.
- Make the Dumpling Dough: While the broth is simmering, prepare the dumplings. In a mixing bowl, combine the flour, baking powder, and salt. In another bowl, mix the milk and melted butter. Gradually add the wet ingredients to the dry, stirring until just combined. Be careful not to overmix.
- Cook the Dumplings: Once the chicken is cooked, remove it from the pot. Shred the chicken meat using two forks, discarding the bones and skin. Return the shredded chicken to the pot. Drop spoonfuls of the dumpling dough onto the surface of the simmering broth. Cover the pot and let the dumplings cook for about 15 minutes, until they’re puffed and cooked through.
- Serve: Ladle the chicken, vegetables, dumplings, and broth into bowls. Garnish with fresh parsley before serving.
Extra Tips:
For an even richer flavor, consider using homemade chicken broth or adding a splash of cream to the broth for extra creaminess. If you prefer a thicker broth, mix a tablespoon of cornstarch with a little water and stir it into the pot before adding the dumplings.
Make sure to keep the pot covered while the dumplings cook to guarantee they steam properly, resulting in fluffy, airy dumplings. Enjoy this comforting dish with crusty bread or a fresh green salad on the side.
Savory Meatloaf With Mashed Potatoes
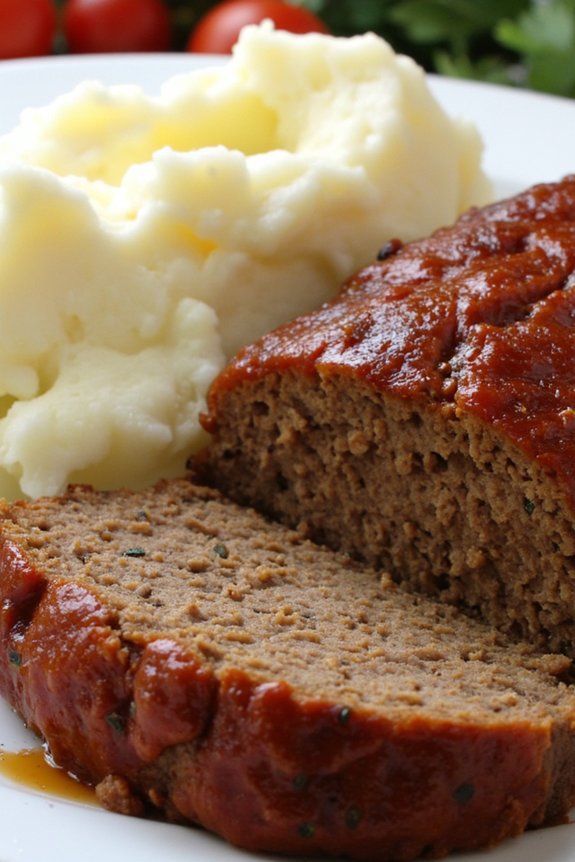
Savory Meatloaf with Mashed Potatoes is a classic comfort food that brings warmth and satisfaction to the dinner table. This hearty dish combines the rich flavors of seasoned ground beef with the creamy, buttery texture of mashed potatoes, creating a meal that’s both filling and flavorful.
Perfect for family gatherings or a cozy dinner at home, this recipe promises to deliver a nostalgic taste that everyone will enjoy. The meatloaf is prepared with a blend of spices and seasonings that enhance the natural flavors of the beef, while the mashed potatoes are whipped to perfection, guaranteeing a smooth and velvety consistency.
The combination of these two elements creates a balanced dish that’s sure to become a family favorite. Easy to prepare and even easier to enjoy, Savory Meatloaf with Mashed Potatoes is the ultimate traditional family dinner recipe.
Ingredients (Serves 4-6)
For the Meatloaf:
- 2 pounds ground beef
- 1 cup breadcrumbs
- 1/2 cup milk
- 1 egg
- 1 small onion, finely chopped
- 2 cloves garlic, minced
- 1 tablespoon Worcestershire sauce
- 1 tablespoon ketchup
- 1 teaspoon salt
- 1/2 teaspoon black pepper
- 1 teaspoon dried thyme
- 1 teaspoon dried oregano
For the Mashed Potatoes:
- 2 pounds potatoes, peeled and cubed
- 1/2 cup heavy cream
- 1/4 cup butter
- Salt to taste
- Pepper to taste
Cooking Instructions
- Preheat the Oven: Start by preheating your oven to 350°F (175°C). This will guarantee the oven is ready for baking the meatloaf.
- Prepare the Meatloaf Mixture: In a large mixing bowl, combine the ground beef, breadcrumbs, milk, egg, chopped onion, minced garlic, Worcestershire sauce, ketchup, salt, black pepper, thyme, and oregano. Mix everything together thoroughly until all ingredients are evenly incorporated.
- Shape the Meatloaf: Transfer the meat mixture to a baking dish and shape it into a loaf form, ensuring it’s packed tight to hold its shape during baking.
- Bake the Meatloaf: Place the baking dish in the preheated oven and bake for 1 hour, or until the meatloaf reaches an internal temperature of 160°F (71°C).
- Boil the Potatoes: While the meatloaf is baking, place the cubed potatoes in a large pot and cover them with water. Bring to a boil over medium-high heat and cook until the potatoes are tender, about 15-20 minutes.
- Mash the Potatoes: Drain the potatoes and return them to the pot. Add the heavy cream and butter, then mash until smooth and creamy. Season with salt and pepper to taste.
- Serve: Once the meatloaf is done, remove it from the oven and let it rest for about 10 minutes. Slice the meatloaf and serve with a generous portion of mashed potatoes on the side.
Extra Tips
For an even more flavorful meatloaf, consider adding a glaze made from ketchup, brown sugar, and a dash of vinegar to the top of the meatloaf before baking. This will create a sweet and tangy crust that complements the savory beef.
Additionally, using Yukon Gold potatoes for the mash will result in a richer and creamier texture. Be sure to taste and adjust the seasoning of both the meatloaf and the mashed potatoes to suit your preference. Enjoy your meal with a side of steamed vegetables or a fresh salad for added nutrition and color.
Traditional Beef Stroganoff
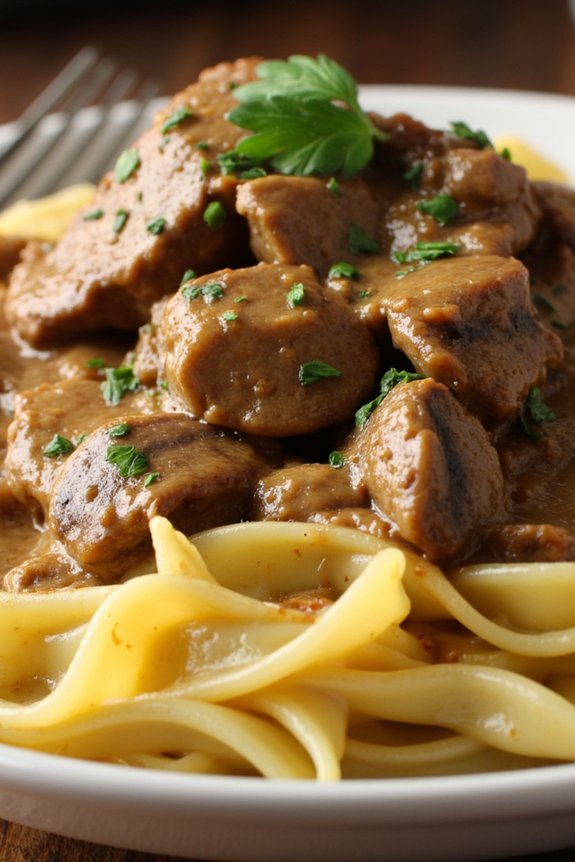
The origins of Beef Stroganoff are rooted in Russian aristocracy, where it was named after a prominent family. Over time, this dish has evolved, with various countries adding their unique twists. However, the traditional recipe remains a staple, featuring tender beef, mushrooms, onions, and a creamy sauce made with sour cream.
This recipe will guide you through creating a delicious Beef Stroganoff that serves 4-6 people, perfect for a family meal or casual gathering.
Ingredients:
- 1 1/2 pounds of beef sirloin, cut into thin strips
- 2 tablespoons of vegetable oil
- 1 large onion, chopped
- 2 cloves garlic, minced
- 8 ounces of mushrooms, sliced
- 1 cup beef broth
- 1 tablespoon Worcestershire sauce
- 1 teaspoon Dijon mustard
- 1 cup sour cream
- Salt and pepper to taste
- 2 tablespoons all-purpose flour
- Cooked egg noodles or rice for serving
- Fresh parsley for garnish
Cooking Instructions:
- Prepare the Beef: Begin by slicing the beef sirloin into thin strips, making sure they’re uniform for even cooking. Season the beef strips with salt and pepper.
- Brown the Beef: In a large skillet, heat the vegetable oil over medium-high heat. Add the beef strips in batches, making sure not to overcrowd the pan. Sear the beef until browned on all sides, about 3-4 minutes per batch. Remove and set aside.
- Cook the Onions and Garlic: In the same skillet, add the chopped onions and cook until they become translucent, about 5 minutes. Add the minced garlic and cook for an additional 1 minute until fragrant.
- Sauté the Mushrooms: Add the sliced mushrooms to the skillet and cook until they’re browned and tender, about 5 minutes.
- Prepare the Sauce: Sprinkle the flour over the mushroom mixture and stir to combine. Cook for 1-2 minutes to remove the raw flour taste. Gradually add the beef broth, stirring constantly to prevent lumps. Add Worcestershire sauce and Dijon mustard, stirring to incorporate.
- Simmer the Beef: Return the browned beef to the skillet, stirring to combine with the sauce. Reduce the heat to low and let it simmer for about 10 minutes, allowing the flavors to meld.
- Add the Sour Cream: Remove the skillet from heat and stir in the sour cream, mixing thoroughly until the sauce is creamy and smooth. Adjust seasoning with salt and pepper if needed.
- Serve: Serve the Beef Stroganoff over a bed of cooked egg noodles or rice. Garnish with freshly chopped parsley for a pop of color.
Extra Tips:
For the best results, make sure the beef is cut against the grain for maximum tenderness. If you prefer a thicker sauce, you can add a bit more flour or reduce the sauce longer before adding the sour cream.
If you want to add more depth to the flavor, consider adding a splash of brandy or cognac to the sauce before simmering. Additionally, using high-quality sour cream will enhance the creaminess and flavor of the dish.
Enjoy your traditional Beef Stroganoff with a side of crusty bread or a fresh green salad for a complete meal.
Homemade Lasagna With Rich Tomato Sauce

Homemade Lasagna With Rich Tomato Sauce is a classic Italian dish that brings comfort and warmth to the dinner table. The layers of pasta, savory meat sauce, creamy cheese, and tangy tomato sauce create a harmonious blend of flavors that are both satisfying and hearty. This dish is perfect for family gatherings or any occasion where you want to impress your loved ones with a homemade meal that tastes like it came straight from an Italian kitchen.
With some time and a few simple ingredients, you can create a lasagna that will have everyone asking for seconds.
This recipe for Homemade Lasagna with Rich Tomato Sauce is designed to serve 4-6 people, making it an ideal choice for a family dinner or small gathering. The key to this dish is the rich tomato sauce, which is simmered to perfection and layered between sheets of tender pasta and a mixture of meats and cheeses.
By following these detailed instructions, you’ll be able to create a delicious lasagna that’s both flavorful and filling. Prepare to commence on a culinary journey that will have your kitchen filled with the delightful aromas of an Italian feast.
Ingredients:
- 9 lasagna noodles
- 1 pound ground beef
- 1/2 pound ground pork
- 1 onion, finely chopped
- 3 cloves garlic, minced
- 2 cans (15 ounces each) crushed tomatoes
- 2 tablespoons tomato paste
- 1 teaspoon dried basil
- 1 teaspoon dried oregano
- 1/2 teaspoon salt
- 1/4 teaspoon black pepper
- 2 cups ricotta cheese
- 1 egg
- 1/2 cup grated Parmesan cheese
- 3 cups shredded mozzarella cheese
- 2 tablespoons olive oil
- Fresh basil leaves for garnish (optional)
Instructions:
1. Prepare the Sauce: In a large skillet, heat olive oil over medium heat. Add the chopped onion and minced garlic, sautéing until the onion becomes translucent, about 5 minutes. Add the ground beef and ground pork, cooking and stirring until browned and fully cooked. Drain any excess fat.
2. Simmer the Tomato Sauce: Stir in the crushed tomatoes, tomato paste, dried basil, dried oregano, salt, and black pepper. Bring the mixture to a simmer, then reduce the heat to low and let it cook for about 30 minutes, stirring occasionally, until the sauce thickens and flavors meld.
3. Cook the Lasagna Noodles: While the sauce is simmering, bring a large pot of salted water to a boil. Cook the lasagna noodles according to package instructions until al dente. Drain and lay them flat on a clean kitchen towel.
4. Prepare the Cheese Mixture: In a mixing bowl, combine ricotta cheese, egg, and Parmesan cheese. Mix well until smooth and set aside.
5. Assemble the Lasagna: Preheat your oven to 375°F (190°C). In a 9×13 inch baking dish, spread a thin layer of the meat sauce on the bottom. Place a layer of lasagna noodles over the sauce, followed by a layer of the ricotta mixture, a generous layer of the meat sauce, and a sprinkling of mozzarella cheese.
Repeat the layers until all ingredients are used, ending with a layer of noodles topped with meat sauce and mozzarella cheese.
6. Bake the Lasagna: Cover the dish with aluminum foil and bake in the preheated oven for 25 minutes. Remove the foil and bake for an additional 15 minutes, or until the cheese is bubbly and golden brown.
7. Rest and Serve: Allow the lasagna to rest for 10-15 minutes before slicing and serving. Garnish with fresh basil leaves if desired.
Extra Tips:
For the best results, allow the lasagna to rest after baking so that it holds its shape when sliced. You can prepare the tomato sauce a day in advance to save time and enhance the flavors.
Feel free to customize the recipe by adding vegetables like spinach or mushrooms for extra nutrition and flavor. If you prefer a spicier sauce, add a pinch of red pepper flakes to the tomato mixture.
Enjoy your homemade lasagna with a side salad and crusty bread for a complete meal.
Comforting Chicken Pot Pie
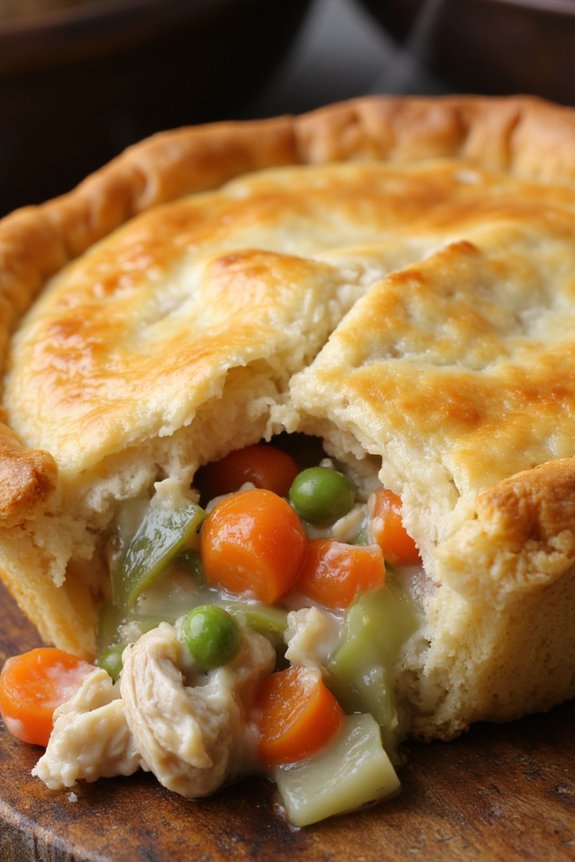
Comforting Chicken Pot Pie is a classic dish that brings warmth and satisfaction to the dinner table, perfect for a family gathering or a cozy meal at home. This recipe combines tender pieces of chicken with a medley of vegetables in a creamy, savory sauce, all encased in a flaky, golden pastry crust. The comforting flavors and hearty ingredients make it a beloved staple in many households, often evoking fond memories of shared meals and cherished family traditions.
The origins of chicken pot pie trace back to ancient cultures, but it gained particular popularity in the United States as a means to create a wholesome meal using leftover ingredients. Today, this dish is celebrated for its versatility and the capability to adapt to personal preferences, whether through varying the vegetables or adding herbs for extra flavor. It’s a delightful way to enjoy a well-rounded meal, complete with protein, vegetables, and carbohydrates, all in one delicious package.
Ingredients for Comforting Chicken Pot Pie (serves 4-6 people):
- 1 pound boneless, skinless chicken breasts, cubed
- 1 cup sliced carrots
- 1 cup frozen green peas
- 1/2 cup sliced celery
- 1/3 cup butter
- 1/3 cup chopped onion
- 1/3 cup all-purpose flour
- 1/2 teaspoon salt
- 1/4 teaspoon black pepper
- 1/4 teaspoon celery seed
- 1 3/4 cups chicken broth
- 2/3 cup milk
- 2 (9 inch) unbaked pie crusts
Cooking Instructions:
- Preheat the Oven: Start by preheating your oven to 425°F (220°C), making sure that it’s hot enough to cook the pie evenly.
- Prepare the Filling: In a saucepan, combine cubed chicken, sliced carrots, peas, and celery. Add water to cover and boil for 15 minutes. Remove from heat, drain, and set aside.
- Make the Sauce: In the same saucepan, melt the butter over medium heat. Stir in chopped onions, flour, salt, pepper, and celery seed. Cook until the mixture is thick and bubbly. Gradually stir in chicken broth and milk. Simmer over medium-low heat until thick. Remove from heat and set aside.
- Assemble the Pie: Place one of the pie crusts in the bottom of a 9-inch pie plate. Pour the chicken mixture into the crust. Pour the hot liquid mixture over the chicken filling. Cover with the second pie crust, seal edges, and cut away excess dough. Make several small slits in the top to allow steam to escape.
- Bake the Pie: Place the pie in the preheated oven and bake for 30 to 35 minutes, or until the pastry is golden brown and the filling is bubbly. Cool for 10 minutes before serving to allow the filling to set.
Extra Tips:
To enhance the flavor of your Comforting Chicken Pot Pie, consider adding fresh herbs such as thyme or rosemary to the sauce. If you prefer a richer filling, substitute half of the milk with cream. For a flaky crust, make sure that the butter used in the dough is very cold, and avoid overworking the dough to prevent it from becoming tough.
If you find the edges of the crust browning too quickly, cover them with strips of foil partway through baking. Enjoy your comforting homemade chicken pot pie with a side salad or a warm, crusty bread to round out the meal.
Slow-Cooked Beef Stew
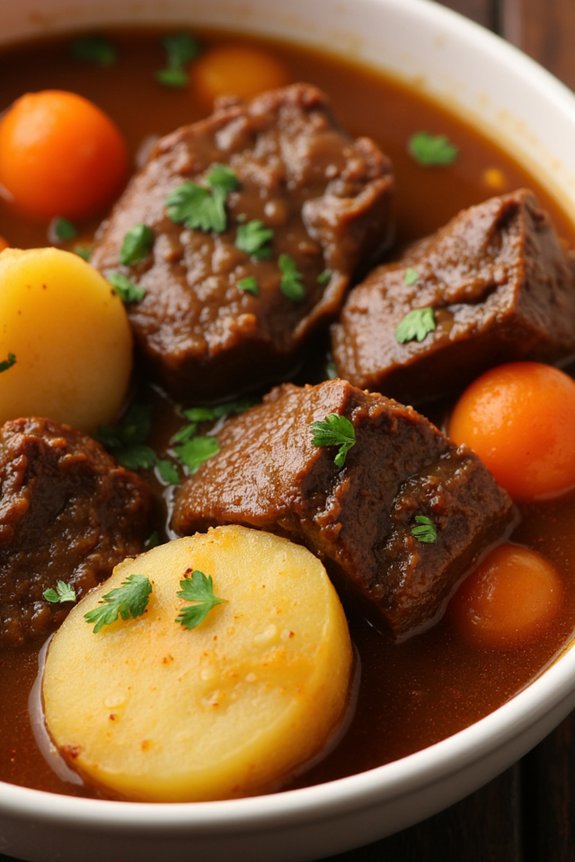
There’s something incredibly comforting about a traditional slow-cooked beef stew, with its rich flavors and tender, melt-in-your-mouth meat. Perfect for family dinners, this dish brings everyone together around the table, filling the room with the inviting aroma of herbs and spices.
With a slow-cooked beef stew, you aren’t just preparing a meal; you’re creating memories that will linger long after the last bite. The recipe takes advantage of a slow cooker, guaranteeing that the beef becomes succulent and the vegetables absorb all the delicious broth flavors.
This slow-cooked beef stew is ideal for a serving size of 4-6 people. It’s a versatile dish that can be enjoyed on its own or accompanied by crusty bread to soak up the savory broth. The beauty of this recipe lies in its simplicity and the depth of flavor that develops while it simmers patiently.
Let’s explore the ingredients and steps necessary to create this timeless family dinner.
Ingredients for 4-6 servings:
- 2 pounds beef chuck, cut into 1-inch cubes
- 3 tablespoons all-purpose flour
- 2 tablespoons olive oil
- 1 large onion, chopped
- 3 garlic cloves, minced
- 4 cups beef broth
- 1 cup red wine (optional)
- 3 large carrots, peeled and sliced
- 3 large potatoes, peeled and cubed
- 2 stalks celery, sliced
- 2 tablespoons tomato paste
- 1 tablespoon Worcestershire sauce
- 2 teaspoons dried thyme
- 1 teaspoon dried rosemary
- 2 bay leaves
- Salt and pepper to taste
- Fresh parsley, chopped (for garnish)
Cooking Instructions:
- Prepare the Beef: In a large bowl, toss the beef cubes with flour, salt, and pepper until well-coated. This step helps to thicken the stew and adds a nice crust to the beef.
- Sear the Beef: Heat olive oil in a large skillet over medium-high heat. Add the coated beef cubes to the skillet, browning them on all sides. Do this in batches if necessary to avoid crowding the pan. Once browned, transfer the beef to the slow cooker.
- Sauté the Aromatics: In the same skillet, add the chopped onion and minced garlic. Sauté for about 3-4 minutes until the onion is translucent and the garlic is fragrant. Add the tomato paste and stir for another minute to enhance its flavor.
- Deglaze the Pan: Pour the red wine into the skillet to deglaze, scraping up any browned bits from the bottom. Let it simmer for a couple of minutes, then pour the mixture over the beef in the slow cooker.
- Combine Ingredients: Add the carrots, potatoes, celery, beef broth, Worcestershire sauce, thyme, rosemary, and bay leaves to the slow cooker. Stir everything together to confirm the ingredients are well-mixed.
- Cook the Stew: Set the slow cooker to low and cook for 8-9 hours, or on high for 4-5 hours, until the beef is tender and the vegetables are cooked through.
- Finish and Serve: Once cooked, remove the bay leaves. Taste the stew and adjust seasoning with additional salt and pepper if needed. Garnish with fresh parsley before serving.
Extra Tips:
For a thicker stew, you can remove a cup of the broth, whisk in an additional tablespoon of flour, and return it to the slow cooker about 30 minutes before serving. This will help thicken the stew as it finishes cooking.
If time permits, let the stew sit for a few hours after cooking and then reheat gently; this often enhances the flavors even further. Don’t forget to serve with a side of crusty bread or over a bed of fluffy mashed potatoes for an extra comforting touch.
Southern-Style Fried Chicken

Southern-Style Fried Chicken is a beloved classic that holds a special place in the heart of many traditional family dinners. This dish is known for its crispy, golden-brown exterior and juicy, flavorful interior. The secret to perfect Southern-Style Fried Chicken lies in the seasoning, the buttermilk marinade, and the method of frying, all of which combine to create a mouthwatering experience that brings family and friends together around the dinner table.
To achieve the iconic taste of Southern-Style Fried Chicken, it’s important to start with quality ingredients and to take the time to properly prepare the chicken. The key is in the details: a well-seasoned flour mixture, a tenderizing buttermilk soak, and the perfect frying temperature all contribute to the dish’s success. Here is a recipe that serves 4-6 people, guaranteeing that everyone gets to enjoy this delicious comfort food.
Ingredients:
- 3-4 pounds of chicken pieces (legs, thighs, wings)
- 2 cups buttermilk
- 2 cups all-purpose flour
- 1 tablespoon paprika
- 1 tablespoon garlic powder
- 1 tablespoon onion powder
- 1 teaspoon cayenne pepper
- 1 tablespoon salt
- 1 teaspoon black pepper
- Vegetable oil for frying
Cooking Instructions:
- Prepare the Chicken: Rinse the chicken pieces under cold water and pat them dry with paper towels. This step is essential to make sure the coating sticks well to the chicken.
- Buttermilk Marinade: In a large bowl or a resealable plastic bag, combine the chicken pieces with the buttermilk. Make sure that all pieces are fully submerged. Cover the bowl or seal the bag and refrigerate for at least 2 hours, or overnight for best results. This marinade tenderizes the chicken and infuses it with flavor.
- Season the Flour: In a separate bowl, mix together the flour, paprika, garlic powder, onion powder, cayenne pepper, salt, and black pepper. This seasoned flour will form the crust of the fried chicken.
- Coat the Chicken: Remove the chicken from the buttermilk marinade, allowing any excess to drip off. Dredge each piece thoroughly in the seasoned flour mixture, making sure of an even coating. Place the coated chicken on a wire rack and let it sit for about 15 minutes. This resting period helps the coating adhere better.
- Heat the Oil: In a large, deep skillet or a Dutch oven, pour enough vegetable oil to reach about halfway up the sides of the pan. Heat the oil to 350°F (175°C). Using a thermometer is recommended to maintain the right temperature, as this will guarantee even frying.
- Fry the Chicken: Carefully place the chicken pieces in the hot oil, skin-side down. Avoid overcrowding the pan; fry in batches if necessary. Cook for about 10-12 minutes on one side, then flip and cook for another 10-12 minutes, until the chicken is golden brown and cooked through. The internal temperature should reach 165°F (75°C).
- Drain and Serve: Once cooked, remove the chicken from the oil and place it on a paper towel-lined plate or a wire rack to drain any excess oil. Let it rest for a few minutes before serving.
Extra Tips:
For the crispiest chicken, it’s important not to overcrowd the pan during frying, as this can lower the oil temperature and result in soggy chicken. If you find the chicken browning too quickly, lower the heat slightly to guarantee the inside cooks thoroughly without burning the crust.
Keeping a close eye on the oil temperature and using a thermometer will help achieve the perfect fry every time. Additionally, allowing the chicken to rest on a wire rack rather than paper towels can prevent the bottom from becoming soggy, maintaining its crispy texture.
Baked Macaroni and Cheese

Baked Macaroni and Cheese is the quintessential comfort food that has been a staple in family dinners for generations. This dish combines tender macaroni pasta with a velvety cheese sauce, baked to golden perfection with a crisp topping. It’s an ideal dish for gatherings, offering a satisfying and nostalgic taste that both adults and children will love.
The creaminess of the cheese sauce combined with the subtle crunch of the baked topping creates a delightful contrast in textures that elevates this simple dish to a family favorite.
This recipe serves 4-6 people, making it perfect for a family dinner or a small get-together. The key to an exceptional Baked Macaroni and Cheese is the quality of cheese used, as well as a careful balance of flavors. By following the steps outlined below, you’ll be able to create a delicious dish that’s sure to become a regular part of your family’s meal rotation.
Ingredients:
- 1 pound elbow macaroni
- 4 tablespoons unsalted butter
- 1/4 cup all-purpose flour
- 2 cups milk
- 1 cup heavy cream
- 2 cups shredded sharp cheddar cheese
- 1 cup shredded mozzarella cheese
- 1 teaspoon salt
- 1/2 teaspoon black pepper
- 1/2 teaspoon paprika
- 1 cup breadcrumbs
- 2 tablespoons melted butter
- Optional: chopped parsley for garnish
Cooking Instructions:
- Preheat and Prepare: Preheat your oven to 350°F (175°C). Grease a 9×13-inch baking dish with a little butter or non-stick spray to prevent sticking.
- Cook the Pasta: Bring a large pot of salted water to a boil. Add the elbow macaroni and cook until al dente, according to the package instructions. Drain the pasta and set it aside.
- Make the Cheese Sauce: In a medium saucepan, melt the 4 tablespoons of butter over medium heat. Whisk in the flour and cook for about 1 minute until it turns golden. Gradually whisk in the milk and cream, stirring constantly to avoid lumps. Continue cooking until the mixture thickens, about 5 minutes.
- Add Cheese and Seasoning: Remove the saucepan from the heat and stir in the shredded cheddar and mozzarella cheeses until fully melted and smooth. Season with salt, black pepper, and paprika. Taste and adjust seasoning if necessary.
- Combine with Pasta: In a large mixing bowl, combine the cooked macaroni with the cheese sauce. Stir until the pasta is well-coated with the sauce.
- Assemble and Bake: Pour the macaroni and cheese mixture into the prepared baking dish. In a small bowl, mix the breadcrumbs with 2 tablespoons of melted butter, then sprinkle evenly over the top of the macaroni.
- Bake: Place the baking dish in the preheated oven and bake for 25-30 minutes, or until the top is golden and crispy.
- Garnish and Serve: Remove from the oven and let it cool slightly. Garnish with chopped parsley if desired and serve warm.
Extra Tips:
For a richer flavor, try incorporating a mix of cheeses such as Gruyere or Parmesan alongside the cheddar and mozzarella. If you prefer a spicier kick, add a pinch of cayenne pepper to the cheese sauce.
To prevent the sauce from becoming grainy, make sure to add the cheese off the heat, stirring until it melts completely. Finally, for an even crispier topping, consider broiling the dish for the last 2-3 minutes of baking, but watch closely to avoid burning.
Herb-Roasted Turkey With Gravy
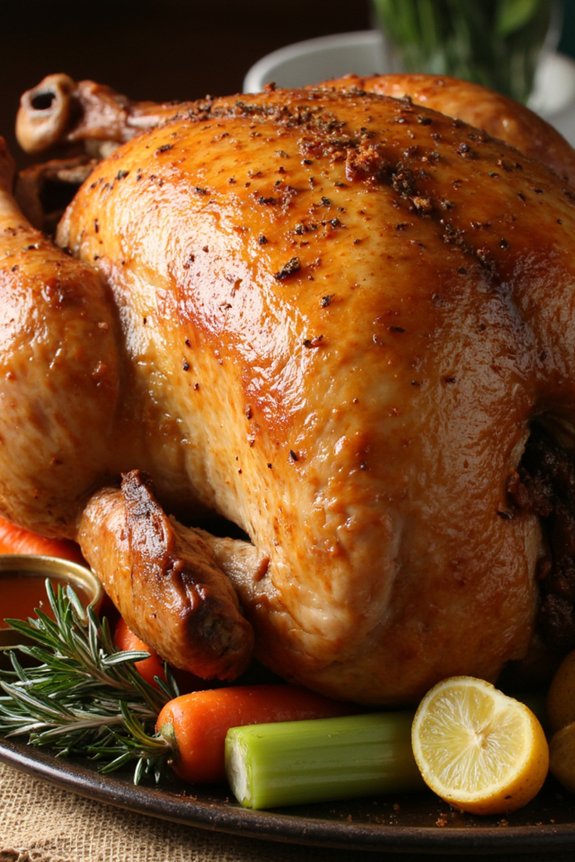
Herb-Roasted Turkey With Gravy is a timeless classic that’s often the centerpiece of many family gatherings and holiday feasts. This dish is celebrated for its tender, juicy meat and aromatic herb-infused skin, which, when paired with a rich, savory gravy, creates a delightful combination that’s certain to impress your guests.
Whether you’re preparing it for Thanksgiving, Christmas, or any special occasion, this recipe will guide you through crafting a perfectly roasted turkey that will leave everyone at the table satisfied and enthusiastic for seconds.
The key to a successful Herb-Roasted Turkey With Gravy lies in the careful selection of herbs and the methodical approach to roasting. The aromatic blend of herbs such as rosemary, thyme, and sage, combined with butter, creates a fragrant and flavorful crust on the turkey’s skin while making certain the meat remains succulent and moist.
As the turkey roasts, the drippings are collected to make a luscious gravy that complements the bird beautifully. This recipe serves 4-6 people, making it an ideal choice for intimate gatherings or smaller celebrations.
Ingredients for Herb-Roasted Turkey With Gravy (Serves 4-6):
- 1 whole turkey (8-10 pounds)
- 1/2 cup unsalted butter, softened
- 1 tablespoon fresh rosemary, chopped
- 1 tablespoon fresh thyme, chopped
- 1 tablespoon fresh sage, chopped
- Salt and black pepper to taste
- 1 onion, quartered
- 2 carrots, chopped
- 2 celery stalks, chopped
- 4 cups chicken stock
- 1/2 cup all-purpose flour
- 1 tablespoon olive oil
Cooking Instructions:
- Preparation: Preheat your oven to 325°F (165°C). Remove the giblets and neck from the turkey and pat the turkey dry with paper towels.
- Herb Butter: In a small bowl, combine the softened butter with rosemary, thyme, sage, salt, and black pepper. Mix well to create a herb butter.
- Season Turkey: Carefully loosen the skin over the turkey breast by gently sliding your fingers under it. Spread half of the herb butter underneath the skin, and rub the remaining butter over the entire turkey. Season the cavity of the turkey with salt and pepper, then stuff it with the onion, carrots, and celery.
- Roasting: Place the turkey on a rack in a roasting pan. Tie the legs together with kitchen twine and tuck the wings under the body. Pour 2 cups of chicken stock into the bottom of the roasting pan. Roast the turkey in the preheated oven, basting every 30 minutes with the pan juices, until the internal temperature reaches 165°F (74°C), about 3 to 3.5 hours.
- Resting: Once cooked, remove the turkey from the oven and let it rest for at least 20 minutes before carving. This helps the juices redistribute throughout the meat.
- Making Gravy: While the turkey rests, pour the drippings from the roasting pan into a fat separator or a bowl, skimming off excess fat. In a saucepan, heat the olive oil over medium heat. Add the flour and whisk continuously to create a roux. Gradually whisk in the remaining chicken stock and the reserved turkey drippings. Bring the mixture to a boil, then reduce the heat and simmer until the gravy thickens, about 10 minutes. Season to taste with salt and pepper.
- Serving: Carve the turkey and serve it with the freshly made gravy on the side.
Extra Tips:
To guarantee even cooking, bring the turkey to room temperature by letting it sit out for about an hour before roasting. Using a meat thermometer is essential for checking the doneness of the turkey without having to cut into it, which helps in keeping the juices intact.
If you find that the turkey skin is browning too quickly, tent it with foil while roasting. For a gluten-free gravy, substitute the all-purpose flour with cornstarch or a gluten-free flour blend.
Spaghetti and Meatballs

Spaghetti and meatballs is a timeless classic that brings warmth and comfort to any family dinner table. This traditional Italian-American dish combines tender, juicy meatballs with hearty spaghetti, all coated in a rich and flavorful tomato sauce. It’s a perfect meal for gathering loved ones and enjoying a leisurely evening together.
The combination of savory meat, al dente pasta, and tangy tomato sauce creates a satisfying experience that appeals to both adults and children alike.
Creating the perfect spaghetti and meatballs involves selecting quality ingredients and following a series of steps to guarantee each component is perfectly cooked. The meatballs should be well-seasoned and have a tender texture, while the sauce should be simmered to meld the flavors together. The spaghetti should be cooked just right, with a slight bite to it.
With a bit of time and attention, this dish can be a delightful centerpiece for your family dinner.
Ingredients for 4-6 servings:
- 1 pound ground beef
- 1/2 pound ground pork
- 1 cup breadcrumbs
- 1/2 cup grated Parmesan cheese
- 2 large eggs
- 1/4 cup chopped fresh parsley
- 3 cloves garlic, minced
- 1 teaspoon salt
- 1/2 teaspoon black pepper
- 2 tablespoons olive oil
- 1 medium onion, finely chopped
- 28 ounces canned crushed tomatoes
- 1 teaspoon dried oregano
- 1 teaspoon dried basil
- 1/2 teaspoon red pepper flakes (optional)
- 1 pound spaghetti
- Fresh basil leaves for garnish
Cooking Instructions:
- Prepare the Meatballs: In a large bowl, combine ground beef, ground pork, breadcrumbs, Parmesan cheese, eggs, parsley, minced garlic, salt, and black pepper. Mix everything together until just combined, being careful not to overwork the meat. Form the mixture into 1.5-inch meatballs and set aside.
- Cook the Meatballs: Heat olive oil in a large skillet over medium heat. Add meatballs in batches, making sure not to overcrowd the pan. Brown the meatballs on all sides, about 5 minutes. Once browned, remove them from the skillet and set aside.
- Make the Sauce: In the same skillet, add the chopped onion and sauté until translucent, about 5 minutes. Add the crushed tomatoes, oregano, basil, and red pepper flakes if using. Stir well and bring the sauce to a simmer.
- Simmer the Meatballs in Sauce: Return the meatballs to the skillet, nestling them into the sauce. Cover and let them simmer in the sauce for about 30 minutes, allowing the flavors to meld together.
- Cook the Spaghetti: While the meatballs are simmering, bring a large pot of salted water to a boil. Add the spaghetti and cook according to package instructions until al dente. Drain the spaghetti and set aside.
- Combine and Serve: Once the meatballs are cooked through, serve them over a bed of spaghetti, topped with the rich tomato sauce. Garnish with fresh basil leaves and additional Parmesan cheese if desired.
Extra Tips:
When preparing spaghetti and meatballs, it’s important to keep a few tips in mind for the best results.
First, using a combination of ground beef and pork adds extra flavor and tenderness to the meatballs. Be gentle when mixing the meatball ingredients to avoid making them dense.
For the sauce, simmering the meatballs allows them to absorb the rich tomato flavors, so don’t rush this step. Finally, always taste the sauce and adjust the seasoning as needed before serving, guaranteeing a balanced and delicious meal for everyone to enjoy.
Classic Shepherd’s Pie
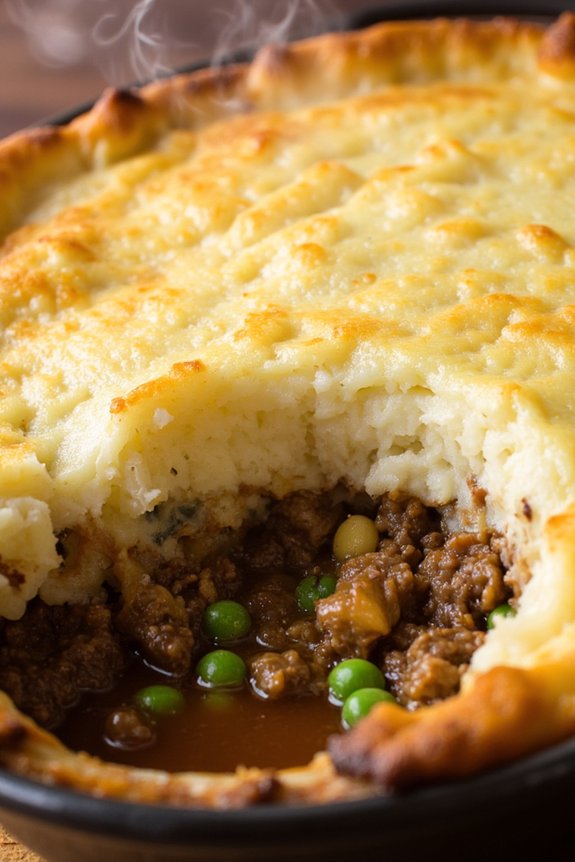
Classic Shepherd’s Pie is a heartwarming and beloved traditional family dinner recipe that has stood the test of time. Originating from the British Isles, this dish is a savory combination of ground meat, vegetables, and a rich gravy, all topped with a layer of creamy mashed potatoes.
It’s a perfect choice for cozy family gatherings or weeknight dinners, providing both comfort and nourishment in every bite. The flavors meld beautifully, and the dish can be prepared in advance, making it a convenient option for busy households.
A quintessential shepherd’s pie features lamb as the primary protein, but it can also be prepared using beef for a slightly different flavor profile. The ground meat is cooked with onions, carrots, and peas, then simmered in a luscious gravy made from beef broth and tomato paste.
Once the filling is ready, it’s layered in a casserole dish and topped with fluffy mashed potatoes, which are then baked to golden perfection. The result is a dish that’s both satisfying and hearty, ideal for feeding a family of 4-6 people.
Ingredients for Classic Shepherd’s Pie (serves 4-6):
- 1 ½ pounds ground lamb or beef
- 1 large onion, chopped
- 2 carrots, diced
- 1 cup frozen peas
- 2 cloves garlic, minced
- 2 tablespoons tomato paste
- 1 cup beef broth
- 1 teaspoon Worcestershire sauce
- 1 teaspoon fresh thyme leaves (or ½ teaspoon dried thyme)
- Salt and pepper to taste
- 2 pounds potatoes, peeled and quartered
- 4 tablespoons butter
- ½ cup milk
- 1 egg yolk (optional)
- 1 tablespoon olive oil
Cooking Instructions:
- Preheat and Prepare: Preheat your oven to 400°F (200°C). Begin by peeling and quartering the potatoes, then place them in a pot of cold, salted water. Bring to a boil and cook until tender, about 15-20 minutes.
- Cook the Meat and Vegetables: While the potatoes are cooking, heat the olive oil in a large skillet over medium heat. Add the chopped onion, diced carrots, and minced garlic. Sauté until the vegetables are tender, about 5 minutes.
- Brown the Meat: Add the ground lamb or beef to the skillet with the vegetables. Cook, breaking up the meat with a spoon, until browned and cooked through. Drain any excess fat from the skillet.
- Make the Gravy: Stir in the tomato paste, Worcestershire sauce, and thyme. Pour in the beef broth and bring to a simmer. Cook for another 10 minutes, allowing the sauce to thicken. Stir in the frozen peas and season with salt and pepper.
- Mash the Potatoes: Once the potatoes are tender, drain them and return them to the pot. Add the butter and milk, mashing until smooth. Stir in the egg yolk for extra richness, if using. Season with salt and pepper.
- Assemble the Shepherd’s Pie: Spread the meat and vegetable mixture evenly in a baking dish. Spoon the mashed potatoes over the top, spreading them to cover the filling completely. Use a fork to create a decorative pattern on the surface of the potatoes.
- Bake: Place the dish in the preheated oven and bake for 25-30 minutes, or until the mashed potatoes are golden brown and the filling is bubbling around the edges.
Tips for Cooking Classic Shepherd’s Pie:
For an extra crispy and golden top, consider brushing a little melted butter on the mashed potatoes before baking. If you prefer a more robust flavor, you can add a dash of red wine to the meat mixture while making the gravy.
To save time, the filling can be prepared a day ahead and refrigerated, allowing the flavors to deepen and making it easier to assemble the pie when needed. Additionally, feel free to customize the vegetables according to your preference or what you have on hand. Enjoy your meal!