

When it comes to family dinners, having a collection of go-to recipes that everyone loves is a lifesaver. Picture the comforting aroma of classic spaghetti and meatballs simmering on the stove or the satisfying sizzle of homemade pizza fresh out of the oven. These meals create cherished moments of joy and connection at the dinner table. Ever wondered which dishes consistently bring smiles and result in empty plates? Let’s explore some favorites that never disappoint.
Classic Spaghetti and Meatballs
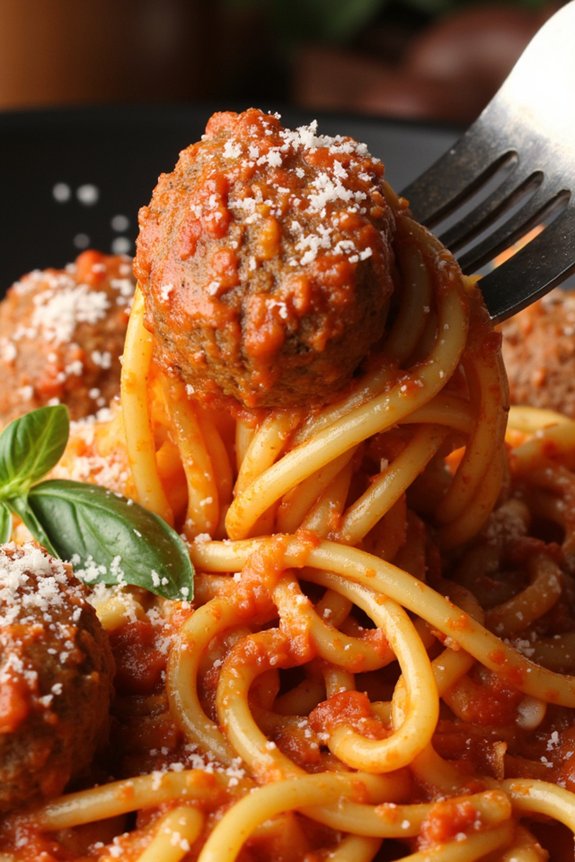
Classic Spaghetti and Meatballs is a beloved dish that brings warmth and comfort to any family dinner table. This timeless recipe combines the rich, savory flavors of homemade meatballs with a perfectly seasoned tomato sauce, all served over a bed of al dente spaghetti. It’s a meal that’s both satisfying and crowd-pleasing, making it an ideal choice for gatherings or a cozy night in with loved ones.
The secret to a delightful Classic Spaghetti and Meatballs lies in the balance of flavors and textures. The meatballs should be tender and juicy, packed with herbs and spices that complement the tangy tomato sauce. Meanwhile, the spaghetti should be cooked to perfection, absorbing just enough sauce to create a harmonious blend in every bite. With a few simple ingredients and a bit of love, you can recreate this classic dish in your own kitchen.
Ingredients (Serves 4-6)
- 1 pound spaghetti
- 1 pound ground beef
- 1/2 cup breadcrumbs
- 1/4 cup grated Parmesan cheese
- 1/4 cup chopped fresh parsley
- 1 egg
- 2 cloves garlic, minced
- 1 teaspoon salt
- 1/2 teaspoon black pepper
- 2 tablespoons olive oil
- 1 (28-ounce) can crushed tomatoes
- 1 teaspoon dried oregano
- 1 teaspoon dried basil
- 1/4 teaspoon red pepper flakes (optional)
- Salt and pepper to taste
- Fresh basil leaves, for garnish
- Grated Parmesan cheese, for serving
Instructions
- Prepare the Meatball Mixture: In a large mixing bowl, combine ground beef, breadcrumbs, Parmesan cheese, chopped parsley, egg, minced garlic, salt, and pepper. Mix until all ingredients are well incorporated, but be careful not to over-mix as this can make the meatballs dense.
- Shape the Meatballs: Roll the mixture into 1.5-inch meatballs, placing them on a baking sheet. You should get about 12-16 meatballs, depending on size.
- Cook the Meatballs: In a large skillet, heat olive oil over medium heat. Add the meatballs in batches, ensuring not to overcrowd the pan. Cook until all sides are browned, about 8-10 minutes. Remove the meatballs from the skillet and set aside.
- Make the Tomato Sauce: In the same skillet, add crushed tomatoes, dried oregano, dried basil, and red pepper flakes. Stir well and bring the sauce to a simmer. Season with salt and pepper to taste.
- Simmer the Meatballs in Sauce: Return the meatballs to the skillet, cover, and let them simmer in the sauce for about 20 minutes, allowing the flavors to meld together.
- Cook the Spaghetti: Meanwhile, bring a large pot of salted water to a boil. Cook the spaghetti according to package instructions until al dente. Drain the pasta, reserving about 1/2 cup of pasta water.
- Combine and Serve: Add the cooked spaghetti to the skillet with the meatballs and sauce. Toss gently to coat the pasta, adding reserved pasta water if needed to reach desired sauce consistency. Garnish with fresh basil leaves and more grated Parmesan cheese before serving.
Extra Tips
For extra flavor, you can substitute some or all of the ground beef with a mix of ground pork or veal. If you prefer a smoother sauce, use an immersion blender to puree the crushed tomatoes before adding the meatballs.
One-Pan Chicken and Vegetables
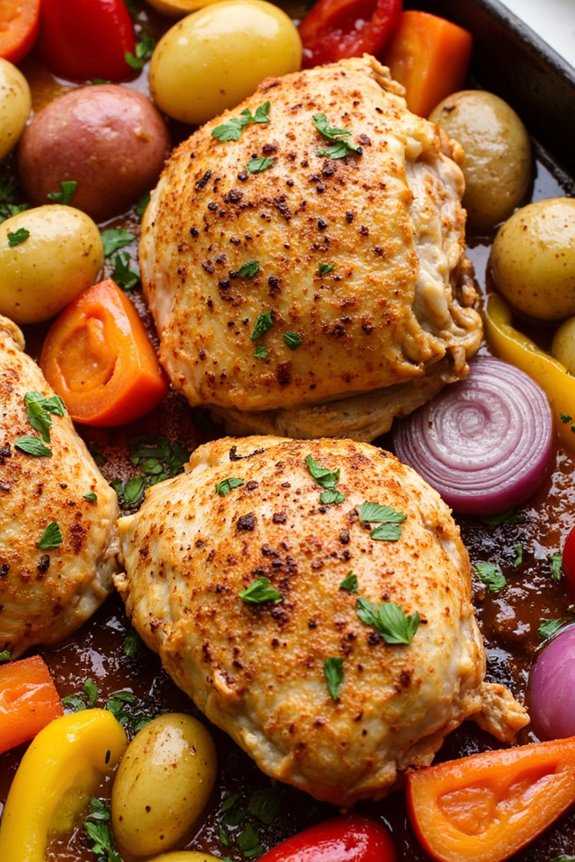
One-Pan Chicken and Vegetables is a delightful and easy-to-make dish perfect for busy weeknights or casual family dinners. The beauty of this recipe lies in its simplicity and the harmonious combination of flavors that come together with minimal effort. By roasting chicken thighs and a medley of colorful vegetables in a single pan, you can enjoy a wholesome meal that’s not only delicious but also healthy. The chicken turns out tender and juicy, while the vegetables become perfectly roasted, absorbing the savory juices from the chicken, creating a symphony of taste in every bite.
This dish is also a great way to incorporate a variety of vegetables into your family’s diet. You can customize the recipe by using your favorite seasonal vegetables, making it adaptable to your preferences or whatever you have on hand. The recipe serves 4-6 people, making it an ideal choice for family gatherings or a small dinner party. Whether you’re a seasoned cook or a beginner, this recipe is straightforward and quick to prepare, guaranteeing a stress-free cooking experience.
Ingredients (Serves 4-6):
- 6 bone-in, skin-on chicken thighs
- 2 tablespoons olive oil
- 1 teaspoon salt
- 1/2 teaspoon black pepper
- 1 teaspoon garlic powder
- 1 teaspoon dried oregano
- 1 teaspoon paprika
- 1 lemon, sliced
- 3 cups baby potatoes, halved
- 2 cups carrots, sliced into 1-inch pieces
- 1 red bell pepper, sliced
- 1 yellow bell pepper, sliced
- 1 red onion, cut into wedges
- 2 tablespoons fresh parsley, chopped
Instructions:
- Preheat the Oven: Start by preheating your oven to 425°F (220°C). This guarantees that the chicken and vegetables cook evenly and achieve a nice roasted texture.
- Prepare the Chicken: In a large mixing bowl, combine olive oil, salt, pepper, garlic powder, dried oregano, and paprika. Add the chicken thighs to the bowl and toss them until they’re well coated with the seasoning mixture. This step guarantees that the chicken is flavorful and aromatic.
- Arrange the Ingredients: In a large baking dish or sheet pan, arrange the seasoned chicken thighs in a single layer. Scatter the lemon slices around the chicken, followed by the baby potatoes, carrots, bell peppers, and red onion. Make sure the vegetables are evenly distributed around the chicken for even roasting.
- Bake the Dish: Place the baking dish in the preheated oven and bake for approximately 35-40 minutes, or until the chicken is cooked through and the skin is crispy. The vegetables should be tender and slightly caramelized. You can check the doneness of the chicken by guaranteeing it reaches an internal temperature of 165°F (74°C).
- Garnish and Serve: Once the dish is cooked, remove it from the oven and let it rest for a few minutes. Sprinkle fresh parsley over the top for a burst of freshness and color. Serve the chicken and vegetables straight from the pan for easy cleanup.
Extra Tips:
For added flavor, consider marinating the chicken in the seasoning mixture for an hour or overnight in the refrigerator before cooking. This allows the spices to penetrate deeper into the meat.
If you prefer a spicier dish, add a pinch of red pepper flakes to the seasoning mix. Additionally, if you notice the vegetables roasting quicker than the chicken, you can remove them from the pan early to prevent overcooking.
Feel free to experiment with different vegetable combinations based on seasonal availability or personal preference.
Homemade Pizza Night

Pizza night is a cherished tradition in many households, bringing family and friends together for a fun, interactive meal experience. Making pizza at home allows everyone to customize their own pie just the way they like it, guaranteeing that each bite is bursting with personalized flavor. The process itself is an enjoyable activity, from kneading the dough to spreading the sauce, and ultimately topping it with a delightful array of ingredients.
Whether you prefer a classic Margherita, a pepperoni feast, or a veggie extravaganza, homemade pizza night offers endless possibilities for creativity and bonding. Creating the perfect pizza at home requires a bit of preparation, but the rewards are well worth the effort. The key is in the dough, which serves as the foundation for all the delicious toppings. A well-risen dough will yield a crust that’s both chewy and crispy, setting the stage for a delectable meal.
Once the dough is ready, the fun begins as you and your family can explore different sauce bases, cheeses, and toppings to craft a masterpiece that suits everyone’s taste. Homemade pizza night not only satisfies the taste buds but also creates lasting memories as you enjoy the fruits of your labor together.
Ingredients for Homemade Pizza Night (Serves 4-6):
- 4 cups all-purpose flour
- 1 packet (2 1/4 teaspoons) active dry yeast
- 1 1/2 cups warm water (110°F)
- 2 tablespoons olive oil
- 1 teaspoon salt
- 1 tablespoon sugar
- 1 cup tomato sauce
- 2 cups shredded mozzarella cheese
- 1/2 cup grated Parmesan cheese
- 1 teaspoon dried oregano
- 1 teaspoon dried basil
- Your choice of toppings: pepperoni, mushrooms, bell peppers, onions, olives, etc.
Cooking Instructions:
- Prepare the Dough: In a large bowl, dissolve the yeast and sugar in warm water. Let it sit for about 5 minutes until it becomes frothy. Add the olive oil and salt, then gradually mix in the flour until a dough forms.
- Knead the Dough: Turn the dough out onto a floured surface and knead for about 8-10 minutes until it’s smooth and elastic. Place the dough in a lightly oiled bowl, cover it with a damp cloth, and let it rise in a warm place for about 1-1.5 hours or until it has doubled in size.
- Preheat the Oven: Preheat your oven to 475°F (245°C) and place a pizza stone or a large baking sheet inside to heat.
- Shape the Dough: Once the dough has risen, punch it down and divide it into two equal portions. Roll each portion into a 12-inch round on a floured surface.
- Assemble the Pizza: Transfer the dough rounds onto parchment paper. Spread each round with tomato sauce, leaving a small border for the crust. Sprinkle with mozzarella and Parmesan cheese, then add the oregano, basil, and your choice of toppings.
- Bake the Pizza: Carefully transfer the parchment paper with the assembled pizza onto the preheated stone or baking sheet. Bake for 12-15 minutes, or until the crust is golden brown and the cheese is bubbly and slightly golden.
- Serve: Remove the pizza from the oven and let it cool for a couple of minutes before slicing. Serve hot and enjoy with your family.
Extra Tips:
When making pizza dough, make sure that your water isn’t too hot, as this can kill the yeast. If you prefer a thinner crust, roll the dough out more before adding toppings. For a crispier crust, try baking your pizza on the lowest oven rack.
Feel free to experiment with different cheeses, sauces, and toppings to suit your family’s preferences. For a healthier option, consider using whole wheat flour or adding more vegetables as toppings. Finally, remember that practice makes perfect; the more you make homemade pizza, the better you’ll get at achieving your ideal crust and flavor combinations.
Creamy Mac and Cheese

Creamy Mac and Cheese is a beloved dish that combines the comforting texture of tender pasta with a rich, velvety cheese sauce. This classic family favorite is perfect for weeknight dinners or special occasions, offering a hearty and satisfying meal that everyone will love.
The magic of this dish lies in its simplicity, with high-quality cheese and a smooth sauce bringing out the best in the pasta. Whether you choose to serve it as a main course or a side dish, Creamy Mac and Cheese is sure to be a hit at the dinner table.
To create the ultimate Creamy Mac and Cheese, you’ll need to focus on creating a perfectly smooth cheese sauce that clings to every piece of pasta. The combination of sharp cheddar and creamy mozzarella gives the sauce a delicious depth of flavor, while a touch of mustard and paprika adds a subtle kick.
By following the recipe carefully, you’ll achieve a dish with the perfect balance of flavors and textures, resulting in a mac and cheese that’s creamy, cheesy, and utterly irresistible.
Ingredients (serving size: 4-6 people):
- 16 oz elbow macaroni
- 4 cups shredded sharp cheddar cheese
- 2 cups shredded mozzarella cheese
- 4 tablespoons unsalted butter
- 1/4 cup all-purpose flour
- 3 cups whole milk
- 1 teaspoon salt
- 1/2 teaspoon black pepper
- 1 teaspoon mustard powder
- 1/2 teaspoon paprika
- 1/2 cup grated Parmesan cheese (optional for topping)
- 1/4 cup breadcrumbs (optional for topping)
Cooking Instructions:
- Prepare the Pasta: Begin by cooking the elbow macaroni according to the package instructions in a large pot of boiling salted water. Cook the pasta until al dente, then drain and set aside.
- Make the Roux: In a large saucepan, melt the butter over medium heat. Once melted, add the flour and whisk continuously for about 1-2 minutes until the mixture is smooth and bubbly, creating a roux.
- Create the Sauce Base: Gradually add the milk to the roux, whisking constantly to prevent any lumps from forming. Continue to cook and whisk for about 5-7 minutes until the mixture thickens enough to coat the back of a spoon.
- Add Seasonings: Stir in the salt, black pepper, mustard powder, and paprika, mixing until well combined. These seasonings will enhance the flavor of the cheese sauce.
- Incorporate the Cheese: Reduce the heat to low and slowly add the shredded cheddar and mozzarella cheeses to the sauce, a handful at a time. Stir continuously until all the cheese is melted and the sauce is smooth and creamy.
- Combine with Pasta: Add the cooked macaroni to the cheese sauce, folding the pasta in gently until it’s fully coated with the sauce.
- Optional Topping: If desired, transfer the mac and cheese to a baking dish. Sprinkle the top with grated Parmesan cheese and breadcrumbs for a crunchy topping.
- Bake (optional): Preheat your oven to 350°F (175°C). Bake the mac and cheese for about 15-20 minutes, or until the top is golden brown and bubbly.
- Serve: Remove from the oven and let it sit for a few minutes before serving warm.
Extra Tips:
For the best results, always use freshly grated cheese as it melts more smoothly compared to pre-shredded cheese which often contains anti-caking agents.
Feel free to experiment with different cheeses such as Gruyère or Monterey Jack for a different flavor profile. If you prefer a creamier consistency, you can add a splash of heavy cream to the sauce.
Additionally, if baking, keep an eye on the mac and cheese to avoid over-baking, as this can lead to a dry dish.
Taco Tuesday Fiesta

Taco Tuesday is a beloved tradition in many households, and it’s no wonder why. The promise of a delicious, customizable meal that’s both fun and flavorful is hard to resist. This classic beef taco recipe is perfect for a family dinner, offering a satisfying and savory experience that brings everyone together at the table.
Whether you’re a seasoned taco aficionado or new to the taco scene, this recipe is sure to become a family favorite. These classic beef tacos aren’t only easy to prepare but also provide an opportunity for everyone to personalize their meal with a variety of toppings.
The seasoned beef filling is hearty and rich, complemented by crisp lettuce, juicy tomatoes, tangy cheese, and creamy avocado. With this recipe, you can create a festive Taco Tuesday fiesta that caters to all taste preferences, making it a delightful occasion for family and friends alike.
Ingredients (Serves 4-6):
- 1 pound ground beef
- 1 packet (about 1 oz) taco seasoning mix
- 2/3 cup water
- 8-10 taco shells
- 1 cup shredded lettuce
- 1 cup diced tomatoes
- 1 cup shredded cheddar cheese
- 1 avocado, sliced
- 1/2 cup sour cream
- 1/4 cup chopped fresh cilantro (optional)
- Salt and pepper to taste
Cooking Instructions:
- Prepare the Beef Filling: In a large skillet over medium-high heat, add the ground beef. Cook until the beef is browned, breaking it apart with a spatula as it cooks. This should take about 5-7 minutes. Drain any excess fat from the pan.
- Season the Beef: Add the taco seasoning mix to the cooked beef, followed by 2/3 cup of water. Stir well to combine all ingredients. Reduce the heat to low and let the mixture simmer for about 5 minutes, stirring occasionally, until the beef is fully coated and the sauce has thickened.
- Prepare the Taco Shells: While the beef is simmering, preheat your oven to 350°F (175°C). Arrange the taco shells on a baking sheet and warm them in the oven for about 5 minutes. This step will make sure that the shells are crisp and ready to hold the filling.
- Assemble the Tacos: Once the beef is ready and the shells are warm, start assembling the tacos. Spoon a generous amount of the beef mixture into each taco shell. Top with shredded lettuce, diced tomatoes, shredded cheese, and avocado slices. Add a dollop of sour cream and sprinkle with fresh cilantro if desired.
- Serve and Enjoy: Serve the tacos immediately while they’re warm. Arrange the toppings in separate bowls to allow each person to customize their tacos as they like.
Extra Tips:
For an even more flavorful experience, consider adding a squeeze of lime juice over the assembled tacos just before serving. This adds a revitalizing zest that enhances the overall taste.
If you prefer a spicier kick, include some sliced jalapeños or a dash of hot sauce. Additionally, for a healthier option, you can substitute the ground beef with ground turkey or chicken.
Savory Beef and Broccoli Stir-Fry
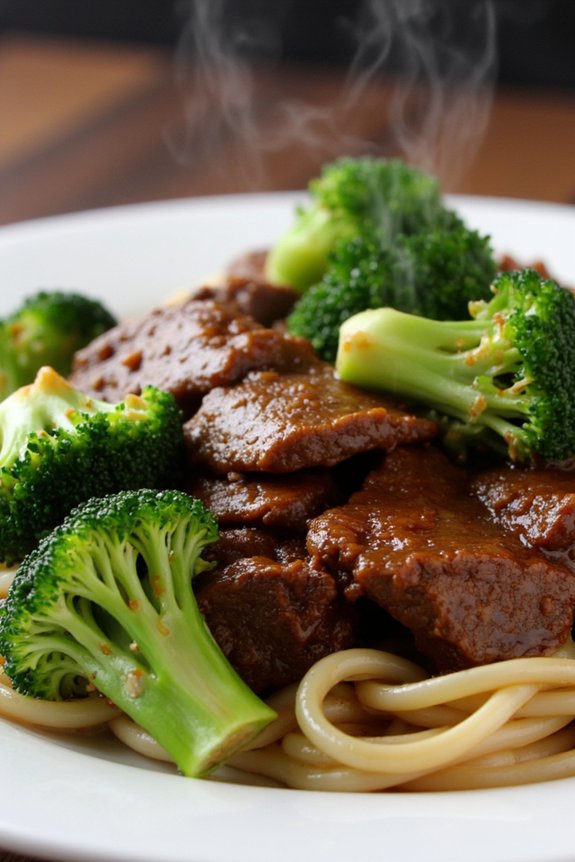
Savory Beef and Broccoli Stir-Fry is a delightful dish that combines tender strips of beef with crisp broccoli florets, all enveloped in a savory sauce. This recipe is perfect for a quick weeknight dinner or a special family gathering, as it’s both flavorful and easy to prepare. The harmony of soy sauce, garlic, and ginger brings out the best in the beef and broccoli, creating a meal that everyone will love.
This dish isn’t only delicious but also nutritious, offering a good balance of protein and vegetables. With its vibrant colors and rich flavors, Beef and Broccoli Stir-Fry is sure to become a family favorite. The preparation is straightforward, and the cooking time is short, making it an ideal option for those busy evenings when you want something wholesome and satisfying without spending too much time in the kitchen.
Ingredients (Serves 4-6):
- 1 pound beef sirloin or flank steak, thinly sliced
- 4 cups broccoli florets
- 3 tablespoons vegetable oil
- 3 cloves garlic, minced
- 1 tablespoon fresh ginger, minced
- 1/4 cup soy sauce
- 2 tablespoons oyster sauce
- 1 tablespoon cornstarch
- 1 tablespoon water
- 1 teaspoon sugar
- 1/4 teaspoon black pepper
- Cooked white or brown rice, for serving
Cooking Instructions:
- Prepare the Beef and Broccoli: Thinly slice the beef across the grain into strips. Wash and cut the broccoli into bite-sized florets. Set aside.
- Make the Sauce: In a small bowl, mix the soy sauce, oyster sauce, cornstarch, water, sugar, and black pepper. Stir until the cornstarch is fully dissolved. This will be the sauce for the stir-fry.
- Cook the Beef: Heat 1 tablespoon of vegetable oil in a large skillet or wok over medium-high heat. Add the beef strips and stir-fry for about 3-4 minutes, or until they’re browned and cooked through. Remove the beef from the skillet and set aside.
- Stir-Fry the Broccoli: In the same skillet, add the remaining 2 tablespoons of vegetable oil. Add the minced garlic and ginger, and sauté for about 30 seconds until fragrant. Add the broccoli florets and stir-fry for 3-4 minutes, or until they’re bright green and tender-crisp.
- Combine and Cook: Return the cooked beef to the skillet with the broccoli. Pour the sauce over the beef and broccoli, stirring well to coat everything evenly. Cook for an additional 2-3 minutes until the sauce has thickened and everything is heated through.
- Serve: Remove from heat and serve immediately over cooked rice for a complete meal.
Extra Tips:
For the best results, make sure that the beef is sliced thinly and evenly to promote even cooking. Freezing the beef for about 30 minutes before slicing can make this task easier.
Additionally, don’t overcrowd the skillet when cooking; if needed, cook the beef in batches to achieve a nice sear. Feel free to add other vegetables like bell peppers or carrots for more variety and color.
Finally, adjust the seasoning to taste, adding more soy sauce or a dash of sesame oil for extra flavor if desired.
Hearty Chicken Pot Pie

Hearty Chicken Pot Pie is a comforting classic that brings warmth and joy to the dinner table. This dish is perfect for family gatherings or a cozy night in, providing a satisfying meal that’s filled with tender chicken, colorful vegetables, and a creamy, flavorful sauce.
All of this is enveloped in a golden, flaky crust that beautifully complements the rich filling. It’s a dish that promises to be a hit with both kids and adults alike, making it a staple in the family recipe collection.
This chicken pot pie recipe is designed to serve 4-6 people, making it ideal for family dinners or small gatherings. With easy-to-find ingredients and straightforward preparation, even novice cooks can achieve delicious results.
The process of making this dish isn’t only rewarding but also allows for a bit of creativity, as you can adapt the vegetables or spices to suit your family’s preferences.
Ingredients (serving size: 4-6 people):
- 1 pound boneless, skinless chicken breasts, diced
- 1 cup diced carrots
- 1 cup frozen peas
- 1 cup diced potatoes
- 1/2 cup diced celery
- 1/3 cup butter
- 1/3 cup all-purpose flour
- 1/2 teaspoon salt
- 1/4 teaspoon black pepper
- 1/4 teaspoon dried thyme
- 1 3/4 cups chicken broth
- 2/3 cup milk
- 1 package refrigerated pie crusts (2 crusts)
Instructions:
- Preheat the Oven: Set your oven to 425°F (220°C) to guarantee it reaches the desired temperature by the time your pot pie is ready to bake.
- Cook the Chicken: In a large skillet over medium heat, cook the diced chicken until it’s no longer pink in the center, about 5-7 minutes. Remove the chicken from the skillet and set it aside.
- Prepare the Vegetables: In the same skillet, add the butter and let it melt. Stir in the diced carrots, celery, and potatoes. Cook for about 10 minutes, or until the vegetables begin to soften.
- Make the Sauce: Sprinkle the flour over the vegetable mixture and stir to coat. Gradually add the chicken broth and milk, stirring continuously to avoid lumps. Add salt, pepper, and thyme. Let the mixture simmer until it thickens, about 5 minutes.
- Combine Ingredients: Add the cooked chicken and peas to the sauce and vegetable mixture. Stir well to combine, confirming the chicken and vegetables are evenly coated with the sauce.
- Assemble the Pie: Roll out one pie crust into a pie dish. Pour the chicken and vegetable mixture into the crust. Cover with the second pie crust, sealing the edges by pressing them together with a fork. Cut a few slits in the top crust to allow steam to escape.
- Bake the Pie: Place the pie in the preheated oven and bake for 30-35 minutes, or until the crust is golden brown. If the edges begin to brown too quickly, cover them with aluminum foil.
- Cool and Serve: Allow the pot pie to cool for about 10 minutes before serving. This helps the filling set slightly and makes it easier to slice.
Extra Tips:
For a more flavorful filling, consider adding a splash of white wine or a dash of Worcestershire sauce to the sauce before combining it with the chicken and vegetables.
If you prefer a thicker sauce, increase the flour slightly or reduce the broth quantity. To save time, use a pre-cooked rotisserie chicken instead of cooking raw chicken.
Feel free to customize the vegetables based on what you have on hand or what your family enjoys. Finally, if you’re short on time, using a ready-made pie crust guarantees you can focus on the delicious filling.
Baked Ziti With Garlic Bread
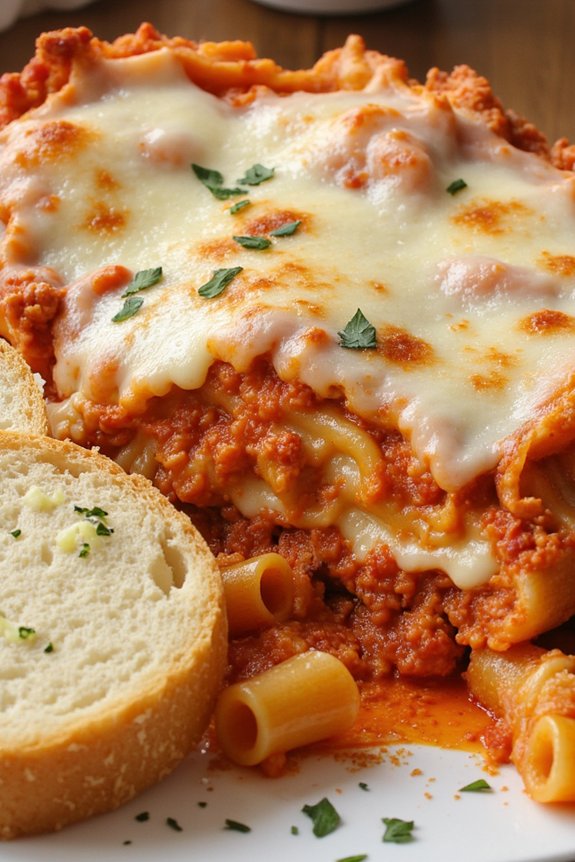
Baked Ziti With Garlic Bread is a classic comfort meal that’s perfect for family dinners. This dish combines the richness of pasta, marinara sauce, and melted cheese, layered together to create a deliciously satisfying meal. It’s a hearty and filling option that pleases both kids and adults alike.
Coupled with crispy and buttery garlic bread, this meal is sure to become a staple in your family’s dinner rotation. The beauty of Baked Ziti is that it can be made ahead of time and simply popped in the oven when you’re ready to eat, making it convenient for busy weeknights.
For this recipe, we’ll be using ziti pasta, but you can substitute with penne or rigatoni if desired. The dish is layered with a savory meat sauce, creamy ricotta cheese, and mozzarella, which melts beautifully in the oven. The garlic bread adds a wonderful contrast with its crispy crust and soft, buttery center, making it the perfect accompaniment to the ziti.
This recipe serves 4-6 people, making it ideal for a small gathering or family meal.
Ingredients for Baked Ziti:
- 1 pound ziti pasta
- 1 tablespoon olive oil
- 1 pound ground beef or Italian sausage
- 1 medium onion, diced
- 3 cloves garlic, minced
- 2 cups marinara sauce
- 1 teaspoon dried oregano
- 1 teaspoon dried basil
- 1/2 teaspoon red pepper flakes (optional)
- Salt and pepper to taste
- 1 cup ricotta cheese
- 2 cups shredded mozzarella cheese
- 1/2 cup grated Parmesan cheese
Ingredients for Garlic Bread:
- 1 loaf French or Italian bread
- 1/2 cup unsalted butter, softened
- 4 cloves garlic, minced
- 2 tablespoons fresh parsley, chopped
- 1/2 teaspoon garlic powder
- Salt to taste
Cooking Instructions:
1. Prepare the Pasta: Preheat your oven to 375°F (190°C). Cook the ziti pasta according to package instructions until al dente. Drain and set aside.
2. Make the Meat Sauce: In a large skillet, heat olive oil over medium heat. Add the ground beef or sausage and cook until browned, breaking it up with a spoon. Add the diced onion and minced garlic, cooking until the onion is translucent.
Stir in the marinara sauce, oregano, basil, red pepper flakes, salt, and pepper. Let simmer for 10 minutes.
3. Assemble the Ziti: In a large bowl, combine the cooked pasta, half of the meat sauce, and the ricotta cheese. Mix until the pasta is well coated. In a baking dish, spread a layer of the meat sauce on the bottom.
Add the pasta mixture, then top with the remaining meat sauce. Sprinkle with mozzarella and Parmesan cheese evenly over the top.
4. Bake the Ziti: Cover the baking dish with foil and bake for 20 minutes. Remove the foil and bake for another 10-15 minutes, or until the cheese is bubbly and golden brown.
5. Prepare the Garlic Bread: While the ziti is baking, slice the bread in half lengthwise. In a small bowl, combine softened butter, minced garlic, parsley, garlic powder, and salt.
Spread the mixture evenly over the cut sides of the bread. Place on a baking sheet and bake in the oven for 10-12 minutes, or until the edges are golden and crispy.
6. Serve: Let the baked ziti cool for a few minutes before serving. Slice the garlic bread and serve alongside the ziti for a complete meal.
Extra Tips:
For added flavor, consider incorporating some chopped spinach or mushrooms into the meat sauce. If you prefer a spicier dish, increase the amount of red pepper flakes or use spicy Italian sausage.
To make the garlic bread extra cheesy, sprinkle some Parmesan on top before baking. This dish can be prepared in advance; simply assemble the ziti and store it covered in the fridge for up to 24 hours before baking.
You can also freeze leftovers for up to three months and reheat them in the oven when needed.
Teriyaki Salmon With Rice
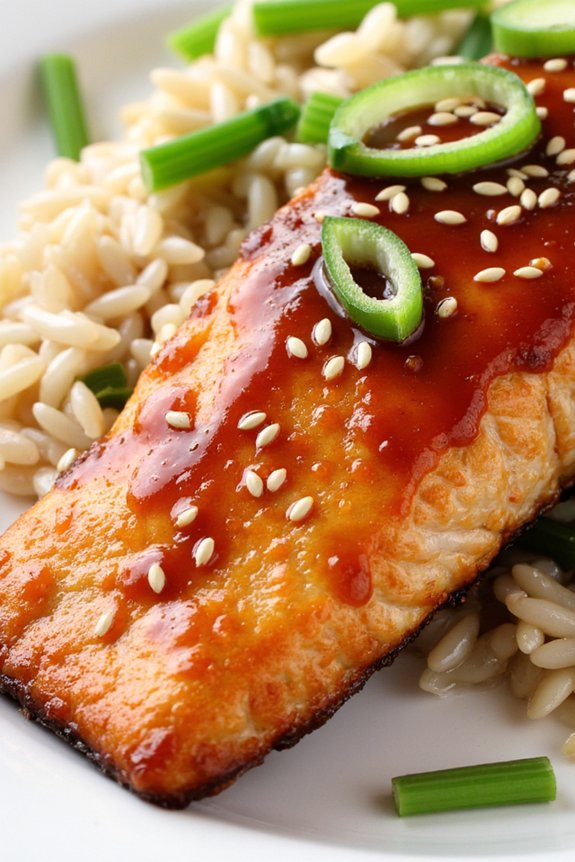
Teriyaki Salmon With Rice is a delightful dish that combines the rich, savory flavors of teriyaki sauce with the delicate taste of salmon. This meal isn’t only delicious but also healthy, providing a good source of protein and omega-3 fatty acids. Perfect for a family dinner, this dish is both quick to prepare and a crowd-pleaser. Serve it over a bed of fluffy rice to soak up the mouth-watering sauce, creating a harmonious blend of textures and flavors.
Whether you’re an experienced cook or a beginner looking to impress, this Teriyaki Salmon With Rice recipe is sure to become a staple in your culinary repertoire. The key to a great teriyaki sauce lies in balancing the sweet and savory elements to complement the natural richness of the salmon. Follow the steps below to create a meal that will have your family asking for seconds.
Ingredients (Serves 4-6):
- 4-6 salmon fillets, skin on
- 1 cup soy sauce
- 1/2 cup water
- 1/4 cup mirin (Japanese sweet rice wine)
- 1/4 cup honey
- 2 tablespoons brown sugar
- 2 teaspoons minced garlic
- 1 teaspoon grated ginger
- 2 tablespoons cornstarch
- 2 tablespoons water (for cornstarch slurry)
- 3 cups cooked jasmine or basmati rice
- 2 tablespoons vegetable oil
- Sesame seeds for garnish
- Chopped green onions for garnish
Instructions:
- Prepare the Teriyaki Sauce: In a medium saucepan, combine the soy sauce, 1/2 cup water, mirin, honey, brown sugar, garlic, and ginger. Bring the mixture to a simmer over medium heat, stirring occasionally until the sugar dissolves completely.
- Thicken the Sauce: In a small bowl, mix the cornstarch with 2 tablespoons of water to create a slurry. Slowly add the slurry to the simmering sauce while stirring continuously. Cook for another 2-3 minutes until the sauce thickens to your desired consistency. Remove from heat and set aside.
- Cook the Salmon: Heat vegetable oil in a large non-stick skillet over medium-high heat. Place the salmon fillets skin-side down in the skillet. Cook for about 4-5 minutes until the skin is crispy. Carefully flip the fillets and cook for an additional 3-4 minutes until the salmon is cooked through and flakes easily with a fork.
- Glaze the Salmon: Pour the prepared teriyaki sauce over the salmon fillets in the skillet. Use a spoon to continuously glaze the salmon with the sauce for about 1-2 minutes to allow the flavors to meld.
- Serve: Arrange a portion of cooked rice on each plate. Place the glazed salmon fillets on top of the rice. Drizzle any remaining sauce over the salmon and rice. Garnish with sesame seeds and chopped green onions.
Extra Tips: When choosing salmon, opt for fillets with a bright, fresh color and a firm texture. Fresh salmon will guarantee the best taste and texture for your dish. If you prefer a less sweet sauce, adjust the amount of honey and brown sugar to taste. For an extra burst of flavor, consider marinating the salmon in the teriyaki sauce for 30 minutes before cooking. Finally, be mindful not to overcook the salmon to maintain its moist and tender texture.
Slow Cooker Pulled Pork Sandwiches
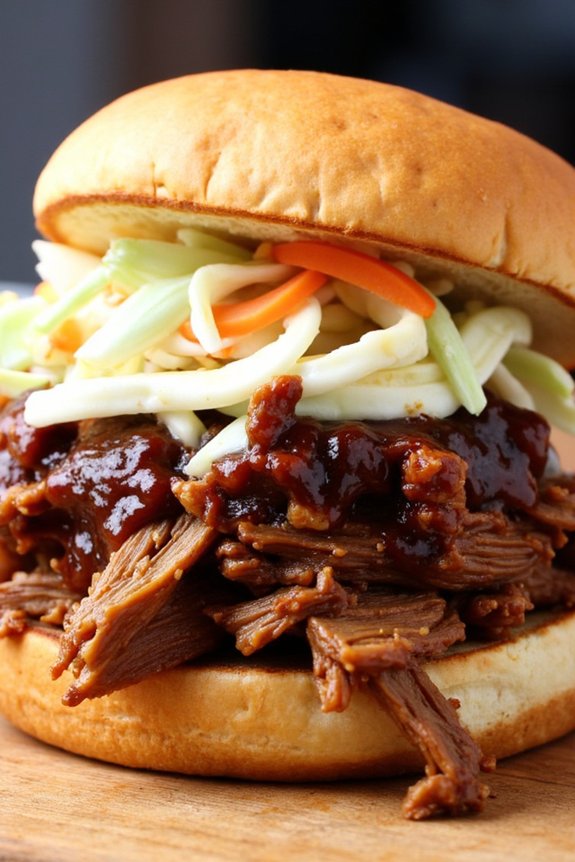
Slow Cooker Pulled Pork Sandwiches are a classic comfort food that brings the taste of summer barbecues right into your kitchen, any time of year. This dish offers tender, juicy pork that’s been slow-cooked to perfection, infused with a blend of spices and flavors that meld together over hours to create a mouthwatering experience.
Served on soft buns, these sandwiches are perfect for family dinners, gatherings, or any occasion where you want to serve something both hearty and delicious.
The beauty of this recipe lies in its simplicity and the use of a slow cooker, which allows the pork to become incredibly tender without constant attention. The pulled pork is seasoned with a savory spice rub and slow-cooked until it effortlessly falls apart.
Finished with your favorite barbecue sauce, these sandwiches are sure to be a hit with both kids and adults alike. Best of all, this recipe is easy to prepare, making it a great choice for busy weeknights or lazy weekends.
Ingredients (Serves 4-6):
- 3-4 pounds pork shoulder (also known as pork butt)
- 2 tablespoons brown sugar
- 1 tablespoon paprika
- 1 tablespoon garlic powder
- 1 tablespoon onion powder
- 1 teaspoon salt
- 1 teaspoon black pepper
- 1/2 cup chicken broth
- 1 cup barbecue sauce
- 6 hamburger buns
- Optional: coleslaw for topping
Cooking Instructions:
- Prepare the Pork: Start by trimming any excess fat from the pork shoulder. Pat the pork dry with paper towels.
- Make the Spice Rub: In a small bowl, combine the brown sugar, paprika, garlic powder, onion powder, salt, and black pepper. Mix well.
- Season the Pork: Rub the spice mixture all over the pork shoulder, ensuring it’s evenly coated.
- Set Up the Slow Cooker: Place the seasoned pork shoulder into the slow cooker. Pour the chicken broth around the pork to keep it moist during cooking.
- Cook the Pork: Cover the slow cooker and set it to low. Let the pork cook for 8-10 hours, or until it’s tender and easily pulls apart with a fork.
- Shred the Pork: Once cooked, remove the pork from the slow cooker and place it on a large cutting board. Use two forks to shred the pork, discarding any large pieces of fat.
- Combine with Barbecue Sauce: Return the shredded pork to the slow cooker. Add the barbecue sauce and stir to combine. Let it cook on low for an additional 30 minutes to allow the flavors to meld.
- Assemble the Sandwiches: Toast the hamburger buns if desired. Spoon a generous amount of the pulled pork mixture onto the bottom half of each bun. Top with coleslaw if using, then place the top half of the bun on the sandwich.
Extra Tips:
For the best results, use a pork shoulder with some marbling; the fat will render during cooking, adding flavor and moisture to the meat.
If you prefer a spicier kick, consider adding a pinch of cayenne pepper to the spice rub. Leftover pulled pork can be stored in an airtight container in the refrigerator for up to 3 days or frozen for up to 3 months.
Reheat gently on the stove or in the microwave, adding a splash of water or broth to keep it moist.