

Planning a special family dinner and need some inspiration?
I’ve got you covered with 14 mouthwatering recipes that are perfect for celebrations.
Picture the delight on everyone’s faces as they savor dishes like Beef Wellington and Lemon Herb Roasted Chicken.
Each recipe is a cherished favorite, just waiting to bring a little extra joy to your gathering.
Curious to see which one will be the star of your table?
Classic Beef Wellington
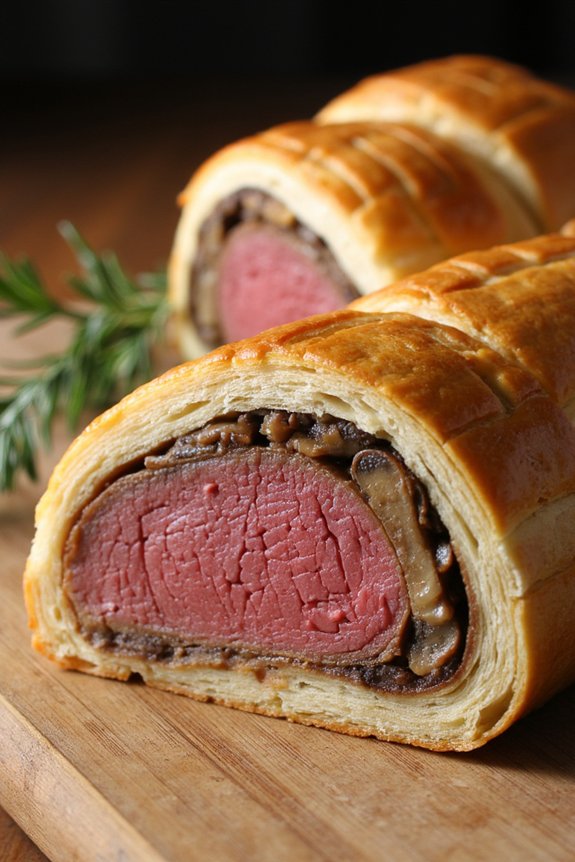
Classic Beef Wellington is a show-stopping dish that combines tender beef fillet, rich mushroom duxelles, savory prosciutto, and flaky puff pastry. This indulgent recipe is perfect for special occasions or a luxurious family dinner. The dish is named after the Duke of Wellington and has become a beloved classic in British cuisine.
With its beautiful presentation and exquisite flavors, Beef Wellington is sure to impress your guests. Preparing a perfect Beef Wellington requires attention to detail and a bit of patience, but the results are well worth the effort. The key components include a juicy beef fillet, a flavorful mushroom mixture, and a golden, crispy pastry crust.
Each layer adds its own unique taste and texture, creating a harmonious combination that delights the palate. While it may seem intimidating at first, following this step-by-step guide will help you create an unforgettable meal that your family and friends will rave about.
Ingredients (Serves 4-6):
- 2 pounds beef tenderloin fillet
- 2 tablespoons olive oil
- Salt and pepper to taste
- 1 pound mushrooms (such as cremini or button), finely chopped
- 2 tablespoons unsalted butter
- 2 cloves garlic, minced
- 2 tablespoons fresh thyme leaves
- 1/4 cup dry white wine
- 1/4 cup Dijon mustard
- 8-10 slices of prosciutto
- 1 sheet of puff pastry, thawed
- 1 egg, beaten (for egg wash)
Instructions:
- Prepare the Beef Fillet: Season the beef fillet with salt and pepper on all sides. Heat olive oil in a large skillet over medium-high heat. Sear the beef on all sides until browned, about 2-3 minutes per side. Remove from heat and let it cool. Once cooled, brush the fillet with Dijon mustard and set aside.
- Make the Mushroom Duxelles: In the same skillet, melt butter over medium heat. Add the chopped mushrooms, garlic, and thyme. Cook until the mushrooms are softened and any moisture has evaporated, about 10 minutes. Add the white wine and cook for an additional 2-3 minutes until the liquid is absorbed. Remove from heat and let it cool.
- Assemble the Wellington: Lay a large piece of plastic wrap on a flat surface. Arrange the prosciutto slices, slightly overlapping, to form a rectangle. Spread the cooled mushroom duxelles evenly over the prosciutto. Place the beef fillet on top and carefully roll it up, using the plastic wrap to help form a tight log. Refrigerate for 15-20 minutes to set.
- Wrap with Puff Pastry: Preheat the oven to 400°F (200°C). Roll out the puff pastry on a floured surface to a size large enough to fully enclose the beef. Remove the beef from the plastic wrap and place it in the center of the pastry. Fold the pastry over the beef, sealing the edges and trimming any excess. Brush the pastry with the beaten egg to guarantee a golden finish.
- Bake the Wellington: Place the wrapped beef on a baking sheet lined with parchment paper. Use a knife to lightly score the top of the pastry for decoration. Bake in the preheated oven for 25-30 minutes, or until the pastry is golden brown and the internal temperature of the beef reaches your desired doneness (125°F for rare, 135°F for medium-rare). Let it rest for 10 minutes before slicing.
Extra Tips:
To achieve the best results, make sure the beef fillet is evenly seared and cooled before wrapping it in the pastry. This prevents the pastry from becoming soggy.
Using prosciutto as a barrier between the mushroom duxelles and the pastry also helps keep the pastry crisp. If you have time, chill the wrapped beef for an extra 30 minutes before baking to help the pastry maintain its shape.
Finally, always use a meat thermometer to check the internal temperature to avoid overcooking the beef.
Lemon Herb Roasted Chicken
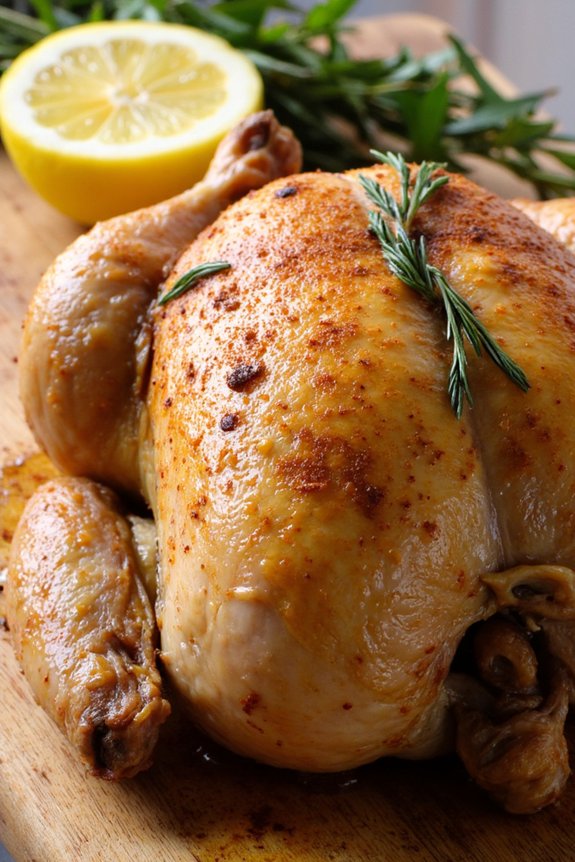
Lemon Herb Roasted Chicken is a classic and delicious option for a family dinner, offering a perfect balance of zesty citrus and fragrant herbs. This dish isn’t only flavorful but also relatively simple to prepare, making it an ideal choice for both weeknight dinners and special occasions.
The combination of lemon and herbs infuses the chicken with a bright, aromatic taste, while roasting guarantees a juicy and tender result. With just a few ingredients and a little bit of time, you can create a meal that will have your family coming back for seconds.
The secret to this dish lies in the marinade, which is made up of fresh lemon juice, a variety of herbs, and a touch of olive oil. Allowing the chicken to sit in the marinade for a few hours helps to deepen the flavor and tenderize the meat.
Once roasted to golden perfection, the chicken is ready to be served alongside your favorite sides, such as roasted vegetables or a crisp salad. This recipe serves 4-6 people, making it perfect for a family gathering or dinner party.
Ingredients for Lemon Herb Roasted Chicken:
- 1 whole chicken (about 4-5 pounds)
- 2 lemons
- 1/4 cup olive oil
- 4 cloves garlic, minced
- 2 teaspoons salt
- 1 teaspoon black pepper
- 1 tablespoon fresh thyme leaves
- 1 tablespoon fresh rosemary, chopped
- 1 tablespoon fresh parsley, chopped
- 1 teaspoon paprika
- 1/2 cup chicken broth
Cooking Instructions:
- Prepare the Chicken: Rinse the chicken under cold water and pat it dry with paper towels. Place the chicken in a large roasting pan.
- Make the Marinade: In a small bowl, combine the juice of one lemon, olive oil, minced garlic, salt, pepper, thyme, rosemary, parsley, and paprika. Mix well to form a marinade.
- Marinate the Chicken: Pour the marinade over the chicken, making certain it’s evenly coated. Rub the marinade under the skin and inside the cavity for maximum flavor. Cover the chicken and refrigerate for at least 2 hours, or overnight for best results.
- Preheat the Oven: About 30 minutes before cooking, remove the chicken from the refrigerator and let it sit at room temperature. Preheat the oven to 425°F (220°C).
- Prepare for Roasting: Slice the second lemon into rounds and place them inside the cavity of the chicken. Pour the chicken broth into the bottom of the roasting pan to keep the chicken moist during cooking.
- Roast the Chicken: Place the chicken in the preheated oven and roast for 1 hour to 1 hour and 15 minutes, or until the internal temperature reaches 165°F (74°C) and the skin is golden brown and crispy.
- Rest the Chicken: Once cooked, remove the chicken from the oven and let it rest for about 10-15 minutes before carving. This allows the juices to redistribute, making certain every bite is tender and flavorful.
- Serve: Carve the chicken and serve it with your choice of sides.
Extra Tips:
For an even more flavorful chicken, consider spatchcocking (butterflying) the bird before marinating. This technique allows the chicken to cook more evenly and faster.
Be sure to use a meat thermometer to check the internal temperature, as cooking times can vary based on the size of the chicken. If the skin starts to brown too quickly, cover it loosely with aluminum foil to prevent burning.
Finally, save any leftover juices from the roasting pan to drizzle over the chicken for added moisture and flavor.
Garlic Butter Shrimp Scampi
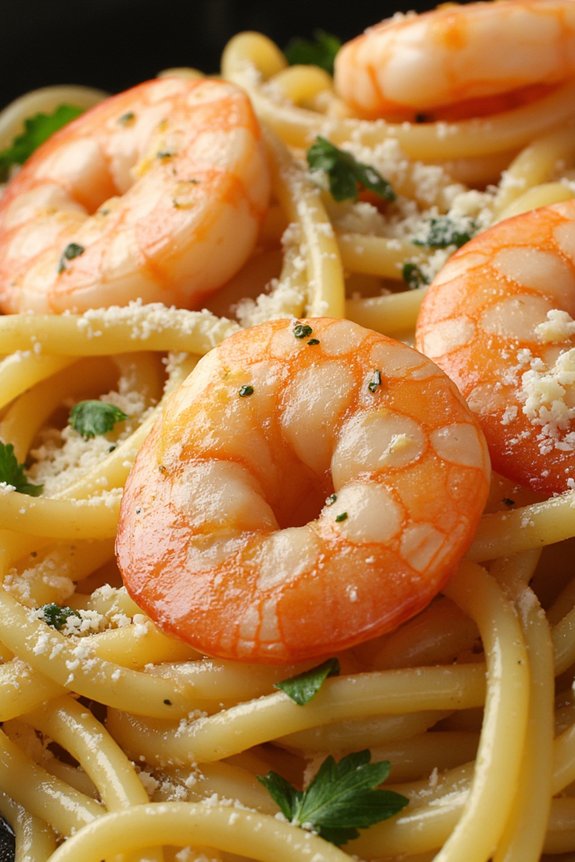
Garlic Butter Shrimp Scampi is a delightful and quick dish that combines succulent shrimp with a rich and buttery garlic sauce. This classic Italian-American recipe is perfect for a family dinner, offering a burst of flavors that everyone will love. The combination of garlic, butter, lemon, and white wine creates a sauce that’s both simple and exquisite, making it a go-to meal for any occasion.
The beauty of Garlic Butter Shrimp Scampi lies in its simplicity and speed; it can be prepared in under 30 minutes, making it ideal for busy weeknights. The shrimp absorb the aromatic flavors of garlic and butter, while the addition of fresh lemon juice adds a zesty touch. This dish pairs wonderfully with pasta, rice, or crusty bread, allowing you to soak up every bit of the delicious sauce. Here’s a recipe to serve 4-6 people.
Ingredients:
- 1 lb large shrimp, peeled and deveined
- 8 oz linguine or spaghetti
- 4 tbsp unsalted butter
- 2 tbsp olive oil
- 4 cloves garlic, minced
- 1/4 cup dry white wine
- 1/4 cup fresh lemon juice
- Zest of 1 lemon
- Salt and pepper, to taste
- 1/4 tsp red pepper flakes (optional)
- 2 tbsp fresh parsley, chopped
- Grated Parmesan cheese, for serving
Instructions:
- Cook the Pasta: Begin by cooking the linguine or spaghetti in a large pot of salted boiling water according to package instructions until al dente. Drain and set aside.
- Prepare the Shrimp: While the pasta is cooking, pat the shrimp dry with paper towels and season them with salt and pepper.
- Sauté Garlic: In a large skillet over medium heat, melt 2 tablespoons of butter with 2 tablespoons of olive oil. Add the minced garlic and sauté for about 1 minute until fragrant, being careful not to brown the garlic.
- Cook the Shrimp: Increase the heat to medium-high and add the shrimp to the skillet. Cook for 2-3 minutes on each side or until pink and opaque. Remove the shrimp from the skillet and set aside.
- Make the Sauce: In the same skillet, add the white wine and lemon juice, scraping up any bits from the bottom of the pan. Let the mixture simmer for about 2 minutes to reduce slightly.
- Combine Ingredients: Return the shrimp to the skillet and add the remaining 2 tablespoons of butter, lemon zest, and red pepper flakes if using. Stir to coat the shrimp in the sauce. Add the drained pasta to the skillet and toss to combine everything well.
- Serve: Remove from heat and sprinkle with chopped parsley. Serve immediately with grated Parmesan cheese on top.
Extra Tips:
For best results, make certain the shrimp are completely dry before cooking to achieve a nice sear. If you prefer a richer sauce, you can increase the amount of butter used. Adjust the level of red pepper flakes according to your heat preference.
For a non-alcoholic version, substitute chicken broth for the white wine. Finally, be careful not to overcook the shrimp, as they can become tough if left on the heat for too long. Enjoy your Garlic Butter Shrimp Scampi with a side of crusty bread to mop up the delicious sauce!
Herb-Crusted Rack of Lamb
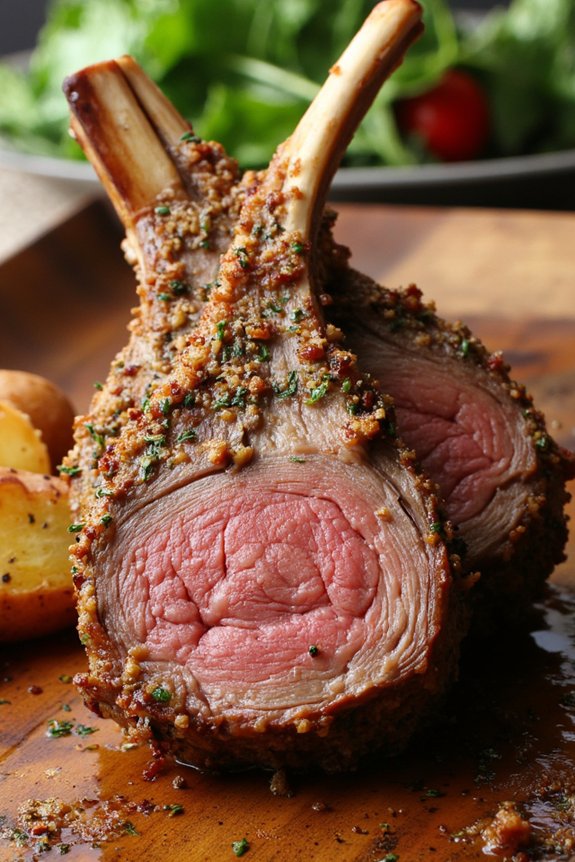
The Herb-Crusted Rack of Lamb is a sophisticated and flavorful dish that makes an impressive centerpiece for any family dinner. This elegant recipe combines the rich, tender flavor of lamb with a fragrant herb crust that enhances its natural taste. Perfect for special occasions or when you want to treat your loved ones to something extraordinary, this dish is both delicious and surprisingly easy to prepare.
The herb crust, made from a blend of fresh herbs, breadcrumbs, and garlic, creates a delightful texture and a burst of flavor that will leave your guests raving.
To guarantee the lamb is cooked to perfection, the racks are first seared to lock in moisture and flavor, then finished in the oven to the desired level of doneness. The end result is a succulent, juicy rack of lamb with a golden, crispy crust. This recipe serves 4-6 people, making it ideal for a family gathering or an intimate dinner party. Serve alongside your favorite sides, such as roasted potatoes or a fresh green salad, for a complete and satisfying meal.
Ingredients (serves 4-6):
- 2 racks of lamb (8 ribs each)
- Salt and freshly ground black pepper
- 2 tablespoons olive oil
- 1 cup fresh breadcrumbs
- 2 tablespoons Dijon mustard
- 3 garlic cloves, minced
- 2 tablespoons fresh rosemary, chopped
- 2 tablespoons fresh thyme, chopped
- 2 tablespoons fresh parsley, chopped
Cooking Instructions:
- Prepare the Lamb: Remove the lamb from the refrigerator and let it sit at room temperature for about 30 minutes. This helps guarantee even cooking. Preheat your oven to 425°F (220°C).
- Season and Sear the Lamb: Pat the lamb racks dry with paper towels, then season generously with salt and pepper. Heat olive oil in a large oven-safe skillet over medium-high heat. Add the lamb racks, fat side down, and sear for about 3-4 minutes until golden brown. Flip and sear the other side for an additional 2 minutes. Remove from heat.
- Make the Herb Crust: In a mixing bowl, combine the breadcrumbs, minced garlic, rosemary, thyme, and parsley. Mix well to combine all the herbs evenly.
- Coat the Lamb: Brush the seared lamb racks with Dijon mustard on all sides, ensuring an even coating. Press the breadcrumb and herb mixture onto the mustard-coated lamb, ensuring the crust adheres well.
- Roast the Lamb: Transfer the skillet with the lamb racks to the preheated oven. Roast for 15-20 minutes for medium-rare, or until the internal temperature reaches 130°F (54°C). Adjust the roasting time based on your preferred level of doneness.
- Rest and Serve: Remove the lamb from the oven and let it rest for about 10 minutes before carving. This allows the juices to redistribute, guaranteeing a moist and tender result. Slice between the ribs into individual chops and serve.
Extra Tips:
For the best flavor, use fresh herbs rather than dried ones. Fresh herbs impart a more vibrant and aromatic quality to the crust.
If you prefer a crispier crust, you can briefly broil the lamb in the oven for an additional 1-2 minutes after roasting. Remember to keep a close eye on it to prevent burning.
Finally, always rest your meat before carving; this significant step allows the juices to settle, making for a juicier and more flavorful dish.
Stuffed Bell Peppers

Stuffed Bell Peppers are a delightful and colorful dish that brings together a medley of flavors and textures, making it a perfect option for a family dinner. The dish involves hollowed-out bell peppers filled with a savory mixture of seasoned ground meat, rice, and vegetables, all topped with melted cheese. Not only are stuffed bell peppers visually appealing, but they’re also nutritious and satisfying, making them a hit with both kids and adults alike.
This recipe serves 4-6 people and is versatile enough to allow for creative adaptations based on personal preferences. You can use different types of meats, grains, or even make a vegetarian version by substituting the meat with beans or lentils. The dish can be prepared ahead of time, making it ideal for busy weeknights or for impressing guests during a weekend gathering. Let’s plunge into this delicious recipe!
Ingredients:
- 6 large bell peppers (any color)
- 1 pound ground beef or turkey
- 1 cup cooked rice
- 1 medium onion, chopped
- 2 cloves garlic, minced
- 1 can (14.5 oz) diced tomatoes, drained
- 1 cup shredded cheese (cheddar or mozzarella)
- 2 tablespoons olive oil
- 1 teaspoon salt
- 1/2 teaspoon black pepper
- 1 teaspoon Italian seasoning
- 1/4 cup fresh parsley, chopped (optional)
Cooking Instructions:
- Prepare the Bell Peppers: Preheat your oven to 375°F (190°C). Cut the tops off the bell peppers and remove the seeds and membranes. Brush the outside of the peppers with a bit of olive oil and place them cut side up in a baking dish.
- Cook the Filling: Heat two tablespoons of olive oil in a large skillet over medium heat. Add the chopped onion and minced garlic, sautéing until the onion becomes translucent. Add the ground beef or turkey, cooking until browned and fully cooked. Drain any excess fat.
- Combine Ingredients: Add the drained diced tomatoes, cooked rice, salt, pepper, and Italian seasoning to the skillet. Stir well to combine all ingredients and let the mixture simmer for about 5 minutes. Taste and adjust seasoning if necessary.
- Stuff the Peppers: Spoon the meat and rice mixture into each hollowed-out bell pepper, packing it in slightly to guarantee each pepper is filled. Top each pepper with a generous amount of shredded cheese.
- Bake the Peppers: Cover the baking dish with aluminum foil and bake in the preheated oven for 30 minutes. Remove the foil and bake for an additional 10-15 minutes, or until the cheese is bubbly and slightly golden.
- Garnish and Serve: Once done, remove from the oven and let the peppers cool slightly. Garnish with fresh chopped parsley if desired and serve warm.
Extra Tips:
When making stuffed bell peppers, it’s essential to select peppers that are uniform in size so they cook evenly.
You can customize the filling by adding vegetables like mushrooms or zucchini for extra flavor and nutrition.
If you prefer a spicier dish, consider adding a dash of cayenne pepper or using spicy sausage instead of ground meat.
To save time, you can prepare the filling a day in advance and store it in the refrigerator until you’re ready to stuff and bake the peppers.
Baked Honey Glazed Ham
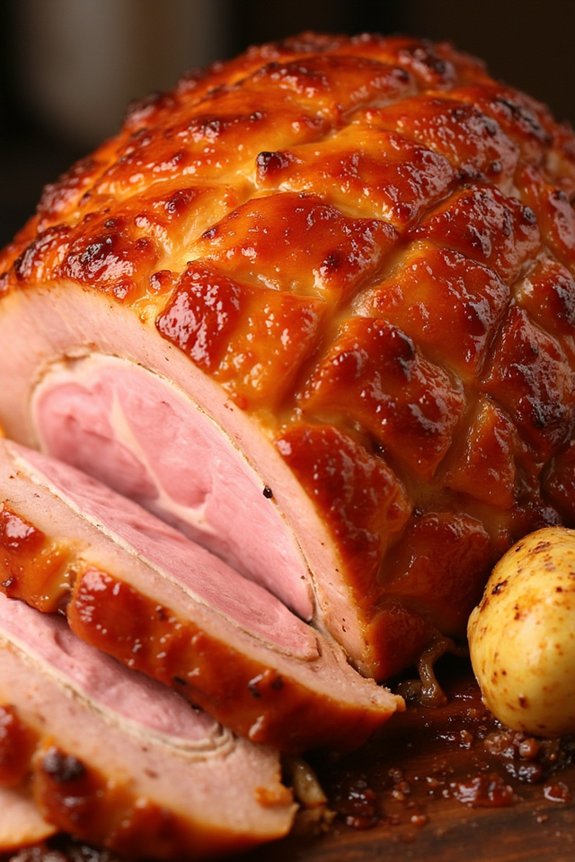
Baked Honey Glazed Ham is a classic dish that brings warmth and cheer to any family dinner. Its sweet and savory flavor, combined with a beautiful caramelized exterior, makes it a centerpiece that everyone will love. This recipe is perfect for gatherings, whether it’s for a holiday celebration or a weekend get-together. The rich flavors of honey, brown sugar, and spices meld perfectly with the natural saltiness of the ham, creating a deliciously balanced and mouthwatering dish.
When preparing Baked Honey Glazed Ham, it’s important to select a quality cut to guarantee the best texture and taste. The glaze, made from honey, brown sugar, and a hint of mustard, adds a delightful sweetness without overpowering the natural flavors of the ham. The process of slow baking allows the glaze to penetrate the meat, enhancing its juiciness and guaranteeing a tender bite. This recipe serves 4-6 people, making it an ideal main course for family dinners or special occasions.
Ingredients (serving size: 4-6 people):
- 1 fully cooked bone-in ham (about 4-5 pounds)
- 1/2 cup honey
- 1/2 cup brown sugar
- 2 tablespoons Dijon mustard
- 1 teaspoon ground cloves
- 1/2 teaspoon ground cinnamon
- 1/4 teaspoon ground nutmeg
Cooking Instructions:
- Preheat the Oven: Start by preheating your oven to 325°F (165°C). This guarantees that the ham will cook evenly and the glaze will set perfectly.
- Prepare the Ham: Place the ham on a rack in a shallow roasting pan. Score the surface in a diamond pattern with a sharp knife, about 1/4 inch deep. This will allow the glaze to seep into the meat.
- Mix the Glaze: In a small saucepan, combine the honey, brown sugar, Dijon mustard, ground cloves, cinnamon, and nutmeg. Heat over medium heat, stirring occasionally until the sugar has dissolved and the mixture is smooth.
- Apply the Glaze: Brush about half of the glaze over the ham, making sure it gets into the scored cuts. Reserve the remaining glaze for later.
- Bake the Ham: Cover the ham loosely with aluminum foil and bake in the preheated oven for about 2 hours, or until the internal temperature reaches 140°F (60°C).
- Glaze Again: Remove the foil and brush the remaining glaze over the ham. Increase the oven temperature to 400°F (200°C) and bake for an additional 15-20 minutes, or until the glaze is caramelized and the ham is golden brown.
- Rest the Ham: Allow the ham to rest for at least 10 minutes before slicing. This helps the juices redistribute, guaranteeing a moist, flavorful result.
Extra Tips:
When selecting your ham, a bone-in option not only adds flavor but also helps keep the meat tender during cooking. If you prefer a less sweet glaze, you can reduce the amount of brown sugar or honey to suit your taste.
Be mindful of the internal temperature when baking; overcooking can lead to a dry ham. Finally, use any leftover glaze as a sauce or condiment to drizzle over the sliced ham when serving. Enjoy your delicious Baked Honey Glazed Ham with your favorite side dishes for a complete meal.
Lobster Tail With Garlic Lemon Butter
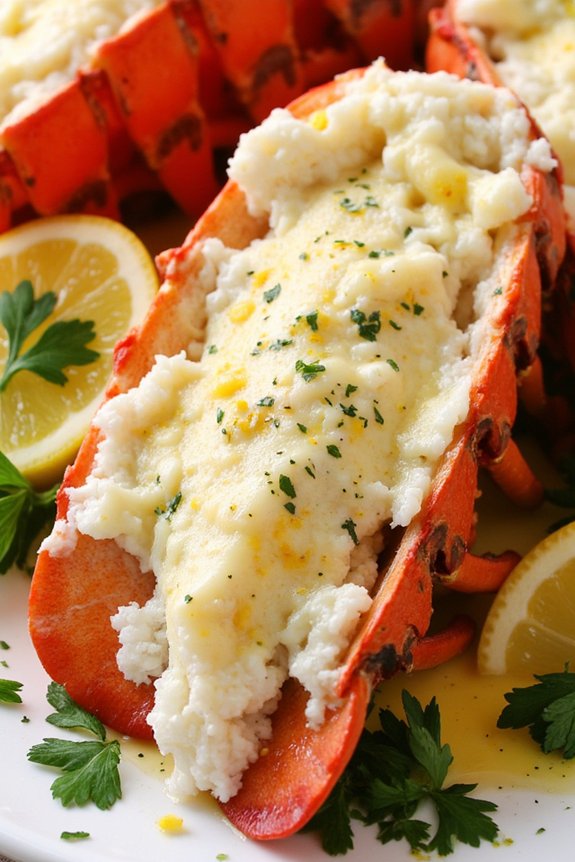
Indulge your family with a sumptuous dinner featuring Lobster Tail with Garlic Lemon Butter. This dish is perfect for special occasions or when you simply want to treat your loved ones to a gourmet meal at home. The succulent lobster tails are perfectly cooked and drizzled with a rich and aromatic garlic lemon butter sauce that enhances their natural sweetness.
Paired with a side of your choice, this dish isn’t only delicious but also an impressive centerpiece for any family gathering.
Preparing Lobster Tail with Garlic Lemon Butter is easier than it sounds, making it an ideal choice for both novice and experienced home cooks. The key to this dish lies in the quality of the ingredients and the balance of flavors in the garlic lemon butter sauce. The fresh lemon juice adds a bright acidity that cuts through the richness of the butter, while the garlic adds a robust flavor that complements the sweet, tender lobster meat.
Follow this recipe to create a memorable dining experience for 4-6 people.
Ingredients:
- 4-6 lobster tails
- 1 cup unsalted butter
- 4 cloves garlic, minced
- 2 tablespoons fresh lemon juice
- 1 teaspoon lemon zest
- Salt to taste
- Freshly ground black pepper to taste
- Fresh parsley, chopped, for garnish
- Lemon wedges, for serving
Cooking Instructions:
- Prepare the Lobster Tails: Start by preheating your oven to 425°F (220°C). Using kitchen shears, carefully cut through the top shell of each lobster tail lengthwise. Gently pull apart the shell, then use your fingers to loosen the meat from the shell and lift it slightly, resting it on top of the shell.
- Season the Lobster: Place the prepared lobster tails on a baking sheet. Season the lobster meat with salt and black pepper to taste. This basic seasoning will enhance the natural flavors of the lobster.
- Make the Garlic Lemon Butter: In a small saucepan over medium heat, melt the butter. Add the minced garlic and sauté until fragrant, about 1-2 minutes. Stir in the fresh lemon juice and lemon zest. Mix well and allow the sauce to simmer gently for another 2-3 minutes. Remove from heat.
- Brush the Lobster with Butter: Generously brush the garlic lemon butter over the lobster meat, ensuring each tail is well-coated. Reserve some of the butter sauce for serving.
- Bake the Lobster Tails: Place the baking sheet with the lobster tails in the preheated oven. Bake for about 12-15 minutes or until the lobster meat is opaque and cooked through. The exact cooking time will depend on the size of the lobster tails.
- Garnish and Serve: Once cooked, remove the lobster tails from the oven. Drizzle them with the reserved garlic lemon butter and garnish with chopped fresh parsley. Serve immediately with lemon wedges on the side for an extra burst of citrus flavor.
Extra Tips:
When cooking lobster tails, it’s important not to overcook them, as this can make the meat tough and rubbery. Keep an eye on the lobster tails during baking, and use a meat thermometer if available; the internal temperature should reach 140°F (60°C).
Additionally, feel free to adjust the amount of lemon juice and zest to suit your taste preferences for a more or less tangy flavor. If you have any leftover garlic lemon butter, it can be stored in the refrigerator for up to a week and used to enhance other seafood dishes.
Spinach and Ricotta Stuffed Shells
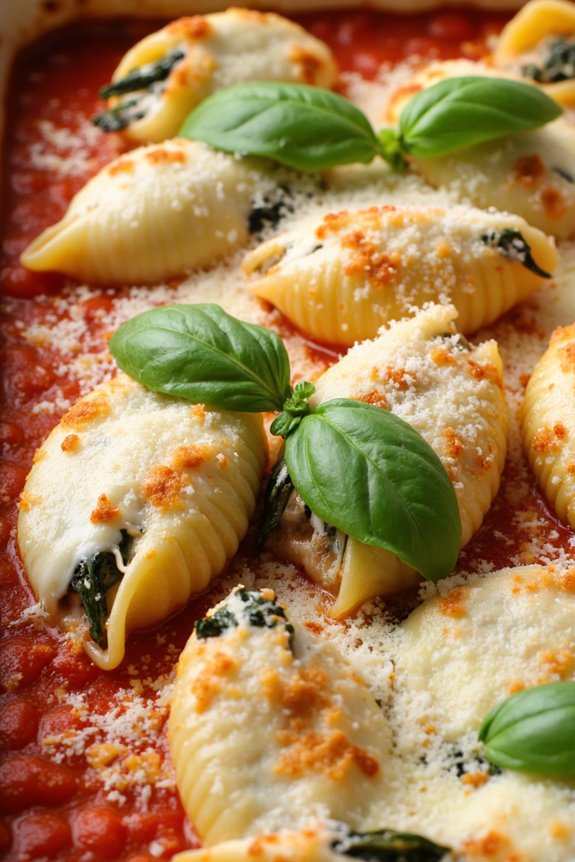
This recipe serves 4-6 people and is perfect for those who enjoy preparing meals that are both impressive and straightforward. The beauty of Spinach and Ricotta Stuffed Shells lies in its simplicity and the ability to prepare most of the components ahead of time, allowing you to spend more time with your loved ones rather than in the kitchen.
Let’s explore the ingredients and the step-by-step instructions to create this delicious dish.
Ingredients (Serves 4-6):
- 20-24 jumbo pasta shells
- 2 cups ricotta cheese
- 1 cup grated mozzarella cheese
- 1/2 cup grated Parmesan cheese
- 1 large egg
- 3 cups fresh spinach, chopped
- 2 cups marinara sauce
- 2 cloves garlic, minced
- 1 tablespoon olive oil
- 1 teaspoon dried Italian seasoning
- Salt and pepper, to taste
- Fresh basil leaves, for garnish (optional)
Cooking Instructions:
- Preheat and Prepare: Preheat your oven to 375°F (190°C). Cook the jumbo pasta shells according to the package instructions until al dente. Drain and set aside to cool slightly.
- Sauté Spinach: In a large skillet over medium heat, add the olive oil and minced garlic. Sauté for about 1 minute until fragrant, then add the chopped spinach. Cook until the spinach is wilted, about 3-4 minutes. Remove from heat and let it cool slightly.
- Make the Filling: In a mixing bowl, combine ricotta cheese, 1/2 cup of the mozzarella cheese, 1/4 cup of the Parmesan cheese, the cooked spinach, egg, Italian seasoning, salt, and pepper. Mix until all ingredients are well incorporated.
- Stuff the Shells: Fill each pasta shell with the ricotta and spinach mixture using a spoon or a piping bag. Be generous with the filling, ensuring each shell is nicely packed.
- Assemble the Dish: Spread about 1 cup of the marinara sauce on the bottom of a 9×13 inch baking dish. Arrange the stuffed shells in a single layer over the sauce. Pour the remaining marinara sauce evenly over the top of the shells.
- Add More Cheese: Sprinkle the remaining mozzarella and Parmesan cheese over the shells, ensuring even coverage.
- Bake: Cover the dish with aluminum foil and bake in the preheated oven for 25 minutes. Remove the foil and bake for an additional 10-15 minutes, or until the cheese is bubbly and golden brown.
- Garnish and Serve: Remove from the oven and let the dish cool for a few minutes. Garnish with fresh basil leaves if desired. Serve warm.
Extra Tips: When boiling the pasta shells, be sure not to overcook them, as they’ll continue to cook in the oven.
If you’re preparing the dish ahead of time, you can stuff the shells and arrange them in the baking dish, then cover and refrigerate until you’re ready to bake. This can save you time on busy evenings.
Additionally, feel free to experiment with the filling by adding other ingredients such as sautéed mushrooms or cooked ground meat for added flavor and texture.
Grilled Ribeye Steak With Chimichurri
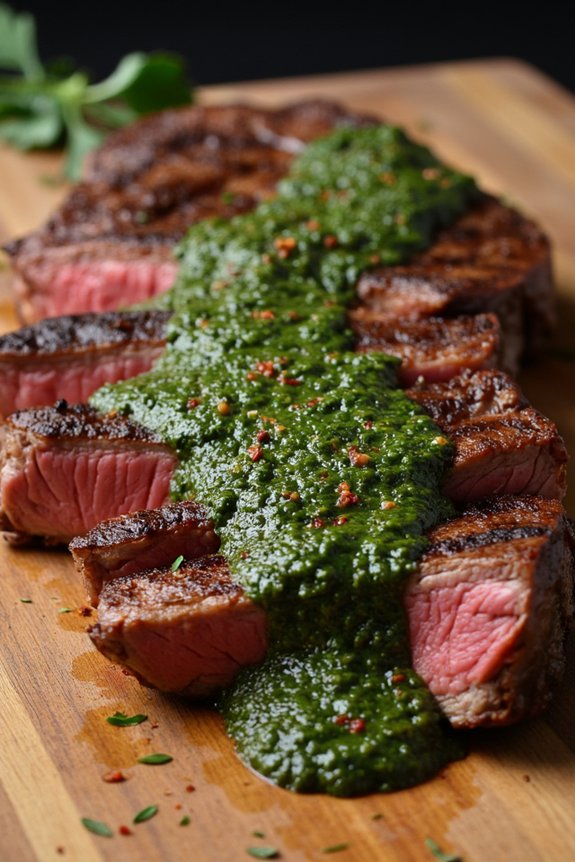
Grilled Ribeye Steak With Chimichurri is a delightful dish that combines the rich, juicy flavor of ribeye steak with the vibrant, herbaceous notes of chimichurri sauce. This meal is perfect for family dinners, offering a sophisticated yet straightforward approach to grilling. The ribeye, known for its marbling and tenderness, is complemented beautifully by the fresh, zesty chimichurri, enhancing the steak’s natural flavors while adding a touch of Argentine flair.
This dish isn’t only a feast for the taste buds but also a visual delight, with the vibrant green of the chimichurri contrasting against the perfectly grilled steak. Whether you’re a seasoned grill master or a beginner, this recipe is approachable and rewarding. The following recipe is designed to serve 4-6 people, making it ideal for gatherings and family meals.
Ingredients:
- 4 ribeye steaks, about 1 inch thick
- 1 teaspoon salt
- 1 teaspoon black pepper
- 1/2 cup red wine vinegar
- 1 teaspoon kosher salt
- 4 garlic cloves, minced
- 1 shallot, finely chopped
- 1/2 cup fresh parsley, finely chopped
- 1/4 cup fresh oregano, finely chopped
- 1/2 teaspoon red pepper flakes
- 1/2 cup olive oil
Cooking Instructions:
1. Prepare the Chimichurri: In a medium bowl, combine the red wine vinegar, kosher salt, minced garlic, and chopped shallot. Let it sit for about 10 minutes to allow the flavors to meld.
Then, stir in the parsley, oregano, and red pepper flakes. Finally, whisk in the olive oil until well combined. Set aside at room temperature to allow the flavors to develop further.
2. Season the Steaks: Pat the ribeye steaks dry with paper towels. Season both sides generously with salt and black pepper. Let them sit at room temperature for about 30 minutes before grilling. This will guarantee even cooking.
3. Preheat the Grill: Preheat your grill to high heat, approximately 450°F to 500°F. If using a charcoal grill, arrange the coals on one side for direct and indirect cooking zones.
4. Grill the Steaks: Place the steaks on the grill over direct heat. Grill for about 4-5 minutes on each side for medium-rare, adjusting the time if a different doneness is desired. Use a meat thermometer to check the internal temperature, aiming for 130°F for medium-rare.
5. Rest the Steaks: Remove the steaks from the grill and let them rest on a cutting board for at least 5 minutes. This allows the juices to redistribute, resulting in a more tender steak.
6. Serve: Slice the ribeye steaks against the grain and serve with a generous drizzle of chimichurri sauce on top. Enjoy with your favorite side dishes.
Extra Tips:
For the best results, make sure your steaks are at room temperature before grilling; this promotes even cooking.
If you prefer a bit of smokiness, consider adding a handful of wood chips to your grill. When making chimichurri, use fresh herbs for the most vibrant flavor.
If you have leftovers, chimichurri can be stored in the refrigerator for up to a week and can also be used as a marinade for other meats or as a dressing for salads.
Prosciutto-Wrapped Asparagus
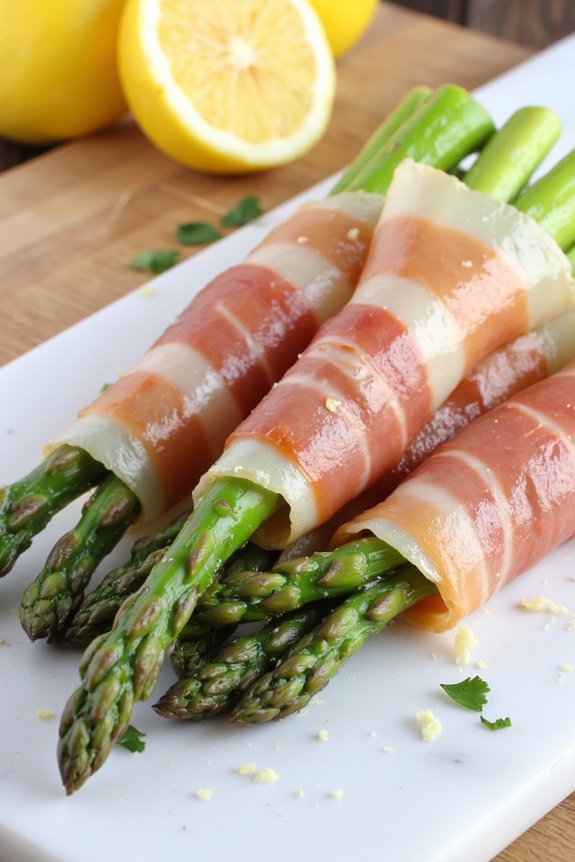
Prosciutto-wrapped asparagus is a delightful and elegant appetizer or side dish that’s perfect for family dinners. This recipe combines the earthy flavor of asparagus with the salty, savory taste of prosciutto, creating a harmonious blend that’s both flavorful and satisfying.
Whether you’re preparing a special occasion meal or a simple weekday dinner, this dish is bound to impress your family and guests alike. The preparation is straightforward, making it an excellent choice for both novice and experienced home cooks.
The key to making the perfect prosciutto-wrapped asparagus lies in selecting fresh, tender asparagus spears and high-quality prosciutto. The asparagus should be bright green and firm, while the prosciutto should be thinly sliced and pliable, allowing it to wrap easily around the spears.
When cooked, the prosciutto crisps up beautifully, providing a delightful contrast to the tender asparagus. This recipe serves 4-6 people, making it an ideal choice for a family dinner.
Ingredients (Serves 4-6):
- 1 pound fresh asparagus spears
- 8-12 slices of prosciutto
- 2 tablespoons olive oil
- Salt to taste
- Freshly ground black pepper to taste
- 1 lemon, cut into wedges, for serving
- Optional: 1/4 cup grated Parmesan cheese
Cooking Instructions:
- Preheat Oven: Preheat your oven to 400°F (200°C) to guarantee it’s hot and ready for baking.
- Prepare Asparagus: Wash the asparagus under cold water and trim the woody ends, about 1-2 inches from the bottom, to make sure they’re tender when cooked.
- Wrap Asparagus: Take each asparagus spear and wrap it with a slice of prosciutto. Start at the bottom and spiral the prosciutto around the spear, leaving the tips exposed. Repeat for all asparagus spears.
- Season and Arrange: Place the wrapped asparagus spears on a baking sheet. Drizzle with olive oil and season with salt and freshly ground black pepper to taste. Make sure the spears are arranged in a single layer for even cooking.
- Bake: Place the baking sheet in the preheated oven and bake for 15-18 minutes, or until the prosciutto is crispy and the asparagus is tender. If desired, sprinkle grated Parmesan cheese over the asparagus during the last 5 minutes of baking.
- Serve: Remove from the oven and transfer to a serving platter. Serve warm with lemon wedges on the side for added zest.
Extra Tips:
To guarantee the prosciutto crisps up nicely, avoid overlapping the wrapped asparagus spears on the baking sheet. This allows air to circulate and helps the prosciutto cook evenly.
If using thicker asparagus spears, you may need to increase the baking time slightly. Additionally, you can experiment with adding different herbs or spices, such as garlic powder or red pepper flakes, to enhance the flavor.
Enjoy this dish as a sophisticated starter or a delightful side to complement your main course.
Creamy Garlic Mashed Potatoes
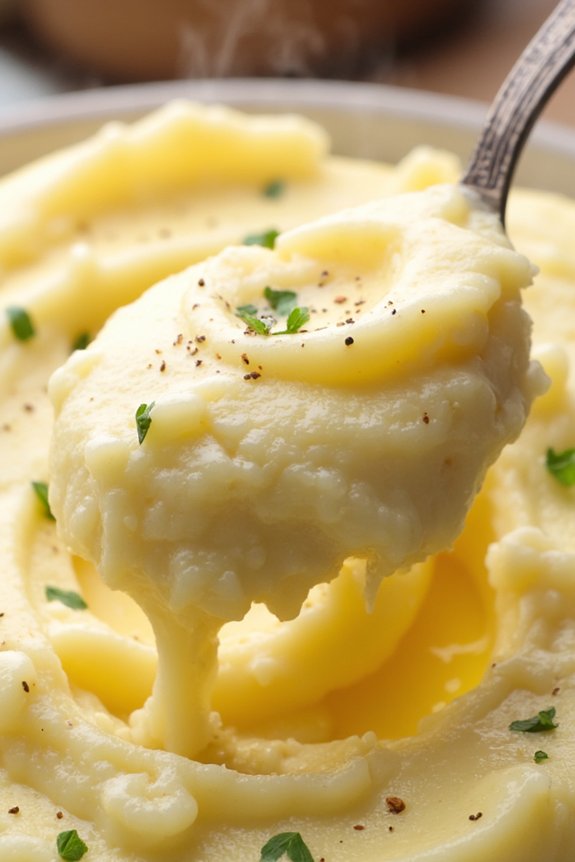
Creamy Garlic Mashed Potatoes are a classic comfort food that makes any family dinner extra special. This dish combines the smooth, rich texture of mashed potatoes with the savory, aromatic flavor of garlic, resulting in a side dish that pairs perfectly with any main course. Whether you’re serving a roast, grilled chicken, or a vegetarian main, these mashed potatoes will complement your meal beautifully.
The key to this dish is using the right type of potatoes and guaranteeing they’re cooked to perfection before mashing them with creamy ingredients and garlic.
To achieve the best Creamy Garlic Mashed Potatoes, you’ll need to start with starchy potatoes, such as Russet or Yukon Gold, which provide a fluffier texture. The garlic should be roasted or gently sautéed before being mixed with the potatoes, to bring out its natural sweetness and mellow flavor. The addition of butter and cream will transform the potatoes into a velvety masterpiece that melts in your mouth. This recipe serves 4-6 people, making it ideal for a family gathering or a cozy dinner party.
Ingredients:
- 3 pounds Russet or Yukon Gold potatoes
- 6 cloves garlic, peeled
- 1 cup heavy cream
- 1/2 cup unsalted butter
- Salt to taste
- Black pepper to taste
- Optional: Chopped fresh parsley for garnish
Instructions:
- Prepare the Potatoes: Peel the potatoes and cut them into evenly sized chunks. This guarantees that they cook evenly. Place the potatoes in a large pot and cover them with cold water. Add a pinch of salt to the water.
- Cook the Potatoes: Bring the pot to a boil over medium-high heat. Once boiling, reduce the heat to medium-low and let the potatoes simmer until they’re fork-tender, approximately 15-20 minutes.
- Prepare the Garlic: While the potatoes are cooking, gently sauté the garlic cloves in a small saucepan with a tablespoon of butter over low heat until they’re soft and fragrant, about 5 minutes. Be careful not to burn the garlic.
- Drain and Mash: Once the potatoes are cooked, drain them well and return them to the pot. Add the sautéed garlic, remaining butter, and heavy cream to the pot. Mash the potatoes using a potato masher or electric mixer until smooth and creamy.
- Season: Season the mashed potatoes with salt and black pepper to taste. Mix well to combine all the flavors.
- Serve: Transfer the mashed potatoes to a serving bowl. For an optional touch, sprinkle chopped fresh parsley over the top for a pop of color and added freshness.
Extra Tips:
For an ultra-smooth texture, consider passing the mashed potatoes through a potato ricer before adding the cream and butter. If you prefer a lighter version, you can substitute half-and-half for the heavy cream.
Be cautious with the amount of salt, as the butter may already have some salt content. Taste as you go and adjust the seasoning to your preference. If you want a more intense garlic flavor, consider roasting the garlic in the oven before adding it to the potatoes.
Caprese Salad With Balsamic Glaze
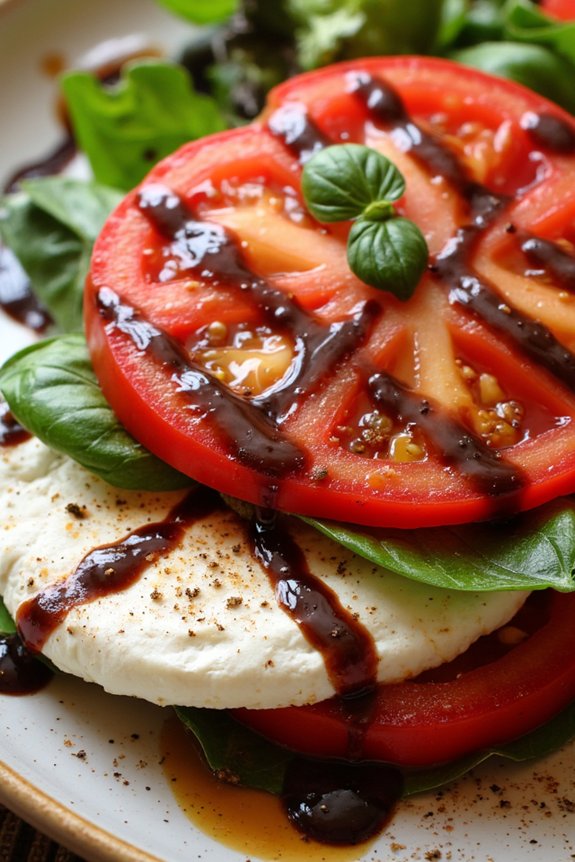
Caprese Salad With Balsamic Glaze is a timeless and invigorating dish that combines the rich flavors of ripe tomatoes, creamy mozzarella, and aromatic basil, all enhanced with a sweet and tangy balsamic glaze. This Italian classic is perfect as a starter or a light main course, and its vibrant colors make it a visually appealing addition to any family dinner table.
The simplicity of the ingredients highlights their natural flavors, creating a dish that feels both elegant and satisfying. Making a Caprese Salad With Balsamic Glaze is straightforward and requires minimal preparation, allowing you to focus on selecting the best quality ingredients.
Freshness is key to this salad, so choose tomatoes that are ripe but firm, mozzarella that has a soft yet resilient texture, and basil leaves that are bright green and aromatic. The balsamic glaze adds a delightful sweetness and depth of flavor, tying all the elements together into a harmonious dish. This recipe serves 4-6 people, making it perfect for a family gathering or a small dinner party.
Ingredients for 4-6 people:
- 4 large ripe tomatoes
- 1 pound fresh mozzarella cheese
- 1 cup fresh basil leaves
- 1/4 cup balsamic glaze
- 1/4 cup extra-virgin olive oil
- Salt to taste
- Freshly ground black pepper to taste
Instructions:
- Prepare the Ingredients: Begin by washing the tomatoes and basil leaves thoroughly under cold water. Pat them dry with a clean kitchen towel. Slice the tomatoes into 1/4 inch thick rounds and the mozzarella cheese into similar slices.
- Assemble the Salad: On a large serving platter, arrange the tomato and mozzarella slices alternately, slightly overlapping them. Tuck whole basil leaves between the layers, guaranteeing they’re evenly distributed throughout the salad.
- Season the Salad: Drizzle the extra-virgin olive oil evenly over the arranged slices. Sprinkle a generous pinch of salt and freshly ground black pepper over the entire salad to enhance the flavors of the tomatoes and mozzarella.
- Add the Balsamic Glaze: Pour the balsamic glaze in a thin stream over the salad. You can create a zigzag pattern or simply drizzle it lightly across the top, depending on your preference. The glaze will add a sweet and tangy contrast to the creamy and savory ingredients.
- Serve Immediately: For the best flavor, serve the Caprese Salad With Balsamic Glaze immediately. The freshness of the ingredients is most pronounced when served right away.
Extra Tips:
When making Caprese Salad With Balsamic Glaze, confirm that the mozzarella is at room temperature before assembling the salad, as this enhances its creamy texture.
If you prefer a homemade balsamic glaze, simply reduce balsamic vinegar on the stove until it thickens to the desired consistency. Additionally, consider using heirloom tomatoes for a more colorful presentation and a richer flavor profile. This dish pairs wonderfully with a crisp white wine or a light sparkling beverage.
Decadent Chocolate Lava Cake
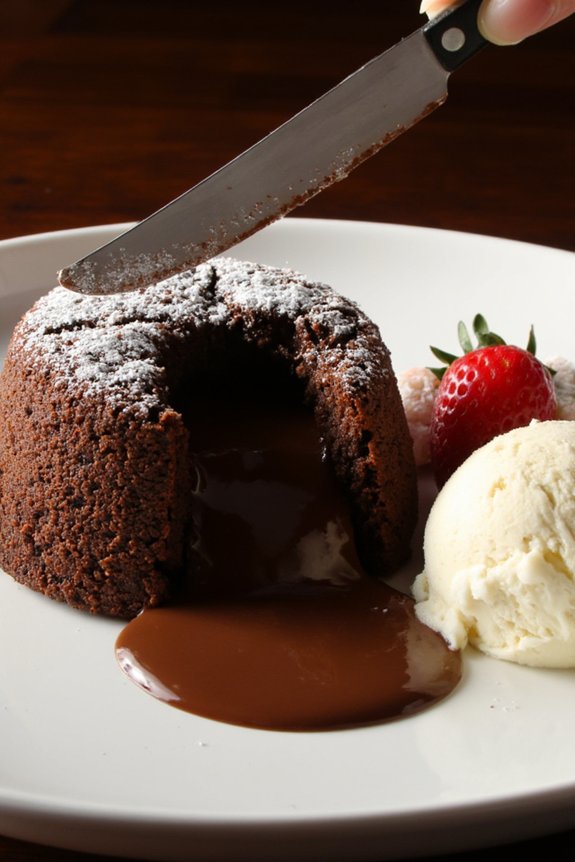
Indulge in the ultimate dessert experience with this Decadent Chocolate Lava Cake, a perfect ending to any family dinner. This rich and gooey treat combines the deep flavors of dark chocolate with a soft, molten center that oozes with every bite.
Whether you’re celebrating a special occasion or simply want to surprise your loved ones with a delightful treat, this recipe is sure to impress both chocolate lovers and casual dessert enthusiasts alike. Best of all, it’s simpler to prepare than it might appear, making it an ideal choice for both novice bakers and seasoned chefs.
To achieve the perfect lava cake, you’ll need to balance a crisp outer layer with a flowing, chocolatey center. This is done by baking the cakes at a high temperature for a short period. The key is to remove them from the oven at just the right moment to guarantee that the centers remain liquid.
When made correctly, cutting into the cake will reveal a luscious, molten core, a true proof of the decadence of this dessert. Serve it with a scoop of vanilla ice cream or a dollop of whipped cream for an added touch of luxury.
Ingredients (Serves 4-6 people):
- 1 cup unsalted butter
- 1 cup high-quality dark chocolate, chopped
- 1/2 cup all-purpose flour
- 1 1/2 cups powdered sugar
- 4 large eggs
- 4 large egg yolks
- 1 teaspoon vanilla extract
- 1/4 teaspoon salt
- Butter for greasing ramekins
- Cocoa powder for dusting ramekins
Cooking Instructions:
- Preheat the Oven: Preheat your oven to 425°F (220°C). This high temperature is essential for forming the cake’s outer crust while keeping the center molten.
- Prepare Ramekins: Generously grease 6 ramekins with butter and dust them with cocoa powder. This helps the cakes release easily once baked.
- Melt the Chocolate and Butter: In a heatproof bowl set over a pot of simmering water, melt the butter and chopped dark chocolate together. Stir occasionally until smooth, then set aside to cool slightly.
- Mix Dry Ingredients: In a separate bowl, whisk together the all-purpose flour, powdered sugar, and salt until well combined.
- Combine Ingredients: In a large mixing bowl, beat the eggs and egg yolks until fluffy. Add the vanilla extract and slowly incorporate the melted chocolate mixture, whisking continuously. Gradually fold in the dry ingredients, mixing until just combined.
- Fill the Ramekins: Evenly divide the batter among the prepared ramekins, filling each about three-quarters full.
- Bake: Place the ramekins on a baking sheet and bake in the preheated oven for 12-14 minutes. The edges should be firm, but the center will still look soft and jiggly.
- Cool Slightly: Remove from the oven and let the cakes cool in the ramekins for about 1-2 minutes. This allows them to set slightly, making it easier to invert.
- Serve: Carefully run a knife around the edges of each cake, then invert onto a plate. Serve immediately with your choice of topping.
Extra Tips:
For the best results, use high-quality chocolate with at least 70% cocoa content, as this will provide a richer and more intense flavor. If the cakes are left in the oven even slightly too long, the center can solidify, so keep a close eye on them during baking.
The batter can be prepared ahead of time and stored in the refrigerator for up to a day, making it easy to bake just before serving. Adjust baking time slightly depending on your oven and the size of your ramekins, and always test one cake first if you’re uncertain about the timing.
Enjoy your Decadent Chocolate Lava Cake with a sprinkle of powdered sugar or a fresh berry garnish for an added touch of elegance.
Classic New York Cheesecake

Indulge in the rich and creamy delight of a Classic New York Cheesecake, a perfect recipe to crown any family dinner. Known for its dense and smooth texture, this cheesecake will captivate your senses with each bite. The secret to its allure lies in the balance of flavors and the perfect baking technique, resulting in a dessert that’s both elegant and comforting.
Whether you’re a seasoned baker or a novice in the kitchen, this recipe will guide you through the process of creating a luscious cheesecake that’s sure to impress your loved ones. Originating from the bustling streets of New York, this cheesecake has become a culinary icon, cherished for its simplicity and decadence.
The recipe features a classic graham cracker crust that complements the creamy filling, made from cream cheese, sugar, and a hint of vanilla. Baked to perfection, this cheesecake is finished with a glossy sour cream topping that adds a tangy contrast to the sweet, velvety interior. Follow the steps below to create a Classic New York Cheesecake that serves 4-6 people, ideal for sharing around the dinner table.
Ingredients:
- 1 1/2 cups graham cracker crumbs
- 1/4 cup unsalted butter, melted
- 4 (8-ounce) packages cream cheese, softened
- 1 1/4 cups granulated sugar
- 1 teaspoon vanilla extract
- 4 large eggs
- 1/2 cup sour cream
- 1/4 cup all-purpose flour
- 1/4 teaspoon salt
- 1 cup sour cream (for topping)
- 2 tablespoons sugar (for topping)
- 1 teaspoon vanilla extract (for topping)
Instructions:
- Prepare the Crust: Preheat your oven to 325°F (160°C). In a medium bowl, mix the graham cracker crumbs with the melted butter until well combined. Press the mixture firmly into the bottom of a 9-inch springform pan to form an even layer. Bake the crust for 10 minutes, then let it cool completely.
- Make the Filling: In a large mixing bowl, beat the softened cream cheese with an electric mixer until smooth and creamy. Add the granulated sugar and vanilla extract, and continue to beat until well combined. Add the eggs one at a time, beating well after each addition. Mix in the sour cream, flour, and salt until the filling is smooth and well incorporated.
- Assemble the Cheesecake: Pour the cream cheese filling over the cooled crust in the springform pan, spreading it evenly with a spatula. Tap the pan gently on the counter to remove any air bubbles.
- Bake the Cheesecake: Place the springform pan on a baking sheet to catch any drips. Bake the cheesecake in the preheated oven for 55-60 minutes, or until the center is set but still slightly jiggly.
- Prepare the Topping: In a small bowl, mix together the sour cream, sugar, and vanilla extract for the topping. Once the cheesecake is baked, remove it from the oven and spread the sour cream mixture evenly over the top.
- Cool and Chill: Allow the cheesecake to cool at room temperature for about 1 hour. Then, refrigerate it for at least 4 hours or overnight to fully set.
- Serve: Once properly chilled, run a knife around the edge of the pan to loosen the cheesecake and carefully remove the sides of the springform pan. Slice and serve your Classic New York Cheesecake to your family and enjoy!
Extra Tips:
For the best results, make sure that all your ingredients are at room temperature before starting, as this will lead to a smoother filling. When mixing the filling, avoid overbeating as it can incorporate too much air, causing the cheesecake to crack.
If you notice any cracks, the sour cream topping is a great way to cover them while adding extra flavor. Finally, use a water bath during baking to create a moist environment, which helps in preventing cracks and guarantees even baking. Enjoy your delightful creation!