

Creating an elegant family dinner can feel like setting the stage for a truly special evening. The aroma of Herb-Crusted Rack of Lamb mingling with the zesty notes of Lemon Garlic Butter Shrimp Pasta is a sensory delight. These recipes are perfect for turning an ordinary meal into something extraordinary. If you’re looking to add a touch of sophistication to your meals, these ideas might become your new favorites. Let’s explore these delightful recipes together.
Herb-Crusted Rack of Lamb
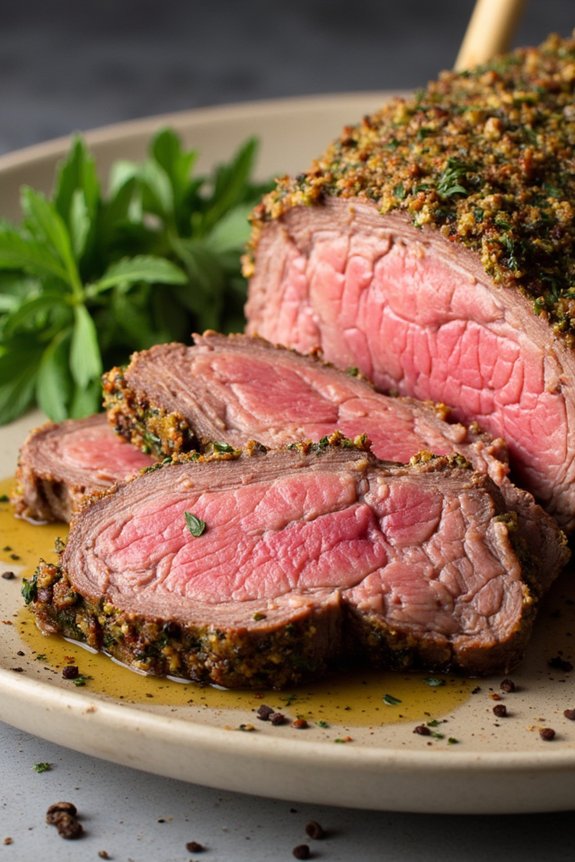
Herb-Crusted Rack of Lamb is a delectable and elegant dish perfect for a family dinner. This recipe combines the rich, succulent flavor of lamb with a savory herb crust that enhances the natural taste of the meat. The herbs create a fragrant crust that locks in moisture, guaranteeing that each bite is tender and juicy.
Whether you’re hosting a special occasion or simply want to treat your family to something extraordinary, this dish is sure to impress. This recipe is designed to serve 4-6 people, making it ideal for a family gathering. The preparation involves marinating the lamb, coating it with a flavorful herb mixture, and roasting it to perfection.
With a few simple ingredients and careful attention to detail, you’ll create a meal that’s as beautiful to look at as it’s delicious to eat. Pair it with your favorite sides, like roasted vegetables or garlic mashed potatoes, to complete the meal.
Ingredients:
- 2 racks of lamb, frenched (about 1.5-2 lbs each)
- 2 tablespoons olive oil
- Salt and pepper to taste
- 1 cup fresh breadcrumbs
- 1/4 cup fresh parsley, finely chopped
- 2 tablespoons fresh rosemary, finely chopped
- 2 tablespoons fresh thyme, finely chopped
- 4 cloves garlic, minced
- 2 tablespoons Dijon mustard
Cooking Instructions:
- Preheat and Prepare: Preheat your oven to 400°F (200°C). Season the lamb racks generously with salt and pepper. Allow them to sit at room temperature for about 30 minutes to guarantee even cooking.
- Create the Herb Crust: In a mixing bowl, combine the breadcrumbs, parsley, rosemary, thyme, and minced garlic. Add a pinch of salt and pepper to season. Drizzle with olive oil and mix until the breadcrumbs are evenly coated and the mixture is fragrant.
- Sear the Lamb: Heat 1 tablespoon of olive oil in a large oven-safe skillet over medium-high heat. Once hot, sear the lamb racks fat-side down until they’re browned, about 2-3 minutes. Flip and sear the other side for an additional 2 minutes. Remove from heat.
- Apply the Mustard and Herb Crust: Brush the seared lamb racks with Dijon mustard. Press the herb mixture onto the mustard-coated lamb, ensuring an even layer that adheres well.
- Roast the Lamb: Place the herb-crusted racks in the preheated oven. Roast for 15-20 minutes, depending on your preferred level of doneness (15 minutes for medium-rare). Use a meat thermometer to check for an internal temperature of 130°F (54°C) for medium-rare.
- Rest and Serve: Remove the lamb from the oven and let it rest for 10 minutes before slicing. This allows the juices to redistribute, guaranteeing tender and juicy meat. Slice between the bones and serve immediately.
Extra Tips: When selecting lamb racks, look for ones with a good ratio of meat to fat, as the fat helps keep the meat moist during cooking. If you prefer a more well-done lamb, adjust the roasting time accordingly, but be cautious not to overcook, as lamb can become dry.
The quality of the herbs will greatly impact the flavor, so use fresh herbs whenever possible. If you don’t have fresh herbs, dried ones can be used, but reduce the quantity by half, as dried herbs are more potent.
Lemon Garlic Butter Shrimp Pasta
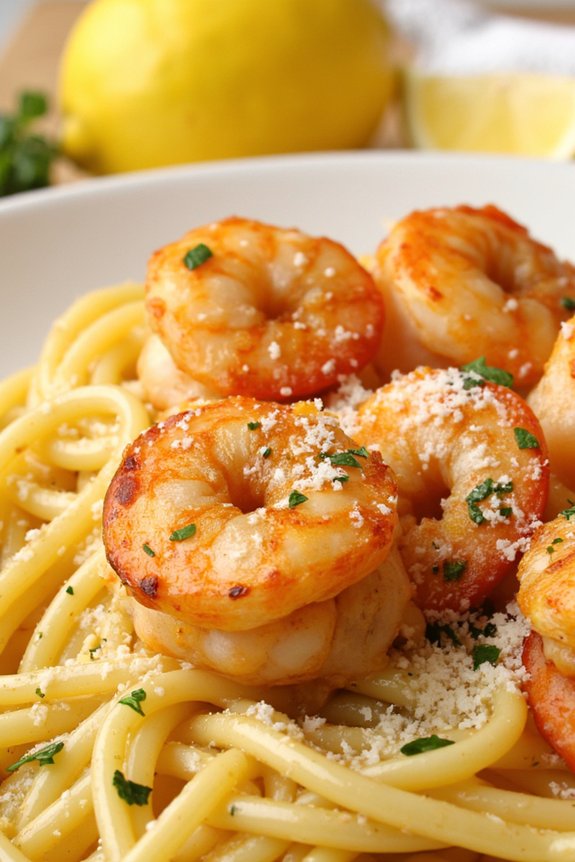
Lemon Garlic Butter Shrimp Pasta is a delightful dish that combines the richness of butter, the zestiness of lemon, and the savory goodness of shrimp. This recipe brings together a harmony of flavors that will please the whole family, making it a perfect option for a cozy dinner at home. The succulent shrimp, coated in a luscious lemon garlic butter sauce, pairs beautifully with the pasta, creating a dish that’s both satisfying and invigorating.
Whether you’re looking to impress guests or simply enjoy a delicious meal with loved ones, this recipe is sure to become a favorite. This dish isn’t only flavorful but also relatively easy to prepare, making it ideal for busy weeknights or spontaneous dinner plans. With a cooking time of approximately 30 minutes, you can have a restaurant-quality meal on the table in no time.
The combination of fresh ingredients and simple cooking techniques allows each component to shine, resulting in a dish that’s wholesome and comforting. Follow the steps below to create a Lemon Garlic Butter Shrimp Pasta that serves 4-6 people.
Ingredients:
- 1 lb (450g) large shrimp, peeled and deveined
- 12 oz (340g) spaghetti or linguine
- 4 tablespoons unsalted butter
- 4 cloves garlic, minced
- Zest and juice of 1 large lemon
- 1/4 cup (60ml) chicken or vegetable broth
- 1/2 teaspoon red pepper flakes (optional)
- Salt and pepper to taste
- 1/4 cup (25g) freshly grated Parmesan cheese
- 2 tablespoons chopped fresh parsley
- Lemon wedges, for serving
Cooking Instructions:
- Cook the Pasta: Bring a large pot of salted water to a boil. Add the spaghetti or linguine and cook according to the package instructions until al dente. Reserve 1 cup of pasta water, then drain the pasta and set aside.
- Prepare the Shrimp: While the pasta is cooking, season the shrimp with salt and pepper. In a large skillet over medium heat, melt 2 tablespoons of butter. Add the shrimp to the skillet and cook for about 2-3 minutes on each side, or until pink and opaque. Remove the shrimp from the skillet and set aside.
- Make the Sauce: In the same skillet, add the remaining 2 tablespoons of butter. Add the minced garlic and cook for about 1 minute until fragrant. Stir in the lemon zest, lemon juice, and chicken broth. Bring to a simmer and cook for 2-3 minutes to allow the flavors to meld.
- Combine Pasta and Shrimp: Return the cooked shrimp to the skillet along with the cooked pasta. Toss everything together to coat in the sauce. If the pasta seems dry, add some of the reserved pasta water a little at a time until you reach the desired consistency.
- Finish the Dish: Stir in the red pepper flakes, if using, and season with additional salt and pepper to taste. Remove the skillet from heat and toss in the Parmesan cheese and fresh parsley. Mix until the cheese is melted and the pasta is evenly coated.
- Serve: Transfer the pasta to serving plates and garnish with extra parsley and lemon wedges. Serve immediately with additional Parmesan cheese on the side.
Extra Tips:
When preparing Lemon Garlic Butter Shrimp Pasta, make sure to use fresh shrimp for the best flavor and texture. If you prefer a spicier dish, feel free to increase the amount of red pepper flakes.
The reserved pasta water is a great way to adjust the sauce’s thickness, so don’t skip this step. Additionally, using freshly grated Parmesan cheese enhances the overall taste of the dish. For added convenience, you can prepare the sauce while the pasta is cooking, ensuring a seamless cooking process. Enjoy this dish with a side salad or garlic bread for a complete meal.
Balsamic Glazed Chicken
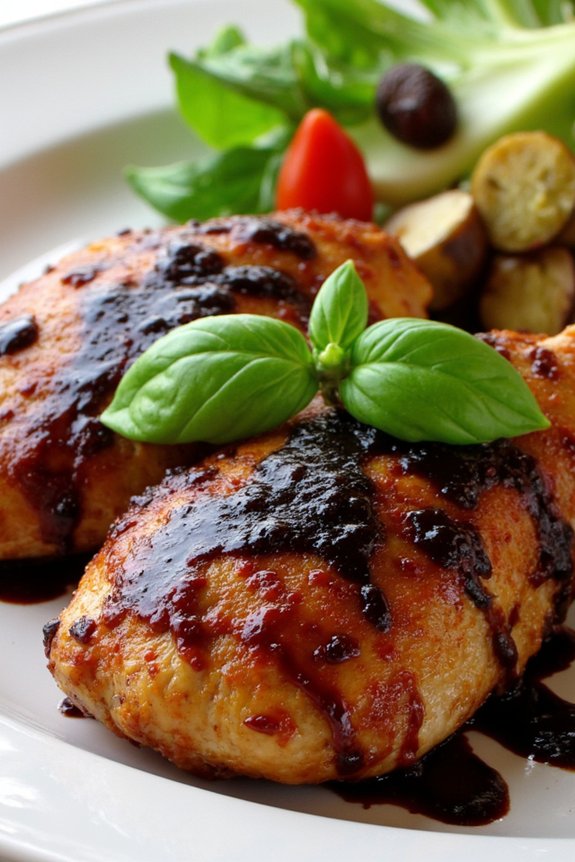
Balsamic Glazed Chicken is a delightful dish that combines the savory goodness of chicken with the sweet and tangy notes of balsamic vinegar. This dish is perfect for a family dinner, offering a wonderful blend of flavors that’s certain to please everyone’s palate. The chicken is cooked to perfection, with a beautiful glaze that enhances the natural flavor of the meat.
Whether you’re looking for a quick weeknight meal or a special dish for a family gathering, Balsamic Glazed Chicken is an excellent choice. This recipe serves 4-6 people, making it ideal for a family dinner. The ingredients are simple and likely already in your pantry, and the cooking process is straightforward, allowing you to have a delicious meal on the table in under an hour.
The balsamic glaze not only adds a rich flavor to the chicken but also gives it a beautiful, appetizing shine that makes the dish look as good as it tastes.
Ingredients:
- 4-6 boneless, skinless chicken breasts
- 1/2 cup balsamic vinegar
- 2 tablespoons honey
- 2 tablespoons olive oil
- 4 cloves garlic, minced
- 1 teaspoon dried thyme
- Salt and pepper to taste
- Fresh basil leaves for garnish (optional)
Cooking Instructions:
- Prepare the Chicken: Season the chicken breasts with salt and pepper on both sides. Set aside while you prepare the glaze.
- Make the Balsamic Glaze: In a small saucepan, combine the balsamic vinegar, honey, minced garlic, and dried thyme. Bring the mixture to a simmer over medium heat, stirring occasionally, until the glaze thickens and slightly reduces, about 5-7 minutes. Remove from heat and set aside.
- Cook the Chicken: In a large skillet, heat the olive oil over medium-high heat. Add the chicken breasts and cook until browned on one side, about 4-5 minutes. Flip the chicken breasts over and continue cooking until the other side is browned, about another 4-5 minutes.
- Glaze the Chicken: Reduce the heat to medium-low and pour the balsamic glaze over the chicken breasts. Cook for an additional 5-7 minutes, occasionally spooning the glaze over the chicken, until the chicken is cooked through and the glaze is sticky and coats the chicken well.
- Serve: Remove the chicken from the skillet and let it rest for a few minutes before slicing. Garnish with fresh basil leaves if desired. Serve the balsamic glazed chicken with your favorite side dishes.
Extra Tips:
For the best results, verify that the chicken breasts are of even thickness to promote even cooking. If needed, you can pound the chicken to achieve uniform thickness.
Be careful not to over-reduce the balsamic glaze, as it can become too thick and sticky. If this happens, add a little water to thin it out. Additionally, fresh basil leaves not only add a pop of color but also enhance the flavor, so don’t skip them if you have some on hand.
Enjoy your Balsamic Glazed Chicken with a side of roasted vegetables or a fresh salad for a complete meal.
Truffle Mushroom Risotto
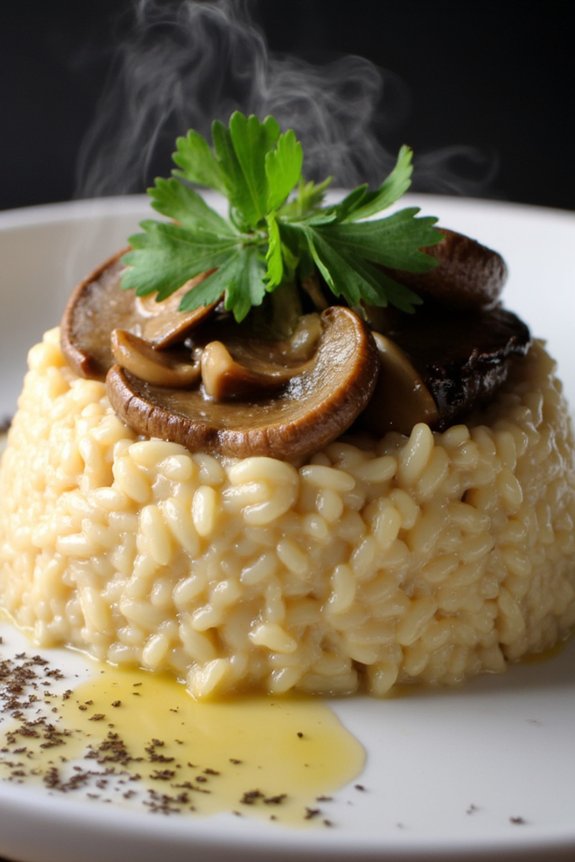
Truffle Mushroom Risotto is a luxurious and creamy dish that brings together the earthy flavors of mushrooms and the distinct aroma of truffle oil. This Italian classic is perfect for a family dinner, offering a comforting and satisfying meal that’s both elegant and easy to prepare.
The creamy texture of the arborio rice, paired with the umami-rich mushrooms and the decadent touch of truffle, makes this dish a favorite among both kids and adults.
Preparing Truffle Mushroom Risotto requires patience and attention, as the secret to perfect risotto lies in the gradual addition of broth and constant stirring. This method releases the starches from the rice, creating a rich, velvety texture.
The combination of fresh mushrooms, white wine, and a hint of truffle oil elevates the dish to an exquisite level. Whether served as a main course or a side, this risotto is sure to impress.
Ingredients (Serves 4-6 people):
- 2 cups arborio rice
- 1 cup finely chopped onion
- 2 tablespoons olive oil
- 1 cup dry white wine
- 6 cups vegetable or chicken broth, kept warm
- 2 cups assorted fresh mushrooms (such as cremini, shiitake, or button), sliced
- 2 tablespoons unsalted butter
- 1 cup grated Parmesan cheese
- 2 tablespoons truffle oil
- Salt and pepper to taste
- Fresh parsley, chopped, for garnish
Cooking Instructions:
- Prepare the Base: Begin by heating the olive oil in a large, heavy-bottomed pot over medium heat. Add the chopped onion and sauté until translucent, about 5 minutes.
- Cook the Mushrooms: Add the sliced mushrooms to the pot and cook until they’re soft and any liquid they release has evaporated, approximately 8-10 minutes. Remove and set aside half of the mushrooms for garnish later.
- Toast the Rice: Stir in the arborio rice and cook for 2-3 minutes, stirring constantly, until the rice is lightly toasted and coated in oil.
- Deglaze with Wine: Pour in the white wine, stirring continuously, until the wine is absorbed completely by the rice.
- Add Broth Gradually: Begin adding the warm broth, one ladleful at a time, allowing each addition to be absorbed before adding the next. Stir frequently to prevent sticking. This process will take about 20-25 minutes.
- Incorporate Cheese and Truffle Oil: Once the risotto is creamy and the rice is al dente, remove from heat. Stir in the butter, Parmesan cheese, and truffle oil until well combined. Season with salt and pepper to taste.
- Garnish and Serve: Serve the risotto immediately, topped with the reserved mushrooms and a sprinkle of fresh parsley.
Extra Tips:
For the best flavor, choose high-quality truffle oil and fresh, seasonal mushrooms. Be mindful not to overcook the rice; it should have a slight bite to it, known as “al dente.”
If you prefer a richer taste, you can substitute some of the broth with additional wine. Adjust the seasoning at the end, as the Parmesan cheese can add a significant amount of saltiness. Always serve risotto immediately, as it tends to thicken as it cools.
Beef Wellington Bites
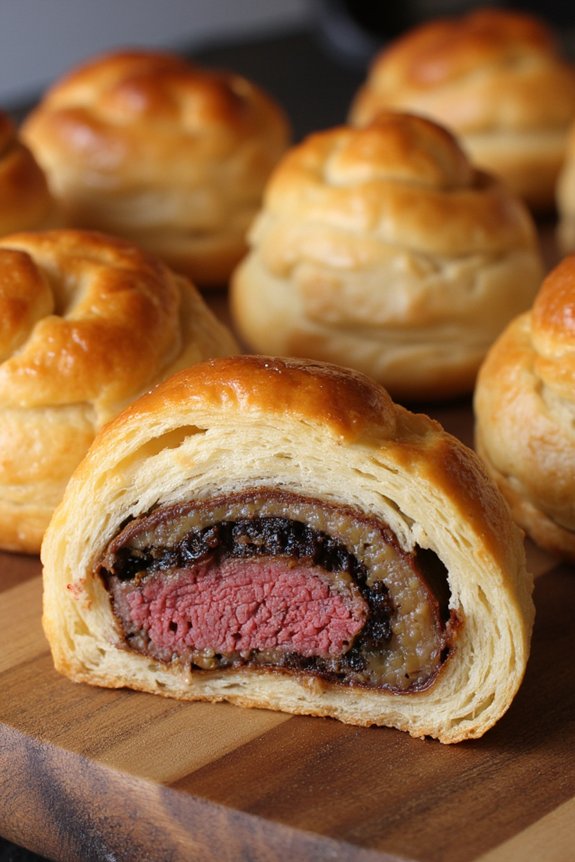
Beef Wellington Bites offer a delightful twist on the classic Beef Wellington, perfect for family dinners or as an elegant appetizer for gatherings. These miniature versions capture the essence of the original dish with tender beef, savory mushrooms, and flaky puff pastry, all in a bite-sized package. The compact nature of the bites makes them easy to serve and enjoy, guaranteeing each guest experiences the harmonious flavors in every mouthful.
The preparation involves wrapping succulent beef tenderloin pieces in a flavorful mushroom duxelles, all encased in golden, buttery puff pastry. These bites aren’t only visually appealing but also burst with rich flavors, making them a hit at any dinner table. Whether you’re hosting a family dinner or a festive party, Beef Wellington Bites are sure to impress your guests with their taste and presentation.
Ingredients for 4-6 servings:
- 1 lb beef tenderloin, cut into 1-inch cubes
- 2 tablespoons olive oil
- Salt and pepper to taste
- 1 cup mushrooms, finely chopped
- 1 shallot, finely chopped
- 2 cloves garlic, minced
- 2 tablespoons butter
- 1 tablespoon Dijon mustard
- 1 tablespoon fresh thyme, chopped
- 1 sheet puff pastry, thawed
- 1 egg, beaten
Cooking Instructions:
- Preparation of Beef: Begin by seasoning the beef tenderloin cubes with salt and pepper. Heat olive oil in a skillet over medium-high heat. Sear the beef cubes for about 1-2 minutes on each side until browned. Remove from skillet and set aside to cool.
- Mushroom Duxelles: In the same skillet, melt butter over medium heat. Add chopped mushrooms, shallots, and garlic. Sauté until the mixture is soft and all moisture has evaporated, about 10 minutes. Stir in Dijon mustard and thyme, then remove from heat and let cool.
- Assembling the Bites: Preheat your oven to 400°F (200°C). Roll out the puff pastry on a floured surface and cut it into squares large enough to wrap around each beef cube. Spread a small amount of mushroom duxelles on each square, place a beef cube on top, and fold the pastry over to enclose it completely. Pinch the seams to seal.
- Baking: Place the wrapped beef bites seam-side down on a baking sheet lined with parchment paper. Brush the tops with beaten egg to give them a golden finish. Bake in the preheated oven for 15-20 minutes, or until the pastry is puffed and golden brown.
- Serving: Allow the Beef Wellington Bites to cool slightly before serving. They can be served warm or at room temperature.
Extra Tips:
For best results, confirm that all components are cooled before assembling the bites to prevent the puff pastry from becoming soggy. You can prepare the mushroom duxelles and sear the beef in advance, refrigerating them until you’re ready to assemble.
If you prefer, you can use store-bought puff pastry, but verify it’s fully thawed before use. Finally, these bites can be customized with additional herbs or a touch of truffle oil for an extra layer of flavor.
Pistachio-Crusted Salmon
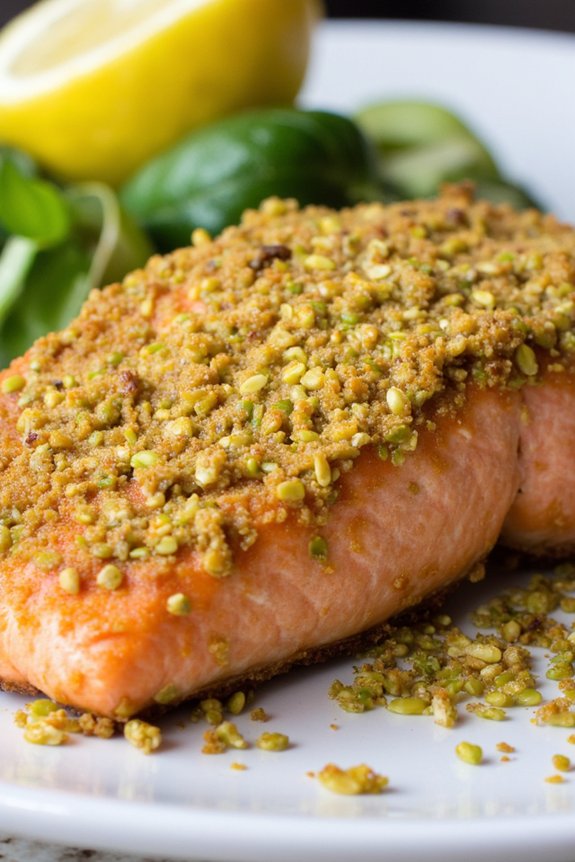
If you’re seeking a deliciously healthy and elegant meal to serve at your family dinner, search no more than Pistachio-Crusted Salmon. This dish combines the rich, buttery flavor of salmon with the nutty, slightly sweet crunch of pistachios for a taste sensation that’s both satisfying and nutritious.
Not only is this dish packed with omega-3 fatty acids and protein, but it’s also incredibly easy to prepare, making it perfect for a special occasion or a weeknight dinner. Salmon’s tender, flaky texture pairs beautifully with the crispness of the pistachio crust, creating a contrast of textures that’s sure to delight your taste buds.
The recipe calls for a simple blend of ingredients that come together to create a dish that’s both visually appealing and palate-pleasing. This recipe is designed to serve 4-6 people, making it an ideal choice for a family gathering or dinner party.
Ingredients (Serves 4-6 people):
- 4-6 salmon fillets (approximately 1 1/2 pounds total)
- 1 cup shelled pistachios
- 1/2 cup panko breadcrumbs
- 2 tablespoons Dijon mustard
- 2 tablespoons honey
- 1 tablespoon olive oil
- Salt and pepper to taste
- Lemon wedges for serving
Instructions:
- Preheat the Oven: Preheat your oven to 375°F (190°C). Line a baking sheet with parchment paper or lightly grease it with olive oil to prevent the salmon from sticking.
- Prepare the Pistachio Crust: In a food processor, combine the pistachios and panko breadcrumbs. Pulse until the mixture is finely ground but still has some texture. Transfer the mixture to a shallow dish and set aside.
- Mix the Mustard Sauce: In a small bowl, whisk together the Dijon mustard, honey, and olive oil until well combined. This mixture will help the pistachio crust adhere to the salmon.
- Season the Salmon: Pat the salmon fillets dry with paper towels, then season both sides with salt and pepper. Place the fillets on the prepared baking sheet, skin-side down if applicable.
- Coat the Salmon: Brush the top of each salmon fillet with the mustard sauce, ensuring an even coating. Gently press the pistachio mixture onto the mustard-coated side of the salmon, covering it completely.
- Bake the Salmon: Place the baking sheet in the preheated oven and bake for 12-15 minutes, or until the salmon is cooked through and the pistachio crust is golden brown. The cooking time may vary depending on the thickness of your fillets, so check for doneness with a fork. The salmon should flake easily when done.
- Serve: Remove the salmon from the oven and let it rest for a few minutes. Serve with lemon wedges on the side for an added burst of freshness.
Extra Tips:
For the best results, choose fresh, high-quality salmon fillets. If pistachios are unavailable, other nuts like almonds or walnuts can be used as substitutes, though it will alter the flavor profile slightly.
When processing the pistachios and breadcrumbs, be careful not to over-process to maintain some texture. If you prefer a spicier kick, consider adding a pinch of cayenne pepper to the mustard mixture.
Finally, keep an eye on the salmon while baking to avoid overcooking, as this can lead to a dry texture.
Spinach and Feta Stuffed Chicken Breasts

Spinach and Feta Stuffed Chicken Breasts is a delightful dish that combines savory flavors with a nutritious profile, making it a perfect addition to any family dinner. The tender chicken breasts are filled with a rich mixture of spinach, creamy feta cheese, and aromatic herbs, then baked to perfection. This dish not only looks impressive but also offers a burst of flavors that will leave your family asking for more.
Whether you’re hosting a gathering or simply preparing a special meal for your loved ones, this recipe promises to be a hit. Ideal for serving 4-6 people, this recipe is straightforward yet yields a sophisticated result. The key to success lies in balancing the creamy filling with the juicy chicken, guaranteeing each bite is as satisfying as the last.
The process involves preparing the filling, stuffing the chicken, and baking it to golden perfection. Enjoy this dish with a side of roasted vegetables or a fresh salad for a complete and balanced meal.
Ingredients:
- 4 large boneless, skinless chicken breasts
- 1 tablespoon olive oil
- 2 cups fresh spinach, chopped
- 1 cup crumbled feta cheese
- 1 tablespoon fresh dill, chopped (optional)
- 1 teaspoon garlic powder
- 1 teaspoon onion powder
- 1 teaspoon dried oregano
- Salt and pepper to taste
- Toothpicks or kitchen twine
Cooking Instructions:
1. Preheat the Oven: Begin by preheating your oven to 375°F (190°C). This guarantees that the oven is at the right temperature when you’re ready to bake the chicken.
2. Prepare the Filling: In a medium-sized skillet, heat 1 tablespoon of olive oil over medium heat. Add the chopped spinach and sauté until wilted, which should take about 2-3 minutes.
Transfer the wilted spinach to a bowl and let it cool slightly. Once cool, mix in the crumbled feta cheese, fresh dill (if using), garlic powder, onion powder, and oregano. Season with salt and pepper to taste.
3. Prepare the Chicken Breasts: Using a sharp knife, carefully make a pocket in each chicken breast by cutting horizontally, being careful not to cut all the way through. This will create a space to hold the filling.
4. Stuff the Chicken: Spoon the spinach and feta mixture into each chicken breast pocket. Secure the openings with toothpicks or kitchen twine to guarantee the filling stays inside while cooking.
5. Bake the Chicken: Place the stuffed chicken breasts in a baking dish and drizzle with a bit of olive oil to keep them moist. Bake in the preheated oven for 25-30 minutes, or until the chicken is cooked through and the juices run clear. The internal temperature should reach 165°F (74°C).
6. Serve and Enjoy: Once cooked, remove the chicken from the oven and let it rest for a few minutes. Carefully remove the toothpicks or twine before serving. Serve the stuffed chicken breasts alongside your choice of sides.
Extra Tips:
For an even more flavorful dish, marinate the chicken breasts in olive oil, lemon juice, and herbs for a few hours before stuffing and baking. This will infuse the chicken with additional flavor and keep it moist.
Additionally, feel free to experiment with different cheeses or herbs in the filling to suit your taste preferences. If you’re short on time, you can also prepare the filling a day in advance and store it in the refrigerator until ready to use.
Prosciutto-Wrapped Asparagus
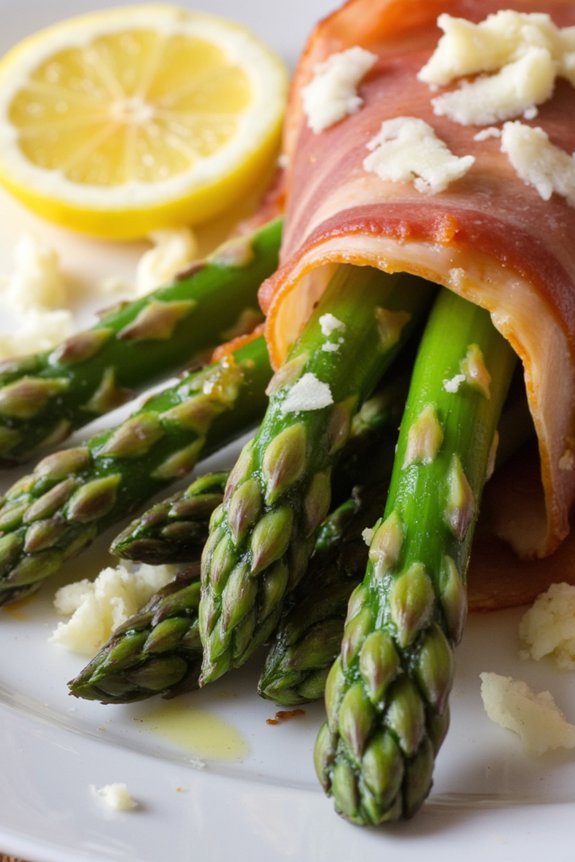
Prosciutto-wrapped asparagus is a delightful and elegant dish that’s perfect for family dinners or special occasions. The combination of tender asparagus spears and salty prosciutto creates a harmonious blend of flavors and textures that will please even the pickiest eaters.
This dish not only looks impressive but is also incredibly easy to prepare, making it a go-to option for busy weeknights or last-minute gatherings. The savory prosciutto crisps up in the oven, enveloping the asparagus in a delightful salty embrace, while the asparagus remains perfectly tender with a subtle crunch.
It’s a versatile dish that can be served as an appetizer, side dish, or even a main course. With just a few ingredients and minimal prep time, you can create a dish that’s both sophisticated and satisfying.
Ingredients for 4-6 servings:
- 1 lb (about 20 spears) fresh asparagus, trimmed
- 1 tablespoon olive oil
- Salt and pepper to taste
- 12 slices of prosciutto
- 1/4 cup grated Parmesan cheese (optional)
- Lemon wedges for serving (optional)
Instructions:
- Preheat the Oven: Preheat your oven to 400°F (200°C) and line a baking sheet with parchment paper or lightly grease it.
- Prepare the Asparagus: Wash the asparagus and trim the tough ends. Lightly drizzle with olive oil, then sprinkle with salt and pepper to taste. Toss to guarantee all spears are evenly coated.
- Wrap with Prosciutto: Take a slice of prosciutto and wrap it tightly around each asparagus spear, starting from the bottom and spiraling up to the tip. Repeat until all asparagus spears are wrapped.
- Bake: Arrange the prosciutto-wrapped asparagus in a single layer on the prepared baking sheet. Bake in the preheated oven for 15-20 minutes, or until the prosciutto is crisp and the asparagus is tender.
- Add Cheese (Optional): If using Parmesan cheese, sprinkle it over the asparagus during the last 5 minutes of baking, allowing it to melt and slightly brown.
- Serve: Remove from the oven and transfer to a serving platter. Serve hot with lemon wedges on the side for an added zing, if desired.
Extra Tips:
When selecting asparagus for this dish, look for spears that are firm and bright green with closed tips. Thinner spears tend to cook faster and more evenly with the prosciutto, so if you have thicker ones, consider blanching them briefly in boiling water before wrapping.
Additionally, if you prefer a more pronounced cheese flavor, you can mix grated Parmesan directly with olive oil before tossing the asparagus. Finally, prosciutto can be substituted with pancetta or thinly sliced bacon for a different flavor profile.
Lobster Mac and Cheese

Preparing Lobster Mac and Cheese is a delightful experience that will fill your kitchen with enticing aromas. The key to this dish is balancing the richness of the cheese sauce with the delicate sweetness of the lobster. By using high-quality ingredients and following these detailed instructions, you can create a dish that’s both comforting and sophisticated, making it an ideal centerpiece for your next family gathering.
Ingredients (Serves 4-6):
- 1 pound elbow macaroni
- 1/4 cup unsalted butter
- 1/4 cup all-purpose flour
- 4 cups whole milk
- 2 cups sharp cheddar cheese, shredded
- 1 cup Gruyère cheese, shredded
- 1 teaspoon Dijon mustard
- 1/2 teaspoon paprika
- Salt and pepper to taste
- 1 pound cooked lobster meat, chopped
- 1/2 cup panko breadcrumbs
- 2 tablespoons melted butter
- 1 tablespoon fresh parsley, chopped (optional)
Cooking Instructions:
1. Cook the Macaroni: Begin by bringing a large pot of salted water to a boil. Add the elbow macaroni and cook according to package instructions until al dente. Drain the pasta and set aside.
2. Prepare the Cheese Sauce: In a large saucepan, melt the unsalted butter over medium heat. Stir in the all-purpose flour to create a roux, cooking for about 1-2 minutes until it turns a light golden color.
Gradually whisk in the whole milk, making sure there are no lumps. Continue to cook, stirring frequently, until the mixture thickens, about 5-7 minutes.
3. Add Cheese and Seasoning: Reduce the heat to low and stir in the sharp cheddar and Gruyère cheeses until fully melted and smooth. Mix in the Dijon mustard and paprika, and season with salt and pepper to taste.
4. Combine with Lobster and Pasta: Gently fold the cooked macaroni and chopped lobster meat into the cheese sauce until everything is evenly coated.
5. Prepare Topping: In a small bowl, combine the panko breadcrumbs with the melted butter, mixing until the crumbs are well-coated.
6. Assemble and Bake: Preheat your oven to 350°F (175°C). Transfer the lobster mac and cheese mixture into a greased baking dish. Sprinkle the breadcrumb mixture evenly over the top.
Bake in the preheated oven for 20-25 minutes, or until the top is golden brown and crisp.
7. Garnish and Serve: Remove from the oven and let it cool slightly before serving. Garnish with chopped fresh parsley if desired.
Extra Tips:
For the best flavor, use freshly shredded cheese as pre-shredded varieties often contain anti-caking agents that can affect the texture of your sauce.
When cooking the lobster, you can use either steamed or boiled lobster tails or opt for pre-cooked lobster meat from your local seafood market. If you prefer more heat, consider adding a pinch of cayenne pepper to the cheese sauce.
Additionally, if you’re preparing this dish ahead of time, you can assemble it and refrigerate, then bake just before serving to guarantee it remains creamy and delicious.
Pear and Gorgonzola Salad

This Pear and Gorgonzola Salad is a perfect blend of sweet and savory flavors, making it a delightful addition to any family dinner. The juicy pears complement the creamy, tangy Gorgonzola cheese, while the crunchy walnuts and mixed greens add texture and freshness.
This salad isn’t only visually appealing with its vibrant colors but also a healthy option that can be easily prepared, making it an ideal choice for a quick and elegant dish.
The combination of ingredients in this salad provides a variety of nutrients and flavors that will tantalize your taste buds. The pears offer a natural sweetness and a good source of fiber, while the Gorgonzola cheese brings a rich depth of flavor.
The walnuts add a satisfying crunch and are packed with omega-3 fatty acids, promoting heart health. This salad can be served as a side dish or as a light main course, perfect for any gathering or weeknight meal.
Ingredients (serves 4-6):
- 4 ripe pears, cored and thinly sliced
- 1 cup crumbled Gorgonzola cheese
- 6 cups mixed salad greens (such as arugula, spinach, and romaine)
- 1 cup walnuts, toasted
- 1/4 cup balsamic vinaigrette
- Salt and pepper to taste
Instructions:
- Prepare the Pears: Begin by washing the pears thoroughly. Core each pear and slice it thinly to guarantee even distribution throughout the salad. Set aside.
- Toast the Walnuts: In a dry skillet over medium heat, toast the walnuts for about 3-5 minutes, stirring frequently. Be careful not to let them burn. Once they’re fragrant and lightly browned, remove them from the heat and allow them to cool.
- Assemble the Salad Base: In a large salad bowl, combine the mixed greens, ensuring they’re well distributed for an even base.
- Add the Pears and Cheese: Gently layer the sliced pears over the greens, followed by sprinkling the crumbled Gorgonzola cheese evenly across the top.
- Incorporate the Walnuts: Once cooled, scatter the toasted walnuts over the salad, adding a crunchy texture to each bite.
- Dress the Salad: Drizzle the balsamic vinaigrette over the salad. Use a salad spoon and fork to toss everything together gently, guaranteeing the dressing coats all ingredients evenly.
- Season and Serve: Finish by seasoning the salad with salt and pepper to taste. Serve immediately to enjoy the fresh and vibrant flavors.
Extra Tips:
To maximize the flavors in this Pear and Gorgonzola Salad, consider using ripe but firm pears that hold their shape well.
If you prefer a more intense cheese flavor, you can substitute Gorgonzola with Roquefort or blue cheese.
For added convenience, prepare the salad components in advance and store them separately; combine them just before serving to maintain freshness.
Additionally, experiment with different types of nuts or add a handful of dried cranberries for extra sweetness and color.
Saffron Chicken With Herb Couscous
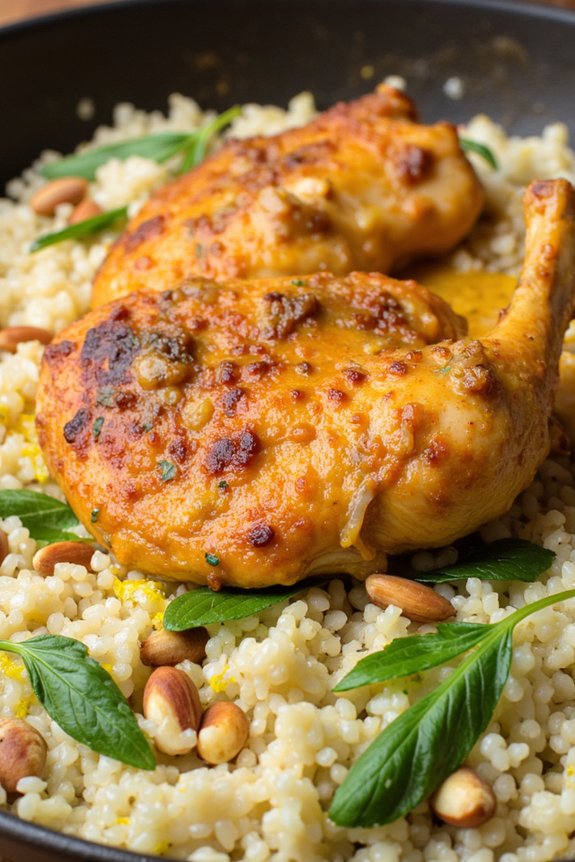
Saffron Chicken with Herb Couscous is a delightful and flavorful family dinner that brings a touch of exotic flair to your table. This dish combines tender, aromatic saffron-infused chicken with fluffy, herbaceous couscous, creating a harmonious blend of tastes and textures. The golden hue of saffron not only adds visual appeal but also imparts a delicate, slightly sweet essence that perfectly complements the savory herbs in the couscous.
It’s an ideal meal for family gatherings, offering a satisfying balance of protein and grains that everyone will enjoy.
Preparing Saffron Chicken with Herb Couscous is both straightforward and rewarding. The rich and fragrant aroma that fills your kitchen as the chicken simmers in the saffron broth is just a precursor to the delicious experience you’ll have at the dining table. This dish is perfect for serving 4-6 people, making it an excellent choice for a cozy family dinner or a small gathering of friends.
Follow the recipe below to create this incredible dish that will impress both kids and adults alike.
Ingredients (Serves 4-6):
- 1.5 pounds of chicken thighs (boneless, skinless)
- 1 cup chicken broth
- 1/2 teaspoon saffron threads
- 2 tablespoons olive oil
- 1 large onion, finely chopped
- 3 cloves garlic, minced
- 1 teaspoon ground cumin
- 1 teaspoon ground coriander
- Salt and pepper to taste
- 1 1/2 cups couscous
- 2 cups water
- 1/4 cup chopped fresh parsley
- 1/4 cup chopped fresh mint
- Juice of 1 lemon
- Zest of 1 lemon
- 1/4 cup toasted pine nuts (optional)
Cooking Instructions:
- Prepare the Saffron Infusion: Begin by soaking the saffron threads in 2 tablespoons of warm water. Let them steep for about 10 minutes to release the vibrant color and aroma.
- Cook the Chicken: In a large skillet, heat the olive oil over medium heat. Add the chopped onion and garlic, sautéing until soft and translucent. Stir in the ground cumin and coriander, cooking for another minute until fragrant.
- Simmer the Chicken: Add the chicken thighs to the skillet, seasoning them with salt and pepper. Pour in the chicken broth and the saffron infusion, mixing well. Bring the mixture to a simmer, cover, and cook for 20-25 minutes or until the chicken is cooked through and tender.
- Prepare the Couscous: While the chicken is cooking, bring 2 cups of water to a boil in a medium saucepan. Remove from heat and stir in the couscous. Cover and let it sit for about 5 minutes until the couscous has absorbed all the water. Fluff with a fork.
- Add Herbs and Seasoning: Stir the chopped parsley, mint, lemon juice, and lemon zest into the couscous. Mix well to evenly distribute the flavors.
- Combine and Serve: Serve the saffron chicken over a bed of herb couscous, garnishing with toasted pine nuts if desired. Make sure the chicken is well-coated with the saffron sauce for maximum flavor.
Extra Tips:
For the best results, use high-quality saffron threads, as they greatly enhance the dish’s flavor and color. If saffron is unavailable, turmeric can be a substitute for color, although it won’t replicate the unique flavor.
Confirm the chicken is thoroughly cooked by checking with a meat thermometer, aiming for an internal temperature of 165°F (74°C). Feel free to adjust the herbs in the couscous to your taste, or add additional vegetables like peas or bell peppers for an extra nutritional boost.
Enjoy this dish with a side of steamed vegetables or a fresh salad to round out the meal.
Chocolate Lava Cake With Raspberry Sauce
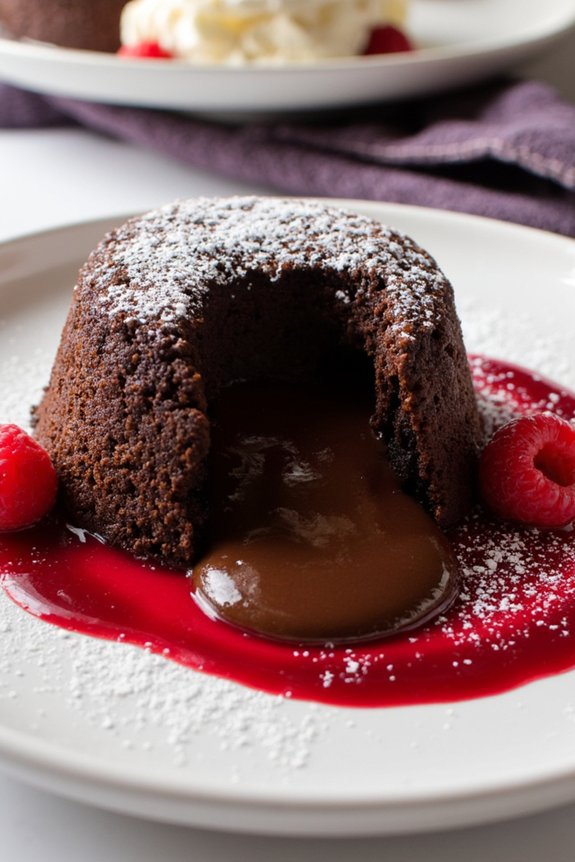
Indulge your family in a decadent dessert experience with this Chocolate Lava Cake with Raspberry Sauce recipe. This rich and gooey lava cake is a perfect blend of a crispy outer shell and molten chocolate center that flows out when you dig your spoon in. Paired with a tangy raspberry sauce, this dessert offers a delightful balance of flavors that will make any family dinner memorable.
Whether you’re celebrating a special occasion or just want to treat your loved ones to something sweet, this dish is bound to impress. The preparation is straightforward, allowing you to spend more time with your family and less time in the kitchen. This recipe is designed to serve 4-6 people, making it ideal for a family gathering or dinner party.
The combination of warm chocolate and fresh raspberries is a classic that never fails to please. With just a few simple ingredients and some careful timing, you can create a dessert that rivals those found in gourmet restaurants. Follow the steps below to guarantee your chocolate lava cakes are perfectly baked every time.
Ingredients (Serves 4-6)
- 1 cup unsalted butter
- 8 ounces quality dark chocolate, chopped
- 1 1/4 cups powdered sugar
- 1/2 cup all-purpose flour
- 3 large eggs
- 3 egg yolks
- 1 teaspoon vanilla extract
- Pinch of salt
- 2 cups fresh raspberries
- 1/4 cup granulated sugar
- 1 tablespoon lemon juice
- 1 tablespoon cornstarch
- Powdered sugar for dusting (optional)
Cooking Instructions
- Preheat the Oven: Begin by preheating your oven to 425°F (220°C). It’s important to have your oven ready so that the cakes bake evenly.
- Prepare the Ramekins: Grease 4-6 ramekins with butter and dust them lightly with flour. This will help the cakes release easily once they’re baked.
- Melt the Chocolate and Butter: In a medium-sized microwave-safe bowl, combine the butter and chopped chocolate. Microwave in 30-second intervals, stirring in between, until the mixture is smooth and fully melted. Let it cool slightly.
- Mix the Batter: In a separate large mixing bowl, whisk together the powdered sugar, flour, eggs, egg yolks, vanilla extract, and salt. Gradually add the melted chocolate mixture, stirring until you have a smooth batter.
- Fill the Ramekins: Divide the batter evenly among the prepared ramekins, filling each about 3/4 full.
- Bake the Cakes: Place the ramekins on a baking tray and bake in the preheated oven for 12-14 minutes. The edges should be firm, but the center should remain soft.
- Prepare the Raspberry Sauce: While the cakes are baking, combine the raspberries, granulated sugar, lemon juice, and cornstarch in a small saucepan. Cook over medium heat, stirring frequently until the mixture thickens and the raspberries break down into a sauce. Strain if you prefer a seedless sauce, and set aside.
- Serve: Once the cakes are done, let them sit for a minute before running a knife around the edges to loosen them. Invert each ramekin onto a plate. Dust with powdered sugar, if desired, and drizzle with raspberry sauce. Serve immediately.
Extra Tips
For best results, use high-quality dark chocolate as it notably impacts the flavor of the lava cakes. Be careful not to overbake the cakes; the centers should be gooey and not set.
If you plan to make these ahead of time, prepare the batter and refrigerate it in the ramekins, then bake just before serving. The raspberry sauce can also be made ahead and stored in the fridge for up to 3 days. If you want to add a touch of luxury, consider serving with a scoop of vanilla ice cream on the side.