

Looking to add a splash of color and nutrition to your family dinners? Incorporating vegetables into everyday meals has been a game-changer for me. From a Veggie-Packed Spaghetti with rich marinara sauce to a creamy Spinach and Mushroom Risotto, these recipes are bursting with flavor. And let’s not forget the sizzle of a Colorful Veggie Stir-Fry with Tofu. These dishes will surely bring joy and vibrancy to your dinner table.
Veggie-Packed Spaghetti With Marinara Sauce
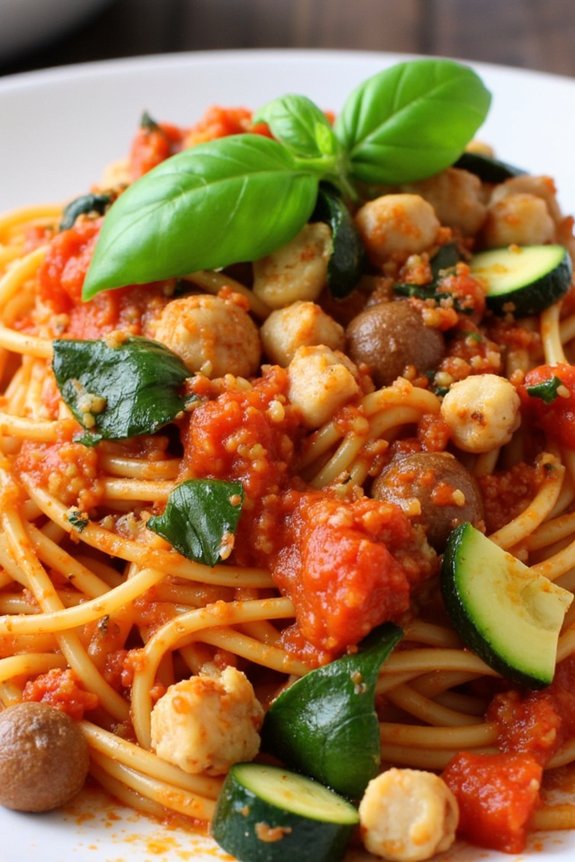
Veggie-Packed Spaghetti With Marinara Sauce is a delightful and nutritious family dinner recipe that combines the classic comfort of spaghetti with a medley of fresh vegetables. This dish offers a healthy twist on traditional pasta, making it perfect for those looking to incorporate more veggies into their meals without sacrificing flavor.
With a rich marinara sauce that bursts with flavors from fresh tomatoes, garlic, and herbs, this recipe is sure to become a family favorite. In this recipe, the vegetables not only add vibrant colors and textures but also enhance the nutritional value of the meal.
The combination of zucchini, bell peppers, mushrooms, and spinach guarantees that every bite is packed with vitamins and minerals. Perfect for serving 4-6 people, this dish is great for busy weeknights or a cozy family gathering. The following ingredients and step-by-step instructions will guide you in creating this delicious and wholesome meal.
Ingredients:
- 12 oz spaghetti
- 2 tablespoons olive oil
- 1 medium onion, finely chopped
- 3 cloves garlic, minced
- 1 zucchini, diced
- 1 red bell pepper, diced
- 8 oz mushrooms, sliced
- 2 cups fresh spinach
- 28 oz canned crushed tomatoes
- 1 teaspoon dried oregano
- 1 teaspoon dried basil
- Salt and pepper to taste
- Grated Parmesan cheese (optional)
- Fresh basil leaves for garnish (optional)
Instructions:
- Cook the Spaghetti:
- Bring a large pot of salted water to a boil. Add the spaghetti and cook according to the package instructions until al dente. Once cooked, drain and set aside.
- Prepare the Vegetables:
- While the spaghetti is cooking, heat the olive oil in a large skillet over medium heat. Add the chopped onion and sauté for 3-4 minutes until translucent. Stir in the minced garlic and cook for another minute.
- Cook the Veggies:
- Add the diced zucchini, bell pepper, and mushrooms to the skillet. Sauté the vegetables for about 5-7 minutes, or until they’re tender and slightly golden.
- Make the Marinara Sauce:
- Stir in the canned crushed tomatoes, dried oregano, and dried basil. Season with salt and pepper to taste. Let the sauce simmer for about 10-15 minutes, allowing the flavors to meld together.
- Add the Spinach:
- Just before serving, stir the fresh spinach into the sauce. Cook for 1-2 minutes until the spinach is wilted.
- Combine and Serve:
- Add the cooked spaghetti to the skillet, gently tossing to coat the pasta with the sauce. Allow the spaghetti to heat through for a couple of minutes. Serve hot, garnished with grated Parmesan cheese and fresh basil leaves if desired.
Extra Tips:
For an added depth of flavor, consider roasting the vegetables before adding them to the sauce. This can enhance the sweetness and richness of the vegetables.
If you prefer a little heat, sprinkle some red pepper flakes into the sauce. To make the dish vegan, simply omit the Parmesan cheese or substitute it with a vegan cheese alternative.
Cheesy Broccoli and Cauliflower Casserole

Cheesy Broccoli and Cauliflower Casserole is a delightful and comforting dish perfect for family dinners. It combines the wholesome goodness of broccoli and cauliflower with a rich, creamy cheese sauce, resulting in a flavorful and satisfying meal. This casserole isn’t only delicious but also a great way to incorporate more vegetables into your family’s diet.
Whether you’re preparing it as a side dish or a main course, this recipe will surely become a favorite at your dinner table. The combination of tender broccoli and cauliflower florets enveloped in a gooey cheese sauce is irresistible. The dish is baked to perfection, allowing the cheese to melt and form a golden crust on top.
This recipe is designed to serve 4-6 people, making it an ideal choice for family gatherings or a cozy dinner with friends. With a balance of nutrients and flavors, this casserole is both nutritious and indulgent, catering to both health-conscious eaters and cheese lovers alike.
Ingredients (serves 4-6):
- 1 head of broccoli, cut into florets
- 1 head of cauliflower, cut into florets
- 2 cups of shredded cheddar cheese
- 1 cup of grated Parmesan cheese
- 2 tablespoons of all-purpose flour
- 2 tablespoons of butter
- 1 cup of milk
- Salt and pepper to taste
- 1 teaspoon of garlic powder
- 1 teaspoon of onion powder
- 1/2 teaspoon of paprika
- 1/2 cup of breadcrumbs
Cooking Instructions:
- Preheat the Oven: Start by preheating your oven to 375°F (190°C). This guarantees the casserole bakes evenly.
- Prepare the Vegetables: In a large pot of boiling water, blanch the broccoli and cauliflower florets for about 3-4 minutes until they’re slightly tender. Drain and set aside.
- Make the Cheese Sauce: In a medium saucepan, melt the butter over medium heat. Add the flour and whisk continuously for about 1 minute to form a roux. Gradually add the milk, whisking constantly to avoid lumps. Cook until the mixture thickens, about 3-5 minutes.
- Add Cheese and Seasonings: Reduce the heat to low and stir in the cheddar cheese and half of the Parmesan cheese until melted and smooth. Season with salt, pepper, garlic powder, onion powder, and paprika.
- Combine and Transfer: In a large mixing bowl, combine the blanched vegetables with the cheese sauce, making sure they’re well coated. Transfer the mixture to a greased casserole dish.
- Top and Bake: Sprinkle the remaining Parmesan cheese and breadcrumbs evenly over the top of the casserole. Bake in the preheated oven for 25-30 minutes or until the top is golden brown and crispy.
- Let it Rest: Remove from the oven and allow the casserole to rest for about 5 minutes before serving. This helps the cheese sauce set a bit more, making it easier to serve.
Extra Tips:
For an added layer of flavor, consider mixing in a bit of Dijon mustard into the cheese sauce for a slight tang. If you prefer a bit of heat, a pinch of cayenne pepper can be included with the seasonings.
Additionally, you can experiment with different types of cheeses, like Gruyère or Monterey Jack, to alter the flavor profile. Confirm the vegetables aren’t over-blanched, as they’ll continue to cook in the oven. This guarantees they maintain a slight crunch, adding texture to the dish.
Colorful Veggie Stir-Fry With Tofu
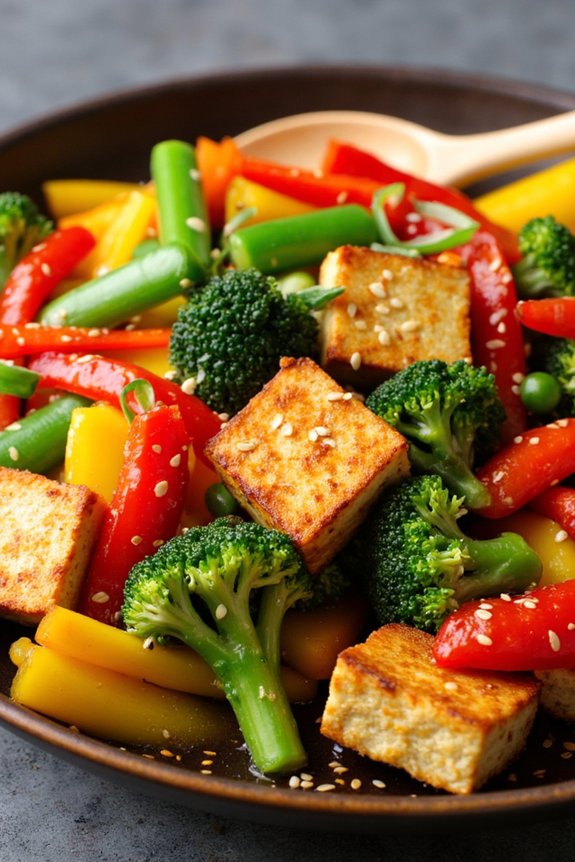
Colorful Veggie Stir-Fry With Tofu is a vibrant and nutritious meal that’s perfect for family dinners. This dish combines a medley of fresh vegetables with protein-rich tofu, all tossed in a flavorful sauce that will tantalize your taste buds. Not only is it visually appealing with its array of bright colors, but it also offers a balanced blend of textures and flavors that make it a satisfying meal for everyone at the table.
Whether you’re looking to incorporate more vegetables into your diet or simply want a delicious and healthy dish, this stir-fry is certain to become a family favorite.
The beauty of this recipe lies in its versatility. Feel free to use whatever vegetables you have on hand, or stick to the suggested ingredients for a tried-and-true combination. The tofu provides a hearty base and absorbs the flavors of the sauce beautifully, while the vegetables offer a crisp and fresh contrast.
This dish is also a great way to introduce more plant-based meals into your diet without sacrificing taste or satisfaction. Perfect for a weeknight dinner, it comes together quickly and can easily be adapted to suit personal preferences.
Ingredients (Serves 4-6):
- 1 block of firm tofu
- 2 tablespoons soy sauce
- 1 tablespoon cornstarch
- 2 tablespoons vegetable oil
- 2 cloves garlic, minced
- 1 tablespoon ginger, minced
- 1 red bell pepper, sliced
- 1 yellow bell pepper, sliced
- 1 cup broccoli florets
- 1 cup sugar snap peas
- 1 large carrot, julienned
- 1/4 cup soy sauce
- 2 tablespoons oyster sauce
- 1 tablespoon sesame oil
- 1 tablespoon honey
- 1 teaspoon chili flakes (optional)
- 3 green onions, sliced
- Sesame seeds for garnish
Instructions:
- Prepare the Tofu: Drain and press the tofu to remove excess moisture. Cut it into bite-sized cubes. In a bowl, toss the tofu with 2 tablespoons of soy sauce and cornstarch until evenly coated. This helps the tofu crisp up nicely when cooked.
- Cook the Tofu: Heat 1 tablespoon of vegetable oil in a large skillet or wok over medium-high heat. Add the tofu cubes and cook until they’re golden brown and crispy on all sides, about 8-10 minutes. Remove the tofu from the pan and set aside.
- Stir-Fry the Vegetables: In the same skillet, add the remaining tablespoon of vegetable oil. Add the garlic and ginger, and sauté for about 30 seconds until fragrant. Add the bell peppers, broccoli, sugar snap peas, and carrot. Stir-fry the vegetables for 5-7 minutes until they’re tender-crisp.
- Make the Sauce: In a small bowl, whisk together 1/4 cup soy sauce, oyster sauce, sesame oil, honey, and chili flakes. Pour the sauce over the vegetables in the skillet.
- Combine and Serve: Return the tofu to the skillet with the vegetables and sauce. Toss everything together to guarantee the tofu and vegetables are well-coated in the sauce. Cook for another 2-3 minutes until everything is heated through. Garnish with sliced green onions and sesame seeds before serving.
Extra Tips:
For best results, confirm the tofu is well-pressed before cooking to achieve a crispy texture. Adjust the amount of chili flakes based on your spice preference, or omit them entirely for a milder dish. If you prefer a gluten-free version, use tamari instead of soy sauce.
This dish pairs well with steamed rice or noodles, making it a complete meal. Remember, the key to a successful stir-fry is cooking over high heat and being quick with your movements to retain the vegetables’ crunch and vibrant colors.
Creamy Spinach and Mushroom Risotto
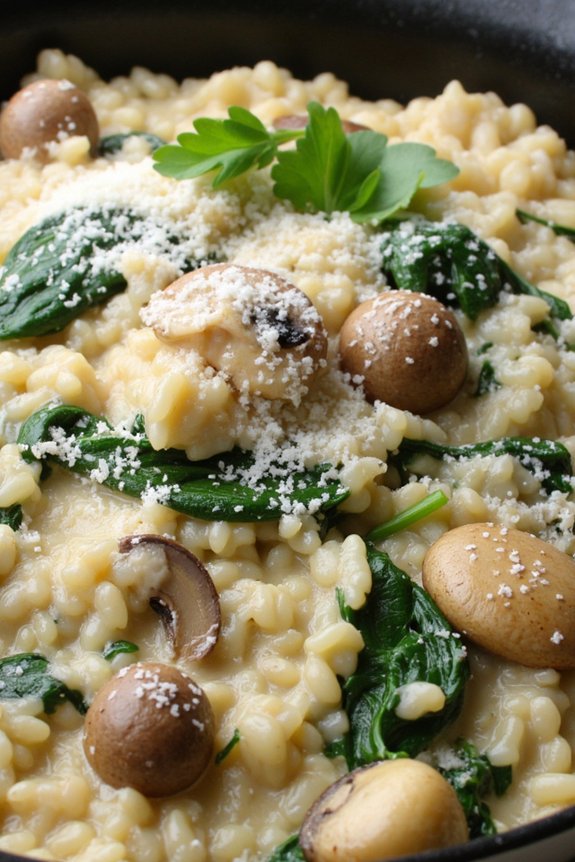
Creamy Spinach and Mushroom Risotto is a delightful dish that combines the earthiness of mushrooms and the vibrant taste of spinach with the creamy, comforting texture of risotto. Perfect for a family dinner, this dish isn’t only satisfying but also packed with nutrition thanks to the inclusion of fresh vegetables.
The creamy texture of the Arborio rice, when paired with the rich flavors of parmesan cheese, makes it a complete meal that your family will love. This risotto is best enjoyed fresh off the stove, making it an ideal choice for a cozy evening meal.
The key to a successful risotto is patience and constant stirring, which helps release the starches from the rice, giving the dish its signature creamy consistency. The addition of mushrooms and spinach not only enhances the flavor but also adds a delightful touch of color and texture. Serve this delicious risotto as a main course or as a side dish to complement roasted meats or grilled vegetables.
Ingredients (Serves 4-6):
- 2 tablespoons olive oil
- 1 onion, finely chopped
- 2 cloves garlic, minced
- 1 cup Arborio rice
- 1/2 cup white wine
- 4 cups vegetable broth, warmed
- 1 cup mushrooms, sliced
- 2 cups fresh spinach leaves
- 1/2 cup grated parmesan cheese
- Salt and pepper to taste
- 2 tablespoons butter
- Fresh parsley, chopped (optional, for garnish)
Cooking Instructions:
- Prepare Ingredients: Begin by preparing all your ingredients. Chop the onion finely, mince the garlic, and slice the mushrooms. Keep the spinach leaves whole for a vibrant texture.
- Sauté Aromatics: In a large pan, heat the olive oil over medium heat. Add the chopped onion and minced garlic, sautéing until the onion becomes translucent and fragrant, about 3-4 minutes.
- Cook the Rice: Stir in the Arborio rice, ensuring each grain gets coated with the oil. Toast the rice for about 2 minutes until it becomes slightly translucent around the edges.
- Deglaze with Wine: Pour in the white wine and stir continuously until the wine is completely absorbed by the rice.
- Add Mushrooms: Add the sliced mushrooms to the pan, stirring them into the rice mixture. Allow them to cook for about 5 minutes until they begin to soften.
- Incorporate Broth: Begin adding the warmed vegetable broth, one ladle at a time, stirring constantly. Wait until each addition is absorbed before adding the next. This process should take about 20-25 minutes.
- Add Spinach: Once the rice is al dente and creamy, stir in the fresh spinach leaves. Cook until the spinach wilts into the risotto.
- Finish with Butter and Cheese: Remove the pan from the heat and stir in the butter and grated parmesan cheese. Mix well until the butter is melted and the cheese is fully integrated into the risotto.
- Season and Serve: Season with salt and pepper to taste. Garnish with fresh parsley if desired, and serve immediately while hot.
Extra Tips: For an even creamier texture, you can add a splash of cream along with the butter and cheese. Make sure to keep the broth warm throughout the cooking process to maintain a consistent temperature in the risotto, which aids in even cooking.
If you prefer a more robust flavor, you can add a pinch of nutmeg or a splash of lemon juice at the end for a bit of zest. Finally, avoid rinsing the Arborio rice before cooking to preserve its starch content, essential for the dish’s creamy texture.
Roasted Vegetable and Quinoa Salad
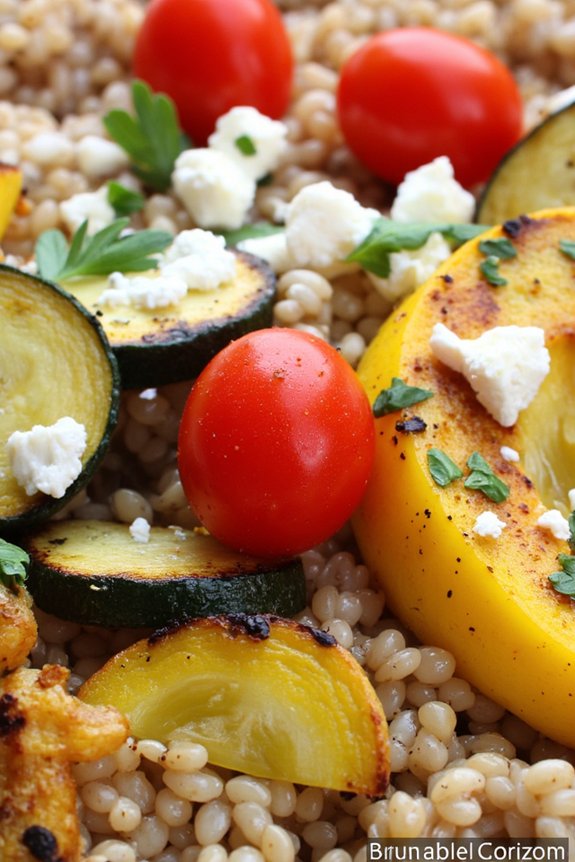
Roasted Vegetable and Quinoa Salad is a vibrant and healthy dish that’s perfect for family dinners. This recipe combines the nutty flavor of quinoa with a variety of roasted vegetables, creating a satisfying and nutritious meal. The salad isn’t only packed with vitamins and minerals from the vegetables but also provides a good source of protein from the quinoa.
It’s a versatile dish that can be served as a main course or a side dish, making it an excellent addition to any dinner table. This recipe is perfect for those looking to incorporate more vegetables into their diet without compromising on flavor. The roasting process enhances the natural sweetness of the vegetables, while the quinoa adds a delightful texture.
You can easily adjust the vegetables based on personal preference or seasonal availability, ensuring that every bite is delicious. This recipe serves 4-6 people, making it ideal for a family gathering or a weeknight dinner.
Ingredients for Roasted Vegetable and Quinoa Salad (serves 4-6):
- 1 cup quinoa
- 2 cups water
- 1 red bell pepper, diced
- 1 zucchini, diced
- 1 yellow squash, diced
- 1 red onion, diced
- 3 tablespoons olive oil
- Salt and pepper to taste
- 1 teaspoon garlic powder
- 1 teaspoon dried thyme
- 1 teaspoon dried oregano
- 1 cup cherry tomatoes, halved
- 1/4 cup feta cheese, crumbled
- 2 tablespoons fresh parsley, chopped
- 2 tablespoons lemon juice
Instructions:
- Preheat the Oven: Preheat your oven to 425°F (220°C) to roast the vegetables.
- Cook the Quinoa: Rinse the quinoa under cold water. In a medium saucepan, combine the quinoa and water. Bring to a boil, then reduce the heat to low, cover, and let it simmer for about 15 minutes or until the quinoa is cooked and the water is absorbed. Fluff with a fork and set aside.
- Prepare the Vegetables: In a large bowl, combine the diced red bell pepper, zucchini, yellow squash, and red onion. Drizzle with olive oil, then season with salt, pepper, garlic powder, thyme, and oregano. Toss the vegetables to coat them evenly with the seasoning.
- Roast the Vegetables: Spread the seasoned vegetables in a single layer on a baking sheet. Roast in the preheated oven for 20-25 minutes, or until they’re tender and slightly caramelized. Stir halfway through the cooking time for even roasting.
- Combine Ingredients: In a large serving bowl, combine the cooked quinoa, roasted vegetables, cherry tomatoes, feta cheese, and fresh parsley. Drizzle with lemon juice and gently toss to combine all ingredients thoroughly.
- Serve: Taste and adjust the seasoning if necessary. Serve the salad warm, at room temperature, or chilled based on preference.
Extra Tips:
When cooking quinoa, make sure to rinse it thoroughly to remove the natural coating called saponin, which can taste bitter. You can customize the vegetables in this recipe; consider adding or substituting with other favorites like carrots, asparagus, or sweet potatoes.
If you prefer a vegan version, omit the feta cheese or replace it with a vegan cheese alternative. For an extra burst of flavor, consider adding a sprinkle of toasted nuts or seeds on top before serving.
Zucchini and Corn Fritters With Avocado Dip

Zucchini and Corn Fritters With Avocado Dip are a delightful addition to any family dinner, offering a tasty way to incorporate more vegetables into your meals.
These fritters are crispy on the outside and tender on the inside, with the sweetness of corn complementing the mild flavor of zucchini. Paired with a creamy avocado dip, they become an irresistible treat suitable for both adults and kids. Perfect as a side dish, appetizer, or even a main course, these fritters are both versatile and satisfying.
Making zucchini and corn fritters is a straightforward process that can be done in under an hour, making it ideal for busy weeknights. The ingredients are simple and easily available, guaranteeing that you can whip up this dish without any hassle.
The avocado dip is a fresh and creamy accompaniment that balances the fritters’ savory notes. This recipe serves 4-6 people, making it perfect for family dinners or casual gatherings with friends.
Ingredients:
- 2 medium zucchinis, grated
- 1 cup corn kernels (fresh or frozen)
- 1/2 cup all-purpose flour
- 1/4 cup grated Parmesan cheese
- 2 eggs, lightly beaten
- 2 green onions, finely chopped
- 1 garlic clove, minced
- 1/2 teaspoon salt
- 1/4 teaspoon black pepper
- 2 tablespoons olive oil (for frying)
For the Avocado Dip:
- 1 ripe avocado
- 1 tablespoon lime juice
- 2 tablespoons Greek yogurt
- Salt and pepper to taste
Cooking Instructions:
- Prepare the Zucchini: Grate the zucchinis using a box grater. Place the grated zucchini in a clean kitchen towel and squeeze out as much excess moisture as possible. This is vital to prevent the fritters from becoming soggy.
- Mix the Fritter Batter: In a large bowl, combine the grated zucchini, corn kernels, all-purpose flour, grated Parmesan cheese, lightly beaten eggs, chopped green onions, minced garlic, salt, and black pepper. Stir until the mixture is well combined and holds together.
- Shape the Fritters: Take a small handful of the mixture and shape it into a patty, about 2-3 inches in diameter. Repeat with the remaining mixture until all patties are formed.
- Cook the Fritters: Heat olive oil in a large non-stick skillet over medium heat. Once the oil is hot, add the fritters in batches, making sure not to overcrowd the pan. Cook each side for 3-4 minutes or until golden brown and crispy. Transfer the cooked fritters to a paper towel-lined plate to drain any excess oil.
- Make the Avocado Dip: While the fritters are cooking, prepare the dip. In a small bowl, mash the ripe avocado with a fork until smooth. Stir in lime juice and Greek yogurt until well mixed. Season with salt and pepper to taste.
- Serve: Serve the hot zucchini and corn fritters immediately with the avocado dip on the side.
Extra Tips:
For the best results, make sure to remove as much moisture as possible from the grated zucchini; this guarantees that the fritters are crispy rather than soggy.
If using frozen corn, thaw and drain it well before adding to the batter. Feel free to add additional seasonings or herbs such as dill or cilantro for extra flavor.
The avocado dip can be adjusted to your taste by adding more lime juice or a pinch of chili powder for a spicy kick. Enjoy these fritters fresh and warm for the ultimate crispy texture.
Stuffed Bell Peppers With Lentil Filling

Stuffed Bell Peppers with Lentil Filling are a delightful and nutritious way to incorporate vegetables into a family dinner. This dish features colorful bell peppers filled with a savory and protein-rich lentil mixture, making it both satisfying and wholesome. The combination of lentils, vegetables, and spices creates a flavorful filling that complements the sweetness of the roasted bell peppers, resulting in a meal that’s both comforting and healthy.
This recipe serves 4-6 people, making it ideal for a family gathering or dinner with friends. The preparation involves cooking the lentil filling before stuffing the bell peppers and baking them to perfection. The dish isn’t only delicious but also versatile, allowing you to adjust the spices and ingredients to suit your family’s preferences. Whether you’re a seasoned cook or new to culinary adventures, these stuffed peppers are straightforward to prepare and make a beautiful presentation on the dinner table.
Ingredients:
- 6 large bell peppers (any color)
- 1 cup dried lentils
- 2 cups vegetable broth
- 1 medium onion, diced
- 2 cloves garlic, minced
- 1 cup diced tomatoes (canned or fresh)
- 1 teaspoon ground cumin
- 1 teaspoon smoked paprika
- 1 teaspoon dried oregano
- 1 cup cooked brown rice
- 1 cup shredded cheese (cheddar or mozzarella)
- Salt and pepper to taste
- 2 tablespoons olive oil
- Fresh parsley for garnish (optional)
Instructions:
- Preheat the Oven: Start by preheating your oven to 375°F (190°C). This will guarantee that it’s ready for baking once the bell peppers are stuffed.
- Prepare the Lentils: Rinse the lentils under cold water, then combine them with the vegetable broth in a medium-sized pot. Bring to a boil, reduce the heat, and let them simmer uncovered for about 20-25 minutes, or until tender. Drain any excess liquid and set the lentils aside.
- Cook the Vegetables: In a large skillet, heat the olive oil over medium heat. Add the diced onion and cook until it becomes translucent. Stir in the minced garlic and cook for another minute until fragrant.
- Add the Tomatoes and Spices: Add the diced tomatoes, ground cumin, smoked paprika, dried oregano, salt, and pepper to the skillet. Stir well and let the mixture simmer for about 5 minutes, allowing the flavors to meld together.
- Combine the Filling: In a large mixing bowl, combine the cooked lentils, the tomato and vegetable mixture, and the cooked brown rice. Mix thoroughly to guarantee all ingredients are evenly distributed.
- Prepare the Bell Peppers: Cut the tops off the bell peppers and remove the seeds and membranes. Lightly brush the outside of the peppers with olive oil and place them in a baking dish.
- Stuff the Peppers: Spoon the lentil filling into each bell pepper, pressing down gently to pack the filling. Once filled, top each pepper with a generous amount of shredded cheese.
- Bake the Peppers: Cover the baking dish with foil and bake in the preheated oven for 30 minutes. Remove the foil and bake for an additional 10-15 minutes, or until the cheese is melted and bubbly.
- Serve and Garnish: Let the peppers cool slightly before serving. Garnish with fresh parsley if desired for an added touch of freshness.
Extra Tips:
When preparing Stuffed Bell Peppers with Lentil Filling, consider using a variety of bell pepper colors to add visual appeal to your dish. If you prefer a spicier filling, add a pinch of cayenne pepper or some chopped jalapeños to the mix.
For a vegan version, simply omit the cheese or use a plant-based cheese alternative. Additionally, these stuffed peppers can be prepared in advance and stored in the refrigerator for up to two days before baking, making them a convenient option for busy schedules.
Baked Sweet Potato and Black Bean Tacos
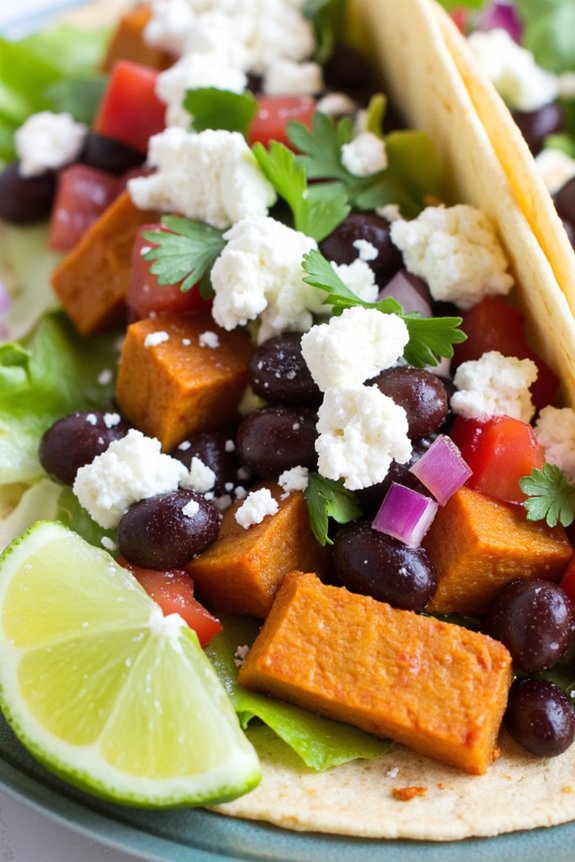
If you’re looking for a family dinner recipe that’s both delicious and nutritious, these Baked Sweet Potato and Black Bean Tacos are the perfect choice. Packed with vibrant flavors and wholesome ingredients, this dish is sure to be a hit at your family dinner table. The combination of roasted sweet potatoes and hearty black beans creates a satisfying filling, while the addition of spices and fresh toppings adds a burst of flavor.
It’s an easy-to-make recipe that not only tastes great but also includes plenty of vegetables, making it a healthy option for everyone. These tacos are ideal for a serving size of 4-6 people, allowing each person to enjoy multiple tacos. The preparation is straightforward, and most of the cooking process involves baking, which means you can focus on spending time with your family while the oven does most of the work.
With a few simple steps and readily available ingredients, you can whip up a meal that’s both satisfying and nourishing.
Ingredients (Serves 4-6):
- 3 large sweet potatoes, peeled and diced
- 2 tablespoons olive oil
- 1 teaspoon ground cumin
- 1 teaspoon chili powder
- Salt and pepper to taste
- 1 (15-ounce) can of black beans, drained and rinsed
- 12 taco shells or small corn tortillas
- 1 cup shredded lettuce
- 1 cup diced tomatoes
- 1/2 cup chopped red onion
- 1/2 cup crumbled feta or cotija cheese
- 1/4 cup chopped fresh cilantro
- Lime wedges for serving
Cooking Instructions:
- Preheat the Oven: Start by preheating your oven to 425°F (220°C). This will guarantee that it’s hot enough to roast the sweet potatoes to perfection.
- Prepare the Sweet Potatoes: In a large mixing bowl, combine the diced sweet potatoes with olive oil, ground cumin, chili powder, salt, and pepper. Toss everything together until the sweet potatoes are evenly coated with the spices.
- Roast the Sweet Potatoes: Spread the seasoned sweet potatoes in a single layer on a baking sheet. Roast in the preheated oven for about 25-30 minutes, or until the sweet potatoes are tender and slightly crispy on the edges. Stir halfway through the cooking time to guarantee even roasting.
- Warm the Black Beans: While the sweet potatoes are roasting, place the drained black beans in a small saucepan over medium heat. Stir occasionally until they’re warmed through, about 5 minutes. You can add a pinch of cumin and salt for extra flavor if desired.
- Assemble the Tacos: Once the sweet potatoes are done, remove them from the oven. Place a generous spoonful of roasted sweet potatoes and black beans into each taco shell or tortilla. Top with shredded lettuce, diced tomatoes, chopped red onion, crumbled cheese, and fresh cilantro.
- Serve: Serve the tacos immediately, accompanied by lime wedges to squeeze over the top for added zest.
Extra Tips:
For added flavor, consider roasting the sweet potatoes with a sprinkle of smoked paprika or garlic powder. If you prefer a spicier version, add some chopped jalapeños to the toppings.
To save time, you can prepare the sweet potatoes and black beans ahead of time and simply reheat them before assembling the tacos. Additionally, if you want a gluten-free option, make sure to use corn tortillas instead of taco shells. Enjoy your family dinner with these delightful and healthy tacos!
Eggplant Parmesan With Fresh Basil

Eggplant Parmesan With Fresh Basil is a classic Italian dish that combines the savory flavors of eggplant, tangy tomato sauce, and creamy cheese, all brought together with the aromatic freshness of basil. This hearty vegetarian meal is perfect for a family dinner, offering both comfort and elegance.
It’s a dish that can be prepared in advance and baked just before serving, making it a convenient option for any busy household.
The recipe involves thinly slicing eggplant, then coating the slices in a crispy breadcrumb mixture before layering them with marinara sauce, mozzarella, and Parmesan cheese. The addition of fresh basil not only enhances the flavor but also adds a vibrant touch to the presentation.
This Eggplant Parmesan serves 4-6 people, making it an ideal choice for family gatherings or a cozy dinner.
Ingredients:
- 2 large eggplants
- Salt (for sweating the eggplant)
- 1 cup all-purpose flour
- 4 large eggs
- 2 cups breadcrumbs
- 1 cup grated Parmesan cheese
- 2 teaspoons dried oregano
- 2 teaspoons garlic powder
- 1 teaspoon black pepper
- 3 cups marinara sauce
- 2 cups shredded mozzarella cheese
- 1/2 cup fresh basil leaves
- Olive oil (for frying)
- Non-stick cooking spray
Cooking Instructions:
- Prepare the Eggplant: Slice the eggplants into 1/4-inch thick rounds. Lay them out on a baking sheet and sprinkle both sides lightly with salt. Let them sit for about 30 minutes to draw out excess moisture and bitterness. Rinse the slices under cold water and pat them dry with paper towels.
- Bread the Eggplant: Set up a breading station with three shallow dishes. Place flour in the first dish. In the second dish, beat the eggs. In the third dish, combine breadcrumbs, 1/2 cup of Parmesan cheese, oregano, garlic powder, and black pepper. Dip each eggplant slice in flour, shake off excess, then dip in egg, and finally coat thoroughly with the breadcrumb mixture.
- Fry the Eggplant: In a large skillet, heat olive oil over medium heat. Fry the breaded eggplant slices in batches until golden brown on both sides, about 3-4 minutes per side. Transfer them to a paper-towel-lined plate to drain any excess oil.
- Assemble the Dish: Preheat the oven to 375°F (190°C). In a 9×13 inch baking dish, spread a thin layer of marinara sauce on the bottom. Layer the fried eggplant slices over the sauce, then top with more marinara sauce, a sprinkle of the remaining Parmesan cheese, and a layer of mozzarella cheese. Repeat the layers, ending with a generous layer of mozzarella on top.
- Bake: Spray a piece of aluminum foil with non-stick cooking spray and cover the baking dish. Bake in the preheated oven for about 25 minutes. Remove the foil and bake for an additional 10-15 minutes, or until the cheese is bubbly and golden brown.
- Garnish and Serve: Remove from the oven and let the Eggplant Parmesan cool for 10 minutes. Garnish with fresh basil leaves before serving.
Extra Tips:
For best results, choose firm, fresh eggplants that are free from blemishes and feel heavy for their size. Sweating the eggplant with salt is essential to remove bitterness and achieve the best texture.
If you prefer a lighter version, you can bake the breaded eggplant slices instead of frying them by placing them on a baking sheet and drizzling them lightly with olive oil before baking at 400°F (200°C) for 20 minutes.
Also, feel free to make this dish a day ahead; the flavors will meld beautifully overnight, making it even more delicious when reheated.
Vegetable and Chickpea Curry
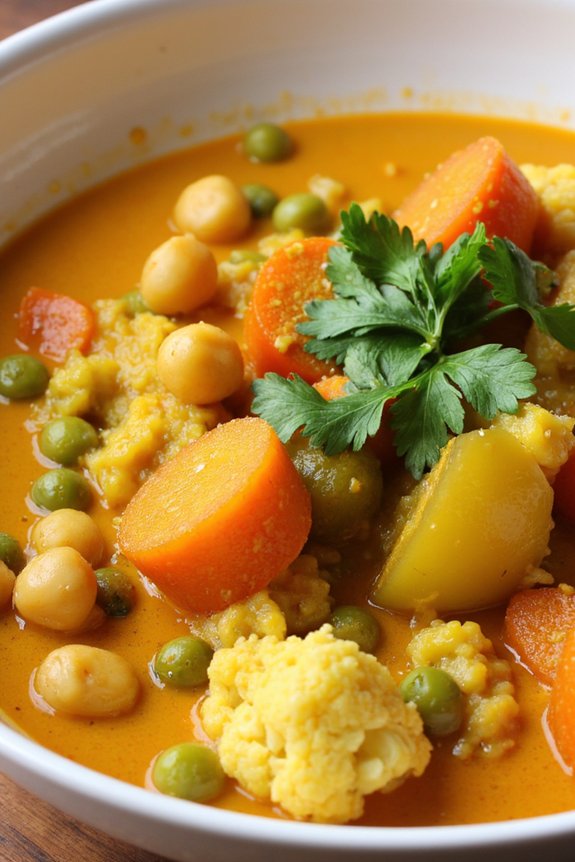
This Vegetable and Chickpea Curry is a hearty and satisfying dish that’s perfect for a family dinner. Packed with vibrant vegetables and protein-rich chickpeas, this curry isn’t only delicious but also nutritious. It’s a great way to incorporate more vegetables into your meals, and it’s sure to be a hit with everyone at the table.
The comforting spices and creamy coconut milk create a flavorful sauce that pairs perfectly with the tender vegetables and chickpeas.
Whether you’re a seasoned cook or a kitchen novice, this recipe is easy to follow and comes together in about 45 minutes. It’s a versatile dish that can be customized to your family’s taste preferences by adjusting the level of spice or swapping in your favorite vegetables.
Serve it over rice or with warm naan bread for a complete meal that will satisfy even the pickiest eaters.
Ingredients for 4-6 People:
- 2 tablespoons olive oil
- 1 large onion, diced
- 3 cloves garlic, minced
- 1-inch piece fresh ginger, grated
- 2 teaspoons curry powder
- 1 teaspoon ground cumin
- 1 teaspoon ground coriander
- 1/2 teaspoon turmeric
- 1/2 teaspoon chili powder (optional for heat)
- 1 can (400 ml) coconut milk
- 1 can (400 g) chickpeas, drained and rinsed
- 2 cups mixed vegetables (e.g., bell peppers, carrots, peas, cauliflower), chopped
- 1 can (400 g) diced tomatoes
- Salt and pepper, to taste
- Fresh cilantro, for garnish
- Cooked rice or naan, for serving
Instructions:
- Prepare the Aromatics: Heat the olive oil in a large pot over medium heat. Add the diced onion and sauté for about 5 minutes, or until the onion becomes translucent. Add the minced garlic and grated ginger, and sauté for an additional 1-2 minutes until fragrant.
- Add the Spices: Stir in the curry powder, ground cumin, ground coriander, turmeric, and chili powder (if using). Cook for another 1-2 minutes, stirring continuously, to toast the spices and release their flavors.
- Combine the Ingredients: Pour in the coconut milk, chickpeas, and diced tomatoes. Stir well to combine all the ingredients. Add the chopped vegetables and mix them into the curry base. Season with salt and pepper to taste.
- Simmer the Curry: Bring the mixture to a simmer. Reduce the heat to low and cover the pot. Let the curry simmer for about 20-25 minutes, or until the vegetables are tender and the flavors have melded together. Stir occasionally to prevent sticking.
- Finish and Serve: Taste the curry and adjust the seasoning if necessary. Remove from heat and garnish with fresh cilantro. Serve hot with cooked rice or warm naan bread on the side.
Extra Tips:
For a creamier texture, you can blend a portion of the curry before adding the vegetables, using an immersion blender. This will give the sauce a thicker consistency.
Feel free to customize this dish with your family’s favorite vegetables or add more spice if you prefer a hotter curry. Additionally, this curry can be made ahead of time and reheated, as the flavors tend to deepen and improve after resting.
For a more protein-packed meal, consider adding cooked chicken or tofu. Enjoy experimenting with this versatile and satisfying dish!