

Feeding a picky family can feel like solving a puzzle, especially when you want meals that are both healthy and quick. Picture serving Zucchini Noodle Spaghetti with Turkey Meatballs that even the fussiest eater will enjoy. It’s all about turning vibrant veggies and lean proteins into dishes that everyone loves. I’ve gathered 15 ideas that do just that. Ready to see how these recipes can refresh your dinner routine?
Zucchini Noodle Spaghetti With Turkey Meatballs
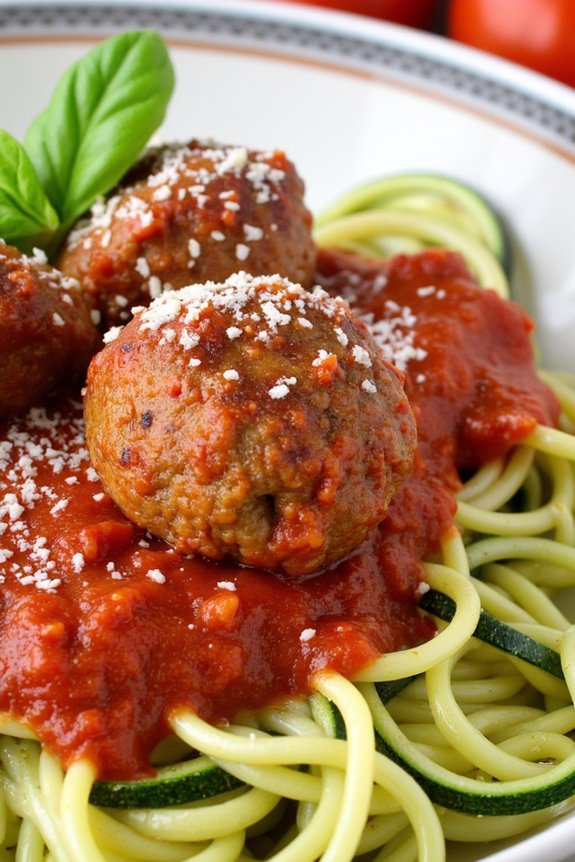
Zucchini Noodle Spaghetti with Turkey Meatballs is a nutritious and delicious dish that will satisfy even the pickiest of eaters. By substituting traditional pasta with zucchini noodles, you get a low-carb, gluten-free alternative that’s just as satisfying.
Paired with juicy turkey meatballs, this meal is packed with protein and flavor, making it a healthy option for dinner that doesn’t compromise on taste.
This dish isn’t only healthy but also easy to prepare, making it perfect for a quick weeknight meal. The zucchini noodles are light and fresh, providing the perfect base for the hearty and savory turkey meatballs.
With a rich tomato sauce to bring everything together, this dish is sure to become a family favorite. Here’s how to make Zucchini Noodle Spaghetti with Turkey Meatballs for 4-6 people:
Ingredients:
- 2 pounds of ground turkey
- 1/2 cup breadcrumbs
- 1/4 cup grated Parmesan cheese
- 1 large egg
- 2 cloves garlic, minced
- 1 teaspoon Italian seasoning
- Salt and pepper to taste
- 2 tablespoons olive oil
- 1 jar (24 ounces) of marinara sauce
- 4 medium zucchini, spiralized into noodles
- Fresh basil leaves, for garnish
- Grated Parmesan cheese, for serving
Instructions:
- Prepare the Meatballs: In a large mixing bowl, combine the ground turkey, breadcrumbs, Parmesan cheese, egg, minced garlic, Italian seasoning, salt, and pepper. Mix everything together until well combined. Form the mixture into 1.5-inch meatballs, placing them on a plate.
- Cook the Meatballs: Heat the olive oil in a large skillet over medium heat. Once hot, add the meatballs to the skillet. Cook them for about 5-7 minutes, turning occasionally, until they’re browned on all sides.
- Simmer in Sauce: Pour the marinara sauce into the skillet with the meatballs. Reduce the heat to low, cover, and let the meatballs simmer in the sauce for about 15-20 minutes, or until cooked through.
- Prepare Zucchini Noodles: While the meatballs are simmering, prepare the zucchini noodles. If they aren’t already spiralized, use a spiralizer to turn the zucchini into noodles.
- Cook Zucchini Noodles: In another large skillet, lightly sauté the zucchini noodles over medium heat for about 3-4 minutes, or until they’re just tender but still firm to the bite. Be careful not to overcook them as they can become mushy.
- Combine and Serve: Once the meatballs are fully cooked, serve them on top of the zucchini noodles and ladle the sauce over everything. Garnish with fresh basil leaves and additional grated Parmesan cheese before serving.
Extra Tips: When spiralizing zucchini, choose medium-sized zucchinis for best results; they’re easier to handle and yield a better noodle texture.
If you prefer a thicker sauce, let it simmer uncovered for a few extra minutes to reduce. To avoid soggy zucchini noodles, make sure to sauté them just until they’re tender.
If you want to prepare this dish in advance, store the meatballs and sauce separately from the zucchini noodles to maintain their texture.
Cauliflower Crust Pizza With Veggie Toppings

Cauliflower Crust Pizza With Veggie Toppings is a delicious and nutritious alternative to traditional pizza, perfect for those looking to indulge in a healthy meal without compromising on flavor. This recipe is especially great for picky eaters, as it sneaks in a generous serving of vegetables while maintaining the classic appeal of pizza.
The cauliflower crust isn’t only gluten-free but also serves as a light, crispy base that complements a variety of fresh veggie toppings. This dish can be a fun and creative way to get everyone in the family excited about eating their greens.
The combination of roasted vegetables and gooey cheese on top of a cauliflower crust makes this pizza a crowd-pleaser for both adults and children. The recipe is versatile, allowing you to customize the toppings according to personal preferences.
Whether you’re a fan of bell peppers, mushrooms, or cherry tomatoes, this pizza is sure to satisfy your taste buds while keeping your meal nutrient-dense. Follow this simple guide to prepare a Cauliflower Crust Pizza with Veggie Toppings for a serving size of 4-6 people.
Ingredients:
- 1 large head of cauliflower, riced
- 2 large eggs
- 1 cup shredded mozzarella cheese
- 1/4 cup grated Parmesan cheese
- 1 teaspoon dried oregano
- 1/2 teaspoon garlic powder
- Salt and pepper to taste
- 1/2 cup pizza sauce
- 1 cup shredded mozzarella cheese (for topping)
- 1/2 cup sliced bell peppers
- 1/2 cup sliced mushrooms
- 1/4 cup sliced red onion
- 1/4 cup cherry tomatoes, halved
- 1/4 cup sliced black olives
- Fresh basil leaves for garnish
Instructions:
- Preheat the Oven: Begin by preheating your oven to 425°F (220°C). Line a baking sheet with parchment paper, which will prevent the crust from sticking and make for easy cleanup.
- Prepare the Cauliflower: Wash and thoroughly dry the cauliflower. Remove the stems and chop it into florets. Place the florets into a food processor and pulse until the texture resembles rice.
- Cook the Cauliflower Rice: Transfer the cauliflower rice into a microwave-safe bowl. Microwave on high for about 5-6 minutes, or until soft. Allow it to cool slightly.
- Form the Cauliflower Dough: Once cooled, place the cooked cauliflower in a clean kitchen towel and squeeze out as much moisture as possible. This step is vital for achieving a crispy crust.
- Mix the Dough Ingredients: In a large bowl, combine the cauliflower rice, eggs, 1 cup of mozzarella cheese, Parmesan cheese, oregano, garlic powder, salt, and pepper. Mix until fully combined.
- Shape the Crust: Spread the cauliflower mixture onto the prepared baking sheet, forming a circle or rectangle about 1/4-inch thick. Make sure the crust is even for consistent baking.
- Bake the Crust: Place the crust in the preheated oven and bake for 15-20 minutes, or until golden brown and firm to the touch.
- Add the Toppings: Remove the crust from the oven and spread the pizza sauce evenly over it. Sprinkle with the remaining 1 cup of mozzarella cheese. Arrange the bell peppers, mushrooms, red onion, cherry tomatoes, and black olives on top.
- Bake the Pizza: Return the pizza to the oven and bake for an additional 10-12 minutes, or until the cheese is melted and bubbly.
- Garnish and Serve: Remove the pizza from the oven and allow it to cool for a few minutes. Garnish with fresh basil leaves before slicing and serving.
Extra Tips:
When making the cauliflower crust, make sure to remove as much moisture as possible from the cauliflower rice to achieve a crispier texture.
You can also experiment with different cheese blends and spices to tailor the crust to your liking. If you prefer a meatier option, add some grilled chicken or turkey sausage on top.
For an extra flavor boost, sprinkle some red pepper flakes or drizzle a bit of balsamic glaze over the finished pizza before serving.
Sheet Pan Lemon Herb Chicken and Vegetables
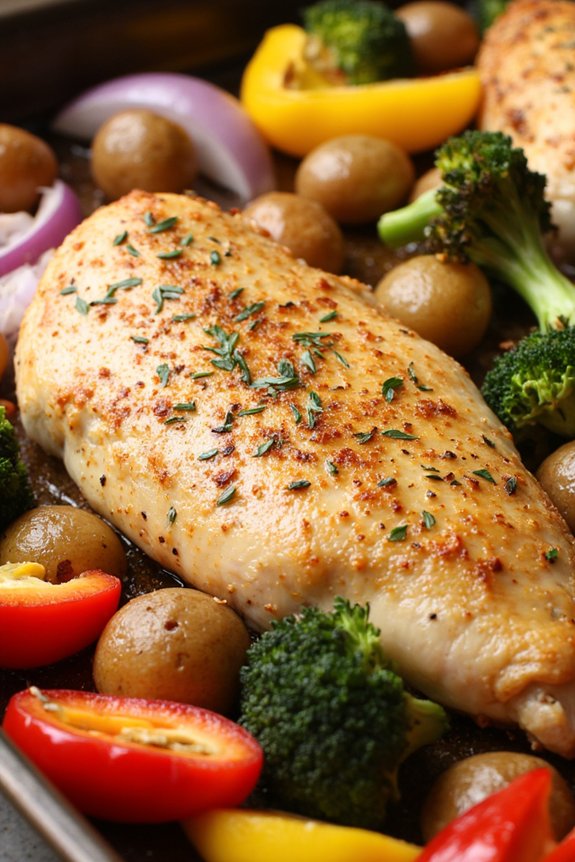
Sheet Pan Lemon Herb Chicken and Vegetables is a delightful and nutritious meal perfect for even the pickiest of eaters. This recipe combines tender chicken breasts with a medley of fresh vegetables, all seasoned with a bright and zesty lemon herb marinade. The best part is that the entire meal is cooked on one sheet pan, making for a quick and easy cleanup.
With its vibrant flavors and colorful presentation, it’s an excellent choice for a healthy family dinner. This dish isn’t only packed with flavor but also loaded with nutrients. The chicken provides a lean source of protein, while the assortment of vegetables offers a variety of vitamins and minerals. The lemon herb marinade infuses the ingredients with a revitalizing taste, making it appealing even to those who typically shy away from vegetables.
Whether you’re cooking for your family or hosting a dinner party, this recipe is sure to please everyone at the table.
Ingredients for 4-6 servings:
- 4 boneless, skinless chicken breasts
- 1 pound baby potatoes, halved
- 1 red bell pepper, sliced
- 1 yellow bell pepper, sliced
- 1 red onion, cut into wedges
- 2 cups broccoli florets
- 1/4 cup olive oil
- Juice of 2 lemons
- Zest of 1 lemon
- 3 cloves garlic, minced
- 1 tablespoon dried Italian herbs
- Salt and pepper to taste
- Fresh parsley, chopped (for garnish)
Cooking Instructions:
- Preheat the Oven: Start by preheating your oven to 400°F (200°C). This guarantees that the chicken and vegetables cook evenly and achieve the desired texture.
- Prepare the Marinade: In a small bowl, whisk together the olive oil, lemon juice, lemon zest, minced garlic, dried Italian herbs, salt, and pepper. This marinade will provide the dish with its signature lemon herb flavor.
- Marinate the Chicken: Place the chicken breasts in a large resealable plastic bag or a shallow dish. Pour half of the marinade over the chicken, making sure they’re well-coated. Seal or cover and let it marinate for at least 15 minutes while you prepare the vegetables.
- Prepare the Vegetables: On a large sheet pan, spread out the halved baby potatoes, sliced bell peppers, red onion wedges, and broccoli florets. Drizzle the remaining marinade over the vegetables and toss them to make sure they’re evenly coated.
- Arrange on Sheet Pan: Remove the chicken from the marinade and place the breasts on the sheet pan, spacing them evenly among the vegetables. Discard the marinade used for the chicken.
- Bake the Dish: Place the sheet pan in the preheated oven and bake for 25-30 minutes or until the chicken is cooked through (internal temperature of 165°F/75°C) and the vegetables are tender and slightly caramelized.
- Garnish and Serve: Once cooked, remove the sheet pan from the oven. Allow the dish to rest for a few minutes. Garnish with freshly chopped parsley before serving.
Extra Tips:
When preparing this dish, make sure that the vegetables are cut into even sizes to promote uniform cooking. If you prefer your vegetables with more or less crunch, adjust the cooking time accordingly.
To save time, you can marinate the chicken in advance, allowing the flavors to deepen. Additionally, experiment with different vegetable combinations based on seasonal availability or personal preference to keep the dish exciting and varied.
Quinoa and Black Bean Stuffed Peppers
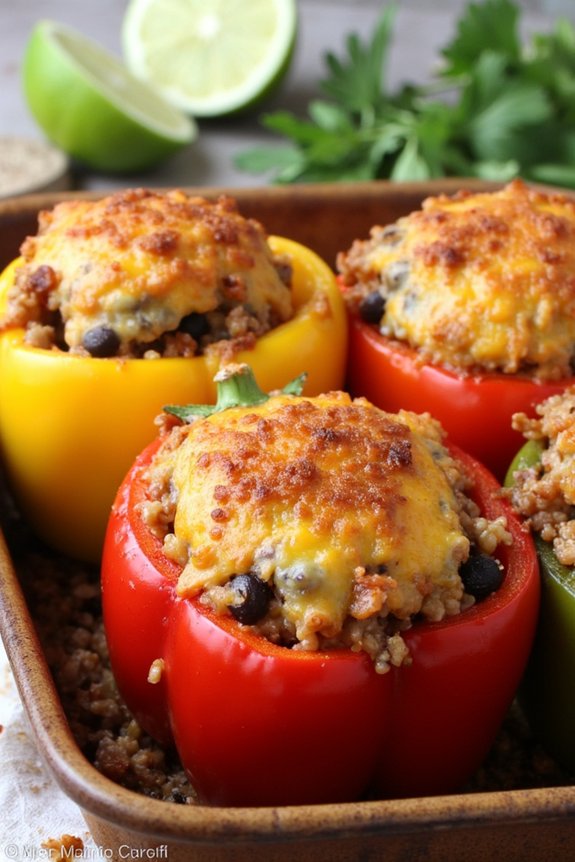
Quinoa and Black Bean Stuffed Peppers are a delightful and nutritious option for those who are looking to satisfy picky eaters with a meal that’s both healthy and colorful. The combination of quinoa and black beans provides a hearty filling that’s rich in protein and fiber, while the vibrant bell peppers serve as the perfect edible vessel. This dish isn’t only visually appealing but also packed with flavors that will entice even the most hesitant eaters, making it a versatile addition to your dinner repertoire.
Preparing Quinoa and Black Bean Stuffed Peppers is straightforward, making it an ideal choice for busy weeknights or casual gatherings. The recipe uses simple ingredients that come together to create a wholesome meal, offering a delightful balance of textures and tastes. The quinoa provides a slightly nutty base, while the black beans add a creamy consistency, complemented by the sweet and tangy notes of the bell peppers. With a hint of spice and a touch of cheese, this dish promises to be a crowd-pleaser.
Ingredients for 4-6 Servings:
- 6 medium bell peppers (any color)
- 1 cup quinoa
- 2 cups vegetable broth or water
- 1 can (15 oz) black beans, drained and rinsed
- 1 cup corn kernels (fresh, frozen, or canned)
- 1 teaspoon cumin
- 1 teaspoon chili powder
- 1/2 teaspoon garlic powder
- 1/2 teaspoon onion powder
- 1 cup salsa
- 1 1/2 cups shredded cheese (cheddar, Monterey Jack, or a blend)
- Salt and pepper to taste
- Fresh cilantro, for garnish (optional)
- Lime wedges, for serving (optional)
Cooking Instructions:
- Prepare the Bell Peppers: Preheat your oven to 375°F (190°C). Cut the tops off the bell peppers and remove the seeds and membranes. Arrange the peppers cut-side up in a baking dish.
- Cook the Quinoa: Rinse the quinoa under cold water. In a medium saucepan, combine the quinoa and vegetable broth or water. Bring to a boil, then reduce the heat to low, cover, and simmer for about 15 minutes, or until the quinoa is cooked and the liquid is absorbed. Fluff with a fork.
- Prepare the Filling: In a large bowl, combine the cooked quinoa, black beans, corn, cumin, chili powder, garlic powder, onion powder, and salsa. Mix well to guarantee all ingredients are evenly distributed. Add salt and pepper to taste.
- Stuff the Peppers: Spoon the quinoa mixture into each prepared bell pepper, pressing down gently to pack the filling. Sprinkle the shredded cheese over the top of each stuffed pepper.
- Bake the Peppers: Cover the baking dish with foil and bake in the preheated oven for 30 minutes. Remove the foil and bake for an additional 10-15 minutes, or until the peppers are tender and the cheese is melted and bubbly.
- Serve: Remove from the oven and let cool slightly before serving. Garnish with fresh cilantro and serve with lime wedges, if desired.
Extra Tips:
For an extra layer of flavor, try roasting the bell peppers for a few minutes before stuffing them. This can enhance their sweetness and add a slight char that complements the filling.
Feel free to customize the recipe by adding other vegetables like diced tomatoes or chopped spinach. If you prefer a spicier dish, consider adding chopped jalapeños or a pinch of cayenne pepper to the filling.
These stuffed peppers are also great for meal prep, as they can be stored in the refrigerator for up to 3 days or frozen for up to a month. Reheat them in the oven or microwave for a quick and satisfying meal.
Creamy Avocado and Spinach Pasta
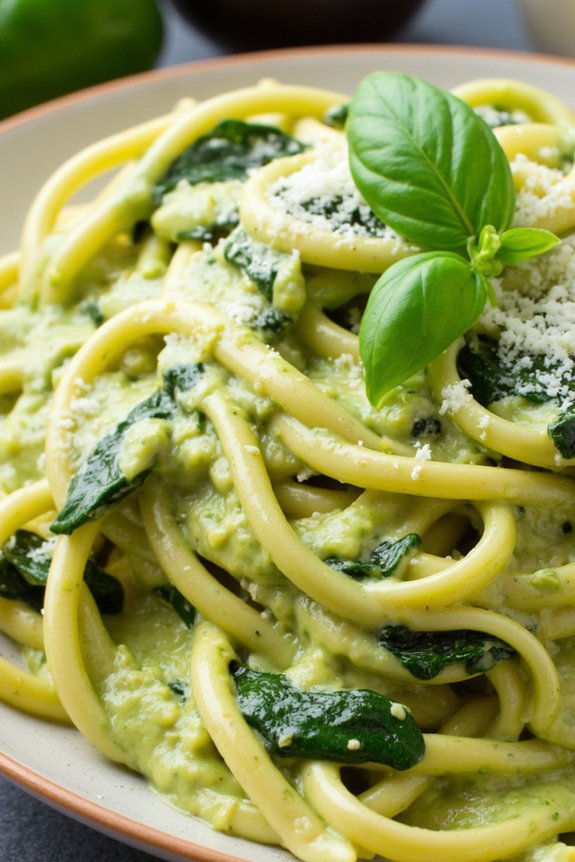
Creamy Avocado and Spinach Pasta is a delicious and nutritious meal that’s perfect for satisfying even the pickiest eaters. This dish combines the rich, buttery flavor of ripe avocados with the fresh, earthy taste of spinach, resulting in a creamy sauce that clings beautifully to pasta. It’s a quick and easy recipe that doesn’t compromise on taste or health, making it a fantastic choice for busy weeknights or when you want to impress guests with minimal effort.
The beauty of this recipe lies in its simplicity and versatility. It’s a perfect way to sneak in some greens into the diet of those who might be averse to them, thanks to the luscious, smooth texture of the avocado-based sauce. Additionally, it’s a dish that can be easily customized—add some grilled chicken or shrimp for extra protein, or sprinkle with some chili flakes for a hint of spice.
Ideal for a serving size of 4-6 people, this Creamy Avocado and Spinach Pasta will surely become a staple in your household.
Ingredients:
- 12 ounces of your favorite pasta (e.g., spaghetti, fettuccine, or penne)
- 2 ripe avocados, peeled and pitted
- 2 cups fresh spinach leaves
- 2 cloves garlic, minced
- 1/4 cup fresh basil leaves
- 1/4 cup grated Parmesan cheese
- 2 tablespoons lemon juice
- 1/4 cup olive oil
- Salt and pepper to taste
- Grated Parmesan and fresh basil for garnish (optional)
Instructions:
- Cook the Pasta: Bring a large pot of salted water to a boil. Add the pasta and cook according to package instructions until al dente. Reserve 1 cup of pasta water and then drain the pasta.
- Prepare the Sauce: While the pasta is cooking, place the avocados, spinach, garlic, basil, Parmesan cheese, lemon juice, and olive oil into a food processor or blender. Blend until smooth and creamy. If the sauce is too thick, add a little of the reserved pasta water until you reach your desired consistency.
- Combine Pasta and Sauce: Return the drained pasta to the pot. Add the avocado-spinach sauce and toss to combine. Add more reserved pasta water if needed to help the sauce coat the pasta evenly.
- Season and Serve: Season the pasta with salt and pepper to taste. Serve immediately, garnished with additional grated Parmesan and fresh basil leaves if desired.
Extra Tips:
To guarantee the avocados retain their bright green color, make sure to use fresh lemon juice. This not only enhances the flavor but also prevents browning.
If you’re not planning to serve the pasta immediately, wait to add the sauce until just before serving to prevent the sauce from drying out. You can store any leftover sauce in an airtight container in the refrigerator for up to two days; just give it a good stir and possibly a splash of lemon juice before using.
Enjoy your Creamy Avocado and Spinach Pasta with a side salad or some crusty bread for a complete meal.
Baked Salmon With Honey Garlic Glaze

Baked Salmon With Honey Garlic Glaze is a delightful dish that combines the richness of salmon with the sweet and savory flavors of a honey garlic glaze. This recipe is perfect for picky eaters who might typically shy away from fish, as the glaze provides a delicious coating that enhances the natural taste of the salmon.
Baking the salmon guarantees it remains moist and tender, while the glaze caramelizes to perfection, creating a dish that’s both visually appealing and mouthwateringly good.
This recipe is designed to serve 4-6 people, making it ideal for a family dinner or a small gathering. The preparation is simple and doesn’t require any advanced cooking skills, making it accessible for home cooks of all levels. The combination of honey, garlic, soy sauce, and lemon juice creates a balanced glaze that complements the salmon beautifully without overpowering its delicate flavor.
Ingredients:
- 4-6 salmon fillets (about 6 oz each)
- 1/3 cup honey
- 1/4 cup soy sauce
- 2 tablespoons freshly squeezed lemon juice
- 3 cloves garlic, minced
- 1 tablespoon olive oil
- Salt and pepper, to taste
- Lemon slices and chopped parsley for garnish (optional)
Instructions:
- Preheat the Oven: Begin by preheating your oven to 400°F (200°C). This temperature is perfect for baking salmon, guaranteeing it cooks evenly and remains juicy.
- Prepare the Glaze: In a small saucepan over medium heat, combine the honey, soy sauce, lemon juice, and minced garlic. Stir the mixture well and let it simmer for about 3-4 minutes until slightly thickened. Remove from heat and set aside.
- Prepare the Salmon: While the glaze is simmering, line a baking sheet with aluminum foil or parchment paper for easy cleanup. Place the salmon fillets on the prepared baking sheet. Drizzle the olive oil over the salmon and season with salt and pepper.
- Apply the Glaze: Using a basting brush or spoon, generously coat each salmon fillet with the honey garlic glaze. Make sure to cover the top and sides of the fillets for maximum flavor.
- Bake the Salmon: Place the baking sheet in the preheated oven and bake the salmon for 12-15 minutes, or until the fish flakes easily with a fork. The glaze should be bubbling and slightly caramelized.
- Serve and Garnish: Once cooked, remove the salmon from the oven. If desired, garnish with lemon slices and chopped parsley before serving. This adds a fresh burst of flavor and a pop of color to the dish.
Extra Tips: When choosing salmon fillets, opt for fresh, high-quality fillets for the best flavor and texture. If fresh salmon isn’t available, frozen fillets can be used; just guarantee they’re fully thawed before cooking.
To enhance the glaze’s flavor, you can add a pinch of red pepper flakes for a subtle hint of heat. Additionally, if you prefer a thicker glaze, allow the sauce to simmer a few extra minutes until it reaches your desired consistency.
Pair this dish with steamed vegetables or a fresh salad for a balanced and nutritious meal.
Turkey and Sweet Potato Skillet
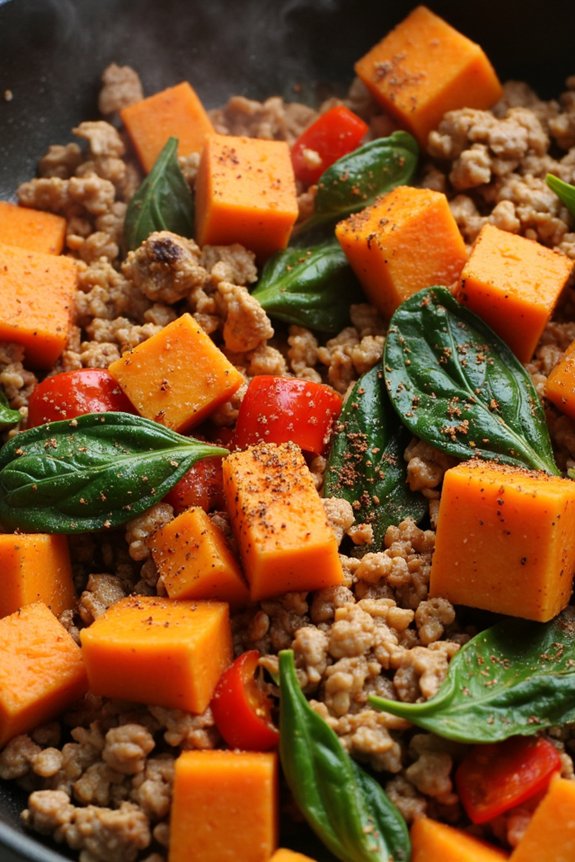
When it comes to finding healthy dinner options that will satisfy even the pickiest of eaters, the Turkey and Sweet Potato Skillet is a winning choice. This dish combines lean ground turkey with nutrient-rich sweet potatoes, offering a balanced meal that’s both delicious and nourishing. The natural sweetness of the sweet potatoes pairs perfectly with the savory turkey, making it a flavorful dish that’s sure to become a family favorite.
Plus, it’s cooked all in one skillet, which means fewer dishes to clean up afterward!
Not only is this skillet dish packed with flavor, but it also comes together quickly, making it perfect for busy weeknights. The combination of spices and fresh vegetables adds depth to the dish, while the turkey provides a good source of protein. This recipe is designed to serve 4-6 people, so it’s ideal for a family dinner or for meal prepping for the week.
With simple ingredients and straightforward instructions, this recipe is as easy as it’s satisfying.
Ingredients (Serves 4-6):
- 1 lb ground turkey
- 2 medium sweet potatoes, peeled and diced
- 1 red bell pepper, chopped
- 1 yellow onion, diced
- 2 cloves garlic, minced
- 2 tablespoons olive oil
- 1 teaspoon smoked paprika
- 1 teaspoon ground cumin
- Salt and pepper to taste
- 1 cup chicken broth
- 2 cups fresh spinach
- 1 tablespoon fresh parsley, chopped (optional)
- 1 tablespoon lime juice (optional)
Cooking Instructions:
- Prepare the Ingredients: Begin by peeling and dicing the sweet potatoes, chopping the red bell pepper, and dicing the onion. Mince the garlic cloves and set aside all the prepared ingredients.
- Cook the Turkey: In a large skillet, heat 1 tablespoon of olive oil over medium heat. Add the ground turkey, breaking it up with a wooden spoon. Cook until the turkey is browned and cooked through, about 7-10 minutes. Remove the turkey from the skillet and set aside.
- Sauté the Vegetables: In the same skillet, add another tablespoon of olive oil. Add the diced onion and minced garlic, and sauté until the onion becomes translucent, about 3-4 minutes. Add the chopped red bell pepper and continue to sauté for an additional 2 minutes.
- Cook the Sweet Potatoes: Add the diced sweet potatoes to the skillet. Season with smoked paprika, ground cumin, salt, and pepper. Stir well to coat the sweet potatoes with the spices. Pour in the chicken broth, cover the skillet, and let it simmer for 10-15 minutes, or until the sweet potatoes are tender.
- Combine Ingredients: Once the sweet potatoes are cooked, return the browned turkey to the skillet. Add the fresh spinach, stirring until it wilts, about 2-3 minutes. Adjust seasoning with additional salt and pepper, if needed.
- Finish and Serve: If desired, add a splash of lime juice and sprinkle fresh parsley over the dish before serving for added flavor. Serve the Turkey and Sweet Potato Skillet hot, and enjoy!
Extra Tips:
For an extra boost of flavor, consider adding a pinch of chili flakes if you enjoy a bit of heat. To save time, you can prep the vegetables in advance and store them in the refrigerator until you’re ready to cook.
If you prefer a creamier texture, you can mash some of the sweet potatoes directly in the skillet before combining them with the turkey. This dish also reheats well, making it a great option for leftovers. Enjoy experimenting with different herbs such as cilantro or basil for additional variety.
Veggie-Packed Chicken Fried Rice
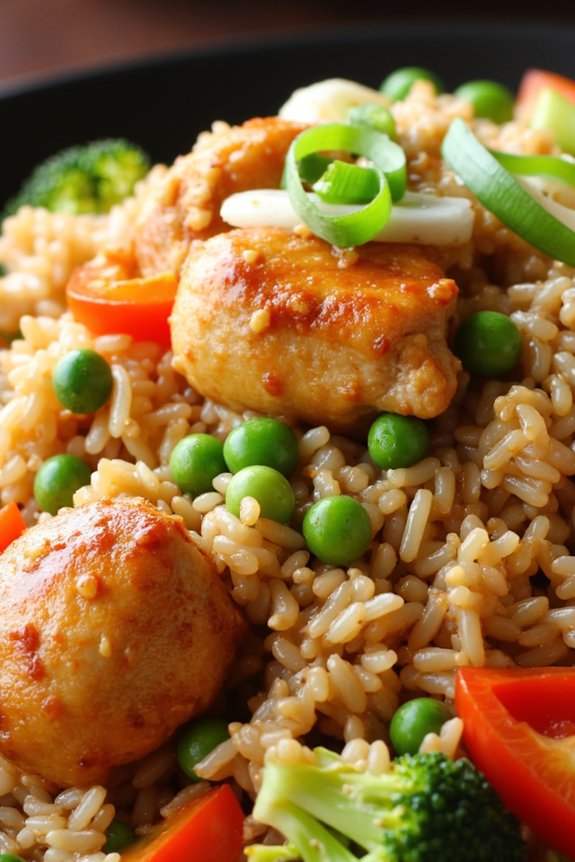
Veggie-Packed Chicken Fried Rice is a delightful and nutritious twist on a classic dish that’s perfect for picky eaters. This recipe cleverly incorporates a variety of vegetables into a simple and familiar meal, making it ideal for families looking to add more veggies to their diet without sacrificing taste.
The combination of tender chicken, a rainbow of veggies, and perfectly cooked rice makes this dish not only flavorful but also visually appealing, enticing even the most selective eaters to give it a try.
This dish is a fantastic way to use up leftover rice and vegetables, reducing food waste while providing a balanced meal. The key to making the perfect Veggie-Packed Chicken Fried Rice is in the preparation and precise cooking of each component to guarantee that the vegetables retain their crunch and the chicken remains juicy.
This recipe serves 4-6 people, making it a great option for a family dinner or a small gathering.
Ingredients:
- 3 cups cooked jasmine rice (preferably day-old)
- 2 tablespoons vegetable oil
- 1 pound boneless, skinless chicken breasts, diced
- 2 cloves garlic, minced
- 1 cup frozen peas and carrots mix
- 1 red bell pepper, diced
- 1 cup broccoli florets
- 3 green onions, sliced
- 2 large eggs, lightly beaten
- 3 tablespoons soy sauce
- 1 tablespoon oyster sauce
- 1 teaspoon sesame oil
- Salt and pepper to taste
Cooking Instructions:
- Prepare Ingredients: Gather and prepare all ingredients before starting to cook. Confirm that the rice is cooked and cooled, and all vegetables are chopped and ready to use.
- Cook Chicken: Heat 1 tablespoon of vegetable oil in a large non-stick skillet or wok over medium-high heat. Add diced chicken and season with a pinch of salt and pepper. Cook until the chicken is browned and cooked through, about 5-7 minutes. Remove chicken from the pan and set aside.
- Sauté Aromatics: In the same skillet, add the remaining tablespoon of vegetable oil. Add minced garlic and sauté for about 30 seconds until fragrant.
- Cook Vegetables: Add the peas and carrots mix, bell pepper, and broccoli to the skillet. Stir-fry the vegetables for about 4-5 minutes, or until they’re tender-crisp.
- Scramble Eggs: Push the vegetables to one side of the skillet. Pour the beaten eggs into the empty side and scramble them until fully cooked. Mix the cooked eggs into the vegetables.
- Combine Ingredients: Return the cooked chicken to the skillet, along with the cooked rice. Stir everything together to combine.
- Season the Rice: Drizzle the soy sauce, oyster sauce, and sesame oil over the rice mixture. Stir well to guarantee all ingredients are evenly coated with the sauce.
- Finish the Dish: Add sliced green onions and stir everything together for another minute. Taste and adjust seasoning with salt and pepper if needed.
- Serve: Transfer the Veggie-Packed Chicken Fried Rice to a serving platter or individual bowls and enjoy warm.
Extra Tips:
To guarantee the best texture, use day-old rice, as it’s drier and less likely to turn mushy when fried. If fresh rice is used, spread it on a baking sheet and let it cool for a bit before cooking.
Feel free to substitute or add other vegetables such as snap peas, corn, or zucchini to suit personal preferences or to use up what you have on hand. For added flavor, consider garnishing with a sprinkle of sesame seeds or a dash of hot sauce for those who enjoy a bit of heat.
Lentil and Vegetable Soup
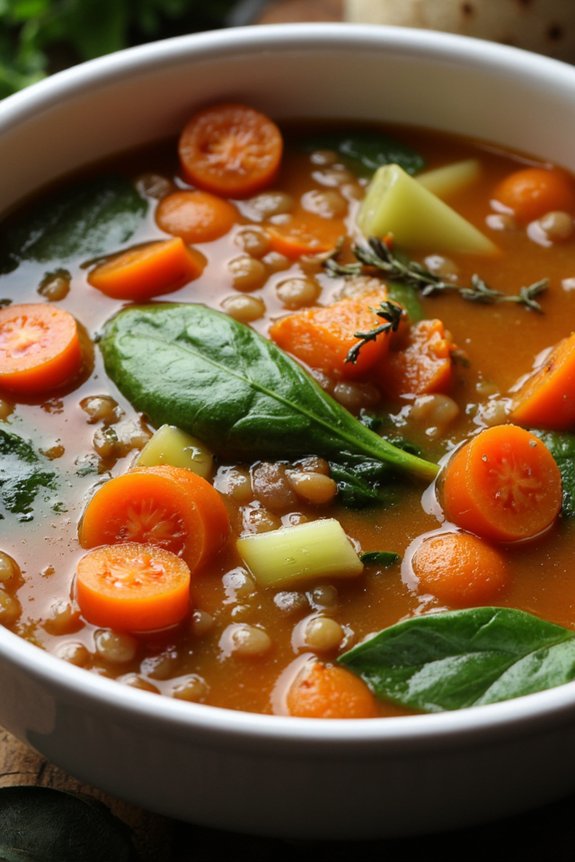
Lentil and Vegetable Soup is a comforting and nutritious dish perfect for even the pickiest eaters. This recipe combines the earthy flavor of lentils with a variety of fresh vegetables, creating a hearty and flavorful meal that’s rich in protein and fiber. The soup is both easy to prepare and versatile, allowing you to adjust the ingredients to suit your family’s preferences.
Whether served as a main course or a side dish, this soup is sure to become a staple in your dinner rotation. Packed with vitamins and minerals, Lentil and Vegetable Soup is an excellent choice for a healthy dinner. Lentils are a great source of plant-based protein and pair wonderfully with the natural sweetness of carrots, the crunch of celery, and the aromatic flavors of onions and garlic.
This recipe is designed to appeal to picky eaters by incorporating familiar vegetables with a mild seasoning, making it a delicious and satisfying meal for the whole family.
Ingredients (Serves 4-6):
- 1 cup dried lentils, rinsed
- 2 tablespoons olive oil
- 1 large onion, diced
- 3 cloves garlic, minced
- 3 carrots, peeled and sliced
- 2 stalks celery, sliced
- 1 can (14.5 oz) diced tomatoes
- 6 cups vegetable broth
- 1 teaspoon dried thyme
- 1 teaspoon dried oregano
- Salt and pepper to taste
- 2 cups fresh spinach leaves
Cooking Instructions:
- Prepare the Ingredients: Start by rinsing the lentils in cold water and setting them aside. Dice the onion, peel and slice the carrots, slice the celery, and mince the garlic.
- Sauté the Aromatics: In a large pot, heat the olive oil over medium heat. Add the diced onion and minced garlic, sautéing until the onion becomes translucent and fragrant, about 3-4 minutes.
- Add Vegetables: Stir in the sliced carrots and celery, cooking for another 5 minutes until they begin to soften.
- Incorporate Lentils and Tomatoes: Add the rinsed lentils and the can of diced tomatoes (including the juice) to the pot, stirring to combine with the vegetables.
- Add Broth and Seasonings: Pour in the vegetable broth, followed by the dried thyme and oregano. Stir well and bring the mixture to a boil.
- Simmer the Soup: Once boiling, reduce the heat to low and cover the pot. Let the soup simmer for about 30-35 minutes, or until the lentils are tender.
- Season and Add Spinach: Season the soup with salt and pepper to taste. Stir in the fresh spinach leaves, allowing them to wilt into the soup.
- Serve: Ladle the soup into bowls and serve hot. Enjoy the hearty flavors of this nutritious dish.
Extra Tips: For an added burst of flavor, consider topping the soup with freshly grated Parmesan cheese or a squeeze of lemon juice before serving. If your family prefers a smoother texture, you can use an immersion blender to partially puree the soup to your desired consistency.
Lentil and Vegetable Soup can be stored in the refrigerator for up to 5 days, making it a great option for meal prep. Feel free to experiment with different vegetables or herbs to tailor the soup to your liking.
Spinach and Ricotta Stuffed Shells
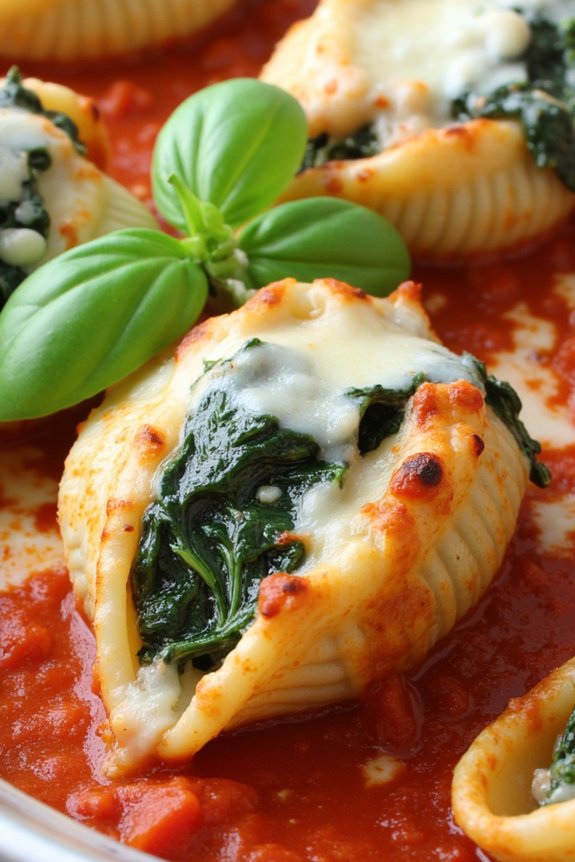
Spinach and Ricotta Stuffed Shells are a delightful and nutritious option for dinner, especially when catering to picky eaters. This dish combines the creamy goodness of ricotta cheese with the vibrant flavor of spinach, all encased in tender pasta shells. The result is a meal that’s not only visually appealing but also satisfies a variety of taste preferences.
By incorporating spinach, you add a dose of healthy greens, while the ricotta provides a creamy texture that kids and adults alike will enjoy. The tomato sauce brings all the ingredients together, adding a rich and savory component that enhances the overall experience of the dish.
This recipe is perfect for a family dinner serving 4-6 people and can be easily prepared in under an hour. With a few simple ingredients, you can create a comforting and hearty meal that even the most selective eaters will appreciate.
The key to making this dish a hit is ensuring the right balance of flavors and textures, so the creamy filling complements the tender pasta and robust sauce. Let’s explore the ingredient list and step-by-step instructions to create this delicious meal.
Ingredients (Serves 4-6):
- 20 jumbo pasta shells
- 2 cups ricotta cheese
- 1 cup mozzarella cheese, shredded
- 1/2 cup parmesan cheese, grated
- 2 cups fresh spinach, chopped
- 1 egg
- 2 cups marinara sauce
- 2 cloves garlic, minced
- 1 tablespoon olive oil
- 1 teaspoon dried Italian herbs
- Salt and pepper to taste
- Fresh basil leaves for garnish (optional)
Cooking Instructions:
- Preheat and Prep: Preheat your oven to 375°F (190°C). Cook the jumbo pasta shells according to package instructions until al dente. Drain and set aside to cool slightly.
- Prepare the Filling: In a large mixing bowl, combine ricotta cheese, mozzarella cheese, parmesan cheese, chopped spinach, egg, minced garlic, and Italian herbs. Mix well until all ingredients are evenly incorporated. Season with salt and pepper to taste.
- Stuff the Shells: Carefully fill each cooked pasta shell with the spinach and ricotta mixture. Use a spoon to pack the filling in without overfilling, as the shells need to hold their shape.
- Assemble the Dish: Spread a thin layer of marinara sauce on the bottom of a baking dish. Arrange the stuffed shells in a single layer over the sauce. Pour the remaining marinara sauce evenly over the shells, ensuring they’re well-covered.
- Bake: Cover the baking dish with aluminum foil and bake in the preheated oven for 25 minutes. Remove the foil and bake for an additional 10 minutes, or until the cheese is bubbly and golden brown.
- Garnish and Serve: Remove from the oven and let cool for a few minutes. Garnish with fresh basil leaves if desired. Serve warm, and enjoy your delicious Spinach and Ricotta Stuffed Shells.
Extra Tips:
For added flavor, consider incorporating a pinch of nutmeg into the ricotta filling, as it complements the spinach beautifully. If you prefer a slightly spicier dish, add a sprinkle of red pepper flakes to the marinara sauce.
You can also prepare this dish ahead of time and store it in the refrigerator; simply assemble the shells and cover them with sauce, then bake when ready to serve. This makes it an excellent option for busy families looking for a quick and healthy dinner solution.
Grilled Chicken Tacos With Mango Salsa
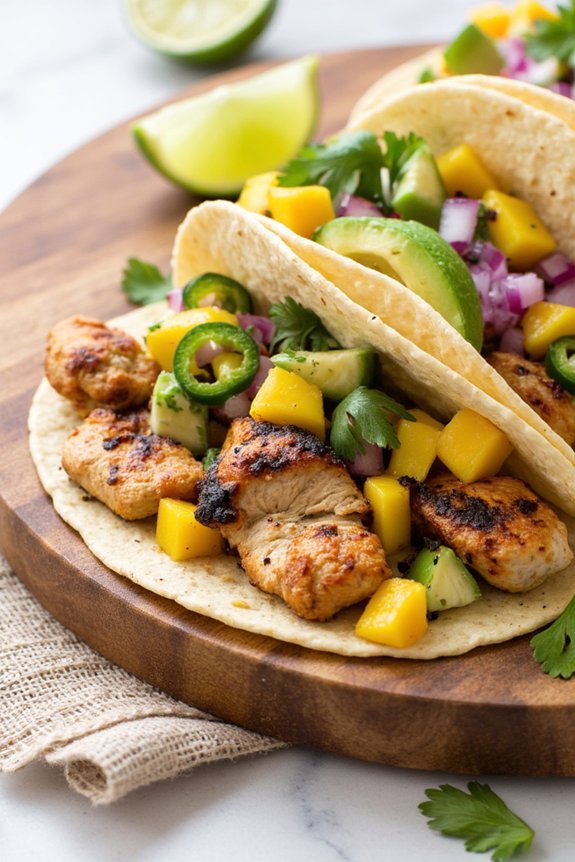
Grilled Chicken Tacos With Mango Salsa is a delightful dish that combines the savory flavors of grilled chicken with the invigorating sweetness of mango salsa. This recipe is perfect for picky eaters who are looking for a healthy and flavorful meal. The tender, marinated chicken pairs beautifully with the bright, juicy mango salsa, creating a harmonious blend of tastes and textures.
Whether you’re planning a family dinner or a casual get-together, these tacos are sure to be a hit with everyone at the table. The secret to making these tacos irresistible lies in the well-seasoned chicken and the fresh, vibrant salsa. The chicken is marinated with a mix of spices and grilled to perfection, guaranteeing it remains juicy and full of flavor.
Meanwhile, the mango salsa offers a burst of freshness with every bite, thanks to the combination of ripe mangoes, crisp red onions, and zesty lime juice. Together, they create a balanced and delicious meal that’s both satisfying and nutritious.
Ingredients (Serves 4-6):
- 1 1/2 pounds boneless, skinless chicken breasts
- 1 tablespoon olive oil
- 1 teaspoon cumin
- 1 teaspoon paprika
- 1 teaspoon garlic powder
- 1/2 teaspoon chili powder
- Salt and pepper to taste
- 8-12 small corn or flour tortillas
- 2 ripe mangoes, diced
- 1/4 cup red onion, finely chopped
- 1 jalapeño, seeded and finely chopped
- 1/4 cup fresh cilantro, chopped
- Juice of 2 limes
- 1 avocado, sliced (optional)
- Lime wedges, for serving
Cooking Instructions:
- Marinate the Chicken: In a small bowl, mix the olive oil, cumin, paprika, garlic powder, chili powder, salt, and pepper. Coat the chicken breasts with this mixture and let them marinate for at least 30 minutes in the refrigerator for the flavors to meld.
- Prepare the Grill: Preheat your grill to medium-high heat. If using a grill pan indoors, heat it over medium-high on the stove.
- Grill the Chicken: Place the marinated chicken breasts on the grill and cook for about 6-7 minutes on each side, or until the internal temperature reaches 165°F (75°C). Remove from the grill and let rest for a few minutes before slicing into thin strips.
- Make the Mango Salsa: In a medium bowl, combine the diced mangoes, red onion, jalapeño, cilantro, and lime juice. Mix well and season with salt to taste. Set aside.
- Warm the Tortillas: Wrap the tortillas in aluminum foil and warm them on the grill for about 1-2 minutes, or until soft and pliable.
- Assemble the Tacos: Place a few slices of grilled chicken on each tortilla, top with a generous spoonful of mango salsa, and add avocado slices if desired. Serve with lime wedges on the side for extra zest.
Extra Tips:
For the best results, verify the mangoes are ripe and juicy, as this will enhance the sweetness of the salsa. Feel free to adjust the spiciness by adding more or less jalapeño, depending on your preference.
If you’re short on time, you can marinate the chicken overnight for an even more pronounced flavor. Finally, to keep the tacos warm while serving, you can place them in a preheated oven at a low temperature until ready to eat. Enjoy your delicious Grilled Chicken Tacos With Mango Salsa!
Greek Yogurt Chicken Salad Wraps
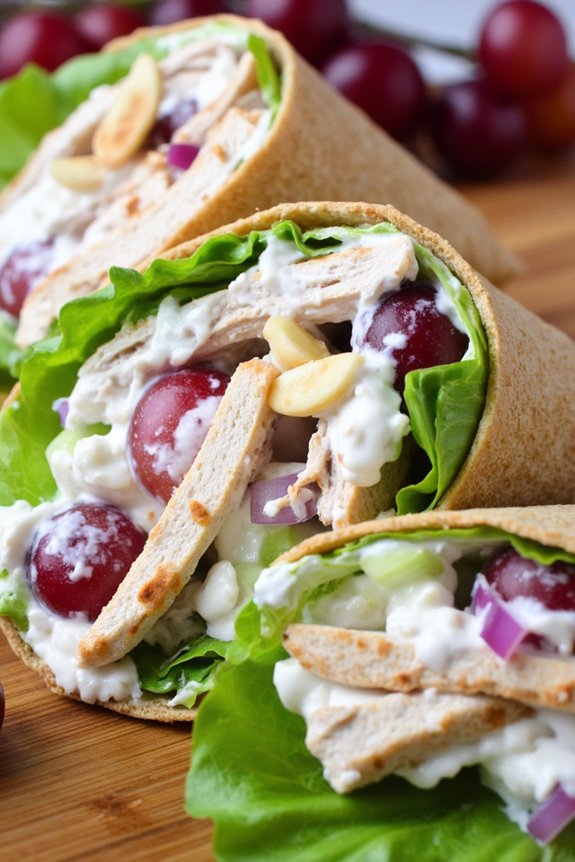
If you’re looking for a healthy dinner option that even the pickiest of eaters will enjoy, these Greek Yogurt Chicken Salad Wraps are a fantastic choice. They offer a creamy, flavorful filling wrapped in a soft tortilla, providing a satisfying meal that’s both nutritious and delicious. The use of Greek yogurt instead of mayonnaise makes this dish lower in fat while still giving it a rich and creamy texture.
The combination of chicken, grapes, celery, and nuts creates a delightful mix of flavors and textures, ensuring that each bite is as enjoyable as the last. Perfect for a family dinner or a casual get-together, these wraps can be easily customized to suit individual tastes. They’re simple to prepare and can be made ahead of time, making them a convenient option for busy weeknights.
Whether you serve them as a main dish or as part of a larger spread, these Greek Yogurt Chicken Salad Wraps are sure to become a household favorite.
Ingredients (Serving Size: 4-6 people):
- 4 cups cooked chicken breast, shredded
- 1 cup Greek yogurt
- 2 tablespoons Dijon mustard
- 1 tablespoon honey
- 1 tablespoon lemon juice
- 1 cup red grapes, halved
- 1/2 cup celery, chopped
- 1/4 cup red onion, finely chopped
- 1/4 cup almonds or walnuts, chopped
- Salt and pepper to taste
- 6 large whole wheat tortillas
- Lettuce leaves for wrapping
Cooking Instructions:
- Prepare the Chicken: Begin by cooking your chicken breasts if they aren’t already cooked. You can poach, grill, or bake them as per your preference. Once cooked, allow them to cool slightly before shredding them into bite-sized pieces using two forks or your fingers.
- Make the Dressing: In a large mixing bowl, combine the Greek yogurt, Dijon mustard, honey, and lemon juice. Stir well until all ingredients are fully incorporated into a smooth, creamy dressing.
- Assemble the Salad: Add the shredded chicken, halved grapes, chopped celery, red onion, and nuts to the bowl with the dressing. Gently fold the ingredients together until the chicken and other components are evenly coated with the dressing. Season with salt and pepper to taste.
- Prepare the Wraps: Lay a tortilla flat on a clean surface. Place a lettuce leaf in the center of the tortilla for added crunch, and then spoon a generous portion of the chicken salad mixture on top.
- Wrap It Up: Carefully fold the sides of the tortilla over the filling, then roll it up tightly starting from the bottom. Repeat this process with the remaining tortillas and filling.
- Serve: Slice each wrap in half for easier handling and serve immediately. These wraps can also be wrapped in foil or parchment paper for easy transport to picnics or as a packed lunch.
Extra Tips:
For added flavor, consider adding a pinch of curry powder or a sprinkle of fresh herbs like dill or parsley to the chicken salad mixture. If you prefer a bit of heat, try adding a dash of hot sauce or some chopped jalapeños.
For a more substantial meal, you can add slices of avocado or a handful of spinach to the wraps. These wraps can be stored in the refrigerator for up to two days, making them a great make-ahead option for meal prep.
One-Pot Cheesy Broccoli and Rice
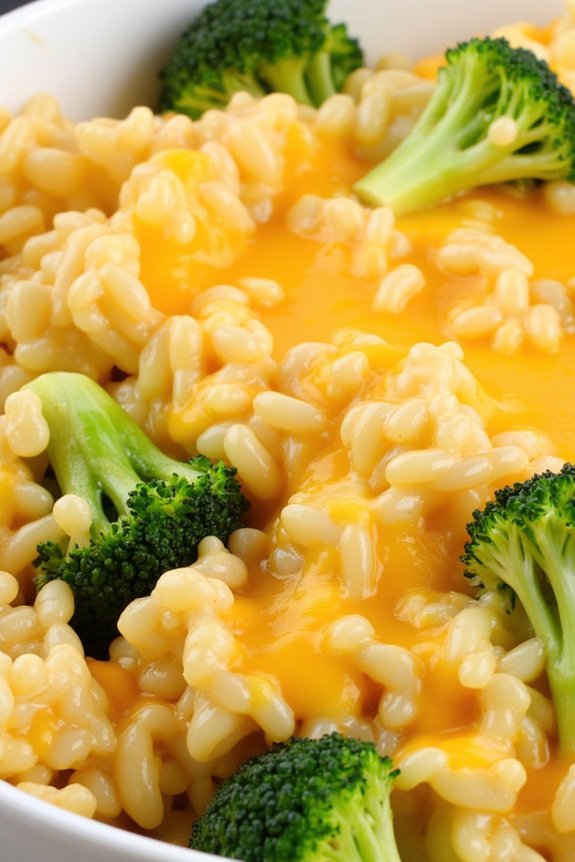
For many families, mealtime can be a struggle, especially when trying to satisfy picky eaters. This One-Pot Cheesy Broccoli and Rice recipe is a surefire way to win over even the most selective palates while guaranteeing a nutritious meal. It’s creamy, cheesy, and filled with healthy broccoli, making it both delicious and wholesome. The best part? It all comes together in one pot, minimizing clean-up and maximizing flavor.
This dish is perfect for busy weeknights when you need something quick and nourishing. The combination of rice and cheese creates a comforting base, while the broccoli adds a pop of color and a dose of vitamins. This recipe yields a serving size for 4-6 people, making it ideal for family dinners or meal prepping for the week. Whether you’re dealing with a child who turns their nose up at greens or an adult craving comfort food, this recipe is sure to become a family favorite.
Ingredients:
- 2 cups of white or brown rice
- 4 cups of low-sodium chicken broth
- 1 tablespoon of olive oil
- 1 medium onion, finely chopped
- 3 cloves of garlic, minced
- 4 cups of broccoli florets
- 2 cups of shredded cheddar cheese
- 1/2 cup of grated Parmesan cheese
- Salt and pepper to taste
- 1 teaspoon of Dijon mustard
- 1 tablespoon of butter
- Optional: 1/2 teaspoon of paprika or cayenne pepper for added spice
Cooking Instructions:
- Prep and Sauté the Aromatics: Begin by heating the olive oil in a large pot over medium heat. Add the chopped onion and sauté for about 3-4 minutes until it becomes translucent. Add the minced garlic and cook for another minute until fragrant.
- Cook the Rice: Stir in the rice, guaranteeing it’s well-coated with the oil and aromatics. Add the chicken broth and bring the mixture to a boil. Once boiling, reduce the heat to low, cover, and let it simmer for about 15 minutes.
- Add the Broccoli: After 15 minutes, add the broccoli florets to the pot. Stir them into the rice and replace the lid. Continue to cook for an additional 5-7 minutes until both the rice and broccoli are tender.
- Incorporate the Cheese: Once the rice and broccoli are cooked, remove the pot from the heat. Stir in the Dijon mustard, butter, cheddar cheese, and Parmesan cheese. Mix until the cheese is fully melted and the mixture is creamy.
- Season and Serve: Taste the dish and add salt, pepper, and optional spices like paprika or cayenne to suit your preference. Serve hot and enjoy your one-pot cheesy broccoli and rice.
Extra Tips:
To make this dish even more nutritious, consider adding protein such as grilled chicken, tofu, or shrimp.
If you prefer a stronger cheese flavor, experiment with different types of cheese like Gruyère or Monterey Jack.
Be sure to use fresh broccoli for the best flavor and texture, or if using frozen, adjust the cooking time accordingly to guarantee it isn’t overcooked.
If you find the mixture too thick, you can add a bit more chicken broth or milk to reach your desired consistency.
Enjoy your meal and the ease of only having one pot to clean afterward!
Shrimp Stir-Fry With Snap Peas

Shrimp Stir-Fry With Snap Peas is a delightful and vibrant dish perfect for picky eaters. This recipe combines succulent shrimp with crisp snap peas, creating a harmonious blend of flavors and textures. It’s a quick and easy meal that isn’t only healthy but also bursting with color and nutrition. The simplicity of the ingredients allows each component to shine, making it an excellent choice for those who are particular about their meals.
This stir-fry can be prepared in under 30 minutes, making it an ideal option for busy weeknights. It’s packed with protein from the shrimp and essential vitamins from the snap peas, guaranteeing a balanced and satisfying dinner. The light soy sauce dressing adds just the right amount of flavor without overwhelming the natural sweetness of the peas and the brininess of the shrimp. Pair it with steamed jasmine rice or noodles for a complete meal that even the most selective eaters will love.
Ingredients (Serving Size: 4-6 people):
- 1 pound large shrimp, peeled and deveined
- 2 cups snap peas, trimmed
- 1 tablespoon vegetable oil
- 3 cloves garlic, minced
- 1 tablespoon fresh ginger, grated
- 1 red bell pepper, thinly sliced
- 3 tablespoons low-sodium soy sauce
- 1 tablespoon oyster sauce
- 1 teaspoon sesame oil
- 1 tablespoon cornstarch mixed with 2 tablespoons water (slurry)
- Salt and pepper to taste
- Sesame seeds and sliced green onions for garnish
Cooking Instructions:
- Prepare Ingredients: Start by washing the shrimp and snap peas thoroughly. Confirm the shrimp is peeled and deveined, and the snap peas are trimmed. Thinly slice the red bell pepper, mince the garlic, and grate the ginger.
- Heat Oil: In a large wok or skillet, heat the vegetable oil over medium-high heat. Make certain the oil is hot before adding the ingredients to guarantee a good sear.
- Cook Shrimp: Add the shrimp to the pan and season with a little salt and pepper. Stir-fry the shrimp for about 2-3 minutes until they turn pink and are cooked through. Remove the shrimp from the pan and set them aside.
- Stir-Fry Vegetables: In the same pan, add the garlic and ginger. Stir-fry for about 30 seconds until fragrant. Add the snap peas and red bell pepper. Stir-fry for another 2-3 minutes until the vegetables are tender-crisp.
- Combine Ingredients: Return the cooked shrimp to the pan. Add the soy sauce, oyster sauce, and sesame oil. Stir everything together to guarantee the shrimp and vegetables are evenly coated with the sauce.
- Thicken Sauce: Pour in the cornstarch slurry and stir well. Cook for another minute or until the sauce has thickened to your desired consistency.
- Serve: Remove the stir-fry from heat. Garnish with sesame seeds and sliced green onions before serving. Pair with steamed rice or noodles if desired.
Extra Tips:
For the best flavor, use fresh shrimp and snap peas. If using frozen shrimp, confirm they’re fully thawed and patted dry before cooking to avoid excess moisture.
To add a bit of heat, consider adding a pinch of red pepper flakes or a splash of Sriracha. Adjust the seasoning to your taste, and feel free to substitute or add other vegetables like broccoli or carrots for variety.
If you’re serving the dish with rice, start cooking it before the stir-fry to have everything ready at the same time.
Hearty Vegetable and Quinoa Chili
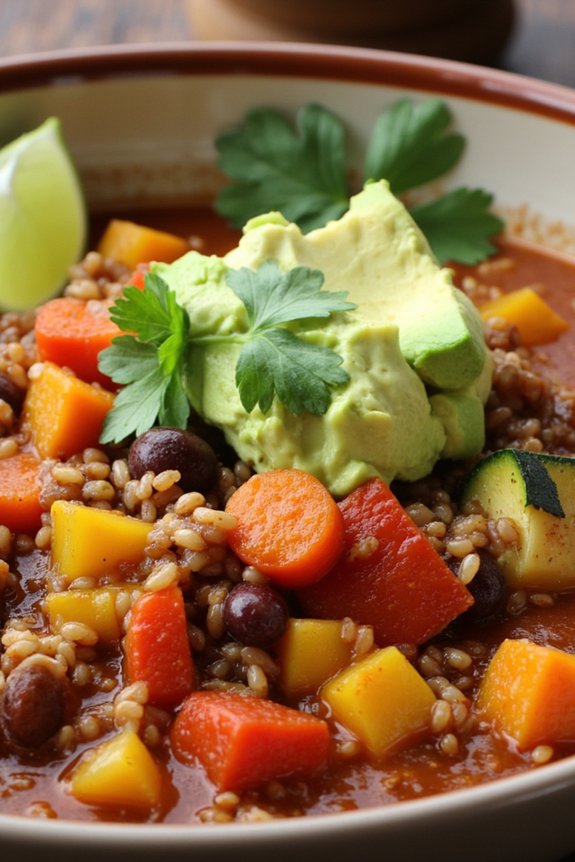
Hearty Vegetable and Quinoa Chili is a delicious and nutritious meal perfect for families with picky eaters. This recipe is packed with vibrant vegetables, protein-rich quinoa, and a medley of spices that create a savory and satisfying dish. It’s an ideal choice for a healthy dinner, offering a balanced array of nutrients while accommodating diverse palates.
The chili is both comforting and wholesome, making it a great option for cooler evenings or any time you crave a hearty, meatless meal. This chili recipe isn’t only flavorful but also easy to prepare, making it a convenient choice for busy weeknights. By incorporating a variety of vegetables, it guarantees a rich and robust flavor profile while providing essential vitamins and minerals.
The quinoa adds a delightful texture and a protein boost, making this dish a complete meal on its own. Whether you’re serving it to children who are selective about their food or adults looking for a healthier alternative to traditional chili, this recipe is sure to please.
Ingredients (serves 4-6):
- 1 tablespoon olive oil
- 1 onion, diced
- 2 cloves garlic, minced
- 1 red bell pepper, chopped
- 1 yellow bell pepper, chopped
- 2 carrots, peeled and diced
- 2 stalks celery, diced
- 1 zucchini, diced
- 1 cup quinoa, rinsed
- 1 can (15 oz) black beans, drained and rinsed
- 1 can (15 oz) kidney beans, drained and rinsed
- 1 can (28 oz) diced tomatoes
- 2 tablespoons tomato paste
- 4 cups vegetable broth
- 2 teaspoons chili powder
- 1 teaspoon ground cumin
- 1 teaspoon smoked paprika
- Salt and pepper to taste
- 1 avocado, diced (for topping)
- Fresh cilantro, chopped (for garnish)
- Lime wedges (for serving)
Instructions:
- Prepare Ingredients: Start by preparing all the vegetables. Dice the onion, mince the garlic, chop the bell peppers, dice the carrots, celery, and zucchini. Rinse and drain the beans and rinse the quinoa thoroughly under cold water to remove any bitterness.
- Sauté Vegetables: In a large pot or Dutch oven, heat the olive oil over medium heat. Add the diced onions and minced garlic, sautéing for about 2 minutes until they become translucent and fragrant.
- Add Vegetables: Stir in the chopped bell peppers, carrots, celery, and zucchini. Cook for about 5 minutes, stirring occasionally, until the vegetables are slightly softened.
- Incorporate Quinoa and Spices: Add the rinsed quinoa to the pot, followed by the chili powder, cumin, smoked paprika, salt, and pepper. Stir well to coat the quinoa and vegetables in the spices.
- Simmer the Chili: Pour in the diced tomatoes, tomato paste, and vegetable broth. Stir to combine, then bring the mixture to a boil. Once boiling, reduce the heat to low, cover the pot, and let it simmer for 25 minutes, or until the quinoa is cooked and the chili has thickened.
- Add Beans and Final Seasoning: Add the drained black beans and kidney beans to the pot. Stir to combine and cook for an additional 5-10 minutes, allowing the flavors to meld together.
- Serve: Once the chili is ready, taste and adjust the seasoning if necessary. Serve hot, garnished with diced avocado, fresh cilantro, and lime wedges on the side.
Extra Tips: For a richer flavor, consider allowing the chili to simmer for a longer period, as this can enhance the depth of the spices. Feel free to customize this recipe by adding or substituting vegetables based on preference or availability.
If you prefer a spicier chili, add a pinch of cayenne pepper or a chopped jalapeño. Additionally, if you have leftovers, this chili can be stored in the refrigerator for up to three days and often tastes even better the next day as the flavors continue to develop.