

Weeknight dinners don’t have to be a hassle, and meal prep can make them a breeze. With clean and easy recipes, you can enjoy delicious dinners without the stress. Think lemon herb chicken with roasted veggies or colorful quinoa-stuffed bell peppers. These meals will keep your family nourished and happy. Let’s uncover some simple and healthy meal prep ideas that your family will love.
One-Pan Lemon Herb Chicken and Vegetables
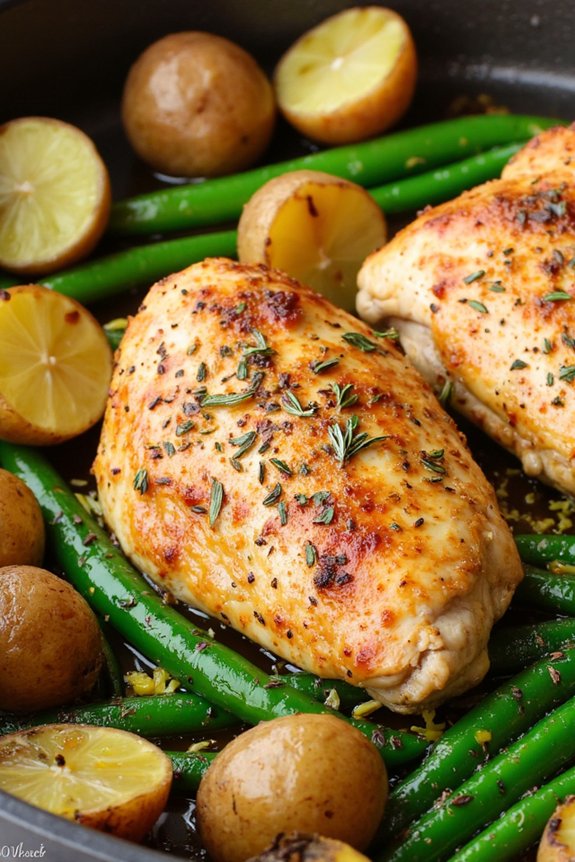
One-Pan Lemon Herb Chicken and Vegetables is a delicious and straightforward recipe that brings together the savory flavors of chicken with the zest of lemon and the earthiness of fresh herbs. This dish is perfect for those looking to prepare a healthy, balanced meal with minimal cleanup.
The combination of tender chicken, roasted vegetables, and a bright lemony herb dressing makes it a crowd-pleaser for family dinners or meal prepping for the week.
This recipe is designed to serve 4-6 people, making it an ideal choice for family meals or gatherings. By using just one pan, you not only save time on cleanup but also allow the flavors to meld together beautifully in the oven.
With just a few fresh ingredients and some staple seasonings, you can create a nutritious dinner that’s both flavorful and satisfying.
Ingredients:
- 4-6 boneless, skinless chicken breasts
- 1 pound baby potatoes, halved
- 1 pound green beans, trimmed
- 2 tablespoons olive oil
- 2 lemons, juiced and zested
- 3 cloves garlic, minced
- 1 tablespoon fresh thyme leaves
- 1 tablespoon fresh rosemary, chopped
- Salt and pepper to taste
- Optional: fresh parsley for garnish
Cooking Instructions:
- Preheat the Oven: Start by preheating your oven to 400°F (200°C). This temperature is perfect for roasting chicken and vegetables to perfection.
- Prepare the Pan: On a large baking sheet, arrange the baby potatoes on one side and the green beans on the other. Drizzle them with 1 tablespoon of olive oil, and season with salt and pepper. Toss the vegetables to guarantee they’re well coated.
- Season the Chicken: In a small bowl, combine the remaining olive oil, lemon juice, lemon zest, minced garlic, thyme, rosemary, salt, and pepper. Place the chicken breasts in the center of the baking sheet and brush them generously with the lemon-herb mixture.
- Roast the Dish: Place the baking sheet in the preheated oven and roast for 25-30 minutes, or until the chicken is cooked through and the vegetables are tender. The internal temperature of the chicken should reach 165°F (75°C).
- Finish and Serve: Once cooked, remove the pan from the oven. Allow the chicken to rest for a few minutes before slicing. Serve the chicken and vegetables warm, garnished with fresh parsley if desired.
Extra Tips:
For best results, make sure to evenly distribute the vegetables on the baking sheet to guarantee they roast rather than steam.
If you prefer your vegetables more crispy, you can increase the oven temperature to 425°F (220°C) for the last 5 minutes of cooking.
Additionally, feel free to experiment with different herbs or add a splash of white wine to the lemon-herb mixture for an extra depth of flavor.
This dish can be easily customized to suit your taste preferences or dietary needs. Enjoy your healthy, satisfying meal!
Quinoa and Black Bean Stuffed Bell Peppers
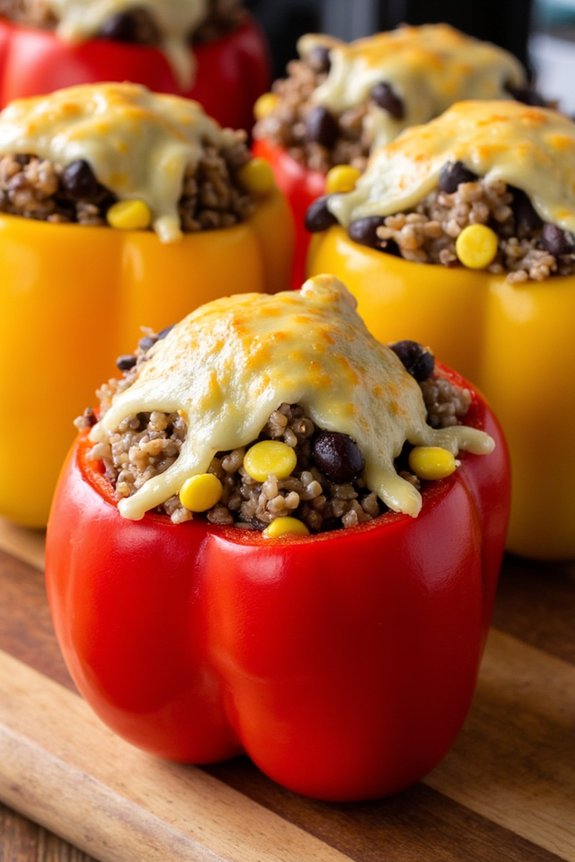
Quinoa and Black Bean Stuffed Bell Peppers are a delightful and nutritious option for a healthy meal prep dinner. This dish combines protein-rich quinoa and black beans with colorful bell peppers, offering a balanced mix of flavors and textures. Perfect for those looking to prepare meals in advance, these stuffed peppers are both satisfying and easy to make. They can be served on their own or as a side dish, making them versatile for various dietary needs.
The beauty of this recipe lies in its simplicity and the vibrant colors it brings to your table. By using fresh ingredients and classic seasonings, you can create a meal that’s not only delicious but also visually appealing. The stuffed peppers are baked to perfection, allowing the flavors to meld together while maintaining the integrity of the pepper itself.
Whether you’re cooking for your family or meal prepping for the week, Quinoa and Black Bean Stuffed Bell Peppers are sure to become a staple in your culinary repertoire.
Ingredients (Serves 4-6):
- 6 large bell peppers
- 1 cup quinoa, rinsed
- 2 cups vegetable broth or water
- 1 tablespoon olive oil
- 1 medium onion, chopped
- 2 cloves garlic, minced
- 1 can (15 ounces) black beans, drained and rinsed
- 1 can (14.5 ounces) diced tomatoes, drained
- 1 teaspoon ground cumin
- 1 teaspoon chili powder
- Salt and pepper to taste
- 1 cup corn kernels (fresh, frozen, or canned)
- 1 cup shredded cheese (cheddar, Monterey Jack, or your choice)
- Fresh cilantro, chopped (optional)
Cooking Instructions:
- Preheat and Prepare Peppers: Preheat your oven to 375°F (190°C). Cut the tops off the bell peppers and remove the seeds and membranes. Place the peppers upright in a baking dish.
- Cook Quinoa: In a medium saucepan, bring the vegetable broth or water to a boil. Add the quinoa, reduce the heat to low, cover, and simmer for about 15 minutes or until the quinoa is cooked and the liquid is absorbed. Fluff with a fork and set aside.
- Sauté Aromatics: In a large skillet, heat the olive oil over medium heat. Add the chopped onion and sauté for about 5 minutes until translucent. Add the minced garlic and sauté for an additional minute.
- Combine Filling Ingredients: Stir in the black beans, diced tomatoes, cooked quinoa, ground cumin, chili powder, corn, salt, and pepper. Cook for 5-7 minutes, stirring occasionally, until the mixture is heated through and well combined.
- Stuff the Peppers: Evenly spoon the quinoa and black bean mixture into each bell pepper, pressing down slightly to pack the mixture in. Top each stuffed pepper with shredded cheese.
- Bake the Peppers: Cover the baking dish with aluminum foil and bake in the preheated oven for 30 minutes. Remove the foil and bake for an additional 10-15 minutes, or until the peppers are tender and the cheese is melted and bubbly.
- Garnish and Serve: Remove the stuffed peppers from the oven and let them cool slightly. Garnish with chopped cilantro if desired, and serve warm.
Extra Tips:
For an extra layer of flavor, consider roasting the bell peppers in the oven for about 10 minutes before stuffing them. This will enhance their sweetness and add a slight char to their flavor.
If you prefer a spicier kick, add some chopped jalapeños or a pinch of cayenne pepper to the quinoa mixture. Additionally, these stuffed peppers can be stored in an airtight container in the refrigerator for up to 4 days, making them perfect for meal prep.
Enjoy experimenting with different cheese and seasoning combinations to make this dish uniquely yours!
Sheet Pan Salmon With Asparagus and Potatoes
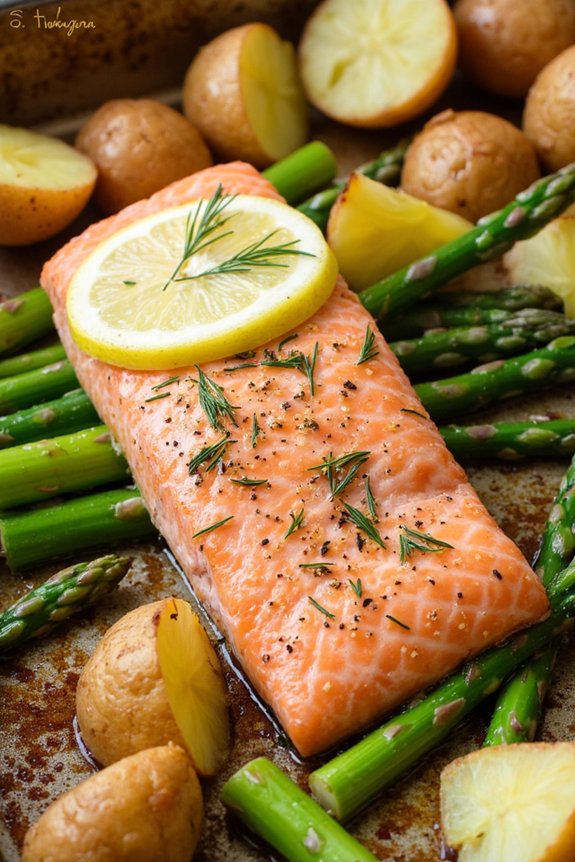
Sheet Pan Salmon With Asparagus and Potatoes is a simple yet delicious meal that’s perfect for those busy weeknights when you want something healthy and satisfying without spending hours in the kitchen. This dish combines the rich flavors of salmon with the freshness of asparagus and the comforting taste of roasted potatoes, all cooked together on a single sheet pan for minimal cleanup.
It’s not only nutritious but also visually appealing, making it a great choice for family dinners or casual gatherings. The beauty of this meal lies in its simplicity and the ability to customize it according to your taste preferences. You can season the salmon and vegetables with your favorite herbs and spices or keep it classic with just salt, pepper, and a squeeze of lemon.
The combination of protein, healthy fats, and fiber makes this dish a balanced meal that will keep you full and satisfied. Plus, it’s a great way to incorporate more omega-3 fatty acids and essential nutrients into your diet.
Ingredients (serving size: 4-6 people):
- 4-6 salmon fillets (about 6 oz each)
- 1 pound asparagus, trimmed
- 1.5 pounds baby potatoes, halved
- 3 tablespoons olive oil
- 2 teaspoons garlic powder
- 2 teaspoons dried dill
- 1 teaspoon salt
- 1 teaspoon black pepper
- 1 lemon, sliced
- Fresh parsley, chopped (optional for garnish)
Cooking Instructions:
- Preheat Oven: Preheat your oven to 400°F (200°C). Confirm your oven rack is in the middle position for even cooking.
- Prepare Baking Sheet: Line a large baking sheet with parchment paper or aluminum foil. This will prevent sticking and make cleanup easier.
- Season Potatoes: In a large bowl, toss the halved baby potatoes with 1.5 tablespoons of olive oil, 1 teaspoon of garlic powder, 0.5 teaspoon of salt, and 0.5 teaspoon of black pepper. Spread them evenly on one side of the prepared baking sheet.
- Roast Potatoes: Place the baking sheet in the oven and roast the potatoes for about 15 minutes. This gives them a head start to confirm they’re fully cooked by the time the salmon and asparagus are done.
- Prepare Salmon and Asparagus: While the potatoes are roasting, prepare the salmon and asparagus. In the same bowl, toss the trimmed asparagus with 1 tablespoon of olive oil, 0.5 teaspoon of salt, and 0.5 teaspoon of black pepper. Set aside.
- Season Salmon: Rub each salmon fillet with a little olive oil and season with the remaining garlic powder, dill, salt, and pepper.
- Add Salmon and Asparagus: Remove the baking sheet from the oven after the potatoes have roasted for 15 minutes. Push the potatoes to one side and add the salmon fillets and asparagus to the other side of the sheet.
- Add Lemon: Place lemon slices over the salmon and asparagus for added flavor.
- Roast Everything Together: Return the sheet to the oven and roast for an additional 15-20 minutes, or until the salmon flakes easily with a fork, and the asparagus and potatoes are tender.
- Serve: Remove from the oven and let cool slightly. Garnish with freshly chopped parsley if desired before serving.
Extra Tips:
To confirm your salmon stays moist and doesn’t dry out, avoid overcooking it. The salmon is done when it flakes easily with a fork. If you prefer your asparagus more on the tender side, you can add it to the pan a few minutes earlier.
Feel free to experiment with different herbs such as thyme or rosemary for additional flavors. This dish pairs well with a side of mixed greens or a light vinaigrette for a complete meal.
Zucchini Noodles With Pesto and Cherry Tomatoes
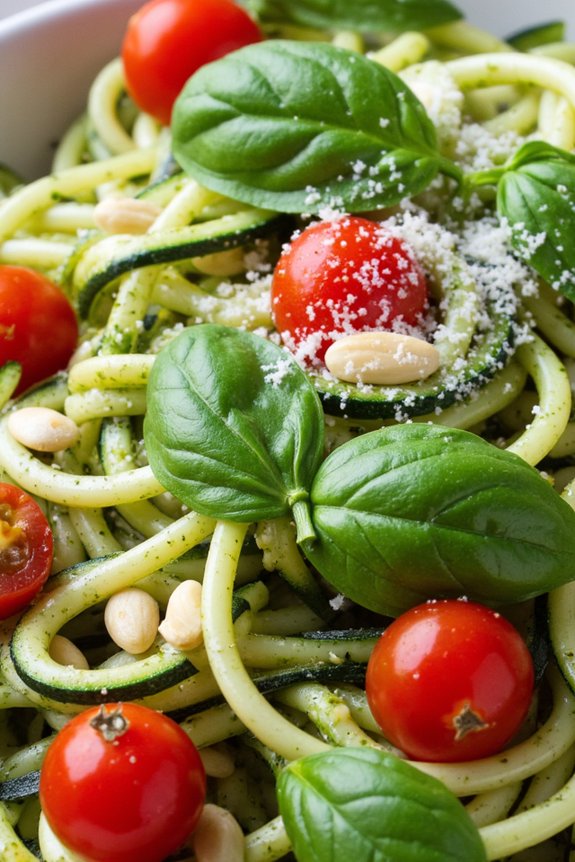
Zucchini Noodles With Pesto and Cherry Tomatoes is a delightful and healthy meal that brings together fresh vegetables and vibrant flavors. This dish is perfect for those looking to maintain a balanced diet without compromising on taste.
It’s a low-carb alternative to traditional pasta, using zucchini noodles as a base, which are light, nutritious, and easy to prepare. The addition of homemade pesto sauce and juicy cherry tomatoes elevates the dish, offering a burst of flavor with every bite.
This recipe isn’t only nutritious but also quick to prepare, making it ideal for busy weeknights or meal prepping for the week. With a few simple ingredients, you can enjoy a satisfying and guilt-free meal that leaves you feeling energized and content.
The following ingredients and instructions will guide you through the process of creating this delicious dinner for a serving size of 4-6 people.
Ingredients:
- 4 medium zucchinis
- 2 cups fresh basil leaves
- 1/2 cup pine nuts
- 2 cloves garlic
- 1/2 cup grated Parmesan cheese
- 1/2 cup extra-virgin olive oil
- Salt and pepper to taste
- 2 cups cherry tomatoes, halved
- 1 tablespoon lemon juice
- Optional: Grated Parmesan for garnish
Cooking Instructions:
- Prepare the Zucchini Noodles: Begin by washing and trimming the ends of the zucchini. Using a spiralizer, create zucchini noodles (also known as zoodles). If you don’t have a spiralizer, you can use a vegetable peeler to create long ribbons.
- Make the Pesto Sauce: In a food processor, combine fresh basil leaves, pine nuts, garlic, grated Parmesan cheese, and a pinch of salt and pepper. Pulse until the mixture is finely chopped. With the processor running, slowly add the olive oil until the pesto reaches a smooth consistency. Taste and adjust seasoning if necessary.
- Sauté the Zoodles: In a large pan, heat a tablespoon of olive oil over medium heat. Add the zucchini noodles and sauté for 3-4 minutes until they’re tender but still have a slight crunch. Be careful not to overcook them as they can become mushy.
- Combine and Serve: Remove the pan from the heat and add the pesto sauce to the zucchini noodles, tossing well to coat them evenly. Add the halved cherry tomatoes and a tablespoon of lemon juice, mixing gently to combine all the ingredients.
- Plating: Divide the zucchini noodles into serving bowls and garnish with additional grated Parmesan cheese if desired. Serve immediately while warm.
Extra Tips:
When preparing Zucchini Noodles With Pesto and Cherry Tomatoes, it’s important to use fresh ingredients for the best flavor. Make sure to dry the zucchini noodles thoroughly after spiralizing to avoid excess water in the dish.
Toasting the pine nuts before adding them to the pesto can enhance their nutty flavor. If you have leftover pesto, it can be stored in an airtight container in the refrigerator for up to a week and used in other dishes such as sandwiches or as a topping for grilled meats.
Turkey and Spinach Stuffed Portobello Mushrooms
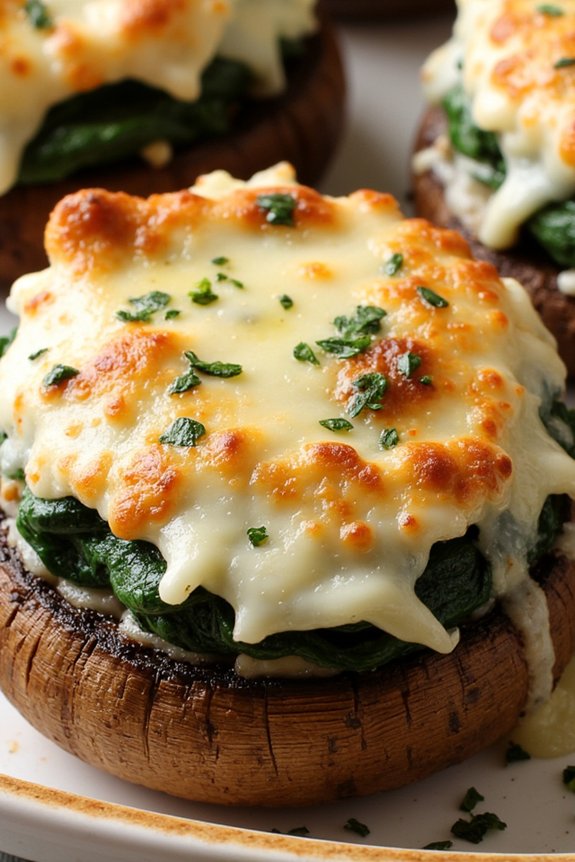
Turkey and Spinach Stuffed Portobello Mushrooms are a delicious and nutritious option for a healthy dinner. This dish combines the earthy flavor of Portobello mushrooms with a savory filling of lean ground turkey and fresh spinach. It’s perfect for those looking to enjoy a satisfying meal without the guilt, as it’s low in carbohydrates and high in protein.
Not only is this meal a treat for your taste buds, but it’s also visually appealing, making it an excellent choice for both family dinners and entertaining guests. This recipe is ideal for meal prepping, as the stuffed mushrooms can be made in advance and stored in the refrigerator until you’re ready to bake them.
It’s also flexible, allowing you to add your favorite herbs and spices to suit your taste. With a serving size of 4-6 people, it’s perfect for sharing or for enjoying leftovers the next day. Let’s explore the ingredients and steps needed to create this delightful dish.
Ingredients for 4-6 servings:
- 6 large Portobello mushrooms
- 1 pound ground turkey
- 2 cups fresh spinach, chopped
- 1 small onion, finely chopped
- 2 cloves garlic, minced
- 1 tablespoon olive oil
- 1 teaspoon dried oregano
- 1 teaspoon dried basil
- Salt and pepper to taste
- 1 cup shredded mozzarella cheese
- 1/2 cup grated Parmesan cheese
Instructions:
- Prepare the Mushrooms: Preheat your oven to 375°F (190°C). Clean the Portobello mushrooms by gently wiping them with a damp paper towel to remove any dirt. Remove the stems and use a spoon to scrape out the gills, creating space for the filling.
- Cook the Filling: In a large skillet, heat the olive oil over medium heat. Add the chopped onion and garlic, sautéing until they become translucent. Add the ground turkey to the skillet, cooking until it’s browned and fully cooked through.
- Add Spinach and Seasoning: Stir in the chopped spinach, and cook until wilted. Season the mixture with oregano, basil, salt, and pepper. Mix well to combine all the flavors. Remove the skillet from heat.
- Stuff the Mushrooms: Place the cleaned Portobello mushroom caps on a baking sheet lined with parchment paper. Spoon the turkey and spinach mixture evenly into each mushroom cap.
- Add Cheese: Sprinkle shredded mozzarella and grated Parmesan cheese over the stuffed mushrooms, ensuring each one is generously topped.
- Bake the Mushrooms: Place the baking sheet in the preheated oven and bake for 20-25 minutes, or until the mushrooms are tender and the cheese is melted and bubbly.
- Serve: Remove the mushrooms from the oven and let them cool for a few minutes before serving. Enjoy your stuffed mushrooms warm for the best taste experience.
Extra Tips:
For a more flavorful filling, consider adding a splash of white wine or balsamic vinegar to the turkey mixture while cooking. If you prefer a bit of heat, a pinch of red pepper flakes can be added as well.
These stuffed mushrooms can be stored in the refrigerator for up to three days, making them a convenient option for meal prepping. Just reheat in the oven or microwave before serving. Finally, feel free to experiment with different types of cheese or additional vegetables, like bell peppers or zucchini, to customize this dish to your liking.
Slow Cooker Chicken and Sweet Potato Stew
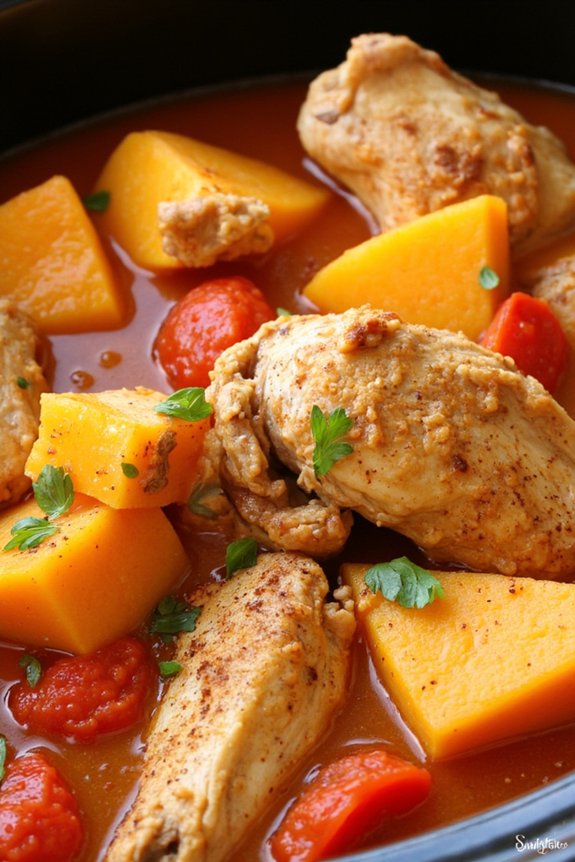
Slow Cooker Chicken and Sweet Potato Stew is a delightful, hearty meal that can easily fit into your weekly meal prep routine. This dish combines tender chicken, sweet potatoes, and a blend of aromatic spices to create a flavorful and nutritious stew that warms the soul.
Perfect for busy weeknights, this slow cooker recipe requires minimal prep time and allows the flavors to meld together beautifully over a few hours, ensuring a deeply satisfying meal by the end of the day.
This recipe isn’t only delicious but also packed with nutrients, making it an excellent choice for a healthy dinner option. The natural sweetness of the sweet potatoes complements the savory chicken, while the slow cooking process tenderizes the meat and infuses the dish with a rich, savory broth.
With a serving size that accommodates 4-6 people, this stew is perfect for family dinners or for preparing meals ahead of time, allowing you to enjoy a home-cooked meal throughout the week with minimal effort.
Ingredients:
- 2 pounds boneless, skinless chicken thighs, cut into chunks
- 2 large sweet potatoes, peeled and diced
- 1 large onion, chopped
- 3 cloves garlic, minced
- 2 cups low-sodium chicken broth
- 1 can (14.5 oz) diced tomatoes
- 1 teaspoon ground cumin
- 1 teaspoon smoked paprika
- 1/2 teaspoon ground cinnamon
- Salt and pepper to taste
- 1 tablespoon olive oil
- 1 tablespoon fresh lemon juice
- Fresh parsley, chopped (for garnish)
Instructions:
- Prepare Ingredients: Start by cutting the chicken thighs into chunks and peeling and dicing the sweet potatoes. Chop the onion and mince the garlic. These steps can be done the night before to save time in the morning.
- Sauté Aromatics: In a skillet over medium heat, add the olive oil. Once hot, add the chopped onion and sauté until translucent, about 3-4 minutes. Add the minced garlic and continue to sauté for an additional 1 minute until fragrant.
- Combine Ingredients in Slow Cooker: Transfer the sautéed onion and garlic into the slow cooker. Add the chicken chunks, diced sweet potatoes, diced tomatoes, cumin, smoked paprika, cinnamon, salt, and pepper. Pour in the chicken broth and stir to combine all ingredients.
- Cook the Stew: Cover the slow cooker and set it to low heat. Allow the stew to cook for 6-7 hours, or until the chicken is tender and the sweet potatoes are cooked through.
- Finish and Serve: Once cooked, stir in the fresh lemon juice to brighten the flavors. Taste and adjust seasoning if necessary. Serve the stew hot, garnished with chopped fresh parsley.
Extra Tips:
To enhance the flavor of your Slow Cooker Chicken and Sweet Potato Stew, consider browning the chicken chunks in the skillet before adding them to the slow cooker. This step adds depth to the flavor but can be skipped if you’re short on time.
Additionally, this stew can be made a day in advance and stored in the refrigerator, as the flavors will continue to develop and improve overnight. For those who enjoy a bit of heat, a pinch of red pepper flakes can be added to the stew.
Shrimp and Broccoli Stir Fry With Brown Rice
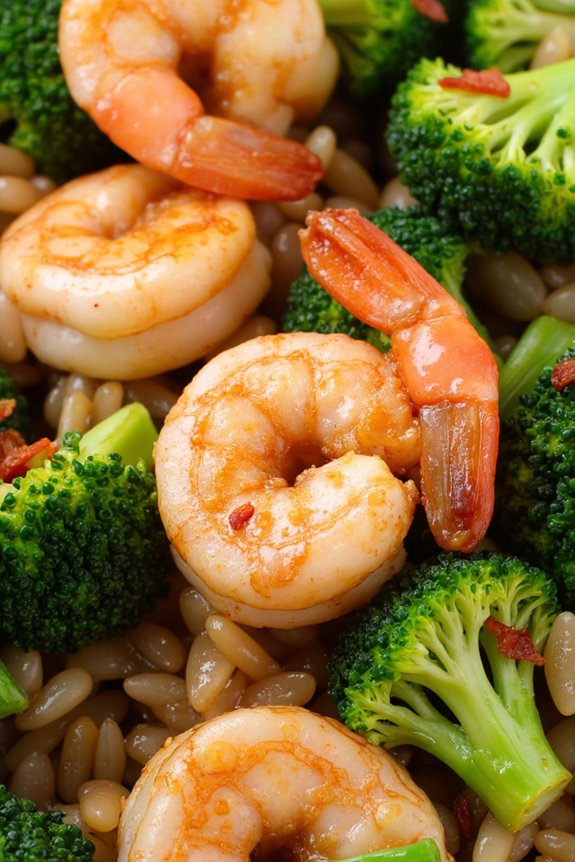
If you’re looking for a nutritious and delicious dinner option that can be prepared in advance, this Shrimp and Broccoli Stir Fry With Brown Rice is perfect for you. It’s a healthy meal that’s packed with lean protein from shrimp, fiber from broccoli, and whole grains from brown rice. Not only is it satisfying and flavorful, but it’s also quick to prepare, making it an ideal choice for those busy weeknights or for meal prepping for the week ahead.
The combination of tender shrimp, crunchy broccoli, and a savory sauce served over fluffy brown rice makes for a delightful dish that the whole family will love. This recipe is designed to serve 4-6 people, making it great for a family dinner or for leftovers that can be enjoyed the next day.
It’s a versatile dish that can be easily customized with additional vegetables or a touch of spice if you prefer some heat. Whether you’re an experienced cook or a beginner in the kitchen, this Shrimp and Broccoli Stir Fry With Brown Rice is simple to make and sure to become a staple in your meal rotation.
Ingredients:
- 1 1/2 pounds large shrimp, peeled and deveined
- 4 cups broccoli florets
- 3 cups cooked brown rice
- 1 tablespoon vegetable oil
- 3 cloves garlic, minced
- 1 tablespoon ginger, minced
- 1/4 cup soy sauce
- 2 tablespoons oyster sauce
- 1 tablespoon sesame oil
- 1 tablespoon cornstarch mixed with 2 tablespoons water
- 1/2 teaspoon crushed red pepper flakes (optional)
- Salt and pepper to taste
- 2 tablespoons chopped green onions for garnish
Instructions:
- Prepare the Ingredients: Begin by cooking the brown rice according to package instructions, ensuring it’s ready to be served with the stir fry. While the rice cooks, prepare the shrimp by peeling and deveining them, and set aside. Cut the broccoli into bite-sized florets and mince the garlic and ginger.
- Stir Fry the Broccoli: Heat the vegetable oil in a large skillet or wok over medium-high heat. Add the broccoli florets and stir fry for about 3-4 minutes until they’re bright green and tender-crisp. Remove the broccoli from the skillet and set aside.
- Cook the Shrimp: In the same skillet, add the shrimp and cook for 2-3 minutes on each side until they’re pink and opaque. Remove the shrimp from the skillet and set aside with the broccoli.
- Prepare the Sauce: In the skillet, add the minced garlic and ginger and sauté for about 1 minute until fragrant. Add the soy sauce, oyster sauce, sesame oil, and optional crushed red pepper flakes. Stir well to combine.
- Thicken the Sauce: Add the cornstarch mixture to the sauce and stir continuously until the sauce thickens slightly, about 1-2 minutes.
- Combine and Serve: Return the cooked shrimp and broccoli to the skillet, tossing to coat them evenly with the sauce. Season with salt and pepper to taste. Serve the stir fry over the cooked brown rice and garnish with chopped green onions.
Extra Tips:
For best results, make sure not to overcrowd the skillet when cooking the shrimp, as this can cause them to steam instead of sear, leading to a less flavorful dish.
Also, feel free to add other vegetables such as bell peppers, snap peas, or carrots to increase the nutritional value and variety of the stir fry. If you prefer a spicier dish, increase the amount of crushed red pepper flakes or add a splash of sriracha to the sauce.
Finally, using fresh ginger and garlic enhances the flavor, but if you’re in a pinch, powdered versions can be used as substitutes.
Veggie-Packed Turkey Meatloaf Muffins
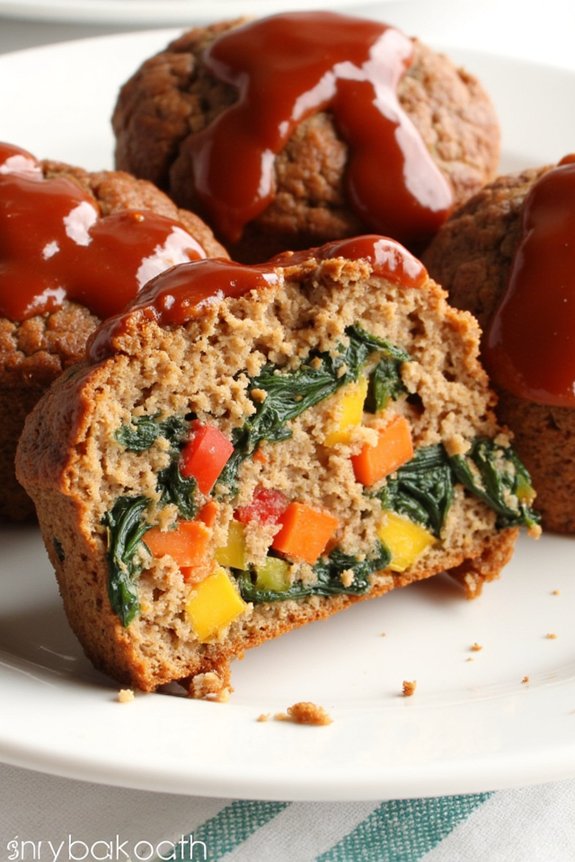
Veggie-Packed Turkey Meatloaf Muffins are a delightful and nutritious twist on the traditional meatloaf dish, perfect for those looking to incorporate more vegetables into their diet without sacrificing flavor.
These muffins aren’t only easy to prepare and portioned perfectly for meal prep, but they also offer a wholesome meal option that can be enjoyed for dinner or as a quick lunch throughout the week. The juicy turkey, combined with a medley of finely chopped vegetables, creates a flavorful and moist meatloaf muffin that’s both satisfying and healthy.
Packed with an array of colorful veggies, these muffins not only taste amazing but also add a vibrant splash of color to your dinner table. The integration of vegetables such as bell peppers, carrots, and spinach not only enhances the taste but also boosts the nutritional value, providing essential vitamins and minerals.
The individual muffin portions make them ideal for serving a family of 4-6 people and make it easy to manage portion sizes, guaranteeing that everyone gets a balanced meal. Whether you’re looking to meal prep for the week or need a simple yet nutritious dinner option, these Veggie-Packed Turkey Meatloaf Muffins are sure to please.
Ingredients (serves 4-6 people):
- 1 pound ground turkey
- 1 cup finely chopped spinach
- 1 cup finely chopped bell peppers (any color)
- 1/2 cup grated carrots
- 1/2 cup finely chopped onion
- 2 cloves garlic, minced
- 1/2 cup breadcrumbs
- 1/4 cup milk
- 1 egg
- 1 tablespoon Worcestershire sauce
- 1 teaspoon dried oregano
- 1 teaspoon salt
- 1/2 teaspoon black pepper
- 1/2 cup ketchup (for topping)
- Cooking spray
Instructions:
- Preheat the Oven: Begin by preheating your oven to 375°F (190°C). This guarantees that the oven is at the right temperature when you’re ready to bake the muffins.
- Prepare the Muffin Tin: Lightly coat a standard 12-cup muffin tin with cooking spray. This prevents the meatloaf muffins from sticking to the tin and makes for easy removal after baking.
- Mix the Ingredients: In a large mixing bowl, combine the ground turkey, spinach, bell peppers, carrots, onion, and garlic. Add the breadcrumbs, milk, egg, Worcestershire sauce, oregano, salt, and black pepper. Mix thoroughly until all the ingredients are well combined.
- Shape the Muffins: Divide the mixture evenly among the prepared muffin cups, pressing lightly to guarantee they hold their shape. Each cup should be filled almost to the top.
- Add the Topping: Spread a thin layer of ketchup over the top of each meatloaf muffin. This adds a tangy and sweet glaze that complements the savory flavors of the meatloaf.
- Bake: Place the muffin tin in the preheated oven and bake for 25-30 minutes, or until the internal temperature of the muffins reaches 165°F (74°C) and the tops are nicely browned.
- Cool and Serve: Once cooked, remove the muffins from the oven and let them cool in the tin for about 5 minutes. Carefully remove them from the tin and serve warm.
Extra Tips: For an even distribution of vegetables, use a food processor to finely chop them. This guarantees that every bite of the muffin is packed with flavor and nutrients.
If you prefer a spicier kick, you can add a dash of chili powder or your favorite hot sauce to the mixture. These muffins store well in the refrigerator for up to 3 days and can be reheated in the microwave for quick and easy meals.
Additionally, they can be frozen for longer storage; simply thaw overnight in the refrigerator before reheating.
Cauliflower Fried Rice With Tofu and Edamame
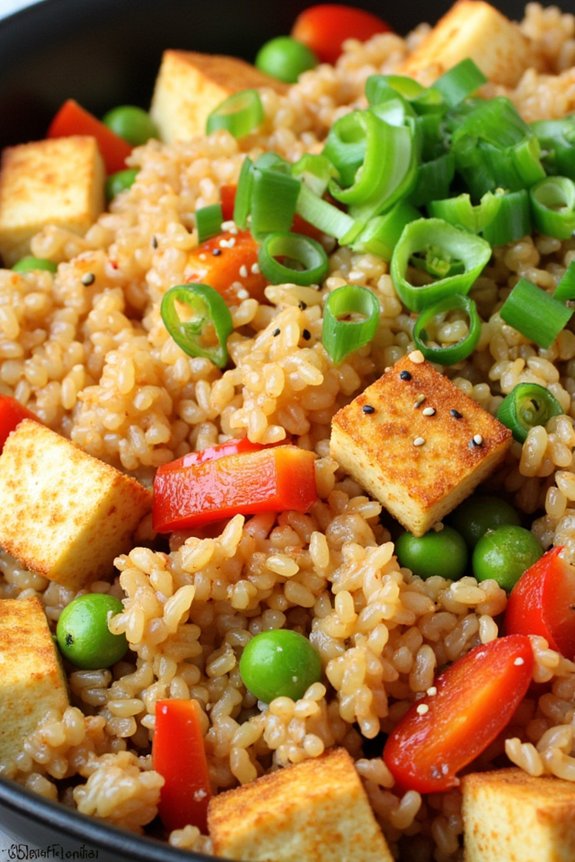
Cauliflower Fried Rice With Tofu and Edamame is a delicious, nutritious, and easy-to-make dish that’s perfect for those looking to enjoy a healthy meal without sacrificing flavor. This dish transforms traditional fried rice into a veggie-packed delight by using cauliflower rice as its base, making it low in carbs but still satisfying.
The addition of tofu provides a hearty source of protein, while edamame adds a pop of color and a boost of essential nutrients. It’s a great meal prep option that can be made ahead of time and enjoyed throughout the week.
This recipe is designed to serve 4-6 people, making it ideal for family dinners or meal prepping for several days. The blend of flavors from ginger, garlic, and soy sauce gives the dish a savory umami taste, while the veggies add freshness and texture.
It’s a versatile recipe that can be adjusted to include your favorite vegetables or protein sources, guaranteeing it’s a meal that everyone will love.
Ingredients (Serves 4-6):
- 1 large head of cauliflower
- 1 tablespoon vegetable oil
- 2 cloves garlic, minced
- 1 inch ginger, grated
- 1 block (14 oz) firm tofu, drained and cubed
- 1 cup frozen edamame, shelled
- 1 red bell pepper, diced
- 3 green onions, chopped
- 3 tablespoons soy sauce
- 1 tablespoon sesame oil
- 2 teaspoons rice vinegar
- Salt and pepper to taste
- Optional: sesame seeds and sliced green onions for garnish
Cooking Instructions:
- Prepare the Cauliflower Rice: Begin by cutting the cauliflower into florets and placing them in a food processor. Pulse until the cauliflower resembles rice grains. Be careful not to over-process.
- Cook the Tofu: Heat 1 tablespoon of vegetable oil in a large skillet over medium-high heat. Add the cubed tofu and cook until all sides are golden brown, about 10 minutes. Remove the tofu from the skillet and set aside.
- Sauté Aromatics: In the same skillet, add the minced garlic and grated ginger. Sauté for about 1 minute until fragrant.
- Add Vegetables: Add the diced red bell pepper and edamame to the skillet. Cook for about 3-4 minutes until the vegetables are tender-crisp.
- Cook Cauliflower Rice: Add the cauliflower rice to the skillet. Stir well to combine with the vegetables. Cook for about 5-7 minutes, stirring occasionally, until the cauliflower is tender.
- Combine Ingredients: Return the cooked tofu to the skillet. Add the chopped green onions, soy sauce, sesame oil, rice vinegar, salt, and pepper. Stir everything together and cook for an additional 2-3 minutes to make sure all flavors are well combined.
- Serve: Remove from heat and serve hot. Garnish with sesame seeds and additional sliced green onions if desired.
Extra Tips:
For an added depth of flavor, try marinating the tofu in a mixture of soy sauce, sesame oil, and rice vinegar for about 30 minutes before cooking. This will infuse the tofu with additional taste and make the dish even more delicious.
If you prefer a bit of a kick, try adding a pinch of red pepper flakes or a splash of sriracha. Additionally, if you’re short on time, you can purchase pre-riced cauliflower from most grocery stores to speed up the prep process.
Whole Wheat Pasta Primavera With Grilled Chicken
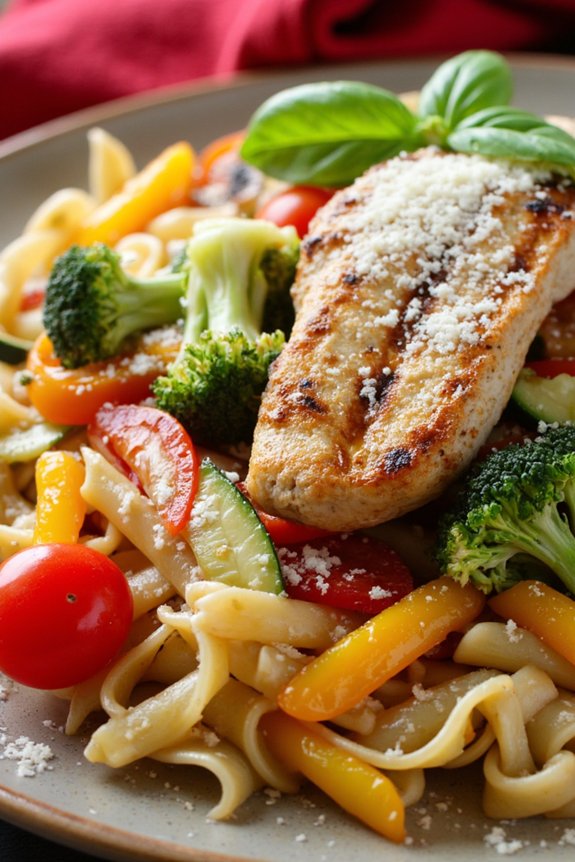
Whole Wheat Pasta Primavera With Grilled Chicken is a delightful and nutritious meal that brings together the vibrant flavors of fresh vegetables and the satisfying taste of grilled chicken. This dish is perfect for those looking to enjoy a healthy and balanced meal without compromising on taste. The whole wheat pasta provides a hearty base, while the colorful array of vegetables adds a burst of flavor and nutrition. The grilled chicken complements the dish with its protein-rich goodness and adds a deliciously smoky flavor.
Ideal for meal prepping, this recipe is designed for a serving size of 4-6 people, making it perfect for family dinners or to prepare in advance for the week. By preparing the vegetables and chicken ahead of time, you can save time during the busy weekdays while still enjoying a wholesome home-cooked meal. With a few simple steps, this Whole Wheat Pasta Primavera With Grilled Chicken can become a staple in your healthy meal rotation.
Ingredients:
- 1 pound whole wheat pasta
- 2 boneless, skinless chicken breasts
- 2 tablespoons olive oil
- 1 red bell pepper, sliced
- 1 yellow bell pepper, sliced
- 1 zucchini, sliced
- 1 cup cherry tomatoes, halved
- 1 cup broccoli florets
- 3 cloves garlic, minced
- 1/2 teaspoon red pepper flakes
- Salt and pepper to taste
- 1/4 cup grated Parmesan cheese
- Fresh basil leaves for garnish
Cooking Instructions:
- Prepare the Chicken: Preheat your grill to medium-high heat. While the grill is heating, season the chicken breasts with salt and pepper on both sides. Drizzle 1 tablespoon of olive oil over the chicken to keep it moist during grilling.
- Grill the Chicken: Place the seasoned chicken breasts on the grill. Cook for about 6-7 minutes on each side, or until the internal temperature reaches 165°F (75°C). Once cooked, remove the chicken from the grill and let it rest for 5 minutes before slicing into thin strips.
- Cook the Pasta: In a large pot, bring salted water to a boil. Add the whole wheat pasta and cook according to the package instructions until al dente. Drain the pasta and set aside.
- Sauté the Vegetables: In a large skillet, heat the remaining tablespoon of olive oil over medium heat. Add the minced garlic and red pepper flakes, sautéing for about 1 minute until fragrant. Add the sliced bell peppers, zucchini, broccoli florets, and cherry tomatoes to the skillet. Cook for 5-7 minutes, stirring occasionally, until the vegetables are tender-crisp.
- Combine Ingredients: Add the cooked pasta to the skillet with the sautéed vegetables. Add the sliced grilled chicken and toss everything together until well combined. Adjust seasoning with additional salt and pepper if necessary.
- Serve the Dish: Transfer the pasta primavera to serving plates. Sprinkle grated Parmesan cheese over each serving and garnish with fresh basil leaves. Serve immediately while warm.
Extra Tips:
When grilling the chicken, consider using a meat thermometer to ascertain it’s perfectly cooked without drying out. If you prefer a vegetarian version, simply omit the chicken and consider adding more vegetables or a plant-based protein source like tofu.
For added flavor, you can incorporate a splash of lemon juice or a sprinkle of your favorite herbs. This dish can also be stored in an airtight container in the refrigerator for up to three days, making it a convenient option for meal prepping.