

We all know how life can get a bit chaotic, and finding the time to cook a nourishing meal for the family can sometimes feel overwhelming. That’s why I’ve rounded up my favorite pantry-ready dinner recipes that are quick, easy, and oh-so-satisfying. Whether you’re in the mood for a simple one-pot spaghetti aglio e olio or a vibrant chickpea curry, these recipes use ingredients you probably already have on hand. Let’s take a moment to appreciate these simple yet tasty recipes that make gathering around the table a little easier.
One-Pot Spaghetti Aglio E Olio

One-Pot Spaghetti Aglio E Olio is a classic Italian dish that boasts simplicity and flavor, making it an ideal choice for a quick and satisfying dinner. This recipe combines the earthy taste of garlic with the subtle heat of red pepper flakes, all tossed together with perfectly cooked spaghetti and finished with a generous sprinkle of parsley. The one-pot approach not only minimizes cleanup but also allows the pasta to absorb the rich flavors of the sauce as it cooks, creating a harmonious blend of tastes and textures.
The beauty of One-Pot Spaghetti Aglio E Olio lies in its minimalistic ingredients and straightforward cooking method. This dish is perfect for busy weeknights when you want to whip up something delicious without spending too much time in the kitchen. With just a handful of pantry staples, you can have a restaurant-quality meal on the table in under 30 minutes. Serve it with a side salad or a piece of crusty bread for a complete meal that will satisfy everyone at the table.
Ingredients (Serves 4-6):
- 1 pound spaghetti
- 1/2 cup extra virgin olive oil
- 8 cloves garlic, thinly sliced
- 1/2 teaspoon red pepper flakes
- 1/4 cup fresh parsley, chopped
- Salt, to taste
- Freshly ground black pepper, to taste
- 1/2 cup Parmesan cheese, grated (optional)
- 6 cups water
Cooking Instructions:
- Prepare the Pasta: In a large pot, add 6 cups of water and a generous pinch of salt. Bring the water to a boil over high heat. Once boiling, add the spaghetti and cook for about 7-8 minutes, or until al dente, stirring occasionally to prevent sticking.
- Create the Sauce Base: While the pasta is cooking, in a deep skillet or large pot, heat the olive oil over medium heat. Add the sliced garlic and sauté for 1-2 minutes until fragrant and lightly golden. Be careful not to burn the garlic as it can become bitter.
- Add Spice: Stir in the red pepper flakes and cook for an additional 30 seconds, allowing the flavors to infuse into the oil.
- Combine Pasta and Sauce: Once the spaghetti is cooked, reserve about 1 cup of the pasta water and then drain the rest. Add the drained spaghetti directly into the skillet with the garlic and oil mixture.
- Toss and Season: Toss the spaghetti in the oil to coat thoroughly, adding reserved pasta water as needed to reach your desired consistency. Season with salt and freshly ground black pepper to taste.
- Finish with Herbs and Cheese: Remove the pan from heat and stir in the chopped parsley. If using, sprinkle the grated Parmesan cheese over the top and toss to combine.
- Serve: Divide the pasta among plates or bowls, garnish with additional parsley if desired, and serve immediately while hot.
Extra Tips:
To enhance the flavor of your One-Pot Spaghetti Aglio E Olio, try toasting the garlic slices slowly to extract a deeper aroma, but watch them closely to prevent burning.
If you enjoy a bit more spice, feel free to add additional red pepper flakes according to your taste preference.
For a creamier texture, you can add a splash of the reserved pasta water gradually until achieving the desired consistency.
Finally, always taste and adjust the seasoning before serving to verify the flavors are balanced.
Classic Tomato and Basil Soup

Tomato and basil soup is a timeless classic that combines the rich flavors of ripe tomatoes with the aromatic freshness of basil. Perfect for a quick dinner, this soup is both comforting and simple to prepare, making it an ideal choice for a weeknight meal.
Its vibrant color and delightful taste are sure to be a hit with family and friends. Whether served as an appetizer or the main course, this soup is a versatile dish that can be paired with a variety of sides, from a crusty loaf of bread to a fresh garden salad.
This recipe is designed to serve 4-6 people, ensuring there’s enough to satisfy everyone at the table. Using fresh ingredients will enhance the flavor, but canned tomatoes and dried basil can work in a pinch. The preparation is straightforward, making it accessible even for those new to cooking.
With just a few steps, you can have a delicious, homemade soup on the table in no time.
Ingredients:
- 2 tablespoons olive oil
- 1 medium onion, chopped
- 2 cloves garlic, minced
- 4 cups ripe tomatoes, chopped (or two 14.5 oz cans of diced tomatoes)
- 3 cups vegetable or chicken broth
- 1 teaspoon salt
- 1/2 teaspoon black pepper
- 1 teaspoon sugar (optional, to taste)
- 1/2 cup fresh basil leaves, chopped (or 1 tablespoon dried basil)
- 1/2 cup heavy cream or half-and-half (optional)
- Crusty bread or croutons for serving
Instructions:
- Prepare the Ingredients: Begin by gathering and preparing all your ingredients. Chop the onion and tomatoes, mince the garlic, and set them aside. If using fresh basil, chop the leaves.
- Sauté the Aromatics: In a large pot over medium heat, add the olive oil. Once heated, add the chopped onion and sauté until translucent, about 5 minutes. Stir in the minced garlic and cook for another 1 minute until fragrant.
- Cook the Tomatoes: Add the chopped tomatoes to the pot. If using canned tomatoes, add the entire contents, including the juice. Stir everything together and allow it to cook for about 10 minutes, or until the tomatoes begin to soften.
- Add Broth and Season: Pour in the vegetable or chicken broth. Season with salt, black pepper, and sugar if using. Stir well to combine all ingredients.
- Simmer the Soup: Bring the mixture to a gentle boil, then reduce the heat to low and let it simmer for 20 minutes to allow the flavors to meld together.
- Blend the Soup: Using an immersion blender, puree the soup until smooth. If you don’t have an immersion blender, carefully transfer the soup in batches to a regular blender and blend until smooth.
- Finish with Basil and Cream: Return the soup to the pot if necessary. Stir in the chopped basil and cream (if using) and heat through for another 5 minutes. Taste and adjust seasoning if needed.
- Serve: Ladle the soup into bowls and garnish with additional basil leaves if desired. Serve hot with crusty bread or croutons.
Extra Tips:
For a richer flavor, roast the tomatoes in the oven with olive oil and seasoning before adding them to the pot. This step can enhance the sweetness and depth of the tomatoes.
If you prefer a thicker soup, reduce the amount of broth slightly or let the soup simmer for longer to reduce. Adjust the level of creaminess by adding more or less cream according to your taste.
For a spicy kick, add a pinch of red pepper flakes during the sautéing of the onion. This soup can also be made ahead of time and stored in the refrigerator for up to three days or frozen for up to three months. Simply reheat on the stove before serving.
Easy Vegetable Fried Rice
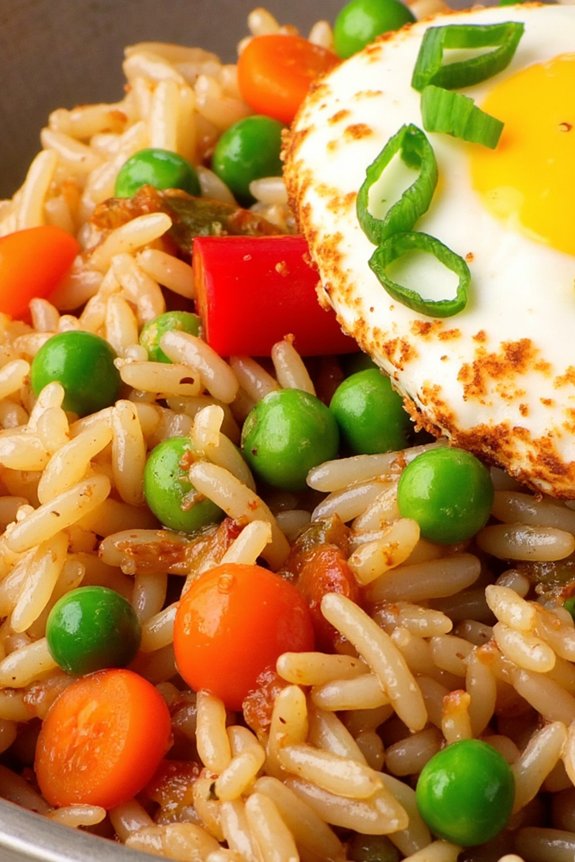
Easy Vegetable Fried Rice is a delicious and quick staple dinner recipe that’s perfect for those busy weeknights when you need to whip up something tasty in a hurry. This dish isn’t only flavorful but also packed with a variety of colorful vegetables, making it a healthy option for the whole family.
It’s a great way to use up leftover rice and veggies from your fridge, and it can easily be customized based on what you have on hand. This dish serves 4-6 people and is incredibly versatile. You can add protein like chicken, shrimp, or tofu to make it more filling, or keep it entirely plant-based for a lighter meal.
The key to achieving the best flavor is to use cold, day-old rice, as it prevents the dish from becoming mushy. Let’s explore the ingredients you’ll need to create this scrumptious meal at home.
Ingredients:
- 3 cups of cooked rice (preferably day-old)
- 2 tablespoons vegetable oil
- 1 cup diced carrots
- 1 cup frozen peas
- 1 red bell pepper, diced
- 1 small onion, chopped
- 3 cloves garlic, minced
- 2 eggs, lightly beaten
- 3 tablespoons soy sauce
- 1 tablespoon sesame oil
- 2 green onions, chopped
- Salt and pepper to taste
Cooking Instructions:
- Prepare the Ingredients: Begin by gathering and preparing all your ingredients. Dice the carrots, red bell pepper, and onion, mince the garlic, and chop the green onions. Make sure your rice is cooked and cooled, preferably using rice that was cooked the previous day.
- Heat the Oil: In a large skillet or wok, heat the vegetable oil over medium-high heat. Once the oil is hot, add the diced carrots and stir-fry for about 2 minutes until they start to soften.
- Add Vegetables and Aromatics: Add the chopped onion, garlic, and red bell pepper to the skillet. Stir-fry for another 2-3 minutes until the vegetables are tender and aromatic.
- Cook the Eggs: Push the vegetables to one side of the skillet, and pour the beaten eggs into the other side. Scramble the eggs until fully cooked, then mix them with the vegetables.
- Add the Rice and Peas: Add the cold, cooked rice and frozen peas to the skillet. Stir everything together, breaking up any clumps of rice, and stir-fry for about 3-4 minutes until the rice is heated through.
- Season the Rice: Pour the soy sauce and sesame oil over the rice mixture. Stir well to combine all the ingredients, ensuring the rice is evenly coated with the sauces.
- Finish with Green Onions: Add the chopped green onions to the skillet and give everything a final stir. Taste and season with salt and pepper as needed.
- Serve: Remove the skillet from heat and serve the Easy Vegetable Fried Rice hot.
Extra Tips:
For the best results, always use cold, day-old rice as it helps maintain the texture without becoming mushy. If you don’t have day-old rice, cook the rice and spread it out on a baking sheet to cool quickly.
You can also experiment with different vegetables like broccoli, corn, or edamame based on your preference. For added protein, consider tossing in some cooked chicken, shrimp, or tofu. Adjust the soy sauce and sesame oil to taste, and don’t forget to garnish with extra green onions or a sprinkle of sesame seeds for added flavor and texture.
Quick Chickpea Curry

Quick Chickpea Curry is a flavorful and hearty dish that can be whipped up in no time, making it perfect for those busy weeknights when you want something satisfying but don’t have hours to spend in the kitchen. Infused with aromatic spices and coconut milk, this dish offers a delicious balance of creamy and spicy flavors. The chickpeas add a nice texture and protein boost, while the tomatoes provide a rich base that enhances the overall taste of the curry.
This recipe isn’t only quick to make but also highly versatile. You can tailor it to your taste by adjusting the spice levels or adding your favorite vegetables. Serve it with steamed rice or warm naan for a complete meal that will leave everyone at the table satisfied. It’s also a fantastic option for those seeking a vegetarian or vegan-friendly meal without compromising on taste or nutrition.
Ingredients (Serves 4-6):
- 2 tablespoons vegetable oil
- 1 large onion, finely chopped
- 3 garlic cloves, minced
- 1 tablespoon fresh ginger, grated
- 1 teaspoon cumin seeds
- 1 teaspoon ground coriander
- 1 teaspoon turmeric powder
- 1 teaspoon garam masala
- 1/2 teaspoon cayenne pepper (optional)
- 1 can (14 oz) diced tomatoes
- 2 cans (15 oz each) chickpeas, drained and rinsed
- 1 can (14 oz) coconut milk
- Salt to taste
- Fresh cilantro, chopped (for garnish)
- Juice of half a lemon
Instructions:
- Prepare the Aromatics: Heat the vegetable oil in a large pan over medium heat. Once hot, add the chopped onion and sauté until it becomes translucent, approximately 5 minutes. Stir in the minced garlic and grated ginger, cooking for another 2 minutes until fragrant.
- Add the Spices: Reduce the heat to low and add the cumin seeds, ground coriander, turmeric powder, garam masala, and cayenne pepper (if using) to the pan. Stir continuously for about 1 minute to toast the spices, enhancing their flavors.
- Incorporate the Tomatoes: Pour the diced tomatoes into the pan and stir well to combine with the spices and aromatics. Allow the mixture to simmer for about 5 minutes, letting the tomatoes break down slightly.
- Mix in the Chickpeas: Add the drained and rinsed chickpeas to the pan, stirring to coat them in the tomato and spice mixture. Cook for 5 minutes to heat the chickpeas through.
- Simmer with Coconut Milk: Pour in the coconut milk, stirring it well into the chickpea mixture. Increase the heat to medium and bring the curry to a gentle simmer. Allow it to cook for 10-15 minutes, stirring occasionally, until the sauce thickens slightly.
- Season and Garnish: Adjust the seasoning with salt to taste. Just before serving, stir in the juice of half a lemon to add brightness to the dish. Garnish with freshly chopped cilantro.
Extra Tips:
For a richer flavor, consider using whole spices like cinnamon sticks or cardamom pods, and remove them before serving. If you prefer a thicker curry, mash some of the chickpeas with a fork before adding the coconut milk.
This dish pairs beautifully with basmati rice or naan bread, and any leftovers can be stored in the refrigerator for up to three days or frozen for a month. Feel free to add vegetables like spinach or peas to increase the nutritional content and variety.
Simple Tuna Pasta Salad
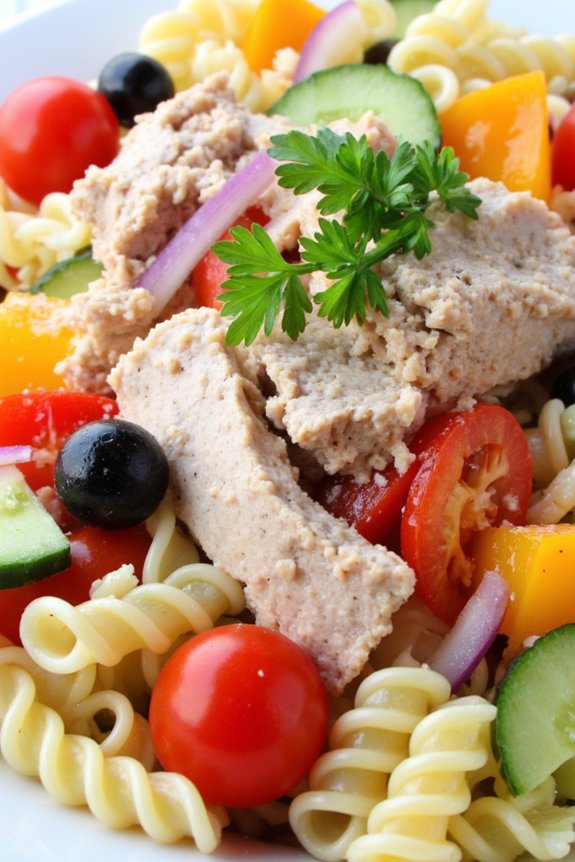
If you’re looking for a quick and easy dinner recipe that can be whipped up in no time, this Simple Tuna Pasta Salad is the perfect solution. Not only is it incredibly easy to make, but it’s also a nutritious meal that packs a punch with protein and veggies. This dish is perfect for those busy weeknights when you need to put together a satisfying meal without spending hours in the kitchen.
With a combination of tender pasta, savory tuna, and fresh vegetables, this salad is both delicious and filling. The versatility of this recipe allows you to get creative with the ingredients. You can use any type of pasta you have on hand, and feel free to add in extra veggies or spices to suit your taste.
The salad can be served cold, making it an ideal option for meal prep or a picnic. Plus, it’s a crowd-pleaser that can cater to a variety of dietary preferences. Whether you’re serving it as a main dish or a side, this Simple Tuna Pasta Salad is sure to become a staple in your dinner rotation.
Ingredients (serving size: 4-6 people):
- 400g pasta (such as fusilli or penne)
- 2 cans (5 oz each) of tuna in water, drained
- 1 cup cherry tomatoes, halved
- 1 cucumber, diced
- 1 small red onion, finely chopped
- 1 bell pepper (any color), diced
- 1/2 cup black olives, sliced
- 1/4 cup mayonnaise
- 2 tablespoons olive oil
- 1 tablespoon lemon juice
- 1 teaspoon dried oregano
- Salt and pepper to taste
- Fresh parsley, chopped (optional, for garnish)
Cooking Instructions:
- Cook the Pasta: Begin by boiling a large pot of salted water. Add the pasta and cook according to the package instructions until al dente. Once cooked, drain the pasta and rinse it under cold water to stop the cooking process. Set aside to cool.
- Prepare the Tuna: While the pasta is cooking, open and drain the cans of tuna. Use a fork to flake the tuna into bite-sized pieces.
- Chop the Vegetables: Prepare the vegetables by halving the cherry tomatoes, dicing the cucumber and bell pepper, and finely chopping the red onion. Slice the black olives as well.
- Mix the Dressing: In a small bowl, combine the mayonnaise, olive oil, lemon juice, dried oregano, salt, and pepper. Whisk together until smooth and well combined.
- Combine Ingredients: In a large mixing bowl, add the cooled pasta, flaked tuna, cherry tomatoes, cucumber, red onion, bell pepper, and black olives. Pour the dressing over the salad and gently toss everything together until all ingredients are evenly coated.
- Chill and Serve: Cover the bowl with plastic wrap and refrigerate for at least 30 minutes to allow the flavors to meld. Before serving, give the salad a final toss and garnish it with freshly chopped parsley if desired.
Extra Tips:
For an added layer of flavor, consider incorporating a splash of red wine vinegar or a sprinkle of grated Parmesan cheese into the salad. If you prefer a creamier texture, you can increase the amount of mayonnaise or add a dollop of Greek yogurt.
This dish is highly adaptable, so feel free to substitute with your favorite vegetables or use whole wheat pasta for a healthier option. Remember, the salad tastes even better the next day, making it a great make-ahead meal.
Bean and Cheese Quesadillas

Bean and Cheese Quesadillas are the perfect quick and easy dinner option that pleases everyone in the family. This dish combines the creamy texture of melted cheese with the savory flavors of refried beans, all sandwiched between crispy, golden tortillas.
It’s an ideal meal for busy weeknights when you need something fast yet satisfying. Additionally, these quesadillas are versatile; you can customize them with various toppings or salsas to suit your taste preferences.
Whether you’re a novice in the kitchen or an experienced cook, you’ll find this recipe straightforward and enjoyable to prepare. It’s also a fantastic way to use up any leftover ingredients you might’ve in your pantry or fridge.
The following recipe serves 4-6 people, making it perfect for a family meal or a small gathering of friends. Let’s plunge into the ingredients and steps necessary to create this delicious dish.
Ingredients (serves 4-6):
- 8 large flour tortillas
- 2 cups of shredded Mexican cheese blend
- 1 can (15 ounces) of refried beans
- 1 tablespoon of olive oil
- 1 teaspoon of ground cumin
- 1 teaspoon of chili powder
- Salt and pepper to taste
- Optional toppings: sour cream, salsa, guacamole, chopped cilantro
Cooking Instructions:
- Prepare the Bean Mixture: In a medium-sized bowl, combine the refried beans with ground cumin, chili powder, salt, and pepper. Mix well to guarantee that the spices are evenly distributed throughout the beans.
- Heat the Skillet: Place a large skillet over medium heat and add the olive oil. Allow the oil to heat up for about a minute until it’s shimmering but not smoking.
- Assemble Quesadillas: Take one tortilla and spread a layer of the bean mixture over one half. Sprinkle a generous amount of shredded cheese on top of the beans. Fold the tortilla in half, pressing gently to seal. Repeat this process with the remaining tortillas.
- Cook the Quesadillas: Carefully place the prepared quesadilla in the hot skillet. Cook for 2-3 minutes on each side, or until the tortilla is golden brown and crispy, and the cheese has melted. Use a spatula to flip the quesadilla halfway through cooking.
- Serve and Enjoy: Once cooked, remove the quesadilla from the skillet and place it on a cutting board. Allow it to cool for a minute before slicing it into wedges. Serve warm with your choice of toppings such as sour cream, salsa, guacamole, or chopped cilantro.
Extra Tips:
For an extra flavor boost, consider adding some finely chopped onions, bell peppers, or jalapeños into the bean mixture or as additional fillings in the quesadillas.
If you’re looking for a healthier alternative, use whole wheat tortillas and opt for a low-fat cheese blend. To keep the quesadillas warm while you cook the rest, place them on a baking sheet in a low oven (around 200°F/95°C) until ready to serve.
Hearty Lentil Stew
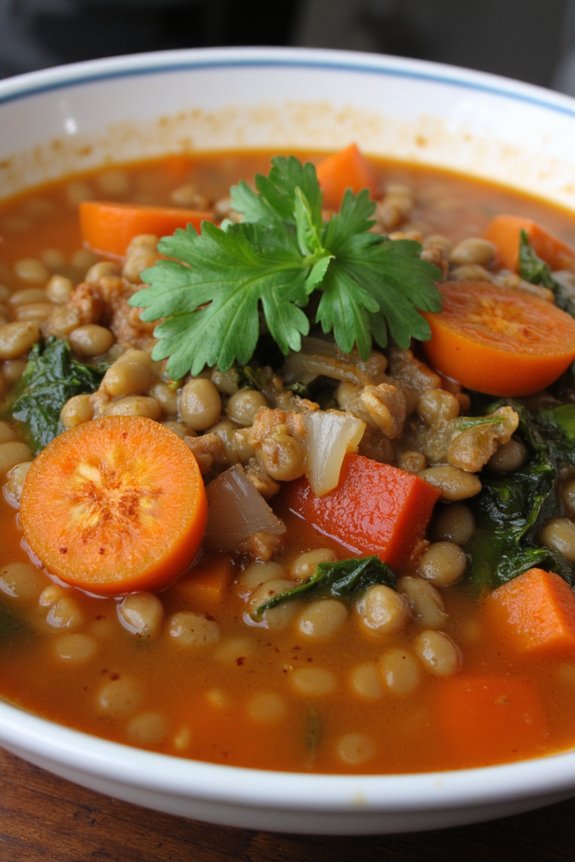
Hearty Lentil Stew is a comforting and nutritious dish that’s perfect for a quick and satisfying dinner. Packed with protein-rich lentils, fresh vegetables, and aromatic spices, this stew isn’t only delicious but also incredibly easy to prepare. It’s an excellent choice for a wholesome meal that will warm you up on a chilly evening.
Plus, it’s versatile enough to accommodate your favorite seasonal vegetables or to be customized with different herbs and spices. This recipe serves 4-6 people, making it ideal for family dinners or meal prepping for the week. The rich flavors develop beautifully as the stew simmers, creating a delightful depth of taste that’s both hearty and satisfying.
Whether you’re a long-time lentil lover or trying them for the first time, this stew is sure to become a staple in your dinner rotation.
Ingredients:
- 2 cups dried green or brown lentils, rinsed
- 1 tablespoon olive oil
- 1 large onion, diced
- 2 carrots, peeled and sliced
- 2 celery stalks, sliced
- 3 cloves garlic, minced
- 1 can (14 oz) diced tomatoes
- 6 cups vegetable broth
- 2 teaspoons ground cumin
- 1 teaspoon smoked paprika
- 1 teaspoon dried thyme
- Salt and pepper to taste
- 2 cups fresh spinach or kale, roughly chopped
- 1 tablespoon lemon juice
- Fresh parsley for garnish (optional)
Instructions:
- Prepare the Lentils: Begin by rinsing the lentils under cold water to remove any debris or dust. Set them aside to drain.
- Sauté the Aromatics: In a large pot or Dutch oven, heat the olive oil over medium heat. Add the diced onion, sliced carrots, and celery. Cook for about 5-7 minutes until the vegetables are softened and the onion is translucent.
- Add the Garlic and Spices: Stir in the minced garlic, ground cumin, smoked paprika, and dried thyme. Cook for an additional 1-2 minutes, allowing the spices to become fragrant.
- Incorporate the Lentils and Tomatoes: Add the rinsed lentils to the pot along with the diced tomatoes. Stir well to combine all the ingredients.
- Simmer the Stew: Pour in the vegetable broth and bring the mixture to a boil. Once boiling, reduce the heat to low and let it simmer uncovered for about 25-30 minutes, or until the lentils are tender.
- Season and Finish: Taste the stew and season with salt and pepper as needed. Stir in the chopped spinach or kale and allow it to wilt for about 5 minutes. Add the lemon juice and stir to incorporate.
- Serve: Ladle the stew into bowls, garnishing with fresh parsley if desired. Serve hot with crusty bread or over a bed of rice.
Extra Tips:
For a more robust flavor, consider adding a bay leaf while simmering the stew and removing it before serving. If you prefer a thicker stew, mash a portion of the lentils with the back of a spoon before adding the greens.
You can also swap the vegetable broth for chicken broth if you aren’t following a vegetarian diet. This stew tastes even better the next day, making it a great option for leftovers. Additionally, you can freeze any extra portions for up to three months, ensuring you always have a quick meal on hand.
Garlic Butter Shrimp With Rice
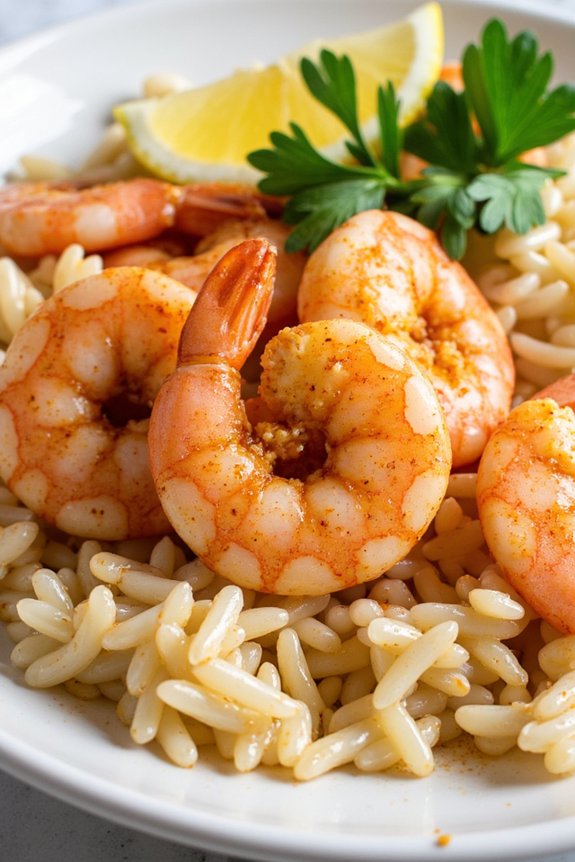
Garlic Butter Shrimp With Rice is a delightful and quick meal that combines succulent shrimp with fragrant garlic butter and fluffy rice. This dish is perfect for busy weeknights when you want something delicious and satisfying without spending hours in the kitchen. The rich garlic butter sauce perfectly complements the delicate flavor of the shrimp, while the rice acts as a comforting base that soaks up all the savory goodness.
Best of all, this recipe is versatile and can easily be adjusted to suit your taste preferences or dietary needs. This recipe is designed to serve 4-6 people, making it ideal for family dinners or small gatherings. The ingredients are simple and may already be in your pantry, yet the result is a restaurant-quality meal that will impress your guests or loved ones.
The key to this dish is using fresh ingredients, especially the shrimp and garlic, to guarantee that you achieve the best possible flavor. With a few easy steps, you can have a delicious meal on the table in no time.
Ingredients (Serves 4-6):
- 1 1/2 pounds large shrimp, peeled and deveined
- 3 cups cooked white or brown rice
- 4 tablespoons unsalted butter
- 6 cloves garlic, minced
- 1 tablespoon olive oil
- 1 tablespoon lemon juice
- 1 teaspoon paprika
- Salt and pepper to taste
- 2 tablespoons chopped fresh parsley
- Lemon wedges for serving
Cooking Instructions:
- Prepare the Shrimp: Start by patting the shrimp dry with paper towels to remove excess moisture. This will help them sear better in the pan.
- Cook the Rice: If you haven’t already cooked the rice, do so according to package instructions. For added flavor, you can cook it in chicken or vegetable broth.
- Sauté the Garlic: In a large skillet over medium heat, add the olive oil and 2 tablespoons of butter. Once the butter has melted, add the minced garlic. Sauté until fragrant, about 1-2 minutes, being careful not to let it burn.
- Cook the Shrimp: Add the shrimp to the skillet in a single layer. Sprinkle with paprika, salt, and pepper. Cook for 2-3 minutes on each side, or until the shrimp turn pink and opaque. Remove the shrimp from the skillet and set aside.
- Make the Garlic Butter Sauce: In the same skillet, add the remaining 2 tablespoons of butter and lemon juice. Stir until the butter has melted and the sauce is well combined.
- Combine Ingredients: Return the shrimp to the skillet and toss to coat them in the garlic butter sauce. Add the cooked rice and gently combine everything together until the rice is well coated.
- Garnish and Serve: Sprinkle the dish with chopped parsley and serve with lemon wedges on the side for an extra burst of citrus flavor.
Extra Tips:
To guarantee the best flavor, use fresh shrimp if possible, but frozen shrimp will work in a pinch; just make sure to thaw them properly before cooking. If you prefer a bit of heat, consider adding a pinch of red pepper flakes when sautéing the garlic.
For a more colorful dish, you can also add vegetables such as bell peppers or peas. Finally, remember to taste and adjust the seasoning as needed before serving to ensure the dish is perfectly to your liking.
Creamy Mushroom Risotto
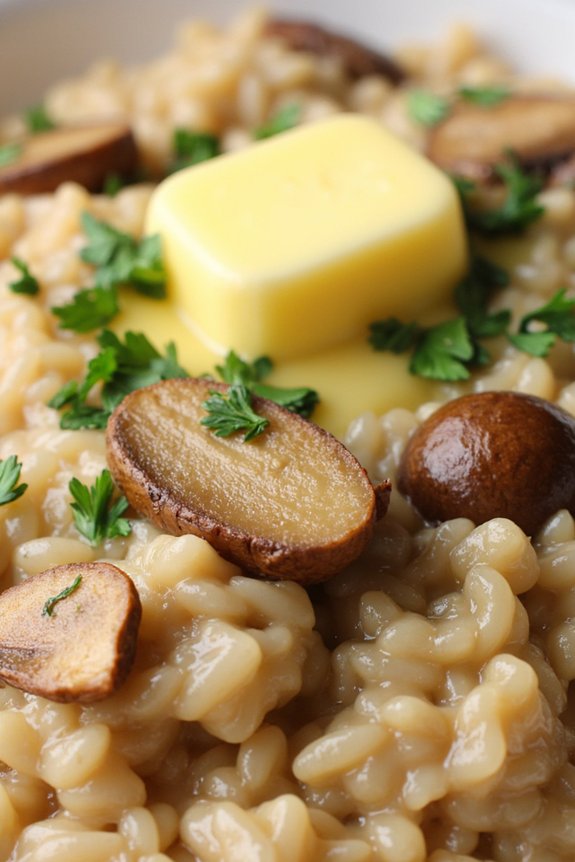
Creamy Mushroom Risotto is a delightful and comforting dish that’s perfect for a cozy dinner. With its rich and velvety texture, this risotto is flavored with earthy mushrooms and creamy cheese, making it a crowd-pleaser for both family dinners and special occasions.
Risotto, a classic Italian rice dish, requires a bit of patience and attention, but the results are well worth it. The key to a perfect risotto is to gradually add the broth, allowing the rice to release its starches and create a creamy consistency.
This recipe serves 4-6 people, making it ideal for a small gathering or a hearty family meal. The combination of fresh mushrooms, aromatic garlic, and Parmesan cheese creates a depth of flavor that’s both satisfying and sophisticated.
By following the step-by-step instructions, you’ll learn how to achieve the perfect balance of creaminess and texture that defines a great risotto. Whether you’re a seasoned cook or a beginner, this recipe will guide you to prepare a delicious Creamy Mushroom Risotto that everyone will love.
Ingredients:
- 2 tablespoons olive oil
- 1 onion, finely chopped
- 3 cloves garlic, minced
- 1 pound (450g) mixed mushrooms, sliced
- 1½ cups (300g) Arborio rice
- 5 cups (1.2 liters) chicken or vegetable broth, warmed
- ½ cup (120ml) white wine
- ½ cup (50g) grated Parmesan cheese
- ¼ cup (60ml) heavy cream
- Salt and pepper to taste
- 2 tablespoons fresh parsley, chopped
- 2 tablespoons butter
Instructions:
- Prepare the Ingredients: Begin by prepping all your ingredients. Chop the onion and garlic, slice the mushrooms, and warm the broth in a separate pan over low heat.
- Sauté the Aromatics: Heat the olive oil in a large pan over medium heat. Add the onion and garlic, cooking until the onion becomes translucent, about 3-4 minutes.
- Cook the Mushrooms: Add the sliced mushrooms to the pan and cook until they’re soft and have released their moisture, around 5-7 minutes. Season with salt and pepper.
- Toast the Rice: Stir in the Arborio rice, ensuring each grain is coated with the oil and mushroom mixture. Cook for about 2 minutes until the rice begins to look translucent around the edges.
- Deglaze with Wine: Pour in the white wine and stir continuously until it’s almost completely absorbed by the rice.
- Add Broth Gradually: Begin adding the warm broth, one ladle at a time, stirring frequently. Allow the liquid to be absorbed before adding more. Continue this process until the rice is cooked al dente and has a creamy texture, about 18-20 minutes.
- Finish with Cream and Cheese: Lower the heat and stir in the Parmesan cheese and heavy cream, mixing until the cheese is melted and the risotto is creamy. Adjust seasoning with salt and pepper as needed.
- Garnish and Serve: Remove from heat, add butter, and stir in the chopped parsley. Serve immediately for the best texture and flavor.
Extra Tips:
To achieve the perfect risotto, maintain a constant stirring motion when adding the broth. This helps release the rice starches, creating the desired creamy texture.
Be careful not to rush the process by adding too much broth at once; patience is key. If you prefer a vegetarian version, use vegetable broth instead of chicken broth.
For an extra burst of flavor, consider adding a splash of truffle oil just before serving.
Rustic Potato and Leek Soup

Rustic Potato and Leek Soup is a comforting and hearty dish perfect for chilly evenings. This classic recipe combines the earthy flavors of potatoes with the subtle sweetness of leeks. The result is a creamy, delectable soup that’s both satisfying and easy to prepare. Ideal for a weeknight dinner, this soup can be whipped up with minimal effort and offers a warm, homely vibe to your meal.
Whether you’re a seasoned chef or a kitchen novice, this Rustic Potato and Leek Soup is a foolproof way to impress your family or guests. The simplicity of the ingredients allows the natural flavors to shine, while the creamy texture provides a velvety mouthfeel. Pair it with crusty bread or a fresh salad, and you have a complete meal that will surely become a staple in your dinner rotation.
Ingredients for 4-6 servings:
- 4 large leeks, white and light green parts only
- 3 tablespoons unsalted butter
- 4 large Yukon Gold potatoes, peeled and diced
- 6 cups chicken or vegetable broth
- 1 bay leaf
- Salt and pepper to taste
- 1 cup heavy cream
- Fresh chives, finely chopped (optional, for garnish)
Cooking Instructions:
- Prepare the Leeks: Start by trimming the leeks and slicing them in half lengthwise. Thoroughly rinse under cold water to remove any dirt or grit, then slice thinly.
- Cook the Leeks: In a large pot, melt the butter over medium heat. Add the sliced leeks and sauté for about 5-7 minutes until they’re soft but not browned.
- Add Potatoes and Broth: Stir in the diced potatoes and pour in the chicken or vegetable broth. Add the bay leaf and bring the mixture to a gentle boil.
- Simmer the Soup: Reduce the heat to low, cover the pot, and let the soup simmer for about 20-25 minutes, or until the potatoes are tender when pierced with a fork.
- Blend the Soup: Remove the bay leaf and use an immersion blender to puree the soup until smooth. Alternatively, transfer the soup in batches to a countertop blender and blend until creamy.
- Add Cream and Season: Return the soup to the pot if needed, and stir in the heavy cream. Season with salt and pepper to taste. Heat through gently without boiling.
- Serve: Ladle the soup into bowls and garnish with finely chopped chives if desired.
Extra Tips: For a richer flavor, consider using homemade chicken or vegetable broth. Be mindful when blending hot liquids to prevent splatters; if using a countertop blender, leave the lid slightly ajar to allow steam to escape. If you like a chunkier texture, only partially blend the soup, leaving some potato pieces intact. Additionally, you can add a sprinkle of grated cheese or a dollop of sour cream on top for extra indulgence.
Savory Chicken Stir-Fry
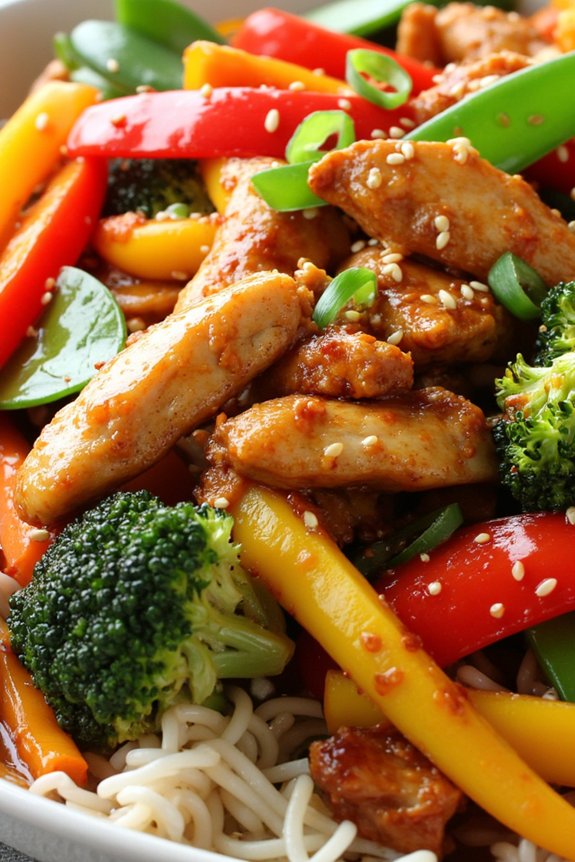
Savory Chicken Stir-Fry is a quick and delicious meal that can be whipped up in under 30 minutes, making it an ideal choice for busy weeknight dinners. This dish combines tender pieces of chicken with a medley of colorful vegetables, all coated in a flavorful sauce that balances savory, sweet, and umami notes. The result is a satisfying and nutritious meal that the whole family will love.
With its vibrant colors and aromatic flavors, Savory Chicken Stir-Fry isn’t only a feast for the taste buds but also for the eyes. Incorporating lean protein and fresh vegetables, this stir-fry is a healthier alternative to takeout and customizable to suit your preferences. You can easily swap out vegetables or adjust the seasoning to cater to your taste.
Serve this savory dish over a bed of steamed rice or noodles to soak up the delectable sauce and complete your meal. Whether you’re an experienced cook or a beginner in the kitchen, this recipe is simple yet rewarding, guaranteeing that you can enjoy a comforting homemade meal without spending hours cooking.
Ingredients for 4-6 servings:
- 1 1/2 pounds boneless, skinless chicken breasts, sliced into thin strips
- 3 tablespoons soy sauce
- 2 tablespoons cornstarch
- 2 tablespoons vegetable oil
- 1 red bell pepper, sliced
- 1 yellow bell pepper, sliced
- 1 cup broccoli florets
- 1 cup snap peas
- 1 large carrot, julienned
- 3 cloves garlic, minced
- 1 tablespoon ginger, grated
- 1/4 cup chicken broth
- 2 tablespoons oyster sauce
- 1 tablespoon hoisin sauce
- 1 tablespoon honey
- 1 teaspoon sesame oil
- Salt and pepper to taste
- Cooked rice or noodles, for serving
- Sesame seeds and sliced green onions, for garnish
Cooking Instructions:
- Marinate the Chicken: In a bowl, combine the sliced chicken with soy sauce and cornstarch. Mix well to coat evenly and let it sit for 10-15 minutes. This will tenderize the chicken and add flavor.
- Prepare the Sauce: In a small bowl, whisk together chicken broth, oyster sauce, hoisin sauce, honey, sesame oil, and a pinch of salt and pepper. Set aside.
- Cook the Chicken: Heat 1 tablespoon of vegetable oil in a large skillet or wok over medium-high heat. Add the marinated chicken and stir-fry until it’s cooked through and lightly browned, about 5-7 minutes. Remove the chicken from the skillet and set it aside.
- Stir-Fry the Vegetables: In the same skillet, add the remaining tablespoon of vegetable oil. Add garlic and ginger and sauté for about 30 seconds until fragrant. Add bell peppers, broccoli, snap peas, and carrots. Stir-fry for 3-5 minutes until the vegetables are tender-crisp.
- Combine Everything: Return the cooked chicken to the skillet. Pour the prepared sauce over the chicken and vegetables. Toss everything together and cook for another 2-3 minutes until the sauce thickens and coats the ingredients evenly.
- Serve: Remove from heat and serve hot over rice or noodles. Garnish with sesame seeds and sliced green onions for added flavor and presentation.
Extra Tips:
For the best results, confirm that all your ingredients are prepped and ready before you start cooking. Stir-frying is a quick process, and having everything at hand prevents overcooking.
Adjust the vegetables based on what you have or prefer; zucchini, mushrooms, or baby corn are excellent additions. If you like a bit of heat, consider adding a pinch of red pepper flakes or a splash of sriracha to the sauce. Remember to taste and adjust seasoning before serving to suit your palate.
Cheesy Broccoli and Rice Casserole

If you’re looking for a comforting and quick staple dinner recipe that the whole family will love, Cheesy Broccoli and Rice Casserole is an excellent choice. This dish is a delightful combination of tender broccoli florets, creamy cheese sauce, and fluffy rice, all baked together to create a warm and satisfying meal.
It’s perfect for busy weeknights when you need a nutritious dinner on the table fast. Plus, it makes for great leftovers that can be easily reheated.
This casserole isn’t only delicious but also versatile. You can customize it by adding cooked chicken or ham for some extra protein or using different types of cheese to suit your taste. The recipe is straightforward, making it an ideal choice even for beginner cooks.
With simple ingredients and minimal prep work, you’ll have a hearty and filling meal ready in no time. This recipe serves 4-6 people, making it perfect for a family dinner or a small gathering with friends.
Ingredients for 4-6 servings:
- 2 cups cooked white rice
- 3 cups broccoli florets (fresh or frozen)
- 2 cups shredded cheddar cheese
- 1 cup milk
- 1 can (10.5 oz) condensed cream of mushroom soup
- 1/4 cup butter
- 1/2 cup diced onion
- 1 teaspoon garlic powder
- Salt and pepper to taste
- 1/2 cup breadcrumbs (optional for topping)
Cooking Instructions:
- Preheat the Oven: Start by preheating your oven to 350°F (175°C). This guarantees that your casserole will cook evenly once it’s assembled.
- Prepare the Broccoli: If using fresh broccoli, steam or blanch the florets until they’re tender but still vibrant green. If using frozen broccoli, thaw and drain any excess water.
- Cook the Onion: In a skillet over medium heat, melt the butter and add the diced onion. Sauté until the onion becomes translucent and fragrant, about 3-4 minutes.
- Make the Cheese Sauce: In a large mixing bowl, combine the cream of mushroom soup, milk, and garlic powder. Stir in the sautéed onions and half of the shredded cheddar cheese. Mix well until the cheese starts to melt into the sauce.
- Combine Ingredients: Add the cooked rice and broccoli to the cheese sauce mixture. Season with salt and pepper to taste. Stir until all ingredients are evenly coated with the sauce.
- Assemble the Casserole: Transfer the mixture into a greased casserole dish. Sprinkle the remaining cheddar cheese evenly over the top. If desired, add a layer of breadcrumbs for a crispy topping.
- Bake: Place the casserole dish in the preheated oven and bake for 25-30 minutes or until the cheese is bubbly and the top is golden brown.
- Serve: Remove from the oven and let it cool for a few minutes before serving. Enjoy your Cheesy Broccoli and Rice Casserole warm.
Extra Tips:
When cooking your rice, try using chicken or vegetable broth instead of water for added flavor. If you want a bit of a kick, consider adding a pinch of cayenne pepper or a few dashes of hot sauce to the cheese sauce.
Leftovers can be stored in an airtight container in the refrigerator for up to 3 days and reheated in the microwave or oven. Additionally, this casserole can be assembled ahead of time, stored in the refrigerator, and baked right before serving to save time on busy days.