

Potluck dinners always have such a unique charm, don’t they? There’s something so special about sharing a meal where each dish brings its own story to the table. Picture arriving with a tray of cheesy baked ziti or the delightful aroma of slow-cooked pulled pork sliders filling the air. These comforting and budget-friendly recipes are perfect for family nights, with options for everyone. Ready to explore more delicious ideas?
Cheesy Baked Ziti

Cheesy Baked Ziti is a classic Italian-American comfort dish that’s perfect for potlucks and family gatherings. This budget-friendly meal isn’t only delicious but also incredibly easy to prepare, making it ideal for feeding a crowd without breaking the bank.
Combining tender pasta with a rich and hearty tomato sauce, creamy ricotta cheese, and plenty of gooey mozzarella, this dish is sure to be a hit at any event. The best part? It’s a versatile recipe that can be easily adapted to suit your taste preferences or dietary needs.
The beauty of Cheesy Baked Ziti lies in its simplicity and ability to please even the pickiest of eaters. It can be made ahead of time and simply popped into the oven when you’re ready to serve, which means less stress on the day of your potluck.
Plus, the leftovers, if there are any, are just as delicious the next day. Whether you’re hosting a gathering or attending one, this Cheesy Baked Ziti will be the star of the show, leaving everyone satisfied and happy.
Ingredients (Serves 4-6):
- 1 pound ziti pasta
- 2 tablespoons olive oil
- 1 medium onion, chopped
- 3 cloves garlic, minced
- 1 pound ground beef or Italian sausage
- 1 jar (24 ounces) marinara sauce
- 1 teaspoon dried oregano
- 1 teaspoon dried basil
- Salt and pepper to taste
- 1 cup ricotta cheese
- 2 cups shredded mozzarella cheese
- 1/2 cup grated Parmesan cheese
- Fresh parsley, chopped (optional, for garnish)
Cooking Instructions:
- Preheat the oven: Set your oven to 375°F (190°C) to get it ready for baking the ziti.
- Cook the pasta: In a large pot of salted boiling water, cook the ziti pasta until it’s al dente, according to the package instructions. Drain and set aside.
- Prepare the sauce: In a large skillet over medium heat, add olive oil. Sauté the chopped onion until translucent, about 3-4 minutes. Add the minced garlic and cook for another minute.
- Brown the meat: Add the ground beef or sausage to the skillet. Cook until browned, breaking it up with a spoon. Drain excess fat if necessary.
- Combine sauce and seasonings: Stir in the marinara sauce, oregano, basil, salt, and pepper. Let the mixture simmer for about 10 minutes to blend the flavors.
- Mix pasta with sauce: In a large mixing bowl, combine the cooked ziti with the sauce, ensuring the pasta is well coated.
- Assemble the dish: In a greased 9×13-inch baking dish, spread half of the pasta and sauce mixture. Dollop ricotta cheese over this layer. Sprinkle with half of the mozzarella and Parmesan cheeses. Repeat with remaining pasta, then top with the rest of the cheeses.
- Bake: Cover with foil and bake for 20 minutes. Remove the foil and bake for an additional 10-15 minutes, or until the cheese is bubbly and golden brown.
- Garnish and serve: Allow the baked ziti to cool for a few minutes before serving. Garnish with chopped parsley if desired.
Extra Tips:
For a vegetarian version, simply omit the meat and add your favorite vegetables such as bell peppers, mushrooms, or zucchini.
If you prefer a spicier dish, consider adding a pinch of red pepper flakes to the sauce. Cheesy Baked Ziti can also be prepared a day in advance and stored in the refrigerator; just add a few extra minutes to the baking time if cooking from cold.
For added convenience, you can freeze the assembled dish before baking—just thaw it in the fridge overnight before baking as directed.
Slow Cooker Pulled Pork Sliders
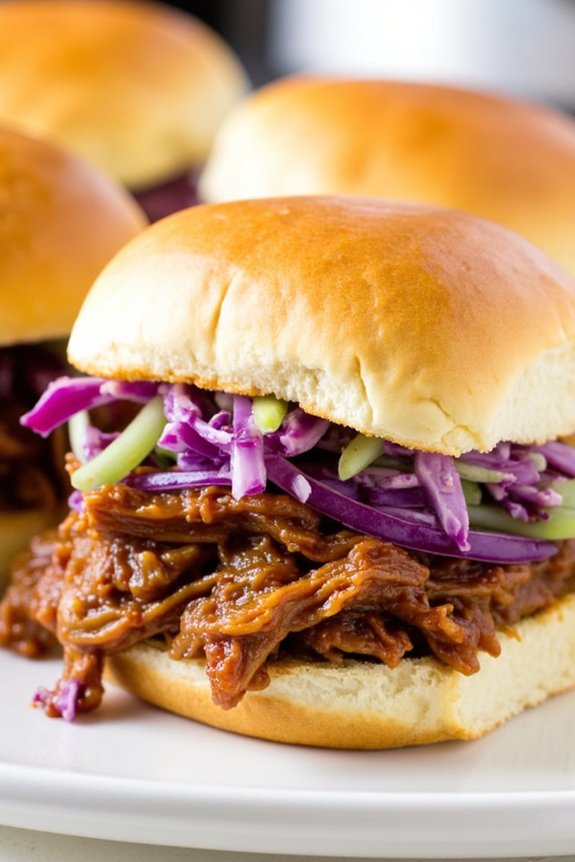
Slow Cooker Pulled Pork Sliders are the perfect potluck dish that combines convenience with mouthwatering flavor. This recipe embraces the ease of a slow cooker, allowing you to prepare a delicious meal without the fuss of constant monitoring. The pulled pork is cooked to tender perfection, seasoned with a mix of savory spices and a hint of sweetness, creating a filling that’s both juicy and flavorful. Served on soft slider buns, these pulled pork sliders are sure to be a crowd favorite at any gathering.
The beauty of this dish lies not only in its taste but also in its simplicity. By using a slow cooker, you can set it up hours before your event and focus on other preparations while the pork slowly cooks to perfection. Plus, the sliders are easy to assemble and serve, making them an ideal option for a potluck where you want to impress without spending hours in the kitchen. Below is a detailed recipe for Slow Cooker Pulled Pork Sliders that serves 4-6 people.
Ingredients
- 3 pounds boneless pork shoulder
- 1 tablespoon olive oil
- 1 large onion, sliced
- 4 cloves garlic, minced
- 1 cup barbecue sauce
- 1/2 cup apple cider vinegar
- 1/4 cup brown sugar
- 1 tablespoon smoked paprika
- 1 teaspoon salt
- 1 teaspoon black pepper
- 1 teaspoon ground cumin
- Slider buns (about 12-15)
- Optional: coleslaw for topping
Cooking Instructions
- Prepare the Pork: Begin by patting the pork shoulder dry with paper towels. Rub the olive oil all over the pork shoulder, then season it generously with the salt, black pepper, smoked paprika, and ground cumin.
- Sauté Aromatics: In a large skillet, heat a small amount of olive oil over medium heat. Add the sliced onion and minced garlic to the skillet, sautéing until the onions are translucent and the garlic is fragrant, about 3-5 minutes.
- Assemble in Slow Cooker: Place the sautéed onions and garlic at the bottom of the slow cooker. Carefully position the seasoned pork shoulder on top of the onions.
- Add Liquids and Sweeteners: Pour the barbecue sauce and apple cider vinegar over the pork. Sprinkle the brown sugar over the top to add a touch of sweetness that will caramelize during cooking.
- Cook: Cover the slow cooker with its lid and set it to cook on low for 8-10 hours, or on high for 4-5 hours. The pork is done when it’s tender and easily shreds with a fork.
- Shred the Pork: Once the pork is cooked, remove it from the slow cooker and place it on a cutting board. Use two forks to shred the pork into bite-sized pieces.
- Mix with Sauce: Return the shredded pork to the slow cooker and mix it well with the juices and sauce left in the pot, ensuring every piece is coated.
- Assemble Sliders: To serve, scoop a generous amount of the pulled pork onto each slider bun. Top with coleslaw if desired for an added crunch.
Extra Tips
For the best flavor, try preparing the pulled pork a day in advance. This allows the flavors to meld together overnight, enhancing the taste.
If you’re in a hurry, using store-bought barbecue sauce is perfectly fine, but for a personal touch, consider making your own homemade sauce.
Finally, for a crispy texture, toast the slider buns lightly before assembling, which helps to prevent them from getting soggy. Enjoy these delicious sliders at your potluck and watch them disappear quickly!
Vegetarian Chili
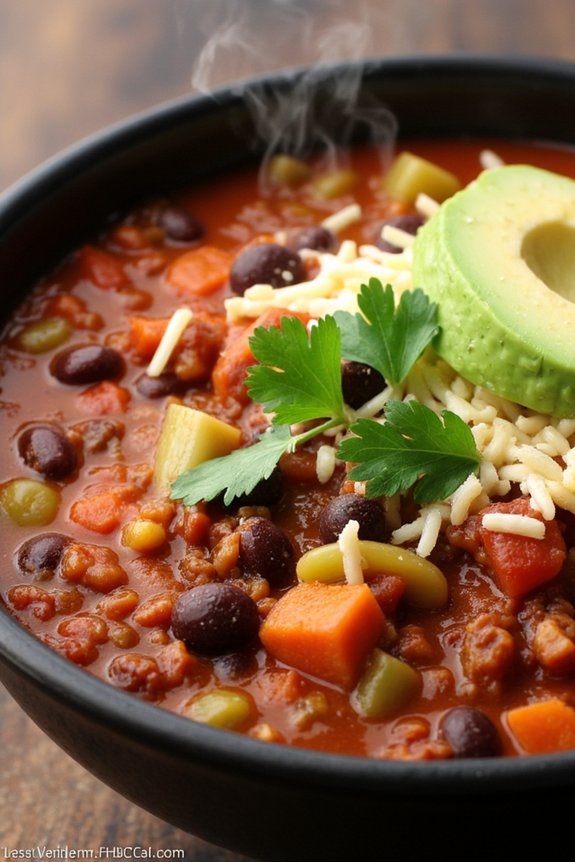
Vegetarian Chili is a hearty and flavorful dish perfect for any potluck gathering. Packed with a variety of vegetables, beans, and spices, this dish isn’t only delicious but also budget-friendly. The rich flavors come together in a comforting bowl that will satisfy any crowd, whether they’re vegetarians or meat-lovers.
With its vibrant colors and robust taste, this chili is sure to be a hit at your next event. This recipe serves 4-6 people and is easy to prepare, making it an excellent choice for anyone looking to whip up a quick and satisfying meal. The ingredients are simple and can often be found in your pantry or easily sourced from any grocery store.
The best part is, you can customize the chili according to your taste preferences by adding more spice or additional veggies.
Ingredients:
- 2 tablespoons olive oil
- 1 large onion, diced
- 2 cloves garlic, minced
- 1 red bell pepper, diced
- 1 green bell pepper, diced
- 2 carrots, peeled and chopped
- 2 celery stalks, chopped
- 2 teaspoons ground cumin
- 2 tablespoons chili powder
- 1 teaspoon smoked paprika
- 1 can (15 oz) crushed tomatoes
- 1 can (15 oz) black beans, drained and rinsed
- 1 can (15 oz) kidney beans, drained and rinsed
- 1 cup vegetable broth
- Salt and pepper to taste
- Optional toppings: chopped cilantro, avocado slices, shredded cheese, sour cream
Instructions:
- Heat the Oil: In a large pot, heat the olive oil over medium heat. Once hot, add the diced onion and sauté for about 5 minutes until translucent.
- Add Aromatics: Stir in the minced garlic and cook for an additional minute until fragrant.
- Cook Vegetables: Add the diced bell peppers, carrots, and celery to the pot. Sauté the vegetables for about 7-8 minutes until they start to soften.
- Spice it Up: Sprinkle in the ground cumin, chili powder, and smoked paprika. Stir well to coat the vegetables with the spices, and cook for another 2-3 minutes to allow the spices to release their flavors.
- Combine Ingredients: Pour in the crushed tomatoes, black beans, kidney beans, and vegetable broth. Stir everything together to combine.
- Simmer: Bring the chili to a boil, then reduce the heat to low. Cover the pot and let it simmer for about 30 minutes, stirring occasionally, until the vegetables are tender and the flavors have melded together.
- Season: Taste and adjust the seasoning with salt and pepper to your liking.
- Serve: Ladle the chili into bowls and top with optional toppings such as chopped cilantro, avocado slices, shredded cheese, or sour cream.
Extra Tips:
For an even heartier chili, consider adding a cup of cooked quinoa or bulgur wheat to the pot during the last 10 minutes of simmering. This won’t only add texture but also increase the nutritional value of the dish.
If you prefer a spicier kick, add a chopped jalapeño or a pinch of cayenne pepper along with the other spices. Leftovers can be stored in an airtight container in the refrigerator for up to 3 days or frozen for longer storage, making it a great make-ahead meal option.
Chicken and Rice Casserole

Chicken and Rice Casserole is a timeless comfort food that’s perfect for potluck gatherings. This dish effortlessly combines tender chicken, fluffy rice, and a creamy sauce, making it a crowd-pleaser that’s both satisfying and budget-friendly. The casserole’s simplicity and rich flavors make it an ideal choice for feeding a group of 4-6 people, offering a warm and comforting meal that everyone will love.
This dish isn’t only delicious but also incredibly easy to prepare. With minimal ingredients and a straightforward cooking process, you can whip up this casserole in no time. Whether you’re hosting a casual get-together or attending a potluck, Chicken and Rice Casserole is bound to impress without breaking the bank. Plus, the leftovers (if there are any!) are just as delightful, making it a practical choice for any occasion.
Ingredients (Serves 4-6):
- 2 cups of uncooked white rice
- 4 boneless, skinless chicken breasts
- 1 can (10.5 oz) of cream of mushroom soup
- 1 can (10.5 oz) of cream of chicken soup
- 1 cup of chicken broth
- 1 cup of water
- 1 teaspoon of garlic powder
- 1 teaspoon of onion powder
- 1 teaspoon of salt
- 1/2 teaspoon of black pepper
- 1 cup of shredded cheddar cheese
- 1 tablespoon of olive oil
- 1/4 cup of chopped fresh parsley (optional, for garnish)
Cooking Instructions:
- Preheat the Oven: Begin by preheating your oven to 350°F (175°C). This will guarantee that it’s ready to cook the casserole evenly.
- Prepare the Rice: In a large mixing bowl, combine the uncooked white rice with the cream of mushroom soup, cream of chicken soup, chicken broth, water, garlic powder, onion powder, salt, and black pepper. Stir until all the ingredients are well mixed.
- Prepare the Chicken: Heat the olive oil in a skillet over medium heat. Season the chicken breasts lightly with salt and pepper, then brown them in the skillet for about 3-4 minutes on each side, until they’re golden brown. This step is just to add flavor, as the chicken will cook fully in the oven.
- Assemble the Casserole: Spread the rice mixture evenly in a 9×13 inch baking dish. Place the browned chicken breasts on top of the rice mixture.
- Bake the Casserole: Cover the baking dish with aluminum foil and bake in the preheated oven for 45 minutes. After 45 minutes, remove the foil, sprinkle the shredded cheddar cheese over the top, and bake for an additional 10-15 minutes, or until the cheese is melted and bubbly.
- Rest and Serve: Once baked, remove the casserole from the oven and let it rest for 5 minutes before serving. This allows the flavors to meld together. Garnish with fresh parsley, if desired, before serving.
Extra Tips:
For a more flavorful dish, consider marinating the chicken breasts in your favorite marinade for a few hours before cooking. This will infuse the chicken with additional flavors.
If you prefer a bit of crunch, you can add breadcrumbs on top of the cheese before the final baking step. Additionally, you can customize the casserole by adding vegetables such as peas, carrots, or broccoli to the rice mixture for extra nutrition and color.
Spaghetti Carbonara
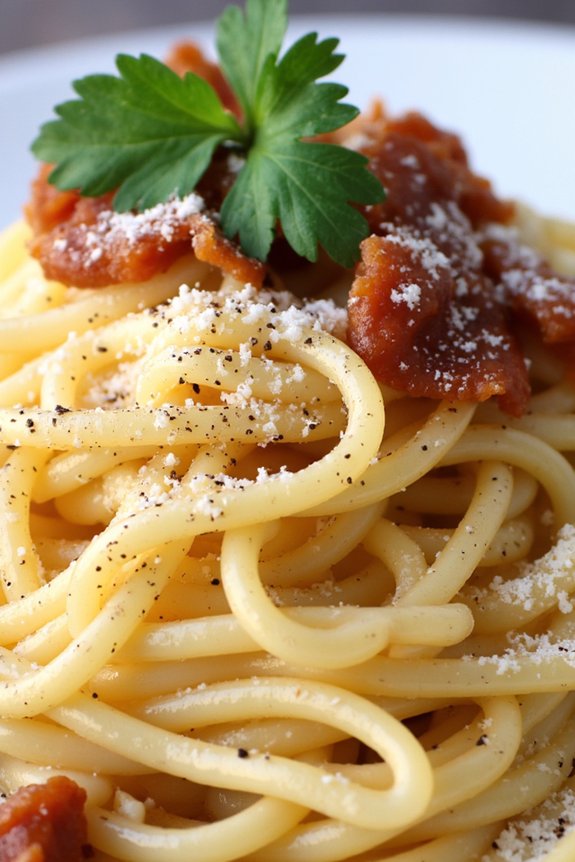
Spaghetti Carbonara is a classic Italian pasta dish that’s both simple and satisfying, making it an excellent choice for a potluck gathering. Known for its creamy texture and rich flavors, this dish combines a handful of basic ingredients to create a meal that feels indulgent without breaking the bank. By using pantry staples such as pasta, eggs, and cheese, you can whip up a delicious meal that will impress guests without requiring a lengthy grocery list or extensive preparation time.
This recipe serves 4-6 people and comes together quickly, making it ideal for those last-minute potluck invitations. The key to a great Spaghetti Carbonara is in the timing and the quality of the ingredients. Freshly cracked black pepper and a good-quality cheese, like Parmigiano-Reggiano or Pecorino Romano, truly elevate this dish. With just a few simple steps, you can create a comforting and flavorful dinner that’s sure to be a hit at any gathering.
Ingredients:
- 1 pound (450g) spaghetti
- 4 large eggs
- 1 cup (100g) grated Parmigiano-Reggiano or Pecorino Romano cheese
- 8 ounces (225g) pancetta or thick-cut bacon, diced
- 4 cloves garlic, minced
- Salt, to taste
- Freshly cracked black pepper, to taste
- 2 tablespoons olive oil
- Fresh parsley, chopped (optional, for garnish)
Instructions:
- Cook the Pasta: Bring a large pot of salted water to a boil. Add the spaghetti and cook according to package instructions until al dente. Reserve 1 cup of pasta water, then drain the pasta.
- Prepare the Sauce Base: While the pasta is cooking, beat the eggs in a mixing bowl and mix in the grated cheese. Season the mixture with a pinch of salt and plenty of black pepper, then set aside.
- Cook the Pancetta/Bacon: In a large skillet, heat the olive oil over medium heat. Add the diced pancetta or bacon and cook until crispy, about 5-7 minutes. Add the minced garlic and sauté for an additional 1-2 minutes until fragrant, being careful not to burn the garlic.
- Combine Ingredients: Reduce the heat to low. Add the drained spaghetti to the skillet with the pancetta and garlic. Toss to combine and guarantee the pasta is coated with the oil rendered from the pancetta.
- Create the Creamy Sauce: Remove the skillet from the heat. Pour the egg and cheese mixture over the pasta, tossing quickly to guarantee the eggs don’t scramble. Gradually add reserved pasta water, a little at a time, until you reach your desired sauce consistency.
- Final Touches: Taste and adjust seasoning with additional salt and black pepper if necessary. Garnish with chopped parsley if using.
Extra Tips:
When making Spaghetti Carbonara, it’s essential to remove the skillet from the heat before adding the egg mixture to prevent scrambling the eggs. The residual heat from the pasta will cook the eggs gently, resulting in a silky, creamy sauce.
Use freshly grated cheese for the best flavor and smoother melting. If the sauce becomes too thick, simply add more reserved pasta water to achieve the right consistency. Enjoy this classic dish with a simple green salad or crusty bread for a complete meal.
Black Bean and Corn Salad
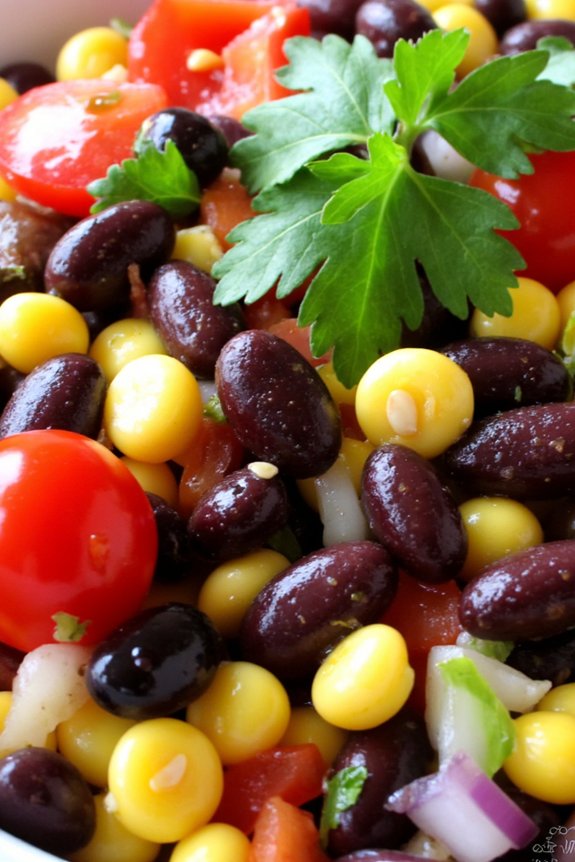
Looking for a quick, budget-friendly dish to bring to your next potluck? This Black Bean and Corn Salad isn’t only cost-effective but also delicious and nutritious. Perfect for any gathering, it combines the earthiness of black beans with the sweetness of corn, enriched by the crispness of cilantro and a zesty lime dressing.
This salad is versatile enough to be served as a side dish, a topping for tacos, or even as a main course for a light meal. The beauty of this dish lies in its simplicity and the ease of preparation, making it ideal for novice cooks and busy individuals. Ready in less than 20 minutes, this salad can be made ahead of time and refrigerated, allowing the flavors to meld beautifully.
With ingredients that are often already in your pantry, you can whip this up without much prior planning. Let’s get started on making this delightful dish for 4-6 people.
Ingredients:
- 2 cans (15 oz each) black beans, drained and rinsed
- 2 cups corn kernels (fresh, frozen, or canned)
- 1 red bell pepper, chopped
- 1 small red onion, finely chopped
- 1 cup cherry tomatoes, halved
- 1/4 cup fresh cilantro, chopped
- 2 tablespoons olive oil
- 1 tablespoon lime juice
- 1 teaspoon ground cumin
- Salt and pepper to taste
Cooking Instructions:
- Prepare the Ingredients: Start by draining and rinsing the black beans in a colander to remove any excess liquid and residue. If using canned corn, drain it as well. Chop the red bell pepper, red onion, and halve the cherry tomatoes. Verify everything is uniformly chopped for even distribution of flavors.
- Mix the Salad: In a large mixing bowl, combine the black beans, corn, chopped bell pepper, red onion, and cherry tomatoes. Toss them gently to guarantee all ingredients are evenly distributed.
- Make the Dressing: In a small bowl, whisk together the olive oil, lime juice, ground cumin, salt, and pepper. Adjust the seasoning to your preference. The lime and cumin create a revitalizing and slightly spicy dressing that complements the salad perfectly.
- Combine and Serve: Pour the dressing over the salad ingredients in the large bowl. Add the chopped cilantro and toss everything together until the salad is well-coated with the dressing. Let the salad sit for at least 10 minutes before serving to allow the flavors to meld. Serve chilled or at room temperature.
Extra Tips:
For additional flavor and texture, consider adding diced avocado just before serving, as it adds creaminess to the salad. If you prefer a bit of heat, include a finely chopped jalapeño or a sprinkle of red pepper flakes.
This salad is very forgiving and can be customized with other beans or vegetables you have on hand. Remember, fresh lime juice is key to the salad’s bright flavor, so try to avoid bottled lime juice if possible. Enjoy your potluck-ready Black Bean and Corn Salad!
Stuffed Bell Peppers
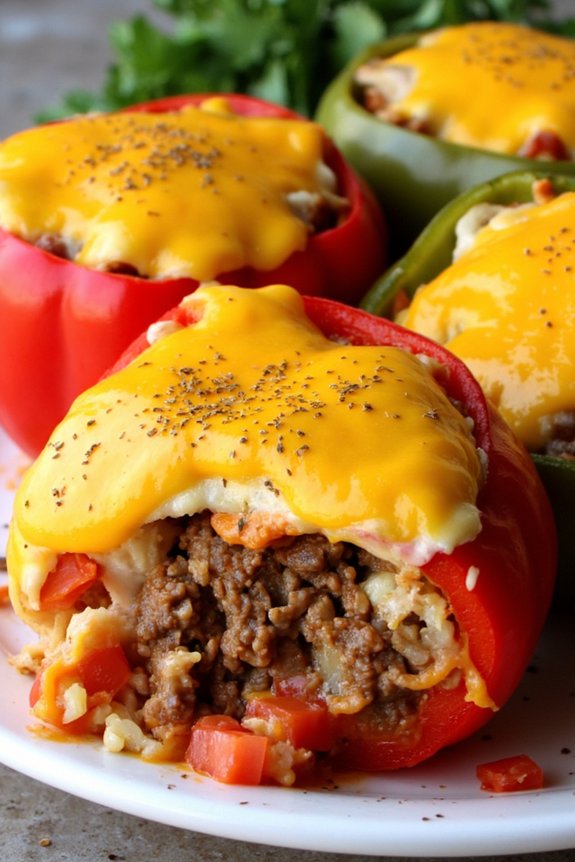
Stuffed Bell Peppers are a classic, crowd-pleasing dish perfect for any potluck or gathering. This recipe combines tender bell peppers with a savory filling of ground beef, rice, and a medley of spices, all topped with melted cheese. Not only is it budget-friendly, but it’s also packed with flavor and nutrients. The vibrant colors of the peppers make this dish as visually appealing as it’s delicious, ensuring it will be a hit at any event.
The versatility of this recipe allows for endless customization. You can easily adapt the filling to suit dietary preferences by substituting ground beef for turkey, chicken, or a vegetarian option like black beans or quinoa. With a short prep time and simple ingredients, Stuffed Bell Peppers are an excellent choice for an easy yet impressive potluck dish. This recipe serves 4-6 people, making it the perfect size for sharing.
Ingredients:
- 6 large bell peppers (any color)
- 1 pound ground beef
- 1 cup cooked white rice
- 1 small onion, finely chopped
- 2 cloves garlic, minced
- 1 can (14.5 oz) diced tomatoes, drained
- 1 teaspoon dried oregano
- 1 teaspoon salt
- 1/2 teaspoon black pepper
- 1 cup shredded cheddar cheese
- 1 tablespoon olive oil
Instructions:
- Preheat and Prepare Peppers: Preheat your oven to 375°F (190°C). Cut the tops off the bell peppers and remove the seeds and membranes. Lightly coat a baking dish with olive oil and arrange the peppers upright.
- Cook the Filling: In a large skillet over medium heat, add the olive oil. Once heated, add the chopped onion and garlic, sautéing until they’re soft and translucent, about 3-4 minutes.
- Brown the Meat: Add the ground beef to the skillet, breaking it apart with a wooden spoon. Cook until the beef is browned and no longer pink, approximately 5-7 minutes.
- Combine Ingredients: Stir in the drained diced tomatoes, cooked rice, oregano, salt, and pepper. Mix everything thoroughly and let it simmer for 5 minutes to allow the flavors to meld.
- Stuff the Peppers: Spoon the beef and rice mixture into each bell pepper, packing it down gently. Fill each pepper to the top, ensuring an even distribution of filling.
- Bake the Peppers: Cover the baking dish with aluminum foil and bake in the preheated oven for 30 minutes. Remove the foil, sprinkle the shredded cheddar cheese over the tops of the peppers, and bake for an additional 10-15 minutes, or until the cheese is melted and bubbly.
- Serve and Enjoy: Allow the peppers to cool slightly before serving. Enjoy this hearty dish as a main course or a side dish.
Extra Tips:
When choosing bell peppers, opt for ones that are similar in size so they cook evenly. If you prefer a bit of a kick, add a pinch of red pepper flakes or a splash of hot sauce to the filling.
To make the dish ahead of time, prepare the stuffed peppers up to the baking step, cover them tightly, and refrigerate for up to a day. When ready to bake, bring them to room temperature before placing them in the oven.
For a complete meal, serve the stuffed peppers with a side salad or crusty bread.
Loaded Baked Potato Bar
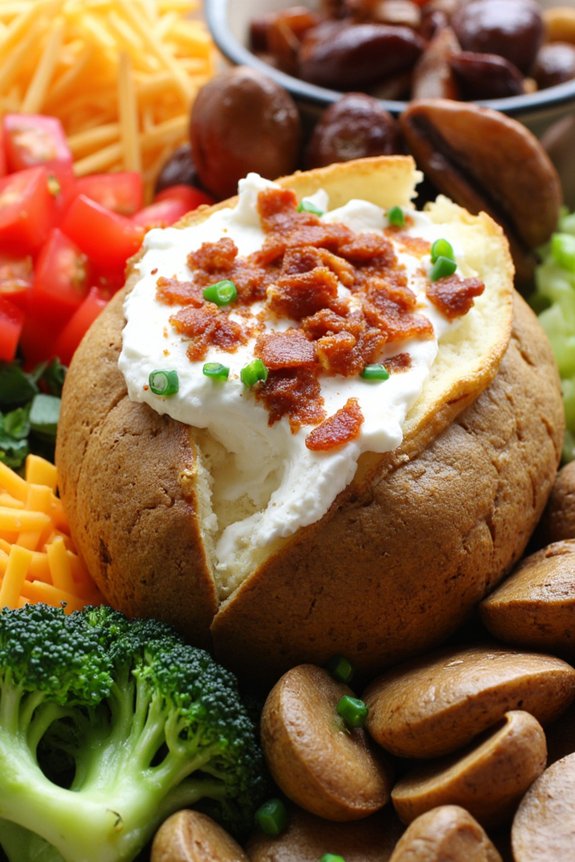
A Loaded Baked Potato Bar is a fun and interactive way to serve a meal that’s both delicious and economical. This dish allows guests to customize their own potatoes with a variety of toppings, making it perfect for potlucks and gatherings. The beauty of this setup is that it caters to everyone’s preferences and dietary needs, from vegetarians to meat lovers.
Not only is it simple to prepare, but it also requires minimal cleanup, making it an ideal choice for hosts looking to enjoy their party without spending the entire time in the kitchen.
To create a Loaded Baked Potato Bar, you’ll start with perfectly baked potatoes as the base. From there, provide a selection of toppings such as sour cream, cheese, bacon bits, chives, and more, allowing guests to create their ultimate loaded potato. This dish is designed to serve 4-6 people, making it perfect for a small gathering or family meal. The key is to guarantee a variety of toppings are available, so everyone can indulge in their favorite combinations.
Ingredients (serving size: 4-6 people):
- 6 medium russet potatoes
- Olive oil
- Salt
- 1 cup shredded cheddar cheese
- 1 cup sour cream
- 1/2 cup cooked bacon bits
- 1/4 cup chopped chives
- 1/2 cup steamed broccoli florets
- 1/2 cup diced tomatoes
- 1/2 cup sautéed mushrooms
- Salt and pepper to taste
Cooking Instructions:
- Prepare the Potatoes: Preheat your oven to 400°F (200°C). Scrub the potatoes under running water to clean them thoroughly. Pat them dry with a towel.
- Season and Bake: Prick each potato several times with a fork to allow steam to escape during cooking. Rub each potato with olive oil and sprinkle with salt. Place the potatoes directly on the oven rack and bake for 50-60 minutes, or until they’re tender when pierced with a fork.
- Prepare Toppings: While the potatoes are baking, prepare your toppings. Cook bacon until crispy and crumble it once cooled. Chop chives, dice tomatoes, and steam broccoli until tender. Sauté mushrooms if using.
- Set Up the Bar: Once potatoes are done, remove them from the oven and let them cool slightly. Cut a slit down the center of each potato and gently push the ends to open them up. Arrange all your toppings in separate bowls or containers next to the potatoes.
- Serve: Invite guests to create their loaded baked potatoes by choosing from the selection of toppings. Provide salt and pepper for additional seasoning.
Extra Tips:
For a more interactive experience, consider labeling each topping or provide a menu card with suggestions for flavor combinations. This can be especially helpful for guests who may not be familiar with the concept of a Loaded Baked Potato Bar.
You can also include additional toppings like guacamole, salsa, or jalapeños for a spicy kick. If you’re short on time, cook the potatoes in the microwave until tender, then finish them in the oven for crispy skin.
Remember to keep toppings replenished throughout the event to guarantee everyone gets their preferred choices.
BBQ Chicken Pizza

BBQ Chicken Pizza is a delightful and budget-friendly option for your next potluck gathering. This dish combines the savory taste of BBQ sauce with tender chicken and a blend of cheeses, all on a crispy homemade pizza crust. It’s perfect for serving a crowd and is sure to become a favorite among friends and family.
Whether you’re looking for something quick or a dish that’s easy to transport, BBQ Chicken Pizza hits all the marks. The beauty of this recipe is its simplicity and versatility. You can easily adjust the ingredients to suit dietary preferences or use whatever you have on hand. The smoky BBQ flavor pairs perfectly with the creaminess of the cheese and the slight tang of red onions.
This recipe serves 4-6 people, making it an excellent choice for a small gathering or as part of a larger spread.
Ingredients for BBQ Chicken Pizza (serves 4-6):
- 1 pre-made pizza crust (or homemade if preferred)
- 1 cup BBQ sauce
- 2 cups cooked chicken breast, shredded
- 1 1/2 cups mozzarella cheese, shredded
- 1/2 cup cheddar cheese, shredded
- 1/4 cup red onion, thinly sliced
- 1/4 cup chopped fresh cilantro (optional)
- Olive oil, for brushing
Instructions:
- Preheat the Oven: Preheat your oven to 475°F (245°C). If you’re using a pizza stone, place it in the oven to heat along with it. This will guarantee a crispy crust.
- Prepare the Pizza Crust: If using a pre-made pizza crust, place it on a pizza peel or baking sheet. For homemade dough, roll it out to your desired thickness and shape. Lightly brush the crust with olive oil to help achieve a golden-brown finish.
- Spread the BBQ Sauce: Evenly spread 3/4 cup of BBQ sauce over the pizza crust, leaving a small border for the crust. Save the remaining sauce to toss with the chicken.
- Prepare the Chicken Topping: In a bowl, mix the shredded chicken with the remaining BBQ sauce until well coated. This mixture will add flavor and moisture to the pizza.
- Assemble the Pizza: Evenly distribute the BBQ chicken mixture over the sauced crust. Sprinkle the mozzarella and cheddar cheeses over the top, ensuring even coverage. Add thinly sliced red onions on top of the cheese.
- Bake the Pizza: Transfer the pizza to the oven and bake for 10-15 minutes, or until the cheese is melted and bubbly, and the crust is golden brown. If using a pizza stone, the baking time may be slightly reduced.
- Garnish and Serve: Once baked, remove the pizza from the oven and let it cool slightly before cutting. Sprinkle chopped fresh cilantro over the top if desired. Serve warm and enjoy!
Extra Tips: For a more flavorful pizza, consider marinating the chicken in the BBQ sauce for a few hours before cooking. This will infuse the meat with extra flavor.
If you’re using homemade dough, verify it’s at room temperature before rolling to make it easier to work with. You can also experiment with different cheeses or add toppings like bell peppers or jalapeños for extra kick.
Finally, always preheat your baking surface, whether it’s a stone or a baking sheet, to achieve the best crust texture.
Taco Salad
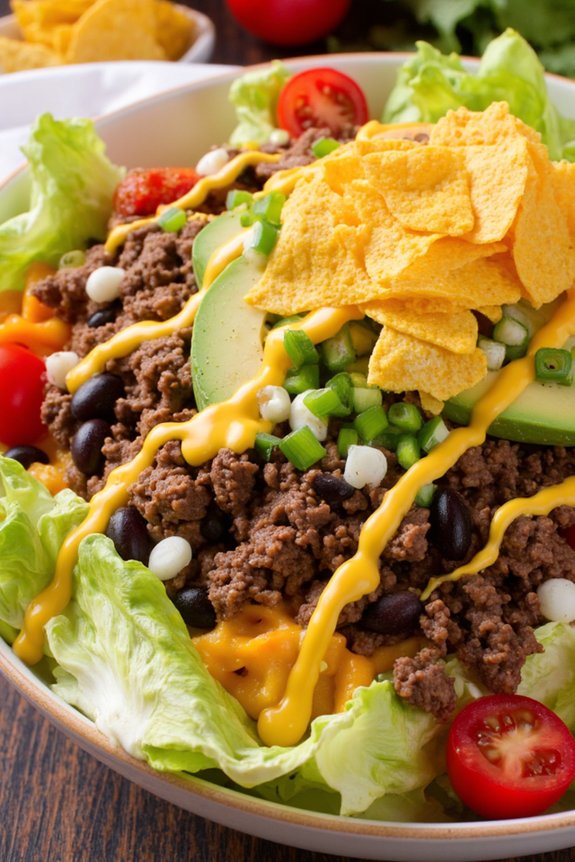
This recipe offers a delicious blend of seasoned ground beef, crisp lettuce, juicy tomatoes, and creamy avocado, all topped with shredded cheese and a zesty dressing. The flavors meld together beautifully, creating a dish that’s both invigorating and hearty.
The use of simple, affordable ingredients makes this taco salad not only budget-friendly but also quick and easy to prepare. Perfect for serving 4-6 people, this recipe is scalable and can be adjusted to cater to larger crowds or smaller gatherings as needed.
Ingredients (for 4-6 people):
- 1 lb ground beef
- 1 packet taco seasoning mix
- 1 head iceberg lettuce, chopped
- 2 cups cherry tomatoes, halved
- 1 cup shredded cheddar cheese
- 1 avocado, diced
- 1 cup canned black beans, drained and rinsed
- 1/2 cup sliced black olives
- 1/4 cup chopped green onions
- 1 cup tortilla chips, crushed
- 1/2 cup sour cream
- 1/2 cup salsa
- 1 lime, juiced
Cooking Instructions:
- Prepare the Ground Beef: Begin by heating a large skillet over medium heat. Add the ground beef and cook until it’s browned, breaking it up with a wooden spoon as it cooks. Once the beef is fully browned, drain any excess fat from the skillet.
- Season the Beef: Return the skillet to the heat and add the taco seasoning mix along with 1/4 cup of water. Stir well to coat the beef evenly with the seasoning. Allow it to simmer for about 5 minutes until the mixture thickens slightly. Remove from heat and set aside.
- Assemble the Salad Base: In a large serving bowl, combine the chopped lettuce, halved cherry tomatoes, black beans, sliced black olives, and chopped green onions. Toss gently to mix the ingredients.
- Add the Toppings: Evenly distribute the seasoned ground beef over the salad base. Follow with the diced avocado and shredded cheddar cheese.
- Finish with Chips and Dressing: Just before serving, sprinkle the crushed tortilla chips over the top for added crunch. In a small bowl, mix together the sour cream, salsa, and lime juice to create a simple dressing. Drizzle the dressing over the salad.
- Serve: Serve the taco salad immediately to ensure the tortilla chips remain crispy. Enjoy it on its own or with additional salsa and sour cream on the side for those who like extra toppings.
Extra Tips:
To make this taco salad even more delightful, consider adding a twist by incorporating different types of beans, such as pinto or kidney beans, for variety.
If you’re aiming for a healthier option, you can substitute ground turkey or chicken for the beef. For those who prefer a vegetarian version, skip the meat entirely and increase the amount of beans and vegetables.
Also, don’t hesitate to experiment with different cheeses or add jalapeños for a spicy kick. Remember, the key to a great taco salad is balancing flavors and textures, so feel free to adjust the ingredients to your liking.
Spinach and Mushroom Quiche

Spinach and Mushroom Quiche is a perfect potluck dish that combines the earthiness of mushrooms with the freshness of spinach, all wrapped up in a savory, creamy custard encased in a flaky pie crust.
This dish isn’t only delicious and filling, but it’s also quite economical, making it an ideal choice for feeding a crowd without breaking the bank. Whether you’re hosting a brunch, a dinner, or need a versatile dish for a gathering, this quiche is sure to please everyone’s palate.
This Spinach and Mushroom Quiche can be served warm or at room temperature, making it a versatile addition to any potluck. The rich flavors of the mushrooms and spinach complement each other beautifully, while the custard provides a smooth, creamy texture.
Plus, it’s easy to prepare ahead of time, which means less stress on the day of your event. This recipe serves 4-6 people, making it perfect for sharing.
Ingredients:
- 1 store-bought pie crust (or homemade if preferred)
- 1 tablespoon olive oil
- 1 medium onion, finely chopped
- 2 cups fresh spinach, roughly chopped
- 1 cup mushrooms, sliced
- 4 large eggs
- 1 cup half-and-half or whole milk
- 1 cup shredded cheese (such as Gruyère or cheddar)
- Salt and pepper to taste
- 1/4 teaspoon nutmeg (optional)
Instructions:
- Preheat the Oven: Start by preheating your oven to 375°F (190°C). This guarantees that the quiche will bake evenly and the crust will become perfectly flaky.
- Prepare the Crust: Place the pie crust in a 9-inch pie pan. Press it firmly against the sides and bottom, and crimp the edges if desired. Use a fork to prick the bottom of the crust to prevent bubbling. Set aside.
- Sauté Vegetables: In a medium skillet, heat the olive oil over medium heat. Add the chopped onions and sauté until translucent, about 4-5 minutes. Add the mushrooms and continue cooking until they’re softened and browned, approximately 5 minutes. Stir in the spinach and cook until wilted, about 2 minutes. Remove from heat and let cool slightly.
- Prepare the Custard: In a large bowl, whisk together the eggs, half-and-half (or milk), salt, pepper, and nutmeg (if using) until fully combined.
- Assemble the Quiche: Spread the sautéed vegetables evenly over the pie crust. Sprinkle the shredded cheese over the vegetables. Pour the egg mixture over the top, ensuring it’s evenly distributed.
- Bake: Place the quiche in the preheated oven and bake for 35-40 minutes, or until the center is set and the top is lightly golden. You can insert a knife into the center to check if it comes out clean.
- Cool and Serve: Allow the quiche to cool for at least 10 minutes before slicing. This resting period helps the quiche to set properly, making it easier to cut and serve.
Extra Tips: For a richer flavor, you can add a splash of cream to the custard mixture. If you prefer a lower-fat option, skim milk can be used, but the quiche may not be as creamy.
Feel free to experiment with different types of cheese or add-ins like cooked bacon or sun-dried tomatoes for extra flavor. Finally, if you’re making the quiche ahead of time, it can be refrigerated and then gently reheated in the oven before serving.
One-Pot Pasta Primavera
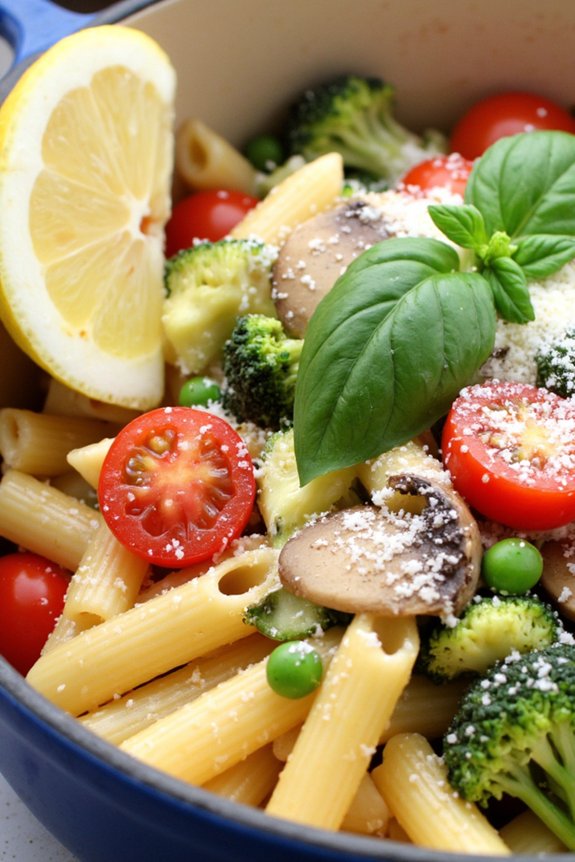
Pasta Primavera is a delightful, colorful dish that’s perfect for a potluck or family dinner. This one-pot version makes it even easier to whip up this fresh and vibrant meal without the hassle of multiple pans. The recipe showcases a variety of seasonal vegetables, making it not only budget-friendly but also a healthy choice. With its creamy sauce and perfectly tender pasta, this dish is sure to be a crowd-pleaser.
The beauty of this dish lies in its simplicity and versatility. You can use whatever vegetables you have on hand, making it a great way to clean out your fridge. The one-pot method means less cleanup and more time to enjoy your meal with friends and family. This recipe serves 4-6 people, making it an ideal choice for a small gathering or a cozy family meal.
Ingredients:
- 12 oz (340g) of penne pasta
- 2 tablespoons olive oil
- 3 cloves garlic, minced
- 1 cup cherry tomatoes, halved
- 1 medium zucchini, sliced
- 1 red bell pepper, sliced
- 1 cup broccoli florets
- 1 cup sliced mushrooms
- 1 cup frozen peas
- 4 cups vegetable broth
- 1 cup heavy cream
- 1/2 cup grated Parmesan cheese
- Salt and pepper to taste
- 1 tablespoon chopped fresh basil
- 1 tablespoon chopped fresh parsley
- Lemon wedges for serving
Instructions:
- Prepare the Vegetables: Start by washing and slicing all the vegetables. Mince the garlic and set it aside. Prepare your workspace by ensuring all ingredients are within reach.
- Sauté the Garlic and Vegetables: In a large pot, heat the olive oil over medium heat. Add the minced garlic and sauté for about 1 minute until fragrant. Add the cherry tomatoes, zucchini, red bell pepper, broccoli, mushrooms, and peas. Sauté the vegetables for about 5 minutes, or until they begin to soften.
- Add the Pasta and Broth: Stir in the penne pasta, ensuring it’s evenly distributed among the vegetables. Pour in the vegetable broth, making sure the pasta is fully submerged. Increase the heat to bring the mixture to a boil.
- Cook the Pasta: Once boiling, reduce the heat to medium-low and cover the pot. Allow the pasta to cook for about 10-12 minutes, stirring occasionally to prevent sticking. Cook until the pasta is al dente and the broth has mostly been absorbed.
- Incorporate the Cream and Cheese: Once the pasta is cooked, stir in the heavy cream and grated Parmesan cheese. Mix well until the cheese has melted and the sauce is creamy. Season with salt and pepper to taste.
- Garnish and Serve: Remove the pot from heat and stir in the chopped basil and parsley. Serve the Pasta Primavera hot, with lemon wedges on the side for a burst of freshness.
Extra Tips:
To enhance the flavor, consider adding a splash of white wine along with the vegetable broth. For a healthier version, you can substitute the heavy cream with a plant-based alternative or reduced-fat cream.
If you prefer your vegetables with a slight crunch, reduce their cooking time slightly before adding the pasta. Remember to taste and adjust the seasoning throughout the cooking process, as the saltiness of the Parmesan cheese can vary.
Enjoy this delightful dish with a side of crusty bread or a simple green salad for a complete meal.