

Wraps are my secret weapon for effortless family dinners that everyone loves. Quick, budget-friendly, and endlessly customizable, they’re perfect for any busy weeknight. From the savory BBQ Pulled Pork to the refreshing Black Bean and Avocado combo, these 14 wrap ideas are sure to please. With whatever ingredients you have on hand, you can create something delicious in no time. Let’s make dinner simple and satisfying with these easy wrap recipes!
Chicken Caesar Salad Wraps

Chicken Caesar Salad Wraps are a delightful and satisfying option for family dinner nights, combining the classic flavors of Caesar salad with the convenience and portability of a wrap. These wraps offer a perfect blend of textures and tastes – tender grilled chicken, crisp romaine lettuce, nutty Parmesan cheese, and creamy Caesar dressing all wrapped up in a soft tortilla.
They aren’t only easy to prepare but also customizable to suit various taste preferences, making them an ideal choice for a quick and nutritious family meal. Perfect for busy weeknights, these Chicken Caesar Salad Wraps can be prepared in advance, making them a great time-saver.
You can grill the chicken and prepare the lettuce and other ingredients ahead of time, allowing you to assemble the wraps in just a few minutes when it’s time to eat. Serve them with a side of fresh fruit or a simple vegetable soup to round out the meal, and you have a delicious dinner that the whole family will enjoy.
Ingredients (Serves 4-6):
- 4 boneless, skinless chicken breasts
- Salt and pepper to taste
- 2 tablespoons olive oil
- 1 teaspoon garlic powder
- 6 large flour tortillas
- 1 head of romaine lettuce, chopped
- 1 cup Caesar dressing
- 1 cup grated Parmesan cheese
- 1 cup croutons
Cooking Instructions:
- Prepare the Chicken: Start by seasoning the chicken breasts with salt, pepper, and garlic powder. Drizzle olive oil over the chicken to guarantee it remains moist and flavorful during cooking.
- Grill the Chicken: Preheat your grill or grill pan over medium-high heat. Once hot, place the chicken breasts on the grill. Cook for about 6-7 minutes on each side or until the internal temperature reaches 165°F (75°C). Remove the chicken from the grill and let it rest for a few minutes before slicing it into thin strips.
- Prepare the Tortillas: While the chicken is resting, warm the tortillas in a dry skillet over medium heat for about 30 seconds on each side. This makes them more pliable and easier to wrap.
- Assemble the Wraps: Lay each tortilla flat and spread about 2 tablespoons of Caesar dressing over the surface. Place a handful of chopped romaine lettuce in the center, followed by a portion of the grilled chicken strips. Sprinkle with Parmesan cheese and a few croutons for added crunch.
- Wrap and Serve: Fold in the sides of the tortilla, then roll it up tightly from the bottom to the top. Cut each wrap in half diagonally and serve immediately with extra Caesar dressing on the side if desired.
Extra Tips:
For a more robust flavor, consider marinating the chicken in Caesar dressing for a few hours before grilling. This not only enhances the taste but also helps to tenderize the chicken.
Additionally, you can add extra toppings such as sliced avocado, cherry tomatoes, or bacon bits for a different twist. If you’re preparing these wraps in advance, keep the ingredients separate and assemble just before serving to prevent the wraps from becoming soggy. Enjoy your family night with these delicious and versatile Chicken Caesar Salad Wraps!
Black Bean and Avocado Wraps
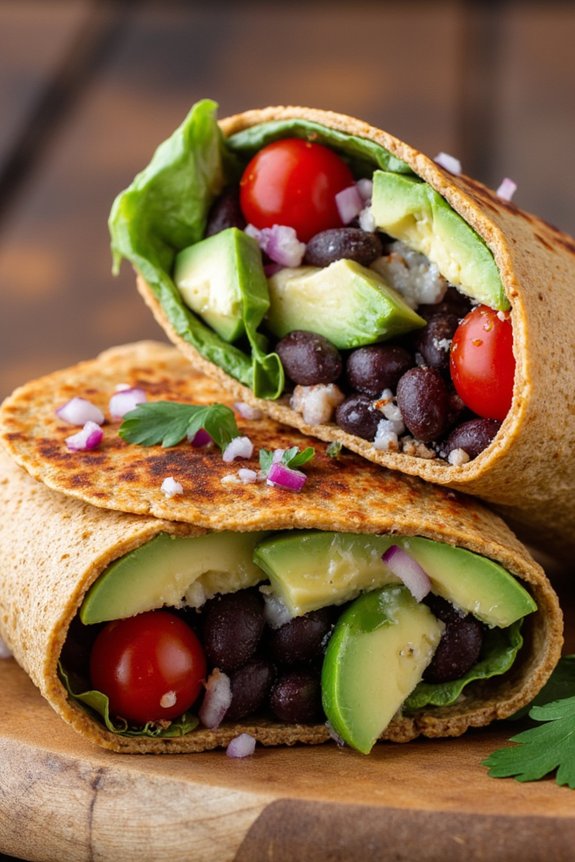
Looking for a quick, healthy, and delicious option for family dinner night? Black Bean and Avocado Wraps might just be the perfect choice! These wraps aren’t only packed with flavor, but they’re also rich in nutrients, making them a great meal for all ages. The creamy avocado pairs wonderfully with the hearty black beans, offering a satisfying texture and taste that will leave everyone at the table asking for seconds.
Plus, these wraps are incredibly easy to prepare, allowing you to enjoy a relaxing evening with your family without spending too much time in the kitchen.
Black Bean and Avocado Wraps are a versatile dish that can be customized with your family’s favorite ingredients. While the combination of black beans and avocado is a classic, feel free to add your own twist by including ingredients like fresh vegetables or a sprinkle of cheese.
The wraps are also perfect for those who are vegetarian or seeking a meatless meal option, as they provide ample protein and healthy fats. With just a few simple ingredients and steps, you’ll have a delicious dinner ready to be enjoyed by everyone.
Ingredients (Serving Size: 4-6 people):
- 2 cans of black beans, drained and rinsed
- 2 ripe avocados, diced
- 1 cup of cherry tomatoes, halved
- 1/2 red onion, finely chopped
- 1/4 cup fresh cilantro, chopped
- Juice of 1 lime
- 1 teaspoon ground cumin
- Salt and pepper to taste
- 6 large whole wheat tortillas
- Optional: 1 cup shredded cheese, 1 cup baby spinach leaves
Cooking Instructions:
- Prepare the Bean Mixture: In a large bowl, combine the drained and rinsed black beans, cherry tomatoes, red onion, and cilantro. Add the ground cumin, lime juice, salt, and pepper, then gently toss everything together until well mixed. This will guarantee the flavors are evenly distributed throughout the mixture.
- Prepare the Avocados: Dice the avocados and add them to the bean mixture. Use a spoon to gently fold the avocados into the mixture, being careful not to mash them. This step gives the wraps their creamy texture and enhances the overall flavor.
- Warm the Tortillas: In a dry skillet over medium heat, warm each tortilla for about 30 seconds on each side until they’re pliable. This step makes it easier to wrap the tortillas around the fillings without tearing.
- Assemble the Wraps: Lay each warmed tortilla flat and place an equal portion of the black bean and avocado mixture in the center. If desired, add a handful of baby spinach leaves and a sprinkle of shredded cheese on top of the filling.
- Roll the Wraps: Fold the sides of the tortilla over the filling, then roll from the bottom up to create a compact wrap. Confirm that the filling is tightly secured inside the wrap to prevent it from spilling out.
- Serve and Enjoy: Slice each wrap in half and serve them immediately while the fillings are fresh and flavorful. These wraps can be served with a side of salsa or guacamole for added flavor.
Extra Tips:
For the best results, use ripe avocados that give slightly when pressed. If you prefer a spicier kick, consider adding a diced jalapeño to the bean mixture or a dash of your favorite hot sauce.
To save time, you can prepare the bean mixture ahead of time and store it in the refrigerator until you’re ready to assemble the wraps. Finally, these wraps can also be enjoyed cold, making them a great option for a packed lunch the next day!
Turkey and Hummus Wraps
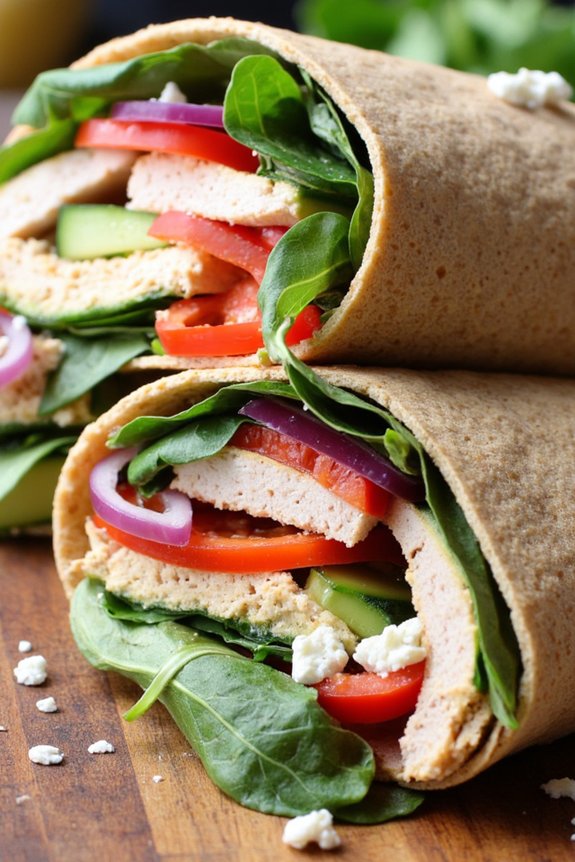
Family nights are a wonderful time to gather around the dinner table and enjoy a meal that’s both delicious and easy to prepare. Turkey and Hummus Wraps are a perfect choice, offering a flavorful and nutritious option that’s sure to please everyone. Packed with lean turkey, creamy hummus, and fresh vegetables, these wraps aren’t only satisfying but also quick to put together, making them ideal for busy weeknights.
These wraps are versatile and can be customized to suit varying tastes, whether you prefer a spicy kick or a milder flavor. The combination of ingredients brings a delightful balance of textures and tastes, from the softness of the wrap to the crunch of fresh veggies. Plus, they can be easily adjusted for larger groups or stored for quick lunches the next day.
Ingredients for 4-6 servings:
- 6 large whole wheat tortillas or wraps
- 1 pound of sliced turkey breast
- 1 cup of hummus (store-bought or homemade)
- 2 cups of mixed greens (such as spinach and arugula)
- 1 large tomato, thinly sliced
- 1 cucumber, thinly sliced
- 1 red bell pepper, thinly sliced
- 1/2 red onion, thinly sliced
- 1/2 cup of crumbled feta cheese (optional)
- Salt and pepper to taste
Cooking Instructions:
1. Prepare the Ingredients:
Begin by washing all the fresh vegetables thoroughly. Slice the tomato, cucumber, red bell pepper, and red onion into thin slices. If using feta cheese, crumble it into a small bowl and set aside.
2. Lay Out the Wraps:
Place the whole wheat tortillas or wraps on a clean, flat surface. If the wraps are stiff, you can microwave them for about 10 seconds to make them more pliable and easier to roll.
3. Spread the Hummus:
Evenly spread about 2 tablespoons of hummus over each wrap. Make sure to leave a small edge around the perimeter to prevent overflow when rolling.
4. Layer the Ingredients:
On top of the hummus, evenly distribute the turkey slices across each wrap. Then, add a handful of mixed greens followed by a few slices of tomato, cucumber, red bell pepper, and red onion. If desired, sprinkle a bit of crumbled feta cheese on top.
5. Season and Roll:
Lightly season the fillings with salt and pepper. Starting from one end, carefully roll each wrap tightly, tucking in the sides as you go to secure the fillings.
6. Cut and Serve:
Once rolled, use a sharp knife to cut each wrap in half diagonally. Arrange the wraps on a serving platter and serve immediately for best taste and texture.
Extra Tips:
For a more heart-healthy option, consider using low-sodium turkey slices and adding more greens. If you prefer a bit more flavor, try adding a drizzle of balsamic glaze or a sprinkle of your favorite herbs.
These wraps can also be made ahead of time and stored in the refrigerator for up to 24 hours, making them a convenient option for meal prep. Just be sure to wrap them tightly in plastic wrap to maintain freshness and prevent the wraps from drying out.
BBQ Pulled Pork Wraps

BBQ Pulled Pork Wraps are a delightful and satisfying option for family dinner nights. This dish combines the smoky, savory flavors of slow-cooked pulled pork with the freshness of vegetables, all wrapped up in a soft tortilla. It’s a versatile meal that can be easily customized to suit everyone’s tastes, making it a favorite for both kids and adults.
Whether served with a side salad or some crispy fries, these wraps are bound to become a staple in your family’s meal rotation.
The key to a delicious BBQ Pulled Pork Wrap is the tender, flavorful pork that forms the centerpiece of the dish. By slow-cooking the pork with a blend of spices and BBQ sauce, you guarantee that each bite is infused with smoky and sweet notes.
Once the pork is ready, it’s simply a matter of assembling the wraps with your choice of fresh vegetables and a sprinkle of cheese for added indulgence. Perfect for a relaxed family dinner or even a casual gathering with friends, these wraps are as easy to make as they’re to enjoy.
Ingredients (Serves 4-6):
- 3 pounds pork shoulder or butt
- 1 tablespoon olive oil
- 1 cup BBQ sauce
- 1 teaspoon smoked paprika
- 1 teaspoon garlic powder
- 1 teaspoon onion powder
- Salt and pepper to taste
- 6 large flour tortillas
- 1 cup shredded lettuce
- 1 cup sliced tomatoes
- 1 cup shredded cheddar cheese
- 1/2 cup sliced red onions
- 1/4 cup chopped fresh cilantro (optional)
Cooking Instructions:
- Prepare the Pork: Rub the pork shoulder with olive oil, smoked paprika, garlic powder, onion powder, salt, and pepper. Ascertain the spices fully cover the meat to enhance flavor.
- Slow-Cook the Pork: Place the seasoned pork in a slow cooker. Pour 1/2 cup of the BBQ sauce over the top. Cover and cook on low for 8 hours or until the pork is tender and easily shredded with a fork.
- Shred the Pork: Once cooked, remove the pork from the slow cooker and shred it using two forks. Discard any excess fat. Return the shredded pork to the slow cooker and mix in the remaining BBQ sauce. Keep warm.
- Prepare the Wraps: Warm the flour tortillas in a dry skillet over medium heat for about 30 seconds on each side, or until pliable.
- Assemble the Wraps: Lay a tortilla flat and layer with shredded lettuce, sliced tomatoes, and shredded cheddar cheese. Add a generous portion of the BBQ pulled pork and top with sliced red onions and cilantro, if using.
- Wrap and Serve: Fold the sides of the tortilla over the filling, then roll from the bottom up to enclose the ingredients. Slice each wrap in half and serve immediately.
Extra Tips:
For the best results, choose a high-quality BBQ sauce that complements the flavors of your pulled pork. If you prefer more heat, you can add a dash of hot sauce to the pork before serving.
Additionally, consider offering a variety of toppings such as pickled jalapeños or avocado slices to allow family members to customize their wraps to their preference. For a lighter option, you can substitute whole wheat tortillas and reduce the amount of cheese.
Greek Veggie Wraps

Greek Veggie Wraps are a delightful and healthy option for family dinners, packed with vibrant flavors and textures. These wraps aren’t only visually appealing but also incredibly satisfying, making them a perfect choice for a nutritious meal.
With an array of fresh ingredients such as cucumbers, tomatoes, and red onions, combined with creamy hummus and tangy feta cheese, these wraps offer a taste of the Mediterranean in every bite. Whether you’re serving a vegetarian family or simply seeking a lighter dinner option, Greek Veggie Wraps will become a family favorite.
Perfect for a serving size of 4-6 people, these wraps are easy to prepare and can be made in a short amount of time. They’re versatile enough to allow for customization according to your family’s preferences. The use of whole-wheat tortillas not only boosts the nutritional value but also provides a hearty base that complements the crisp and flavorful fillings.
Whether you enjoy them as a main dish or a light lunch, these wraps are sure to please both adults and children alike.
Ingredients for 4-6 servings:
- 6 whole-wheat tortillas
- 1 cup hummus
- 1 cucumber, thinly sliced
- 2 tomatoes, diced
- 1 red onion, thinly sliced
- 1 cup crumbled feta cheese
- 1 cup baby spinach leaves
- 1/2 cup pitted kalamata olives, sliced
- 2 tablespoons olive oil
- 1 tablespoon lemon juice
- 1 teaspoon dried oregano
- Salt and pepper to taste
Cooking Instructions:
- Prepare the Vegetables: Start by washing the cucumber, tomatoes, and spinach leaves thoroughly. Thinly slice the cucumber and red onion, and dice the tomatoes. Set these aside for filling the wraps.
- Mix the Dressing: In a small bowl, combine the olive oil, lemon juice, dried oregano, salt, and pepper. Whisk until well combined to create a flavorful dressing that will enhance the taste of the vegetables.
- Warm the Tortillas: Using a non-stick skillet over medium heat, warm each tortilla for about 30 seconds on each side. This will make them more pliable and easier to wrap.
- Assemble the Wraps: Lay one tortilla flat and spread a generous spoonful of hummus over it. Layer the cucumber slices, diced tomatoes, red onion, spinach leaves, kalamata olives, and crumbled feta cheese evenly on top of the hummus.
- Drizzle the Dressing: Spoon a small amount of the prepared dressing over the layered ingredients to add flavor and moisture to the wrap.
- Wrap and Serve: Carefully fold the sides of the tortilla inward, then roll it up from the bottom to enclose the filling. Repeat the process for the remaining tortillas. Serve the wraps immediately for the best taste and texture.
Extra Tips:
Feel free to customize your Greek Veggie Wraps by adding or substituting ingredients like roasted red peppers or grilled zucchini for extra flavor.
If you prefer a bit of spice, consider adding a dash of hot sauce or red pepper flakes to the dressing. For those who enjoy a protein boost, grilled chicken or chickpeas can be included as well.
Remember to roll the wraps tightly to prevent the ingredients from spilling out, especially if packing them for lunch or a picnic. Enjoy your Greek Veggie Wraps with a side of tzatziki sauce for an authentic Mediterranean experience!
Tuna Salad Wraps

Tuna Salad Wraps are a delightful and versatile option for family dinner nights. They’re quick to prepare, nutritious, and can be customized to suit various taste preferences. Perfect for a casual meal, these wraps combine the savory flavors of tuna with fresh vegetables, all enveloped in a soft tortilla for a satisfying bite.
Whether you’re looking for a light meal or a hearty snack, Tuna Salad Wraps are sure to please both kids and adults alike.
Preparing Tuna Salad Wraps involves creating a creamy tuna filling that’s packed with flavor, then wrapping it in a tortilla with fresh greens and vegetables for added texture and nutrition. This dish isn’t only delicious but also a great way to incorporate more seafood into your family’s diet.
The wraps can be served cold, which makes them an excellent choice for a quick weeknight dinner or even a picnic.
Ingredients (Serves 4-6):
- 3 cans of tuna in water, drained
- 1/2 cup mayonnaise
- 1 tablespoon Dijon mustard
- 1 tablespoon lemon juice
- Salt and pepper to taste
- 1/4 cup chopped red onion
- 1/4 cup chopped celery
- 1/4 cup chopped dill pickles
- 2 cups mixed greens (such as lettuce or spinach)
- 6 large flour tortillas
- 1/2 cup shredded carrots
- 1 avocado, sliced
- Optional: sliced tomatoes, cucumbers, or cheese
Instructions:
- Prepare the Tuna Salad: In a large bowl, combine the drained tuna, mayonnaise, Dijon mustard, and lemon juice. Mix well until the tuna is thoroughly coated. Season with salt and pepper to taste.
- Add the Vegetables: Stir in the chopped red onion, celery, and dill pickles until evenly distributed throughout the tuna mixture.
- Assemble the Wraps: Lay a tortilla flat on a clean surface. Place a handful of mixed greens in the center of the tortilla as the base layer.
- Add the Tuna Mixture: Spoon a generous amount of the tuna salad onto the greens. Spread it evenly, leaving room around the edges for folding.
- Add Additional Toppings: Top the tuna with shredded carrots, a few avocado slices, and any optional ingredients like sliced tomatoes, cucumbers, or cheese.
- Wrap the Tortilla: Fold in the sides of the tortilla, then roll it from the bottom up to create a secure wrap. Repeat with the remaining tortillas and filling.
- Serve: Cut each wrap in half diagonally and serve immediately, or wrap them in foil for easy storage and transport.
Extra Tips:
For an extra flavor boost, try adding a teaspoon of dill or parsley to the tuna mixture. If you prefer a lighter wrap, you can substitute Greek yogurt for some or all of the mayonnaise.
When choosing tortillas, whole wheat or spinach varieties can add extra nutrients to your meal. To prevent the wraps from becoming soggy, consider placing a layer of greens between the tortilla and the tuna salad.
Tuna Salad Wraps can be made ahead of time and stored in the refrigerator for up to a day, making them a convenient option for busy weeknights.
Spicy Buffalo Chicken Wraps

Spicy Buffalo Chicken Wraps are a delicious and zesty twist on traditional chicken wraps, perfect for invigorating family dinner nights. This dish combines the classic flavors of buffalo chicken wings with the convenience and portability of a wrap. Packed with tender, spicy chicken, crisp vegetables, and a creamy dressing, these wraps are certain to become a family favorite.
They’re not only quick and easy to make but also versatile, allowing for adjustments to suit individual taste preferences. These wraps are ideal for a meal that’s both satisfying and fun, as everyone can participate in assembling their own wrap with their favorite toppings.
Whether you’re hosting a casual dinner or looking for a fun way to spice up your usual family meal, these Spicy Buffalo Chicken Wraps won’t disappoint. They’re best served with a side of ranch or blue cheese dressing for dipping, and perhaps a fresh salad on the side to balance the heat.
Ingredients (Serves 4-6):
- 1.5 pounds boneless, skinless chicken breasts
- 1 cup buffalo sauce
- 2 tablespoons olive oil
- 1 teaspoon garlic powder
- 1 teaspoon onion powder
- Salt and pepper to taste
- 6 large flour tortillas
- 1 cup shredded lettuce
- 1 cup diced tomatoes
- 1 cup shredded cheddar cheese
- 1/2 cup sliced green onions
- 1/2 cup ranch or blue cheese dressing
Cooking Instructions:
- Prepare the Chicken: Preheat your oven to 375°F (190°C). Place the chicken breasts on a baking sheet. Drizzle with olive oil and season with garlic powder, onion powder, salt, and pepper. Bake in the preheated oven for 20-25 minutes, or until the chicken is cooked through and juices run clear.
- Shred the Chicken: Once the chicken is cooked, remove it from the oven and let it cool for a few minutes. Using two forks, shred the chicken into bite-sized pieces in a large bowl.
- Add the Buffalo Sauce: Pour the buffalo sauce over the shredded chicken and toss to coat evenly. Confirm all chicken pieces are covered in sauce for a consistent flavor throughout.
- Prepare the Tortillas: Warm the flour tortillas in a dry skillet over medium heat for about 30 seconds on each side, or until they’re soft and pliable.
- Assemble the Wraps: Lay each tortilla flat and spread a spoonful of ranch or blue cheese dressing in the center. Add a generous portion of the buffalo chicken, followed by lettuce, tomatoes, cheddar cheese, and green onions.
- Wrap and Serve: Fold the sides of the tortilla inward, then roll from the bottom up to form a wrap. Cut each wrap in half diagonally and serve immediately with additional dressing on the side for dipping.
Extra Tips:
For an extra crispy texture, consider grilling the wraps on a panini press or skillet for 2-3 minutes on each side after they’re assembled. This will give the tortillas a deliciously crunchy exterior.
Additionally, feel free to customize the wraps with other toppings such as avocado, jalapeños, or bell peppers for added flavor and texture. If you prefer a milder wrap, adjust the amount of buffalo sauce to taste.
Caprese Salad Wraps
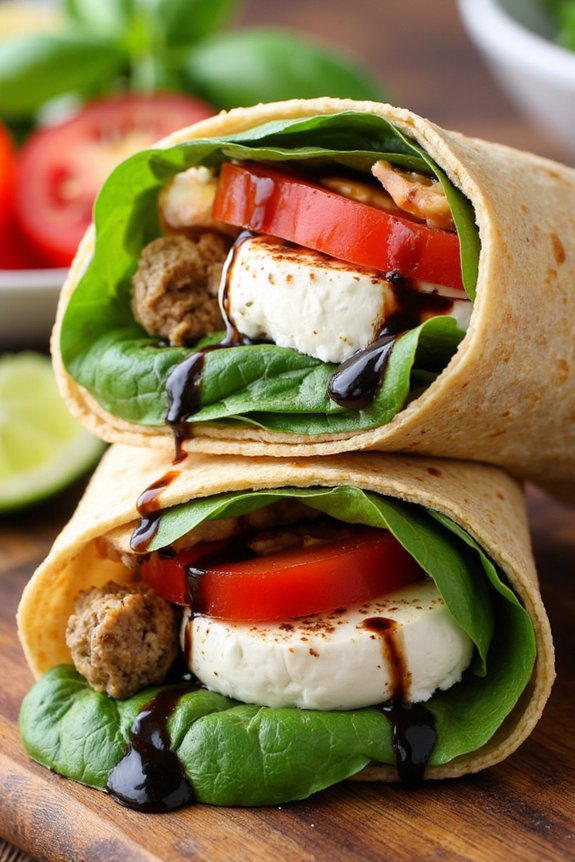
Caprese Salad Wraps are a delightful twist on the classic Italian Caprese salad, perfect for family dinners or casual get-togethers. Combining fresh mozzarella, ripe tomatoes, and fragrant basil, these wraps deliver a burst of flavors in every bite. Wrapped in a soft tortilla, they’re easy to handle and make for a satisfying meal that even the pickiest eaters will enjoy.
The wraps offer a revitalizing and light option that’s both nutritious and delicious, making them ideal for warm summer evenings or as a quick dinner solution. These wraps aren’t only simple to prepare but also customizable to suit various dietary preferences. You can easily add grilled chicken or prosciutto for a heartier version or keep them purely vegetarian by sticking to the classic ingredients.
The balsamic glaze adds a sweet and tangy dimension, enhancing the natural flavors of the tomatoes and mozzarella. These Caprese Salad Wraps are sure to become a staple in your family meal rotation, offering a perfect blend of convenience and gourmet taste.
Ingredients (Serves 4-6)
- 6 large flour tortillas
- 3 large ripe tomatoes, sliced
- 16 ounces fresh mozzarella cheese, sliced
- 1 cup fresh basil leaves
- 1/4 cup balsamic glaze
- Salt and black pepper to taste
- 2 tablespoons olive oil
Cooking Instructions
- Prepare the Ingredients: Begin by slicing the tomatoes and mozzarella cheese into even slices. Wash and pat dry the fresh basil leaves to make certain they’re clean and ready to use.
- Heat the Tortillas: In a skillet over medium heat, warm each tortilla for about 30 seconds on each side. This will make them more pliable and easier to wrap.
- Assemble the Wraps: Lay a warm tortilla flat on a clean surface. Start by placing a few slices of tomato in the center, followed by slices of mozzarella cheese. Add a handful of fresh basil leaves on top.
- Season and Drizzle: Sprinkle a pinch of salt and black pepper over the ingredients. Drizzle a small amount of olive oil and balsamic glaze over the top for added flavor.
- Wrap It Up: Fold in the sides of the tortilla, then roll it up from the bottom to the top to secure the filling. Make certain the wrap is tight enough to hold all the ingredients without spilling.
- Serve: Cut each wrap in half diagonally for easy serving. Arrange the wraps on a platter and serve immediately for the best taste.
Extra Tips
When making Caprese Salad Wraps, opt for the freshest ingredients you can find. The quality of the tomatoes and mozzarella will greatly affect the flavor of the dish.
If you prefer a bit of crunch, consider adding a few slices of cucumber or a handful of arugula. Additionally, if you don’t have a balsamic glaze on hand, you can make your own by simmering balsamic vinegar with a bit of honey until it thickens.
Finally, for a more robust flavor, try grilling the tortillas briefly to give them a subtle char.
Falafel and Tzatziki Wraps

Falafel and Tzatziki Wraps are a delicious and healthy choice for family dinner nights. These wraps combine the savory taste of homemade falafel with the invigorating flavors of tzatziki sauce, all wrapped up in a soft flatbread. The contrast between the warm, crispy falafel and the cool, creamy tzatziki creates a delightful balance of textures and flavors that everyone around the dinner table will enjoy.
Not only are these wraps full of flavor, but they’re also packed with nutrients, making them a wholesome meal option.
Preparing Falafel and Tzatziki Wraps at home is easier than you might think. The key to perfect falafel is using chickpeas that have been soaked but not cooked, which helps achieve the ideal texture. Paired with a homemade tzatziki sauce made from fresh cucumbers, yogurt, and herbs, these wraps are sure to be a hit.
Serve them with your choice of veggies and flatbreads for a complete meal that’s both satisfying and nourishing for a family of 4-6 people.
Ingredients:
- 2 cups dried chickpeas, soaked overnight
- 1 small onion, roughly chopped
- 4 cloves garlic
- 1 cup fresh parsley leaves
- 1 cup fresh cilantro leaves
- 2 teaspoons ground cumin
- 1 teaspoon ground coriander
- 1 teaspoon salt
- 1/2 teaspoon baking soda
- Oil for frying
Tzatziki Sauce:
- 1 cup Greek yogurt
- 1 cucumber, grated and drained
- 2 tablespoons lemon juice
- 2 cloves garlic, minced
- 2 tablespoons fresh dill, chopped
- Salt and pepper to taste
Wraps:
- 6 flatbreads or pita
- Sliced tomatoes
- Sliced cucumbers
- Shredded lettuce
Cooking Instructions:
- Prepare the Falafel Mixture:
- Drain the soaked chickpeas and place them in a food processor along with the onion, garlic, parsley, cilantro, cumin, coriander, and salt.
- Pulse the mixture until it resembles a coarse paste. Be careful not to over-process; the mixture should hold together when formed into a ball.
- Transfer the mixture to a bowl, add baking soda, and mix well. Cover and refrigerate for at least 30 minutes.
- Make the Tzatziki Sauce:
- In a medium bowl, combine the Greek yogurt, grated cucumber, lemon juice, minced garlic, and fresh dill.
- Stir the ingredients until they’re fully integrated, then season with salt and pepper to taste. Refrigerate until ready to use.
- Shape and Fry the Falafel:
- Remove the falafel mixture from the refrigerator. Using your hands, form small balls or patties, about the size of a golf ball.
- Heat oil in a deep pan to 350°F (175°C). Carefully drop the falafel balls into the hot oil, a few at a time, and fry until golden brown and crispy, about 3-5 minutes.
- Remove from oil and drain on a paper towel-lined plate.
- Assemble the Wraps:
- Warm the flatbreads or pita in a dry skillet or oven. Place a few falafel balls in the center of each flatbread.
- Top with slices of tomato, cucumber, and shredded lettuce. Drizzle with tzatziki sauce and wrap tightly.
Extra Tips:
For the best falafel texture, confirm the chickpeas are thoroughly drained before processing. If the mixture seems too wet, you can add a tablespoon of flour to help bind it.
When making tzatziki, squeeze as much liquid out of the grated cucumber as possible to prevent the sauce from becoming watery. These wraps can be customized with additional toppings such as pickled red onions or spicy harissa for added flavor.
Enjoy your Falafel and Tzatziki Wraps immediately for the freshest taste!
Beef Taco Wraps

Looking for a simple yet delicious meal to bring the family together on a busy weeknight? Beef Taco Wraps are the perfect solution. This flavorful dish combines the savory taste of seasoned ground beef with the freshness of vegetables, all wrapped in a soft tortilla. The best part is that it’s customizable, allowing each family member to add their favorite toppings for a meal that everyone will enjoy.
With just a few ingredients and minimal preparation time, these wraps are sure to become a family favorite. Beef Taco Wraps aren’t only easy to make, but they also offer a fun way for everyone to get involved in the cooking process. You can set up a taco bar with all the toppings and let each person create their own wrap.
This interactive approach not only makes dinner more enjoyable but also encourages healthy eating habits by incorporating a variety of fresh vegetables. Whether you’re planning a casual dinner or a festive family night, Beef Taco Wraps are a versatile and crowd-pleasing choice.
Ingredients for 4-6 people:
- 1 pound ground beef
- 1 packet taco seasoning mix
- 1/2 cup water
- 8 large flour tortillas
- 1 cup shredded lettuce
- 1 cup diced tomatoes
- 1 cup shredded cheddar cheese
- 1/2 cup sour cream
- 1/2 cup salsa
- 1/4 cup sliced black olives (optional)
- 1/4 cup chopped green onions (optional)
Cooking Instructions:
- Brown the Beef: In a large skillet, cook the ground beef over medium heat until it’s browned and cooked through, about 6-8 minutes. Stir occasionally to break up the meat into small pieces.
- Season the Meat: Once the beef is cooked, drain the excess fat. Add the taco seasoning mix and 1/2 cup of water to the skillet. Stir well to combine, and let it simmer over low heat for about 5 minutes or until the mixture thickens.
- Prepare the Tortillas: While the beef is simmering, warm the flour tortillas. You can do this by wrapping them in aluminum foil and placing them in a preheated oven at 350°F (175°C) for about 10 minutes, or by microwaving them on a plate covered with a damp paper towel for 30 seconds.
- Assemble the Wraps: Lay a warm tortilla on a flat surface. Spoon a portion of the seasoned beef onto the center of the tortilla. Top with shredded lettuce, diced tomatoes, and shredded cheese. Add a dollop of sour cream and salsa. If desired, sprinkle with black olives and green onions.
- Wrap and Serve: Fold the sides of the tortilla over the filling, then roll it up from the bottom to form a wrap. Repeat with the remaining tortillas and ingredients. Serve the wraps immediately while they’re warm.
Extra Tips:
For an added flavor boost, consider adding a squeeze of lime juice or a sprinkle of chopped cilantro to your wraps. If you prefer a bit of heat, some jalapeño slices or a dash of hot sauce can spice things up.
To keep the tortillas soft and pliable, make sure not to overheat them. Finally, if you’re looking to make the dish healthier, you can opt for whole wheat tortillas and lean ground beef or ground turkey as a substitute. Enjoy experimenting with different toppings to find the perfect combination for your family!
Egg and Spinach Breakfast Wraps

Egg and Spinach Breakfast Wraps are a delightful and nutritious option to start your family night with a healthy twist. These wraps are filled with protein-rich eggs, fresh spinach, and a burst of flavors from cheese and herbs, making them a perfect meal to satisfy the whole family.
Whether you’re seeking a quick breakfast-for-dinner option or a hearty breakfast dish, these wraps are easy to prepare and sure to please everyone at the table.
The beauty of these wraps lies in their versatility. You can easily customize them with additional ingredients like tomatoes, mushrooms, or bacon to suit your family’s preferences. The combination of eggs and spinach not only provides a rich source of nutrients but also a vibrant color and a delightful texture.
Serve these wraps with a side of fresh fruit or a simple green salad to complete the meal.
Ingredients (Serves 4-6):
- 8 large eggs
- 1 cup fresh spinach, chopped
- 1 cup shredded cheese (cheddar or mozzarella)
- 6 large tortillas
- 1 tablespoon butter
- Salt and pepper to taste
- 1/4 cup milk
- Optional toppings: diced tomatoes, sliced avocado
Cooking Instructions:
- Prepare the Ingredients: Begin by cracking the eggs into a bowl, adding the milk, and whisking until well combined. This mixture will create a creamy texture for the scrambled eggs. Season with a pinch of salt and pepper.
- Cook the Eggs: Heat a large non-stick skillet over medium heat and melt the butter. Once the butter is melted, add the egg mixture. Allow the eggs to set slightly, then gently stir with a spatula, folding them over until they’re fully cooked but still soft. This should take about 5-7 minutes.
- Add Spinach and Cheese: Once the eggs are almost done, add the chopped spinach and cheese. Stir gently until the spinach is wilted and the cheese is melted. Remove from heat immediately to prevent overcooking.
- Assemble the Wraps: Lay the tortillas on a flat surface. Divide the egg mixture evenly among the tortillas, placing the filling in the center of each. Add any optional toppings like diced tomatoes or sliced avocado.
- Wrap and Serve: Fold the sides of the tortilla over the filling and then roll it up tightly from the bottom. Serve the wraps warm, cutting them in half if desired, and enjoy your delicious Egg and Spinach Breakfast Wraps.
Extra Tips:
For the fluffiest scrambled eggs, make sure not to overcook them; remove them from the heat while they’re still slightly runny as they’ll continue to cook from residual heat.
Additionally, you can warm the tortillas before filling them to make them more pliable and less likely to crack. If you’re preparing these wraps ahead of time, wrap them in foil and keep warm in a low oven until ready to serve.
Customize your wraps with different cheeses or herbs, like chives or parsley, to add a personal touch to this versatile dish.
Thai Peanut Chicken Wraps

Thai Peanut Chicken Wraps are a delightful and flavorful option for family dinner nights, combining the rich and nutty taste of peanut sauce with tender chicken and fresh vegetables. This dish is perfect for a casual yet satisfying meal that everyone can enjoy. The combination of textures and flavors in these wraps creates a harmonious balance that’s both nutritious and delicious.
Not only do these wraps offer something different from the usual fare, but they’re also relatively easy to prepare, making them ideal for busy weeknights.
The beauty of Thai Peanut Chicken Wraps lies in their versatility. You can customize the wraps based on your family’s preferences and dietary needs. Whether you prefer a spicier version or a milder one, you can easily adjust the ingredients to suit your taste.
The wraps are made with a creamy peanut sauce, which complements the chicken and vegetables perfectly. Served in soft tortillas or lettuce leaves for a low-carb option, these wraps are sure to become a favorite at your dinner table.
Ingredients for 4-6 servings:
- 1.5 lbs boneless, skinless chicken breasts
- 1 cup creamy peanut butter
- 1/4 cup soy sauce
- 2 tablespoons lime juice
- 2 tablespoons honey
- 1 tablespoon rice vinegar
- 1 teaspoon grated ginger
- 2 cloves garlic, minced
- 1/2 teaspoon crushed red pepper flakes
- 1/4 cup water
- 1 red bell pepper, thinly sliced
- 1 cucumber, julienned
- 2 cups shredded carrots
- 1/4 cup chopped fresh cilantro
- 8-10 large tortillas or 12-16 large lettuce leaves
- 1/2 cup chopped peanuts
- Salt and pepper to taste
Cooking Instructions:
- Prepare the Chicken: Season the chicken breasts with salt and pepper. In a large skillet over medium heat, cook the chicken for about 6-7 minutes on each side or until fully cooked and no longer pink inside. Remove from heat and let it rest before slicing into thin strips.
- Make the Peanut Sauce: In a medium bowl, whisk together the peanut butter, soy sauce, lime juice, honey, rice vinegar, grated ginger, minced garlic, crushed red pepper flakes, and water. Adjust the consistency by adding more water if necessary until the sauce is smooth and pourable.
- Prepare the Vegetables: Thinly slice the red bell pepper and julienne the cucumber. Set aside with the shredded carrots and chopped cilantro for easy assembly.
- Assemble the Wraps: Lay out the tortillas or lettuce leaves. Spread a generous spoonful of the peanut sauce onto each one. Top with sliced chicken, bell pepper, cucumber, shredded carrots, and a sprinkle of cilantro and chopped peanuts.
- Wrap and Serve: Fold the sides of the tortilla or lettuce leaves over the filling, then roll it up tightly. Serve immediately with extra peanut sauce on the side for dipping.
Extra Tips:
For a more intense flavor, marinate the chicken in a mixture of soy sauce, ginger, and garlic for at least 30 minutes before cooking. If you prefer a spicier wrap, add more crushed red pepper flakes or a dash of Sriracha to the peanut sauce.
To save time, you can prepare the peanut sauce and chop the vegetables ahead of time. For a vegetarian version, replace the chicken with tofu or tempeh. Remember that the key to a good wrap isn’t to overfill them, as this can make them difficult to eat.
Enjoy your Thai Peanut Chicken Wraps with a side of fresh fruit or a simple green salad for a complete meal.
Roasted Veggie and Feta Wraps

Roasted Veggie and Feta Wraps are an ideal choice for a wholesome, family-friendly meal that’s both flavorful and satisfying. These wraps are a perfect fusion of roasted vegetables and creamy feta cheese, encased in a soft tortilla. The roasting process enhances the natural sweetness of the vegetables, while the feta adds a tangy, rich dimension to the dish.
This recipe isn’t only delicious but also a great way to incorporate a variety of colorful vegetables into your family’s diet, making it an excellent choice for those looking to enjoy a nutritious and filling meal. Perfect for family nights, these wraps can be customized to suit different tastes and preferences.
Whether served as a main course or a hearty snack, Roasted Veggie and Feta Wraps are sure to be a hit with both kids and adults alike. The recipe is designed to serve 4-6 people, making it perfect for a small family gathering. With a few simple ingredients and easy preparation steps, you can bring a taste of the Mediterranean to your dinner table and enjoy a meal that’s both healthy and delicious.
Ingredients for 4-6 Servings:
- 2 large red bell peppers
- 2 medium zucchinis
- 1 large red onion
- 2 cups cherry tomatoes
- 3 tablespoons olive oil
- Salt and black pepper to taste
- 1 teaspoon dried oregano
- 1 teaspoon garlic powder
- 1 cup crumbled feta cheese
- 6 large whole wheat tortillas
- 1 cup fresh spinach leaves
- 2 tablespoons balsamic glaze (optional)
Cooking Instructions:
- Preheat and Prepare Vegetables: Preheat your oven to 425°F (220°C). Wash and dry the red bell peppers, zucchinis, and cherry tomatoes. Cut the bell peppers and zucchinis into strips, slice the red onion into thick rings, and leave the cherry tomatoes whole.
- Season and Roast: Place the prepared vegetables on a large baking sheet. Drizzle with olive oil, and sprinkle with salt, black pepper, dried oregano, and garlic powder. Toss the vegetables to make sure they’re evenly coated with the oil and seasonings. Spread them out in a single layer on the baking sheet.
- Roast Vegetables: Roast in the preheated oven for 20-25 minutes, or until the vegetables are tender and slightly charred, stirring halfway through to make certain of even cooking. Remove from the oven and let them cool slightly.
- Assemble Wraps: Lay a tortilla flat on a clean surface. Place a handful of fresh spinach leaves in the center, and then spoon a generous portion of the roasted vegetables over the spinach. Sprinkle with crumbled feta cheese, and if desired, drizzle with a bit of balsamic glaze for added flavor.
- Wrap It Up: Fold the sides of the tortilla over the filling, then roll it from the bottom up to create a secure wrap. Repeat with the remaining tortillas and ingredients.
- Serve and Enjoy: Slice each wrap in half and serve immediately while the vegetables are still warm. These wraps pair well with a side salad or a light soup.
Extra Tips:
For an added layer of flavor, consider marinating the vegetables with the olive oil and spices for about 30 minutes before roasting. This allows the flavors to penetrate deeper into the vegetables.
If you prefer a bit of heat, add a pinch of red pepper flakes to the seasoning mix. These wraps can also be served cold, making them a perfect option for packed lunches or picnics. Feel free to experiment with other vegetables, such as eggplant or mushrooms, to customize the wraps to your family’s preference.
Ham and Cheese Wraps

Ham and cheese wraps make for a delightful and easy-to-prepare dinner option for family nights. This classic combination isn’t only delicious but also versatile, as you can customize it with your favorite ingredients. These wraps are perfect for a quick weeknight meal, a picnic, or even a school lunch. The creamy cheese paired with savory ham and fresh vegetables wrapped in a soft tortilla makes for a satisfying meal that everyone will enjoy.
The beauty of ham and cheese wraps lies in their simplicity and the minimal cooking time required. You can prepare these wraps in just a few minutes, making them a convenient choice for busy families. Plus, they’re a great way to involve the kids in the kitchen, as they can help assemble the wraps with their favorite fillings. In this recipe, you’ll learn how to make delicious ham and cheese wraps for a serving size of 4-6 people.
Ingredients for 4-6 Servings:
- 6 large flour tortillas
- 12 slices of deli ham
- 6 slices of cheddar cheese
- 1 cup of mixed greens (lettuce, spinach, or arugula)
- 1 medium tomato, sliced
- 1 small red onion, thinly sliced
- ¼ cup mayonnaise
- 2 tablespoons Dijon mustard
- Salt and pepper to taste
Cooking Instructions:
- Prepare the Spread: In a small bowl, combine the mayonnaise and Dijon mustard. Mix well until smooth and creamy. This will serve as the spread for the wraps and add a flavorful base.
- Lay Out the Tortillas: Place the tortillas flat on a clean work surface or cutting board. Spread about a tablespoon of the mayonnaise-mustard mixture evenly over each tortilla, guaranteeing it reaches the edges for maximum flavor.
- Layer the Ingredients: On one side of each tortilla, layer 2 slices of ham followed by a slice of cheddar cheese. Add a handful of mixed greens, a few tomato slices, and a few onion slices. Season lightly with salt and pepper.
- Roll the Wraps: Starting from the side with the fillings, carefully roll each tortilla tightly to enclose the fillings. Confirm that the wrap is snug to prevent the ingredients from spilling out.
- Slice and Serve: Once rolled, use a sharp knife to slice each wrap in half at an angle. This not only makes them easier to eat but also adds a nice presentation. Arrange the wraps on a serving platter and enjoy!
Extra Tips:
Feel free to experiment with different types of cheese or deli meats to suit your family’s preferences. Swiss cheese or turkey can be great alternatives.
If you prefer a bit of spice, add some sliced jalapeños or a dash of hot sauce to the mayonnaise-mustard spread. For a healthier option, consider using whole wheat tortillas or adding extra vegetables like cucumbers or bell peppers.
These wraps can be prepared in advance and kept in the refrigerator, making them perfect for meal prep.