

As summer evenings bring warmth and a gentle breeze, I find myself craving meals that are both colorful and easy to prepare. Picture juicy lemon herb chicken skewers on the grill paired with a refreshing summer vegetable pasta salad. These delightful dishes are perfect for sharing with family without breaking the bank. Ready to discover these easy recipes and elevate your summer dinners? Let’s embark on this delicious journey together.
Grilled Lemon Herb Chicken Skewers

Grilled Lemon Herb Chicken Skewers are a delightful addition to any summer dinner menu. These skewers are perfect for outdoor gatherings, offering a rejuvenating and savory dish that captures the essence of warm-weather cooking. The lemon and herb marinade infuses the chicken with bright and zesty flavors, while grilling adds a delicious smoky depth.
Whether you’re hosting a barbecue or simply enjoying a family meal on the patio, these skewers are sure to be a crowd-pleaser. This recipe is designed to serve 4-6 people, making it ideal for small parties or family dinners. The preparation involves marinating the chicken in a mixture of fresh herbs, lemon juice, and olive oil, guaranteeing that each bite is bursting with flavor.
Serve these skewers with a side of grilled vegetables, a fresh garden salad, or a light pasta to complete the meal. They aren’t only easy to prepare but also quick to cook, allowing you more time to enjoy the company of your guests.
Ingredients:
- 2 pounds boneless, skinless chicken breasts
- 1/4 cup olive oil
- 1/4 cup freshly squeezed lemon juice
- 3 cloves garlic, minced
- 2 tablespoons chopped fresh parsley
- 1 tablespoon chopped fresh rosemary
- 1 tablespoon chopped fresh thyme
- 1 teaspoon salt
- 1/2 teaspoon black pepper
- Wooden or metal skewers
Cooking Instructions:
- Prepare the Marinade: In a mixing bowl, combine the olive oil, lemon juice, minced garlic, chopped parsley, rosemary, thyme, salt, and pepper. Whisk together until well blended to create the marinade.
- Cut the Chicken: Slice the chicken breasts into evenly sized cubes, about 1 to 1.5 inches in size. This ensures the chicken cooks evenly on the skewers.
- Marinate the Chicken: Place the chicken cubes in a large resealable plastic bag or a bowl. Pour the marinade over the chicken, ensuring all pieces are well coated. Seal the bag or cover the bowl and refrigerate for at least 1 hour, or up to overnight for maximum flavor.
- Preheat the Grill: About 15 minutes before you’re ready to cook, preheat your grill to medium-high heat. If using wooden skewers, soak them in water for at least 30 minutes to prevent burning.
- Assemble the Skewers: Thread the marinated chicken pieces onto the skewers, leaving a small gap between each piece to ensure even cooking.
- Grill the Skewers: Place the chicken skewers on the preheated grill. Cook for about 5-7 minutes per side, turning once, until the chicken is cooked through and has grill marks. The internal temperature should reach 165°F (75°C).
- Serve: Once cooked, remove the skewers from the grill and let them rest for a couple of minutes. Serve hot with your choice of sides.
Extra Tips: To enhance the flavor, consider adding some lemon wedges or slices to the skewers alongside the chicken. This will add a burst of citrus flavor as they grill. Additionally, if you prefer a spicier dish, add a pinch of red pepper flakes to the marinade for a bit of heat.
Remember to keep the lid of the grill closed as much as possible while cooking to maintain the heat and achieve a nice char on the chicken.
Summer Vegetable Pasta Salad
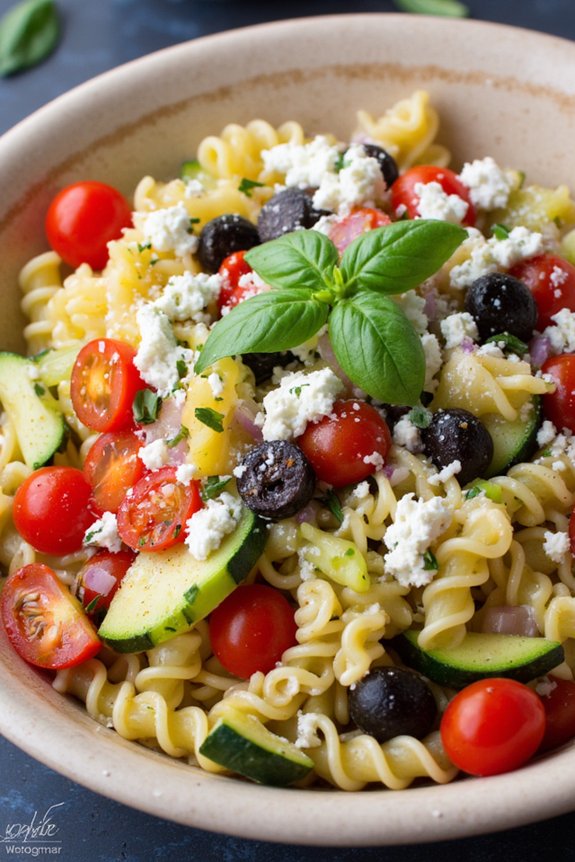
Summer Vegetable Pasta Salad is the quintessential dish for warm weather gatherings. Bursting with fresh, seasonal vegetables and a zesty dressing, this pasta salad is both invigorating and satisfying. It’s perfect for picnics, barbecues, or as a light dinner option.
The dish combines the vibrant flavors of summer produce with the comforting texture of pasta, creating a harmonious balance that will leave your taste buds singing. This recipe is easy to prepare and can be made in advance, allowing the flavors to meld together beautifully.
The salad features a variety of colorful vegetables, adding not just taste but also visual appeal. The simplicity of the ingredients allows for the natural flavors of the vegetables to shine through, making it a healthy and delicious option for any occasion. This recipe serves 4-6 people, making it ideal for families or small gatherings.
Ingredients:
- 12 ounces of rotini or fusilli pasta
- 1 cup cherry tomatoes, halved
- 1 cup cucumber, diced
- 1 cup red bell pepper, diced
- 1 cup zucchini, diced
- 1/2 cup red onion, finely chopped
- 1/2 cup black olives, sliced
- 1/2 cup feta cheese, crumbled
- 1/4 cup fresh basil leaves, torn
- 1/4 cup fresh parsley, chopped
- 1/4 cup olive oil
- 3 tablespoons red wine vinegar
- 1 tablespoon lemon juice
- 1 teaspoon Dijon mustard
- Salt and pepper to taste
Instructions:
- Cook the Pasta: Begin by bringing a large pot of salted water to a boil. Add the pasta and cook according to package instructions until al dente. Drain the pasta and rinse under cold water to stop the cooking process. This will also help cool the pasta for the salad. Set aside.
- Prepare the Vegetables: While the pasta is cooking, wash and prepare all the vegetables. Halve the cherry tomatoes, dice the cucumber, bell pepper, and zucchini, and finely chop the red onion. Slice the black olives. Set these aside in a large mixing bowl.
- Make the Dressing: In a small bowl, whisk together the olive oil, red wine vinegar, lemon juice, Dijon mustard, salt, and pepper. Taste and adjust seasoning as needed.
- Combine Ingredients: Add the cooled pasta to the bowl with the vegetables. Pour the dressing over the pasta and vegetables. Gently toss everything together to make sure the ingredients are well coated with the dressing.
- Final Touches: Add the crumbled feta cheese, torn basil leaves, and chopped parsley to the salad. Gently mix again, ensuring the herbs and cheese are evenly distributed.
- Chill and Serve: Cover the salad and refrigerate for at least 30 minutes before serving. This allows the flavors to meld. Serve chilled and enjoy!
Extra Tips:
For an added twist, consider incorporating grilled chicken or shrimp to make the salad more filling. You can also substitute other vegetables based on what’s in season or your personal preference, like asparagus or corn.
If you prefer a creamier dressing, add a spoonful of Greek yogurt to the dressing mix. Remember to taste and adjust the seasoning before serving, as the flavors can change slightly as the salad chills. Store any leftovers in an airtight container for up to 2 days in the refrigerator.
BBQ Pulled Pork Sliders
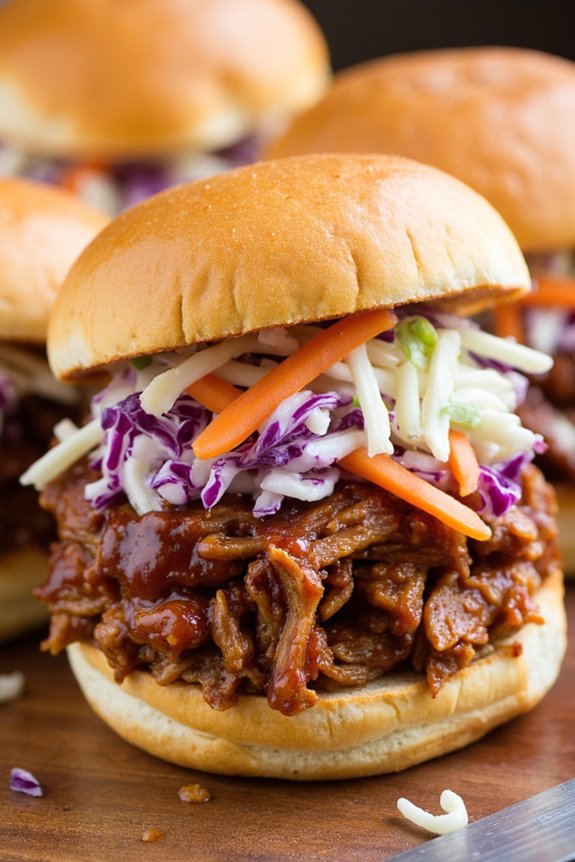
BBQ Pulled Pork Sliders are a perfect summer dinner recipe, combining the smokey sweetness of BBQ sauce with tender, flavorful pork, all nestled between soft slider buns. These sliders are ideal for a casual dinner party or family gathering, offering a satisfying meal that’s both easy to make and sure to impress.
The key to these sliders is slow-cooking the pork until it’s tender enough to be pulled apart with a fork, allowing the flavors to meld beautifully. This recipe will guide you through the process of making succulent BBQ Pulled Pork Sliders from scratch, ensuring a delicious and memorable dish.
To prepare these mouthwatering sliders, you’ll need to start by seasoning and slow-cooking a pork shoulder, which will be infused with BBQ sauce and spices for a rich, robust flavor. After the pork is cooked to perfection, it will be shredded and mixed with additional BBQ sauce, then served on soft slider buns.
Whether you’re hosting a backyard barbecue or just enjoying a lazy summer evening, these sliders offer a delightful combination of flavors and textures that are sure to please any crowd. Here’s everything you need to prepare BBQ Pulled Pork Sliders for 4-6 people.
Ingredients:
- 3-4 pounds pork shoulder (also known as pork butt)
- 1 tablespoon smoked paprika
- 1 tablespoon garlic powder
- 1 tablespoon onion powder
- 1 teaspoon black pepper
- 1 teaspoon salt
- 1 cup BBQ sauce (plus extra for serving)
- 1/2 cup apple cider vinegar
- 1/4 cup brown sugar
- 1 tablespoon Worcestershire sauce
- 1 teaspoon liquid smoke (optional)
- 12-16 slider buns
- Coleslaw (optional, for serving)
Cooking Instructions:
- Prepare the Pork Shoulder:
- Begin by patting the pork shoulder dry with paper towels. In a small bowl, mix together the smoked paprika, garlic powder, onion powder, black pepper, and salt. Rub this spice mixture all over the pork shoulder, ensuring it’s evenly coated.
- Slow Cook the Pork:
- Place the seasoned pork shoulder in a slow cooker. In a separate bowl, whisk together the BBQ sauce, apple cider vinegar, brown sugar, Worcestershire sauce, and liquid smoke. Pour this mixture over the pork. Cover and cook on low for 8-10 hours, or until the pork is tender and easily pulls apart with a fork.
- Shred the Pork:
- Once cooked, remove the pork from the slow cooker and place it on a large cutting board. Use two forks to shred the pork into bite-sized pieces, discarding any excess fat. Transfer the shredded pork back into the slow cooker and mix it with the remaining cooking juices.
- Assemble the Sliders:
- Preheat your oven to 350°F (175°C). Slice the slider buns in half and place them on a baking sheet. Toast the buns in the oven for about 5 minutes, or until they’re lightly golden. Remove from the oven and top the bottom half of each bun with a generous portion of shredded pork. Drizzle with additional BBQ sauce if desired.
- Serve:
- Top the pork with coleslaw, if using, and place the other half of the bun on top. Serve the sliders immediately while they’re warm, with extra BBQ sauce on the side for dipping.
Extra Tips:
For the most flavorful BBQ Pulled Pork Sliders, make sure to use a good quality BBQ sauce that complements the flavors of the pork. If you have time, prepare the pork a day in advance and let it sit in the refrigerator overnight. This allows the flavors to deepen and makes it easier to remove excess fat.
Additionally, if you prefer a bit of crunch, consider adding pickles or crispy onions to your sliders. Enjoy your sliders with a side of corn on the cob or a fresh summer salad for a complete meal.
Fresh Caprese Salad With Balsamic Glaze
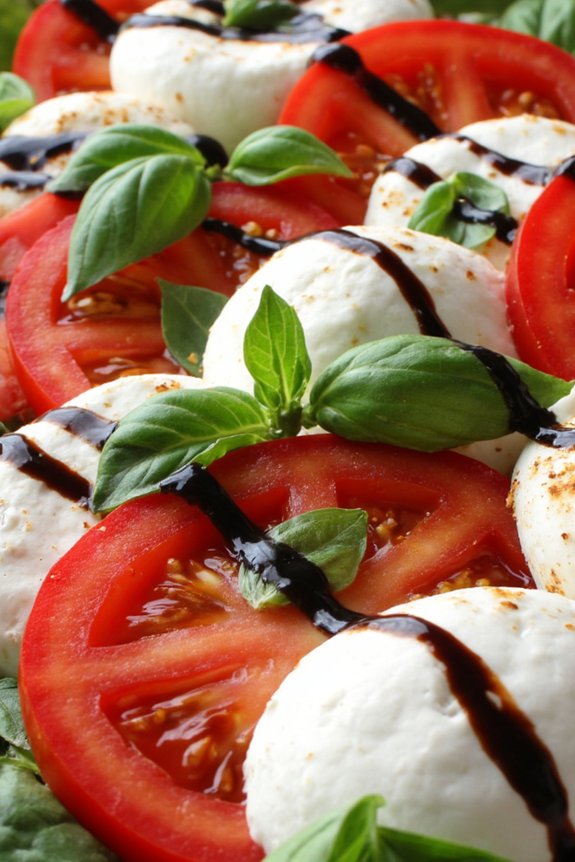
Fresh Caprese Salad With Balsamic Glaze is a quintessential summer dish that combines the vibrant flavors of ripe tomatoes, creamy mozzarella, and aromatic basil, all drizzled with a rich balsamic glaze. This invigorating salad is perfect for those warm evenings when you crave something light yet satisfying.
The simplicity of the ingredients allows each component to shine, making it a favorite choice for both casual dinners and elegant gatherings. The key to a perfect Caprese Salad lies in the quality of its ingredients. Opt for fresh, juicy tomatoes and soft, fresh mozzarella for the best results.
Basil leaves should be vibrant green and aromatic, providing a fragrant lift to the dish. The balsamic glaze ties everything together with its sweet and tangy notes, elevating the salad without overpowering it. Serve this salad as an appetizer or alongside grilled meats for a delightful summer meal.
Ingredients (Serves 4-6):
- 4 large ripe tomatoes
- 1 pound fresh mozzarella cheese
- 1 cup fresh basil leaves
- 1/2 cup balsamic glaze
- 2 tablespoons extra-virgin olive oil
- Salt, to taste
- Freshly ground black pepper, to taste
Cooking Instructions:
- Prepare the Tomatoes: Start by washing the tomatoes thoroughly under cool water. Pat them dry with a clean kitchen towel. Slice the tomatoes into 1/4-inch thick rounds. Arrange the slices on a serving platter, slightly overlapping each piece.
- Slice the Mozzarella: Drain the mozzarella cheese if it’s stored in liquid. Slice the mozzarella into 1/4-inch thick rounds. Layer the mozzarella slices on top of the tomato slices, alternating between tomato and cheese.
- Add the Basil: Gently rinse the basil leaves and pat them dry. Tuck whole basil leaves between the layers of tomato and mozzarella. Scatter a few extra leaves on top for garnish.
- Drizzle with Olive Oil: Drizzle the extra-virgin olive oil evenly over the salad. This adds a rich, smooth flavor that enhances the freshness of the tomatoes and basil.
- Season the Salad: Sprinkle salt and freshly ground black pepper over the entire salad. Be generous with the seasoning to bring out the flavors of the ingredients.
- Finish with Balsamic Glaze: Just before serving, drizzle the balsamic glaze over the salad. Aim for a zig-zag pattern to guarantee even distribution and a visually appealing presentation.
- Serve Immediately: This salad is best enjoyed fresh at room temperature. Serve it immediately after preparation to savor the full flavors of the ingredients.
Extra Tips:
For an extra burst of flavor, consider using heirloom tomatoes, which offer a variety of colors and tastes. If you can’t find fresh mozzarella, burrata cheese can be an excellent substitute, offering a creamier texture.
When making the balsamic glaze at home, reduce balsamic vinegar with a bit of sugar until it reaches a syrupy consistency. This homemade touch can add a depth of flavor to the dish.
Finally, remember that Caprese Salad isn’t only about its taste but also its appearance—arranging the ingredients artfully can make it a stunning centerpiece for your summer table.
Easy Fish Tacos With Mango Salsa

Enjoying a summer evening with a light and flavorful meal is a delight when you prepare Easy Fish Tacos with Mango Salsa. This dish combines tender, seasoned fish with a revitalizing, vibrant mango salsa that adds a tropical twist to your dining experience.
Perfect for a family dinner or a small gathering of friends, these tacos aren’t only delicious but also quick and simple to prepare, making them an ideal choice for those warm summer nights.
Fish tacos are a versatile dish that allows you to experiment with various types of fish and salsas. For this recipe, we suggest using a mild white fish like tilapia or cod, which pairs beautifully with the sweetness of the mango.
The combination of textures and flavors creates a balanced meal that’s sure to please everyone’s palate. With a serving size of 4-6 people, this recipe is both satisfying and healthy, making it an excellent addition to your summer dining repertoire.
Ingredients:
- 1 1/2 pounds of white fish fillets (tilapia or cod)
- 1 tablespoon olive oil
- 1 teaspoon chili powder
- 1 teaspoon cumin
- Salt and pepper to taste
- 8-12 small corn tortillas
- 2 ripe mangoes, peeled, pitted, and diced
- 1/4 cup red onion, finely chopped
- 1/4 cup fresh cilantro, chopped
- 1 jalapeño, seeded and finely chopped
- Juice of 1 lime
- 1 avocado, sliced
- 1 cup shredded cabbage
Cooking Instructions:
- Prepare the Fish:
- Rinse the fish fillets under cold water and pat them dry with paper towels. Cut the fillets into pieces suitable for tacos, usually around 2-3 inches in length.
- In a small bowl, mix the olive oil, chili powder, cumin, salt, and pepper. Brush this mixture over both sides of the fish pieces to coat them evenly.
- Cook the Fish:
- Heat a large skillet over medium-high heat. Once hot, add the fish pieces and cook for about 3-4 minutes on each side, or until the fish is cooked through and flakes easily with a fork. Remove from heat and set aside.
- Make the Mango Salsa:
- In a medium bowl, combine the diced mango, red onion, cilantro, jalapeño, and lime juice. Mix well and let the salsa sit for a few minutes to allow the flavors to meld.
- Assemble the Tacos:
- Warm the corn tortillas in a dry skillet over medium heat for about 30 seconds on each side, or until they’re pliable.
- Fill each tortilla with a few pieces of cooked fish, a spoonful of mango salsa, a slice of avocado, and a handful of shredded cabbage.
- Serve:
- Arrange the tacos on a serving platter and garnish with extra cilantro or lime wedges if desired. Serve immediately while the fish is still warm.
Extra Tips:
For a little extra crunch, consider adding a sprinkle of crushed tortilla chips or toasted pumpkin seeds on top of the tacos.
If you enjoy a bit more heat, leave some seeds in the jalapeño or add a pinch of cayenne pepper to the fish seasoning.
For a creamier texture, you can also drizzle a bit of sour cream or a yogurt-based sauce over the tacos just before serving.
One-Pan Sausage and Veggie Bake

One-Pan Sausage and Veggie Bake is a delightful and simple summer dinner recipe that brings together the vibrant flavors of fresh vegetables and savory sausages in one convenient dish. This meal is perfect for those warm summer evenings when you’re looking to minimize kitchen time and maximize flavor.
The combination of colorful veggies and juicy sausages creates a visually appealing and satisfying meal that both kids and adults will love. The beauty of this dish lies in its simplicity and versatility. With minimal prep time and just one pan to clean, it’s an ideal choice for a weeknight dinner or a casual gathering.
The vegetables roast beautifully, bringing out their natural sweetness, while the sausage adds a depth of flavor that ties everything together. Feel free to customize the vegetables based on what’s in season or what you have on hand, making it a great way to use up any leftover produce from your fridge.
Ingredients (for 4-6 people):
- 1 pound of Italian sausage links
- 2 bell peppers (any color), sliced
- 1 large red onion, sliced
- 1 zucchini, sliced
- 1 yellow squash, sliced
- 1 cup cherry tomatoes, halved
- 3 tablespoons olive oil
- 1 teaspoon garlic powder
- 1 teaspoon dried oregano
- Salt and pepper to taste
- Fresh basil leaves for garnish (optional)
Cooking Instructions:
1. Preheat the Oven: Start by preheating your oven to 400°F (200°C). This will guarantee that your dish cooks evenly and the vegetables become perfectly roasted.
2. Prepare the Vegetables: While the oven is heating, wash and slice the bell peppers, red onion, zucchini, and yellow squash into similarly sized pieces. Halve the cherry tomatoes and set aside.
3. Arrange the Ingredients: Place the sliced vegetables and sausage links on a large baking sheet. Drizzle the olive oil over the vegetables and sausages, guaranteeing they’re well coated.
4. Season the Dish: Sprinkle the garlic powder, dried oregano, salt, and pepper evenly over the vegetables and sausages. Toss everything together gently with your hands or a spatula to make sure the seasonings are evenly distributed.
5. Bake the Dish: Place the baking sheet in the preheated oven and bake for 30-35 minutes, or until the sausages are cooked through and the vegetables are tender and slightly caramelized around the edges.
You may want to turn the sausages and stir the vegetables halfway through cooking to promote even browning.
6. Garnish and Serve: Once the bake is done, remove it from the oven and let it cool for a few minutes. Garnish with fresh basil leaves if desired. Serve the One-Pan Sausage and Veggie Bake hot, either on its own or with a side of crusty bread.
Extra Tips:
When preparing this One-Pan Sausage and Veggie Bake, feel free to experiment with different types of sausages to suit your taste preferences, such as spicy Italian or a chicken sausage for a lighter option.
To add more depth to the flavor, consider tossing in a few cloves of crushed garlic or a sprinkle of parmesan cheese towards the end of the baking time. Additionally, if you prefer your vegetables to have more of a crunch, reduce the cooking time slightly.
This recipe is highly adaptable, so don’t hesitate to make it your own!
Zucchini and Corn Fritters

Zucchini and Corn Fritters are a delightful summer dish that brings together the fresh flavors of seasonal vegetables in a crispy, golden-brown package. Perfect as an appetizer, light lunch, or side dish, these fritters combine grated zucchini and sweet corn kernels with a hint of spice and cheese. The result is a savory treat that’s both satisfying and packed with nutrients.
Whether you’re hosting a summer barbecue or looking for a simple, yet delicious meal, these fritters are bound to please everyone at the table.
The beauty of this recipe lies in its simplicity and adaptability. You can easily adjust the flavors according to your preference by adding herbs like parsley or cilantro, or spices like paprika or cumin. The key is to guarantee that the fritters hold their shape and have a crispy exterior while remaining tender on the inside.
Served with a dollop of sour cream or a tangy yogurt dip, Zucchini and Corn Fritters are a versatile addition to any summer menu. This recipe serves 4-6 people.
Ingredients:
- 2 medium zucchinis, grated
- 1 cup fresh or frozen corn kernels
- 2 large eggs
- 1/2 cup all-purpose flour
- 1/4 cup grated Parmesan cheese
- 1/4 cup chopped green onions
- 1-2 cloves garlic, minced
- 1/2 teaspoon salt
- 1/4 teaspoon black pepper
- 1/4 teaspoon red pepper flakes (optional)
- Olive oil for frying
Cooking Instructions:
- Prepare the Zucchini: Grate the zucchinis using a box grater and place them in a colander. Sprinkle a pinch of salt over the grated zucchini and let it sit for about 10 minutes. This will help draw out excess moisture. Afterward, use a clean kitchen towel or cheesecloth to squeeze out as much liquid as possible from the zucchini.
- Mix the Ingredients: In a large bowl, combine the squeezed zucchini, corn kernels, eggs, flour, Parmesan cheese, green onions, garlic, salt, pepper, and red pepper flakes (if using). Mix well until all ingredients are fully incorporated and you have a thick batter.
- Heat the Oil: In a large skillet, heat a few tablespoons of olive oil over medium heat. You want enough oil to cover the bottom of the skillet generously to help the fritters cook evenly and achieve a crispy exterior.
- Cook the Fritters: Scoop about 2 tablespoons of the batter for each fritter, placing it carefully into the hot oil. Flatten the batter slightly with the back of the spoon. Cook for about 3-4 minutes on each side, or until golden brown and crispy. Avoid overcrowding the pan; cook in batches if necessary.
- Drain and Serve: Once cooked, transfer the fritters to a plate lined with paper towels to drain excess oil. Serve hot with a side of sour cream or yogurt dip.
Extra Tips: For best results, make sure to thoroughly squeeze out the moisture from the zucchini. This will prevent the fritters from becoming too soggy.
Additionally, you can experiment with different types of cheese for added flavor, such as feta or cheddar. If you’re looking to make the fritters gluten-free, substitute the all-purpose flour with a gluten-free alternative like chickpea flour or a pre-made blend. Enjoy these fritters as soon as they’re cooked for maximum crispiness!
Chilled Cucumber Avocado Soup
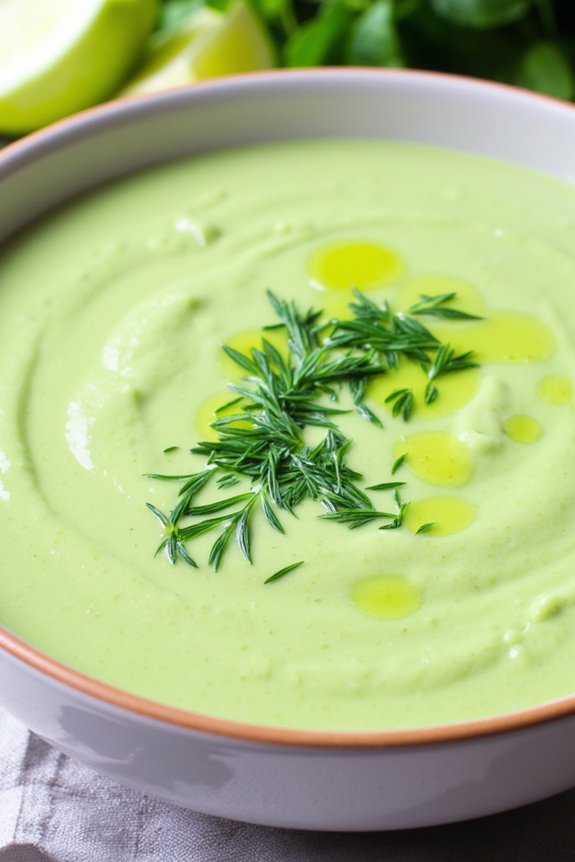
Chilled Cucumber Avocado Soup is a revitalizing and creamy dish perfect for hot summer evenings. This delightful soup combines the coolness of cucumbers with the rich, creamy texture of ripe avocados, creating a light yet satisfying meal. It’s an ideal choice for a starter or a light main course, especially when you want something quick and easy that doesn’t require turning on the stove.
This soup isn’t only delicious but also packed with nutrients, making it a healthy option for those looking to enjoy a flavorful dish without compromising on nutrition.
The beauty of Chilled Cucumber Avocado Soup lies in its simplicity and the freshness of its ingredients. By blending together just a few key components, you can create a dish that’s both elegant and comforting. The addition of lime juice adds a zesty kick, while fresh herbs like cilantro or dill enhance the overall flavor profile.
This soup can be prepared in advance and kept in the refrigerator until serving, making it a convenient option for entertaining guests or simply enjoying a no-fuss meal at home.
Ingredients for a serving size of 4-6 people:
- 3 large cucumbers, peeled and chopped
- 2 ripe avocados, peeled and pitted
- 1 small onion, chopped
- 2 cloves garlic, minced
- 1 1/2 cups plain Greek yogurt
- 1/4 cup fresh lime juice
- 2 tablespoons olive oil
- 1/4 cup fresh cilantro or dill, chopped
- Salt and pepper to taste
- Optional: 1/2 teaspoon cayenne pepper for a spicy kick
Cooking Instructions:
- Prepare the Cucumbers and Avocados: Start by peeling and chopping the cucumbers and avocados. Confirm the avocados are ripe for a creamy texture. Place the chopped cucumbers and avocados in a large blender or food processor.
- Add Aromatics: Add the chopped onion and minced garlic to the cucumber and avocado mixture in the blender. These ingredients will add depth and flavor to the soup.
- Blend the Base: Add the Greek yogurt, olive oil, and fresh lime juice to the blender. Blend the mixture until smooth and creamy, confirming there are no large chunks left.
- Season the Soup: Add chopped cilantro or dill, salt, and pepper to the blender. If you prefer a spicier soup, add the cayenne pepper at this stage. Blend again until the herbs are well incorporated and the soup is evenly seasoned.
- Chill the Soup: Transfer the blended soup to a large bowl or airtight container. Cover and refrigerate for at least 1-2 hours to allow the flavors to meld and the soup to chill thoroughly.
- Serve: Before serving, taste the soup and adjust the seasoning if necessary. Serve the chilled soup in bowls, garnished with extra cilantro or dill for a fresh touch.
Extra Tips:
For the best flavor, confirm the avocados are perfectly ripe; they should feel slightly soft to the touch but not mushy. This soup can be made up to a day in advance, which can enhance the flavors.
If the soup thickens too much while chilling, you can thin it with a bit of cold water or more yogurt before serving. Garnishing with additional herbs or a drizzle of olive oil not only adds to the presentation but also enhances the taste.
Classic Margherita Pizza

Summer is the perfect time to enjoy the vibrant flavors of a Classic Margherita Pizza. This simple yet delicious dish is a proof of the beauty of fresh ingredients. Originating from Naples, Italy, the Margherita pizza is known for its thin, crispy crust topped with a harmonious blend of fresh basil leaves, creamy mozzarella cheese, and ripe tomatoes. Perfect for a casual summer dinner with friends or family, this pizza brings a taste of Italy right to your kitchen.
Crafting the perfect Margherita pizza starts with selecting high-quality ingredients. The dough should be light and airy, providing a perfect base for the toppings. The mozzarella should be fresh and creamy, adding a wonderful texture and richness. Fresh basil leaves not only add a pop of color but also infuse the pizza with a fragrant aroma. Finally, ripe tomatoes or a well-prepared tomato sauce complete this classic dish, offering a sweet and tangy flavor that balances the richness of the cheese.
Ingredients (Serves 4-6):
- 2 1/2 cups all-purpose flour
- 1 cup warm water
- 1 packet (2 1/4 teaspoons) active dry yeast
- 1 teaspoon sugar
- 1 teaspoon salt
- 2 tablespoons olive oil
- 1 cup tomato sauce or crushed ripe tomatoes
- 12 ounces fresh mozzarella cheese, sliced
- Fresh basil leaves
- Salt and pepper to taste
Cooking Instructions:
- Prepare the Dough: In a large bowl, combine the warm water, yeast, and sugar. Stir gently and let it sit for about 5 minutes until the mixture becomes frothy. This indicates that the yeast is active.
- Mix the Dough: Add the flour, salt, and olive oil to the yeast mixture. Stir until the dough begins to come together. Transfer the dough onto a floured surface and knead for about 8-10 minutes until it’s smooth and elastic.
- Let the Dough Rise: Place the dough in a lightly oiled bowl, cover it with a damp cloth, and let it rise in a warm area for about 1-2 hours or until it has doubled in size.
- Preheat the Oven: Preheat your oven to 475°F (245°C). If you have a pizza stone, place it in the oven to heat up as well.
- Shape the Dough: Once the dough has risen, punch it down to release air bubbles. Divide it into two equal portions. Roll out each portion on a floured surface to your desired thickness (typically about 1/4 inch).
- Add the Toppings: Spread a thin layer of tomato sauce over each dough circle, leaving a small border around the edge. Arrange slices of fresh mozzarella evenly on top, followed by a scattering of fresh basil leaves. Season with a pinch of salt and pepper.
- Bake the Pizza: Transfer the topped dough onto a baking sheet or a preheated pizza stone. Bake in the preheated oven for about 10-12 minutes or until the crust is golden brown and the cheese is bubbly and slightly browned.
- Serve: Remove the pizza from the oven and let it rest for a few minutes before slicing. Garnish with additional fresh basil leaves if desired.
Extra Tips:
For the best results, use a pizza stone as it helps achieve a crispy crust similar to that of a traditional wood-fired oven. If you don’t have a pizza stone, a regular baking sheet will work fine, but be sure to preheat it for a crispier base.
When choosing mozzarella, opt for fresh mozzarella rather than the pre-shredded variety, as it melts better and provides a creamier texture. Additionally, if you have the time, allow the dough to rise slowly in the refrigerator overnight – this enhances the flavor considerably.
Honey Lime Grilled Shrimp
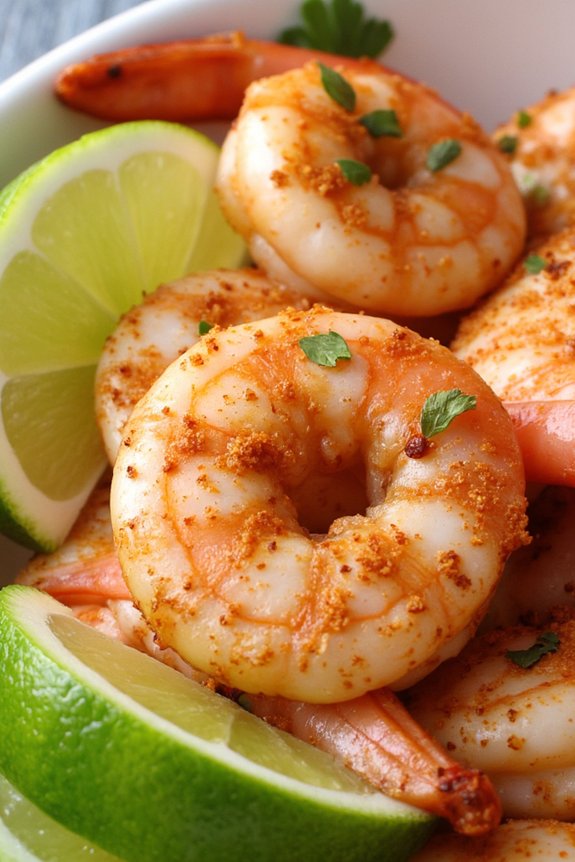
Honey Lime Grilled Shrimp is a delightful summer dish that combines the sweetness of honey with the tangy crispness of lime, all enveloped by the smoky flavor of grilled shrimp. This recipe is perfect for a light dinner or as an appetizer for a summer cookout. The marinade is simple yet flavorful, enhancing the natural sweetness of the shrimp without overpowering it.
Grilling the shrimp over an open flame adds a charred exterior that contrasts beautifully with the juicy, tender interior. The result is a dish that’s bursting with flavor and sure to be a hit at any gathering. Best of all, this recipe is quick and easy to prepare, making it an ideal choice for those warm summer evenings when you want something delicious without spending hours in the kitchen.
Ingredients for 4-6 servings:
- 2 pounds large shrimp, peeled and deveined
- 1/4 cup honey
- 1/4 cup fresh lime juice
- 2 tablespoons olive oil
- 2 cloves garlic, minced
- 1 teaspoon chili powder
- 1/2 teaspoon salt
- 1/4 teaspoon black pepper
- Lime wedges, for serving
- Fresh cilantro, chopped, for garnish
Cooking Instructions:
- Prepare the Marinade: In a medium bowl, whisk together honey, lime juice, olive oil, minced garlic, chili powder, salt, and black pepper until well combined.
- Marinate the Shrimp: Place the shrimp in a large resealable plastic bag or a shallow dish. Pour the marinade over the shrimp, making certain they’re well coated. Seal the bag or cover the dish, and refrigerate for at least 30 minutes or up to 2 hours to allow the flavors to meld.
- Preheat the Grill: About 10 minutes before cooking, preheat your grill to medium-high heat. If using wooden skewers, soak them in water for at least 15 minutes to prevent burning.
- Skewer the Shrimp: Remove the shrimp from the marinade and thread them onto the skewers, discarding the excess marinade. Aim for about 4-6 shrimp per skewer, depending on their size.
- Grill the Shrimp: Place the skewers on the preheated grill. Cook for 2-3 minutes on each side or until the shrimp turn pink and opaque, and have a slight char.
- Serve and Garnish: Remove the shrimp from the grill and transfer them to a serving platter. Garnish with fresh cilantro and lime wedges. Serve immediately while hot.
Extra Tips:
When selecting shrimp, opt for those that are fresh or thawed just before marinating to make sure they absorb the flavors well. If you prefer a spicier kick, consider adding a pinch of cayenne pepper to the marinade.
Always keep an eye on the shrimp while grilling, as they cook quickly and can become rubbery if overcooked. Additionally, consider serving the shrimp alongside a fresh salad or grilled vegetables to add a revitalizing contrast to the rich flavors.