

When it comes to creating special moments with family, few things bring us together like a home-cooked meal.
There’s something truly heartwarming about the vibrant colors and rich aromas of a Chinese feast.
Dishes like Kung Pao Chicken with its spicy sauce and Sweet and Sour Pork with its perfect crisp are sure to impress.
Each recipe holds a touch of tradition and flavor that can turn any evening into a memorable one.
Are you ready to explore these delicious recipes for your next family dinner?
Classic Kung Pao Chicken
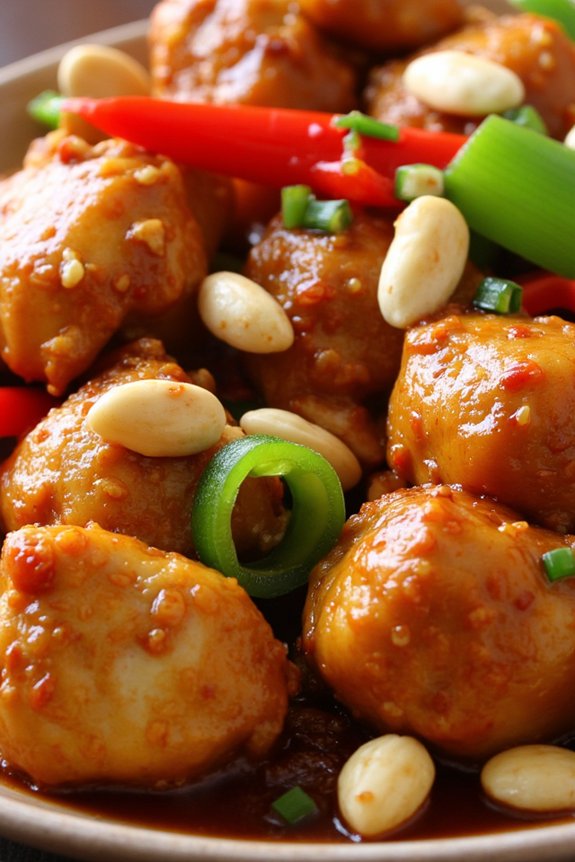
Classic Kung Pao Chicken is a beloved Chinese dish that combines tender pieces of chicken with a savory, spicy, and slightly sweet sauce. This Sichuan-style dish is renowned for its bold flavors and contrasting textures, featuring tender chicken, crunchy peanuts, and vibrant vegetables. The dish is typically served over steamed rice, making it a complete and satisfying meal.
Preparing Kung Pao Chicken at home allows you to control the level of spiciness and tailor the ingredients to your preferences, ensuring a delightful dining experience for family and friends.
Originating from the Sichuan province, Kung Pao Chicken is named after a Qing Dynasty official, Ding Baozhen, who was known as “Kung Pao,” a title that denotes a palace guardian. The dish reflects the characteristics of Sichuan cuisine, which is famous for its use of chili peppers, Sichuan peppercorns, and garlic.
Although regional variations exist, this recipe captures the essence of the classic dish, ensuring a balance of flavors that bring out the best in each ingredient. Perfect for a family dinner, this recipe serves 4-6 people and is certain to become a staple in your culinary repertoire.
Ingredients (Serves 4-6):
- 1 1/2 pounds boneless, skinless chicken breasts
- 1/2 cup unsalted peanuts
- 2 tablespoons vegetable oil
- 8-10 dried red chili peppers
- 1 tablespoon Sichuan peppercorns
- 1 red bell pepper, diced
- 1 green bell pepper, diced
- 4 cloves garlic, minced
- 1 tablespoon fresh ginger, minced
- 4 scallions, chopped
- 1 tablespoon soy sauce
- 1 tablespoon dark soy sauce
- 1 tablespoon rice vinegar
- 1 tablespoon sugar
- 1 tablespoon cornstarch
- 1/4 cup chicken broth
- Salt, to taste
Cooking Instructions:
- Prepare the Chicken: Cut the chicken breasts into bite-sized cubes. In a bowl, mix 1 tablespoon of soy sauce, 1 tablespoon of cornstarch, and a pinch of salt. Add the chicken cubes and marinate for about 20 minutes to enhance tenderness and flavor.
- Toast the Peanuts: In a dry skillet over medium heat, toast the peanuts until they’re golden brown. Remove from heat and set aside. This step enhances the nutty flavor and adds a crunchy texture to the dish.
- Fry the Spices: Heat the vegetable oil in a large wok or frying pan over medium-high heat. Add the dried red chili peppers and Sichuan peppercorns, stirring continuously until fragrant. Be cautious not to burn the spices, as this can result in a bitter taste.
- Stir-Fry the Chicken: Add the marinated chicken to the wok and stir-fry until it’s cooked through and begins to brown, about 5-7 minutes. Remove the chicken from the wok and set aside.
- Cook the Vegetables: In the same wok, add the diced red and green bell peppers, minced garlic, and ginger. Stir-fry for 2-3 minutes until the vegetables are tender-crisp.
- Combine Ingredients: Return the chicken to the wok, along with the toasted peanuts and scallions. Stir in the dark soy sauce, rice vinegar, sugar, and chicken broth. Mix well to coat all the ingredients with the sauce.
- Simmer and Serve: Allow the mixture to simmer for another 2-3 minutes, letting the flavors meld together. Adjust seasoning with salt if needed. Serve hot over steamed rice.
Extra Tips:
When making Classic Kung Pao Chicken, be sure to adjust the number of dried chili peppers to your preferred level of spiciness. The dish should have a balance of heat, sweetness, and savory flavors, so taste as you go and modify the ingredients accordingly.
If you prefer a thicker sauce, you can dissolve an additional teaspoon of cornstarch in water and stir it into the simmering dish. Finally, for an authentic touch, try to source Sichuan peppercorns as they provide a distinctive numbing sensation that complements the heat perfectly.
Savory Beef and Broccoli Stir-Fry
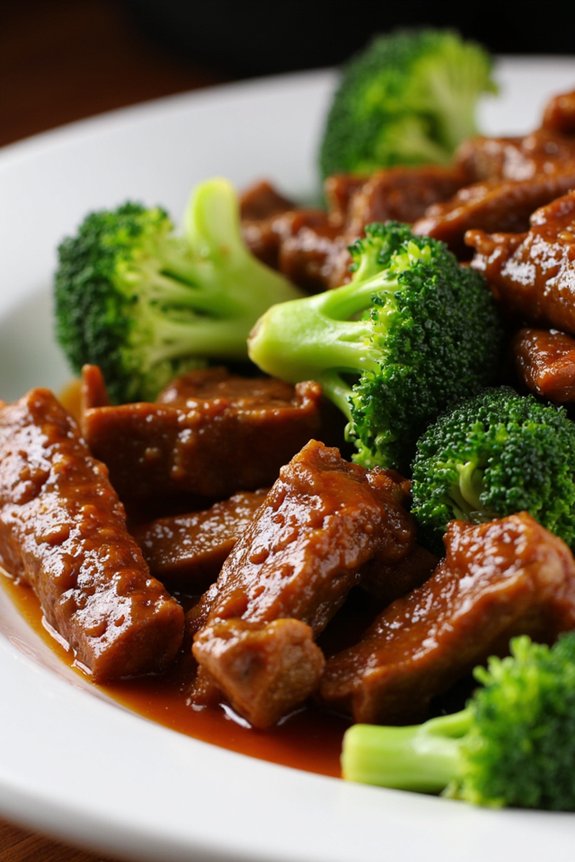
The Savory Beef and Broccoli Stir-Fry is a classic Chinese family dinner dish that combines tender beef strips with fresh broccoli florets, all enveloped in a flavorful, aromatic sauce. This dish isn’t only delicious but also quick to prepare, making it a perfect choice for a busy weeknight meal. The combination of savory soy sauce, garlic, and ginger creates a rich, harmonious flavor that melds beautifully with the beef and broccoli. The dish pairs well with steamed rice or noodles, making it a complete and satisfying meal.
In Chinese cuisine, the stir-fry technique is revered for its ability to cook ingredients quickly over high heat, preserving their natural flavors and textures. This dish exemplifies that technique, with the beef seared to perfection and the broccoli maintaining its vibrant color and crunch. The balance of protein and vegetables in this dish makes it not only tasty but also nutritious. Whether you’re a novice or a seasoned cook, this Savory Beef and Broccoli Stir-Fry is sure to become a favorite in your household.
Ingredients (Serves 4-6):
- 1 pound beef sirloin or flank steak, thinly sliced
- 1 tablespoon cornstarch
- 3 tablespoons soy sauce
- 2 tablespoons oyster sauce
- 1 tablespoon rice wine or dry sherry
- 1 teaspoon sugar
- 1 tablespoon vegetable oil
- 1 tablespoon sesame oil
- 3 cloves garlic, minced
- 1 tablespoon fresh ginger, minced
- 1 pound broccoli florets
- 1/4 cup beef broth or water
- 1 teaspoon sesame seeds (optional, for garnish)
- Cooked rice or noodles, for serving
Cooking Instructions:
- Marinate the Beef: In a medium bowl, combine the beef slices with cornstarch and 1 tablespoon of soy sauce. Mix well to coat the beef evenly and set aside to marinate for about 15 minutes. This will help tenderize the meat and enhance its flavor.
- Prepare the Sauce: In a small bowl, mix together the remaining 2 tablespoons of soy sauce, oyster sauce, rice wine, and sugar. Stir until the sugar is dissolved, then set aside. This will be the sauce for the stir-fry, providing depth and umami.
- Heat the Oil: In a large wok or skillet, heat the vegetable oil and sesame oil over medium-high heat. Once the oils are shimmering, add the minced garlic and ginger. Stir-fry for about 30 seconds until fragrant, being careful not to burn them.
- Cook the Beef: Increase the heat to high and add the marinated beef to the wok. Stir-fry the beef for 2-3 minutes, until it’s browned and cooked through. Remove the beef from the wok and set aside on a plate.
- Stir-Fry the Broccoli: In the same wok, add the broccoli florets. Stir-fry for about 2 minutes, then add the beef broth or water. Cover the wok with a lid and let the broccoli steam for another 2-3 minutes until it’s bright green and tender-crisp.
- Combine and Serve: Return the cooked beef to the wok along with the prepared sauce. Stir well to combine all ingredients and coat them in the sauce. Cook for an additional 1-2 minutes until the sauce thickens slightly. Transfer the stir-fry to a serving platter, sprinkle with sesame seeds if desired, and serve hot with rice or noodles.
Extra Tips:
For the best results, make sure that the beef is sliced against the grain, which will make it more tender when cooked. If you prefer your dish with a bit more heat, consider adding a pinch of red pepper flakes or a dash of chili oil to the sauce. Always use fresh ginger and garlic for the most authentic flavor. Finally, keep all ingredients prepared and ready to go before you start cooking, as stir-frying is a quick process and requires your full attention.
Flavorful Sweet and Sour Pork
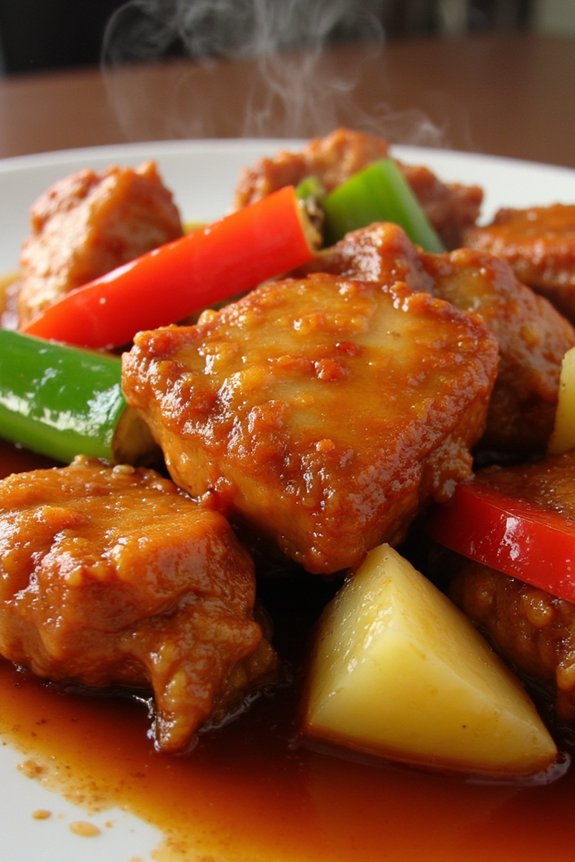
Sweet and Sour Pork is a classic Chinese dish that perfectly balances tangy and sweet flavors, with a delightful crispy texture. It’s often enjoyed at family dinners, providing a comforting and satisfying meal that appeals to a wide range of palates.
This dish typically features succulent pieces of pork that are fried to a golden crisp, then coated in a vibrant sauce made from a harmonious blend of ingredients, including vinegar, sugar, and ketchup. The addition of bell peppers, pineapple, and onions not only adds color but also enhances the taste, making it an all-time favorite among many families.
Ideal for serving 4-6 people, this recipe guarantees that each bite is packed with flavor and texture. Whether it’s a special occasion or a regular family gathering, Sweet and Sour Pork is sure to be a crowd-pleaser.
The preparation might seem detailed, but the result is well worth the effort, bringing together the essence of Chinese cuisine in a single dish. Follow this recipe to recreate an authentic dining experience right at home.
Ingredients:
- 1 pound pork loin, cut into 1-inch cubes
- 1 teaspoon salt
- 1/2 teaspoon ground black pepper
- 1 egg
- 1/2 cup cornstarch
- 1/4 cup all-purpose flour
- 1 cup vegetable oil (for frying)
- 1 red bell pepper, cut into 1-inch pieces
- 1 green bell pepper, cut into 1-inch pieces
- 1 onion, cut into 1-inch pieces
- 1 cup pineapple chunks
- 1/4 cup ketchup
- 1/4 cup rice vinegar
- 1/4 cup sugar
- 1 tablespoon soy sauce
- 1 tablespoon cornstarch mixed with 2 tablespoons water
Cooking Instructions:
- Prepare the Pork: Season the pork cubes with salt and pepper in a large bowl. Crack the egg over the pork and mix well until all pieces are coated. Gradually add the cornstarch and flour, stirring to form a light batter around the pork.
- Fry the Pork: Heat the vegetable oil in a deep skillet or wok over medium-high heat. Once the oil is hot, carefully add the pork pieces, frying them in batches to avoid overcrowding. Fry until golden brown and crispy, about 4-5 minutes per batch. Remove and drain on paper towels.
- Prepare the Vegetables: In the same skillet or wok, remove excess oil, leaving about 1 tablespoon. Add the bell peppers and onion. Stir-fry for about 2 minutes until they start to soften. Add the pineapple chunks and stir-fry for another minute.
- Make the Sauce: In a small bowl, combine ketchup, rice vinegar, sugar, and soy sauce. Pour this mixture into the skillet with the vegetables, stirring to combine. Bring the sauce to a simmer over medium heat.
- Thicken the Sauce: Add the cornstarch slurry (cornstarch mixed with water) to the skillet. Stir continuously until the sauce thickens and coats the vegetables evenly.
- Combine and Serve: Add the fried pork to the skillet, tossing everything together until the pork is well coated with the sauce. Cook for an additional 2 minutes, then remove from heat. Serve hot with steamed rice.
Extra Tips:
For the best results, make sure not to overcrowd the pan when frying the pork as this can lower the oil temperature, resulting in less crispy pork.
It’s essential to maintain the oil at a consistent medium-high heat. You can also marinate the pork in a bit of soy sauce and ginger beforehand for extra flavor.
When making the sauce, adjust the sweetness and tanginess according to preference by tweaking the sugar and vinegar amounts.
Finally, for an added crunch, consider garnishing the dish with toasted sesame seeds before serving.
Aromatic Sichuan Mapo Tofu
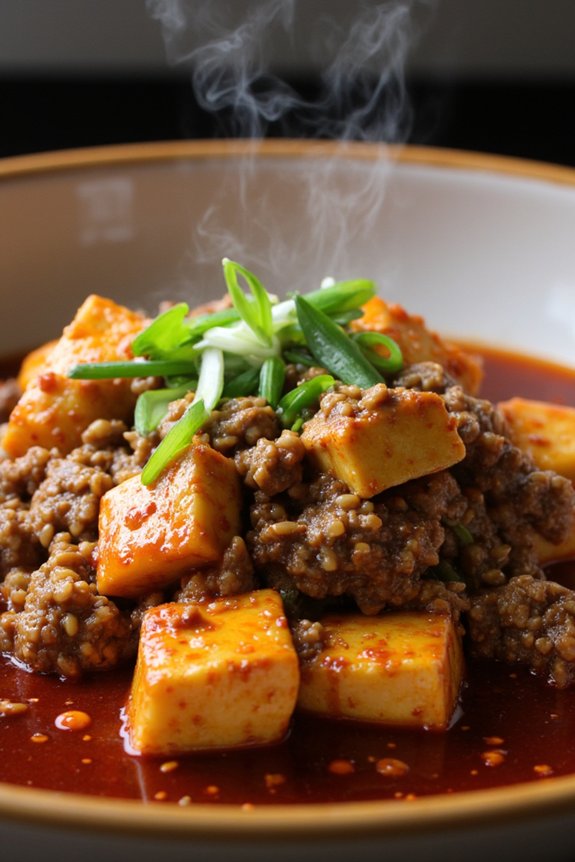
Aromatic Sichuan Mapo Tofu is a classic and beloved dish from the Sichuan province of China, known for its bold flavors and spicy, numbing sensation.
It’s a delightful combination of silky tofu, ground meat (typically pork or beef), and a rich, spicy sauce made from fermented bean paste and chili oil. The dish is often garnished with fresh green onions and a dusting of Sichuan peppercorns, which give it its characteristic numbing effect.
Perfect for a family dinner, this dish is traditionally served with steamed rice, allowing you to soak up the intensely flavored sauce.
This recipe for Aromatic Sichuan Mapo Tofu serves 4-6 people, making it an ideal choice for a family meal or a gathering with friends.
It’s a straightforward dish that requires some key ingredients often used in Sichuan cuisine. Once you have these ingredients on hand, the dish comes together quickly and easily.
Whether you’re a longtime fan of Sichuan food or trying it for the first time, this Mapo Tofu recipe is sure to become a favorite in your home.
Ingredients:
- 1 block (about 400g) of silken or soft tofu
- 200g ground pork or beef
- 3 tablespoons vegetable oil
- 2 tablespoons Sichuan peppercorns
- 2 tablespoons doubanjiang (fermented broad bean paste)
- 1 tablespoon douchi (fermented black beans), rinsed and minced
- 3 cloves garlic, minced
- 1 tablespoon ginger, minced
- 1 tablespoon soy sauce
- 1 tablespoon chili oil
- 1 teaspoon sugar
- 1/2 cup chicken or vegetable broth
- 1 tablespoon cornstarch mixed with 2 tablespoons water
- 2 green onions, chopped
- Cooked white rice, for serving
Cooking Instructions:
- Prepare the Tofu: Begin by cutting the tofu into 1-inch cubes. To remove excess moisture, gently blanch the tofu in simmering water for about 2 minutes. Drain and set aside.
- Toast the Sichuan Peppercorns: In a dry pan over medium heat, toast the Sichuan peppercorns until fragrant. Remove from heat, crush them lightly with a mortar and pestle, and set aside.
- Cook the Meat: In a large pan or wok, heat the vegetable oil over medium-high heat. Add the ground pork or beef and cook until browned and cooked through, breaking it up into small pieces with a spatula.
- Add Aromatics: Reduce the heat to medium and add the minced garlic, ginger, and douchi to the pan. Stir-fry for about 1 minute or until fragrant.
- Incorporate the Doubanjiang: Add the doubanjiang to the pan and stir well to combine with the meat and aromatics, cooking for another minute.
- Make the Sauce: Pour in the soy sauce, chili oil, sugar, and broth. Stir everything together and bring to a simmer.
- Simmer the Tofu: Gently add the tofu cubes to the sauce. Simmer for 5-7 minutes, allowing the tofu to absorb the flavors of the sauce.
- Thicken the Sauce: Stir in the cornstarch mixture to thicken the sauce. Cook for an additional 2 minutes until the sauce reaches your desired consistency.
- Garnish and Serve: Sprinkle the toasted Sichuan peppercorns and chopped green onions over the dish. Serve hot with cooked white rice.
Extra Tips:
To guarantee a smooth and silky texture, handle the tofu gently to avoid breaking it apart.
Adjust the level of spiciness according to your preference by varying the amount of chili oil and doubanjiang. If you enjoy a more numbing sensation, feel free to increase the quantity of Sichuan peppercorns.
For a vegetarian version, you can substitute the meat with chopped mushrooms or omit it altogether. Enjoy your Aromatic Sichuan Mapo Tofu with a side of steamed vegetables to balance the flavors.
Traditional Hot and Sour Soup
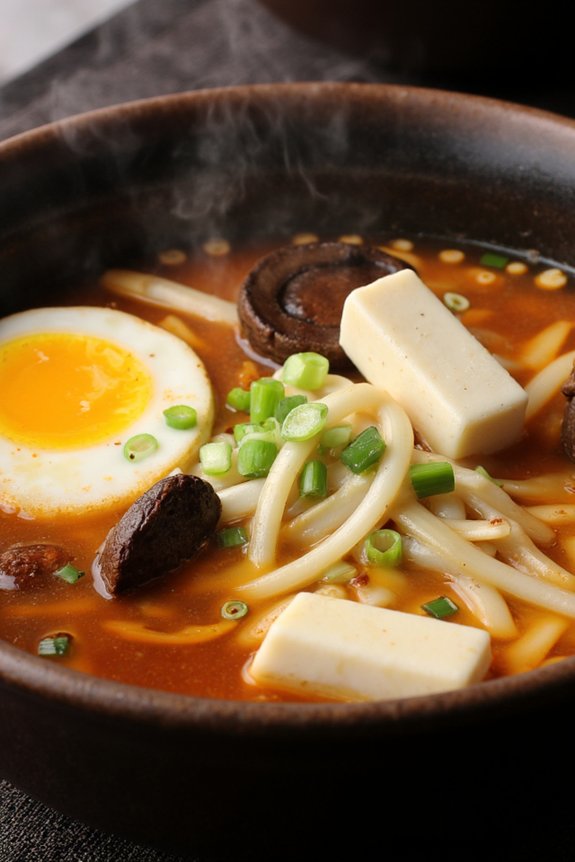
Hot and Sour Soup is a classic Chinese dish that balances the perfect combination of heat and tang. This soup is a staple for family dinners, offering a delightful burst of flavors that stimulate the palate. Known for its warming characteristics, the dish is perfect for any time of the year but especially comforting during colder months.
It’s an easy-to-prepare soup that brings together a variety of textures and tastes, guaranteeing a satisfying experience for everyone at the table.
The origins of Hot and Sour Soup can be traced back to the Sichuan province of China, renowned for its spicy cuisine. Over time, this soup has been embraced worldwide, with slight variations to suit local tastes.
The traditional recipe uses ingredients like tofu, mushrooms, and bamboo shoots, combined with a tantalizing broth made from chicken or vegetable stock. The addition of vinegar provides the sourness, while white pepper adds the necessary heat, making this soup a remarkable blend of flavors.
Ingredients (for 4-6 people):
- 8 cups chicken or vegetable stock
- 1/2 cup shredded cooked chicken (optional)
- 1 cup sliced mushrooms (shiitake or button)
- 1/2 cup bamboo shoots, julienned
- 1/2 cup tofu, cut into small cubes
- 1/4 cup rice vinegar
- 3 tablespoons soy sauce
- 1 tablespoon sesame oil
- 2 tablespoons cornstarch mixed with 2 tablespoons water
- 1 teaspoon white pepper
- 2 eggs, lightly beaten
- 3 green onions, sliced
- 1 tablespoon chili oil (optional)
- Salt to taste
Cooking Instructions:
- Prepare the Broth: In a large pot, bring the chicken or vegetable stock to a gentle simmer over medium heat. This will be the base of your soup, so make certain it’s flavorful.
- Add the Ingredients: Stir in the mushrooms, bamboo shoots, and tofu. If you’re using chicken, add it at this stage. Allow these ingredients to cook for about 5 minutes until the mushrooms soften.
- Season the Soup: Pour in the rice vinegar, soy sauce, and sesame oil. Stir well to combine all the flavors. Adjust the seasoning with salt to taste.
- Thicken the Soup: Add the cornstarch mixture to the pot, stirring continuously to prevent lumps. This will help thicken the soup slightly, giving it a rich texture.
- Add Heat and Texture: Slowly drizzle the beaten eggs into the soup while stirring gently. This will create thin, silky strands of egg throughout the soup. Immediately add the white pepper for that signature heat.
- Finish and Serve: Turn off the heat and stir in the green onions and chili oil if desired. Ladle the soup into bowls and serve hot.
Extra Tips:
When preparing Hot and Sour Soup, adjust the levels of vinegar and white pepper according to your taste preference. For a vegetarian version, simply omit the chicken and make sure the stock is vegetable-based.
The cornstarch mixture should be added slowly to avoid clumping, and constant stirring is key when incorporating the beaten eggs to achieve the perfect egg ribbons.
Feel free to customize with additional ingredients such as wood ear mushrooms or a splash of chili paste for extra spice.
Delicious Chicken Fried Rice
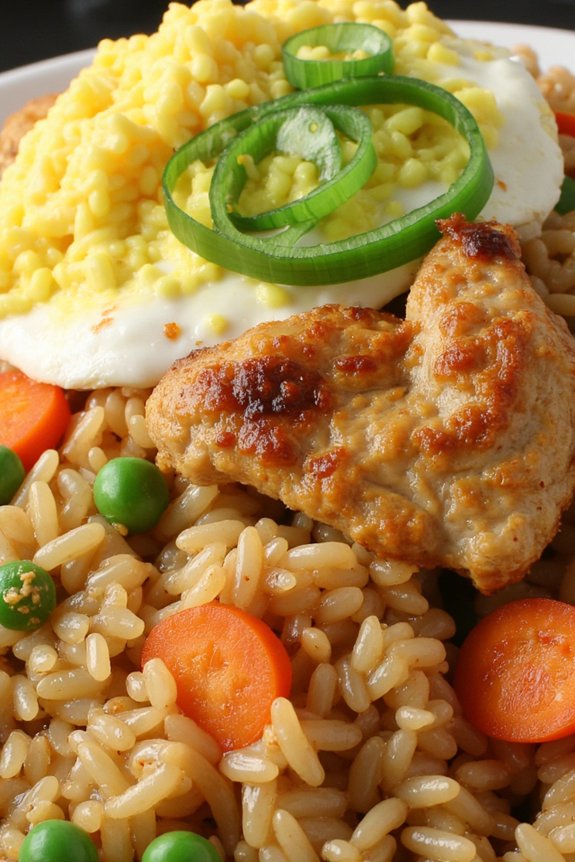
Chicken Fried Rice is a classic Chinese family dinner recipe that combines the savory flavors of marinated chicken, perfectly seasoned rice, and a medley of vegetables. This dish isn’t only delicious but also versatile, allowing you to adjust the ingredients based on what you have on hand.
Whether you’re looking for a quick weeknight meal or a dish to impress guests, this recipe provides on both taste and convenience. The beauty of Chicken Fried Rice lies in its simplicity and the harmonious blend of flavors.
This dish is perfect for using up leftover rice and vegetables, making it both economical and environmentally friendly. By following this recipe, you’ll create a satisfying meal that’s sure to become a family favorite. The following ingredients and instructions will guide you through making a serving size suitable for 4-6 people.
Ingredients (Serves 4-6):
- 3 cups of cooked jasmine rice (preferably day-old)
- 2 tablespoons vegetable oil
- 1 pound boneless, skinless chicken breast, cut into small cubes
- 3 tablespoons soy sauce
- 2 eggs, beaten
- 1 cup frozen peas and carrots, thawed
- 1 small onion, finely chopped
- 3 cloves garlic, minced
- 4 green onions, sliced
- 1 tablespoon sesame oil
- Salt and pepper to taste
Cooking Instructions:
- Prepare the Rice: Ideally, use day-old rice as it’s less sticky. If using freshly cooked rice, spread it out on a baking sheet and allow it to cool and dry slightly.
- Cook the Chicken: Heat 1 tablespoon of vegetable oil in a large skillet or wok over medium-high heat. Add the chicken cubes and stir-fry until they’re cooked through and lightly browned, about 5-7 minutes. Remove the chicken from the pan and set it aside.
- Scramble the Eggs: In the same skillet, add the beaten eggs and stir quickly to scramble them. Once cooked, remove the eggs and set them aside.
- Sauté Vegetables: Add the remaining tablespoon of vegetable oil to the skillet. Add the chopped onion and garlic, sautéing until fragrant and the onion is translucent, about 2-3 minutes.
- Combine the Ingredients: Add the peas and carrots to the skillet, stirring to combine. Return the cooked chicken and scrambled eggs to the pan. Mix well.
- Add the Rice: Stir in the cooked rice, breaking up any clumps with your spatula. Pour the soy sauce evenly over the rice and continue to stir-fry until everything is well combined and heated through.
- Season and Finish: Add the sesame oil, green onions, and a pinch of salt and pepper to taste. Stir everything together for another minute until the green onions are just wilted.
- Serve: Transfer the Chicken Fried Rice to a serving platter and enjoy while hot.
Extra Tips:
For the best flavor, use day-old rice as it’s drier and less likely to become mushy when stir-fried. If you don’t have time to pre-cook the rice, use freshly cooked rice but allow it to cool and dry slightly before frying.
Feel free to customize the vegetables based on your preference or what you have available; bell peppers, corn, or even zucchini make great additions. Finally, always taste and adjust the seasoning before serving to confirm the perfect balance of flavors.
Steamed Dumplings With Pork Filling
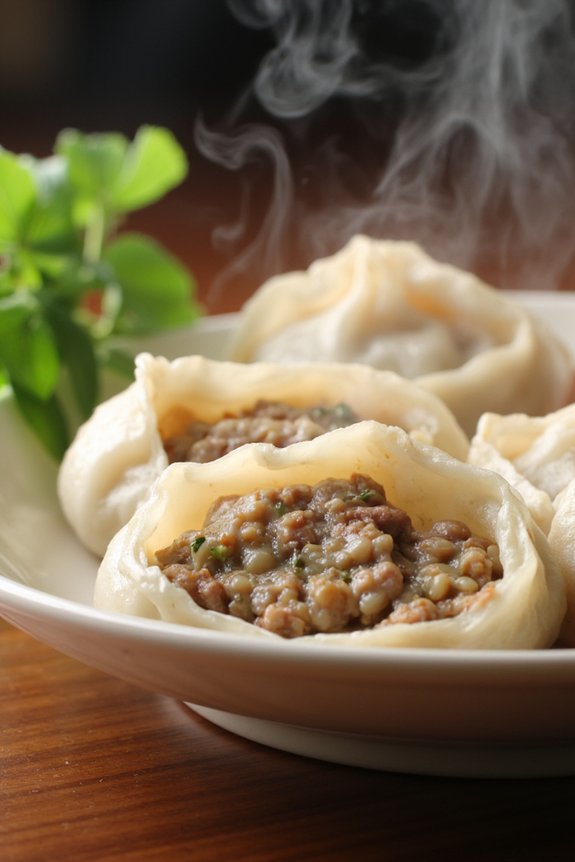
Steamed Dumplings With Pork Filling are a delightful addition to any Chinese family dinner. These dumplings are a staple in Chinese cuisine, loved for their savory pork filling encased in a delicate, soft wrapper. The beauty of this dish lies in its simplicity and the rich flavors that meld together during the steaming process. Each dumpling is a small bundle of joy, bursting with juicy pork, ginger, garlic, and scallions, offering a taste that’s both comforting and satisfying.
Perfect for a family meal or a gathering with friends, these dumplings aren’t only delicious but also fun to prepare. Making dumplings can be a wonderful family activity, bringing everyone together in the kitchen. The recipe provided here is designed for 4-6 people, guaranteeing there’s enough to go around. Whether you’re a seasoned cook or a beginner, this step-by-step guide will help you create perfectly steamed dumplings to impress your loved ones.
Ingredients for Steamed Dumplings With Pork Filling (Serves 4-6):
- 1 pound ground pork
- 1 tablespoon soy sauce
- 1 tablespoon sesame oil
- 1 tablespoon rice wine or dry sherry
- 1 teaspoon sugar
- 1 teaspoon salt
- 2 teaspoons minced ginger
- 2 cloves garlic, minced
- 3 scallions, finely chopped
- Dumpling wrappers (about 40 pieces)
- Water, for sealing the dumplings
Cooking Instructions:
- Prepare the Filling:
- In a large bowl, combine the ground pork, soy sauce, sesame oil, rice wine, sugar, and salt. Mix well until the ingredients are fully incorporated.
- Add the minced ginger, garlic, and chopped scallions to the mixture. Stir until everything is evenly distributed. Set the filling aside.
- Assemble the Dumplings:
- Take a dumpling wrapper and place it on a flat surface. Spoon about a teaspoon of the pork filling into the center of the wrapper.
- Dip your finger in water and moisten the edges of the wrapper. Fold the wrapper in half to create a half-moon shape, pressing the edges to seal. You can pleat the edges for a decorative touch if desired.
- Repeat the process with the remaining wrappers and filling.
- Steam the Dumplings:
- Prepare a steamer by lining it with parchment paper or lightly greasing it to prevent sticking.
- Arrange the dumplings in the steamer, making sure they don’t touch each other.
- Fill a pot with water and bring it to a boil. Place the steamer over the boiling water, cover, and steam the dumplings for about 10-12 minutes, or until the pork is cooked through.
- Serve:
- Once cooked, carefully remove the dumplings from the steamer and serve them hot. They can be enjoyed on their own or with a dipping sauce made from soy sauce, vinegar, and chili oil.
Extra Tips:
When making dumplings, verify that the filling is well-mixed but not overworked, as this can make it dense. If you prefer a juicier filling, you can add a small amount of chicken stock to the pork mixture.
For the best results, use store-bought dumpling wrappers if you’re short on time, but homemade wrappers can offer a more authentic texture. Finally, when steaming, confirm the water in the pot doesn’t touch the dumplings, as this can cause them to become soggy.
Crispy Peking Duck
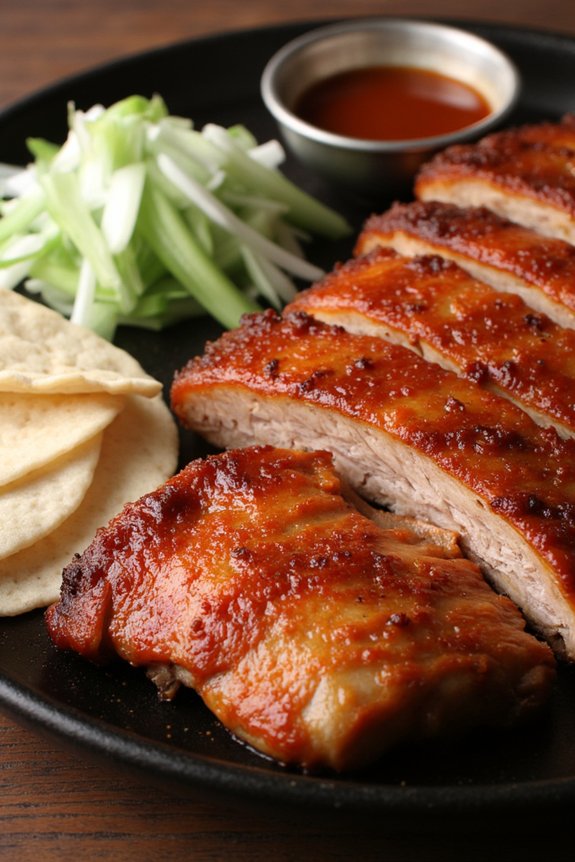
Crispy Peking Duck is a quintessential dish in Chinese cuisine, known for its rich flavors and the irresistible crunch of its perfectly roasted skin. This dish, traditionally served with thin pancakes, hoisin sauce, and sliced spring onions, is a delightful centerpiece for any family gathering.
The preparation involves several stages, including marinating, air-drying, and roasting, to achieve the signature crispy texture and succulent meat. The process of making authentic Crispy Peking Duck may seem intimidating, but with careful attention to detail and patience, you can recreate this classic dish at home.
The key to success lies in verifying that the duck skin is thoroughly dried and seasoned before roasting, which results in the desired crispness. By following the steps outlined below, you can prepare a restaurant-quality Peking Duck for your family to enjoy.
Ingredients (Serves 4-6):
- 1 whole duck (approximately 5-6 pounds)
- 1 tablespoon Chinese five-spice powder
- 2 tablespoons honey
- 2 tablespoons soy sauce
- 2 tablespoons rice vinegar
- 1 tablespoon Shaoxing wine
- 6-8 thin pancakes
- 1/2 cup hoisin sauce
- 1 bunch spring onions, sliced thin
- 1 cucumber, julienned
Cooking Instructions:
1. Prepare the Duck: Clean the duck thoroughly, removing any excess fat and innards. Pat the duck dry with paper towels. Prick the skin all over with a sharp fork, being careful not to pierce the meat.
2. Marinate the Duck: Mix the Chinese five-spice powder, soy sauce, rice vinegar, and Shaoxing wine in a bowl to create the marinade. Rub this mixture all over the duck, inside and out. Let it marinate in the refrigerator for at least 4 hours, preferably overnight.
3. Air-Dry the Duck: After marinating, remove the duck from the refrigerator. In a small saucepan, combine the honey with 1 cup of water and bring to a boil. Pour this hot mixture over the duck to glaze it.
Hang the duck in a cool, airy place, or place it on a rack in the refrigerator, uncovered, for about 6-8 hours to allow the skin to dry out.
4. Roast the Duck: Preheat the oven to 375°F (190°C). Place the duck on a rack in a roasting pan, breast side up. Roast in the oven for 1 hour.
Then, increase the oven temperature to 425°F (220°C) and roast for another 30 minutes, or until the skin is crisp and golden.
5. Prepare the Accompaniments: Warm the pancakes in a steamer or microwave. Arrange the sliced spring onions and julienned cucumber on a serving plate.
6. Serve: Carve the duck into thin slices. Serve with warm pancakes, hoisin sauce, spring onions, and cucumber. Allow each person to assemble their own pancake roll.
Extra Tips:
For best results, verify that the duck is hung or placed in a way that allows air to circulate around it fully during the drying process, as this is vital for achieving crispy skin.
If you don’t have a place to hang the duck, placing it on a wire rack in the fridge works well. Also, consider using a fan to speed up the air-drying process if necessary.
When carving the duck, a sharp knife is essential to slice through the skin without tearing it. Enjoy your homemade Crispy Peking Duck with your family and savor the flavors of this iconic dish.
Fragrant Shrimp and Vegetable Lo Mein
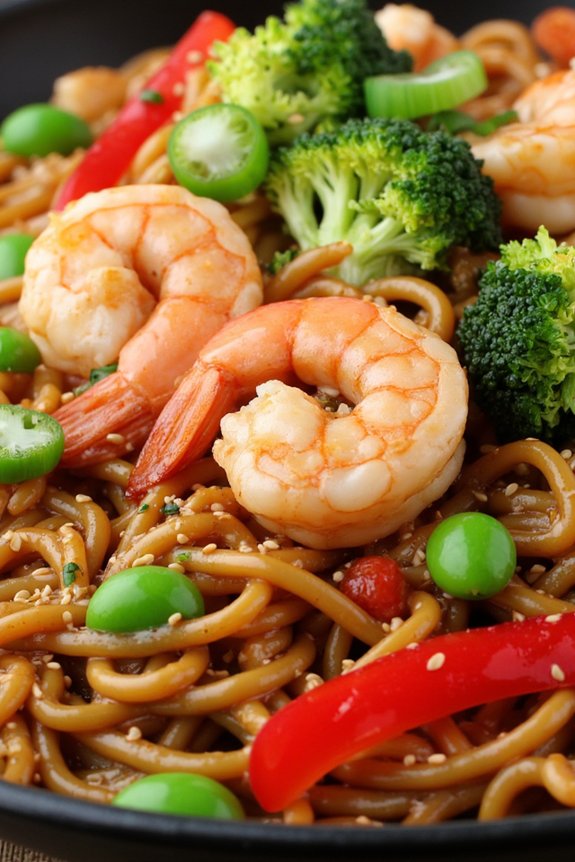
This recipe serves 4-6 people and is ideal for those who love Asian-inspired cuisine. The key to this dish lies in the balance of flavors and the freshness of the ingredients. The shrimp should be perfectly cooked, tender yet slightly firm, while the vegetables should retain a bit of their crunch.
The lo mein noodles are the perfect vehicle for soaking up the flavorful sauce, creating a harmonious blend of taste and texture. Whether you’re a seasoned cook or a beginner in the kitchen, this recipe is straightforward and can be easily followed to create a delicious family meal.
Ingredients:
- 1 pound large shrimp, peeled and deveined
- 12 ounces lo mein noodles
- 2 tablespoons vegetable oil
- 1 onion, thinly sliced
- 1 red bell pepper, thinly sliced
- 1 cup broccoli florets
- 1 cup snap peas
- 3 cloves garlic, minced
- 2 tablespoons soy sauce
- 1 tablespoon oyster sauce
- 1 tablespoon hoisin sauce
- 1 teaspoon sesame oil
- 1/4 teaspoon white pepper
- 2 green onions, sliced
- Sesame seeds, for garnish
Instructions:
- Cook the Noodles: Begin by cooking the lo mein noodles according to the package instructions. Once cooked, drain and set aside. It’s important to rinse the noodles with cold water to stop the cooking process and prevent them from sticking together.
- Prepare the Shrimp and Vegetables: While the noodles are cooking, heat 1 tablespoon of vegetable oil in a large pan or wok over medium-high heat. Add the shrimp and cook for about 2-3 minutes on each side, or until pink and cooked through. Remove the shrimp from the pan and set aside.
- Stir-fry the Vegetables: In the same pan, add the remaining tablespoon of vegetable oil. Add the onion, bell pepper, broccoli, and snap peas. Stir-fry the vegetables for about 4-5 minutes, or until they’re tender but still crisp. Stir in the garlic and cook for an additional 30 seconds until fragrant.
- Combine the Ingredients: Return the cooked shrimp to the pan with the vegetables. Add the cooked noodles and toss everything together.
- Add the Sauce: In a small bowl, mix together the soy sauce, oyster sauce, hoisin sauce, sesame oil, and white pepper. Pour this mixture over the noodles, shrimp, and vegetables. Toss everything together until the noodles are well coated and everything is heated through.
- Garnish and Serve: Remove from heat and garnish with sliced green onions and sesame seeds. Serve immediately.
Extra Tips:
For the best results, make certain that all your ingredients are prepped and ready to go before you start cooking, as stir-frying is a quick process.
You can substitute the vegetables with your favorites or what you have on hand, such as carrots, cabbage, or mushrooms. If you like a bit of heat, consider adding a teaspoon of chili paste or sliced fresh chili peppers to the sauce.
Finally, be cautious with the salt as the soy sauce and other condiments already contain a significant amount.
Comforting Chinese Egg Drop Soup
Chinese Egg Drop Soup is a soothing and flavorful dish that brings warmth and comfort to the dining table. This classic soup is often served as a starter in Chinese cuisine but can easily be enjoyed as a light meal on its own. It features delicate ribbons of egg swirled into a savory broth, enriched with subtle notes of ginger and sesame oil. The addition of tender corn kernels and scallions provide a delightful texture and a pop of color, making it visually appealing and satisfying to the palate.
The beauty of Egg Drop Soup lies in its simplicity and quick preparation, making it an ideal choice for busy weeknights or when you’re craving something comforting and nourishing. With just a handful of ingredients, you can create a delicious, homemade version of this beloved soup. Whether you’re serving it as part of a larger Chinese family dinner or enjoying a bowl by itself, this recipe is sure to become a favorite in your household.
Ingredients (for 4-6 servings):
- 6 cups chicken broth
- 1 teaspoon ginger, minced
- 1 tablespoon soy sauce
- 1 tablespoon cornstarch
- 2 tablespoons water
- 3 large eggs
- 1 cup corn kernels (fresh or frozen)
- 3 scallions, finely chopped
- 1 teaspoon sesame oil
- Salt and white pepper to taste
Cooking Instructions:
- Prepare the Broth: In a large pot, bring the chicken broth to a gentle boil over medium heat. Add the minced ginger and soy sauce, stirring to combine, and let the flavors meld for about 5 minutes.
- Thicken the Soup Base: In a small bowl, mix the cornstarch and water to create a slurry. Gradually pour the slurry into the simmering broth while stirring continuously. This will slightly thicken the soup and give it a smooth texture.
- Whisk the Eggs: Crack the eggs into a separate bowl and beat them well until they’re fully combined. This will guarantee that the egg ribbons are uniform when added to the soup.
- Create Egg Ribbons: Slowly pour the beaten eggs into the soup in a steady stream, using a fork or chopsticks to gently stir the broth in a circular motion. This will create the characteristic egg ribbons.
- Add Corn and Scallions: Stir in the corn kernels and half of the chopped scallions. Allow the soup to simmer for an additional 2-3 minutes, guaranteeing the corn is heated through.
- Finish with Seasoning: Drizzle the sesame oil over the soup and season with salt and white pepper to taste. Stir to combine all the flavors.
- Serve Hot: Ladle the soup into bowls and garnish with the remaining scallions for a fresh touch.
Extra Tips:
For an extra layer of flavor, consider adding a dash of white pepper or a splash of rice vinegar before serving. If you prefer a thicker soup, increase the amount of cornstarch in your slurry. Additionally, for a heartier version, you can add cooked shredded chicken or tofu.
Always taste the soup before serving and adjust the seasoning as necessary to suit your preference. Enjoy your homemade Comforting Chinese Egg Drop Soup with a side of steamed rice or dumplings for a complete meal.