

Have you ever swapped out your usual dinner for breakfast favorites? It’s such a cozy and comforting twist after a long day. There’s something special about enjoying pancakes or a savory omelet in the evening. Plus, these meals are easy on the wallet, which is always a plus. Ready to discover some new family favorites that might just become staples?
Fluffy Buttermilk Pancakes

Breakfast for dinner is always a comforting choice, and these Fluffy Buttermilk Pancakes fit the bill perfectly. There’s something delightfully indulgent about settling down to a plate of golden-brown pancakes in the evening. Not only are they simple and quick to make, but they also bring a sense of warmth and nostalgia to the table.
Whether you’re cooking for your family or just for yourself, this recipe will fill your home with the inviting aroma of a classic breakfast treat.
The secret to achieving a light and airy texture lies in the use of buttermilk, which reacts with baking soda to create bubbles in the batter. This is what gives the pancakes their characteristic fluffiness. Furthermore, these pancakes are versatile and can be topped with a variety of ingredients such as fresh berries, maple syrup, or even a dollop of whipped cream.
So, grab your mixing bowl and get ready to enjoy a plate of delicious, fluffy pancakes that are sure to please both kids and adults alike.
Ingredients (serves 4-6 people):
- 2 cups all-purpose flour
- 2 tablespoons granulated sugar
- 2 teaspoons baking powder
- 1 teaspoon baking soda
- 1/2 teaspoon salt
- 2 cups buttermilk
- 2 large eggs
- 1/4 cup unsalted butter, melted
- 1 teaspoon vanilla extract
- Butter or oil for cooking
Cooking Instructions:
- Prepare the Dry Ingredients: In a large mixing bowl, whisk together the flour, sugar, baking powder, baking soda, and salt until well combined. This guarantees that the leavening agents are evenly distributed throughout the flour.
- Mix the Wet Ingredients: In a separate bowl, beat the eggs lightly and then add the buttermilk, melted butter, and vanilla extract. Whisk the mixture until it’s smooth and the components are well incorporated.
- Combine the Mixtures: Pour the wet ingredients into the dry ingredients. Gently fold them together with a spatula or wooden spoon until just combined. Be careful not to overmix; some lumps in the batter are okay and help to keep the pancakes fluffy.
- Preheat the Cooking Surface: Heat a non-stick skillet or griddle over medium heat. Lightly grease with butter or oil. The surface is ready when a few drops of water dance and sizzle upon contact.
- Cook the Pancakes: Pour about 1/4 cup of batter onto the skillet for each pancake. Cook until bubbles form on the surface and the edges appear set, about 2-3 minutes. Flip the pancakes and cook for an additional 1-2 minutes, until golden brown and cooked through.
- Serve Warm: Transfer the pancakes to a plate and cover with a clean towel to keep warm while you cook the remaining batter. Serve immediately with your choice of toppings.
Extra Tips:
For the fluffiest pancakes, avoid overmixing the batter; this can lead to tough pancakes. Allow the batter to rest for a few minutes before cooking to let the baking soda fully activate.
If you’re cooking for a larger group, keep the pancakes warm by placing them in an oven preheated to 200°F. Experiment with add-ins like blueberries or chocolate chips by sprinkling them on top of the batter just after pouring it onto the skillet.
Enjoy your cozy breakfast-for-dinner!
Savory Vegetable Omelet

There’s nothing quite as comforting as having breakfast for dinner, and a savory vegetable omelet is a perfect candidate. This dish isn’t only cozy and satisfying but also adaptable to whatever vegetables you have on hand. The combination of fluffy eggs and fresh veggies makes it both nutritious and delicious.
Whether you’re a seasoned cook or a beginner, this omelet is easy to whip up and is bound to please everyone at the table. This savory vegetable omelet is ideal for a family meal, serving 4-6 people. The beauty of this dish is in its versatility; you can incorporate a variety of vegetables to suit your taste or make use of what you already have in your fridge.
Pair it with a slice of whole grain toast or a simple side salad, and you’ve got a balanced meal that’s quick to prepare and easy on the wallet.
Ingredients for 4-6 servings:
- 8 large eggs
- 1/4 cup milk
- Salt and pepper to taste
- 1 tablespoon olive oil
- 1 cup diced bell peppers (any color)
- 1 cup sliced mushrooms
- 1/2 cup diced onions
- 1 zucchini, chopped
- 1 cup spinach leaves
- 1/2 cup shredded cheese (cheddar, mozzarella, or your choice)
- Chopped fresh herbs (parsley, chives, or basil)
Cooking Instructions:
1. Prepare the Vegetables: Begin by washing all the vegetables thoroughly. Dice the bell peppers, slice the mushrooms, chop the zucchini, and dice the onions. Set them aside in separate bowls.
2. Whisk the Eggs: In a large mixing bowl, crack open the eggs. Add the milk, and season with salt and pepper to taste. Whisk the mixture until the eggs are fully combined and slightly frothy.
3. Cook the Vegetables: Heat the olive oil in a large non-stick frying pan over medium heat. Once the oil is hot, add the onions and cook for about 2 minutes until they start to soften.
Add the bell peppers, mushrooms, and zucchini, and sauté for another 5 minutes until all vegetables are tender. Add the spinach leaves at the end, cooking until just wilted.
4. Combine Eggs and Vegetables: Reduce the heat to low. Pour the egg mixture over the cooked vegetables in the frying pan. Use a spatula to gently stir the mixture for the first few minutes to guarantee the eggs cook evenly.
5. Add Cheese: Once the eggs begin to set, sprinkle the shredded cheese evenly over the top. Cover the pan with a lid and let the omelet cook for another 5 minutes, or until the cheese is melted and the eggs are fully cooked through.
6. Serve: Use a spatula to carefully slide the omelet onto a large serving plate. Garnish with your choice of fresh herbs. Slice and Serve warm with optional sides like toast or salad.
Extra Tips:
To make the perfect omelet, confirm your vegetables are cooked but not overdone, as they’ll continue to cook slightly once the eggs are added.
Using a non-stick pan is vital for easy flipping and serving. If you prefer a spicier kick, consider adding a pinch of red pepper flakes or a splash of hot sauce to the egg mixture. Finally, feel free to customize the ingredients by adding other vegetables like tomatoes, or even some cooked bacon or ham for extra flavor.
Cheesy Breakfast Casserole

If you’re in the mood for a comforting and satisfying meal that combines the best of breakfast and dinner, seek no further than this Cheesy Breakfast Casserole. This dish isn’t only incredibly easy to prepare, but it also allows you to enjoy the fluffy textures and delightful flavors of breakfast at any time of the day.
With layers of cheese, eggs, and savory breakfast ingredients, this casserole is sure to become a family favorite that’s both hearty and economical. Perfect for serving 4-6 people, this casserole is packed with cheese and other breakfast staples, making it a versatile dish that can be adapted to suit your taste.
Whether you’re feeding a hungry family or preparing a cozy meal for yourself, this recipe is both budget-friendly and delicious. Gather your ingredients and follow the simple steps below to create a heartwarming meal that everyone will love.
Ingredients:
- 8 large eggs
- 2 cups shredded cheddar cheese
- 1 cup milk
- 1 pound breakfast sausage, cooked and crumbled
- 4 cups frozen hash browns, thawed
- 1/2 cup chopped bell pepper
- 1/2 cup chopped onion
- 1 teaspoon salt
- 1/2 teaspoon black pepper
- 1/2 teaspoon garlic powder
- Cooking spray
Cooking Instructions:
1. Preheat the Oven: Preheat your oven to 350°F (175°C). This will make certain that your casserole cooks evenly once it’s assembled.
2. Prepare the Baking Dish: Spray a 9×13-inch baking dish with cooking spray to prevent sticking. This will make it easier to serve the casserole once it’s baked.
3. Cook the Sausage: In a large skillet, cook the breakfast sausage over medium heat until browned and crumbled. Drain any excess fat and set aside.
4. Mix the Ingredients: In a large bowl, whisk together the eggs, milk, salt, black pepper, and garlic powder until well combined.
5. Assemble the Casserole: Spread the thawed hash browns evenly in the bottom of the prepared baking dish. Layer the cooked sausage on top of the hash browns, followed by the chopped bell pepper and onion.
Pour the egg mixture over the top, ensuring all ingredients are evenly covered.
6. Add Cheese: Sprinkle the shredded cheddar cheese over the top of the casserole, covering it completely.
7. Bake the Casserole: Place the baking dish in the preheated oven and bake for 35-40 minutes, or until the eggs are set and the cheese is bubbly and golden brown.
8. Cool and Serve: Allow the casserole to cool for a few minutes before slicing and serving. This will make it easier to cut and serve.
Extra Tips:
For added flavor, consider adding some fresh herbs like chives or parsley to the egg mixture. If you prefer a spicier version, try using pepper jack cheese or adding a dash of hot sauce to the eggs.
You can also customize this recipe by swapping in your favorite breakfast meats or vegetables. Leftovers can be stored in the refrigerator for up to three days and are easily reheated in the microwave for a quick and satisfying meal.
Loaded Breakfast Burritos

Loaded Breakfast Burritos are a delicious and comforting meal that can easily double as a hearty dinner option for those cozy evenings at home. These burritos are packed with all the classic breakfast flavors and are perfect for satisfying those cravings for a warm, filling meal. The combination of eggs, cheese, sausage or bacon, and an array of fresh vegetables all wrapped up in a soft tortilla brings a delightful mix of textures and flavors that everyone at the table will love.
Preparing these Loaded Breakfast Burritos isn’t only simple but also budget-friendly, making it an ideal meal choice for families or groups of 4-6 people. You can easily customize the ingredients based on your preferences or what you have on hand, allowing for creativity while keeping the cost low. Serve these burritos with your favorite salsa or hot sauce for an extra kick, and enjoy a meal that’s both comforting and satisfying.
Ingredients (Serves 4-6):
- 12 large eggs
- 1 cup shredded cheddar cheese
- 1 pound breakfast sausage or 6 slices of bacon
- 1 bell pepper, diced
- 1 small onion, diced
- 1 cup diced tomatoes
- 1 cup chopped spinach (optional)
- 1/2 cup milk
- Salt and pepper to taste
- 6 large flour tortillas
- 1 tablespoon butter or oil for cooking
Cooking Instructions:
- Prepare the Ingredients: Begin by dicing the bell pepper, onion, and tomatoes. If you’re using bacon, chop it into bite-sized pieces. If using sausage, remove it from the casing and crumble it into small pieces.
- Cook the Meat: In a large skillet over medium heat, cook the sausage or bacon until fully cooked. If using bacon, drain some of the excess fat. For sausage, make sure it’s browned and crumbled. Remove the meat from the skillet and set aside.
- Sauté Vegetables: In the same skillet, add the diced onion and bell pepper. Sauté for about 3-4 minutes or until they’re softened. If using spinach, add it in the last minute of cooking.
- Prepare the Eggs: In a large mixing bowl, whisk together the eggs, milk, salt, and pepper until well combined. Pour this mixture into the skillet with the vegetables and cook over medium-low heat, stirring constantly, until the eggs are scrambled and fully cooked.
- Assemble the Burritos: On each tortilla, layer a portion of scrambled eggs, a sprinkle of shredded cheese, a spoonful of cooked sausage or bacon, and a bit of diced tomatoes. Roll the tortilla tightly, folding in the sides as you go.
- Warm the Burritos: For a warm and slightly crispy texture, heat a clean skillet over medium heat. Place each burrito seam-side down and cook for about 1-2 minutes on each side until golden brown.
- Serve and Enjoy: Serve the burritos hot with a side of salsa or your favorite hot sauce.
Extra Tips: To prevent the tortillas from tearing when you roll them, warm them up slightly in the microwave for about 15-20 seconds before assembling the burritos. This will make them more pliable. Additionally, if you prefer a spicier kick, consider adding diced jalapeños to the vegetable mix or using a spicy breakfast sausage. You can also prepare the ingredients in advance and store them in the fridge, making it quick and easy to assemble the burritos when you’re ready to eat.
Classic French Toast

Indulge in the comforting embrace of Classic French Toast, a beloved breakfast staple that effortlessly shifts into a delightful dinner option. This dish is perfect for those evenings when you crave something sweet and simple yet utterly satisfying. The beauty of French toast lies in its ability to transform day-old bread into a deliciously crisp and tender treat, soaked in a rich, eggy custard.
With just a few pantry staples, you can create a meal that’s both elegant and economical, making it an ideal choice for a cozy night in. The secret to perfect French toast is in the balance of flavors and textures. A hint of vanilla and cinnamon infuses the custard with warmth, while a touch of sugar adds a subtle sweetness that caramelizes beautifully when cooked.
The bread absorbs the custard, creating a creamy interior contrasted by a golden, crunchy crust. Serve your French toast with a drizzle of maple syrup, a sprinkle of powdered sugar, or a dollop of whipped cream to elevate the experience. Whether it’s breakfast or dinner, this recipe is sure to delight and comfort.
Ingredients for 4-6 servings:
- 6 large eggs
- 1 cup whole milk
- 1 tablespoon vanilla extract
- 1 teaspoon ground cinnamon
- 2 tablespoons granulated sugar
- Pinch of salt
- 1 loaf of day-old bread (such as brioche or challah), sliced into 1-inch thick slices
- 2 tablespoons unsalted butter
- Maple syrup, for serving
- Powdered sugar, for garnish (optional)
Cooking Instructions:
1. Prepare the Custard:
In a large mixing bowl, whisk together the eggs, milk, vanilla extract, cinnamon, sugar, and salt until well combined. Confirm the mixture is smooth and the sugar has dissolved completely to avoid any graininess in the custard.
2. Soak the Bread:
Arrange the bread slices in a shallow baking dish or a large plate. Pour the prepared custard over the bread, allowing it to soak for at least 10 minutes. Turn the slices halfway through to confirm even absorption. The bread should be saturated but not falling apart.
3. Preheat the Pan:
Heat a large non-stick skillet or griddle over medium heat. Add 1 tablespoon of butter and allow it to melt, coating the entire surface. The butter should sizzle but not brown immediately, indicating the correct temperature.
4. Cook the French Toast:
Gently place the soaked bread slices onto the hot skillet, being careful not to overcrowd the pan. Cook each side for about 3-4 minutes or until golden brown and slightly crisp. Adjust the heat as necessary to avoid burning.
5. Serve:
Transfer the cooked French toast to a warm plate and repeat the process with the remaining bread, adding more butter to the skillet as needed. Serve immediately with maple syrup, a sprinkle of powdered sugar, or your preferred toppings.
Extra Tips:
To achieve the best texture, use slightly stale bread as it absorbs the custard more effectively without falling apart. If your bread is fresh, you can slightly toast it before soaking.
Consider experimenting with different types of bread like sourdough or whole grain for a unique flavor twist. Additionally, make sure not to rush the soaking process; allowing the bread to fully absorb the custard is essential for that creamy interior.
Finally, keep the cooked French toast warm in an oven set to low heat while you finish cooking the remaining slices, confirming every serving is hot and delicious.
Hash Brown and Egg Skillet

There’s something undeniably comforting about enjoying breakfast for dinner, and a Hash Brown and Egg Skillet is the perfect dish to satisfy those cozy cravings. This hearty meal combines crispy hash browns, savory sausage, and perfectly cooked eggs all in one skillet, making it not only delicious but also incredibly easy to prepare.
Whether you’re cooking for your family or hosting a casual gathering, this dish is sure to please everyone at the table with its rich flavors and satisfying texture. This recipe is designed to serve 4-6 people, making it ideal for a family dinner or a small get-together.
The combination of ingredients isn’t only budget-friendly but also allows for variations based on what you have on hand. You can customize this dish to suit your taste by adding your favorite vegetables or adjusting the seasoning to your liking. With just a few simple steps, you can have a delicious and comforting meal on the table in no time.
Ingredients:
- 4 cups frozen hash browns
- 1 pound breakfast sausage
- 1 medium onion, chopped
- 1 red bell pepper, chopped
- 1 green bell pepper, chopped
- 1 ½ cups shredded cheddar cheese
- 6 large eggs
- ¼ cup milk
- Salt and pepper to taste
- 2 tablespoons olive oil
- Fresh parsley, chopped (for garnish)
Cooking Instructions:
- Prepare the Sausage and Vegetables:
- In a large skillet over medium heat, add the breakfast sausage. Cook until browned and fully cooked, breaking it into crumbles with a spatula. Remove the sausage from the skillet and set aside.
In the same skillet, add the chopped onion and bell peppers, cooking until they’re soft and translucent.
2. Cook the Hash Browns:
– Add olive oil to the skillet if needed, then add the frozen hash browns. Spread them evenly across the bottom of the skillet. Cook over medium-high heat for about 5-7 minutes or until the bottom is golden brown and crispy.
Flip the hash browns and continue cooking until the other side is also crispy.
3. Combine Ingredients:
– Once the hash browns are crispy, add the cooked sausage, onions, and bell peppers back into the skillet. Stir everything together until well combined.
4. Prepare the Egg Mixture:
– In a bowl, whisk together the eggs, milk, salt, and pepper. Pour the egg mixture evenly over the hash brown mixture in the skillet. Reduce the heat to low and cover the skillet with a lid.
5. Cook the Eggs:
– Allow the eggs to cook gently for about 5-8 minutes, or until they’re set to your liking. Sprinkle the shredded cheddar cheese over the top and cover again to allow the cheese to melt.
6. Finish and Serve:
– Once the cheese has melted, remove the skillet from the heat. Garnish with fresh chopped parsley. Serve the hash brown and egg skillet hot, directly from the skillet for a rustic presentation.
Extra Tips:
For added flavor, consider using different types of cheese such as Monterey Jack or pepper jack. Feel free to incorporate additional vegetables like mushrooms or spinach for extra nutrition.
If you prefer your eggs more well-done, leave them to cook a little longer before adding the cheese. To save time, you can pre-cook the sausage and veggies ahead of time and store them in the fridge until you’re ready to assemble the skillet. Enjoy your cozy breakfast for dinner!
Sausage and Egg Breakfast Pizza

Breakfast for dinner is a delightful way to break the monotony of traditional meals, and what better way to do it than with a Sausage and Egg Breakfast Pizza? This dish combines the savory flavors of breakfast sausages, creamy eggs, and gooey cheese, all laid atop a crispy pizza crust. Perfect for any time of the day, this recipe isn’t only budget-friendly but also incredibly simple to prepare, making it an ideal choice for a cozy family dinner.
The combination of ingredients creates a deliciously satisfying meal that will certainly become a staple in your household. The Sausage and Egg Breakfast Pizza brings together the best breakfast components in a single bite. The versatility of this dish allows for customization, so you can easily adjust the ingredients based on what you have on hand or to suit your taste preferences.
Whether you’re a fan of spicy sausage or prefer a hint of sweetness in your sauce, this recipe can be adapted to your liking. Plus, it’s an engaging dish to make with family or friends, guaranteeing a fun, interactive cooking experience. Gather your ingredients and get ready to enjoy the comforting taste of breakfast any time of the day.
Ingredients (serves 4-6 people):
- 1 pre-made pizza crust
- 1 cup marinara or pizza sauce
- 1 pound breakfast sausage, crumbled
- 1 cup shredded mozzarella cheese
- 1 cup shredded cheddar cheese
- 4 large eggs
- 1/4 cup chopped green onions
- Salt and pepper to taste
- 1 tablespoon olive oil
Cooking Instructions:
- Prepare the Oven and Crust: Preheat your oven to 425°F (220°C). Place the pre-made pizza crust on a pizza stone or a baking sheet lined with parchment paper. This guarantees a crispy base for your breakfast pizza.
- Cook the Sausage: In a skillet over medium heat, add 1 tablespoon of olive oil. Once hot, add the crumbled breakfast sausage. Cook until browned and fully cooked through, about 6-8 minutes. Remove from heat and set aside.
- Assemble the Pizza: Spread the marinara or pizza sauce evenly over the pizza crust, leaving a small border around the edge. Sprinkle the cooked sausage over the sauce, followed by the shredded mozzarella and cheddar cheese.
- Add the Eggs: Create four small wells in the cheese using the back of a spoon. Carefully crack an egg into each well, ensuring the yolk remains intact. Season the eggs with salt and pepper to taste.
- Bake the Pizza: Place the pizza in the preheated oven and bake for 10-15 minutes, or until the egg whites are set and the cheese is bubbly and golden. Keep an eye on the pizza to prevent the eggs from overcooking.
- Garnish and Serve: Once baked, remove the pizza from the oven. Sprinkle the chopped green onions over the top for a fresh and vibrant finish. Allow the pizza to cool slightly before slicing and serving.
Extra Tips:
For those who enjoy a bit of spice, consider adding red pepper flakes or a drizzle of hot sauce before serving for an extra kick. If you prefer your eggs runny, keep a close watch during baking and remove the pizza as soon as the whites are set.
You can also experiment with different cheeses, such as gouda or feta, for unique flavor profiles. When using a store-bought crust, be sure to check the package instructions as some may require pre-baking before adding toppings. Enjoy your Sausage and Egg Breakfast Pizza with a side salad or fruit for a balanced meal.
Avocado Toast With Poached Eggs
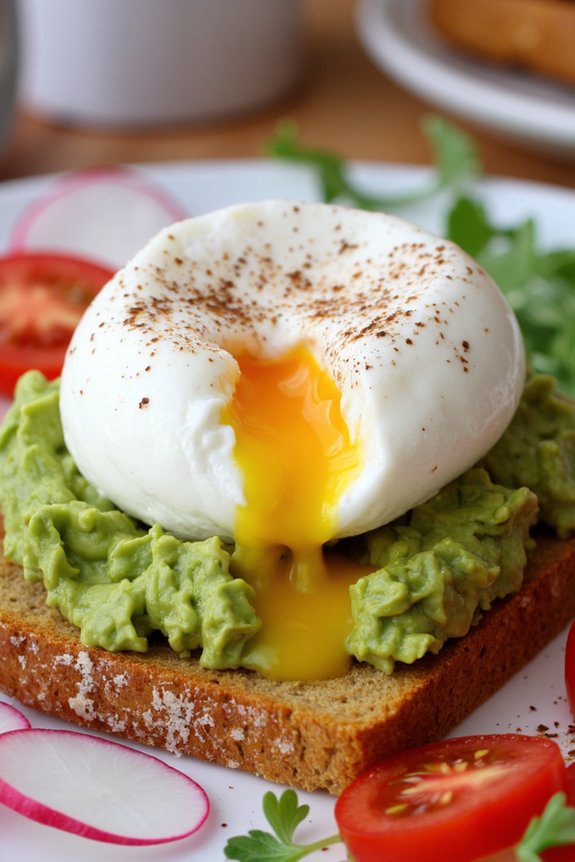
Avocado Toast With Poached Eggs is a delightful and satisfying meal that brings the comfort of breakfast to your dinner table. This dish isn’t only nourishing but also simple to prepare, making it an excellent choice for a cozy evening meal. The creamy avocado paired with perfectly poached eggs provides a rich flavor profile, while the toast adds a satisfying crunch. This recipe is perfect for those nights when you want something quick, nutritious, and delicious.
Whether you’re hosting a casual dinner with friends or enjoying a quiet evening at home, Avocado Toast With Poached Eggs is sure to please. The combination of fresh ingredients and simple preparation allows for a healthy meal that doesn’t skimp on taste. Plus, it’s a versatile dish that can be customized with your favorite toppings, such as cherry tomatoes, radishes, or a sprinkle of chili flakes for added heat.
Ingredients for 4-6 servings:
- 6 large eggs
- 6 slices of whole-grain bread
- 3 ripe avocados
- 1 tablespoon lemon juice
- Salt and pepper to taste
- 1 tablespoon white vinegar
- Optional toppings: cherry tomatoes, radishes, chili flakes, microgreens
Cooking Instructions:
- Prepare the Avocado Mixture:
- Begin by cutting the avocados in half, removing the pits, and scooping the flesh into a bowl. Mash the avocado with a fork until you achieve a slightly chunky texture.
- Add the lemon juice, salt, and pepper to the mashed avocado, stirring to combine. Set aside.
- Toast the Bread:
- Place the slices of whole-grain bread in a toaster and toast until golden brown. Alternatively, you can lightly grill the bread in a skillet over medium heat for a few minutes on each side.
- Poach the Eggs:
- Fill a medium-sized saucepan with water and bring it to a gentle simmer. Add the white vinegar to the water.
- Crack each egg into a small bowl or ramekin. Create a gentle whirlpool in the simmering water using a spoon, then slowly slide each egg into the water. Allow the eggs to poach for 3-4 minutes, or until the whites are set and the yolks remain runny.
- Use a slotted spoon to remove the eggs from the water and set them on a paper towel to drain excess water.
- Assemble the Avocado Toast:
- Spread a generous amount of the avocado mixture onto each slice of toasted bread.
- Place a poached egg on top of the avocado, then season with additional salt and pepper to taste.
- Garnish with optional toppings such as cherry tomatoes, radishes, chili flakes, or microgreens for added flavor and presentation.
Extra Tips:
For perfectly poached eggs, make sure the water is at a gentle simmer rather than a rolling boil, which helps maintain the shape of the eggs. Using fresh eggs will also yield better results, as the whites will be firmer and less likely to spread in the water.
If you’re preparing this dish for a larger group, poach the eggs in batches and keep them warm in a bowl of warm water until ready to serve. Finally, feel free to experiment with different types of bread, such as sourdough or rye, to complement the flavors of the avocado and eggs.
Crispy Waffles With Maple Syrup

There’s nothing quite like the comfort of having breakfast for dinner, and crispy waffles with maple syrup is the perfect dish to bring that cozy vibe to your evening meal. The combination of light, crunchy waffles slathered in warm, rich maple syrup is a delight that pleases both the palate and the soul.
Whether you’re cooking for your family or treating yourself to a solo indulgence, this recipe will make everyone feel like they’re dining in a cozy diner from the comfort of their own home.
This particular recipe serves 4-6 people, making it ideal for a small gathering or a family dinner. The ingredients are simple and likely already in your pantry, making it an easy, budget-friendly option. The key to achieving that perfect crispiness lies in the batter and the cooking technique, guaranteeing that each waffle emerges golden brown, with a light and airy texture inside.
Ingredients (Serves 4-6):
- 2 cups all-purpose flour
- 2 tablespoons sugar
- 1 tablespoon baking powder
- 1/2 teaspoon salt
- 2 large eggs
- 1 3/4 cups milk
- 1/2 cup vegetable oil
- 1 teaspoon vanilla extract
- Cooking spray or extra oil for the waffle iron
- 1 cup maple syrup, warmed
Cooking Instructions:
- Preheat the Waffle Iron: Begin by preheating your waffle iron according to the manufacturer’s instructions. This guarantees that each waffle cooks evenly and achieves the desired crispiness.
- Mix Dry Ingredients: In a large bowl, whisk together the flour, sugar, baking powder, and salt. This dry mixture will form the foundation of your waffle batter.
- Prepare Wet Ingredients: In a separate bowl, beat the eggs, then add the milk, vegetable oil, and vanilla extract. Whisk until all wet ingredients are thoroughly combined.
- Combine Wet and Dry Ingredients: Gradually pour the wet ingredients into the bowl of dry ingredients, stirring gently until just combined. Be careful not to overmix; a few lumps in the batter are perfectly fine.
- Cook the Waffles: Lightly grease the waffle iron with cooking spray or a little oil. Pour the batter onto the center of the iron, using about 1/2 to 3/4 cup for each waffle, depending on your waffle iron’s size. Close the lid and cook until the waffle is golden brown and crisp, usually about 5 minutes.
- Serve with Maple Syrup: Once the waffles are done, remove them from the iron and place them on a wire rack to maintain crispiness. Serve immediately with warm maple syrup drizzled generously over the top.
Extra Tips:
To guarantee your waffles remain crispy, avoid stacking them immediately after cooking, as this can create steam and soften their texture.
If you’re cooking for a large group and want to keep the waffles warm, place them in a single layer on a baking sheet in a low oven (around 200°F) until ready to serve.
For added flavor, consider incorporating a pinch of cinnamon or a handful of chopped nuts into the batter.
Finally, always remember to read the waffle iron’s instructions, as cooking times can vary depending on the model.
Spinach and Feta Frittata

Spinach and Feta Frittata is a delightful dish perfect for those cozy evenings when you crave breakfast for dinner. This recipe combines the earthy flavors of fresh spinach with the tangy, creamy goodness of feta cheese. The frittata is fluffy, savory, and satisfying, making it an ideal dish for a simple yet elegant meal.
Plus, it’s nutritious and can be whipped up in a matter of minutes, making it a go-to option for busy weeknights. Not only is this frittata delicious, but it’s also budget-friendly, using ingredients that are often already in your kitchen.
Eggs provide a protein-rich base, while spinach adds a boost of vitamins and minerals. The feta cheese offers a punch of flavor without breaking the bank. Best of all, this dish is versatile; you can easily add other ingredients you have on hand, such as mushrooms or bell peppers, to customize it to your liking.
Ingredients (Serves 4-6):
- 8 large eggs
- 1/4 cup milk
- Salt and black pepper to taste
- 2 tablespoons olive oil
- 1 small onion, chopped
- 2 cups fresh spinach, roughly chopped
- 1 cup crumbled feta cheese
- 1/4 cup fresh parsley, chopped (optional)
Cooking Instructions:
- Prepare the Egg Mixture: In a large bowl, whisk together the eggs, milk, salt, and black pepper until well combined. The milk helps to make the frittata fluffy, while seasoning guarantees the flavor is evenly distributed.
- Sauté the Vegetables: Heat the olive oil in an oven-safe skillet over medium heat. Add the chopped onion and cook until it becomes translucent, about 3-4 minutes. Stir in the spinach and cook until it wilts down, approximately 2 minutes.
- Combine Ingredients: Pour the egg mixture over the sautéed vegetables in the skillet. Sprinkle the crumbled feta cheese evenly over the top. If desired, add parsley for an extra touch of freshness.
- Cook the Frittata: Allow the frittata to cook on the stovetop without stirring, for about 5-7 minutes, or until the edges begin to set. Meanwhile, preheat your oven broiler.
- Finish in the Oven: Transfer the skillet to the oven and broil for 3-5 minutes, or until the top of the frittata is golden brown and fully set. Keep a close eye to prevent burning.
- Serve: Remove from the oven, let it cool slightly, and slice into wedges. Serve warm and enjoy your cozy breakfast for dinner!
Extra Tips:
When making a frittata, it’s essential to use an oven-safe skillet to seamlessly change from stovetop to oven. Non-stick pans are ideal to prevent sticking.
Feel free to experiment with additional ingredients such as sun-dried tomatoes or olives for added depth of flavor. If you prefer a spicier kick, a dash of crushed red pepper can enhance the dish.
Finally, this frittata can be stored in the refrigerator for up to three days, making it a great option for meal prepping.
Breakfast Quesadilla

Breakfast quesadillas are a delightful and versatile dish that can be enjoyed at any time of the day, but there’s something particularly comforting about having them for dinner. Packed with a satisfying combination of eggs, cheese, and other breakfast favorites, these quesadillas are both filling and flavorful.
They’re an excellent option for a cozy dinner that doesn’t break the bank, and they can easily be customized to suit your taste preferences or dietary needs. This recipe serves 4-6 people and is perfect for those nights when you want something quick yet satisfying.
The key to a great breakfast quesadilla is balancing the flavors and textures of the ingredients, ensuring every bite is as enjoyable as the final. With a crispy tortilla exterior and a warm, gooey interior, these quesadillas are sure to become a family favorite.
Ingredients (Serving Size: 4-6 people):
- 8 large flour tortillas
- 6 large eggs
- 1 cup shredded cheddar cheese
- 1 cup cooked breakfast sausage, crumbled
- 1 cup diced bell peppers (any color)
- 1/2 cup diced onions
- 1/4 cup milk
- 2 tablespoons butter
- Salt and pepper to taste
- Cooking spray or a little oil for the pan
- Salsa and sour cream for serving (optional)
Cooking Instructions:
1. Prepare the Ingredients: Start by dicing the bell peppers and onions, and crumble the cooked breakfast sausage. Set these aside. Beat the eggs in a bowl with the milk, and season with salt and pepper to taste.
2. Cook the Vegetables: In a large skillet, melt 1 tablespoon of butter over medium heat. Add the diced onions and bell peppers, cooking until they’re tender and the onions are translucent, about 5 minutes. Remove from the skillet and set aside.
3. Scramble the Eggs: In the same skillet, melt the remaining tablespoon of butter. Pour in the beaten eggs and cook over medium heat, stirring gently until scrambled and just set. Remove from the heat and set aside.
4. Assemble the Quesadillas: Lay a tortilla flat and sprinkle a layer of cheese on one half. Add a portion of the scrambled eggs, cooked sausage, and sautéed vegetables. Top with a little more cheese, then fold the tortilla over to close.
5. Cook the Quesadillas: Heat a large skillet over medium heat and lightly grease it with cooking spray or a small amount of oil. Place the assembled quesadilla in the skillet and cook until the bottom is golden brown and the cheese has melted, about 2-3 minutes per side.
Repeat with the remaining tortillas and filling.
6. Serve: Slice the quesadillas into wedges and serve hot, with salsa and sour cream on the side if desired.
Extra Tips:
To add a bit of spice, consider incorporating jalapeños or a dash of hot sauce into your filling. If you have leftover vegetables or meats in your fridge, this is a great opportunity to use them up.
Feel free to swap in bacon or ham for the sausage, or use different types of cheese for a varied flavor profile. Finally, make sure not to overfill the tortillas to prevent the filling from spilling out during cooking. Enjoy your cozy, budget-friendly dinner!
Biscuits and Gravy

Biscuits and Gravy is a quintessential comfort food that brings warmth and satisfaction to any meal. This dish isn’t only perfect for breakfast but also makes for a hearty dinner option, especially when you’re looking for something cozy and budget-friendly.
With flaky biscuits smothered in a rich sausage gravy, it’s a meal that’s easy to prepare and delightful to savor. Whether you’re serving your family or hosting friends, this dish is sure to be a hit.
The beauty of Biscuits and Gravy lies in its simplicity and the way flavors come together to create a truly comforting experience. The savory sausage gravy paired with the buttery, tender biscuits is a match made in culinary heaven.
This recipe is designed to serve 4-6 people, making it an ideal choice for a family dinner or a small gathering. Let’s explore the ingredients and steps needed to create this delicious meal.
Ingredients (Serves 4-6):
- 2 cups all-purpose flour
- 1 tablespoon baking powder
- 1/2 teaspoon baking soda
- 1 teaspoon salt
- 6 tablespoons unsalted butter, cold and cubed
- 3/4 cup buttermilk
- 1 pound breakfast sausage
- 1/4 cup all-purpose flour
- 3 cups whole milk
- Salt and black pepper to taste
Cooking Instructions:
1. Preheat the Oven: Start by preheating your oven to 450°F (230°C). This guarantees that the biscuits cook evenly and achieve the perfect golden-brown color.
2. Prepare the Biscuit Dough****: In a large mixing bowl, whisk together 2 cups of all-purpose flour, 1 tablespoon of baking powder, 1/2 teaspoon of baking soda, and 1 teaspoon of salt.
Using a pastry cutter or your fingers, cut in 6 tablespoons of cold, cubed unsalted butter until the mixture resembles coarse crumbs.
3. Mix in Buttermilk****: Gradually add 3/4 cup of buttermilk to the flour mixture, stirring until a soft dough forms. Be careful not to overwork the dough to guarantee tender biscuits.
4. Shape and Bake the Biscuits: Turn the dough out onto a lightly floured surface and gently pat it into a 1-inch thick rectangle. Use a round biscuit cutter to cut out biscuits and place them on a baking sheet lined with parchment paper.
Bake in the preheated oven for 12-15 minutes or until golden brown.
5. Cook the Sausage: While the biscuits are baking, heat a large skillet over medium heat. Add 1 pound of breakfast sausage and cook until browned, breaking it into crumbles with a spatula.
6. Make the Gravy: Sprinkle 1/4 cup of all-purpose flour over the cooked sausage in the skillet. Stir well to combine and cook for about 1 minute to remove the raw flour taste.
7. Add Milk and Season: Slowly pour in 3 cups of whole milk, stirring constantly to avoid lumps. Continue to cook the gravy over medium heat until it thickens, about 5-7 minutes.
Season with salt and black pepper to taste.
8. Serve: Split the warm biscuits in half and ladle the sausage gravy generously over them. Serve immediately for the best taste and texture.
Extra Tips:
For the fluffiest biscuits, make sure your butter is cold and handle the dough as little as possible. If you don’t have buttermilk on hand, you can make a substitute by adding 1 tablespoon of lemon juice or white vinegar to 3/4 cup of milk and letting it sit for a few minutes.
Also, feel free to adjust the thickness of the gravy by adding more milk if it becomes too thick. Enjoy your cozy breakfast for dinner with a side of fresh fruit or a simple salad for a complete meal.
Chorizo and Potato Breakfast Tacos

Chorizo and Potato Breakfast Tacos are a delightful twist on traditional tacos, perfect for those nights when breakfast for dinner is on the menu. This dish combines the savory, spicy flavors of chorizo with the comforting texture of potatoes, all wrapped up in a warm tortilla. It’s an inexpensive, hearty meal that will satisfy your taste buds and leave you feeling content.
Whether you’re serving a family or entertaining friends, these breakfast tacos are sure to impress with their bold flavors and satisfying ingredients.
The beauty of Chorizo and Potato Breakfast Tacos lies in their simplicity and versatility. With just a few ingredients, you can create a dish that’s both filling and flavorful. The spiciness of the chorizo is balanced by the mildness of the potatoes, creating a harmonious blend that appeals to everyone.
This recipe serves 4-6 people, making it ideal for a small gathering or a cozy family dinner. Plus, it’s a dish that can be easily customized to suit individual preferences, whether that means adding a sprinkle of cheese or a dollop of salsa on top.
Ingredients:
- 1 pound Mexican chorizo
- 2 large russet potatoes, peeled and diced
- 1 medium onion, diced
- 2 tablespoons olive oil
- Salt and pepper, to taste
- 8-10 small flour or corn tortillas
- Optional toppings: shredded cheese, chopped cilantro, salsa, sour cream, or avocado slices
Cooking Instructions:
- Prepare the Ingredients: Begin by peeling and dicing the potatoes into small cubes. Dice the onion and set aside. Remove the chorizo from its casing if necessary.
- Cook the Potatoes: In a large skillet, heat the olive oil over medium heat. Add the diced potatoes and season with salt and pepper. Cook for about 10-12 minutes, stirring occasionally, until the potatoes are golden brown and tender. Remove the potatoes from the skillet and set them aside.
- Cook the Chorizo and Onion: In the same skillet, add the chorizo, breaking it apart with a spatula. Cook for about 5-7 minutes until it starts to brown. Add the diced onion to the skillet and continue to cook for an additional 3-5 minutes, until the onion is translucent and the chorizo is fully cooked.
- Combine Potatoes and Chorizo: Return the cooked potatoes to the skillet with the chorizo and onion mixture. Stir everything together and cook for another 2-3 minutes to combine the flavors. Taste and adjust seasoning if necessary.
- Warm the Tortillas: While the filling is finishing up, warm the tortillas in a separate dry skillet over medium heat for about 30 seconds on each side, or until they’re pliable and warm.
- Assemble the Tacos: To assemble, spoon the chorizo and potato mixture into the center of each tortilla. Top with your choice of optional toppings, such as shredded cheese, cilantro, salsa, sour cream, or avocado slices.
Extra Tips:
When cooking Chorizo and Potato Breakfast Tacos, consider using pre-cooked chorizo for a quicker meal prep. Additionally, for a healthier twist, you can substitute part of the potatoes with sweet potatoes.
If you prefer a milder flavor, use half chorizo and half ground pork or turkey. Don’t forget to keep the tortillas warm in a clean kitchen towel to prevent them from drying out while you finish assembling the tacos. Enjoy your cozy breakfast-for-dinner delight!
Sweet Potato Hash With Eggs
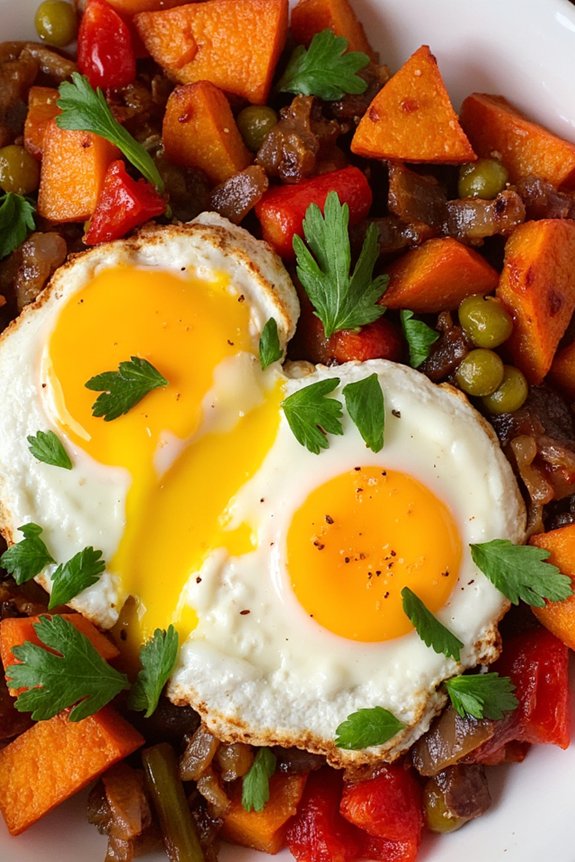
Sweet Potato Hash With Eggs is a delightful and hearty dish that combines the natural sweetness of sweet potatoes with savory flavors, making it perfect for breakfast or dinner. The dish isn’t only nutritious but also budget-friendly, providing a satisfying meal that’s quick and easy to prepare.
It’s an excellent way to use up leftover ingredients and can be customized with a variety of vegetables and seasonings to suit your taste. The combination of tender sweet potatoes, crisp bell peppers, and onions, all cooked to perfection, creates a flavorful base that’s complemented by perfectly cooked eggs.
Whether you prefer your eggs sunny-side-up, over-easy, or scrambled, this dish is versatile enough to accommodate your preference. With a serving size for 4-6 people, it’s an ideal option for a family meal or a cozy dinner with friends.
Ingredients (Serves 4-6):
- 3 large sweet potatoes, peeled and diced
- 1 large onion, diced
- 1 red bell pepper, diced
- 1 green bell pepper, diced
- 3 tablespoons olive oil
- 1 teaspoon garlic powder
- 1 teaspoon smoked paprika
- Salt and pepper to taste
- 6 large eggs
- Fresh parsley, chopped (for garnish)
Cooking Instructions:
- Prepare the Sweet Potatoes: Preheat your oven to 400°F (200°C). In a large bowl, combine the diced sweet potatoes with 2 tablespoons of olive oil, garlic powder, smoked paprika, salt, and pepper. Toss well to guarantee the sweet potatoes are evenly coated with the spices.
- Roast the Sweet Potatoes: Spread the seasoned sweet potatoes in a single layer on a baking sheet. Roast in the preheated oven for 20-25 minutes, or until they’re tender and slightly crispy on the edges. Stir the potatoes halfway through the cooking time to guarantee even roasting.
- Cook the Vegetables: While the sweet potatoes are roasting, heat the remaining 1 tablespoon of olive oil in a large skillet over medium heat. Add the diced onion, red bell pepper, and green bell pepper to the skillet. Sauté for about 5-7 minutes, or until the vegetables are softened and slightly caramelized.
- Combine Ingredients: Once the sweet potatoes are done roasting, add them to the skillet with the sautéed vegetables. Stir to combine all the ingredients and adjust the seasoning with additional salt and pepper if needed.
- Cook the Eggs: Use a spoon to create small wells in the sweet potato mixture in the skillet. Crack an egg into each well, guaranteeing the yolk remains intact. Cover the skillet and cook for about 5 minutes, or until the egg whites are set and the yolks are cooked to your liking.
- Serve: Garnish with freshly chopped parsley for an added pop of color and flavor. Serve the sweet potato hash with eggs hot, straight from the skillet.
Extra Tips:
For an added layer of flavor, consider adding some cooked bacon or sausage to the hash. You can also sprinkle some cheese, such as cheddar or feta, over the top before adding the eggs.
If you prefer a spicier dish, a pinch of red pepper flakes can be added to the sweet potatoes. To save time, you can roast the sweet potatoes in advance and simply reheat them when combining with the vegetables and eggs.
This dish pairs well with a fresh fruit salad or a side of avocado slices for a complete meal.