

Weeknights can be hectic, but that doesn’t mean dinner has to be complicated.
Low-carb meals can be both quick and satisfying, perfect for feeding a hungry family without the fuss.
With just a few fresh ingredients, you can create delightful dishes like zucchini noodles with garlic shrimp in under 30 minutes.
These recipes are not only easy on the wallet but also sure to become your new family favorites.
Get ready to explore some simple and delicious low-carb dinner ideas.
Zucchini Noodles With Garlic Shrimp
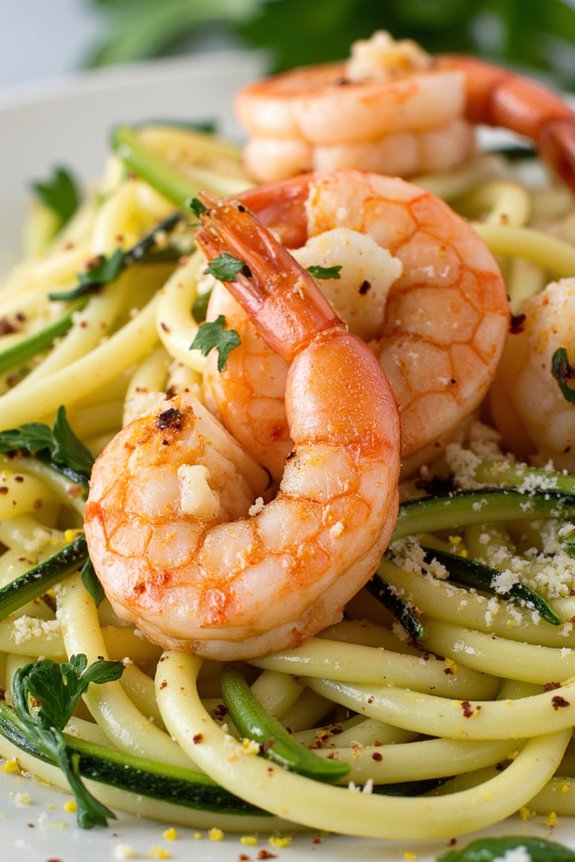
Zucchini Noodles With Garlic Shrimp is a delightful and healthy low-carb dinner option that’s both satisfying and easy to prepare. This dish combines the fresh taste of zucchini noodles, often referred to as “zoodles,” with the rich and savory flavor of garlic shrimp. The combination isn’t only delicious but also a visually appealing dish that can be enjoyed by the whole family.
The zucchini noodles serve as an excellent substitute for traditional pasta, making this meal a great choice for those looking to cut down on carbohydrates without sacrificing taste.
The shrimp, marinated and cooked with garlic, adds a wonderful depth of flavor to the dish. As they cook, the shrimp develop a beautiful pink hue and a succulent texture that pairs perfectly with the lightly sautéed zucchini noodles.
This recipe is perfect for a quick weeknight dinner or a special occasion, as it’s both simple to prepare and impressive to serve. With minimal ingredients and a short cooking time, Zucchini Noodles With Garlic Shrimp is sure to become a staple in your low-carb dining repertoire.
Ingredients for 4-6 servings:
- 4 medium zucchini
- 1 ½ pounds large shrimp, peeled and deveined
- 4 cloves garlic, minced
- 2 tablespoons olive oil
- 2 tablespoons butter
- 1 lemon, juiced
- Salt and pepper, to taste
- ½ teaspoon red pepper flakes (optional)
- ¼ cup fresh parsley, chopped
- Grated Parmesan cheese, for garnish (optional)
Cooking Instructions:
- Prepare the Zucchini Noodles: Begin by washing the zucchini thoroughly. Using a spiralizer or a vegetable peeler, create long, thin noodles from the zucchini. Set the noodles aside on a paper towel to absorb any excess moisture while you prepare the shrimp.
- Marinate the Shrimp: In a mixing bowl, combine the shrimp with minced garlic, olive oil, lemon juice, salt, and pepper. If desired, add red pepper flakes for a bit of heat. Allow the shrimp to marinate for about 10 minutes to absorb the flavors.
- Cook the Shrimp: In a large skillet, melt the butter over medium heat. Add the marinated shrimp to the skillet and cook for 2-3 minutes on each side, or until they turn pink and opaque. Remove the shrimp from the skillet and set aside.
- Sauté the Zucchini Noodles: In the same skillet used for the shrimp, add a little more olive oil if needed. Sauté the zucchini noodles over medium heat for about 3-4 minutes, tossing occasionally, until they’re just tender but not mushy.
- Combine and Serve: Return the shrimp to the skillet with the zucchini noodles. Toss everything together to guarantee even distribution of the shrimp and noodles. Adjust seasoning with additional salt and pepper if necessary. Sprinkle fresh parsley over the dish, and garnish with grated Parmesan cheese if desired. Serve immediately.
Extra Tips:
When preparing Zucchini Noodles With Garlic Shrimp, it’s important not to overcook the zucchini noodles as they can become too soft and watery. Keep an eye on them and remove them from the heat as soon as they’re tender.
Additionally, for a more flavorful dish, consider adding a splash of white wine to the shrimp marinade or while cooking the shrimp for an extra layer of complexity. Finally, always use fresh shrimp for the best taste and texture. Enjoy your meal!
Cauliflower Fried Rice

Cauliflower Fried Rice is a delicious and healthy alternative to traditional fried rice, perfect for those looking to enjoy a low-carb meal without sacrificing flavor. This dish utilizes cauliflower rice as a base, which is both nutritious and easy to prepare. With a medley of vegetables, savory seasonings, and a hint of soy sauce, this recipe is sure to satisfy your cravings for fried rice while keeping your diet on track.
Not only is Cauliflower Fried Rice a great low-carb option, but it’s also incredibly versatile. You can customize it with your favorite vegetables or add protein such as chicken, shrimp, or tofu to make it a complete meal. The preparation is straightforward and doesn’t require much time, making it perfect for a quick weeknight dinner for the whole family. This recipe serves 4-6 people, making it ideal for gatherings or meal prep.
Ingredients:
- 1 large head of cauliflower
- 2 tablespoons vegetable oil
- 1 cup frozen peas and carrots mix
- 1 small onion, diced
- 2 cloves garlic, minced
- 2 large eggs, beaten
- 3 tablespoons soy sauce
- 2 teaspoons sesame oil
- 4 green onions, sliced
- Salt and pepper to taste
Instructions:
- Prepare the Cauliflower Rice: Remove the leaves and core from the cauliflower head. Cut it into florets and place them in a food processor. Pulse until the cauliflower resembles rice grains. Be careful not to over-process.
- Cook the Vegetables: In a large skillet or wok, heat 1 tablespoon of vegetable oil over medium heat. Add the diced onion and minced garlic, sautéing for about 2 minutes until they become fragrant. Add the frozen peas and carrots mix, and cook for another 3-5 minutes until the vegetables are tender.
- Scramble the Eggs: Push the vegetables to one side of the skillet. Add another tablespoon of vegetable oil to the empty side and pour in the beaten eggs. Scramble the eggs until fully cooked, then mix them with the vegetables.
- Cook the Cauliflower Rice: Add the prepared cauliflower rice to the skillet. Stir everything together and cook for about 5-7 minutes, until the cauliflower is tender but not mushy.
- Season the Fried Rice: Pour the soy sauce and sesame oil over the cauliflower rice mixture. Stir well to combine, making certain the rice is evenly coated. Add salt and pepper to taste.
- Add Green Onions: Stir in the sliced green onions just before serving to maintain their fresh flavor and vibrant color.
Extra Tips:
For an added boost of protein, consider incorporating cooked chicken, shrimp, or tofu into your Cauliflower Fried Rice. You can also experiment with other vegetables like bell peppers or snap peas for additional flavors and textures. If you prefer a spicier dish, add a dash of chili sauce or sriracha when seasoning.
Finally, make sure the cauliflower is well-drained before processing to avoid sogginess in your fried rice.
Baked Lemon Herb Chicken
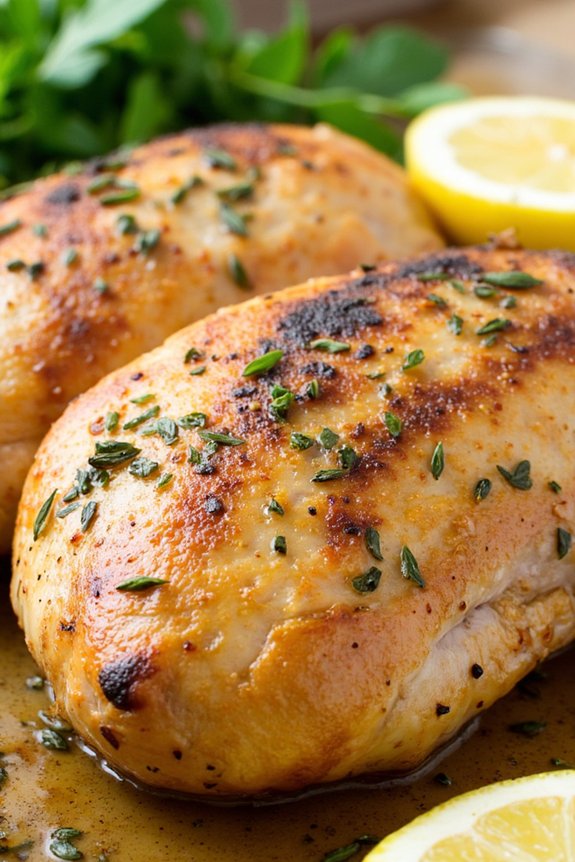
Baked Lemon Herb Chicken is a delightful and nutritious meal that perfectly fits into a low-carb lifestyle while offering a burst of flavor. This dish combines the zesty freshness of lemon with aromatic herbs to create a mouth-watering entrée that’s both healthy and satisfying. Ideal for busy weeknights or a relaxing weekend dinner, this recipe is easy to prepare and certain to please everyone at the table.
The combination of juicy, tender chicken with the fresh taste of lemons and herbs makes this a staple in any low-carb meal plan. This recipe serves 4-6 people, making it perfect for a family meal or a small gathering. The key to this dish is the harmonious blend of ingredients that work together to enhance the natural flavors of the chicken.
With a few simple steps, you can have this delicious meal ready in under an hour, offering a perfect blend of protein and flavor without added carbs.
Ingredients for 4-6 servings:
- 4-6 boneless, skinless chicken breasts
- 1/4 cup olive oil
- 1/4 cup fresh lemon juice
- 1 tablespoon lemon zest
- 2 teaspoons dried oregano
- 1 teaspoon dried thyme
- 1 teaspoon garlic powder
- Salt and pepper to taste
- Fresh parsley for garnish (optional)
Cooking Instructions:
- Preheat the Oven: Start by preheating your oven to 400°F (200°C). This guarantees that your chicken bakes evenly and becomes deliciously tender.
- Prepare the Marinade: In a small mixing bowl, combine the olive oil, fresh lemon juice, lemon zest, dried oregano, dried thyme, garlic powder, salt, and pepper. Mix well until all ingredients are thoroughly combined.
- Marinate the Chicken: Place the chicken breasts in a large resealable plastic bag or a shallow dish. Pour the marinade over the chicken, making sure each piece is well-coated. Seal the bag or cover the dish with plastic wrap, and let the chicken marinate in the refrigerator for at least 30 minutes. For maximum flavor, you can marinate it for up to 2 hours.
- Bake the Chicken: Arrange the marinated chicken breasts in a single layer on a baking dish. Pour any leftover marinade over the chicken. Bake in the preheated oven for 25-30 minutes or until the chicken is cooked through and no longer pink in the center. The internal temperature should reach 165°F (75°C).
- Serve and Garnish: Once cooked, remove the chicken from the oven and let it rest for a few minutes. Garnish with fresh parsley if desired before serving to add a touch of color and extra freshness.
Extra Tips:
For an even more flavorful dish, consider marinating the chicken overnight. This allows the herbs and lemon to penetrate deeper into the meat, resulting in a more intense taste.
Additionally, you can use fresh herbs if available, which will enhance the brightness of the flavors. If you prefer a crispier texture, broil the chicken for the last 2-3 minutes of baking, keeping a close eye on it to prevent burning.
Serve with a side of steamed vegetables or a fresh salad to keep the meal low-carb and balanced.
Spinach and Feta Stuffed Bell Peppers

Spinach and Feta Stuffed Bell Peppers are a delightful and nutritious option for a low-carb dinner that doesn’t skimp on flavor. This dish combines the earthy taste of spinach with the tangy creaminess of feta cheese, all encased in sweet and juicy bell peppers. The result is a satisfying meal that’s not only pleasing to the palate but also easy on your waistline. Perfect for a family of 4-6, this recipe is both simple to prepare and sure to impress at the dinner table.
Whether you’re a seasoned cook or a beginner in the kitchen, Spinach and Feta Stuffed Bell Peppers are a straightforward dish that offers a gourmet touch without the fuss. The combination of bright, colorful peppers and the savory filling makes for an eye-catching presentation.
As a bonus, this dish is highly customizable, allowing you to add your favorite herbs or spices to tailor it to your taste. Follow the recipe below to create this lovely low-carb dinner that’s as enjoyable to make as it’s to eat.
Ingredients (serves 4-6):
- 6 large bell peppers (any color)
- 1 tablespoon olive oil
- 1 medium onion, chopped
- 3 cloves garlic, minced
- 10 oz fresh spinach, roughly chopped
- 8 oz feta cheese, crumbled
- 1/2 cup ricotta cheese
- 1 teaspoon dried oregano
- 1/2 teaspoon black pepper
- Salt to taste
- 1 cup tomato sauce
- 1/4 cup grated Parmesan cheese
Cooking Instructions:
- Prepare the Peppers:
- Preheat your oven to 375°F (190°C). Slice the tops off the bell peppers and remove the seeds and membranes. Arrange the peppers upright in a baking dish.
- Cook the Spinach:
- In a large skillet, heat olive oil over medium heat. Add the chopped onion and garlic, sautéing until they’re translucent, about 3-4 minutes. Add the chopped spinach and cook until wilted, approximately 2-3 minutes. Remove from heat and let it cool slightly.
- Make the Filling:
- In a large mixing bowl, combine the cooked spinach mixture, crumbled feta cheese, ricotta cheese, dried oregano, black pepper, and salt. Mix well until all ingredients are evenly distributed.
- Stuff the Peppers:
- Spoon the spinach and feta mixture into each bell pepper, packing it gently. Pour tomato sauce evenly over the stuffed peppers. Cover the baking dish with aluminum foil.
- Bake the Peppers:
- Place the baking dish in the preheated oven and bake for 30 minutes. Remove the foil, sprinkle the grated Parmesan cheese over the peppers, and continue baking for an additional 15 minutes until the cheese is golden and bubbly.
- Serve:
- Allow the peppers to cool slightly before serving. Enjoy your Spinach and Feta Stuffed Bell Peppers hot, with extra tomato sauce if desired.
Extra Tips:
When choosing bell peppers, try to select ones that are similar in size so they cook evenly. If you prefer a bit of heat, consider adding a pinch of red pepper flakes to the spinach mixture.
For a more Mediterranean flair, you can include chopped black olives or sun-dried tomatoes in the filling. Also, if you’re short on time, you can prepare the stuffing a day ahead and refrigerate it, stuffing the peppers right before baking. Enjoy experimenting with this versatile dish!
Eggplant Parmesan Casserole
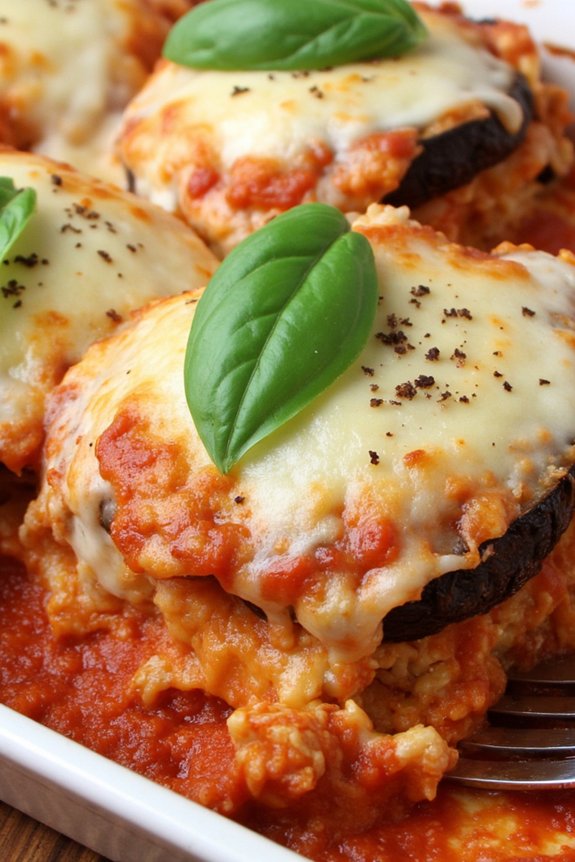
Eggplant Parmesan Casserole is a delicious and affordable low-carb dinner option that’s perfect for feeding a family or a small group of friends. This comforting dish combines layers of tender eggplant slices, rich marinara sauce, and gooey melted cheese to create a meal that’s both satisfying and healthy.
Whether you’re looking to cut carbohydrates or just trying to incorporate more vegetables into your diet, this casserole is certain to please everyone at the table. This dish isn’t only budget-friendly but also incredibly easy to prepare, making it a great choice for busy weeknights.
The eggplants provide a hearty base, while the Parmesan and mozzarella cheese add a savory richness. Plus, with the addition of Italian herbs and spices, this casserole is bursting with flavor. By using fresh ingredients, you can enjoy a wholesome meal that’s both nutritious and flavorful, without breaking the bank.
Ingredients (serving size: 4-6 people):
- 2 medium eggplants
- 2 cups marinara sauce
- 1 teaspoon salt
- 1/2 teaspoon black pepper
- 1 teaspoon garlic powder
- 1 teaspoon dried oregano
- 1 teaspoon dried basil
- 1/2 cup grated Parmesan cheese
- 2 cups shredded mozzarella cheese
- 2 tablespoons olive oil
Cooking Instructions:
- Preheat the Oven: Start by preheating your oven to 375°F (190°C). This will guarantee that your casserole cooks evenly and reaches the desired consistency.
- Prepare the Eggplants: Slice the eggplants into 1/4-inch thick rounds. Sprinkle them with salt and let them sit for about 15 minutes to draw out excess moisture. Afterward, pat them dry with a paper towel.
- Season the Eggplant: In a small bowl, mix together the garlic powder, black pepper, dried oregano, and dried basil. Lightly brush the eggplant slices with olive oil and then sprinkle the seasoning mixture evenly over them.
- Sear the Eggplant: Heat a large skillet over medium heat. Add a bit of olive oil and sear the eggplant slices in batches for about 2-3 minutes on each side, until they’re golden brown. Remove them from the skillet and set aside.
- Assemble the Casserole: In a 9×13 inch baking dish, spread a thin layer of marinara sauce on the bottom. Arrange a layer of eggplant slices over the sauce, followed by a sprinkle of Parmesan cheese and a handful of mozzarella. Repeat these layers until all the ingredients are used, finishing with a generous layer of mozzarella cheese on top.
- Bake the Casserole: Cover the dish with foil and bake in the preheated oven for 25 minutes. Then remove the foil and bake for an additional 15 minutes, or until the cheese is bubbly and golden brown.
- Rest and Serve: Allow the casserole to cool for a few minutes before serving. This will help the layers set and make it easier to slice and serve.
Extra Tips: For an even lower carb version, consider using a no-sugar-added marinara sauce. You can also add a layer of cooked ground turkey or chicken between the eggplant layers for added protein.
If you have leftovers, this casserole reheats beautifully and can even be frozen for later meals. When searing the eggplant, make sure not to overcrowd the pan, as this will prevent the slices from browning properly.
Garlic Butter Steak Bites
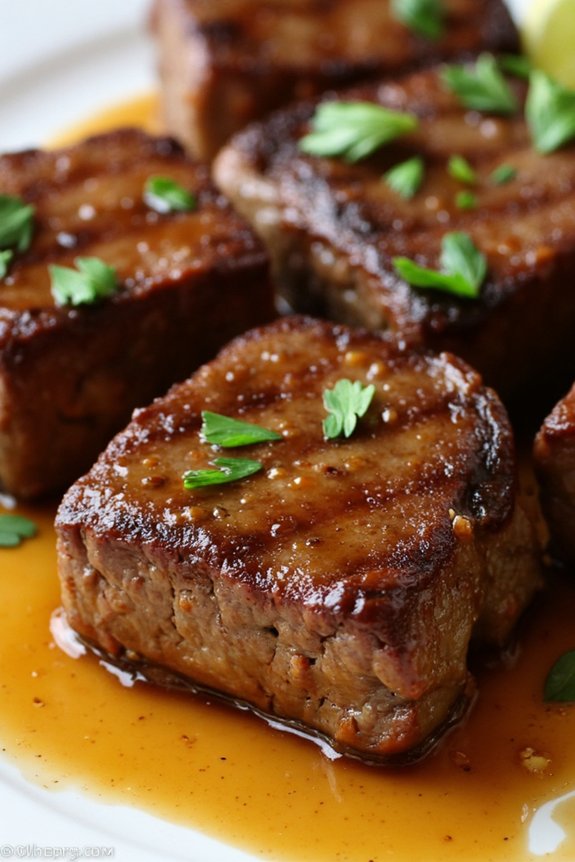
Garlic Butter Steak Bites are a delicious and easy-to-make dish that’s perfect for a low-carb dinner. This mouthwatering recipe features juicy pieces of steak cooked to perfection and coated in a rich, garlic-infused butter sauce. The combination of tender meat and flavorful garlic butter creates a dish that’s both satisfying and packed with flavor.
Best of all, it comes together quickly, making it ideal for busy weeknights or when you’re craving something indulgent without the carbs.
To make this dish, you’ll want to choose a high-quality cut of steak, such as sirloin or ribeye, that will remain tender and flavorful after cooking. The steak is cut into bite-sized pieces to guarantee even cooking and maximum flavor absorption. The garlic butter sauce is made with fresh garlic and butter, which are sautéed together to create a fragrant and savory coating for the steak.
Served alongside a simple salad or steamed vegetables, Garlic Butter Steak Bites are sure to become a family favorite.
Ingredients for 4-6 servings:
- 1 ½ pounds of sirloin or ribeye steak
- 4 tablespoons unsalted butter
- 5 cloves of garlic, minced
- Salt and pepper, to taste
- 1 tablespoon olive oil
- 1 tablespoon chopped fresh parsley (optional)
Cooking Instructions:
- Prepare the Steak: Begin by patting the steak dry with paper towels. This helps guarantee a nice sear. Cut the steak into bite-sized cubes, approximately 1-inch in size. Season the cubes generously with salt and pepper.
- Heat the Pan: In a large skillet, heat the olive oil over medium-high heat. Once the oil is hot, add the steak cubes in a single layer. You may need to work in batches to avoid overcrowding the pan, which can result in steaming instead of searing.
- Cook the Steak: Allow the steak pieces to cook undisturbed for about 2-3 minutes to form a nice crust. Flip the pieces and cook for another 2-3 minutes, or until they reach your desired level of doneness. Once cooked, remove the steak bites from the pan and set aside.
- Make the Garlic Butter Sauce: In the same pan, reduce the heat to medium and add the butter. Once the butter has melted, add the minced garlic. Cook for about 1-2 minutes, stirring constantly, until the garlic is fragrant but not browned.
- Combine and Serve: Return the steak bites to the pan and toss them in the garlic butter until well coated. Allow them to heat through for about 1 minute, then remove from heat. Garnish with chopped fresh parsley if desired, and serve immediately.
Extra Tips:
When preparing Garlic Butter Steak Bites, verify your pan is hot before adding the steak. A hot pan helps to quickly sear the meat, locking in juices and flavor.
If you prefer your steak medium-rare, be mindful of cooking times, as small pieces can overcook quickly. For added flavor, consider deglazing the pan with a splash of white wine or beef broth before adding the garlic to lift any flavorful bits from the bottom of the pan.
Enjoy your delicious, low-carb meal!
Broccoli Cheddar Soup

Broccoli Cheddar Soup is a comforting and satisfying dish that’s perfect for a chilly evening or when you’re in the mood for something creamy yet low in carbs. This soup combines the hearty flavors of broccoli and the rich, creamy texture of cheddar cheese to deliver a delicious meal that’s both filling and nutritious.
It’s an excellent choice for those who want to enjoy a flavorful meal without the added carbohydrates found in many other dinner options. This recipe is designed to serve 4-6 people, making it ideal for a family dinner or for meal prepping for the week. By using fresh broccoli and a good quality cheddar cheese, you’ll guarantee that the flavors are robust and satisfying.
This soup isn’t only tasty, but it also comes together quickly, making it a great option for a weeknight meal.
Ingredients (serving size: 4-6 people):
- 4 cups broccoli florets
- 1 medium onion, diced
- 2 cloves garlic, minced
- 4 cups chicken or vegetable broth
- 1 cup heavy cream
- 2 cups shredded sharp cheddar cheese
- 2 tablespoons butter
- Salt and pepper to taste
- Optional: 1/4 teaspoon nutmeg
Cooking Instructions:
- Prepare the Vegetables: Begin by washing the broccoli and cutting it into small florets. Dice the onion and mince the garlic to prepare them for cooking.
- Sauté the Aromatics: In a large pot, melt the butter over medium heat. Add the diced onion and cook until it becomes translucent, about 4-5 minutes. Stir in the minced garlic and cook for an additional minute, being careful not to let it burn.
- Cook the Broccoli: Add the broccoli florets to the pot and stir to combine with the onions and garlic. Pour in the chicken or vegetable broth, and bring the mixture to a simmer. Let it cook until the broccoli is tender, approximately 10-15 minutes.
- Blend the Soup: Using an immersion blender, blend the soup until it reaches your desired consistency. If you prefer a chunkier texture, blend less; for a smoother soup, blend more thoroughly. Alternatively, you can carefully transfer the soup in batches to a countertop blender and blend until smooth.
- Add Cream and Cheese: Return the blended soup to the pot (if using a countertop blender), then stir in the heavy cream. Gradually add the shredded cheddar cheese, stirring constantly until the cheese has melted completely and the soup is smooth. Season with salt, pepper, and nutmeg if using.
- Final Adjustments: Taste the soup and adjust the seasoning as needed. Heat the soup gently, without bringing it to a boil, until it’s warmed through and ready to serve.
Extra Tips:
For a richer flavor, roast the broccoli in the oven with a little olive oil before adding it to the soup. This will enhance the depth of flavor in your dish.
If you prefer a thicker soup, consider adding a tablespoon of cream cheese along with the cheddar cheese. For those who like a bit of spice, a pinch of cayenne pepper or some finely chopped jalapeños can add a nice kick.
Remember to continually stir when adding the cheese to prevent it from clumping or sticking to the bottom of the pot. Enjoy your Broccoli Cheddar Soup with a side salad or a slice of low-carb bread for a complete meal.
Taco Lettuce Wraps

Taco Lettuce Wraps are a fantastic option for those looking to enjoy a delicious meal without the added carbs. These wraps are a healthy twist on traditional tacos, using crisp lettuce leaves instead of tortillas, which makes them perfect for anyone following a low-carb or keto diet. The combination of seasoned ground beef, fresh vegetables, and a sprinkle of cheese creates a satisfying and flavorful dish that doesn’t compromise on taste.
This recipe isn’t only easy to prepare, but it also offers flexibility with the ingredients, allowing you to customize the fillings to suit your taste preferences or dietary needs. It’s a great option for a quick weeknight dinner, or even for entertaining guests with a healthy spread. With minimal prep time and a short cooking duration, you can have these delicious Taco Lettuce Wraps ready to serve in no time.
Ingredients (Serves 4-6)
- 1 pound ground beef
- 1 tablespoon olive oil
- 1 small onion, diced
- 2 cloves garlic, minced
- 1 tablespoon taco seasoning
- 1/2 cup diced tomatoes
- 1/2 cup shredded cheddar cheese
- 1/4 cup chopped cilantro
- 1 avocado, diced
- 1 head of Romaine or iceberg lettuce
- Salt and pepper to taste
- Lime wedges for serving
Cooking Instructions
- Prepare the Lettuce: Start by washing the lettuce leaves thoroughly. Pat them dry with a paper towel or use a salad spinner to remove excess water. Set aside the largest leaves, as these will serve as the wraps.
- Cook the Beef: Heat olive oil in a large skillet over medium heat. Add the diced onion and minced garlic, sautéing until the onion becomes translucent, about 3 minutes. Add the ground beef to the skillet, breaking it apart with a spoon. Cook until the beef is browned and cooked through, approximately 5-7 minutes.
- Season the Beef: Sprinkle the taco seasoning over the cooked beef, stirring to coat the meat evenly. Add the diced tomatoes and cook for an additional 2 minutes, allowing the flavors to meld together. Season with salt and pepper to taste.
- Assemble the Wraps: Place a spoonful of the beef mixture in the center of each lettuce leaf. Top with shredded cheddar cheese, chopped cilantro, and diced avocado.
- Serve: Arrange the assembled wraps on a serving platter. Garnish with lime wedges for an extra burst of flavor.
Extra Tips
For added flavor, consider adding a spoonful of sour cream or a splash of hot sauce to each wrap. You can also swap the ground beef for ground turkey or chicken for a leaner option.
If you prefer a bit of crunch, add some chopped bell peppers or a sprinkle of crushed tortilla chips as a topping. Remember, the key to perfect lettuce wraps is to verify the lettuce leaves are dry, as this will help them hold the fillings without becoming soggy.
Enjoy your Taco Lettuce Wraps as a light and invigorating meal!
Chicken and Broccoli Stir Fry

Chicken and Broccoli Stir Fry is a delightful and healthy dish that perfectly fits into a low-carb diet while being budget-friendly and incredibly satisfying. This dish is a simple yet flavorful combination of tender chicken breast pieces and crisp broccoli florets, all enveloped in a savory, slightly sweet sauce that ties everything together.
It’s a quick recipe that can be made on a busy weeknight, offering a wholesome meal that doesn’t skimp on taste or nutrition. Perfect for serving 4 to 6 people, this dish not only provides a great source of protein and fiber but also guarantees you’re staying on track with your dietary goals.
The combination of fresh vegetables and lean chicken guarantees a balanced meal that’s both filling and nutritious. With just a few ingredients and minimal preparation time, you can have this tasty Chicken and Broccoli Stir Fry on the table in no time.
Ingredients (serves 4-6):
- 1.5 lbs chicken breast, cut into bite-sized pieces
- 4 cups broccoli florets
- 2 tablespoons olive oil
- 3 cloves garlic, minced
- 1 tablespoon fresh ginger, grated
- 1/4 cup soy sauce (low sodium)
- 2 tablespoons oyster sauce
- 1 tablespoon cornstarch
- 1 tablespoon water
- 1 teaspoon sesame oil
- Salt and pepper to taste
- Sesame seeds for garnish (optional)
Cooking Instructions:
- Prepare the Sauce: In a small bowl, combine the soy sauce, oyster sauce, cornstarch, and water. Stir until the cornstarch is completely dissolved. This will be the sauce that flavors the stir fry.
- Cook the Chicken: Heat 1 tablespoon of olive oil in a large pan or wok over medium-high heat. Add the chicken pieces and season them lightly with salt and pepper. Stir-fry the chicken for about 5-7 minutes, or until it’s fully cooked and lightly browned. Remove the chicken from the pan and set it aside.
- Stir Fry the Vegetables: In the same pan, add the remaining tablespoon of olive oil. Add the garlic and ginger, sautéing them for about 30 seconds until fragrant. Then, add the broccoli florets and stir-fry for about 4-5 minutes, or until they become tender-crisp.
- Combine and Cook: Return the cooked chicken to the pan with the broccoli. Give the sauce mixture a quick stir, then pour it over the chicken and broccoli. Stir everything together to guarantee the sauce evenly coats all the ingredients. Cook for an additional 2-3 minutes, or until the sauce thickens and everything is heated through.
- Finish and Serve: Drizzle the sesame oil over the stir fry and toss everything once more. Remove the pan from the heat. Serve the Chicken and Broccoli Stir Fry hot, garnished with sesame seeds if desired.
Extra Tips: To add more flavor, consider marinating the chicken in half of the sauce mixture for about 30 minutes before cooking. This will infuse the chicken with more depth of flavor.
You can also add other vegetables like bell peppers or snap peas for variety. If you prefer a spicier dish, add a dash of red pepper flakes or a sliced chili pepper to the stir fry. Remember, the key to a great stir fry is high heat and quick cooking, so have all your ingredients prepped and ready to go before you start cooking.
Creamy Tuscan Salmon
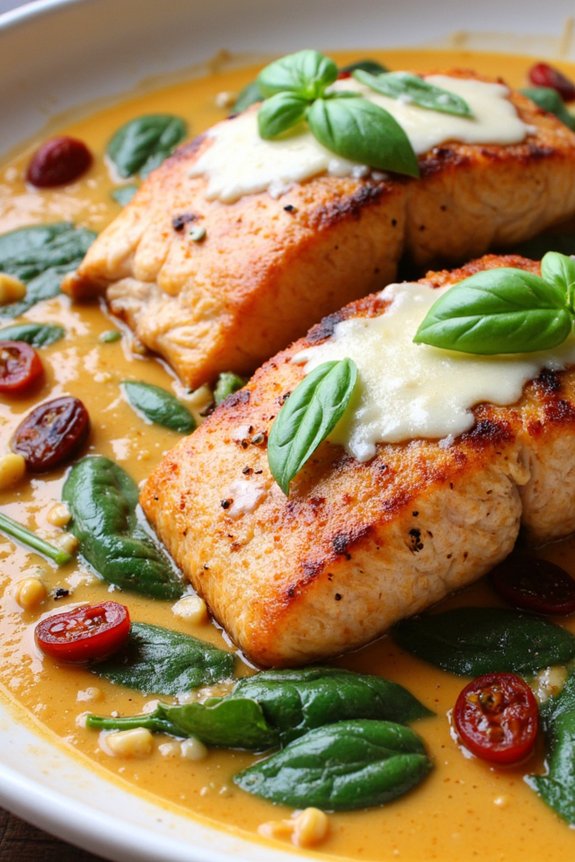
Indulge in a delightful and healthy dinner with this Creamy Tuscan Salmon recipe that perfectly aligns with a low-carb diet. This dish combines the rich flavors of salmon with a creamy, garlicky sauce infused with sun-dried tomatoes, spinach, and a touch of Parmesan cheese.
It’s a restaurant-quality meal that’s surprisingly quick and easy to prepare at home, making it ideal for both weeknight dinners and special occasions. The luscious sauce complements the tender and flaky salmon fillets, creating a harmonious blend of textures and flavors.
With its vibrant and colorful presentation, Creamy Tuscan Salmon is sure to impress your family and guests. This recipe serves 4-6 people, making it perfect for a family meal or small gathering.
Ingredients:
- 4-6 salmon fillets (about 6 oz each)
- Salt and pepper, to taste
- 2 tablespoons olive oil
- 3 cloves garlic, minced
- 1 cup heavy cream
- 1/2 cup chicken broth
- 1/2 cup grated Parmesan cheese
- 1 cup sun-dried tomatoes, chopped
- 2 cups fresh spinach
- 1 teaspoon Italian seasoning
- 1/2 teaspoon red pepper flakes (optional)
- Fresh basil leaves, for garnish
Cooking Instructions:
- Prepare the Salmon: Season the salmon fillets with salt and pepper on both sides. Heat the olive oil in a large skillet over medium-high heat. Add the salmon fillets, skin-side down, and cook for 4-5 minutes on each side until they’re golden brown and cooked through. Remove the salmon from the skillet and set aside.
- Make the Sauce: In the same skillet, add the minced garlic and sauté for about 1 minute until fragrant. Pour in the heavy cream and chicken broth, stirring to combine. Bring the mixture to a gentle simmer.
- Thicken the Sauce: Add the grated Parmesan cheese, stirring until it melts and the sauce thickens slightly. Mix in the chopped sun-dried tomatoes, fresh spinach, Italian seasoning, and red pepper flakes if using. Cook for 2-3 minutes until the spinach wilts and the sauce is well combined.
- Combine and Serve: Return the cooked salmon fillets to the skillet, spooning the creamy sauce over the top. Allow the salmon to heat through for about 2 minutes. Garnish with fresh basil leaves before serving.
Extra Tips:
When selecting salmon fillets, opt for fresh, high-quality cuts to guarantee the best flavor and texture. If you prefer a thicker sauce, allow it to simmer a bit longer to reduce.
For added flavor, consider using smoked salmon or adding a splash of white wine to the sauce. Feel free to adjust the seasoning and spice levels according to your taste preferences.
This dish pairs wonderfully with a side of cauliflower rice or a simple green salad for a complete low-carb meal.
Cabbage Roll Skillet

Cabbage Roll Skillet is a delightful and budget-friendly dinner option that combines all the flavors of traditional cabbage rolls without the fuss of rolling and baking. This low-carb dish is perfect for those looking to enjoy a hearty, satisfying meal while keeping their carbohydrate intake in check.
With its rich and savory flavors, this skillet meal is sure to become a favorite for family dinners or meal prep. The Cabbage Roll Skillet is a one-pan wonder, making cleanup a breeze and allowing you to spend more time enjoying your meal rather than working in the kitchen.
It features tender cabbage, ground meat, and a flavorful tomato-based sauce, all cooked together to create a comforting dish that’s packed with nutrients and flavor. Ideal for 4-6 people, this recipe is perfect for those busy weeknights when you want something quick, delicious, and healthy.
Ingredients (for 4-6 servings):
- 1 pound ground beef or turkey
- 1 tablespoon olive oil
- 1 medium onion, chopped
- 2 cloves garlic, minced
- 1 small head of cabbage, chopped
- 1 can (14.5 ounces) diced tomatoes
- 1/2 cup tomato sauce
- 1/2 cup beef or chicken broth
- 1 tablespoon Worcestershire sauce
- 1 teaspoon paprika
- 1 teaspoon dried oregano
- Salt and pepper to taste
- Fresh parsley, chopped (for garnish)
Cooking Instructions:
- Prepare the Ingredients: Begin by chopping the onion and mincing the garlic. Then chop the cabbage into bite-sized pieces and set aside.
- Brown the Meat: Heat the olive oil in a large skillet over medium heat. Add the ground beef or turkey and cook until browned, breaking it up with a wooden spoon as it cooks. This should take about 5-7 minutes. Once browned, drain any excess fat from the pan.
- Sauté the Vegetables: Add the chopped onion and minced garlic to the skillet with the browned meat. Sauté for 2-3 minutes until the onion becomes translucent and the garlic is fragrant.
- Add the Cabbage: Stir in the chopped cabbage, allowing it to cook down slightly, about 3-4 minutes. The cabbage should begin to soften.
- Incorporate the Tomatoes and Broth: Pour in the diced tomatoes, tomato sauce, and beef or chicken broth. Stir in the Worcestershire sauce, paprika, oregano, salt, and pepper. Mix well to combine all the ingredients.
- Simmer: Reduce the heat to low, cover the skillet, and let the mixture simmer for about 15-20 minutes, stirring occasionally. The cabbage should be tender, and the flavors should meld together well.
- Finish and Serve: Once done, taste and adjust the seasoning if necessary. Sprinkle with fresh chopped parsley before serving.
Extra Tips:
For added flavor, consider using a combination of ground beef and pork. If you prefer a spicier dish, add a pinch of red pepper flakes or a dash of hot sauce to the skillet.
This dish is versatile, so feel free to add other low-carb vegetables like bell peppers or mushrooms. Leftovers can be stored in an airtight container in the refrigerator for up to three days, making it perfect for meal prep. Enjoy your delicious and easy Cabbage Roll Skillet!
Pork Tenderloin With Roasted Veggies

Pork Tenderloin with Roasted Veggies is a perfect meal for those who are looking to enjoy a low-carb dinner that doesn’t compromise on flavor. This recipe combines tender, juicy pork with a medley of colorful vegetables, all roasted to perfection. The pork tenderloin is seasoned with a blend of herbs and spices, giving it a delightful aroma and taste that pairs beautifully with the natural sweetness and earthiness of the roasted vegetables.
Not only is this dish delicious, but it’s also easy to prepare and budget-friendly, making it an ideal choice for a family dinner or a casual gathering with friends.
What makes this recipe stand out is its simplicity and the capacity to customize it according to personal preferences or what’s available in your pantry. The vegetables can be mixed and matched based on the season or your taste, and the entire meal can be prepared in under an hour. This makes it a great option for those busy weeknights when time is of the essence.
Plus, the recipe serves 4-6 people, guaranteeing there’s plenty to go around for everyone.
Ingredients for 4-6 People:
- 2 pork tenderloins (about 1 pound each)
- 2 tablespoons olive oil
- 4 cloves garlic, minced
- 1 teaspoon dried thyme
- 1 teaspoon dried rosemary
- Salt and pepper to taste
- 2 cups broccoli florets
- 2 cups chopped bell peppers (mix of colors)
- 1 large onion, chopped
- 2 cups zucchini, sliced
- 1 lemon, sliced
- Fresh parsley, chopped (optional, for garnish)
Cooking Instructions:
- Preheat Oven: Preheat your oven to 400°F (200°C) to guarantee even cooking of the pork and veggies.
- Prepare Pork Tenderloin: Pat the pork tenderloins dry with paper towels. In a small bowl, mix the olive oil, minced garlic, thyme, rosemary, salt, and pepper. Rub this mixture all over the pork tenderloins to coat them evenly with the seasoning.
- Prepare Vegetables: In a large bowl, combine the broccoli, bell peppers, onion, and zucchini. Drizzle with a little olive oil and season with salt and pepper. Toss the vegetables until they’re well coated.
- Arrange on Baking Sheet: Place the seasoned pork tenderloins in the center of a large baking sheet. Arrange the seasoned vegetables around the pork. Place lemon slices on top of the pork and scatter over the veggies.
- Roast: Roast in the preheated oven for 25-30 minutes, or until the internal temperature of the pork reaches 145°F (63°C) and the vegetables are tender and slightly caramelized.
- Rest and Serve: Once done, remove the baking sheet from the oven and let the pork rest for about 5 minutes before slicing. Garnish with freshly chopped parsley if desired, and serve with the roasted vegetables.
Extra Tips:
For the best flavor, marinate the pork tenderloin with the seasoning mix for a few hours or overnight if time allows. This will enhance the taste and tenderness of the meat.
Additionally, feel free to substitute or add other low-carb vegetables such as asparagus or Brussels sprouts. Keep an eye on the veggies as they roast, giving them a stir halfway through to guarantee even cooking.
If you prefer your pork with a bit more crust, you can sear the tenderloins in a hot skillet for 2-3 minutes on each side before roasting.