

After a busy day, there’s something incredibly satisfying about preparing a quick and tasty dinner for your family. Picture vibrant veggies sizzling with lemon-garlic flavor or a customizable veggie taco bowl that even the pickiest eater will love. These dishes aren’t just meals; they’re opportunities to share and enjoy flavors together. Ready to bring these lively, simple plates to your dinner table? Let’s explore these mouthwatering secrets together.
Zesty Lemon-Garlic Stir-Fried Vegetables

This recipe is incredibly versatile, allowing you to use your favorite vegetables or whatever you have on hand.
It’s a great way to clear out the fridge while making sure nothing goes to waste. The preparation is simple and quick, making it ideal for those busy nights when you want something nutritious without spending too much time in the kitchen.
Serve it as a main dish with rice or noodles, or as a vibrant side to accompany your favorite protein.
Ingredients for 4-6 servings:
- 1 tablespoon olive oil
- 3 cloves garlic, minced
- 1 red bell pepper, sliced
- 1 yellow bell pepper, sliced
- 1 medium zucchini, sliced
- 1 medium carrot, julienned
- 1 cup broccoli florets
- 1 cup sugar snap peas
- 1 lemon, juiced and zested
- 2 tablespoons soy sauce
- Salt and pepper to taste
- Fresh parsley, chopped (for garnish)
Cooking Instructions:
- Prepare Vegetables: Start by washing all your vegetables thoroughly. Slice the bell peppers and zucchini, julienne the carrot, and separate the broccoli into small florets.
- Heat the Oil: In a large skillet or wok, heat the olive oil over medium-high heat. Add the minced garlic and sauté for about 30 seconds until fragrant but not browned.
- Stir-Fry Vegetables: Add the sliced bell peppers, zucchini, carrot, broccoli florets, and sugar snap peas into the skillet. Stir-fry the vegetables, stirring frequently, for about 5-7 minutes or until they’re just tender but still crisp.
- Add Flavorings: Pour in the lemon juice and zest, along with the soy sauce. Stir well to coat all the vegetables evenly. Season with salt and pepper to taste.
- Finish and Serve: Once the vegetables are cooked to your desired level of tenderness, remove them from the heat. Transfer the stir-fried vegetables to a serving dish and garnish with freshly chopped parsley. Serve immediately.
Extra Tips:
When preparing Zesty Lemon-Garlic Stir-Fried Vegetables, try to cut all vegetables to a similar size to guarantee even cooking.
If you prefer a bit of heat, consider adding a pinch of red pepper flakes along with the garlic. You can also experiment with adding other vegetables such as mushrooms, asparagus, or baby corn.
For a more filling dish, toss in some cooked tofu or chicken. Finally, make sure not to overcook the vegetables; they should retain some crunch for the best texture and flavor.
Quick Veggie Taco Bowls
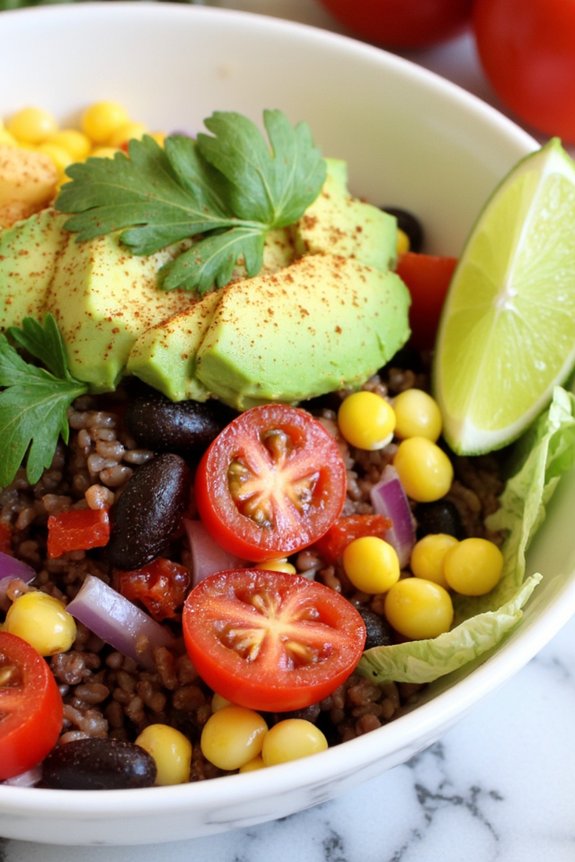
For a delicious and healthy dinner option that can be whipped up in no time, search no further than Quick Veggie Taco Bowls. This dish combines the vibrant flavors and textures of fresh vegetables, beans, and spices to create a satisfying and nutritious meal that’s perfect for family dinners or casual gatherings.
The recipe is designed to be flexible, allowing you to customize it according to your taste preferences or the ingredients you have on hand. Not only are these veggie taco bowls packed with flavor, but they also offer a great source of plant-based protein and fiber, making them a wholesome choice for vegetarians and meat lovers alike.
In just about 30 minutes, you’ll have a colorful and hearty meal ready to serve, proving that you don’t need meat to enjoy a filling and appetizing taco night.
Ingredients (Serves 4-6):
- 2 cups cooked brown rice or quinoa
- 1 can (15 oz) black beans, drained and rinsed
- 1 cup corn kernels (fresh, canned, or frozen)
- 1 red bell pepper, diced
- 1 avocado, diced
- 1 cup cherry tomatoes, halved
- 1 small red onion, diced
- 1/4 cup fresh cilantro, chopped
- 1 lime, juiced
- 1 teaspoon ground cumin
- 1 teaspoon smoked paprika
- Salt and pepper to taste
- 1 cup shredded lettuce
- Optional toppings: salsa, sour cream, shredded cheese, hot sauce
Cooking Instructions:
- Prepare the Grains: Start by cooking your choice of brown rice or quinoa according to package instructions. This should take about 15-20 minutes, during which you can prepare the other ingredients.
- Cook the Vegetables: In a large skillet over medium heat, add a tablespoon of oil. Once heated, add the diced red bell pepper and red onion. Sauté for about 5 minutes until they’re soft and fragrant.
- Add the Beans and Corn: Stir in the black beans and corn kernels to the skillet. Season with ground cumin, smoked paprika, salt, and pepper. Cook for another 5 minutes, stirring occasionally, until everything is heated through.
- Prepare the Fresh Ingredients: While the beans and corn are cooking, dice the avocado and halve the cherry tomatoes. Chop the cilantro and juice the lime.
- Assemble the Bowls: Once everything is ready, begin assembling your taco bowls. Start with a base of rice or quinoa in each bowl. Layer on the bean and corn mixture, followed by shredded lettuce, cherry tomatoes, avocado, and a sprinkle of cilantro.
- Garnish and Serve: Squeeze fresh lime juice over each bowl and add any optional toppings such as salsa, sour cream, or shredded cheese. Serve immediately and enjoy!
Extra Tips:
To make this meal even quicker, consider using pre-cooked rice or quinoa, which can be found in many grocery stores. You can also save time by preparing the vegetables and other ingredients in advance.
Feel free to get creative with your toppings; jalapeños, olives, or even a dollop of guacamole can add extra flavor and flair to your taco bowls. If you have leftover grilled vegetables or roasted sweet potatoes, they make a wonderful addition as well.
Adjust the seasoning to your liking, and don’t hesitate to add a pinch of chili powder if you enjoy a bit of heat in your dish.
Creamy Tomato Basil Pasta
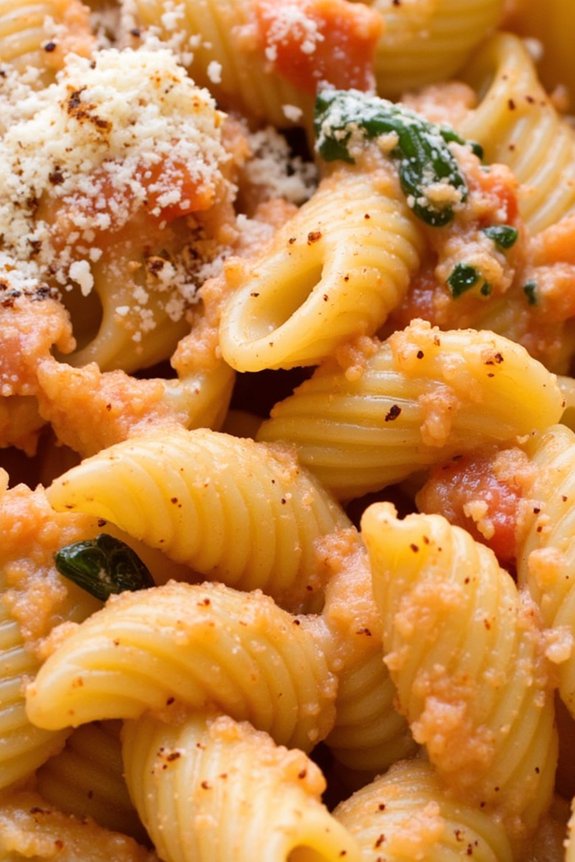
Creamy Tomato Basil Pasta is a delightful and quick dinner option for those who want to enjoy a delicious vegetarian meal without spending too much time in the kitchen. This dish combines the rich and tangy flavors of ripe tomatoes with the fresh and aromatic notes of basil, all wrapped up in a luxurious and creamy sauce.
It’s a comforting meal that perfectly balances the acidity of the tomatoes with the creaminess of the sauce, making it a family favorite that even picky eaters will love.
The beauty of Creamy Tomato Basil Pasta lies in its simplicity. With just a handful of ingredients, you can whip up a meal that’s both satisfying and visually appealing. This recipe is perfect for a busy weeknight when you want something quick yet fulfilling.
It showcases the versatility of pasta, which absorbs the savory flavors of the sauce beautifully, making every bite a delight. Whether you’re a seasoned cook or a kitchen novice, this recipe is approachable and rewarding.
Ingredients (Serves 4-6):
- 400g pasta of your choice (such as penne or fettuccine)
- 2 tablespoons olive oil
- 4 cloves garlic, minced
- 1 can (400g) crushed tomatoes
- 1 cup heavy cream
- 1 teaspoon salt
- 1/2 teaspoon black pepper
- 1/2 cup grated Parmesan cheese
- 1 cup fresh basil leaves, chopped
- Optional: red pepper flakes for heat
Cooking Instructions:
- Cook the Pasta: Begin by bringing a large pot of salted water to a boil. Add the pasta and cook according to the package instructions until al dente. Drain the pasta and set aside, reserving 1 cup of pasta water for later use.
- Prepare the Sauce Base: In a large skillet over medium heat, add the olive oil. Once hot, add the minced garlic and sauté for about 1 minute until fragrant, but be careful not to burn it.
- Add Tomatoes: Pour the crushed tomatoes into the skillet with the garlic. Stir well and let it simmer for about 5 minutes to allow the flavors to meld together.
- Make it Creamy: Reduce the heat to low and slowly stir in the heavy cream, salt, and black pepper. Mix until the sauce is well combined and creamy. Let it simmer for another 5 minutes.
- Incorporate Cheese and Basil: Add the grated Parmesan cheese and stir until it melts into the sauce. Then, add the chopped basil leaves, reserving a few for garnish.
- Combine Pasta and Sauce: Add the cooked pasta to the skillet, tossing it gently to coat thoroughly with the sauce. If the sauce is too thick, add a bit of the reserved pasta water until you reach your desired consistency.
- Serve: Once the pasta is evenly coated and heated through, remove from heat. Serve hot, garnished with additional Parmesan cheese, basil, and a pinch of red pepper flakes if desired.
Extra Tips:
For an extra boost of flavor, consider adding a splash of white wine to the sauce before adding the cream. This adds depth and enhances the overall taste.
If you prefer a smoky flavor, you can roast the tomatoes before adding them to the sauce. Always taste your sauce before serving to adjust the seasoning as necessary.
For a healthier twist, you can substitute the heavy cream with coconut milk or a plant-based cream alternative. Finally, this dish pairs wonderfully with garlic bread or a fresh green salad for a complete meal.
Easy Bean and Cheese Quesadillas

Easy Bean and Cheese Quesadillas are a perfect solution for a quick, delicious, and satisfying vegetarian dinner that requires minimal effort. These quesadillas are packed with protein and flavor, making them a great choice for both kids and adults alike.
Whether you’re looking for a speedy weeknight meal or a fun dish to serve at a casual gathering, these quesadillas come together in no time and are sure to please everyone’s taste buds. The combination of creamy cheese and hearty beans encased in crispy, golden tortillas creates a delightful texture contrast.
You can customize your quesadillas with additional toppings like salsa, guacamole, or sour cream to take the flavor profile to the next level. Plus, this dish is versatile enough to accommodate various dietary preferences, so feel free to experiment with different types of beans or cheese to suit your taste.
Let’s plunge into the simple ingredients and straightforward instructions for making Easy Bean and Cheese Quesadillas for 4-6 people.
Ingredients:
- 8 large flour tortillas
- 2 cups shredded cheese (cheddar, Monterey Jack, or a blend)
- 1 can (15 oz) black beans, drained and rinsed
- 1 small onion, finely chopped
- 1 tablespoon olive oil
- 1 teaspoon ground cumin
- 1 teaspoon chili powder
- Salt and pepper to taste
- Optional toppings: salsa, guacamole, sour cream, chopped cilantro
Cooking Instructions:
1. Prepare the Filling: In a medium skillet, heat the olive oil over medium heat. Add the finely chopped onion and sauté for about 3-4 minutes, or until the onion becomes translucent.
Stir in the drained and rinsed black beans, ground cumin, chili powder, salt, and pepper. Cook for an additional 3-5 minutes, stirring occasionally, until the beans are warmed through and well-coated with the spices.
2. Assemble the Quesadillas: Lay out the flour tortillas on a clean work surface. Evenly distribute the bean mixture over one half of each tortilla.
Sprinkle a generous amount of shredded cheese over the beans. Fold the other half of each tortilla over the filling to create a half-moon shape.
3. Cook the Quesadillas: Heat a large skillet or griddle over medium heat. Carefully place the folded quesadillas onto the skillet, cooking 2-3 at a time depending on your skillet size.
Cook for about 2-3 minutes on each side, or until the tortillas are golden brown and crispy, and the cheese has melted inside. Use a spatula to gently press down on the quesadillas to guarantee even cooking.
4. Serve and Enjoy: Once cooked, remove the quesadillas from the skillet and let them cool for a minute before slicing them into wedges.
Serve with your choice of optional toppings such as salsa, guacamole, sour cream, or freshly chopped cilantro.
Extra Tips: For a smokier flavor, you can add a pinch of smoked paprika to the bean mixture. If you prefer a spicier kick, consider adding a chopped jalapeño to the onion while sautéing.
To make the quesadillas even heartier, you can add cooked corn or sliced bell peppers to the filling. For a gluten-free option, use corn tortillas instead of flour tortillas, adjusting the cooking time as needed since they tend to cook faster.
Remember to keep an eye on the heat level to prevent the tortillas from burning, and adjust as necessary.
Veggie-Packed Fried Rice
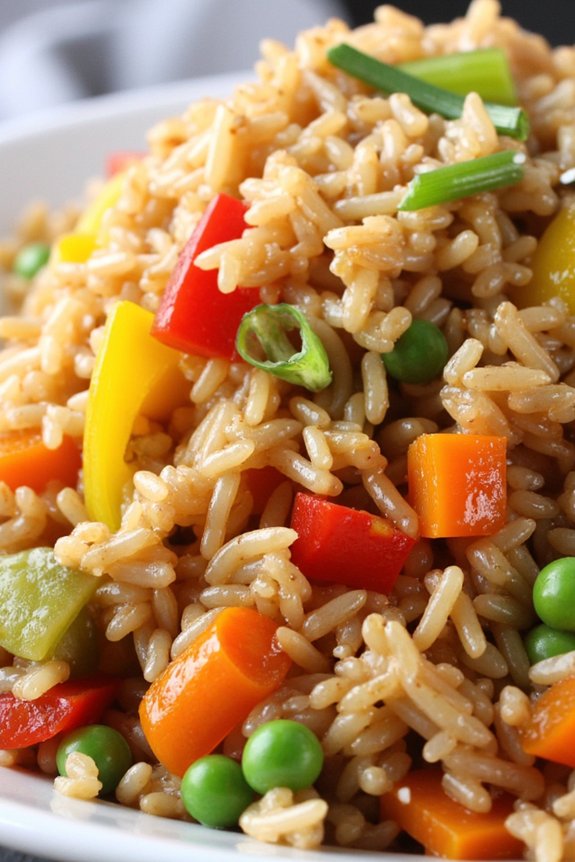
Veggie-Packed Fried Rice is a delightful and vibrant dish that brings together a variety of fresh vegetables and hearty rice into one flavorful meal. This recipe is perfect for those nights when you need a quick and satisfying dinner that doesn’t skimp on nutrition.
The beauty of this dish lies in its versatility, allowing you to use whatever vegetables you have on hand, making it a great option for using up leftover produce. Not only is it quick to prepare, but it also offers a great balance of flavors and textures, with the crunch of fresh veggies complementing the soft, fluffy rice.
This dish serves as a fantastic main course for a family dinner or a substantial side dish for gatherings. It’s a hit with both adults and kids, thanks to its colorful presentation and savory taste. The recipe is designed to serve 4-6 people, making it ideal for family meals or small get-togethers.
With minimal prep time and simple cooking steps, you can have a delicious homemade meal ready in no time.
Ingredients for 4-6 servings:
- 3 cups cooked rice (preferably day-old)
- 2 tablespoons vegetable oil
- 1 medium onion, finely chopped
- 2 cloves garlic, minced
- 1 cup bell peppers, diced (any color)
- 1 cup carrots, diced
- 1 cup frozen peas
- 3 green onions, sliced
- 3 tablespoons soy sauce
- 2 teaspoons sesame oil
- Salt and pepper to taste
- Optional: 2 eggs, lightly beaten
- Optional garnish: sesame seeds and chopped cilantro
Cooking Instructions:
- Prepare the Rice: If you haven’t done so already, cook your rice in advance and let it cool. Day-old rice works best as it’s less sticky and has a better texture for frying.
- Heat the Oil: In a large skillet or wok, heat the vegetable oil over medium-high heat. This will guarantee a nice even cooking of all your ingredients.
- Cook the Aromatics: Add the chopped onion and minced garlic to the pan. Stir-fry for about 2-3 minutes until they become fragrant and the onion turns translucent.
- Add the Veggies: Toss in the bell peppers and carrots. Stir-fry for another 3-4 minutes until the vegetables start to soften.
- Incorporate the Peas and Green Onions: Add the frozen peas and sliced green onions. Stir everything together and cook for an additional 2 minutes.
- Mix in the Rice: Add the cooked rice to the vegetable mix. Stir well to combine and guarantee the rice is evenly distributed among the vegetables.
- Season the Dish: Pour in the soy sauce and sesame oil. Stir everything together to coat the rice and vegetables evenly. Season with salt and pepper to taste.
- Optional Egg Addition: If using eggs, move the rice mixture to one side of the pan. Pour the beaten eggs into the empty side and scramble them until fully cooked. Mix the scrambled eggs into the rice.
- Serve: Once everything is well combined and heated through, remove from heat. Garnish with sesame seeds and chopped cilantro if desired.
Extra Tips:
To enhance the flavor, consider using a combination of soy sauce and oyster sauce for a richer taste. If you prefer a bit of heat, add a pinch of red pepper flakes or a few dashes of hot sauce.
For a heartier meal, you can include tofu or tempeh. Remember, it’s essential to use cold rice because warm rice tends to get mushy when stir-fried. Finally, don’t overcrowd the pan; if necessary, cook in batches to guarantee all ingredients are cooked evenly.
Spinach and Feta Stuffed Peppers

Spinach and Feta Stuffed Peppers are a delightful and nutritious option for a quick vegetarian dinner. This dish combines the vibrant flavors of fresh spinach, creamy feta cheese, and sweet bell peppers to create a satisfying meal that’s both colorful and healthy. Ideal for busy weeknights, this recipe is simple to prepare and can be on the table in under an hour.
Whether you’re a vegetarian or just looking to add more plant-based meals to your diet, these stuffed peppers are sure to become a household favorite. The combination of spinach and feta makes for a deliciously creamy filling that pairs perfectly with the natural sweetness of the bell peppers.
These stuffed peppers aren’t only packed with flavor but also provide a good source of vitamins and minerals. The recipe can be easily adapted to suit personal tastes by adding other ingredients such as olives or sun-dried tomatoes. Serve these stuffed peppers with a side salad or some crusty bread for a complete meal that will please the whole family.
Ingredients (serving size: 4-6 people):
- 6 large bell peppers
- 2 tablespoons olive oil
- 1 onion, diced
- 3 cloves garlic, minced
- 1 bag (about 10 oz) fresh spinach
- 1 cup cooked quinoa
- 1 cup crumbled feta cheese
- 1 teaspoon dried oregano
- Salt and pepper to taste
- Juice of 1 lemon
Instructions:
- Preheat the Oven: Begin by preheating your oven to 375°F (190°C). This will allow the peppers to cook evenly and the filling to become perfectly warm and melty.
- Prepare the Peppers: Slice the tops off the bell peppers and remove the seeds and membranes. Lightly brush the exterior of each pepper with olive oil and set them in a baking dish, standing upright.
- Cook the Filling: Heat olive oil in a large skillet over medium heat. Add the diced onion and cook until translucent, about 5 minutes. Stir in the minced garlic and cook for another minute until fragrant.
- Add Spinach: Add the fresh spinach to the skillet and cook until wilted, stirring occasionally. This should take about 3 minutes. Once wilted, remove the skillet from heat.
- Combine Ingredients: In a large bowl, combine the cooked quinoa, sautéed spinach mixture, crumbled feta cheese, dried oregano, salt, and pepper. Squeeze the lemon juice over the mixture and stir well to combine.
- Stuff the Peppers: Fill each prepared bell pepper with the spinach and feta mixture, pressing down lightly to pack the filling in.
- Bake: Cover the baking dish with aluminum foil and bake in the preheated oven for 30 minutes. Then, remove the foil and bake for an additional 10 minutes, or until the peppers are tender and the tops are slightly browned.
- Serve: Remove from the oven and let cool for a few minutes before serving. Enjoy the stuffed peppers warm.
Extra Tips:
When selecting bell peppers, look for ones that can stand upright on their own, as this will make them easier to stuff and bake. For added flavor, consider roasting the peppers in the oven for a few minutes before stuffing them. This will enhance their natural sweetness.
If you prefer a spicier dish, add a pinch of crushed red pepper flakes to the filling. Leftover stuffed peppers can be stored in the refrigerator for up to 3 days and reheated in the oven or microwave.
Simple Chickpea Salad With Lemon Dressing
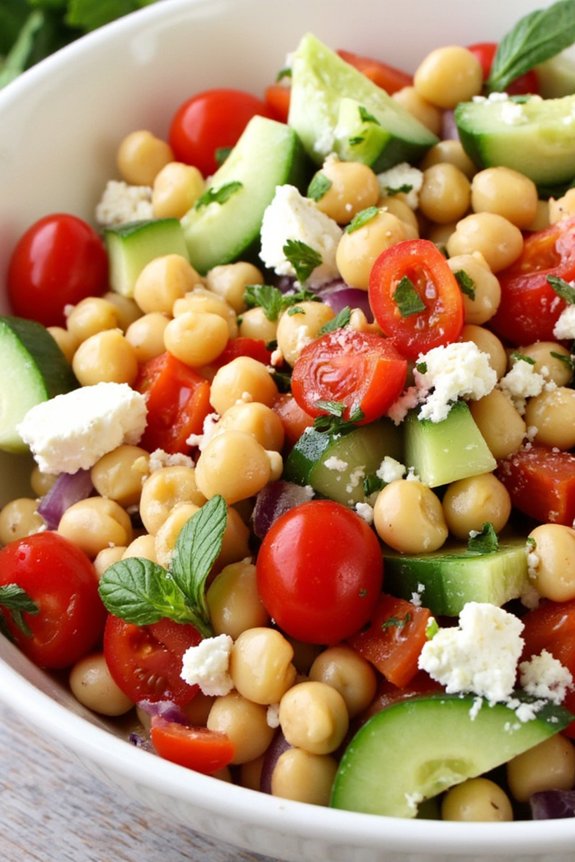
If you’re looking for a quick and invigorating meal that’s both delicious and nutritious, this Simple Chickpea Salad With Lemon Dressing is a must-try. Perfect for a light dinner or as a side dish, this salad combines the wholesome goodness of chickpeas with the zesty flavor of a lemon dressing.
With just a few ingredients, you can create a vibrant dish that’s not only easy to prepare but also packed with protein, fiber, and essential vitamins. This salad is great for those busy weeknights when you want something healthy without spending too much time in the kitchen.
This chickpea salad is versatile and can be customized to suit your taste preferences. You can add various fresh vegetables, herbs, or even some crumbled feta cheese to enhance the flavors.
The lemon dressing is simple yet flavorful, using fresh lemon juice, olive oil, and a hint of garlic to complement the earthy taste of the chickpeas. Whether you’re a seasoned cook or a beginner, this recipe is straightforward and will surely become a staple in your quick dinner repertoire.
Ingredients (Serves 4-6):
- 2 cans (15 oz each) chickpeas, drained and rinsed
- 1 cup cherry tomatoes, halved
- 1 cucumber, diced
- 1 red bell pepper, diced
- 1/2 red onion, finely chopped
- 1/4 cup fresh parsley, chopped
- 1/4 cup fresh mint, chopped
- 1/3 cup crumbled feta cheese (optional)
- 3 tablespoons olive oil
- 2 tablespoons fresh lemon juice
- 1 clove garlic, minced
- Salt and pepper to taste
Cooking Instructions:
1. Prepare the Ingredients: Start by draining and rinsing the chickpeas thoroughly in a colander. This helps to remove the canning liquid and any excess sodium.
Chop the cherry tomatoes, cucumber, red bell pepper, red onion, parsley, and mint as per the measurements above.
2. Make the Dressing: In a small mixing bowl, combine the olive oil, fresh lemon juice, and minced garlic. Whisk together until well blended.
Add salt and pepper to taste, adjusting to your preference.
3. Combine the Salad: In a large mixing bowl, add the chickpeas, cherry tomatoes, cucumber, red bell pepper, red onion, parsley, and mint.
If you’re using feta cheese, add it to the bowl as well.
4. Add the Dressing: Pour the prepared lemon dressing over the salad ingredients. Gently toss everything together until the chickpeas and vegetables are well coated with the dressing.
5. Chill and Serve: For the best flavor, cover the salad and let it chill in the refrigerator for at least 30 minutes before serving.
This allows the flavors to meld together. Serve cold as a main dish or a side.
Extra Tips:
For an extra boost of flavor, consider adding a pinch of cumin or smoked paprika to the dressing.
You can also substitute or add other vegetables like avocado or radishes for variety. If you prefer a spicier kick, add a pinch of red pepper flakes or a chopped jalapeño.
This salad keeps well in the refrigerator for up to 2 days, making it a great option for meal prep. Just make sure to store it in an airtight container to maintain freshness.
One-Pot Broccoli Cheese Soup

One-Pot Broccoli Cheese Soup is the perfect quick and comforting dinner option for any night of the week. This creamy, cheesy delight isn’t only easy to make but also requires minimal cleanup since it’s all prepared in a single pot. The combination of fresh broccoli, melted cheese, and a hint of savory seasonings creates a hearty meal that will please both kids and adults alike.
Whether you’re looking for a simple family dinner or a cozy dish to enjoy on a chilly evening, this soup is sure to satisfy. This recipe is designed to serve 4-6 people and can be prepared in under 30 minutes, making it an ideal choice for busy weeknights.
With just a few basic ingredients and straightforward steps, you’ll have a delicious meal ready in no time. Not only does it offer a delightful blend of flavors, but it’s also a great way to sneak in some extra vegetables without compromising on taste. Serve it with crusty bread or a light salad for a complete and satisfying dinner experience.
Ingredients for 4-6 servings:
- 2 tablespoons butter
- 1 small onion, finely chopped
- 2 cloves garlic, minced
- 4 cups broccoli florets
- 4 cups vegetable broth
- 2 cups shredded cheddar cheese
- 1 cup heavy cream
- 1 teaspoon salt
- 1/2 teaspoon black pepper
- 1/4 teaspoon nutmeg (optional)
Cooking Instructions:
- Prepare the Base: In a large pot, melt the butter over medium heat. Add the chopped onion and minced garlic, sautéing until the onion becomes translucent and fragrant, about 3-4 minutes.
- Add Broccoli and Broth: Stir in the broccoli florets and pour in the vegetable broth. Bring the mixture to a boil, then reduce the heat to a simmer. Cover the pot and let the broccoli cook until tender, approximately 8-10 minutes.
- Blend the Soup: Once the broccoli is tender, use an immersion blender to puree the soup until smooth. If you prefer a chunkier texture, blend only part of the soup and leave some broccoli pieces whole.
- Incorporate the Cheese and Cream: Gradually add the shredded cheddar cheese to the soup, stirring continuously until it’s fully melted and incorporated. Pour in the heavy cream, stirring to combine.
- Season and Serve: Season the soup with salt, black pepper, and nutmeg if using. Allow the soup to heat through for another 2-3 minutes before serving hot.
Extra Tips:
For a richer flavor, consider using sharp cheddar cheese or a combination of cheeses like Gruyère or Monterey Jack. If you don’t have an immersion blender, carefully transfer the soup in batches to a countertop blender to puree.
When reheating leftovers, do so gently over low heat to prevent the cheese from separating. Finally, feel free to garnish the soup with additional cheese, croutons, or a sprinkle of fresh herbs for an extra touch of flavor and presentation.
Rustic Ratatouille With Fresh Herbs
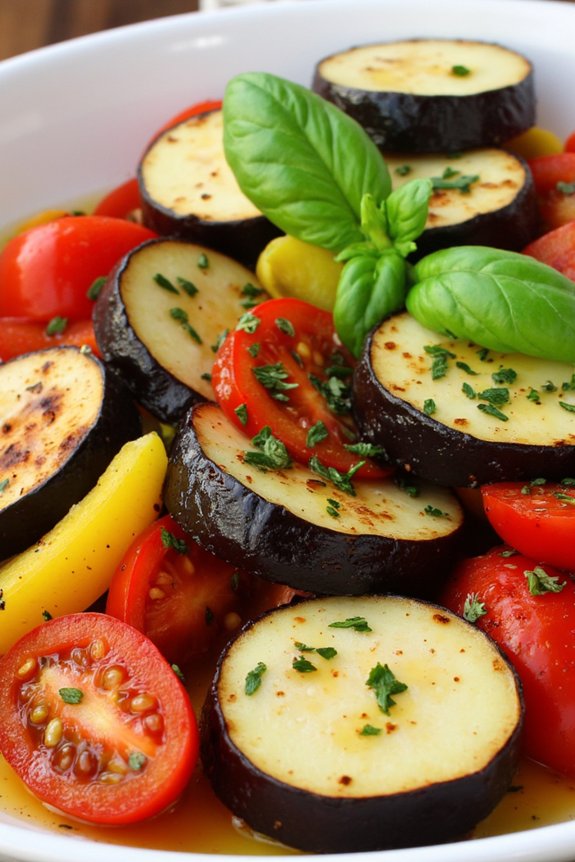
Rustic Ratatouille With Fresh Herbs is a vibrant and hearty vegetable dish that brings the flavors of Provence right to your kitchen. This comforting and nutritious meal is perfect for a quick dinner, as it showcases a medley of fresh vegetables sautéed and simmered to perfection. The addition of fresh herbs elevates the natural flavors, making this dish a delightful option for both vegetarians and non-vegetarians alike. Ideal for serving 4-6 people, this recipe isn’t only easy to prepare but also a feast for the senses with its colorful presentation and aromatic appeal.
Ratatouille is traditionally a French Provençal stewed vegetable dish, but our version offers a rustic twist by focusing on a more simplified preparation method that retains all the classic flavors. The key ingredients include eggplant, zucchini, bell peppers, and tomatoes, which are complemented by the fragrance of fresh thyme and basil. This rustic ratatouille can be enjoyed on its own, served over rice or pasta, or accompanied by crusty bread to soak up the delicious juices. Let’s plunge into creating this delightful dish.
Ingredients for 4-6 Servings
- 1 large eggplant, diced
- 2 medium zucchinis, sliced
- 2 bell peppers (red and yellow), chopped
- 1 large onion, finely chopped
- 4 cloves garlic, minced
- 4 large ripe tomatoes, chopped
- 1/4 cup olive oil
- 1 teaspoon salt
- 1/2 teaspoon black pepper
- 1 teaspoon dried oregano
- 1 teaspoon fresh thyme leaves
- 1/2 cup fresh basil leaves, roughly chopped
- 2 tablespoons tomato paste
- 1/4 cup vegetable broth or water
Cooking Instructions
- Prepare the Vegetables: Begin by washing all the vegetables thoroughly. Dice the eggplant, slice the zucchinis, chop the bell peppers, and finely chop the onion. Mince the garlic and set everything aside.
- Sauté the Base: In a large skillet or Dutch oven, heat the olive oil over medium heat. Add the chopped onion and minced garlic, sautéing them for about 5 minutes until they become translucent and fragrant.
- Cook the Vegetables: Add the diced eggplant to the skillet and cook for about 5 minutes, stirring occasionally, until it begins to soften. Follow with the sliced zucchinis and bell peppers, cooking for an additional 5 minutes.
- Incorporate Tomatoes and Seasonings: Stir in the chopped tomatoes, tomato paste, salt, black pepper, and dried oregano. Mix well to combine all the ingredients.
- Simmer the Ratatouille: Pour in the vegetable broth (or water) and bring the mixture to a gentle simmer. Reduce the heat to low, cover the skillet, and let it simmer for 20-25 minutes. Stir occasionally to prevent sticking.
- Add Fresh Herbs: In the last 5 minutes of cooking, add the fresh thyme leaves and chopped basil. Stir them into the ratatouille, allowing the herbs to release their flavors.
- Serve and Enjoy: Once the vegetables are tender and the flavors melded, remove from heat. Serve hot, garnished with additional fresh basil if desired.
Extra Tips
- For a deeper flavor, consider roasting the vegetables in the oven before adding them to the skillet. This step caramelizes the vegetables, enhancing their natural sweetness.
- If you prefer a thicker consistency, allow the ratatouille to simmer uncovered for a few extra minutes to reduce the liquid.
- Feel free to adjust the seasoning to your taste. A dash of red pepper flakes can add a hint of heat, while a splash of balsamic vinegar at the end can provide a touch of acidity.
- This dish is even more flavorful the next day, so consider making it ahead of time to allow the flavors to deepen.
Quick Sautéed Zucchini and Corn
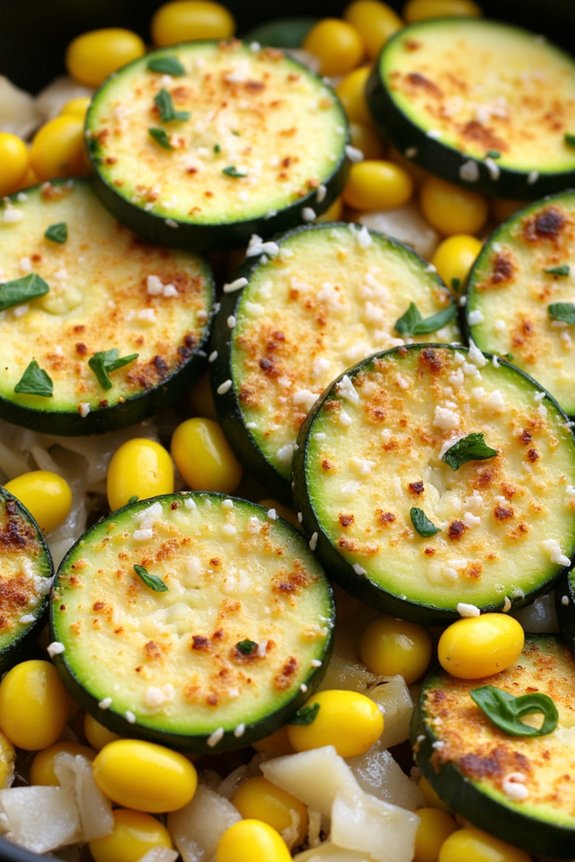
Quick Sautéed Zucchini and Corn is a delightful and vibrant dish that perfectly complements any meal. This dish brings together the fresh flavors of zucchini and sweet corn, creating a quick and satisfying side dish or light main course.
With its bright colors and crisp textures, it’s an ideal option for a busy weeknight when you need to whip up something nutritious and delicious in a short amount of time. This recipe is particularly appealing because it uses simple, fresh ingredients that are often readily available.
It’s a great way to make use of summer produce, and it requires minimal preparation time. Whether you’re serving it alongside grilled meats or enjoying it as a vegetarian main, this dish is sure to become a favorite.
Ingredients for 4-6 servings:
- 2 medium zucchinis, sliced into half-moons
- 1 1/2 cups fresh corn kernels (or frozen, thawed)
- 2 tablespoons olive oil
- 1 tablespoon butter
- 2 cloves garlic, minced
- Salt and pepper to taste
- 1 tablespoon lemon juice
- 1/4 cup freshly grated Parmesan cheese
- 2 tablespoons fresh basil, chopped
Cooking Instructions:
- Prepare the Ingredients:
- Begin by washing the zucchinis and slicing them into half-moons. If using fresh corn, remove the kernels from the cob. Mince the garlic cloves.
- Heat the Oil:
- In a large skillet over medium heat, add the olive oil and butter. Allow the butter to melt and blend with the oil, creating a rich base for sautéing.
- Sauté the Garlic:
- Add the minced garlic to the skillet. Sauté for about 1 minute, or until fragrant, being careful not to let it burn.
- Cook the Zucchini:
- Add the sliced zucchini to the skillet. Cook for about 5 minutes, stirring occasionally, until the zucchini starts to soften and turn golden brown.
- Add the Corn:
- Stir in the corn kernels. Continue to cook for another 3-4 minutes, allowing the corn to heat through and combine with the zucchini.
- Season and Finish:
- Season the mixture with salt and pepper to taste. Drizzle with lemon juice, and toss everything together to combine. Sprinkle with Parmesan cheese and fresh basil, stirring to evenly distribute.
- Serve:
- Transfer the sautéed zucchini and corn to a serving dish. Serve warm as a side or main dish.
Extra Tips:
For an added burst of flavor, try incorporating a pinch of red pepper flakes or a sprinkle of smoked paprika during the sautéing process.
If you prefer a bit more richness, consider adding a splash of cream or a dollop of crème fraîche just before serving. Additionally, this dish can be easily adapted to include other seasonal vegetables, such as bell peppers or cherry tomatoes, to add more color and variation.
Remember to adjust the seasoning to your preference and enjoy the simplicity and deliciousness of this quick dish.
Easy Mushroom and Spinach Risotto
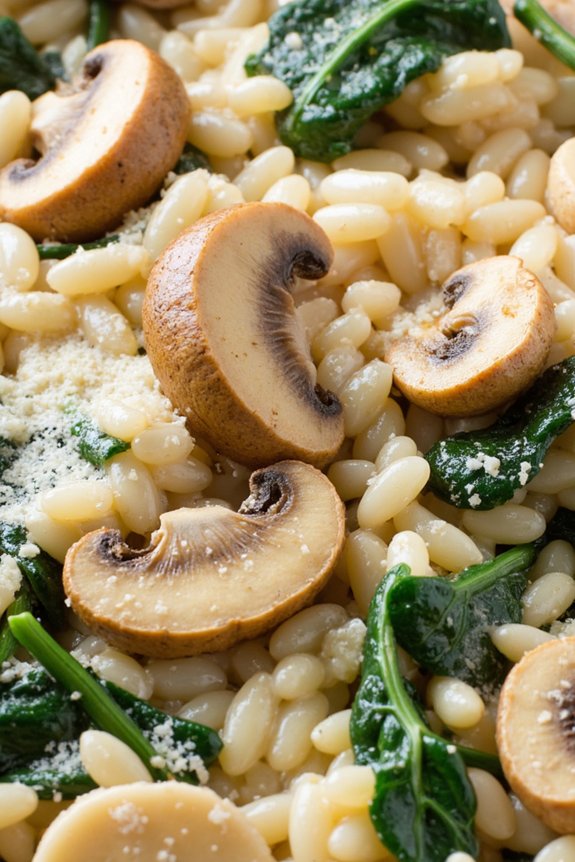
Mushroom and Spinach Risotto is a creamy, savory dish that’s perfect for a quick weekday dinner. This traditional Italian dish combines arborio rice with hearty mushrooms and fresh spinach, resulting in a comforting meal that’s both filling and nutritious. The creamy texture of the risotto, enhanced with Parmesan cheese, pairs beautifully with the earthy flavors of mushrooms and the mild, slightly sweet taste of spinach.
This recipe is designed for a serving size of 4-6 people, making it ideal for family dinners or for serving guests. With just a few simple ingredients and easy-to-follow steps, you can have this delicious risotto ready in no time. The key to success with this dish is to be patient, allowing the rice to slowly absorb the broth, becoming creamy and flavorful. Let’s explore the details of how to make this delicious dish.
Ingredients:
- 2 tablespoons olive oil
- 1 onion, finely chopped
- 2 cloves garlic, minced
- 250g (about 9 oz) arborio rice
- 1 cup white wine
- 1 liter (about 4 cups) vegetable broth
- 200g (about 7 oz) mushrooms, sliced
- 100g (about 3.5 oz) fresh spinach
- 50g (about 1.75 oz) grated Parmesan cheese
- Salt and pepper to taste
- 2 tablespoons butter
Cooking Instructions:
- Prepare the Ingredients: Begin by finely chopping the onion and mincing the garlic. Slice the mushrooms and wash the spinach thoroughly, setting them aside for later use.
- Sauté the Onions and Garlic: Heat the olive oil in a large pan over medium heat. Add the chopped onions and sauté until they become translucent, about 3-4 minutes. Stir in the minced garlic and cook for another minute until fragrant.
- Cook the Mushrooms: Add the sliced mushrooms to the pan, stirring occasionally, until they’re golden brown and any liquid they release has evaporated, approximately 5 minutes.
- Add the Rice: Stir in the arborio rice, making certain it’s well-coated with the oil and juices from the vegetables. Cook for about 2 minutes, allowing the rice to toast slightly.
- Deglaze with Wine: Pour in the white wine, stirring constantly until the wine has mostly evaporated and the rice has absorbed the flavors.
- Gradually Add Broth: Begin adding the vegetable broth, one ladle at a time, stirring frequently. Wait until the broth is almost fully absorbed before adding the next ladle. Continue this process for about 18-20 minutes or until the rice is cooked al dente.
- Incorporate Spinach and Cheese: Once the rice is cooked, stir in the fresh spinach and butter. Allow the spinach to wilt before adding the Parmesan cheese. Mix thoroughly until the cheese is melted and the risotto is creamy.
- Season and Serve: Taste and season with salt and pepper as needed. Serve immediately, garnished with additional Parmesan if desired.
Extra Tips:
When making risotto, it’s important to use a good quality arborio rice, as it provides the necessary starch content for a creamy texture.
Stirring frequently as you add the broth helps release the starch, which is key to achieving the right consistency. Additionally, using warm broth can help maintain the cooking temperature and guarantee the rice cooks evenly.
Finally, don’t rush the process; the gradual addition of broth is what gives risotto its signature creaminess. Enjoy your delicious homemade Mushroom and Spinach Risotto!