

I’ve been exploring the magic of air fryer cooking and have uncovered a collection of crispy, quick, and easy dinner recipes that are perfect for family meals. Dishes like crunchy fish tacos or garlic butter shrimp come together with minimal oil and maximum flavor. Everyday ingredients are transformed into delightful, guilt-free meals with the help of the air fryer. I’m so excited to share these recipes with you. Each one promises a satisfying crunch and taste that the whole family will love.
Crispy Air Fryer Chicken Tenders

Crispy Air Fryer Chicken Tenders are a delightful meal option that combines the satisfying crunch of fried chicken with a healthier cooking method. This dish is perfect for family dinners or gatherings, as it provides a tasty and nutritious alternative to traditional deep-fried chicken tenders.
Using an air fryer, these chicken tenders achieve a golden brown, crispy exterior while remaining juicy and tender inside. The air fryer markedly reduces the amount of oil used, making this a guilt-free indulgence.
These chicken tenders are seasoned to perfection and coated with breadcrumbs, creating a texture that’s both crispy and flavorful. The key to this recipe is confirming that the chicken tenders are evenly coated and cooked thoroughly while maintaining their natural juices.
This dish is also versatile, allowing you to pair it with a variety of dips and sides for a complete meal. Whether serving them with a classic honey mustard sauce or a spicy buffalo dip, these crispy air fryer chicken tenders are sure to be a hit.
Ingredients (Serving Size: 4-6 people):
- 1.5 lbs chicken tenders
- 1 cup all-purpose flour
- 2 large eggs
- 1 cup breadcrumbs
- 1 teaspoon garlic powder
- 1 teaspoon onion powder
- 1 teaspoon paprika
- 1 teaspoon salt
- 1/2 teaspoon black pepper
- Cooking spray
Cooking Instructions:
- Preparation: Begin by preheating your air fryer to 400°F (200°C) to confirm even cooking. This typically takes about 5 minutes.
- Season the Chicken: Pat the chicken tenders dry with paper towels. In a large bowl, mix the garlic powder, onion powder, paprika, salt, and black pepper. Sprinkle this seasoning mix over the chicken tenders, confirming they’re well-coated.
- Coating Process: Set up a dredging station with three shallow dishes: one for flour, one for beaten eggs, and one for breadcrumbs. First, coat each chicken tender in flour, shaking off any excess. Next, dip them into the egg, allowing the excess to drip off. Finally, coat them in breadcrumbs, pressing gently to confirm the breadcrumbs adhere well.
- Cooking in the Air Fryer: Lightly spray the air fryer basket with cooking spray to prevent sticking. Place the chicken tenders in a single layer in the basket, confirming they aren’t touching. You may need to cook in batches depending on the size of your air fryer.
- Air Frying: Cook the chicken tenders for 10-12 minutes, flipping them halfway through the cooking time, until they’re golden brown and reach an internal temperature of 165°F (74°C).
- Serving: Once cooked, remove the chicken tenders from the air fryer and let them rest for a couple of minutes before serving. This helps them to remain juicy.
Extra Tips:
For extra crispy chicken tenders, try double coating them by repeating the egg and breadcrumb steps. If you prefer more flavor, consider adding Parmesan cheese to the breadcrumb mixture or using panko breadcrumbs for added crunch.
Additionally, avoid overcrowding the air fryer basket, as this can lead to uneven cooking. If you’re cooking in batches, keep the cooked tenders warm in a low oven while the remaining tenders are frying.
Air Fryer Parmesan Crusted Pork Chops
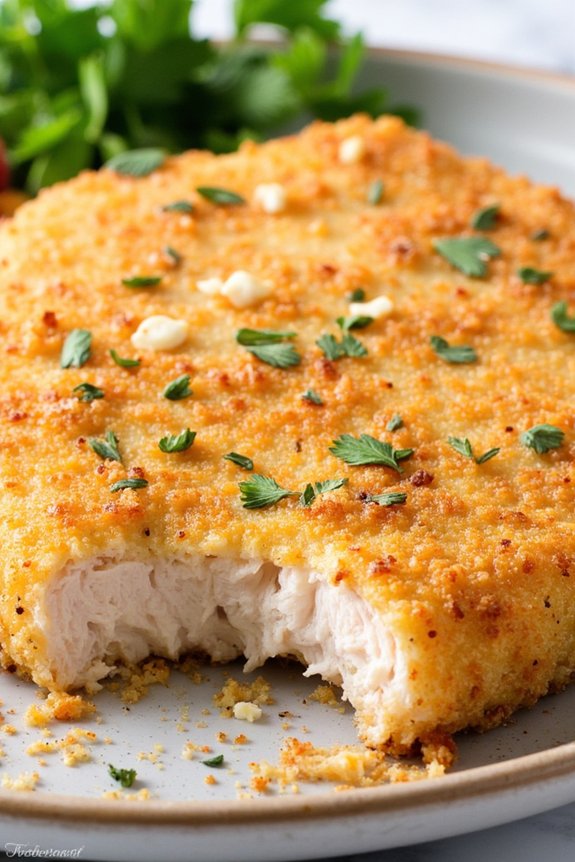
Air Fryer Parmesan Crusted Pork Chops are a delightful and easy way to enjoy a classic dish with a modern twist. The air fryer method guarantees that the pork chops are cooked to perfection with a crispy, golden-brown crust. This recipe is perfect for a family dinner or a small gathering, offering a delectable combination of textures and flavors with minimal cleanup.
The parmesan and herb coating adds a savory depth to the pork, making it a crowd-pleaser that’s sure to become a staple in your meal rotation. The air fryer not only cooks the pork chops evenly but also locks in moisture, assuring that each bite is juicy and tender. This method is a healthier alternative to traditional frying, as it requires less oil while still providing that desirable crispy finish.
Whether you’re an air fryer novice or a seasoned pro, this Air Fryer Parmesan Crusted Pork Chops recipe is simple to follow and yields impressive results that will have everyone asking for seconds.
Ingredients (Serves 4-6):
- 4-6 boneless pork chops, about 1 inch thick
- 1 cup grated Parmesan cheese
- 1 cup panko breadcrumbs
- 1 tablespoon dried Italian seasoning
- 1 teaspoon garlic powder
- 1/2 teaspoon salt
- 1/2 teaspoon black pepper
- 2 large eggs
- Cooking spray
Cooking Instructions:
- Preparation: Begin by preheating your air fryer to 375°F (190°C). This will guarantee that the pork chops cook evenly and achieve a crispy exterior.
- Mix Coating: In a shallow dish, combine the grated Parmesan cheese, panko breadcrumbs, Italian seasoning, garlic powder, salt, and black pepper. Mix well to assure even distribution of the ingredients.
- Prepare Egg Wash: In a separate bowl, beat the eggs until they’re fully blended. This will be used to help the breadcrumb mixture adhere to the pork chops.
- Coat the Pork Chops: Dip each pork chop into the egg wash, making sure it’s fully coated. Allow any excess egg to drip off before placing the chop into the breadcrumb mixture. Press the mixture onto the pork chop firmly, assuring a thorough and even coating.
- Arrange in Air Fryer: Lightly spray the air fryer basket with cooking spray to prevent sticking. Place the coated pork chops in a single layer in the basket, ensuring they don’t overlap.
- Cook: Air fry the pork chops for 12-15 minutes, flipping halfway through the cooking time. The pork chops should reach an internal temperature of 145°F (63°C) and should be golden brown and crispy.
- Rest and Serve: Once cooked, allow the pork chops to rest for a few minutes before serving. This will help the juices redistribute, keeping the meat tender and juicy.
Extra Tips:
For best results, assure that the pork chops are of uniform thickness so they cook evenly. If you prefer a spicier kick, consider adding a pinch of cayenne pepper to the breadcrumb mixture. Additionally, using freshly grated Parmesan cheese will enhance the flavor compared to pre-packaged options.
Always check the pork chops’ internal temperature with a meat thermometer to prevent overcooking, which can dry out the meat. If you have a smaller air fryer, cook the pork chops in batches to avoid overcrowding, which can lead to uneven cooking.
Garlic Butter Shrimp in the Air Fryer
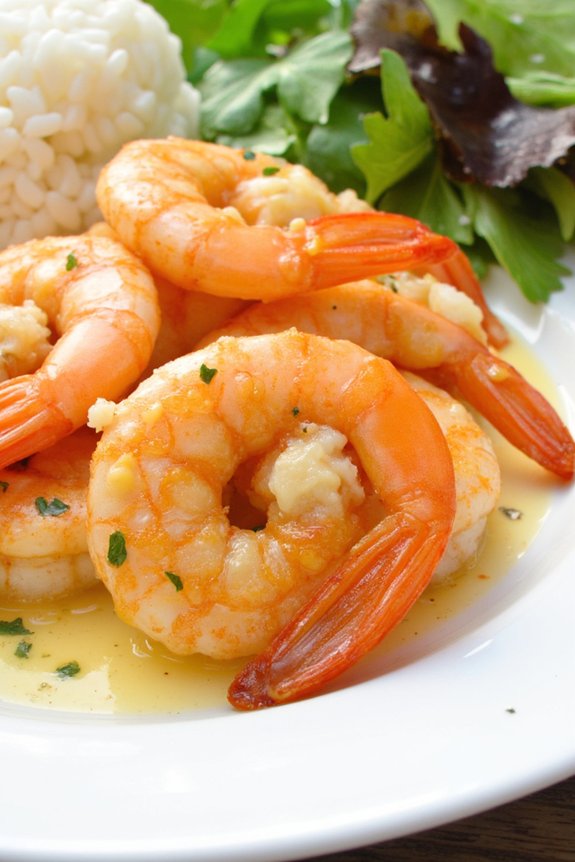
Garlic Butter Shrimp in the Air Fryer is a quick and delicious meal that combines the rich flavors of garlic and butter with the juicy texture of shrimp. This dish is perfect for a weeknight dinner or a special occasion, providing a restaurant-quality meal in the comfort of your own home.
The air fryer perfectly cooks the shrimp, giving them a slightly crispy exterior while keeping the inside tender and flavorful. This recipe isn’t only tasty but also extremely easy to prepare, making it ideal for those who are short on time.
With a few simple ingredients and minimal prep work, you can have a mouthwatering meal ready in under 20 minutes. The garlic butter sauce infuses the shrimp with a savory taste that pairs beautifully with a side of rice, pasta, or a fresh salad.
Ingredients (Serves 4-6):
- 1 1/2 pounds large shrimp, peeled and deveined
- 1/4 cup unsalted butter, melted
- 4 cloves garlic, minced
- 1 tablespoon lemon juice
- 1 tablespoon chopped fresh parsley
- 1/2 teaspoon salt
- 1/4 teaspoon black pepper
Cooking Instructions:
- Prepare the Shrimp: Start by rinsing the shrimp under cold water and pat them dry with paper towels. This helps remove any excess moisture, allowing the shrimp to cook evenly.
- Make the Garlic Butter Sauce: In a medium bowl, combine the melted butter, minced garlic, lemon juice, chopped parsley, salt, and black pepper. Mix well to guarantee all ingredients are fully incorporated.
- Coat the Shrimp: Add the shrimp to the bowl with the garlic butter sauce. Toss the shrimp gently to coat them evenly with the sauce. Make sure each shrimp is well-covered with the mixture.
- Preheat the Air Fryer: Set your air fryer to 400°F (200°C) and allow it to preheat for about 3 minutes. This guarantees that the shrimp will start cooking immediately upon entering the fryer.
- Arrange the Shrimp in the Air Fryer: Place the shrimp in a single layer in the air fryer basket. Avoid overcrowding to guarantee even cooking. You may need to cook in batches depending on the size of your air fryer.
- Cook the Shrimp: Air fry the shrimp for 7-9 minutes or until they’re opaque and pink in color. Shake the basket halfway through the cooking time for even cooking.
- Serve and Enjoy: Once cooked, remove the shrimp from the air fryer and transfer them to a serving dish. Drizzle any remaining garlic butter sauce over the shrimp and garnish with additional parsley if desired.
Extra Tips:
For the best results, use fresh shrimp if possible, as they tend to have a better texture and flavor compared to frozen shrimp. However, if using frozen shrimp, confirm they’re completely thawed and drained before cooking.
Adjust the salt and pepper to taste, and feel free to add more garlic if you prefer a stronger garlic flavor. Pair this dish with your favorite side for a complete meal that’s sure to impress!
Air Fryer BBQ Chicken Wings

Air Fryer BBQ Chicken Wings are a delicious and healthier alternative to traditional fried wings, perfect for a family dinner or a gathering with friends.
These wings come out crispy on the outside and juicy on the inside, all while being coated in a mouthwatering barbecue sauce that will satisfy any craving. With the help of an air fryer, you can achieve that perfect texture and flavor without the excess oil and calories, making these wings a guilt-free indulgence.
Cooking chicken wings in an air fryer isn’t only quick and easy but also guarantees even cooking throughout. The air fryer circulates hot air around the wings, giving them a crispy finish similar to deep frying, but with less mess and hassle.
Whether you’re a seasoned home cook or a beginner, you’ll find this recipe straightforward and rewarding, as it results in restaurant-quality wings right in your own kitchen.
Ingredients (Serves 4-6):
- 2 lbs chicken wings, split into drumettes and flats
- 1 tablespoon olive oil
- 1 teaspoon garlic powder
- 1 teaspoon onion powder
- 1 teaspoon smoked paprika
- 1 teaspoon salt
- 1/2 teaspoon black pepper
- 1 cup barbecue sauce
- Optional: chopped fresh parsley for garnish
Instructions:
- Prep the Wings: Start by patting the chicken wings dry with paper towels. This will help them crisp up nicely in the air fryer. Once dry, transfer the wings to a large bowl.
- Season the Wings: Drizzle the olive oil over the wings and toss to coat evenly. In a small bowl, mix together the garlic powder, onion powder, smoked paprika, salt, and pepper. Sprinkle this seasoning mix over the wings, making sure each piece is well seasoned.
- Preheat the Air Fryer: Preheat your air fryer to 400°F (200°C) for about 5 minutes. This step guarantees that the air fryer is hot enough to start cooking the wings immediately.
- Cook the Wings: Arrange the wings in a single layer in the air fryer basket, making sure they aren’t overcrowded. You may need to cook them in batches depending on the size of your air fryer. Cook the wings for 20-25 minutes, flipping them halfway through the cooking time to guarantee even crisping.
- Coat with Barbecue Sauce: Once the wings are cooked and crispy, transfer them to a clean bowl. Pour the barbecue sauce over the wings and toss them until they’re thoroughly coated.
- Finish in the Air Fryer: Return the sauced wings to the air fryer basket and cook at 400°F (200°C) for an additional 5 minutes. This will help the sauce caramelize slightly and adhere better to the wings.
- Serve: Remove the wings from the air fryer and transfer them to a serving platter. Garnish with chopped fresh parsley if desired, and serve immediately.
Extra Tips:
For the best results, it’s important to avoid overcrowding the air fryer basket, as this can lead to uneven cooking and less crispy wings.
If you’re making a larger batch, consider keeping the cooked wings warm in an oven set to a low temperature while you finish frying the rest. Additionally, feel free to experiment with different barbecue sauces or seasonings to customize the flavor to your liking.
If you prefer a spicier kick, add a bit of cayenne pepper to the seasoning mix or choose a spicy barbecue sauce.
Crunchy Air Fryer Fish Tacos

Crunchy Air Fryer Fish Tacos are a delightful twist on a classic dish, offering the perfect blend of flavors and textures. By using an air fryer, these tacos achieve a crispy, golden exterior on the fish while maintaining a tender and flavorful interior, all without the excess oil used in traditional frying methods.
Perfect for a family dinner or casual get-together, these tacos are both easy to make and exceptionally satisfying. The combination of seasoned fish, fresh toppings, and creamy sauce wrapped in a warm tortilla creates a symphony of taste that’s sure to impress.
This recipe is designed to serve 4-6 people, guaranteeing there’s plenty to go around. Whether you’re a seasoned chef or a kitchen novice, these Crunchy Air Fryer Fish Tacos will become a beloved favorite at your dining table.
Ingredients (Serves 4-6):
- 1 ½ pounds white fish fillets (such as cod or tilapia)
- 1 cup all-purpose flour
- 2 eggs, beaten
- 1 cup panko breadcrumbs
- 1 tablespoon chili powder
- 1 teaspoon garlic powder
- 1 teaspoon onion powder
- 1 teaspoon salt
- ½ teaspoon black pepper
- 1 tablespoon olive oil
- 12 small corn tortillas
- 1 cup shredded cabbage
- ½ cup diced tomatoes
- ½ cup chopped cilantro
- ½ cup sour cream
- 2 tablespoons lime juice
- Lime wedges, for serving
Cooking Instructions:
- Prepare the Fish: Pat the fish fillets dry with paper towels and cut them into strips about 1 inch wide. This guarantees even cooking and a crispy texture.
- Coat the Fish: Set up a dredging station with three shallow bowls. In the first bowl, place the flour; in the second, the beaten eggs; and in the third, mix the panko breadcrumbs with chili powder, garlic powder, onion powder, salt, and black pepper.
- Dredge the Fish: Coat each fish strip first in the flour, shaking off excess, then dip in the beaten eggs, and finally roll in the seasoned panko mixture, pressing gently to verify the breadcrumbs adhere well.
- Preheat the Air Fryer: Set your air fryer to 400°F (200°C) and let it preheat for about 3 minutes.
- Cook the Fish: Arrange the coated fish strips in a single layer in the air fryer basket. Lightly spray or brush with olive oil to enhance crispiness. Cook for 10-12 minutes, flipping halfway through, until the fish is golden brown and cooked through.
- Warm the Tortillas: While the fish cooks, warm the corn tortillas by wrapping them in aluminum foil and placing them in a preheated oven at 300°F (150°C) for about 5 minutes.
- Prepare the Sauce: In a small bowl, combine the sour cream and lime juice. Mix well and set aside.
- Assemble the Tacos: Place a piece of crispy fish on each warm tortilla, top with shredded cabbage, diced tomatoes, and chopped cilantro. Drizzle with the lime sour cream sauce.
- Serve: Garnish with lime wedges on the side and serve immediately for the best taste experience.
Extra Tips: For added spice, consider incorporating a dash of cayenne pepper into the panko mixture. If you prefer a more substantial sauce, incorporate a tablespoon of mayonnaise into the lime sour cream mixture for added creaminess.
Additionally, to prevent the tortillas from cracking, confirm they’re thoroughly warmed before assembling your tacos. Enjoy these tacos with a side of fresh guacamole or a simple green salad for a complete meal.
Air Fryer Stuffed Bell Peppers

Air Fryer Stuffed Bell Peppers are a delightful and healthy meal option that combines the crispiness of air frying with the savory, flavorful stuffing. This dish makes for an excellent dinner choice, especially when you want something filling and nutritious. By using an air fryer, you get the added benefit of a quicker cooking time while maintaining the integrity of the bell peppers’ texture.
The stuffing, usually a mix of ground meat, rice, and vegetables, is infused with spices that elevate the taste, making it a family favorite. The beauty of Air Fryer Stuffed Bell Peppers lies in their versatility. You can customize the stuffing to accommodate different dietary preferences, such as using quinoa instead of rice or opting for a vegetarian filling with beans and corn.
This recipe is designed to serve 4-6 people, making it perfect for a family dinner or small gathering. With its vibrant colors and enticing aroma, this dish is sure to be a hit at the dining table.
Ingredients for 4-6 Servings:
- 6 large bell peppers (any color)
- 1 pound ground beef or turkey
- 1 cup cooked rice
- 1 medium onion, chopped
- 2 cloves garlic, minced
- 1 can (14.5 oz) diced tomatoes, drained
- 1 cup shredded cheese (cheddar or mozzarella)
- 1 teaspoon Italian seasoning
- Salt and pepper to taste
- 2 tablespoons olive oil
- 2 tablespoons chopped fresh parsley (optional)
Cooking Instructions:
- Prepare the Bell Peppers: Cut the tops off the bell peppers and remove the seeds and membranes inside. Brush the outside of the peppers lightly with olive oil. This helps them cook evenly and adds a nice flavor.
- Cook the Filling: In a large skillet over medium heat, add the remaining olive oil and sauté the chopped onion and minced garlic until they’re soft and fragrant, about 3-4 minutes. Add the ground beef or turkey to the skillet and cook until browned, breaking it apart with a spoon.
- Mix the Stuffing: Once the meat is fully cooked, drain any excess fat and stir in the cooked rice, diced tomatoes, Italian seasoning, salt, and pepper. Let the mixture cook for another 5 minutes, allowing the flavors to meld together.
- Stuff the Peppers: Spoon the meat and rice mixture into each prepared bell pepper, filling them generously. Top each stuffed pepper with shredded cheese.
- Air Fry the Peppers: Preheat the air fryer to 360°F (180°C). Place the stuffed peppers in the air fryer basket, being careful not to overcrowd them. Cook for 12-15 minutes, or until the peppers are tender and the cheese is melted and bubbly.
- Serve and Garnish: Remove the stuffed peppers from the air fryer, let them cool slightly, and garnish with fresh parsley before serving.
Extra Tips:
When selecting bell peppers, choose ones that are firm and have a flat base so they can stand upright in the air fryer. You can prepare the stuffing mixture in advance and refrigerate it until you’re ready to stuff the peppers, making this dish even quicker to prepare on a busy weeknight.
If you prefer a bit of a kick, consider adding a pinch of red pepper flakes to the filling mixture. For a vegetarian option, replace the meat with black beans or chopped mushrooms.
Crispy Air Fryer Cauliflower Bites

Crispy Air Fryer Cauliflower Bites are the perfect snack or side dish that brings a burst of flavor and a delightful crunch to your table.
These bites aren’t only delicious but also a healthier alternative to traditional deep-fried snacks, thanks to the air fryer method which requires minimal oil. With a golden-brown exterior and a tender interior, they’re sure to be a hit with both kids and adults alike.
Whether you’re looking to enjoy them as an appetizer or serve alongside your favorite main course, these cauliflower bites are versatile and oh-so-satisfying.
This recipe is designed to serve 4-6 people, making it great for a family meal or a small gathering. The blend of spices gives these bites a punch of flavor, while the air fryer guarantees they’ve a perfect crispy texture without the need for excessive oil.
Pair them with your favorite dipping sauce or enjoy them straight out of the fryer for a guilt-free treat. Now, let’s explore the ingredients and steps to create these delicious Crispy Air Fryer Cauliflower Bites.
Ingredients:
- 1 large head of cauliflower, cut into bite-sized florets
- 1 cup all-purpose flour
- 1 teaspoon garlic powder
- 1 teaspoon onion powder
- 1 teaspoon smoked paprika
- 1 teaspoon salt
- 1/2 teaspoon black pepper
- 1 cup buttermilk
- 1 cup panko breadcrumbs
- Cooking spray
Cooking Instructions:
- Prepare the Cauliflower: Start by washing and drying the cauliflower. Cut the cauliflower into bite-sized florets, making sure they’re uniform in size for even cooking.
- Mix the Dry Ingredients: In a large bowl, combine the all-purpose flour, garlic powder, onion powder, smoked paprika, salt, and black pepper. Stir well to confirm the spices are evenly distributed throughout the flour.
- Coat the Cauliflower: Pour the buttermilk into a separate bowl. Dip each cauliflower floret into the buttermilk, allowing any excess to drip off. Then, coat the floret in the flour mixture, confirming it’s fully covered. Shake off any excess flour.
- Breadcrumb Coating: Place the panko breadcrumbs in another bowl. After coating with the flour mixture, press each floret into the breadcrumbs, ensuring a nice even coating. This step is vital for achieving that crispy texture.
- Preheat the Air Fryer: Set your air fryer to 400°F (200°C) and let it preheat for about 5 minutes.
- Cooking: Lightly spray the air fryer basket with cooking spray. Arrange the cauliflower in a single layer in the basket, making sure not to overcrowd it. Lightly spray the tops of the cauliflower with more cooking spray to aid in crisping. Cook for 15-20 minutes, shaking the basket halfway through, until the cauliflower is golden brown and crispy.
- Serve: Once cooked, remove the cauliflower bites from the air fryer and serve immediately with your favorite dipping sauce.
Extra Tips:
To achieve the crispiest cauliflower bites, make sure not to overcrowd the air fryer basket. Cooking in batches may be necessary, depending on the size of your air fryer.
Additionally, for extra flavor, try incorporating some grated Parmesan cheese into the breadcrumb mixture. If you prefer a spicier kick, add a pinch of cayenne pepper to the flour mixture.
Finally, these bites are best enjoyed fresh out of the air fryer, so plan to serve them immediately for the best texture and taste.
Air Fryer Lemon Herb Salmon

Air Fryer Lemon Herb Salmon is a delightful and healthy dish that combines the fresh flavors of lemon and herbs with the rich taste of salmon. This recipe is perfect for a quick weeknight dinner or a special weekend meal. Using an air fryer not only makes this dish convenient and faster to prepare but also guarantees that the salmon remains tender and juicy while achieving a perfect golden crust.
The combination of lemon, garlic, and herbs infuses the salmon with a zesty and aromatic flavor profile that’s both invigorating and satisfying. This dish isn’t only simple to prepare but also provides a nutritious meal rich in omega-3 fatty acids. Serve it alongside a fresh salad or steamed vegetables for a complete and balanced dinner.
Ingredients for 4-6 servings:
- 4-6 salmon fillets (about 6 ounces each)
- 2 tablespoons olive oil
- 2 lemons (one for juice, one for slicing)
- 3 cloves garlic, minced
- 2 tablespoons fresh parsley, chopped
- 1 tablespoon fresh dill, chopped
- 1 teaspoon salt
- 1/2 teaspoon black pepper
- Cooking spray
Cooking Instructions:
- Prepare the Marinade: In a small bowl, combine the olive oil, juice of one lemon, minced garlic, chopped parsley, chopped dill, salt, and black pepper. Mix well to confirm all ingredients are fully incorporated.
- Marinate the Salmon: Place the salmon fillets in a shallow dish or a resealable plastic bag. Pour the marinade over the salmon, confirming each fillet is well coated. Seal the bag or cover the dish, then refrigerate for at least 30 minutes to allow the flavors to penetrate the salmon.
- Preheat the Air Fryer: Set your air fryer to 400°F (200°C) and let it preheat for about 5 minutes. This step is vital for assuring even cooking.
- Prepare the Air Fryer Basket: Lightly spray the air fryer basket with cooking spray to prevent sticking. Arrange the marinated salmon fillets in a single layer, confirming there’s space between each piece for proper air circulation.
- Cook the Salmon: Air fry the salmon fillets for 8-10 minutes, depending on their thickness. Halfway through the cooking time, open the air fryer and arrange lemon slices on top of each fillet for added flavor.
- Check for Doneness: Use a fork to gently flake the salmon at its thickest part. It should be opaque and flake easily when done. If needed, cook for an additional 1-2 minutes.
- Serve: Once cooked, carefully remove the salmon fillets from the air fryer. Serve immediately, garnished with additional fresh herbs and lemon slices if desired.
Extra Tips:
For the best results, choose salmon fillets that are evenly sized to guarantee uniform cooking. If your air fryer is small, you may need to cook the salmon in batches to avoid overcrowding.
Additionally, you can experiment with different herbs such as basil or thyme for a unique twist on the recipe. When marinating, allow the salmon to rest in the fridge covered to maximize flavor absorption.
Air Fryer Margherita Pizza

Elevate your pizza night with this delicious and easy-to-make Air Fryer Margherita Pizza. The air fryer is a perfect tool to achieve a crispy crust and perfectly melted cheese while markedly reducing the cooking time compared to a traditional oven. This recipe highlights the classic flavors of a Margherita pizza, featuring fresh mozzarella, aromatic basil, and ripe tomatoes, all coming together on a homemade or store-bought pizza crust.
Ideal for a quick dinner or a fun family cooking night, this recipe serves 4-6 people and is sure to become a staple in your household.
Traditional Margherita pizza is known for its simplicity, using only a few high-quality ingredients to create a fresh and satisfying dish. This air fryer version maintains the integrity of those classic flavors while offering a modern twist with its efficient cooking method.
Whether you’re a seasoned pizza maker or a beginner, this recipe provides straightforward steps to guarantee success every time. Gather your ingredients, and let’s get started on this delightful, crispy, and flavorful pizza.
Ingredients for 4-6 servings:
- 2 large pizza crusts (store-bought or homemade)
- 1 cup pizza sauce
- 2 cups fresh mozzarella cheese, sliced
- 2-3 ripe tomatoes, thinly sliced
- 1/4 cup fresh basil leaves
- 2 tablespoons olive oil
- Salt and pepper to taste
- Optional: red pepper flakes for garnish
Cooking Instructions:
- Prepare the Air Fryer: Preheat your air fryer to 375°F (190°C). Preheating guarantees that the pizza crust will start cooking immediately for a crispier texture.
- Assemble the Pizza: Place one pizza crust on a clean surface. Spread 1/2 cup of pizza sauce evenly over the crust, leaving a small border around the edges. Arrange half of the mozzarella slices evenly over the sauce, followed by half of the tomato slices. Drizzle 1 tablespoon of olive oil over the top, and season with salt and pepper to taste.
- Cook in the Air Fryer: Carefully place the assembled pizza into the air fryer basket. Depending on the size of your air fryer, you may need to cook the pizza in batches. Cook for 8-10 minutes, or until the cheese is bubbly and starting to brown, and the crust is golden and crispy.
- Add Fresh Basil: Once cooked, remove the pizza from the air fryer and immediately sprinkle half of the fresh basil leaves over the top. The residual heat will slightly wilt the basil, enhancing its flavor.
- Repeat for Second Pizza: Assemble and cook the second pizza following the same steps.
- Serve: Slice the pizzas into desired portions and serve immediately. Optionally, garnish with red pepper flakes for added heat.
Extra Tips:
When using store-bought pizza crusts, choose a thin crust for the best results in an air fryer. This guarantees that the crust crisps up nicely without becoming soggy. If you prefer a thicker crust, adjust the cooking time by adding a few extra minutes.
Always keep an eye on the pizza during the final few minutes of cooking to prevent over-browning. For a more robust flavor, you can add a sprinkle of grated Parmesan cheese before serving. Finally, if you have leftover pizza, reheat it in the air fryer for a few minutes to regain its original crispiness.
Crispy Air Fryer Brussels Sprouts
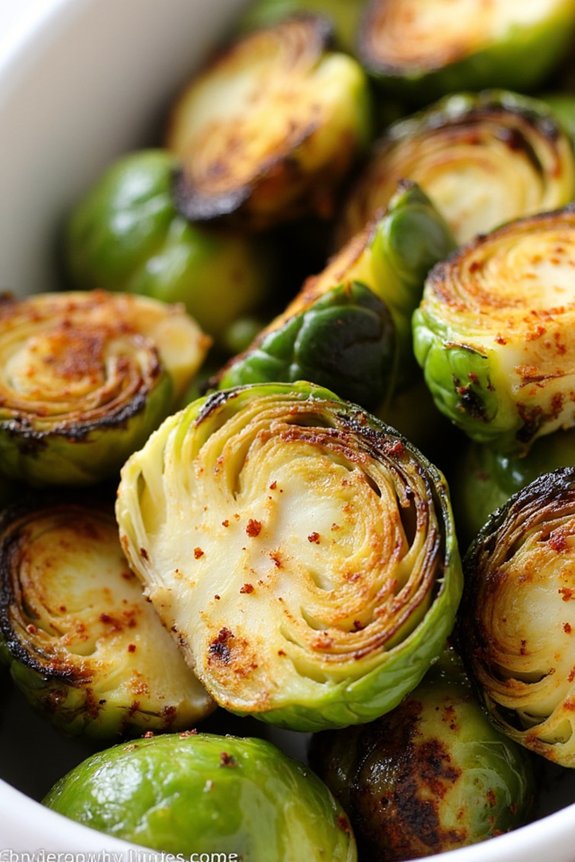
Crispy Air Fryer Brussels Sprouts are a delicious and healthy side dish that’s perfect for any meal. These Brussels sprouts are cooked to perfection in the air fryer, resulting in a crispy exterior and tender interior. The air fryer method not only reduces the amount of oil needed but also enhances the natural flavors of the Brussels sprouts, making them a favorite even among those who are usually not fans of this vegetable.
These air fryer Brussels sprouts are incredibly easy to prepare and cook in just a fraction of the time it would take in a conventional oven. With a few simple ingredients and minimal prep work, you can have a nutritious and flavorful side dish ready to serve. Whether you’re preparing a weeknight dinner or a holiday feast, these crispy Brussels sprouts will surely impress your family and guests.
Ingredients (Serves 4-6):
- 1.5 pounds Brussels sprouts
- 3 tablespoons olive oil
- 1 teaspoon garlic powder
- 1 teaspoon onion powder
- 1 teaspoon salt
- 1/2 teaspoon black pepper
- 1/4 teaspoon red pepper flakes (optional)
- 1 tablespoon balsamic vinegar (optional)
Cooking Instructions:
- Prepare the Brussels Sprouts: Begin by washing the Brussels sprouts thoroughly under cold water. Trim the ends and remove any yellow or damaged leaves. Cut the Brussels sprouts in half lengthwise, guaranteeing even cooking.
- Season the Brussels Sprouts: In a large mixing bowl, combine the halved Brussels sprouts with olive oil, garlic powder, onion powder, salt, black pepper, and red pepper flakes if using. Toss the Brussels sprouts until they’re evenly coated with the oil and spices.
- Preheat the Air Fryer: Preheat your air fryer to 375°F (190°C) for about 5 minutes. Preheating guarantees the Brussels sprouts start cooking immediately, which helps in achieving a crispy texture.
- Air Fry the Brussels Sprouts: Arrange the seasoned Brussels sprouts in the air fryer basket in a single layer. Depending on the size of your air fryer, you may need to cook them in batches. Cook for 15-20 minutes, shaking the basket halfway through to guarantee even cooking. The Brussels sprouts should be crispy and golden brown on the outside.
- Finish and Serve: Once cooked, transfer the Brussels sprouts to a serving dish. Drizzle with balsamic vinegar if desired for an added layer of flavor. Serve immediately while hot and crispy.
Extra Tips:
To guarantee maximum crispiness, avoid overcrowding the air fryer basket. This allows the hot air to circulate efficiently around each Brussels sprout.
If you prefer a sweeter flavor, consider adding a touch of honey or maple syrup to the seasoning mix.
Also, feel free to experiment with different spices or add-ins like Parmesan cheese or roasted nuts for extra flavor and texture.
Air Fryer Teriyaki Chicken Thighs
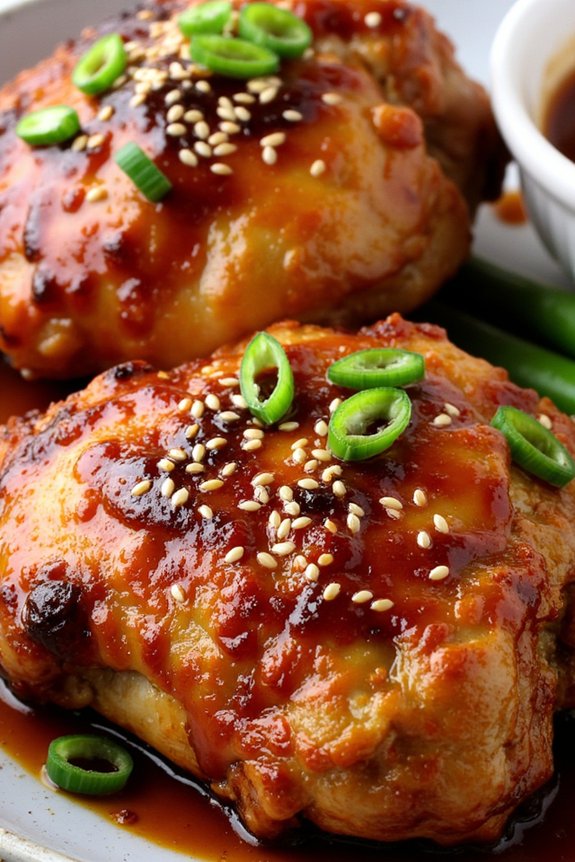
Air Fryer Teriyaki Chicken Thighs are a delicious and easy-to-make dish that combines the rich flavors of homemade teriyaki sauce with the crispy texture of air-fried chicken. Perfect for a weeknight dinner or a weekend gathering, this recipe allows you to enjoy a restaurant-quality meal right at home.
The air fryer not only reduces the amount of oil needed for cooking but also guarantees that the chicken thighs are juicy on the inside and perfectly crispy on the outside. The teriyaki sauce, made from a blend of soy sauce, honey, garlic, and ginger, coats the chicken thighs beautifully, creating a savory and slightly sweet glaze that’s sure to please your taste buds.
This recipe serves 4-6 people and is perfect when paired with steamed rice and your favorite vegetables for a complete meal. Now, let’s explore the ingredients and instructions needed to make this mouthwatering dish.
Ingredients (Serves 4-6):
- 6 bone-in, skin-on chicken thighs
- 1/2 cup soy sauce
- 1/4 cup honey
- 2 tablespoons rice vinegar
- 2 cloves garlic, minced
- 1 tablespoon fresh ginger, grated
- 1 teaspoon sesame oil
- 1 tablespoon cornstarch
- 2 tablespoons water
- Sesame seeds (optional, for garnish)
- Sliced green onions (optional, for garnish)
Cooking Instructions:
- Prepare the Marinade: In a medium bowl, combine soy sauce, honey, rice vinegar, minced garlic, grated ginger, and sesame oil. Mix until the honey is fully dissolved and the ingredients are well combined.
- Marinate the Chicken: Place the chicken thighs in a large resealable plastic bag or a shallow dish. Pour the marinade over the chicken, making sure all pieces are well coated. Seal the bag or cover the dish and refrigerate for at least 1 hour, or up to overnight for more intense flavor.
- Preheat the Air Fryer: Set your air fryer to 375°F (190°C) and allow it to preheat for about 5 minutes.
- Cook the Chicken: Remove the chicken thighs from the marinade, letting any excess drip off. Place them in the air fryer basket in a single layer, skin side up. Cook for 20-25 minutes, flipping halfway through, until the internal temperature reaches 165°F (74°C) and the skin is crispy.
- Thicken the Sauce: While the chicken is cooking, pour the remaining marinade into a small saucepan. Bring it to a boil over medium heat, then reduce to a simmer. In a small bowl, mix cornstarch and water to form a slurry, then add it to the saucepan. Stir until the sauce thickens, about 2-3 minutes.
- Serve: Once the chicken is cooked, remove it from the air fryer and let it rest for a few minutes. Brush the thickened teriyaki sauce over the chicken thighs. Garnish with sesame seeds and sliced green onions if desired. Serve immediately with your choice of sides.
Extra Tips: When cooking chicken thighs in the air fryer, make sure not to overcrowd the basket. This allows the hot air to circulate properly around each piece, guaranteeing even cooking and crispy skin. If needed, cook in batches.
Also, for a deeper flavor, try marinating the chicken overnight. Using fresh ginger and garlic will give the marinade a more robust flavor compared to powdered spices. Adjust the sweetness of the teriyaki sauce by varying the amount of honey to suit your taste preferences.
Air Fryer Loaded Potato Skins

Air Fryer Loaded Potato Skins are a delicious and easy-to-make appetizer or side dish that will be a hit at any gathering. These crispy and cheesy potato skins are a healthier version of the traditional deep-fried ones, thanks to the air fryer. The process involves baking the potatoes until tender, scooping out the flesh, and then filling them with a savory mixture of cheese, bacon, and green onions. The air fryer gives the potato skins a perfectly crispy texture without the need for excessive oil, making them a guilt-free indulgence.
For this recipe, you’ll start by selecting medium-sized russet potatoes, as they’ve a sturdy skin that holds up well during cooking. The filling is customizable, so feel free to add your favorite toppings like sour cream, chives, or even jalapeños for an extra kick. Whether you’re serving these at a party or enjoying a cozy family dinner, Air Fryer Loaded Potato Skins are sure to impress with their delicious flavors and satisfying crunch.
Ingredients (serving size: 4-6 people):
- 6 medium-sized russet potatoes
- 1 cup shredded cheddar cheese
- 1/2 cup cooked and crumbled bacon
- 1/4 cup chopped green onions
- 1/4 cup sour cream (optional for serving)
- 2 tablespoons olive oil
- Salt and pepper to taste
Cooking Instructions:
- Prepare the Potatoes: Begin by thoroughly washing the russet potatoes under cold water to remove any dirt. Pat them dry with a kitchen towel. Using a fork, pierce each potato a few times to allow steam to escape during cooking.
- Cook the Potatoes: Preheat your air fryer to 400°F (200°C). Rub the potatoes with olive oil, then season them generously with salt and pepper. Place the potatoes in the air fryer basket and cook for 35-40 minutes, or until they’re tender when pierced with a fork.
- Prepare the Skins: Once the potatoes are cooked, allow them to cool slightly until they can be handled safely. Slice each potato in half lengthwise. Using a spoon, carefully scoop out the flesh, leaving about 1/4-inch of potato attached to the skin. Save the scooped-out potato for another use, like mashed potatoes.
- Assemble the Skins: Brush the insides of the potato skins with a little more olive oil and season with salt and pepper. Place them back in the air fryer basket, cut side up, and cook for 5 minutes to crisp up the edges.
- Add the Toppings: Remove the potato skins from the air fryer. Fill each skin with shredded cheddar cheese and crumbled bacon. Return the filled skins to the air fryer and cook for an additional 3-5 minutes, or until the cheese is melted and bubbly.
- Garnish and Serve: Once cooked, remove the potato skins from the air fryer and top with chopped green onions. Serve immediately with a dollop of sour cream if desired.
Extra Tips: To guarantee even cooking, avoid overcrowding the air fryer basket. If necessary, cook the potato skins in batches. For an added flavor twist, try mixing some of the scooped-out potato flesh with butter and your favorite seasonings before placing it back into the skins. This can create a creamier filling.
Additionally, if you like your potato skins extra crispy, leave them in the air fryer for a minute or two longer, but keep an eye on them to prevent burning.
Air Fryer Eggplant Parmesan

Air Fryer Eggplant Parmesan is a delightful twist on the classic Italian dish, offering a healthier alternative without sacrificing flavor. By using an air fryer, you can achieve a crispy, golden crust on the eggplant slices without the need for excess oil. This method not only cuts down on calories but also allows for faster cooking times, making it ideal for busy weeknight dinners.
The combination of tender eggplant, zesty marinara sauce, and gooey melted cheese creates a mouthwatering meal that even picky eaters will enjoy.
Eggplant Parmesan is traditionally a labor-intensive dish, often involving frying the eggplant slices in oil. However, with the air fryer, you can enjoy the same delicious flavors with a fraction of the effort. This recipe serves 4-6 people, making it perfect for family gatherings or dinner parties. With just a few simple ingredients and easy-to-follow steps, you’ll have a restaurant-quality meal on your table in no time.
Ingredients (Serves 4-6):
- 2 large eggplants
- 2 cups marinara sauce
- 2 cups shredded mozzarella cheese
- 1 cup grated Parmesan cheese
- 1 cup all-purpose flour
- 3 large eggs
- 2 cups Italian-style breadcrumbs
- 1 teaspoon salt
- 1 teaspoon black pepper
- 1 teaspoon garlic powder
- 1 teaspoon dried oregano
- Olive oil spray
- Fresh basil leaves (optional, for garnish)
Cooking Instructions:
- Prepare the Eggplant: Wash the eggplants and cut them into 1/2-inch thick slices. Sprinkle salt on each side of the slices and let them sit for about 15 minutes to draw out excess moisture. Afterward, pat them dry with a paper towel.
- Set Up the Breading Station: In three separate shallow dishes, place the flour in one, beat the eggs in another, and mix the breadcrumbs with Parmesan cheese, garlic powder, salt, pepper, and oregano in the third.
- Bread the Eggplant Slices: Dip each eggplant slice into the flour, shaking off any excess. Then, dip it into the beaten eggs, and finally coat it with the breadcrumb mixture, pressing gently to confirm the breadcrumbs adhere.
- Preheat the Air Fryer: Preheat your air fryer to 375°F (190°C) for about 5 minutes.
- Air Fry the Eggplant: Spray the air fryer basket with olive oil spray. Place a single layer of breaded eggplant slices into the basket, ensuring they don’t overlap. Spray the tops lightly with olive oil spray. Cook for 8-10 minutes, flipping halfway through, until the eggplant is golden brown and crispy. Repeat with remaining slices.
- Assemble the Dish: In a baking dish that fits in your air fryer or oven, spread a thin layer of marinara sauce. Place a layer of air-fried eggplant slices on top, cover with more marinara sauce, and sprinkle with mozzarella cheese. Repeat the layers until all ingredients are used, finishing with a layer of mozzarella.
- Cook Until Cheese is Melted: Return the dish to the air fryer or oven and cook at 375°F (190°C) for an additional 5-7 minutes, or until the cheese is bubbly and melted.
- Serve: Remove from the air fryer and let it cool for a few minutes. Garnish with fresh basil leaves if desired. Serve warm.
Extra Tips:
For the best flavor and texture, choose eggplants that are firm and have smooth, shiny skin. Avoid overloading the air fryer basket to confirm even cooking and crispiness.
If your air fryer is small, you may need to cook the eggplant slices in multiple batches. You can make the dish ahead of time and store it in the refrigerator; simply reheat in the air fryer before serving to retain the crisp texture. Enjoy your Air Fryer Eggplant Parmesan with a side salad or pasta for a complete meal.
Air Fryer Buffalo Cauliflower Wings

Air Fryer Buffalo Cauliflower Wings are a delicious and healthier alternative to traditional buffalo wings, perfect for a snack or appetizer. These crispy and spicy cauliflower bites are a great way to enjoy the bold flavors of buffalo sauce without the added calories from deep frying. The air fryer guarantees that the cauliflower becomes beautifully crispy on the outside while remaining tender on the inside, all in a fraction of the time it would take in a conventional oven. This dish is ideal for gatherings, game days, or a fun family dinner.
The key to making the perfect Air Fryer Buffalo Cauliflower Wings is in the preparation and seasoning. By using a combination of spices and a light batter, you can achieve a flavor-packed dish that satisfies both vegetarians and meat lovers alike. The buffalo sauce, with its tangy and spicy characteristics, adds a punch of flavor that’s balanced by the cooling effect of a side of ranch or blue cheese dressing. This recipe serves 4-6 people, making it an excellent choice for sharing.
Ingredients:
- 1 large head of cauliflower, cut into florets
- 1 cup all-purpose flour
- 1 cup water
- 1 teaspoon garlic powder
- 1 teaspoon onion powder
- 1 teaspoon paprika
- 1 teaspoon salt
- 1/2 teaspoon black pepper
- 1 cup buffalo sauce
- 2 tablespoons unsalted butter, melted
- Ranch or blue cheese dressing, for serving
- Chopped fresh parsley, for garnish (optional)
Cooking Instructions:
- Prepare the Cauliflower: Wash and dry the cauliflower thoroughly. Cut it into bite-sized florets, ensuring they’re all roughly the same size for even cooking.
- Make the Batter: In a large mixing bowl, combine the all-purpose flour, water, garlic powder, onion powder, paprika, salt, and black pepper. Stir until the batter is smooth and free of lumps.
- Coat the Cauliflower: Add the cauliflower florets to the batter, ensuring each piece is well-coated. Use a spatula or your hands to mix the florets in the batter, allowing excess batter to drip off before placing them in the air fryer.
- Preheat the Air Fryer: Set your air fryer to 375°F (190°C) and preheat for about 5 minutes.
- Cook the Cauliflower: Arrange the coated cauliflower florets in a single layer in the air fryer basket. Cook for 15-20 minutes, shaking the basket halfway through to guarantee even cooking, until the cauliflower is golden brown and crispy.
- Prepare the Buffalo Sauce: In a small saucepan over low heat, combine the buffalo sauce and melted butter. Stir until well combined and heated through.
- Toss the Cauliflower in Sauce: Once the cauliflower is cooked, transfer it to a large bowl. Pour the buffalo sauce over the cauliflower and toss until each piece is evenly coated.
- Serve: Transfer the buffalo cauliflower wings to a serving platter. Garnish with chopped parsley if desired, and serve immediately with ranch or blue cheese dressing on the side.
Extra Tips:
For added crispiness, avoid overcrowding the air fryer basket. If necessary, cook the cauliflower in batches to guarantee each piece is evenly cooked and crispy.
You can also experiment with different seasoning combinations in the batter to suit your taste preferences. If you prefer a milder flavor, reduce the amount of buffalo sauce or serve it on the side for dipping.
Additionally, make sure to serve the wings immediately after coating them in the sauce to maintain their crisp texture.