

I recently discovered an amazing collection of budget-friendly, crunchy air fryer recipes perfect for family dinners. Crispy chicken tenders and savory fish tacos are just the beginning. These recipes bring ease and flavor to your table without costing a fortune or taking up too much time in the kitchen. I’ve loved how they’ve transformed my weeknight meals. Can’t wait to share my favorites with you!
Crispy Air Fryer Chicken Tenders

Crispy Air Fryer Chicken Tenders are a delightful and healthier alternative to traditional fried chicken. These tenders are juicy on the inside and perfectly crispy on the outside, thanks to the magic of the air fryer. Ideal for a quick family dinner or a fun gathering, this recipe is simple to prepare and will certainly become a favorite in your household. By using the air fryer, you cut down on excess oil while still achieving that desirable crunch that everyone loves.
This recipe works well for both adults and kids, making it versatile and family-friendly. With just a few ingredients and minimal prep work, you can have a delicious meal on the table in no time. The key to these delicious tenders lies in the seasoning and the breadcrumb coating, which provides a flavorful and satisfying bite. Serve them with your favorite dipping sauces or pair them with a fresh salad for a complete meal.
Ingredients (Serves 4-6):
- 2 pounds chicken tenders
- 1 cup all-purpose flour
- 1 teaspoon salt
- 1/2 teaspoon black pepper
- 1 teaspoon garlic powder
- 1 teaspoon paprika
- 2 large eggs
- 1 tablespoon milk
- 2 cups panko breadcrumbs
- Cooking spray or olive oil spray
Cooking Instructions:
- Prepare the Chicken: Rinse and pat the chicken tenders dry with paper towels. This will help the coating adhere better to the chicken.
- Set Up Coating Stations: In three separate shallow bowls, prepare the coating ingredients. In the first bowl, mix the flour, salt, pepper, garlic powder, and paprika. In the second bowl, whisk the eggs and milk until well combined. In the third bowl, place the panko breadcrumbs.
- Coat the Chicken: Dip each chicken tender into the flour mixture, making sure it’s fully coated. Shake off any excess flour, then dip it into the egg mixture, ensuring it’s completely covered. Finally, press the chicken into the panko breadcrumbs, covering it entirely and pressing lightly to establish the breadcrumbs stick.
- Preheat the Air Fryer: Preheat your air fryer to 400°F (200°C) for about 5 minutes. This guarantees even cooking for the chicken tenders.
- Arrange the Tenders in the Air Fryer: Lightly spray the air fryer basket with cooking spray to prevent sticking. Arrange the chicken tenders in a single layer in the basket, ensuring they don’t touch or overlap. This allows the hot air to circulate around each piece for maximum crispiness.
- Cook the Tenders: Cook the chicken tenders in the air fryer at 400°F (200°C) for 10-12 minutes, turning them halfway through. They should be golden brown and have an internal temperature of 165°F (74°C).
- Serve Immediately: Remove the tenders from the air fryer and let them cool slightly on a wire rack or a plate lined with paper towels. Serve with your choice of dipping sauces or sides.
Extra Tips:
For best results, avoid overcrowding the air fryer basket as this can prevent the tenders from crisping up properly. If necessary, cook in batches.
You can customize the seasoning in the flour mixture to suit your taste, such as adding a pinch of cayenne for extra heat or some Italian seasoning for a different flavor profile.
If you prefer a gluten-free option, substitute the all-purpose flour and panko breadcrumbs with gluten-free alternatives.
Keeping the tenders uniform in size ensures even cooking, and always check the internal temperature to guarantee they’re fully cooked before serving.
Crunchy Air Fryer Fish Tacos

Crunchy Air Fryer Fish Tacos are a delightful twist on the traditional taco night, offering a crisp and flavorful experience that’s both healthy and satisfying. Using an air fryer, you can achieve that perfect crunch without the need for excessive oil, making it a guilt-free option. The fish is seasoned to perfection, enveloped in a light and crispy coating, and then nestled into warm tortillas with a variety of fresh toppings that complement the flavors beautifully.
This dish is perfect for a family dinner or a casual get-together with friends, and it’s sure to be a hit with both adults and kids alike. The convenience of the air fryer means that this recipe isn’t only easy to execute but also quick, making it ideal for weeknight dinners. The fish cooks to a perfect golden brown in a fraction of the time it would take in a traditional oven or frying pan.
Paired with a zesty slaw and your choice of toppings, these tacos are a revitalizing and modern take on a beloved classic. With minimal cleanup and maximum flavor, Crunchy Air Fryer Fish Tacos are sure to become a staple in your meal rotation.
Ingredients (serves 4-6 people):
- 1 ½ pounds white fish fillets (such as cod or tilapia)
- 1 cup all-purpose flour
- 2 large eggs
- 1 cup panko breadcrumbs
- 1 teaspoon paprika
- 1 teaspoon garlic powder
- ½ teaspoon salt
- ½ teaspoon black pepper
- 8-12 small corn or flour tortillas
- 2 cups shredded cabbage or slaw mix
- 1 avocado, sliced
- ½ cup sour cream or Greek yogurt
- 1 lime, cut into wedges
- Fresh cilantro leaves
- Hot sauce (optional)
Cooking Instructions:
- Prepare the Fish: Rinse the fish fillets under cold water and pat them dry with paper towels. Cut them into strips about 1 inch wide, which will fit nicely into the taco shells.
- Set Up Breading Stations: Arrange three shallow bowls. In the first bowl, place the flour. In the second bowl, beat the eggs. In the third bowl, mix together the panko breadcrumbs, paprika, garlic powder, salt, and black pepper.
- Bread the Fish: Dip each fish strip first into the flour, shaking off any excess, then into the egg, and finally coat it well with the seasoned panko breadcrumbs. Confirm each piece is thoroughly coated for the best crunch.
- Preheat the Air Fryer: Set your air fryer to 400°F (200°C) and allow it to preheat for about 3-5 minutes.
- Cook the Fish: Arrange the breaded fish strips in a single layer in the air fryer basket. You may need to cook them in batches to avoid overcrowding. Cook for 8-10 minutes, or until the fish is golden brown and cooked through, flipping halfway through the cooking time.
- Prepare the Toppings: While the fish is cooking, prepare your taco toppings. Mix the shredded cabbage or slaw mix with a squeeze of lime juice and a pinch of salt. Slice the avocado and chop the cilantro.
- Assemble the Tacos: Warm the tortillas in a dry pan or microwave. Place a few strips of crispy fish in each tortilla, then top with the slaw, avocado, a dollop of sour cream or Greek yogurt, and fresh cilantro. Add a squeeze of lime and a dash of hot sauce if desired.
- Serve and Enjoy: Serve the tacos immediately while the fish is hot and crunchy.
Extra Tips:
For an even crispier texture, spray the breaded fish lightly with cooking spray before placing them in the air fryer. This will help in achieving a golden brown crust.
If you prefer spicier tacos, add a pinch of cayenne pepper to the breadcrumb mixture or use a spicy hot sauce as a drizzle. Additionally, if you’re short on time, you can use a pre-made slaw mix and store-bought taco sauce to speed up the preparation process.
Finally, remember to not overcrowd the air fryer basket to confirm even cooking and maximum crunch.
Air Fryer Potato Wedges
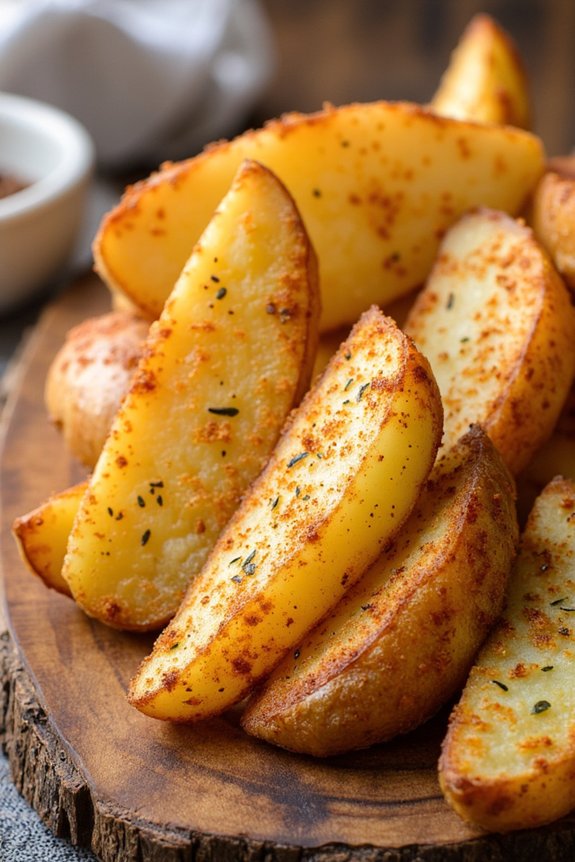
Air Fryer Potato Wedges are a delightful and healthier alternative to traditional deep-fried potatoes. These wedges are crispy on the outside and tender on the inside, making them a perfect side dish or snack. Using an air fryer not only reduces the amount of oil needed but also guarantees a quick and uniform cooking process. The seasoning can be adjusted to suit your taste, whether you prefer them spicy, herby, or plain.
Perfect for serving alongside burgers, steaks, or just as a standalone snack, these potato wedges are sure to be a hit with family and friends. The air fryer enhances the natural flavors of the potatoes while providing a satisfying crunch. Once you try making these, they’re sure to become a staple in your recipe collection.
Ingredients (serving size: 4-6 people)
- 4 large russet potatoes
- 2 tablespoons olive oil
- 1 teaspoon garlic powder
- 1 teaspoon paprika
- 1 teaspoon salt
- 1/2 teaspoon black pepper
- 1/2 teaspoon dried oregano
- Optional: 1/4 teaspoon cayenne pepper for added heat
Cooking Instructions
- Prepare the Potatoes: Start by washing the potatoes thoroughly under running water. Pat them dry with a clean kitchen towel. Cut each potato in half lengthwise, then cut each half into wedges (about 6-8 wedges per half, depending on the size of the potato).
- Season the Wedges: Place the potato wedges in a large mixing bowl. Add olive oil, garlic powder, paprika, salt, black pepper, and oregano. For a spicier kick, include the cayenne pepper. Toss the wedges until they’re evenly coated with the seasoning and oil.
- Preheat the Air Fryer: Set your air fryer to 400°F (200°C) and let it preheat for about 3 minutes. Preheating the air fryer helps achieve a crispy texture.
- Arrange the Wedges: Place the seasoned potato wedges in the air fryer basket. Make sure they’re arranged in a single layer to guarantee even cooking. If necessary, cook in batches to avoid overcrowding.
- Cook the Wedges: Cook the potato wedges in the air fryer for 15-20 minutes, flipping them halfway through the cooking time. This guarantees they cook evenly on all sides.
- Check for Doneness: Once the cooking time is up, check if the wedges are golden brown and crispy. If needed, cook for an additional 2-3 minutes.
- Serve: Remove the potato wedges from the air fryer and let them cool slightly before serving. They can be served with your favorite dipping sauce or as a side dish.
Extra Tips
To achieve the best results, try to cut the wedges as evenly as possible to guarantee they cook at the same rate. If your air fryer tends to cook unevenly, shake the basket a couple of times during cooking to redistribute the wedges.
Additionally, you can experiment with other seasonings like rosemary or thyme to change up the flavor profile. Remember, the key to crispy potato wedges isn’t overcrowding the air fryer basket. Enjoy your deliciously crispy air fryer potato wedges!
Air Fryer Stuffed Bell Peppers

Air Fryer Stuffed Bell Peppers are a delicious and healthy way to enjoy a classic comfort food without the need for excessive oil or long cooking times. These colorful and flavorful peppers are filled with a savory mixture of ground meat, rice, vegetables, and spices, making them a perfect all-in-one dish. Cooking them in an air fryer guarantees that they come out perfectly cooked with a slightly crispy exterior and a tender, juicy filling.
This recipe is great for a weeknight dinner or when you’re hosting friends and family, as it’s both easy to prepare and impressive to serve. The beauty of this dish lies in its adaptability; you can customize the filling to suit your dietary preferences or to use up what you have on hand. Whether you prefer beef, turkey, or a vegetarian alternative, these stuffed peppers are sure to satisfy.
The air fryer not only cuts down on cooking time but also enhances the flavors by giving the peppers a slight char, intensifying their natural sweetness. With minimal prep and cleanup, this Air Fryer Stuffed Bell Peppers recipe is a must-try for anyone looking to streamline their dinner routine without compromising on taste.
Ingredients (Serves 4-6):
- 4 large bell peppers, any color
- 1 pound ground beef or turkey
- 1 cup cooked rice
- 1 small onion, finely chopped
- 2 cloves garlic, minced
- 1 can (14.5 oz) diced tomatoes, drained
- 1 teaspoon Italian seasoning
- 1 cup shredded mozzarella cheese
- Salt and pepper to taste
- Olive oil spray
Cooking Instructions:
- Prepare the Peppers: Slice the tops off the bell peppers and remove the seeds and membranes inside. Set aside the tops to use as lids if desired. Preheat the air fryer to 360°F (180°C).
- Cook the Filling: In a skillet over medium heat, cook the ground meat until browned. Add the chopped onion and minced garlic, and sauté until the onion is translucent. Stir in the drained diced tomatoes, cooked rice, Italian seasoning, salt, and pepper. Mix well and let the mixture cook for another 2-3 minutes to combine flavors.
- Stuff the Peppers: Fill each bell pepper with the meat and rice mixture, packing it in tightly. Place the filled peppers in the air fryer basket, guaranteeing they’re upright. Spray the peppers lightly with olive oil to help with browning.
- Air Fry: Cook the stuffed peppers in the air fryer for 12-15 minutes, or until the peppers are tender and slightly charred. Halfway through the cooking time, carefully remove the basket and sprinkle the tops of the peppers with shredded mozzarella cheese.
- Melt the Cheese: Return the basket to the air fryer and cook for an additional 3-5 minutes, or until the cheese is melted and bubbly. Carefully remove the peppers from the air fryer and let them cool slightly before serving.
Extra Tips:
For a vegetarian version, you can replace the ground meat with a mixture of black beans and corn, or use a plant-based meat substitute. If you want to add a bit of heat, consider adding a pinch of red pepper flakes or some chopped jalapeños to the filling.
You can also experiment with different types of cheese, such as cheddar or pepper jack, to change up the flavor profile. When selecting bell peppers, try to choose ones that are similar in size, so they cook evenly. If you have leftover filling, it can be stored in the refrigerator and used as a topping for baked potatoes or as a filling for burritos.
Air Fryer BBQ Chicken Drumsticks
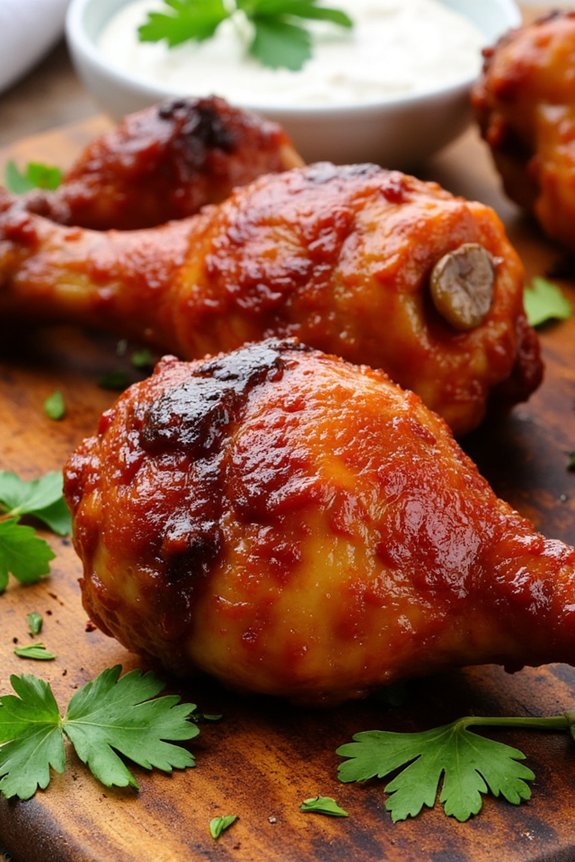
Air Fryer BBQ Chicken Drumsticks are a delightful, healthier alternative to traditionally fried chicken, offering a crisp, juicy texture with a smoky barbecue flavor. This dish is perfect for family dinners or casual gatherings, providing a satisfying and easy-to-make option that doesn’t compromise on taste.
By using an air fryer, you can enjoy all the deliciousness of BBQ chicken with considerably less oil, making it a guilt-free indulgence.
In this recipe, we’ll guide you through the process of preparing these succulent drumsticks, making sure they’re perfectly seasoned and cooked to a golden-brown perfection. With just a few simple ingredients and steps, you can have a mouthwatering meal ready in no time.
Gather your ingredients and get ready to impress your family and friends with this delicious air fryer BBQ chicken drumsticks recipe that serves 4-6 people.
Ingredients:
- 12 chicken drumsticks
- 1 cup BBQ sauce
- 2 tablespoons olive oil
- 1 teaspoon garlic powder
- 1 teaspoon onion powder
- 1 teaspoon smoked paprika
- Salt and pepper to taste
Cooking Instructions:
- Prepare the Drumsticks: Begin by patting the chicken drumsticks dry with paper towels. This helps the seasoning stick better and guarantees a crispier skin.
- Season the Chicken: In a large mixing bowl, combine the olive oil, garlic powder, onion powder, smoked paprika, salt, and pepper. Add the drumsticks to the bowl and toss them until they’re evenly coated with the seasoning mixture.
- Preheat the Air Fryer: Set your air fryer to 375°F (190°C) and allow it to preheat for about 3-5 minutes. Preheating helps to make sure even cooking.
- Arrange in the Air Fryer: Arrange the seasoned drumsticks in a single layer in the air fryer basket. Make sure not to overcrowd the basket to allow for proper air circulation.
- Cook the Drumsticks: Air fry the drumsticks for 25 minutes, flipping halfway through the cooking time to ensure even browning on all sides.
- Add BBQ Sauce: After 25 minutes, remove the drumsticks from the air fryer and brush them generously with BBQ sauce on all sides.
- Final Cook: Return the drumsticks to the air fryer and cook for an additional 5-7 minutes, or until the internal temperature reaches 165°F (74°C) and the sauce is caramelized and sticky.
- Serve: Once cooked, remove the drumsticks from the air fryer and let them rest for a few minutes before serving. Enjoy them hot with your favorite sides.
Extra Tips:
For best results, use drumsticks of similar size to ensure even cooking. If you prefer a spicier kick, consider adding a pinch of cayenne pepper to the seasoning mix.
To avoid sticking, lightly spray the air fryer basket with cooking spray before adding the chicken. Additionally, if your air fryer is smaller, you may need to cook the drumsticks in batches to avoid overcrowding.
Finally, feel free to experiment with different BBQ sauce flavors to find your favorite combination.
Air Fryer Zucchini Fries

Air Fryer Zucchini Fries are a delightful and healthier alternative to traditional fries, making them a perfect side dish or snack. These crispy, golden-brown fries are easy to make and packed with flavor. Using an air fryer guarantees that they achieve that satisfying crunch without the need for excessive oil, which keeps the calorie count lower while still delivering on taste.
Whether you’re looking to add more vegetables to your diet or simply want a guilt-free treat, this recipe is sure to please both adults and kids alike. The secret to achieving the perfect Air Fryer Zucchini Fries lies in the coating. A well-seasoned breadcrumb mixture provides a savory crust that contrasts beautifully with the tender zucchini inside.
With just a few simple ingredients and about 30 minutes, you can have a batch of these irresistible fries ready to serve. They pair wonderfully with a variety of dipping sauces, like marinara or ranch, making them a versatile addition to any meal. Follow the steps below to create a dish that’s crunchy, flavorful, and utterly delicious.
Ingredients for Air Fryer Zucchini Fries (Serves 4-6):
- 3 medium zucchinis
- 1 cup all-purpose flour
- 3 large eggs
- 1 cup breadcrumbs
- 1/2 cup grated Parmesan cheese
- 1 teaspoon garlic powder
- 1 teaspoon onion powder
- 1 teaspoon Italian seasoning
- Salt and pepper to taste
- Cooking spray
Cooking Instructions:
- Prepare the Zucchini: Wash the zucchinis thoroughly and cut off the ends. Slice each zucchini into sticks approximately 3-4 inches long and about 1/2 inch thick, resembling the shape of traditional fries.
- Set Up the Coating Station: In three separate shallow dishes, set up your coating station. Place the flour in the first dish. Beat the eggs in the second dish. In the third dish, mix together the breadcrumbs, Parmesan cheese, garlic powder, onion powder, Italian seasoning, salt, and pepper.
- Coat the Zucchini: Begin by dredging each zucchini stick in the flour, making sure it’s fully coated. Shake off any excess flour, then dip it into the beaten eggs. Allow any excess egg to drip off, and then roll the zucchini in the breadcrumb mixture, pressing gently to make sure the coating adheres well.
- Preheat the Air Fryer: Preheat your air fryer to 400°F (200°C) for about 5 minutes. This helps make certain that the zucchini fries will cook evenly and become crispy.
- Air Fry the Zucchini Fries: Lightly spray the zucchini fries with cooking spray to promote browning. Place the coated zucchini sticks in a single layer in the air fryer basket, ensuring they don’t overlap. You may need to work in batches depending on the size of your air fryer. Air fry for 10-12 minutes, flipping halfway through, until golden brown and crispy.
- Serve: Once cooked, remove the zucchini fries from the air fryer and serve immediately, accompanied by your favorite dipping sauces.
Extra Tips: For best results, make sure to cut the zucchini uniformly to make certain of even cooking. If you prefer a spicier kick, consider adding a pinch of cayenne pepper to the breadcrumb mixture.
Additionally, to avoid sogginess, avoid overcrowding the air fryer basket, as proper air circulation is essential for achieving that perfect crisp exterior. Experiment with different seasoning blends to customize the flavor to your liking, and enjoy these guilt-free fries as a versatile and delicious accompaniment to any meal.
Air Fryer Meatballs

Air fryer meatballs are a delicious and healthier alternative to traditional fried meatballs. Perfect for a quick weeknight dinner, these meatballs come out juicy on the inside with a perfectly crisp exterior, thanks to the magic of the air fryer.
They’re versatile enough to be served with pasta, in a sub sandwich, or as an appetizer with your favorite dipping sauce. Not only are they delicious, but cooking them in an air fryer also reduces the amount of oil needed, making them a guilt-free addition to your meal repertoire.
This recipe serves 4-6 people, making it an ideal choice for family dinners or small gatherings. The blend of ground meats, herbs, and spices guarantees that each bite is packed with flavor. Follow these simple instructions to create a batch of air fryer meatballs that are sure to impress.
Ingredients:
- 1 pound ground beef
- 1 pound ground pork
- 1 cup breadcrumbs
- 1/2 cup grated Parmesan cheese
- 1/4 cup milk
- 2 large eggs
- 3 cloves garlic, minced
- 1 tablespoon fresh parsley, chopped
- 1 teaspoon salt
- 1/2 teaspoon black pepper
- 1/2 teaspoon onion powder
- 1/2 teaspoon dried oregano
- Cooking spray
Cooking Instructions:
- Prepare the Mixture: In a large mixing bowl, combine the ground beef and ground pork. Add breadcrumbs, Parmesan cheese, milk, eggs, minced garlic, parsley, salt, pepper, onion powder, and oregano. Mix everything together using your hands or a spatula until all ingredients are well incorporated.
- Form the Meatballs: Preheat your air fryer to 400°F (200°C). While the air fryer is heating, shape the meat mixture into 1.5-inch balls, making sure they’re uniform in size for even cooking. You should have around 20-24 meatballs.
- Cook the Meatballs: Lightly spray the air fryer basket with cooking spray to prevent sticking. Arrange the meatballs in a single layer in the basket, making sure they aren’t touching. Depending on the size of your air fryer, you may need to cook them in batches.
- Air Fry the Meatballs: Cook the meatballs for 10-12 minutes, turning them halfway through the cooking time to guarantee even browning. The meatballs should be golden brown and have an internal temperature of at least 160°F (71°C).
- Serve and Enjoy: Once cooked, remove the meatballs from the air fryer and let them rest for a couple of minutes. Serve them with your favorite pasta, marinara sauce, or as part of a meatball sub.
Extra Tips:
To confirm the meatballs are juicy and tender, avoid over-mixing the meat mixture. Over-mixing can result in dense meatballs.
If you find the mixture too sticky, wet your hands slightly to make shaping the meatballs easier. Additionally, you can experiment with different herbs and spices to suit your taste preferences.
For a gluten-free option, substitute regular breadcrumbs with gluten-free breadcrumbs.
Air Fryer Sweet and Spicy Shrimp
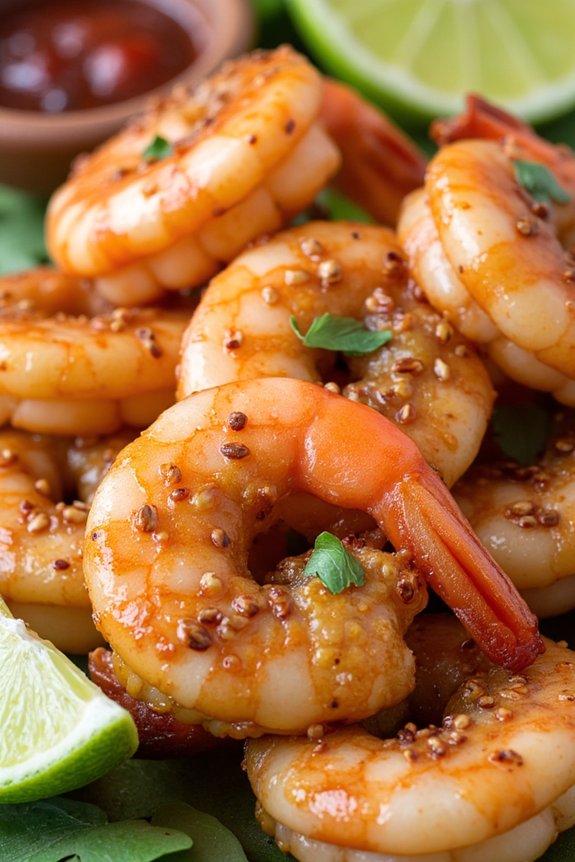
Air Fryer Sweet and Spicy Shrimp is a delightful dish that perfectly balances bold flavors with a satisfying crunch. This recipe is ideal for those who enjoy a little heat with their seafood, as it combines the sweetness of honey and brown sugar with the spiciness of sriracha and chili flakes. The air fryer guarantees that the shrimp cook evenly and maintain a tender, juicy interior while achieving a crispy exterior.
Perfect for a quick weeknight meal or as an impressive appetizer for guests, this dish will surely become a staple in your culinary repertoire.
The key to attaining the perfect Sweet and Spicy Shrimp lies in the marinade, which infuses the shrimp with flavor and guarantees that each bite is an explosion of taste. Allowing the shrimp to marinate for at least 30 minutes will enhance the depth of flavor, while the air fryer will lock in the moisture and create a delightful texture.
With minimal oil and a short cooking time, this recipe isn’t only delicious but also a healthier option compared to traditional frying methods.
Ingredients for 4-6 servings:
- 2 pounds large shrimp, peeled and deveined
- 2 tablespoons olive oil
- 3 tablespoons honey
- 2 tablespoons soy sauce
- 1 tablespoon sriracha sauce
- 1 tablespoon brown sugar
- 1 teaspoon garlic powder
- 1 teaspoon onion powder
- ½ teaspoon red chili flakes
- ½ teaspoon salt
- ½ teaspoon black pepper
- 1 tablespoon lime juice
- Fresh cilantro, chopped (for garnish)
- Lime wedges (for serving)
Instructions:
- Prepare the Marinade: In a large mixing bowl, combine olive oil, honey, soy sauce, sriracha, brown sugar, garlic powder, onion powder, red chili flakes, salt, and black pepper. Whisk the ingredients together until they’re well-blended and the sugar is dissolved.
- Marinate the Shrimp: Add the peeled and deveined shrimp to the bowl with the marinade. Toss the shrimp until they’re evenly coated. Cover the bowl with plastic wrap and refrigerate for at least 30 minutes to allow the flavors to penetrate the shrimp.
- Preheat the Air Fryer: Set the air fryer to 400°F (200°C) and allow it to preheat for about 5 minutes.
- Arrange the Shrimp: Remove the shrimp from the marinade, letting any excess drip off. Arrange the shrimp in a single layer in the air fryer basket. Avoid overcrowding to guarantee even cooking; you may need to cook in batches depending on the size of your air fryer.
- Cook the Shrimp: Air fry the shrimp for 6-8 minutes, flipping them halfway through the cooking time, until they’re pink, opaque, and slightly crispy.
- Garnish and Serve: Transfer the cooked shrimp to a serving platter. Drizzle with lime juice and garnish with freshly chopped cilantro. Serve with lime wedges on the side for an extra burst of citrus flavor.
Extra Tips:
For the best results, choose large shrimp as they’re easier to manage and cook evenly in the air fryer. If you prefer a spicier dish, feel free to increase the amount of sriracha or chili flakes according to your taste.
Additionally, make sure that the shrimp are patted dry before marinating to help the marinade adhere better. If you have leftover marinade, you can reduce it on the stovetop to use as a dipping sauce. This dish pairs well with steamed rice or a fresh salad for a complete meal.
Air Fryer Vegetable Spring Rolls

Air Fryer Vegetable Spring Rolls are a delightful and healthy appetizer perfect for any dinner gathering or as a tasty snack. These rolls are packed with fresh vegetables and are cooked to crispy perfection using an air fryer, which means they contain less oil compared to traditional frying methods.
With a combination of crunchy vegetables wrapped in a delicate spring roll wrapper, these treats are sure to impress your guests with their flavor and texture. Spring rolls are an excellent way to incorporate more veggies into your diet, and using an air fryer makes them a guilt-free indulgence.
The air fryer not only guarantees an even, crispy exterior but also retains the vibrant colors and nutrients of the vegetables inside. This recipe is designed to serve 4-6 people, making it ideal for family dinners or small gatherings.
Ingredients:
- 12 spring roll wrappers
- 1 cup shredded cabbage
- 1/2 cup grated carrots
- 1/2 cup bean sprouts
- 1/4 cup finely chopped green onions
- 1/4 cup chopped bell peppers (any color)
- 2 tablespoons soy sauce
- 1 tablespoon sesame oil
- 1 teaspoon grated ginger
- 1 clove garlic, minced
- Cooking spray
Cooking Instructions:
- Prepare the Filling: In a large bowl, combine the shredded cabbage, grated carrots, bean sprouts, green onions, and chopped bell peppers. Add the soy sauce, sesame oil, grated ginger, and minced garlic. Mix everything together until the vegetables are evenly coated with the sauce.
- Assemble the Spring Rolls: Place a spring roll wrapper on a clean surface with one corner facing you. Spoon about 2 tablespoons of the vegetable filling near the bottom corner of the wrapper. Fold the bottom corner over the filling, then fold in the sides, and roll up tightly. Seal the edge with a little water. Repeat with the remaining wrappers and filling.
- Preheat the Air Fryer: Set your air fryer to 400°F (200°C) and preheat it for about 3 minutes.
- Cook the Spring Rolls: Lightly coat the spring rolls with cooking spray to guarantee crispiness. Arrange them in a single layer in the air fryer basket, making sure they don’t touch. Cook for 8-10 minutes, turning them halfway through the cooking time, until they’re golden brown and crispy.
- Serve: Once cooked, remove the spring rolls from the air fryer and let them cool slightly. Serve them warm with your choice of dipping sauce, such as sweet chili sauce or soy sauce.
Extra Tips:
For best results, avoid overfilling the spring rolls, as this can cause them to burst during cooking. If you find the wrappers drying out as you work, cover them with a damp cloth to keep them pliable.
Experiment with different vegetables or add some tofu or mushrooms for a more substantial filling. Additionally, be sure to monitor the cooking time as air fryers can vary, and you may need to adjust the time based on your specific model.
Enjoy your crispy, delicious, and healthy Air Fryer Vegetable Spring Rolls!
Air Fryer Herb-Crusted Pork Chops
Air fryers have revolutionized the way we approach cooking, offering a healthier alternative to traditional frying methods without sacrificing flavor or texture. One of the standout recipes that perfectly illustrates this advantage is Air Fryer Herb-Crusted Pork Chops. This dish combines the fragrant aromas of fresh herbs with the crispy exterior of perfectly cooked pork chops, creating a mouthwatering experience that’s sure to please any palate.
Whether you’re preparing a family dinner or hosting a small gathering, these herb-crusted pork chops will be a delightful centerpiece that highlights the convenience and versatility of the air fryer.
The secret to this dish lies in the herb crust, which is a flavorful blend of fresh herbs, breadcrumbs, and Parmesan cheese, all working together to form a crispy coating that locks in the natural juices of the pork. As the air fryer works its magic, the herb crust becomes golden brown and perfectly crispy, providing a delightful contrast to the tender and juicy meat inside.
This recipe isn’t only simple to prepare but also quick to cook, making it an excellent choice for a weeknight dinner or a special occasion. With just a handful of ingredients and minimal prep time, you can enjoy a gourmet meal in the comfort of your own home.
Ingredients (Serves 4-6):
- 4-6 bone-in pork chops (about 1 inch thick)
- 1 cup breadcrumbs
- 1/2 cup grated Parmesan cheese
- 2 tablespoons fresh parsley, chopped
- 1 tablespoon fresh thyme, chopped
- 1 tablespoon fresh rosemary, chopped
- 2 cloves garlic, minced
- 1 teaspoon salt
- 1/2 teaspoon black pepper
- 2 large eggs
- Olive oil spray
Cooking Instructions:
- Prepare the Herb Mixture: In a medium mixing bowl, combine the breadcrumbs, Parmesan cheese, parsley, thyme, rosemary, garlic, salt, and black pepper. Mix well to confirm that the herbs and spices are evenly distributed throughout the breadcrumb mixture.
- Prepare the Egg Wash: In a separate shallow bowl, beat the eggs until they’re well combined. This will be used to help the herb mixture adhere to the pork chops.
- Coat the Pork Chops: Pat the pork chops dry with a paper towel. Dip each pork chop into the egg wash, allowing any excess to drip off. Then, press the pork chop into the herb mixture, coating both sides evenly. Verify the pork chops are completely covered with the herb crust.
- Preheat the Air Fryer: Set your air fryer to 375°F (190°C) and allow it to preheat for about 3-5 minutes.
- Air Fry the Pork Chops: Lightly spray the air fryer basket with olive oil spray to prevent sticking. Place the pork chops in the basket in a single layer, ensuring they don’t overlap. Lightly spray the tops of the pork chops with olive oil spray. Cook for 12-15 minutes, flipping halfway through, until the internal temperature reaches 145°F (63°C) and the crust is golden brown.
- Rest and Serve: Once cooked, remove the pork chops from the air fryer and let them rest for about 5 minutes before serving. This allows the juices to redistribute, confirming a tender and juicy pork chop.
Extra Tips:
For best results, let the pork chops come to room temperature before coating and cooking. This helps them cook more evenly in the air fryer.
If you prefer a spicier kick, consider adding a pinch of cayenne pepper to the herb mixture. Additionally, make sure not to overcrowd the air fryer basket; cook in batches if necessary to confirm each pork chop gets evenly cooked and crispy.
Enjoy your Air Fryer Herb-Crusted Pork Chops with a side of roasted vegetables or a fresh salad for a well-rounded meal.
Air Fryer Buffalo Cauliflower Bites

Air Fryer Buffalo Cauliflower Bites are the perfect vegetarian alternative to traditional buffalo wings. They’re crispy, spicy, and incredibly satisfying, making them a great addition to any game day spread or a simple weeknight dinner.
Using an air fryer to cook the cauliflower guarantees that you get a perfectly crunchy exterior without the need for excessive oil, making this dish a healthier option. The cauliflower florets are coated in a spicy buffalo sauce, which gives them that classic tangy and hot flavor associated with buffalo wings.
These buffalo cauliflower bites aren’t just delicious but also easy to prepare. The air fryer cuts down on cooking time, allowing you to enjoy this tasty dish without spending too long in the kitchen.
Whether you’re a seasoned vegetarian or just looking to add more plant-based meals to your diet, these buffalo cauliflower bites are sure to be a hit. Serve them with a side of celery sticks and a creamy dip like ranch or blue cheese for the full experience.
Ingredients (Serves 4-6):
- 1 large head of cauliflower, cut into bite-sized florets
- 1 cup all-purpose flour
- 1 cup water
- 1 teaspoon garlic powder
- 1 teaspoon onion powder
- 1 teaspoon paprika
- Salt and pepper to taste
- 2 tablespoons olive oil
- 1 cup buffalo sauce
- Optional: Ranch or blue cheese dressing for serving
- Optional: Celery sticks for serving
Cooking Instructions:
- Prepare the Cauliflower: Begin by washing the cauliflower thoroughly. Cut it into small, bite-sized florets that will cook evenly in the air fryer.
- Make the Batter: In a medium bowl, combine the all-purpose flour, water, garlic powder, onion powder, paprika, salt, and pepper. Mix until you have a smooth batter without lumps.
- Coat the Cauliflower: Dip each cauliflower floret into the batter, guaranteeing that it’s completely coated. Shake off any excess batter and place the florets on a plate.
- Preheat the Air Fryer: Preheat your air fryer to 375°F (190°C) for about 5 minutes to guarantee even cooking.
- Air Fry the Cauliflower: Lightly spray the air fryer basket with olive oil. Place the battered cauliflower florets in a single layer in the basket. Cook for 12-15 minutes, flipping halfway through, until they’re golden brown and crispy.
- Toss in Buffalo Sauce: Once cooked, remove the cauliflower from the air fryer and place them in a large bowl. Pour the buffalo sauce over the cauliflower and toss until each piece is fully coated.
- Serve: Serve immediately with optional celery sticks and your choice of ranch or blue cheese dressing for dipping.
Extra Tips: For an extra crispy texture, you can double-coat the cauliflower by dipping them again in the batter after the first round of air frying. If you prefer a milder flavor, you can adjust the amount of buffalo sauce to suit your taste.
Also, avoid overcrowding the air fryer basket; cook in batches if necessary to maintain the crispiness.
Air Fryer Garlic Parmesan Wings

Air Fryer Garlic Parmesan Wings are a delicious and easy-to-make dish that will quickly become a favorite at your dinner table. These wings are perfectly crispy on the outside while remaining juicy and tender on the inside, thanks to the magic of the air fryer. With the rich and savory combination of garlic and Parmesan, these wings are bursting with flavor that will have everyone reaching for more.
Whether you’re preparing a casual weeknight meal or hosting a game day gathering, these wings are bound to impress.
The best part about making Air Fryer Garlic Parmesan Wings is that they require minimal ingredients and are ready in just a short amount of time. The air fryer cuts down on cooking time and reduces the amount of oil traditionally needed for frying, making it a healthier alternative. Plus, cleanup is a breeze, leaving you more time to enjoy with family and friends.
This recipe is designed to serve 4-6 people, making it perfect for a small crowd.
Ingredients:
- 2 pounds of chicken wings
- 1 tablespoon olive oil
- 1 teaspoon salt
- 1 teaspoon black pepper
- 1 teaspoon garlic powder
- 1/2 cup grated Parmesan cheese
- 2 tablespoons chopped fresh parsley
- 1/4 cup melted butter
- 4 cloves of garlic, minced
Cooking Instructions:
- Prepare the Wings: Begin by patting the chicken wings dry with paper towels. This helps them get extra crispy in the air fryer. Place the wings in a large bowl and add olive oil, salt, black pepper, and garlic powder. Toss the wings until they’re evenly coated with the oil and seasonings.
- Preheat the Air Fryer: Preheat your air fryer to 400°F (200°C) for about 5 minutes. Preheating guarantees that the wings start cooking immediately, leading to a crispier texture.
- Cook the Wings: Arrange the wings in a single layer in the air fryer basket. It’s important not to overcrowd the basket, so the hot air can circulate around each piece. You may need to cook them in batches. Cook the wings for 20-25 minutes, flipping them halfway through the cooking time to guarantee even crispiness.
- Prepare the Garlic Parmesan Sauce: While the wings are cooking, prepare the garlic Parmesan sauce. In a small saucepan over low heat, melt the butter. Add the minced garlic and cook for 1-2 minutes until fragrant. Remove from heat and stir in the grated Parmesan cheese and chopped parsley.
- Coat the Wings: Once the wings are done cooking, transfer them to a large mixing bowl. Pour the garlic Parmesan sauce over the wings and toss until they’re fully coated.
- Serve: Serve the wings hot, garnished with additional Parmesan cheese and parsley if desired.
Extra Tips:
For extra crispiness, make sure the wings are spaced out in the air fryer and not touching each other. If you prefer spicier wings, add a dash of cayenne pepper or a sprinkle of red pepper flakes to the seasoning mix.
Additionally, using freshly grated Parmesan cheese will enhance the flavor more than pre-grated varieties. Don’t forget to preheat your air fryer for the best results, and consider serving these wings with your favorite dipping sauces for added flavor.
Air Fryer Falafel

Air Fryer Falafel is a healthier twist on the traditional deep-fried Middle Eastern delight. By using an air fryer, you can achieve the same crispy texture and delicious flavor without the added oil and fat. This recipe is perfect for a quick weeknight dinner or a tasty snack that everyone will love. The combination of chickpeas, fresh herbs, and spices creates a flavorful and satisfying dish that pairs well with a variety of sides and sauces.
Making falafel in an air fryer not only reduces the amount of oil used but also makes the cooking process much simpler and cleaner. With just a few ingredients and some basic kitchen equipment, you can have a batch of homemade falafel ready in no time. This recipe serves 4-6 people, making it great for a small gathering or family meal. Serve your air fryer falafel with pita bread, salad, or your favorite dipping sauce for a complete meal.
Ingredients for Air Fryer Falafel (Serves 4-6)
- 2 cups dried chickpeas, soaked overnight
- 1 small onion, roughly chopped
- 4 cloves garlic
- 1 cup fresh parsley leaves
- 1 cup fresh cilantro leaves
- 1 teaspoon ground cumin
- 1 teaspoon ground coriander
- 1 teaspoon salt
- 1/2 teaspoon baking powder
- 1/4 teaspoon cayenne pepper
- 2 tablespoons all-purpose flour
- Cooking spray or a light brush of olive oil
Cooking Instructions
- Soak the Chickpeas: Begin by soaking the dried chickpeas in a large bowl with plenty of water overnight or for at least 12 hours. This softens them and makes them perfect for blending.
- Prepare the Falafel Mixture: Drain and rinse the soaked chickpeas. In a food processor, combine the chickpeas, onion, garlic, parsley, cilantro, cumin, coriander, salt, baking powder, and cayenne pepper. Pulse until the mixture is coarse and well combined, but not pureed. Add the flour and pulse a few more times to incorporate.
- Shape the Falafel: Using your hands, form the mixture into small balls or patties, about 2 inches in diameter. If the mixture is too sticky, add a bit more flour until it holds together.
- Preheat the Air Fryer: Preheat your air fryer to 350°F (175°C) for about 5 minutes.
- Cook the Falafel: Lightly spray the air fryer basket with cooking spray or brush with olive oil. Arrange the falafel balls in a single layer in the basket, making sure they don’t touch each other. You may need to cook them in batches. Cook for 12-15 minutes, flipping halfway through, until they’re golden brown and crispy.
- Serve: Once cooked, remove the falafel from the air fryer and let them cool slightly before serving. Enjoy them warm with your choice of accompaniments like pita bread, hummus, or tahini sauce.
Extra Tips
For the best texture, verify that the chickpeas are soaked long enough; this helps in achieving a perfect blend. If the mixture feels too wet, add more flour a tablespoon at a time until it reaches the right consistency.
To prevent the falafel from sticking to the air fryer basket, make sure to apply a light coating of oil. Experiment with different herbs and spices to customize the flavor to your liking—mint, dill, or paprika can add a unique twist.
Finally, if you’re not ready to cook all the falafel at once, you can freeze the uncooked balls for up to a month and cook them directly from frozen, adjusting the cooking time as needed.