

Spring is in the air, and Easter is the perfect time to gather with loved ones for a meal that’s full of fresh, vibrant flavors.
Think about an herb-crusted rack of lamb or a citrus-glazed ham with pineapple gracing your table.
This list of Easter recipes has everything from refreshing salads to delightful desserts.
These dishes are sure to make your holiday meal truly special.
Let’s make this Easter feast one to remember!
Herb-Crusted Rack of Lamb
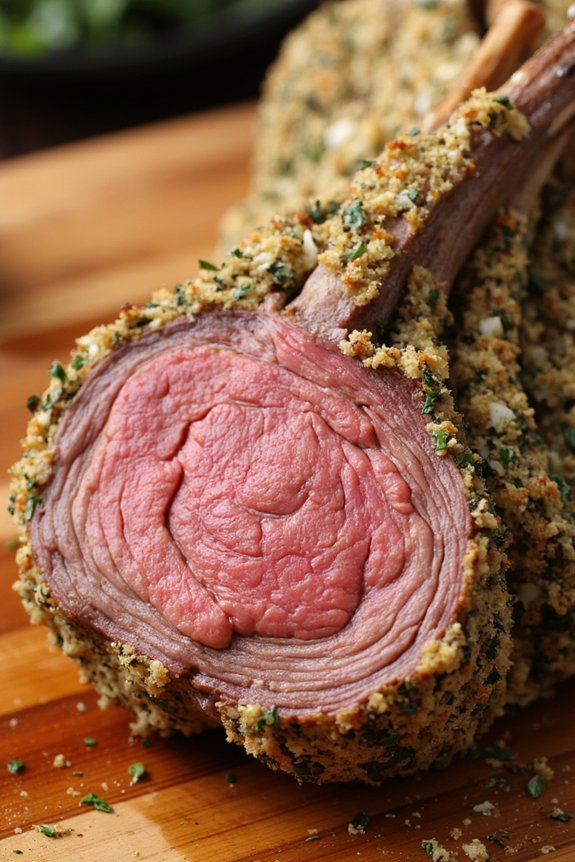
Celebrate Easter with a show-stopping Herb-Crusted Rack of Lamb that will delight your family and guests. This elegant dish combines the tender, juicy flavors of lamb with a fragrant herb crust that will leave everyone asking for seconds. The key to this recipe is the perfect balance of fresh herbs and garlic, which complement the richness of the lamb beautifully.
Whether you’re a seasoned cook or trying lamb for the first time, this recipe is sure to impress and become a staple in your Easter celebrations. The Herb-Crusted Rack of Lamb isn’t only delicious but also visually stunning, making it the centerpiece of your Easter family dinner.
With a serving size that comfortably feeds 4-6 people, this recipe guarantees that everyone gets a taste of this exquisite dish. Pair it with your favorite sides, such as roasted vegetables or a light salad, to complete your Easter feast. Gather your ingredients, follow the simple steps, and get ready to enjoy a flavorful meal that brings everyone together.
Ingredients (Serves 4-6):
- 2 racks of lamb (8 ribs each), frenched
- 1/4 cup Dijon mustard
- 4 cloves garlic, minced
- 1/4 cup fresh parsley, finely chopped
- 2 tablespoons fresh rosemary, finely chopped
- 2 tablespoons fresh thyme, finely chopped
- 1 cup breadcrumbs
- 1/4 cup grated Parmesan cheese
- Salt and pepper, to taste
- 2 tablespoons olive oil
Cooking Instructions:
- Prepare the Lamb: Preheat your oven to 400°F (200°C). Season the lamb racks with salt and pepper on all sides. Let them sit at room temperature for about 20 minutes to promote even cooking.
- Make the Herb Crust: In a small bowl, combine the minced garlic, parsley, rosemary, thyme, breadcrumbs, and Parmesan cheese. Mix well until all ingredients are evenly distributed.
- Coat the Lamb: Brush the lamb racks generously with Dijon mustard, creating a thin, even layer. This will help the herb crust adhere to the meat.
- Apply the Herb Mixture: Press the herb mixture onto the mustard-coated lamb racks, making sure to cover all sides. Use your hands to gently press the mixture so that it sticks well.
- Sear the Lamb: Heat olive oil in a large, oven-safe skillet over medium-high heat. Carefully place the lamb racks in the skillet, herb-side up, and sear for 2-3 minutes until the bottoms are golden brown.
- Roast the Lamb: Transfer the skillet to the preheated oven and roast for 15-20 minutes for medium-rare, or longer if desired. Use a meat thermometer to check the internal temperature, aiming for 130°F (54°C) for medium-rare.
- Rest and Serve: Remove the lamb from the oven and let it rest for 10 minutes before slicing. This allows the juices to redistribute, promoting a juicy and tender result. Slice between the ribs and serve on a platter.
Extra Tips:
When preparing the Herb-Crusted Rack of Lamb, using fresh herbs will greatly enhance the flavor of the dish. Be sure to finely chop the herbs to make certain they adhere well to the mustard coating.
If you prefer a different degree of doneness, adjust the roasting time accordingly, and always use a meat thermometer for accuracy. Finally, resting the lamb after roasting is vital, as it locks in the juices and makes slicing easier.
Enjoy your Easter dinner with this delightful centerpiece that’s as delicious as it’s impressive!
Citrus-Glazed Ham With Pineapple

Citrus-Glazed Ham With Pineapple is a delightful dish that brings a burst of flavor to your Easter family dinner. The sweet and tangy glaze, made with a combination of citrus juices and brown sugar, perfectly complements the savory and succulent ham. The addition of pineapple not only enhances the tropical essence of the dish but also adds a revitalizing contrast to the rich flavors of the ham. This delectable dish is sure to be the centerpiece of your Easter celebration, leaving your guests impressed and satisfied.
This recipe is designed to serve 4-6 people, making it ideal for a cozy family gathering. With its vibrant glaze and juicy pineapple rings, this Citrus-Glazed Ham isn’t only a feast for the taste buds but also a visual delight. The preparation is straightforward, allowing you to focus on enjoying your time with loved ones while the ham bakes to perfection. Follow these steps to create a memorable Easter dinner that will have everyone coming back for seconds.
Ingredients:
- 1 (4-6 pound) fully cooked boneless ham
- 1 cup pineapple juice
- 1/2 cup orange juice
- 1/2 cup brown sugar
- 1/4 cup honey
- 2 tablespoons Dijon mustard
- 1 teaspoon ground ginger
- 1/2 teaspoon ground cloves
- 1 (20-ounce) can pineapple rings
- Maraschino cherries (optional, for garnish)
Instructions:
- Preheat the Oven: Preheat your oven to 325°F (165°C). This temperature will guarantee that the ham heats through evenly without drying out.
- Prepare the Glaze: In a medium saucepan, combine the pineapple juice, orange juice, brown sugar, honey, Dijon mustard, ground ginger, and ground cloves. Stir the mixture over medium heat until the sugar has dissolved and the glaze is slightly thickened, about 5-7 minutes.
- Score the Ham: Place the ham on a rack in a roasting pan. Score the surface of the ham by making shallow cuts in a diamond pattern. This helps the glaze to penetrate the meat and enhances the presentation.
- Apply the Glaze: Brush the ham generously with the prepared glaze, guaranteeing the entire surface is coated. Reserve some glaze for basting later.
- Arrange Pineapple Rings: Place the pineapple rings over the surface of the ham, securing them with toothpicks if necessary. If desired, place a maraschino cherry in the center of each pineapple ring for added color and flavor.
- Bake the Ham: Cover the ham loosely with foil and place it in the preheated oven. Bake for approximately 18-20 minutes per pound, basting with the reserved glaze every 20 minutes.
- Final Glaze and Serve: During the last 20 minutes of baking, remove the foil to allow the glaze to caramelize slightly. Once the ham reaches an internal temperature of 140°F (60°C), remove it from the oven and let it rest for 10 minutes before slicing and serving.
Extra Tips: When choosing a ham, opt for a fully cooked boneless variety for ease of preparation and serving. To prevent the ham from drying out, make sure it’s covered with foil while baking and basted regularly with the glaze. For added flavor, consider marinating the ham in the glaze for a couple of hours before baking.
Finally, use a meat thermometer to check the internal temperature to guarantee the ham is heated through without overcooking. This will ensure a juicy and flavorful dish that your family will love.
Spring Vegetable Risotto
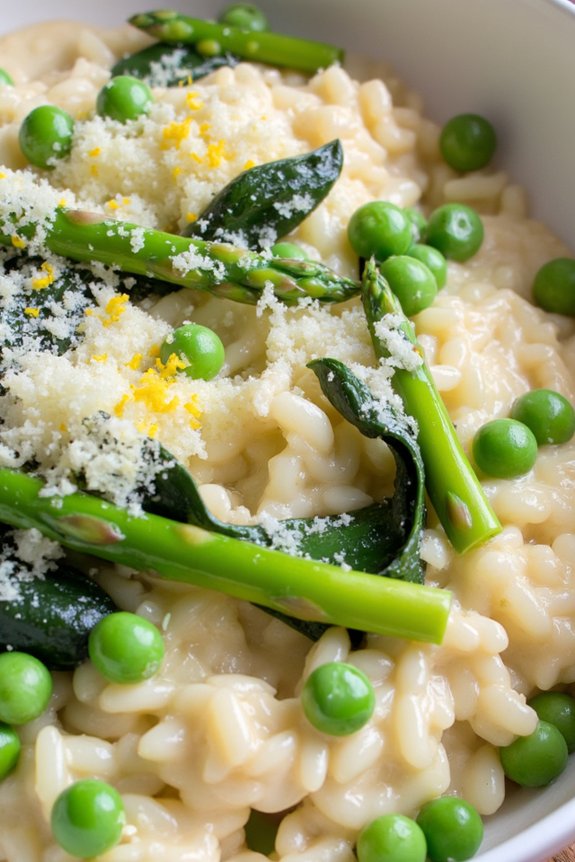
Spring Vegetable Risotto is a delightful dish that offers a fresh and vibrant take on traditional risotto, making it an excellent choice for an Easter family dinner. This recipe combines creamy Arborio rice with the crisp, tender flavors of spring’s finest vegetables, such as asparagus, peas, and spinach.
It’s a perfect blend of comfort and lightness, ideal for celebrating the season of renewal and new beginnings with your loved ones.
The key to a successful Spring Vegetable Risotto lies in the careful preparation and timing, guaranteeing that each component contributes to the dish’s overall harmony. As you stir the risotto, the rice releases its starch, creating a rich, creamy texture that pairs beautifully with the vivid green hues of the vegetables.
With a touch of lemon zest and Parmesan cheese, this dish not only pleases the palate but also embodies the essence of springtime on a plate.
Ingredients (serves 4-6):
- 1 1/2 cups Arborio rice
- 4 cups vegetable broth
- 1 cup white wine
- 1 bunch asparagus, trimmed and cut into 1-inch pieces
- 1 cup fresh or frozen peas
- 2 cups fresh spinach
- 1 medium onion, finely chopped
- 3 cloves garlic, minced
- 1/2 cup grated Parmesan cheese
- 2 tablespoons olive oil
- 2 tablespoons butter
- Zest of 1 lemon
- Salt and pepper to taste
Cooking Instructions:
1. Prepare the Broth: In a medium saucepan, bring the vegetable broth to a simmer and maintain it at a low heat throughout the cooking process. This guarantees that the broth is hot when added to the rice, promoting even cooking.
2. Cook the Vegetables: In a large skillet or risotto pan, heat 1 tablespoon of olive oil over medium heat. Add the asparagus pieces and sauté for about 3-4 minutes until they’re tender but still crisp.
Add the peas and cook for an additional 2 minutes. Remove the vegetables from the pan and set aside.
3. Sauté Aromatics: In the same pan, add the remaining tablespoon of olive oil and butter. Once the butter has melted, add the chopped onion and cook until translucent, about 5 minutes.
Stir in the minced garlic and cook for another minute until fragrant.
4. Toast the Rice: Add the Arborio rice to the pan and stir to coat it with the oil and butter. Cook for about 2 minutes, allowing the rice to toast lightly.
This step helps to enhance the flavor and texture of the risotto.
5. Deglaze with Wine: Pour in the white wine and stir continuously until the wine is mostly absorbed by the rice.
This step adds depth and acidity to the dish.
6. Add Broth Gradually: Begin adding the hot vegetable broth, one ladleful at a time, stirring frequently. Allow each addition of broth to be absorbed before adding more.
This process should take about 18-20 minutes, resulting in a creamy consistency.
7. Incorporate Vegetables and Cheese: Once the rice is al dente and creamy, stir in the cooked asparagus, peas, and fresh spinach.
Continue to cook until the spinach wilts. Remove from heat and stir in the grated Parmesan cheese and lemon zest. Season with salt and pepper to taste.
8. Serve: Allow the risotto to rest for a couple of minutes, then serve in warm bowls to enjoy immediately.
Tips for Perfect Risotto:
To achieve the ideal creamy texture, it’s important to stir the risotto frequently. This helps release the starch from the rice, creating the desired creaminess.
Also, use a good quality dry white wine for deglazing, as it will greatly impact the flavor of your dish. Finally, make sure not to overcook the vegetables in the beginning, as they’ll continue to cook when added back into the hot risotto, preserving their vibrant color and fresh taste.
Lemon and Herb Roasted Chicken
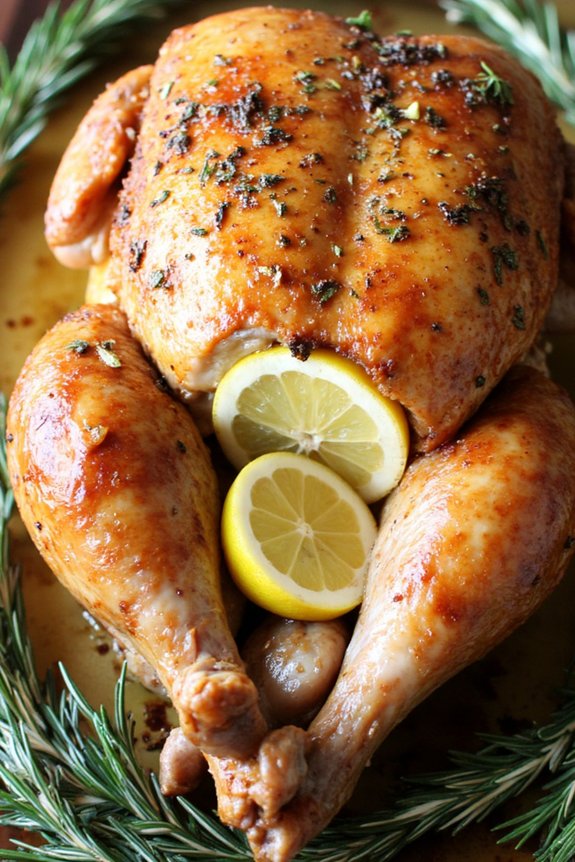
Easter is a time for families to come together and enjoy each other’s company, often accompanied by a delicious meal. One classic dish that never fails to impress and satisfies everyone’s taste buds is Lemon and Herb Roasted Chicken. This dish combines the fresh, zesty flavor of lemon with a blend of aromatic herbs, creating a succulent and flavorful chicken that’s perfect for a family Easter dinner. The crispy skin and juicy meat are sure to make this dish a centerpiece on your holiday table.
This Lemon and Herb Roasted Chicken recipe is designed to serve 4-6 people, making it ideal for a small family gathering or a more intimate Easter celebration. The preparation is straightforward, and the result is a perfectly roasted chicken with a delightful balance of flavors. Whether you’re a seasoned cook or a novice in the kitchen, this recipe will guide you to create a memorable dish that will be talked about long after the holiday is over.
Ingredients (Serving Size: 4-6 people):
- 1 whole chicken (about 4-5 pounds)
- 2 tablespoons olive oil
- 2 lemons (1 sliced, 1 juiced)
- 3 cloves garlic, minced
- 1 tablespoon fresh rosemary, chopped
- 1 tablespoon fresh thyme, chopped
- 1 tablespoon fresh parsley, chopped
- Salt and pepper, to taste
- 1 cup chicken broth
- Optional: additional herbs for garnish
Cooking Instructions:
- Preheat the Oven: Preheat your oven to 425°F (220°C). This high heat will help achieve a crispy skin on the chicken.
- Prepare the Chicken: Remove the giblets from the chicken cavity if present. Rinse the chicken under cold water and pat dry with paper towels. This guarantees a crispy skin during roasting.
- Season the Chicken: In a small bowl, mix together the olive oil, lemon juice, minced garlic, rosemary, thyme, parsley, salt, and pepper. Rub this mixture all over the chicken, including inside the cavity and under the skin where possible.
- Stuff and Tie: Stuff the cavity of the chicken with the lemon slices. Tie the legs together with kitchen twine to guarantee even cooking.
- Roast the Chicken: Place the chicken in a roasting pan or oven-safe dish. Pour the chicken broth into the bottom of the pan to keep the chicken moist. Roast in the preheated oven for about 1 hour and 15 minutes, or until the internal temperature reaches 165°F (74°C) and the juices run clear.
- Rest and Carve: Remove the chicken from the oven and let it rest for 10-15 minutes before carving. This allows the juices to redistribute, keeping the meat moist.
Extra Tips:
For an even more flavorful chicken, consider marinating it in the lemon-herb mixture for a few hours or overnight in the refrigerator. If you prefer a deeper color on the skin, broil the chicken for the last few minutes of cooking, but keep a close eye to prevent burning.
Additionally, basting the chicken with the pan juices a couple of times during roasting can enhance the flavor and keep it moist. If you have any leftover herbs, use them as a garnish for a fresh and vibrant presentation.
Asparagus and Pea Salad With Mint Dressing

Asparagus and Pea Salad with Mint Dressing is a revitalizing and vibrant dish that brings a burst of spring flavors to your Easter family dinner. This salad combines tender asparagus, sweet peas, and a bright mint dressing to create a dish that’s both healthy and flavorful.
The balance of textures and flavors makes it a delightful addition to your holiday spread, offering a crisp contrast to richer dishes typically served during the Easter feast. Perfect for a serving size of 4-6 people, this salad isn’t only easy to make, but it also highlights the best of seasonal produce.
The mint dressing adds a rejuvenating twist that complements the earthy asparagus and sweet peas beautifully. Whether you’re serving it as a starter or a side, this salad will surely be a hit at your Easter table, providing a pop of color and freshness.
Ingredients:
- 1 pound of asparagus, trimmed and cut into 1-inch pieces
- 1 cup of fresh or frozen peas
- 1/4 cup of fresh mint leaves, finely chopped
- 1/4 cup of olive oil
- 2 tablespoons of lemon juice
- 1 teaspoon of lemon zest
- Salt and pepper to taste
- 1/4 cup of crumbled feta cheese (optional)
- 1/4 cup of toasted pine nuts (optional)
Instructions:
- Prepare the Asparagus: Bring a large pot of salted water to a boil. Add the asparagus pieces and blanch them for about 2-3 minutes until they’re tender-crisp. Immediately transfer the asparagus to a bowl of ice water to stop the cooking process. This will help maintain their bright green color. Drain and set aside.
- Cook the Peas: If using fresh peas, add them to the boiling water and cook for about 2 minutes. If using frozen peas, simply thaw them in warm water. Drain the peas and add them to the bowl with the asparagus.
- Make the Mint Dressing: In a small bowl, whisk together the olive oil, lemon juice, lemon zest, chopped mint, salt, and pepper. Taste and adjust the seasoning if necessary.
- Combine the Salad: In a large serving bowl, combine the blanched asparagus, peas, and the mint dressing. Toss gently to ascertain the vegetables are well coated with the dressing.
- Add Optional Toppings: If desired, sprinkle the salad with crumbled feta cheese and toasted pine nuts for added texture and flavor.
- Serve: Serve the salad immediately or refrigerate for up to an hour before serving. Enjoy the salad chilled or at room temperature.
Extra Tips:
For the best flavor, use the freshest asparagus and peas you can find. Blanching the asparagus is essential for maintaining its vibrant color and crisp texture.
If you’re short on time, the salad can be made a few hours in advance and stored in the fridge; just be sure to add the mint dressing just before serving to keep the flavors fresh. Additionally, if you don’t have pine nuts, toasted almonds or walnuts can be a great substitute for added crunch.
Honey Dijon Roasted Carrots

Honey Dijon Roasted Carrots are a delightful and flavorful side dish perfect for your Easter family dinner. The natural sweetness of the carrots is beautifully enhanced by a glaze of honey and Dijon mustard, offering a perfect balance of sweet and tangy flavors.
Roasting the carrots also adds a wonderful depth of flavor, bringing out their natural caramelized notes. This dish isn’t only delicious but also visually appealing, with the vibrant orange of the carrots adding a pop of color to your dinner table.
Preparing Honey Dijon Roasted Carrots is straightforward and requires minimal ingredients, making it an ideal choice for any cook, whether you’re a novice or an experienced chef. The key to this recipe is selecting fresh, tender carrots and guaranteeing they’re evenly coated with the honey Dijon glaze before roasting.
This recipe serves 4-6 people, making it perfect for a family gathering or holiday celebration.
Ingredients (Serves 4-6):
- 2 pounds of carrots, peeled and cut into sticks
- 3 tablespoons olive oil
- 2 tablespoons Dijon mustard
- 2 tablespoons honey
- 1 teaspoon garlic powder
- Salt and pepper to taste
- Fresh parsley, chopped (for garnish)
Instructions:
- Preheat the Oven: Begin by preheating your oven to 400°F (200°C). This will guarantee the carrots roast evenly and develop a nice caramelized exterior.
- Prepare the Carrots: Peel the carrots and cut them into uniform sticks, about 2-3 inches long. This helps them cook evenly.
- Make the Glaze: In a large mixing bowl, combine the olive oil, Dijon mustard, honey, garlic powder, salt, and pepper. Whisk until well blended to form a smooth glaze.
- Coat the Carrots: Add the carrot sticks to the bowl with the glaze. Toss the carrots until they’re thoroughly coated with the mixture, guaranteeing an even distribution of flavor.
- Arrange for Roasting: Line a baking sheet with parchment paper or lightly grease it with cooking spray. Spread the glazed carrots in a single layer on the sheet, ensuring they aren’t overcrowded.
- Roast the Carrots: Place the baking sheet in the preheated oven. Roast the carrots for 25-30 minutes, stirring halfway through, until they’re tender and slightly caramelized.
- Garnish and Serve: Once roasted to perfection, remove the carrots from the oven. Transfer them to a serving dish and garnish with freshly chopped parsley for a burst of color and freshness.
Extra Tips:
For best results, try to choose carrots that are similar in size to guarantee even cooking. If some carrots are thicker, you might need to cut them into smaller pieces.
You can also experiment by adding a pinch of crushed red pepper flakes to the glaze for a slight heat contrast to the sweetness. Additionally, if you prefer a stronger garlic flavor, consider using fresh minced garlic instead of garlic powder.
These small adjustments can enhance the overall flavor profile of your Honey Dijon Roasted Carrots.
Savory Spinach and Feta Stuffed Phyllo Pastries

Savory Spinach and Feta Stuffed Phyllo Pastries are a delightful addition to any Easter family dinner. These flaky, golden pastries are filled with a rich and creamy mixture of fresh spinach and tangy feta cheese, making them an irresistible treat for both vegetarians and non-vegetarians alike. The combination of flavors and textures creates a mouthwatering experience that will have your guests reaching for seconds.
Perfect as an appetizer or as part of a larger spread, these pastries are sure to impress with their elegant presentation and delectable taste.
Making these pastries involves working with phyllo dough, which may seem intimidating at first, but with a bit of practice, you’ll find it to be quite manageable. The key is to keep the delicate sheets of dough covered with a damp towel to prevent them from drying out.
Once you’ve mastered the art of handling phyllo, you’ll be able to create these delicious spinach and feta pastries with ease. Follow this recipe to prepare a serving size of 4-6 people, ideal for your Easter gathering.
Ingredients:
- 1 package (16 oz) of frozen phyllo dough, thawed
- 1 tablespoon olive oil
- 1 small onion, finely chopped
- 2 cloves garlic, minced
- 10 oz fresh spinach, washed and chopped
- 8 oz feta cheese, crumbled
- 1 egg, lightly beaten
- Salt and pepper to taste
- 1/2 cup melted butter
Cooking Instructions:
- Preheat the Oven: Preheat your oven to 375°F (190°C). Line a baking sheet with parchment paper and set aside.
- Prepare the Filling: In a large skillet, heat the olive oil over medium heat. Add the chopped onion and garlic, sautéing until the onion becomes translucent, about 3-4 minutes. Add the chopped spinach to the skillet and cook until wilted, approximately 5 minutes. Remove from heat and let cool slightly.
- Mix Filling Ingredients: In a mixing bowl, combine the cooled spinach mixture with crumbled feta cheese and the beaten egg. Season with salt and pepper to taste, mixing until the ingredients are well incorporated.
- Prepare Phyllo Sheets: Unroll the phyllo dough and cover it with a damp kitchen towel to prevent drying. Carefully take one sheet of phyllo and place it on a clean work surface. Brush the sheet lightly with melted butter. Layer another sheet on top and brush again with butter.
- Cut and Fill Phyllo: Cut the layered phyllo sheets into strips about 3 inches wide. Place a tablespoon of the spinach and feta filling at one end of each strip. Fold the corner of the strip over the filling to form a triangle. Continue folding the strip in a triangular pattern, encasing the filling, until you reach the end of the strip. Repeat with the remaining phyllo sheets and filling.
- Bake the Pastries: Place the filled phyllo triangles on the prepared baking sheet. Brush the tops with more melted butter. Bake in the preheated oven for 20-25 minutes, or until the pastries are golden brown and crisp.
Extra Tips:
When working with phyllo dough, always keep the unused sheets covered with a damp towel to prevent them from drying out and becoming brittle.
If you wish to make the pastries in advance, you can assemble them and freeze them before baking. Simply place the pastries on a baking sheet in a single layer, freeze until solid, then transfer to a freezer-safe container. Bake directly from frozen, adding a few extra minutes to the baking time.
Enjoy the delicious combination of spinach and feta in these flaky pastries that are perfect for your Easter celebration.
Garlic and Herb Mashed Potatoes
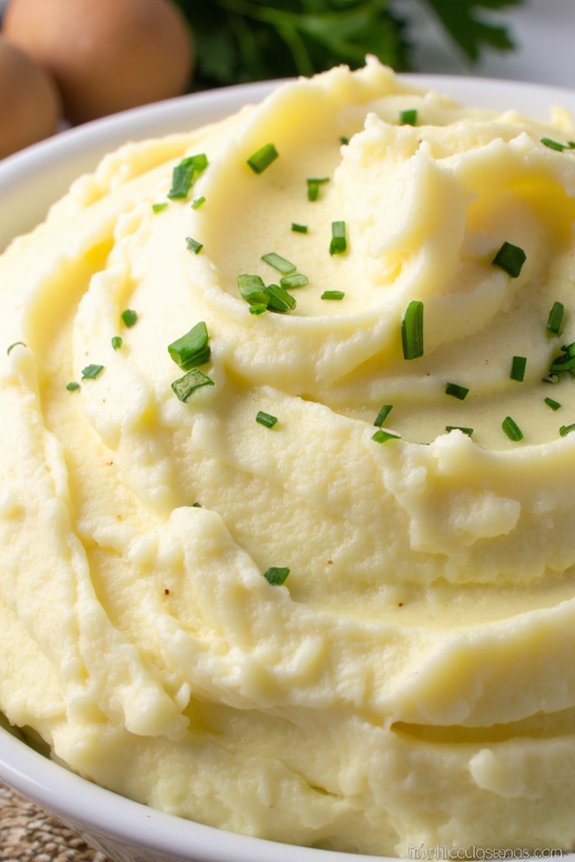
Garlic and Herb Mashed Potatoes are a delightful addition to any Easter family dinner. This creamy, flavorful side dish pairs well with a variety of main courses, bringing a comforting and aromatic touch to your festive table.
The use of fresh herbs and garlic elevates the traditional mashed potatoes into a dish that’s both elegant and hearty, making it a favorite for both young and old.
The key to perfect Garlic and Herb Mashed Potatoes lies in the balance of flavors and textures. By carefully selecting the right type of potatoes and combining them with the right amount of herbs and seasonings, you can achieve a consistently smooth and rich mash.
The result is a dish that stands out on its own, while complementing the other flavors in your Easter feast.
Ingredients (serves 4-6):
- 3 pounds Yukon Gold potatoes
- 4 cloves garlic, minced
- 1/2 cup unsalted butter, softened
- 1 cup heavy cream
- 1/4 cup fresh parsley, finely chopped
- 1/4 cup fresh chives, finely chopped
- Salt and pepper to taste
Cooking Instructions:
- Prepare the Potatoes: Peel the potatoes and cut them into evenly sized chunks. This guarantees that they cook at the same rate, resulting in a uniform texture.
- Boil the Potatoes: Place the potato chunks in a large pot and cover them with cold water. Add a pinch of salt to the water to enhance the flavor. Bring to a boil over medium-high heat, then reduce the heat to a simmer. Cook until the potatoes are fork-tender, about 15-20 minutes.
- Drain and Mash: Once cooked, drain the potatoes thoroughly and return them to the pot. Allow them to sit for a minute to let any remaining moisture evaporate. Mash the potatoes using a potato masher or a ricer, depending on your preferred texture.
- Infuse the Cream: In a small saucepan, heat the heavy cream, butter, and minced garlic over low heat until the butter is melted and the mixture is warm. Stir occasionally to prevent the garlic from burning.
- Combine and Season: Gradually add the warm cream mixture to the mashed potatoes, stirring continuously until smooth and creamy. Mix in the fresh parsley and chives. Season with salt and pepper to taste, adjusting as needed.
- Serve: Transfer the mashed potatoes to a serving dish, garnish with additional herbs if desired, and serve immediately for the best flavor and texture.
Extra Tips: For an extra burst of flavor, consider roasting the garlic before adding it to the cream mixture. This will give the mashed potatoes a sweeter, more caramelized garlic taste.
Additionally, using a combination of Yukon Gold and Russet potatoes can provide a balance of creaminess and fluffiness. If you prefer a lighter version, substitute milk or half-and-half for the heavy cream.
Remember to taste and adjust the seasoning as necessary to suit your personal preference.
Balsamic Roasted Brussels Sprouts
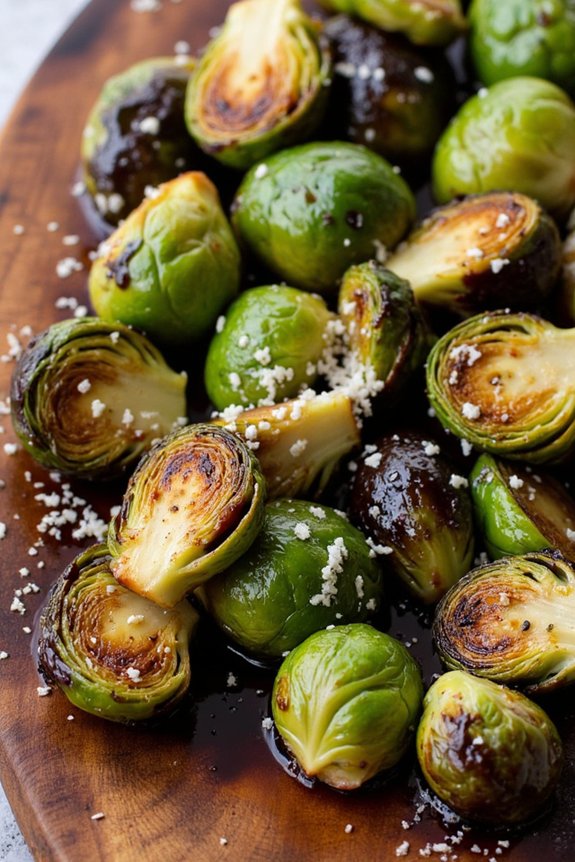
Balsamic Roasted Brussels Sprouts are a delicious and healthy side dish that can easily become a highlight of your Easter family dinner. The natural sweetness of balsamic vinegar complements the earthy flavors of Brussels sprouts, creating a perfect balance that will tantalize your taste buds.
Roasting Brussels sprouts brings out their nutty flavor and enhances their crisp-tender texture, making them a delightful addition to your festive meal.
This recipe is designed to serve 4-6 people, making it ideal for a family gathering. The key to achieving perfectly roasted Brussels sprouts is to make sure they’re evenly coated with the balsamic mixture and spread out in a single layer on the baking sheet. With just a few simple ingredients and steps, you’ll have a flavorful dish that pairs wonderfully with a variety of main courses.
Ingredients for Balsamic Roasted Brussels Sprouts (Serves 4-6):
- 1 1/2 pounds Brussels sprouts
- 3 tablespoons olive oil
- 3 tablespoons balsamic vinegar
- 1 tablespoon honey
- 2 cloves garlic, minced
- Salt and black pepper, to taste
- 1/4 cup grated Parmesan cheese (optional)
Instructions:
- Preheat the Oven: Preheat your oven to 400°F (200°C). This temperature is ideal for roasting Brussels sprouts to achieve a crispy exterior.
- Prepare the Brussels Sprouts: Rinse the Brussels sprouts under cold water and pat them dry with a paper towel. Trim the ends and remove any yellow or damaged outer leaves. Cut each Brussels sprout in half lengthwise for even cooking.
- Mix the Dressing: In a small bowl, whisk together the olive oil, balsamic vinegar, honey, and minced garlic. This dressing will give the Brussels sprouts a sweet and tangy flavor.
- Season the Brussels Sprouts: Place the halved Brussels sprouts in a large bowl. Pour the balsamic dressing over them and toss to coat evenly. Season with salt and black pepper to taste.
- Roast the Brussels Sprouts: Spread the seasoned Brussels sprouts in a single layer on a baking sheet. Make sure they aren’t crowded to allow even roasting. Place the baking sheet in the preheated oven.
- Bake Until Tender and Crisp: Roast the Brussels sprouts for 20-25 minutes, stirring halfway through, until they’re tender on the inside and crispy on the outside. If desired, sprinkle grated Parmesan cheese over the Brussels sprouts during the last 5 minutes of roasting for added flavor.
- Serve: Remove the Brussels sprouts from the oven and transfer them to a serving dish. Serve warm as a delightful side dish for your Easter family dinner.
Extra Tips:
For an even deeper flavor, consider marinating the Brussels sprouts in the balsamic mixture for 30 minutes before roasting. If you’re looking to add more texture, toss in some chopped nuts such as walnuts or pecans before serving.
Classic Deviled Eggs With a Twist

Deviled eggs are a timeless addition to any Easter family dinner, beloved for their creamy texture and subtle tang. This classic appetizer is elevated with a unique twist that will surprise and delight your guests. By incorporating unexpected ingredients, you can transform ordinary deviled eggs into a flavorful masterpiece, guaranteeing they’re a standout on your holiday spread.
Whether you’re a seasoned cook or a beginner, this recipe is easy to follow and promises delicious results.
For this version, we’re adding a touch of curry powder and a sprinkle of crispy bacon to give the deviled eggs a spicy and savory edge. The curry powder adds warmth and complexity, while the bacon provides a satisfying crunch. These additions complement the rich yolk mixture perfectly, making them irresistible.
This recipe serves 4-6 people, making it ideal for a small gathering or as part of a larger meal.
Ingredients (serving size: 4-6 people):
- 6 large eggs
- 3 tablespoons mayonnaise
- 1 teaspoon Dijon mustard
- 1/2 teaspoon curry powder
- Salt and pepper to taste
- 2 slices of bacon, cooked and crumbled
- Paprika for garnish
- Chives, chopped for garnish
Instructions:
- Boil the Eggs: Place the eggs in a saucepan and cover with cold water. Bring the water to a rolling boil over medium-high heat, then remove the saucepan from heat. Cover with a lid and let the eggs sit in the hot water for 12 minutes. Once done, transfer the eggs to a bowl of ice water to cool.
- Prepare the Filling: Peel the cooled eggs and slice them in half lengthwise. Carefully remove the yolks and place them in a mixing bowl. Add mayonnaise, Dijon mustard, curry powder, salt, and pepper to the yolks. Mash the mixture with a fork until smooth and creamy.
- Assemble the Deviled Eggs: Spoon or pipe the yolk mixture back into the egg white halves. Guarantee each egg white is filled generously with the mixture, creating a slight mound.
- Add the Twist: Sprinkle the crumbled bacon evenly over the filled eggs. Lightly dust with paprika for added color and flavor, and garnish with chopped chives for a fresh finish.
- Chill and Serve: Arrange the deviled eggs on a serving platter. For best results, refrigerate for at least 30 minutes before serving to allow the flavors to meld together.
Extra Tips:
To guarantee perfect hard-boiled eggs, use eggs that are slightly older, as they tend to peel more easily than fresh eggs.
If you prefer a smoother filling, use a hand mixer to blend the yolk mixture. For a spicier kick, consider adding a dash of hot sauce or a pinch of cayenne pepper to the filling.
You can also prepare the deviled eggs a day in advance; simply cover tightly with plastic wrap and refrigerate until ready to serve, which can help save time on the day of your Easter celebration.
Fresh Berry and Spinach Salad With Balsamic Vinaigrette

Fresh Berry and Spinach Salad With Balsamic Vinaigrette is a vibrant and flavorful addition to your Easter family dinner. This invigorating salad combines the sweetness of fresh berries with the earthiness of spinach, all brought together by a tangy balsamic vinaigrette.
It’s a dish that not only adds a pop of color to your table but also offers a delightful contrast of textures and flavors. Perfect as a side dish, this salad is sure to please guests of all ages and dietary preferences.
The beauty of this salad lies in its simplicity and the quality of its ingredients. Fresh spinach leaves provide a nutritious base, while a mix of berries—such as strawberries, blueberries, and raspberries—adds a juicy sweetness.
The balsamic vinaigrette, with its perfect balance of acidity and sweetness, ties all the elements together. Topped with crunchy nuts and a sprinkle of cheese, this salad is both elegant and easy to prepare, making it an ideal choice for Easter gatherings.
Ingredients (Serves 4-6):
- 8 cups fresh spinach leaves
- 1 cup sliced strawberries
- 1 cup blueberries
- 1/2 cup raspberries
- 1/2 cup crumbled feta or goat cheese
- 1/4 cup chopped walnuts or pecans
- 1/2 cup balsamic vinaigrette dressing
Cooking Instructions:
- Prepare the Spinach: Start by thoroughly washing the spinach leaves under cold water. Pat them dry using a clean kitchen towel or use a salad spinner to remove excess water. Place the dried spinach in a large salad bowl.
- Add the Berries: Rinse the strawberries, blueberries, and raspberries under cold water. Gently pat them dry with paper towels. Slice the strawberries into thin, even slices and add them to the bowl with the spinach. Add the blueberries and raspberries whole.
- Incorporate Cheese and Nuts: Crumble the feta or goat cheese over the spinach and berries. Next, sprinkle the chopped walnuts or pecans evenly across the salad for added texture and flavor.
- Dress the Salad: Just before serving, drizzle the balsamic vinaigrette over the salad. Use salad tongs to gently toss all the ingredients together, ensuring the dressing coats everything evenly.
- Serve Immediately: Transfer the salad to a serving platter or individual plates, and serve immediately to enjoy the fresh and vibrant flavors at their best.
Extra Tips:
For the freshest salad, prepare and assemble it just before serving. This helps maintain the crispness of the spinach and the juiciness of the berries.
Feel free to customize the salad by adding other seasonal fruits or incorporating different types of nuts and cheese. If you prefer, you can make your own balsamic vinaigrette by whisking together balsamic vinegar, olive oil, Dijon mustard, honey, salt, and pepper.
Finally, for a more substantial dish, consider adding grilled chicken or shrimp on top.
Lemon Poppy Seed Bundt Cake

Lemon Poppy Seed Bundt Cake is a delightful dessert perfect for your Easter family dinner. This cake is moist, flavorful, and elegantly presented in a Bundt shape, making it a showstopper on any dining table. The combination of tangy lemon and nutty poppy seeds creates a unique taste that balances sweetness with a hint of tartness.
Whether you’re hosting a large family gathering or having a small, intimate meal, this cake will undoubtedly be a crowd pleaser.
The preparation of Lemon Poppy Seed Bundt Cake is straightforward and requires only a few simple steps. This recipe serves 4-6 people, making it ideal for a small to medium-sized gathering. With an easy-to-follow method and ingredients that are readily available, you can whip up this delightful dessert in no time.
The cake is finished with a light glaze that enhances its flavor and gives it a beautiful, glossy finish.
Ingredients:
- 1 1/2 cups all-purpose flour
- 1 teaspoon baking powder
- 1/2 teaspoon baking soda
- 1/4 teaspoon salt
- 1/2 cup unsalted butter, softened
- 1 cup granulated sugar
- 2 large eggs
- 1 tablespoon lemon zest
- 1/4 cup lemon juice
- 1/2 cup sour cream
- 2 tablespoons poppy seeds
- 1 cup powdered sugar (for glaze)
- 2-3 tablespoons lemon juice (for glaze)
Instructions:
- Preheat the Oven: Preheat your oven to 350°F (175°C). Grease and flour a Bundt pan to guarantee the cake doesn’t stick.
- Mix Dry Ingredients: In a bowl, whisk together the all-purpose flour, baking powder, baking soda, and salt. This guarantees even distribution of the leavening agents throughout the flour.
- Cream Butter and Sugar: In a separate large mixing bowl, beat the softened butter and granulated sugar together until light and fluffy. This should take about 3-4 minutes using an electric mixer.
- Add Eggs and Lemon: Add the eggs one at a time, mixing well after each addition. Then, mix in the lemon zest and lemon juice until fully incorporated.
- Combine Wet and Dry Ingredients: Gradually add the dry ingredients to the wet mixture, alternating with the sour cream. Begin and end with the dry ingredients to maintain a smooth batter.
- Stir in Poppy Seeds: Gently fold in the poppy seeds until they’re evenly distributed throughout the batter.
- Pour and Bake: Pour the batter into the prepared Bundt pan, spreading it evenly. Bake in the preheated oven for 35-40 minutes or until a toothpick inserted into the center comes out clean.
- Cool and Glaze: Allow the cake to cool in the pan for about 10 minutes before transferring it to a wire rack. While the cake cools, prepare the glaze by whisking together the powdered sugar and lemon juice until smooth. Drizzle the glaze over the cooled cake.
Extra tips: For the best results, confirm all your ingredients are at room temperature before you begin, as this helps with better mixing and texture. Additionally, try not to over-mix the batter once you’ve added the flour to avoid a dense cake.
If you want an extra lemony flavor, you can add a bit more lemon zest or juice to the glaze. Finally, storing the cake in an airtight container will keep it moist and flavorful for up to 3 days.
Mini Lemon Meringue Pies

Mini Lemon Meringue Pies are a delightful treat that will surely impress your family and friends during Easter dinner. These individual-sized desserts bring together the perfect balance of tart lemon filling, sweet meringue topping, and a buttery, flaky crust. Not only are they delicious, but they also add an elegant touch to any dinner table.
Baking them in mini form allows everyone to enjoy their own personal pie, and it’s a great way to serve a classic dessert with a modern twist.
The preparation of Mini Lemon Meringue Pies involves creating three main components: the pastry crust, the lemon filling, and the meringue topping. Each component is simple to make but requires attention to detail to guarantee the perfect texture and flavor. The tartness of the lemon filling is complemented beautifully by the sweetness of the meringue, making each bite a delightful experience.
This recipe serves 4-6 people, making it ideal for small gatherings or as part of a larger dessert spread.
Ingredients:
*Pastry Crust:*
- 1 1/4 cups all-purpose flour
- 1/2 cup unsalted butter, chilled and cubed
- 1/4 cup granulated sugar
- 1/4 teaspoon salt
- 1 large egg yolk
- 2 tablespoons ice water
Lemon Filling:
- 1 cup granulated sugar
- 2 tablespoons all-purpose flour
- 3 tablespoons cornstarch
- 1/4 teaspoon salt
- 1 1/2 cups water
- 2 lemons, juiced and zested
- 2 tablespoons unsalted butter
- 4 large egg yolks, beaten
Meringue Topping:
- 4 large egg whites
- 1/4 teaspoon cream of tartar
- 1/2 cup granulated sugar
Instructions:
- Prepare the Pastry Crust:
- In a mixing bowl, combine the flour, sugar, and salt. Cut in the butter using a pastry cutter or fork until the mixture resembles coarse crumbs.
- Add the egg yolk and ice water. Mix until the dough comes together, then shape it into a disk. Wrap in plastic wrap and refrigerate for at least 30 minutes.
- Bake the Crust:
- Preheat the oven to 375°F (190°C). Roll out the dough on a lightly floured surface to about 1/8-inch thick.
- Cut circles slightly larger than your mini pie tins, fit the dough into the tins, and trim the edges. Prick the bases with a fork.
- Line with parchment paper and fill with pie weights or dried beans. Bake for 10-12 minutes until lightly golden. Remove weights and paper, then bake for an additional 5 minutes. Let cool.
- Prepare the Lemon Filling:
- In a saucepan, whisk together sugar, flour, cornstarch, and salt. Stir in water, lemon juice, and zest. Cook over medium heat until the mixture comes to a boil, stirring constantly.
- Stir in butter. Temper the egg yolks by mixing a small amount of the hot lemon mixture into the yolks, then return the egg mixture to the saucepan. Cook for another 2 minutes, stirring constantly, until thickened. Remove from heat and pour into the baked crusts.
- Make the Meringue:
- In a clean mixing bowl, beat the egg whites and cream of tartar until soft peaks form. Gradually add sugar, beating until stiff, glossy peaks form.
- Spoon the meringue over the lemon filling, spreading to seal the edges of the crust.
- Bake the Pies:
- Reduce oven temperature to 350°F (175°C). Bake pies for 10-12 minutes, or until the meringue is golden brown. Let cool to room temperature before serving.
Extra Tips:
For the best results, verify that your mixing bowl and beaters are completely clean and dry before whipping the egg whites for the meringue. Fat residue or moisture can prevent the egg whites from reaching their full volume.
Additionally, when spreading the meringue over the lemon filling, make sure to seal the edges well; this prevents the meringue from shrinking during baking. Finally, these mini pies are best enjoyed on the day they’re made, as the meringue can start to weep if stored for too long.