

If you’re like me, you’re always searching for dinner ideas that are both tasty and easy to clean up. That’s why these 13 filling sheet pan recipes are perfect for busy weeknights. Think of the savory aroma of garlic herb chicken or the tangy kick of honey mustard salmon filling your kitchen. It’s a stress-free cooking experience that doesn’t skimp on flavor. Curious about what’s on the menu?
One-Pan Garlic Herb Chicken and Asparagus
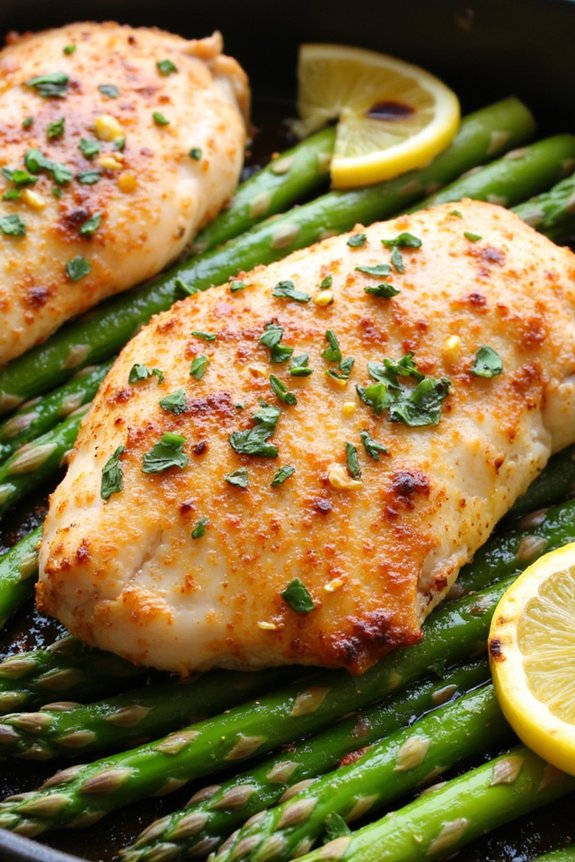
The One-Pan Garlic Herb Chicken and Asparagus is a delightful, hassle-free meal perfect for busy weeknights or a relaxed family dinner. This dish combines tender, juicy chicken breasts with crisp-tender asparagus, all enveloped in a fragrant garlic and herb seasoning. The beauty of this recipe lies in its simplicity and the minimal cleanup required, as everything is cooked together on a single sheet pan.
With its vibrant flavors and appealing presentation, this meal is sure to become a favorite in your household. Not only is this dish quick and easy to prepare, but it’s also a nutritious choice that doesn’t skimp on flavor. The chicken is seasoned with a blend of herbs like thyme and rosemary, which pair beautifully with the natural sweetness of roasted asparagus.
The addition of garlic infuses the dish with a rich aroma that will have everyone enthusiastically waiting at the dinner table. Whether you’re looking to impress guests or simply want to enjoy a wholesome meal with your family, this One-Pan Garlic Herb Chicken and Asparagus is a must-try.
Ingredients (serves 4-6):
- 4 boneless, skinless chicken breasts
- 1 pound asparagus, trimmed
- 3 tablespoons olive oil
- 4 cloves garlic, minced
- 1 tablespoon fresh thyme, chopped
- 1 tablespoon fresh rosemary, chopped
- 1 teaspoon salt
- 1/2 teaspoon black pepper
- 1 lemon, sliced
Cooking Instructions:
- Preheat the Oven: Start by preheating your oven to 400°F (200°C). This guarantees the chicken and asparagus cook evenly and develop a nice roasted flavor.
- Prepare the Baking Sheet: Line your sheet pan with parchment paper or lightly grease it with olive oil to prevent sticking and make cleanup easier.
- Season the Chicken: In a small bowl, combine olive oil, minced garlic, thyme, rosemary, salt, and pepper. Mix well. Place the chicken breasts on the prepared sheet pan and brush them generously with half of the garlic herb mixture.
- Arrange the Asparagus: Add the trimmed asparagus spears to the sheet pan around the chicken. Drizzle with remaining garlic herb mixture and toss lightly to coat the asparagus evenly.
- Add Lemon Slices: Distribute the lemon slices over the chicken and asparagus. The lemons will infuse the dish with a fresh, citrusy aroma as they roast.
- Bake: Place the sheet pan in the preheated oven and bake for approximately 25-30 minutes, or until the chicken is cooked through and the asparagus is tender yet crisp. The internal temperature of the chicken should reach 165°F (75°C).
- Serve: Remove from the oven and let it rest for a few minutes before serving. This allows the juices in the chicken to redistribute, keeping it moist and flavorful.
Extra Tips:
For added depth of flavor, consider marinating the chicken in the garlic herb mixture for 30 minutes to an hour before cooking. You can also substitute the asparagus with other vegetables like broccoli or green beans if desired.
To facilitate even cooking, try to select chicken breasts of similar size and thickness. If you prefer a golden, crispy finish on the chicken, you can broil the dish for the last 2-3 minutes of cooking. Finally, pair the meal with a side of crusty bread or a light salad to complete your dinner spread.
Sheet Pan Honey Mustard Glazed Salmon

Sheet Pan Honey Mustard Glazed Salmon is an ideal choice for a healthy and delicious family dinner, combining the robust flavors of honey and mustard with the succulent taste of salmon. This recipe isn’t only quick and easy to prepare but also guarantees minimal cleanup, thanks to the use of a single sheet pan.
By roasting the salmon alongside a medley of fresh vegetables, you create a balanced meal that’s as visually appealing as it’s tasty. The honey mustard glaze adds a sweet and tangy profile that perfectly complements the rich, fatty salmon, making it a hit with both adults and kids alike.
Perfect for a busy weeknight, this dish can be prepared in under an hour. The vegetables soak up the flavors of the glaze and the salmon, enhancing their natural sweetness and creating a delightful harmony of tastes. As the salmon cooks, it becomes tender and flaky, while the vegetables develop a lovely roasted texture.
Whether you’re a seasoned cook or a beginner in the kitchen, this sheet pan recipe is designed to impress without the stress. It’s a foolproof way to get a nutritious dinner on the table, and it’s versatile enough to accommodate various dietary needs and preferences.
Ingredients for 4-6 servings:
- 4-6 salmon fillets (about 6 ounces each)
- 1/4 cup honey
- 3 tablespoons Dijon mustard
- 2 tablespoons olive oil
- 1 tablespoon lemon juice
- 3 cloves garlic, minced
- Salt and pepper, to taste
- 1 pound baby potatoes, halved
- 1 pound asparagus, trimmed
- 1 red bell pepper, sliced
- 1 lemon, sliced into rounds
- Fresh parsley, chopped, for garnish
Cooking Instructions:
- Preheat the Oven: Preheat your oven to 400°F (200°C). Line a large sheet pan with parchment paper or aluminum foil for easy cleanup.
- Prepare the Glaze: In a small bowl, whisk together the honey, Dijon mustard, olive oil, lemon juice, minced garlic, salt, and pepper until well combined.
- Arrange the Salmon and Vegetables: Place the salmon fillets on one side of the prepared sheet pan. Arrange the halved baby potatoes, asparagus, and bell pepper slices around the salmon. Drizzle the vegetables with a little olive oil and season with salt and pepper.
- Apply the Glaze: Brush the honey mustard glaze generously over each salmon fillet. Pour any remaining glaze over the vegetables to allow the flavors to meld during roasting.
- Add Lemon Slices: Place lemon slices over the salmon and scattered among the vegetables for a burst of citrus aroma and flavor.
- Roast in the Oven: Roast in the preheated oven for 20-25 minutes, or until the salmon is cooked through and flakes easily with a fork, and the vegetables are tender and slightly caramelized.
- Garnish and Serve: Remove from the oven and let it rest for a couple of minutes. Garnish with freshly chopped parsley before serving. Enjoy your delicious sheet pan honey mustard glazed salmon with family and friends!
Extra Tips:
For the best results, make sure to use fresh salmon fillets. If using frozen salmon, thaw it completely before cooking.
Feel free to customize the vegetables according to your family’s preferences or seasonal availability. Carrots, broccoli, or cherry tomatoes can be excellent additions.
Keep an eye on the cooking time, as ovens may vary, and you don’t want to overcook the salmon. For a spicier kick, add a pinch of red pepper flakes to the glaze.
This dish pairs well with a simple green salad or a side of quinoa for a complete meal.
Roasted Sausage and Bell Pepper Delight

Indulge in the vibrant flavors of the Mediterranean with our Roasted Sausage and Bell Pepper Delight. This delightful sheet pan dinner brings together the savory taste of sausages with the sweetness of bell peppers, all roasted to perfection.
With minimal prep work and even fewer dishes to clean, this recipe is perfect for busy weeknights. The harmonious blend of spices and herbs elevates the dish, making it a favorite among adults and kids alike. Serve this with a side of crusty bread or a fresh salad to complete a meal that’s both satisfying and nutritious.
This recipe is designed to serve 4-6 people, making it ideal for family dinners or small gatherings. The variety of colorful bell peppers not only adds a visual appeal but also a spectrum of flavors, from the mild and sweet to the vibrant and slightly bitter.
The sausages, when roasted alongside the peppers, become wonderfully juicy and flavorful. The dish requires just a few simple ingredients, most of which you might already have in your pantry.
Ingredients:
- 1.5 lbs (about 6 links) of Italian sausage (mild or spicy, based on preference)
- 3 bell peppers (red, yellow, and green), sliced
- 1 large red onion, sliced
- 3 tablespoons olive oil
- 1 teaspoon dried oregano
- 1 teaspoon garlic powder
- 1/2 teaspoon crushed red pepper flakes (optional)
- Salt and black pepper to taste
- Fresh basil leaves for garnish (optional)
Cooking Instructions:
- Preheat the Oven: Begin by preheating your oven to 400°F (200°C). This guarantees that the sausages and vegetables cook evenly and develop a nice roasted flavor.
- Prepare the Ingredients: Slice the bell peppers and red onion into strips. If the sausages are linked, cut them apart, and set everything aside.
- Season the Vegetables: In a large mixing bowl, combine the sliced bell peppers and onions. Drizzle with olive oil, and sprinkle with oregano, garlic powder, crushed red pepper flakes (if using), salt, and black pepper. Toss everything together until the vegetables are evenly coated with the seasoning.
- Arrange on a Sheet Pan: Spread the seasoned vegetables evenly onto a large sheet pan. Nestle the sausages among the peppers and onions, spacing them evenly to allow for proper roasting.
- Roast in the Oven: Place the sheet pan in the preheated oven and roast for 25-30 minutes. Midway through, use a spatula to stir the vegetables and turn the sausages for even cooking. The sausages should be browned and cooked through, and the vegetables tender and slightly caramelized.
- Serve: Once done, remove from the oven and let it cool slightly. Transfer to a serving dish and garnish with fresh basil leaves if desired. Enjoy hot alongside your choice of side dish.
Extra Tips:
To enhance the flavors, you can marinate the sausages and vegetables in olive oil and spices for a few hours before cooking.
For a healthier twist, consider using turkey or chicken sausages. This dish is very versatile; feel free to add other vegetables like zucchini or cherry tomatoes.
Leftovers can be stored in an airtight container in the fridge for up to 3 days and can be reheated in the oven to retain their roasted texture.
Easy Sheet Pan Beef Nachos

Sheet Pan Beef Nachos are a quick and delicious way to satisfy your family’s craving for a tasty, cheesy, and hearty meal. This recipe is perfect for a busy weeknight or a casual gathering with friends. By using a sheet pan, you can easily assemble and bake this dish with minimal cleanup. The combination of crispy tortilla chips, seasoned ground beef, melted cheese, and fresh toppings makes this a standout dish that everyone will love.
The beauty of this recipe is its versatility; you can customize it with your favorite toppings, such as jalapeños, black olives, or avocado, to suit your taste preferences. This dish serves 4-6 people, making it perfect for feeding a family or having leftovers for the next day. With minimal prep time and a quick bake in the oven, Easy Sheet Pan Beef Nachos are sure to become a go-to meal in your household.
Ingredients for 4-6 servings:
- 1 pound ground beef
- 1 tablespoon olive oil
- 1 packet taco seasoning (about 1 ounce)
- 1/4 cup water
- 1 large bag (about 13 ounces) tortilla chips
- 2 cups shredded cheddar cheese (or Mexican blend cheese)
- 1 cup canned black beans, drained and rinsed
- 1 cup cherry tomatoes, halved
- 1/2 cup sliced green onions
- 1/2 cup sliced jalapeños (optional)
- 1/4 cup chopped fresh cilantro
- Sour cream, for serving
- Salsa, for serving
Cooking Instructions:
- Preheat the oven: Begin by preheating your oven to 400°F (200°C). This guarantees the nachos will bake evenly and the cheese will melt perfectly.
- Cook the beef: In a large skillet, heat the olive oil over medium heat. Add the ground beef and cook until browned, breaking it up with a spoon as it cooks. This should take about 5-7 minutes.
- Season the beef: Once the beef is browned, drain any excess fat. Stir in the taco seasoning and water. Allow the mixture to simmer for about 2-3 minutes until the beef is well-coated and the liquid has reduced.
- Assemble the nachos: On a large sheet pan, spread out the tortilla chips in an even layer. Top with the seasoned beef, spreading it out evenly across the chips. Sprinkle the cheese over the beef, ensuring it’s distributed evenly. Add the black beans, cherry tomatoes, and jalapeños if using.
- Bake the nachos: Place the sheet pan in the preheated oven and bake for about 8-10 minutes, or until the cheese is fully melted and bubbly.
- Finish with toppings: Remove the nachos from the oven and sprinkle with sliced green onions and chopped cilantro. Serve immediately with sour cream and salsa on the side.
Extra Tips:
For best results, use a sturdy brand of tortilla chips that can hold the toppings without getting soggy. You can also switch up the protein by using ground chicken or turkey instead of beef. If you prefer a spicier dish, add extra jalapeños or a sprinkle of crushed red pepper flakes.
To make this meal even more filling, consider adding a layer of refried beans beneath the beef. These nachos are best enjoyed fresh from the oven, but you can store leftovers in an airtight container in the fridge for up to two days. Reheat them in the oven to maintain crispiness.
Lemon Herb Sheet Pan Shrimp and Broccoli
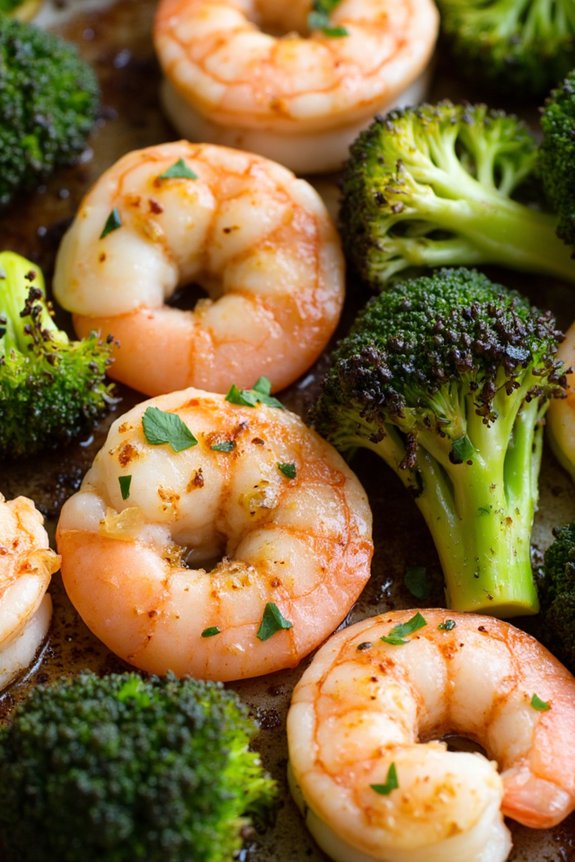
Lemon Herb Sheet Pan Shrimp and Broccoli is a delightful and easy-to-make meal that brings vibrant flavors to your dinner table. This dish combines succulent shrimp with fresh broccoli, all seasoned with zesty lemon and fragrant herbs to create a comforting yet invigorating family dinner.
The beauty of this recipe lies in its simplicity—everything is cooked on a single sheet pan, making both preparation and cleanup a breeze. Perfect for a busy weeknight, this dish can be ready in under 30 minutes, freeing up more time for you to enjoy with your family.
The combination of lemon, garlic, and herbs infuses the shrimp and broccoli with a bright and aromatic flavor profile that’s both satisfying and light. The shrimp cooks quickly, absorbing the marinade and becoming tender and flavorful, while the broccoli roasts to perfection, bringing out its natural sweetness and crisp texture.
This recipe isn’t only delicious but also nutritious, providing a balanced meal rich in protein, fiber, and vitamins. It’s an ideal choice for families looking to enjoy a healthy, home-cooked meal without spending hours in the kitchen.
Ingredients for 4-6 Servings:
- 2 pounds large shrimp, peeled and deveined
- 1 large head of broccoli, cut into florets
- 3 tablespoons olive oil
- 3 cloves garlic, minced
- 1 lemon, zested and juiced
- 1 teaspoon dried oregano
- 1 teaspoon dried thyme
- Salt and pepper to taste
- Optional: fresh parsley or basil for garnish
Cooking Instructions:
- Preheat the Oven: Begin by preheating your oven to 400°F (200°C). This guarantees that the shrimp and broccoli cook evenly and to the right consistency.
- Prepare the Marinade: In a large mixing bowl, combine the olive oil, minced garlic, lemon zest, lemon juice, dried oregano, dried thyme, salt, and pepper. Whisk these ingredients together until well blended to create the flavorful marinade.
- Marinate the Shrimp: Add the peeled and deveined shrimp to the bowl with the marinade. Toss the shrimp until they’re well coated with the mixture. Let them sit for about 10 minutes to absorb the flavors.
- Prepare the Broccoli: While the shrimp are marinating, spread the broccoli florets evenly on a large sheet pan. Drizzle with a little olive oil and season with salt and pepper. Toss to coat the broccoli thoroughly.
- Combine and Roast: Arrange the marinated shrimp on the sheet pan with the broccoli. Make sure everything is spread out in a single layer for even cooking. Place the sheet pan in the preheated oven.
- Cook the Dish: Roast the shrimp and broccoli in the oven for 12-15 minutes, or until the shrimp are pink and opaque, and the broccoli is tender-crisp with slightly charred edges.
- Serve: Once done, remove the sheet pan from the oven. If desired, sprinkle with fresh parsley or basil for garnish before serving. Enjoy your Lemon Herb Sheet Pan Shrimp and Broccoli hot for the best flavor.
Extra Tips:
For an extra burst of flavor, consider adding a pinch of red pepper flakes to the marinade for a subtle kick. If you prefer your broccoli with a bit more bite, reduce the cooking time by a few minutes.
Remember, shrimp cook very quickly, so keep an eye on them to avoid overcooking, which can make them rubbery. Feel free to get creative with the herbs—fresh dill or rosemary can be excellent alternatives to oregano and thyme.
Finally, serving the dish with a side of crusty bread or over a bed of rice can make it a more filling meal for larger families.
Maple Dijon Pork Chops With Brussels Sprouts
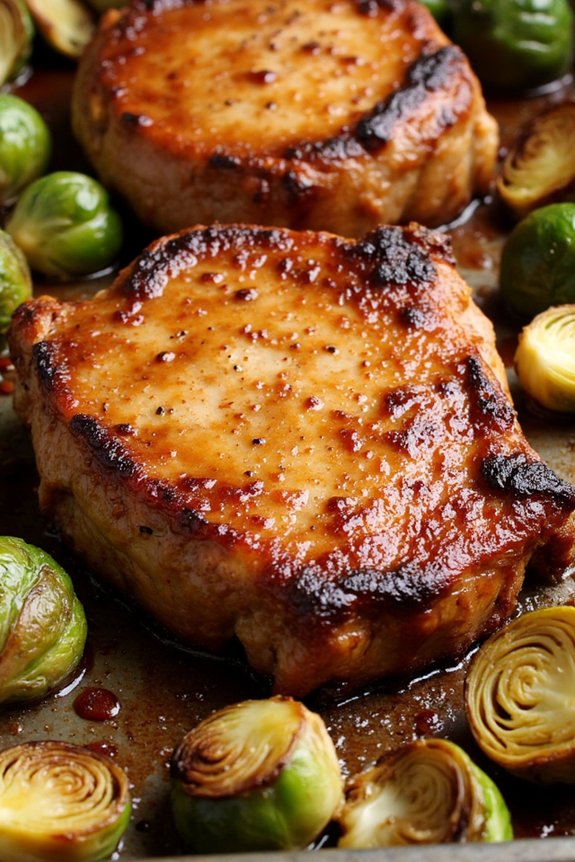
Maple Dijon Pork Chops With Brussels Sprouts is a delightful sheet pan dinner that brings together the savory flavors of pork with the sweetness of maple syrup and the tanginess of Dijon mustard. This dish isn’t only simple to prepare but is also perfect for a family meal, as it requires minimal cleanup and is ready in under an hour.
The combination of juicy pork chops and roasted Brussels sprouts, which get beautifully caramelized in the oven, makes for a satisfying and nutritious meal. Cooking sheet pan meals like Maple Dijon Pork Chops With Brussels Sprouts allows you to deliver a wholesome dinner without the fuss of multiple pots and pans.
By roasting everything together, the flavors meld wonderfully, guaranteeing that every bite is infused with the essence of maple and mustard. This recipe is designed to serve 4-6 people, making it ideal for family dinners or a small gathering.
Ingredients:
- 4-6 bone-in pork chops, about 1 inch thick
- 1 pound Brussels sprouts, halved
- 1/4 cup maple syrup
- 2 tablespoons Dijon mustard
- 2 tablespoons olive oil
- 2 cloves garlic, minced
- Salt and pepper to taste
- 1 teaspoon dried thyme
- 1/2 teaspoon paprika
Cooking Instructions:
- Preheat the Oven: Begin by preheating your oven to 400°F (200°C). This temperature is ideal for roasting the pork and Brussels sprouts, guaranteeing they cook evenly and develop a nice caramelized exterior.
- Prepare the Marinade: In a small mixing bowl, whisk together the maple syrup, Dijon mustard, olive oil, minced garlic, salt, pepper, dried thyme, and paprika. This marinade will add flavor to both the pork chops and the Brussels sprouts.
- Marinate the Pork Chops: Place the pork chops in a shallow dish or a resealable plastic bag. Pour half of the marinade over the pork chops, making sure they’re well coated. Allow them to marinate for at least 15 minutes while you prepare the Brussels sprouts.
- Prepare the Brussels Sprouts: On a large sheet pan, toss the halved Brussels sprouts with the remaining marinade, guaranteeing they’re evenly coated. Spread them out in a single layer to ensure even roasting.
- Assemble the Sheet Pan: Remove the pork chops from the marinade and place them on the sheet pan with the Brussels sprouts. Guarantee there’s some space between each pork chop and the Brussels sprouts for even cooking.
- Roast in the Oven: Place the sheet pan in the preheated oven and roast for 25-30 minutes, or until the pork chops reach an internal temperature of 145°F (63°C) and the Brussels sprouts are tender and caramelized. Flip the pork chops halfway through cooking for even browning.
- Rest and Serve: Once cooked, remove the sheet pan from the oven and let the pork chops rest for 5 minutes before serving. This allows the juices to redistribute within the meat, guaranteeing they remain juicy and flavorful.
Extra Tips:
For best results, choose pork chops that are uniform in size and thickness to guarantee even cooking. If you prefer your Brussels sprouts extra crispy, you can broil them for an additional 2-3 minutes after roasting.
Feel free to add other vegetables to the sheet pan, such as sweet potatoes or carrots, to make the meal even more colorful and nutritious. Finally, adjust the seasoning to your taste, and enjoy a delightful balance of flavors with every bite!
Sheet Pan BBQ Chicken With Sweet Potatoes
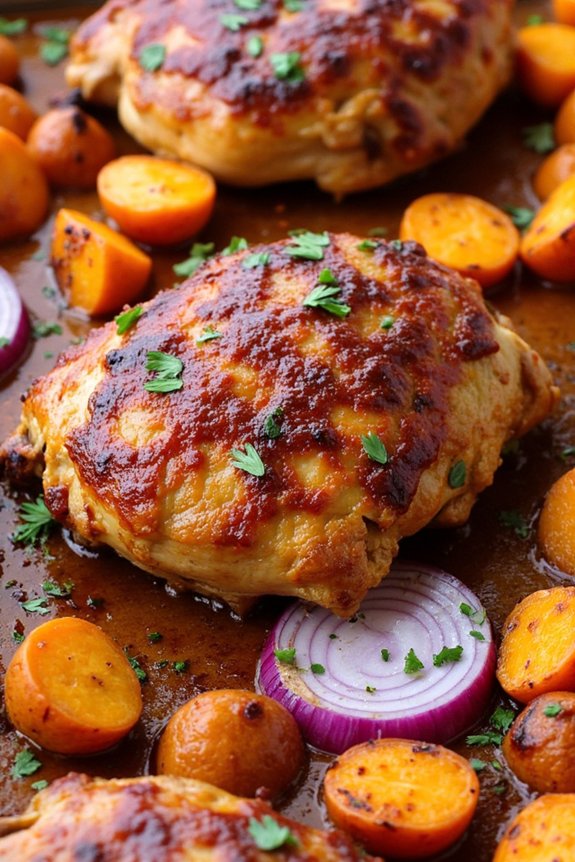
Sheet Pan BBQ Chicken With Sweet Potatoes is a delightful and convenient meal that brings together the savory flavors of barbecue sauce with the natural sweetness of roasted sweet potatoes. This dish is perfect for busy weeknights when you want a home-cooked meal without spending hours in the kitchen. By using a sheet pan, you can cook everything at once, allowing the juices from the chicken to infuse into the vegetables, creating a harmony of flavors.
It’s a colorful, nutritious meal that can easily become a family favorite. The combination of tender chicken thighs coated in smoky barbecue sauce and caramelized sweet potatoes isn’t only delicious but also visually appealing. The dish is packed with protein and fiber, making it a wholesome meal that satisfies both the palate and the appetite.
Whether you’re hosting a casual dinner or need a quick meal solution, this sheet pan recipe is sure to impress. You can customize it with your favorite vegetables, but the classic pairing of sweet potatoes and chicken is always a winner.
Ingredients (serves 4-6):
- 6 chicken thighs (bone-in, skin-on)
- 4 large sweet potatoes, peeled and cut into 1-inch cubes
- 1 large red onion, sliced
- 1/2 cup barbecue sauce
- 2 tablespoons olive oil
- 1 teaspoon smoked paprika
- 1 teaspoon garlic powder
- Salt and pepper to taste
- Fresh parsley for garnish (optional)
Cooking Instructions:
- Preheat the Oven: Begin by preheating your oven to 425°F (220°C). This temperature is ideal for roasting, guaranteeing that the chicken becomes crispy while the sweet potatoes caramelize beautifully.
- Prepare the Vegetables: In a large mixing bowl, combine the sweet potato cubes and sliced red onion. Drizzle with olive oil, then sprinkle with smoked paprika, garlic powder, salt, and pepper. Toss everything together until the vegetables are well coated in the seasoning.
- Arrange on Sheet Pan: Spread the seasoned sweet potatoes and onions evenly on a large sheet pan. Confirm they’re in a single layer for even roasting.
- Prepare the Chicken: Pat the chicken thighs dry with paper towels to make sure they crisp up nicely. Place the chicken thighs skin-side up on top of the vegetables. Brush each thigh generously with barbecue sauce, making sure they’re thoroughly coated.
- Roast the Dish: Place the sheet pan in the preheated oven and roast for 35-45 minutes, or until the chicken is cooked through (internal temperature should reach 165°F or 74°C) and the sweet potatoes are tender and slightly caramelized.
- Finish and Serve: Once cooked, remove the sheet pan from the oven. Allow the chicken to rest for a few minutes before serving. Garnish with fresh parsley if desired, and serve hot.
Extra Tips: For best results, choose chicken thighs that are similar in size to guarantee even cooking. If you prefer a spicier dish, consider adding a pinch of cayenne pepper to the sweet potatoes.
Always make sure the chicken skin is patted dry before applying the barbecue sauce to achieve maximum crispiness. If your oven heats unevenly, rotate the sheet pan halfway through cooking. This recipe is versatile—feel free to add other vegetables like bell peppers or zucchini for added flavor and nutrition.
Mediterranean Roasted Vegetable and Chickpea Traybake

This Mediterranean Roasted Vegetable and Chickpea Traybake is a delightful and wholesome meal that harnesses the vibrant flavors of the Mediterranean. Perfectly roasted vegetables, protein-rich chickpeas, and aromatic herbs come together in this one-pan wonder.
It’s an ideal dish for busy weeknights or a weekend gathering, providing a healthy and satisfying option for the whole family. This traybake isn’t only easy to prepare but also packed with nutrients, making it a favorite for those seeking a balanced diet without compromising on taste.
The combination of colorful vegetables such as bell peppers, zucchini, and cherry tomatoes, paired with earthy chickpeas and seasoned with Mediterranean spices, guarantees a burst of flavor in every bite.
The roasting process enhances the natural sweetness of the vegetables, while the chickpeas become delightfully crisp on the outside and tender on the inside. Whether you’re a seasoned cook or a beginner, this recipe is straightforward and rewarding, offering a comforting meal that can be enjoyed year-round.
Ingredients (serving size: 4-6 people):
- 2 large bell peppers (red or yellow), sliced
- 1 large zucchini, sliced
- 1 large red onion, cut into wedges
- 1 pint cherry tomatoes
- 2 cans (15 oz each) chickpeas, drained and rinsed
- 4 cloves garlic, minced
- 1/4 cup olive oil
- 2 teaspoons dried oregano
- 1 teaspoon dried thyme
- 1 teaspoon ground cumin
- 1 teaspoon smoked paprika
- Salt and pepper, to taste
- 1 lemon, cut into wedges
- Fresh parsley, chopped, for garnish
Cooking Instructions:
- Preheat the Oven: Preheat your oven to 400°F (200°C). This will make sure that the vegetables roast evenly and develop a nice caramelization.
- Prepare the Vegetables: On a large sheet pan, spread out the sliced bell peppers, zucchini, red onion, and cherry tomatoes. Add the drained chickpeas to the pan.
- Season the Ingredients: In a small bowl, mix together the olive oil, minced garlic, dried oregano, thyme, cumin, smoked paprika, salt, and pepper. Drizzle this mixture over the vegetables and chickpeas, making sure everything is evenly coated.
- Roast the Traybake: Place the sheet pan in the preheated oven and roast for 25-30 minutes. Halfway through cooking, give the vegetables a quick stir to make sure of even roasting.
- Finish and Serve: Once the vegetables are tender and slightly charred, remove the traybake from the oven. Squeeze the lemon wedges over the top and garnish with freshly chopped parsley. Serve warm.
Extra Tips:
For added depth of flavor, consider adding some olives or feta cheese before serving. If you prefer your dish with a bit of heat, sprinkle some red pepper flakes over the vegetables before roasting.
To make this dish even more substantial, serve it with a side of couscous or quinoa. For a more crispy texture, make sure not to overcrowd the pan; use two pans if necessary to make certain all the ingredients have enough space to roast properly.
Teriyaki Chicken and Pineapple Stir-Fry

Indulge your family with a delicious Teriyaki Chicken and Pineapple Stir-Fry that’s perfect for a weeknight dinner, all cooked on a single sheet pan. This recipe combines juicy chicken, sweet pineapple, and a medley of colorful vegetables, all glazed with a savory homemade teriyaki sauce. The balance of sweet and savory flavors, along with the ease of preparation, makes this dish a family favorite that everyone will love.
With minimal prep time and a quick cooking process, this dish isn’t only flavorful but also convenient for busy families. This dish serves 4-6 people and is a perfect way to enjoy a nutritious meal that doesn’t require you to spend hours in the kitchen. By cooking it all on one sheet pan, you minimize cleanup and maximize flavor as the ingredients roast together, allowing the juices and aromas to meld perfectly.
Whether you’re a novice or a seasoned cook, this recipe will guide you through creating a delightful meal that brings the taste of Asian-inspired cuisine right to your table.
Ingredients:
- 1.5 pounds boneless, skinless chicken thighs, cut into bite-sized pieces
- 2 cups pineapple chunks (fresh or canned, drained)
- 2 red bell peppers, sliced
- 1 large onion, sliced
- 2 cups broccoli florets
- 1 tablespoon olive oil
- Salt and pepper to taste
- 1/4 cup soy sauce
- 2 tablespoons honey
- 2 tablespoons rice vinegar
- 1 tablespoon sesame oil
- 2 cloves garlic, minced
- 1 teaspoon grated ginger
- 1 tablespoon cornstarch
- 2 tablespoons water
- Sesame seeds and chopped green onions for garnish
Cooking Instructions:
- Preheat and Prep: Preheat your oven to 400°F (200°C). Line a large sheet pan with parchment paper or lightly grease it with cooking spray to prevent sticking.
- Prepare the Chicken and Vegetables: In a large mixing bowl, combine the chicken pieces, pineapple chunks, sliced red bell peppers, onion, and broccoli florets. Drizzle with olive oil, sprinkle with salt and pepper, and toss everything together until well coated.
- Arrange on Sheet Pan: Spread the chicken and vegetable mixture evenly across the prepared sheet pan, making sure there’s space between pieces for even roasting.
- Make the Teriyaki Sauce: In a small saucepan over medium heat, whisk together the soy sauce, honey, rice vinegar, sesame oil, minced garlic, and grated ginger. Bring the mixture to a simmer.
- Thicken the Sauce: In a small bowl, mix the cornstarch with water until smooth. Gradually add this slurry to the simmering sauce, whisking continuously until the sauce thickens. Remove from heat.
- Bake the Stir-Fry: Pour about two-thirds of the prepared teriyaki sauce over the chicken and vegetables on the sheet pan, reserving some for later. Toss everything to coat well. Bake in the preheated oven for 25-30 minutes, or until the chicken is fully cooked and the vegetables are tender.
- Finish and Serve: Once cooked, remove the sheet pan from the oven. Drizzle the reserved teriyaki sauce over the top and gently toss to combine. Garnish with sesame seeds and chopped green onions before serving.
Extra Tips:
For additional flavor, you can marinate the chicken in a portion of the teriyaki sauce for 30 minutes before cooking, but make sure to reserve enough sauce for baking and drizzling.
When cutting the chicken and vegetables, aim for uniform sizes to promote even cooking. If you prefer a spicier dish, add a pinch of red pepper flakes to the teriyaki sauce. Finally, serve this stir-fry with steamed rice or noodles to make it a complete meal.
Italian Sausage and Potato Skillet

Italian Sausage and Potato Skillet is a delightful and hearty meal that can be prepared in a single sheet pan, making it perfect for busy weeknights or a relaxed family dinner. This dish combines the savory flavors of Italian sausage with the comforting taste of roasted potatoes, all brought together by the addition of colorful bell peppers and onions. The combination of ingredients not only creates a symphony of flavors but also guarantees a balanced meal that’s both satisfying and easy to prepare.
The beauty of a sheet pan meal is its simplicity and minimal cleanup. With just a little bit of preparation, you can have a nutritious and delicious meal on the table in no time. The Italian Sausage and Potato Skillet is versatile, allowing you to adjust the ingredients based on what you have on hand or your family’s preferences. Whether you’re looking to impress guests or simply enjoy a cozy night in, this recipe is sure to become a family favorite.
Ingredients (Serves 4-6):
- 1.5 pounds Italian sausage links (mild or spicy, as preferred)
- 1.5 pounds baby potatoes, halved
- 2 bell peppers (any color), sliced
- 1 large red onion, sliced
- 3 tablespoons olive oil
- 1 teaspoon garlic powder
- 1 teaspoon dried oregano
- 1 teaspoon dried basil
- Salt and pepper to taste
- Fresh parsley, chopped (optional, for garnish)
Instructions:
- Preheat the Oven: Start by preheating your oven to 400°F (200°C) to guarantee it’s hot enough to roast the ingredients evenly.
- Prepare the Sausage: Pierce the Italian sausage links with a fork several times. This allows the juices to escape and the sausages to cook thoroughly without bursting.
- Slice the Vegetables: While the oven is heating, wash and halve the baby potatoes. Slice the bell peppers and red onion into strips. This preparation helps in even cooking and a uniform presentation.
- Combine Ingredients: On a large sheet pan, combine the halved potatoes, sliced bell peppers, and onions. Drizzle with olive oil and sprinkle with garlic powder, dried oregano, dried basil, salt, and pepper. Toss everything together until the vegetables are well coated.
- Add Sausages: Place the sausages on top of the vegetable mixture. This allows the flavors from the sausage to infuse into the vegetables as they roast.
- Roast: Place the sheet pan in the preheated oven and roast for 25-30 minutes. Stir the vegetables halfway through to guarantee even cooking. The dish is done when the potatoes are tender and the sausages are cooked through.
- Serve: Remove from the oven and let it cool for a few minutes. Garnish with fresh parsley if desired, and serve directly from the sheet pan for a rustic presentation.
Extra Tips:
To guarantee even cooking, try to cut the vegetables into uniform sizes. This helps in achieving consistent texture and doneness. If you prefer a bit of spice, consider adding a pinch of red pepper flakes to the vegetable mix before roasting.
Additionally, you can experiment with different types of sausages, such as chicken or turkey, for a lighter version of the dish. Finally, lining the sheet pan with parchment paper can make cleanup even easier. Enjoy your meal with a side of crusty bread to soak up the delicious juices!
Balsamic Glazed Steak and Veggies
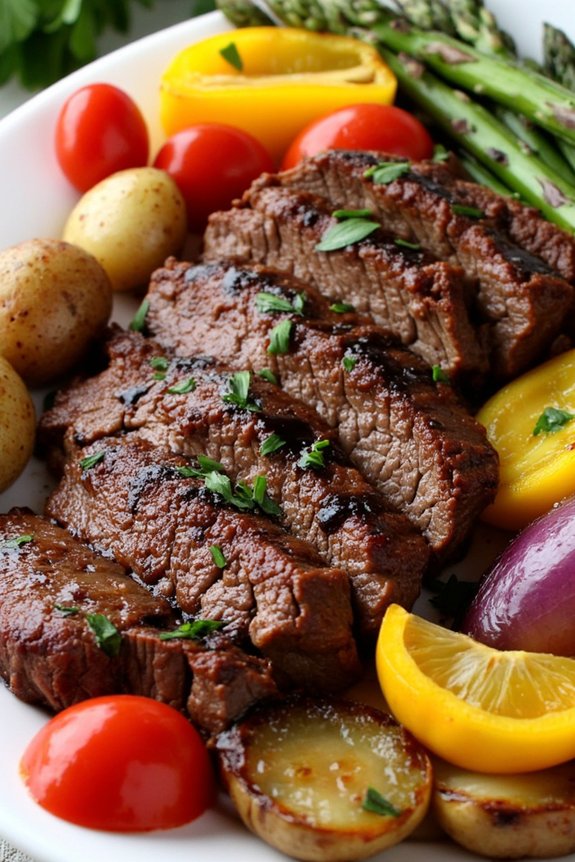
Balsamic Glazed Steak and Veggies is a delightful and savory dish that brings together the richness of steak with the vibrant flavors of fresh vegetables, all enhanced by a tangy balsamic glaze. This recipe is perfect for a family dinner, allowing everyone to enjoy a hearty and nutritious meal with minimal cleanup, thanks to the convenience of using a single sheet pan.
The combination of tender, juicy steak and perfectly roasted vegetables makes this dish a crowd-pleaser, suitable for both casual family meals and special occasions. The magic of this recipe lies in the balsamic glaze, which adds a depth of flavor that complements the natural tastes of the meat and veggies.
The glaze not only enhances the dish but also helps to caramelize the ingredients, giving them a beautiful and appetizing appearance. This recipe is designed to serve 4-6 people, making it an ideal choice for a family gathering or a dinner party. With just a few simple steps, you can create a delicious and well-rounded meal that will leave everyone satisfied.
Ingredients:
- 2 pounds of flank steak
- 1 pound of baby potatoes, halved
- 1 pound of asparagus, trimmed
- 1 red bell pepper, sliced
- 1 yellow bell pepper, sliced
- 1 red onion, sliced
- 1/4 cup balsamic vinegar
- 1/4 cup olive oil
- 3 tablespoons honey
- 3 cloves garlic, minced
- 1 teaspoon dried thyme
- Salt and pepper to taste
- Fresh parsley, chopped (for garnish)
Cooking Instructions:
1. Preheat the Oven:
Preheat your oven to 400°F (200°C) to prepare for roasting the steak and vegetables.
2. Prepare the Balsamic Glaze:
In a small mixing bowl, whisk together the balsamic vinegar, olive oil, honey, minced garlic, dried thyme, salt, and pepper. This will be the glaze to coat your steak and veggies.
3. Prepare the Steak:
Place the flank steak on a cutting board and brush it generously with the balsamic glaze. Allow it to marinate for about 10-15 minutes to absorb the flavors.
4. Arrange the Vegetables:
On a large sheet pan, arrange the baby potatoes, asparagus, red bell pepper, yellow bell pepper, and red onion. Drizzle half of the remaining balsamic glaze over the vegetables and toss them to guarantee they’re evenly coated.
5. Cook the Steak:
Move the marinated steak to the center of the sheet pan, making space among the vegetables. Pour any remaining glaze over the entire dish.
6. Roast in the Oven:
Place the sheet pan in the preheated oven and roast for approximately 20-25 minutes, or until the steak reaches your desired level of doneness and the vegetables are tender and slightly caramelized.
7. Rest and Serve:
Once cooked, remove the steak from the oven and let it rest for about 5 minutes before slicing. This will help the juices redistribute throughout the meat. Slice the steak against the grain and serve with the roasted vegetables.
Extra Tips:
For best results, make sure the steak is at room temperature before cooking, which helps it cook more evenly. If you prefer your steak well-done, you can leave it in the oven for an additional 5-10 minutes.
You can also substitute the vegetables based on your preference or seasonal availability; zucchini and cherry tomatoes make great alternatives. Finally, garnishing the dish with fresh parsley not only adds a pop of color but also enhances the overall flavor profile. Enjoy your meal with a side of crusty bread or a fresh salad for a complete dining experience.
Sheet Pan Parmesan Crusted Tilapia
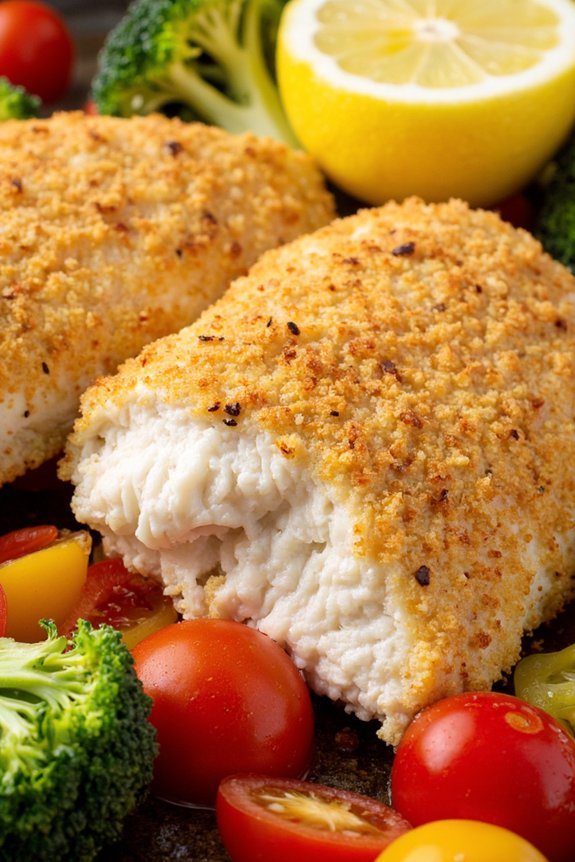
Sheet Pan Parmesan Crusted Tilapia is a delightful and easy-to-make dish that brings a burst of flavor to your dinner table with minimal cleanup. It’s perfect for busy weeknights when you want something delicious but don’t have much time to spare. This recipe combines the delicate flavor of tilapia with a crispy, cheesy crust that’s certain to be a hit with the whole family.
The beauty of this dish lies in its simplicity and the fact that it’s all cooked on one sheet pan, making both preparation and cleanup a breeze. Tilapia is a mild-flavored fish that pairs wonderfully with the savory, nutty taste of parmesan cheese. When baked to perfection, the fish is tender and flaky, while the crust is golden and crispy.
This recipe is designed to serve 4-6 people, making it an ideal choice for a family dinner or a small gathering. Alongside the fish, you can roast some vegetables on the same sheet pan for a complete meal that’s both nutritious and satisfying. With its quick preparation and delicious outcome, Sheet Pan Parmesan Crusted Tilapia is certain to become a family favorite.
Ingredients (serves 4-6):
- 4-6 tilapia fillets
- 1 cup grated Parmesan cheese
- 1 cup panko breadcrumbs
- 1 tablespoon dried Italian seasoning
- 1 teaspoon garlic powder
- 1/2 teaspoon salt
- 1/4 teaspoon black pepper
- 2 tablespoons olive oil
- 2 tablespoons lemon juice
- 1 lemon, sliced (optional, for garnish)
- 1 pound of mixed vegetables (such as broccoli, bell peppers, and cherry tomatoes)
- Cooking spray
Instructions:
- Preheat the Oven: Set your oven to 400°F (200°C) to guarantee it reaches the desired temperature by the time you finish preparing the ingredients.
- Prepare the Baking Sheet: Line a large baking sheet with aluminum foil or parchment paper, and lightly coat it with cooking spray to prevent sticking.
- Mix the Crust Ingredients: In a shallow bowl, combine the Parmesan cheese, panko breadcrumbs, Italian seasoning, garlic powder, salt, and black pepper. Mix well to guarantee even distribution of the seasonings.
- Prepare the Fish: Pat the tilapia fillets dry with paper towels. Drizzle them with olive oil and lemon juice, then press each fillet into the parmesan mixture, ensuring they’re well coated on all sides.
- Arrange on the Sheet Pan: Place the crusted tilapia fillets on one side of the prepared baking sheet. On the other side, arrange the mixed vegetables. Drizzle the vegetables with a little olive oil, and season with salt and pepper.
- Bake the Dish: Place the baking sheet in the preheated oven and bake for 15-20 minutes. The fish should be opaque and flake easily with a fork, and the crust should be golden brown. The vegetables should be tender and slightly caramelized.
- Serve: Once cooked, remove the sheet pan from the oven. Optionally, garnish the tilapia with lemon slices for added flavor and presentation. Serve immediately while hot.
Extra Tips:
For the best results, confirm that all fillets are of similar thickness to promote even cooking. If you’re using frozen tilapia, make sure it’s fully thawed and patted dry to prevent a soggy crust.
Feel free to customize the vegetable selection based on what you have on hand or what’s in season. You can also experiment with other herbs and spices to suit your taste preferences. This dish pairs well with a simple side salad or crusty bread to complete the meal.
Spicy Honey Lime Chicken and Corn
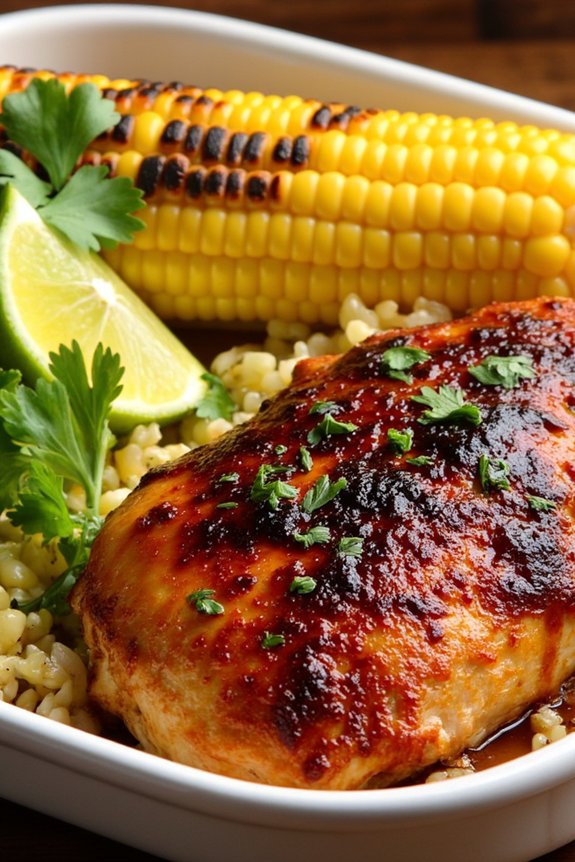
Spicy Honey Lime Chicken and Corn is the perfect sheet pan family dinner that combines the sweetness of honey with the zest of lime, creating a delightful balance of flavors that will tantalize your taste buds. This dish is ideal for busy weeknights when you want something quick, easy, and satisfying for the whole family.
The chicken is marinated in a spicy honey lime sauce that infuses it with flavor, while the corn adds a sweet and smoky element that complements the spice perfectly. This recipe serves 4-6 people and utilizes simple ingredients that you might already have in your kitchen.
The beauty of this dish lies in its simplicity—everything is cooked on one pan, which means less cleanup and more time to enjoy your meal. Whether you’re a fan of spicy dishes or prefer your meals on the milder side, you can easily adjust the heat level to suit your family’s preferences.
Let’s plunge into the recipe and create a meal your family will love.
Ingredients:
- 4-6 boneless, skinless chicken breasts
- 3 ears of corn, cut into halves
- 1/4 cup honey
- 3 tablespoons lime juice
- 2 tablespoons olive oil
- 1 tablespoon chili powder
- 1 teaspoon garlic powder
- 1 teaspoon ground cumin
- 1/2 teaspoon red pepper flakes (adjust to taste)
- Salt and pepper to taste
- Lime wedges for serving
- Fresh cilantro for garnish (optional)
Instructions:
- Prepare the Marinade: In a medium-sized bowl, combine the honey, lime juice, olive oil, chili powder, garlic powder, ground cumin, red pepper flakes, salt, and pepper. Whisk these ingredients until the mixture is smooth and well-blended.
- Marinate the Chicken: Place the chicken breasts in a large resealable plastic bag or a shallow dish. Pour the marinade over the chicken, making sure each piece is well coated. Seal the bag or cover the dish and refrigerate for at least 30 minutes to allow the flavors to penetrate the chicken. For best results, marinate for up to 2 hours.
- Preheat the Oven: Preheat your oven to 400°F (200°C). While the oven is heating, line a large baking sheet with parchment paper or aluminum foil for easy cleanup.
- Prepare the Corn: Arrange the corn halves on one side of the prepared baking sheet. Drizzle them with a bit of olive oil and sprinkle with salt and pepper.
- Bake the Chicken and Corn: Remove the chicken from the marinade and place it next to the corn on the baking sheet. Discard the excess marinade. Bake in the preheated oven for 25-30 minutes, or until the chicken is cooked through (internal temperature should reach 165°F/74°C) and the corn is tender and slightly charred.
- Serve the Dish: Once cooked, remove the sheet pan from the oven. Serve the chicken with lime wedges and garnish with fresh cilantro if desired. Enjoy this dish hot with your favorite side salad or bread.
Extra Tips:
To guarantee even cooking, try to use chicken breasts of similar thickness. If some pieces are thicker than others, consider pounding them to an even thickness before marinating.
For an extra burst of flavor, consider adding zest from the limes to the marinade. If you prefer your corn more charred, you can finish it under the broiler for a minute or two after the baking time.
This dish can be easily adjusted to suit different tastes by altering the amount of chili powder and red pepper flakes. Happy cooking!