

Are you ready to make dinner time a breeze without losing any flavor?
I’ve found a collection of quick and easy recipes that are perfect for those busy nights when you still want to serve something delicious.
From creamy garlic mushroom pasta to zesty shrimp tacos, these dishes can be on your table in under 30 minutes.
They cater to every craving, whether you’re in the mood for hearty meat options or vibrant vegetarian delights.
Let’s turn your weeknight meals into a delightful family gathering.
Creamy Garlic Mushroom Pasta
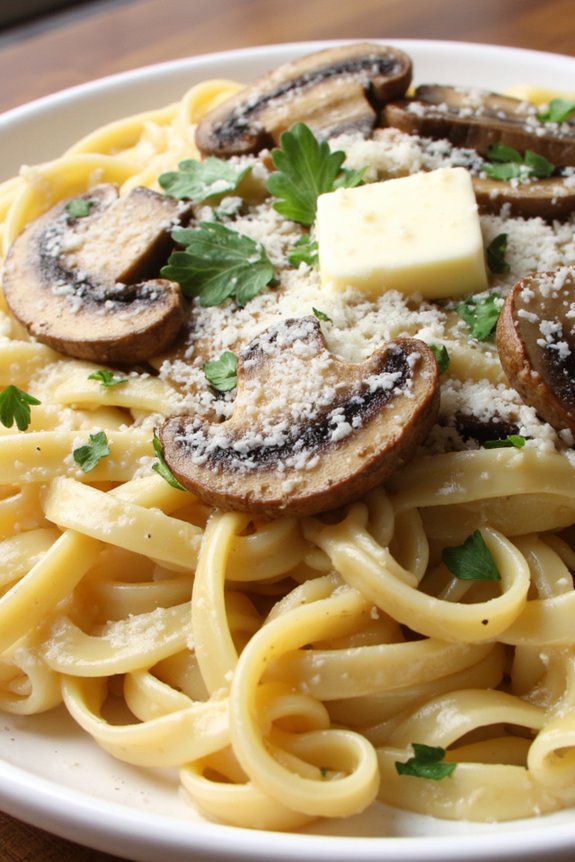
Creamy Garlic Mushroom Pasta is a quick and easy dinner recipe that delivers indulgent flavors with minimal effort. This dish combines the earthy taste of mushrooms with the rich creaminess of a garlic-infused sauce, all tossed together with perfectly cooked pasta.
It’s the perfect meal for busy weeknights when you want something delicious without spending hours in the kitchen. Whether you’re cooking for family or hosting a dinner with friends, this recipe is sure to impress.
The beauty of this dish lies in its simplicity and the way the garlic, mushrooms, and cream come together to create a sauce that’s both comforting and satisfying. It’s versatile enough to be paired with your favorite pasta, and you can easily adjust the ingredients to suit your taste preferences.
This Creamy Garlic Mushroom Pasta recipe serves 4-6 people, making it ideal for a small gathering or a family meal.
Ingredients:
- 400g pasta (such as fettuccine or spaghetti)
- 2 tablespoons olive oil
- 500g mushrooms, sliced
- 4 cloves garlic, minced
- 1 cup heavy cream
- 1/2 cup grated Parmesan cheese
- Salt and black pepper, to taste
- 1/4 cup chopped fresh parsley
- 1 tablespoon butter
Cooking Instructions:
- Cook the Pasta: Begin by bringing a large pot of salted water to a boil. Add the pasta and cook according to the package instructions until al dente. Reserve 1 cup of pasta water, then drain the pasta and set it aside.
- Sauté the Mushrooms: In a large skillet, heat the olive oil over medium heat. Add the sliced mushrooms and cook for about 5-7 minutes, or until they’re golden brown and tender. Stir occasionally to guarantee even cooking.
- Prepare the Garlic Sauce: Add the minced garlic to the skillet with the mushrooms and cook for an additional 1-2 minutes, until fragrant. Be careful not to burn the garlic.
- Make the Creamy Sauce: Pour in the heavy cream and stir to combine. Allow the mixture to simmer for 3-4 minutes, or until it starts to thicken. Season with salt and black pepper to taste.
- Combine with Pasta: Add the cooked pasta to the skillet and toss it with the creamy mushroom sauce. If the sauce is too thick, gradually add some of the reserved pasta water until you reach your desired consistency.
- Add Cheese and Herbs: Stir in the grated Parmesan cheese until melted and well combined. Finish by adding the butter and chopped parsley, stirring until the butter is melted and the parsley is evenly distributed.
- Serve: Divide the pasta among plates or bowls, and garnish with additional Parmesan and parsley if desired. Serve immediately while hot.
Extra Tips:
For the best flavor, try using a mix of mushrooms, such as cremini, shiitake, or button mushrooms. If you want to add some protein, cooked chicken or shrimp can be incorporated into the dish.
Additionally, feel free to adjust the amount of garlic to suit your preference. If you prefer a lighter sauce, substitute half of the heavy cream with chicken or vegetable broth.
Finally, always taste and adjust the seasoning before serving to guarantee the perfect balance of flavors.
One-Pot Lemon Herb Chicken and Rice

One-Pot Lemon Herb Chicken and Rice is the perfect solution for those busy weeknights when you want a delicious, home-cooked meal without the hassle of multiple dishes to clean. This flavorful dish combines juicy, tender chicken with fragrant herbs, zesty lemon, and perfectly cooked rice, all in one pot.
Whether you’re a seasoned cook or a beginner, this recipe is simple enough to follow, yet sophisticated in taste, making it a family favorite. The beauty of this recipe lies in its simplicity and the harmonious blend of fresh ingredients.
The lemon adds a bright, citrusy note that pairs beautifully with the herbs, while the chicken and rice make it a satisfying and wholesome meal. With just a few pantry staples and fresh produce, you can create a dish that isn’t only comforting but also impressive enough to serve to guests.
So, gather your ingredients and let’s get started with this effortless and delightful One-Pot Lemon Herb Chicken and Rice.
Ingredients (Serves 4-6):
- 4-6 chicken thighs or breasts, skin-on and bone-in
- Salt and pepper, to taste
- 2 tablespoons olive oil
- 1 medium onion, diced
- 3 cloves garlic, minced
- 1 cup long-grain white rice
- 2 cups chicken broth
- 1 lemon, zested and juiced
- 1 teaspoon dried oregano
- 1 teaspoon dried thyme
- 1 teaspoon dried rosemary
- 1/2 cup frozen peas (optional)
- Fresh parsley, chopped, for garnish
Cooking Instructions:
- Prepare the Chicken: Season the chicken thighs or breasts with salt and pepper on both sides. This will help to enhance the flavor of the meat as it cooks.
- Sear the Chicken: In a large pot or Dutch oven, heat the olive oil over medium-high heat. Once hot, add the chicken pieces, skin-side down, and sear until golden brown, about 5-7 minutes per side. Remove the chicken from the pot and set aside.
- Sauté the Aromatics: In the same pot, add the diced onion and sauté until translucent, about 3-4 minutes. Add the minced garlic and cook for an additional minute, stirring frequently to avoid burning.
- Toast the Rice: Add the rice to the pot and stir to coat it with the oil and aromatics. Toast the rice for about 2 minutes, stirring occasionally. This helps to enhance the nutty flavor of the rice.
- Add Liquid and Seasonings: Pour in the chicken broth, lemon juice, and lemon zest. Stir in the oregano, thyme, and rosemary. Bring the mixture to a simmer.
- Cook the Chicken and Rice: Nestle the seared chicken back into the pot on top of the rice. Cover the pot with a lid, reduce the heat to low, and let it cook for 20-25 minutes, or until the rice is tender and the chicken is cooked through.
- Finish and Serve: If using, stir in the frozen peas during the last 5 minutes of cooking. Once done, remove from heat and let it sit, covered, for 5 minutes. Garnish with fresh parsley before serving.
Extra Tips:
For an even deeper flavor, consider marinating the chicken in lemon juice, herbs, and olive oil for a few hours before cooking. If you prefer a crispier chicken skin, you can finish the dish by placing the pot under a broiler for a few minutes to brown the top.
Additionally, feel free to experiment with different herbs or add vegetables like bell peppers or carrots for variation. Remember, the key to a successful one-pot meal is maintaining the balance between liquid and rice, so adjust the broth quantity if needed to guarantee the rice cooks perfectly.
Quick Beef and Broccoli Stir-Fry

If you’re looking for a dish that’s both delicious and easy to prepare, this Quick Beef and Broccoli Stir-Fry is the perfect solution. A classic favorite, this dish combines tender slices of beef with crisp broccoli florets in a savory sauce, all cooked to perfection in just around 30 minutes.
It’s not only a time-saver but also a nutritious meal that’s bursting with flavor, making it ideal for busy weeknights or impromptu dinner gatherings.
This recipe serves 4-6 people, making it great for family meals or small dinner parties. The combination of soy sauce, garlic, and ginger brings out the best in both the beef and broccoli, creating a harmonious blend that’s sure to satisfy. Serve it over steamed rice or noodles for a complete meal that everyone will love.
Ingredients:
- 1 1/2 pounds flank steak, thinly sliced against the grain
- 4 cups broccoli florets
- 3 tablespoons vegetable oil, divided
- 3 cloves garlic, minced
- 1 tablespoon fresh ginger, minced
- 1/4 cup soy sauce
- 2 tablespoons oyster sauce
- 1 tablespoon cornstarch
- 1 tablespoon water
- 1 tablespoon sesame oil
- Salt and pepper to taste
- Cooked rice or noodles, for serving
Cooking Instructions:
- Prepare the Beef: In a medium bowl, combine the sliced flank steak with 1 tablespoon of soy sauce, a pinch of salt, and pepper. Let it marinate for at least 10 minutes to absorb the flavors.
- Prepare the Sauce: In a small bowl, mix together the remaining soy sauce, oyster sauce, cornstarch, and water. Stir until the cornstarch is fully dissolved, then set the sauce aside.
- Cook the Broccoli: In a large skillet or wok, heat 1 tablespoon of vegetable oil over medium-high heat. Add the broccoli florets and stir-fry for about 4-5 minutes, or until they’re bright green and just tender. Remove the broccoli from the skillet and set aside.
- Cook the Beef: In the same skillet, add another tablespoon of vegetable oil. Add the marinated beef slices in a single layer and cook for about 2-3 minutes on each side, or until browned. Remove the beef from the skillet and set aside.
- Combine Ingredients: Add the remaining tablespoon of oil to the skillet, followed by the minced garlic and ginger. Stir-fry for about 30 seconds, or until fragrant. Return the beef and broccoli to the skillet.
- Add the Sauce: Pour the prepared sauce over the beef and broccoli. Stir everything together and let it cook for about 2 minutes, or until the sauce has thickened and everything is well coated.
- Finish the Dish: Drizzle the sesame oil over the stir-fry for added flavor, and give it one final stir. Remove from heat and serve immediately over cooked rice or noodles.
Extra Tips:
For the best results, make sure to slice the beef thinly against the grain; this will guarantee it remains tender and easy to chew.
If you prefer your broccoli more tender, you can blanch it in boiling water for a minute before adding it to the stir-fry.
Adjust the seasoning to your taste, adding more soy sauce or even a pinch of sugar for balance if needed.
Finally, don’t overcrowd the skillet when cooking the beef; work in batches if necessary to guarantee even cooking and browning.
Zesty Shrimp Tacos With Lime Slaw

Zesty Shrimp Tacos With Lime Slaw are a delightful and easy-to-make dish that brings a burst of flavor to your dinner table. These tacos are perfect for a quick weeknight meal, offering a revitalizing combination of spiced shrimp and a tangy lime slaw. The shrimp are marinated in a blend of spices that accentuate their natural sweetness, while the lime slaw adds a crunchy, zesty contrast.
Whether you’re cooking for a family or hosting a casual dinner with friends, these tacos are sure to impress. This recipe serves 4-6 people, making it ideal for a small gathering or family dinner. The preparation is straightforward and quick, ensuring you spend less time in the kitchen and more time enjoying your meal.
The lime slaw can be prepared ahead of time, allowing the flavors to meld together beautifully. With minimal ingredients and maximum taste, these shrimp tacos will become a staple in your dinner rotation.
Ingredients:
- 1 1/2 pounds large shrimp, peeled and deveined
- 1 tablespoon olive oil
- 1 teaspoon ground cumin
- 1 teaspoon paprika
- 1/2 teaspoon garlic powder
- 1/2 teaspoon onion powder
- 1/4 teaspoon cayenne pepper (optional)
- Salt and pepper to taste
- 2 cups shredded cabbage (green or red)
- 1/4 cup mayonnaise
- 2 tablespoons fresh lime juice
- 1 tablespoon honey
- 1 tablespoon chopped fresh cilantro
- 8-10 small corn tortillas
- Lime wedges for serving
Instructions:
- Prepare the Lime Slaw: In a large bowl, combine shredded cabbage, mayonnaise, fresh lime juice, honey, and chopped cilantro. Mix well to combine, ensuring the cabbage is evenly coated with the dressing. Cover and refrigerate the slaw for at least 15 minutes to allow the flavors to blend.
- Season the Shrimp: In a medium bowl, mix olive oil, ground cumin, paprika, garlic powder, onion powder, cayenne pepper (if using), salt, and pepper. Add the peeled and deveined shrimp to the bowl and toss until they’re well coated in the spice mixture.
- Cook the Shrimp: Heat a large skillet over medium-high heat. Once hot, add the seasoned shrimp in a single layer. Cook for 2-3 minutes on each side, or until the shrimp are pink and opaque. Remove from heat and set aside.
- Warm the Tortillas: In the same skillet or using a separate pan, warm the corn tortillas over medium heat for about 30 seconds on each side, or until they’re pliable and slightly toasted.
- Assemble the Tacos: Take a warm tortilla and place a generous spoonful of lime slaw in the center. Top with a few cooked shrimp and garnish with additional cilantro if desired. Repeat with the remaining tortillas, slaw, and shrimp.
- Serve: Serve the tacos immediately with lime wedges on the side for an extra burst of citrus flavor.
Extra Tips:
For a creamier slaw, you can add a tablespoon of sour cream or Greek yogurt to the slaw dressing. If you prefer a bit more heat, feel free to increase the amount of cayenne pepper in the shrimp seasoning.
To save time, you can also use pre-shredded cabbage mix available in most grocery stores. If you have leftover shrimp, they can be used in salads or wraps the next day. Enjoy these Zesty Shrimp Tacos With Lime Slaw with a side of black beans or a fresh green salad for a complete meal.
Easy Vegetable Stir-Fry With Tofu
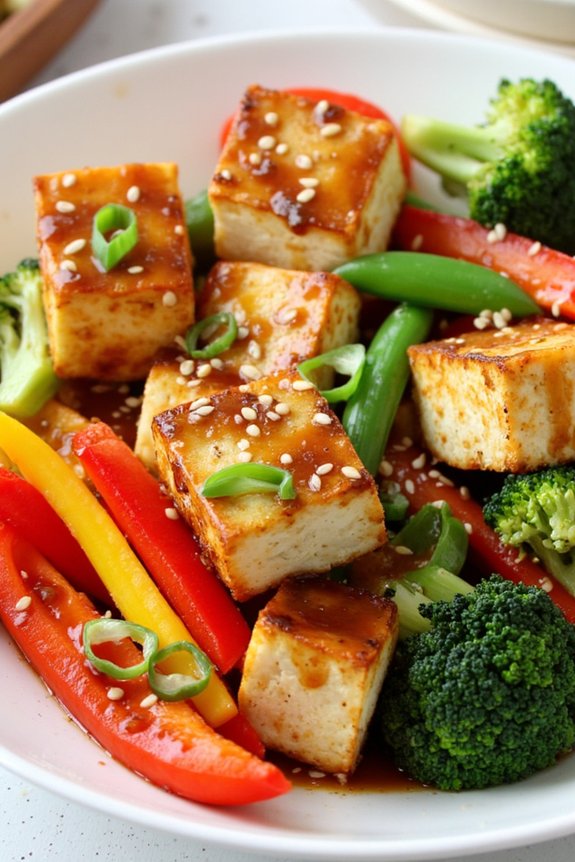
This Easy Vegetable Stir-Fry With Tofu is a perfect dish for those busy weeknights when you need a healthy meal on the table in no time. Packed with vibrant vegetables and protein-rich tofu, this stir-fry isn’t only delicious but also nutritious. The combination of fresh vegetables and savory tofu is enhanced with a tangy sauce that brings everything together.
It’s a satisfying and colorful dish that can be served on its own or with your choice of rice or noodles. The beauty of this stir-fry is its versatility. You can easily customize it with your favorite vegetables or whatever you have on hand. The tofu absorbs all the wonderful flavors from the sauce, making each bite incredibly tasty.
This recipe yields 4-6 servings, making it an ideal meal for family dinners or for meal prepping. With just a few simple ingredients and minimal prep time, this vegetable stir-fry is sure to become a staple in your dinner rotation.
Ingredients (Serves 4-6):
- 1 block (14 oz) firm tofu, drained and pressed
- 2 tablespoons vegetable oil
- 1 red bell pepper, sliced
- 1 yellow bell pepper, sliced
- 1 cup broccoli florets
- 1 cup snap peas
- 2 carrots, sliced
- 3 cloves garlic, minced
- 1 tablespoon fresh ginger, minced
- 1/4 cup soy sauce
- 2 tablespoons hoisin sauce
- 1 tablespoon sesame oil
- 1 tablespoon cornstarch
- 1/4 cup cold water
- 2 green onions, sliced
- Sesame seeds for garnish
Instructions:
- Prepare the Tofu: Begin by draining and pressing the tofu to remove excess moisture. This step is essential for achieving a crispy texture. Once pressed, cut the tofu into 1-inch cubes.
- Cook the Tofu: Heat 1 tablespoon of vegetable oil in a large non-stick pan or wok over medium-high heat. Add the tofu cubes and cook until golden brown on all sides, about 8-10 minutes. Remove the tofu from the pan and set aside.
- Stir-Fry the Vegetables: In the same pan, add the remaining tablespoon of vegetable oil. Add the minced garlic and ginger, and sauté for about 30 seconds until fragrant. Then, add the red and yellow bell peppers, broccoli florets, snap peas, and sliced carrots. Stir-fry the vegetables for 4-5 minutes until they’re tender-crisp.
- Prepare the Sauce: In a small bowl, whisk together the soy sauce, hoisin sauce, sesame oil, cornstarch, and cold water until smooth.
- Combine Tofu and Sauce: Return the cooked tofu to the pan with the vegetables. Pour the sauce over the tofu and vegetables, and toss everything together to guarantee the sauce coats all the ingredients evenly. Cook for another 2-3 minutes until the sauce thickens.
- Finish and Serve: Remove the stir-fry from the heat, garnish with sliced green onions and sesame seeds, and serve immediately. Enjoy it on its own or with steamed rice or cooked noodles.
Extra Tips:
To make this dish even more flavorful, consider marinating the tofu in soy sauce and a splash of sesame oil for 15 minutes before cooking. If you prefer a spicier kick, add a pinch of red pepper flakes or a splash of Sriracha to the sauce.
Additionally, always verify your pan is hot before adding the tofu and vegetables for the best texture and flavor. Finally, using a variety of colorful vegetables not only adds to the visual appeal but also increases the nutritional value of the dish.
20-Minute Chicken Alfredo
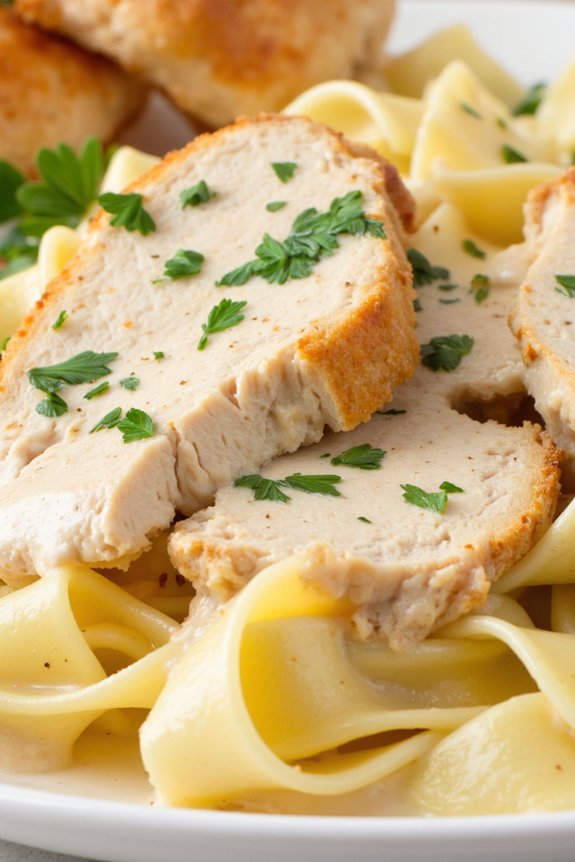
Minute Chicken Alfredo is a quick and easy dinner recipe that will satisfy your cravings for a rich and creamy pasta dish. This recipe is perfect for busy weeknights when you want a delicious homemade meal without spending hours in the kitchen.
Combining tender chicken pieces with a luscious Alfredo sauce and perfectly cooked pasta, this dish is a comforting classic that the whole family will love.
The beauty of Minute Chicken Alfredo lies in its simplicity and speed. By using a few key ingredients and following some straightforward steps, you can have a gourmet meal on the table in no time.
This recipe serves 4-6 people, making it ideal for a family dinner or for entertaining guests. Whether you’re a seasoned cook or a kitchen novice, this recipe is approachable and delivers fantastic results every time.
Ingredients (serves 4-6):
- 1 pound of boneless, skinless chicken breasts
- Salt and pepper to taste
- 2 tablespoons olive oil
- 3 cloves garlic, minced
- 2 cups heavy cream
- 1 cup grated Parmesan cheese
- 12 ounces fettuccine pasta
- 2 tablespoons unsalted butter
- Fresh parsley, chopped, for garnish
Cooking Instructions:
1. Prepare the Chicken: Begin by seasoning the chicken breasts with salt and pepper on both sides. Heat olive oil in a large skillet over medium-high heat.
Add the chicken breasts and cook for about 6-7 minutes on each side, or until they’re cooked through and golden brown. Remove from the skillet and let them rest for a few minutes before slicing into thin strips.
2. Cook the Pasta: While the chicken is cooking, bring a large pot of salted water to a boil. Add the fettuccine pasta and cook according to package instructions until al dente.
Drain the pasta and set aside.
3. Make the Alfredo Sauce: In the same skillet used for the chicken, reduce the heat to medium and add the butter and minced garlic.
Sauté the garlic for about 1 minute until fragrant, being careful not to burn it. Pour in the heavy cream and bring it to a gentle simmer. Gradually add the grated Parmesan cheese, stirring continuously, until the cheese is melted and the sauce is smooth.
4. Combine Everything: Add the cooked pasta to the skillet with the Alfredo sauce, tossing to coat the pasta evenly.
Add the sliced chicken strips to the pasta, stirring to combine everything well. If the sauce is too thick, you can add a little reserved pasta water to reach your desired consistency.
5. Serve and Garnish: Transfer the pasta to a serving dish and garnish with fresh parsley. Serve hot and enjoy the creamy, flavorful Minute Chicken Alfredo with your family or guests.
Extra Tips:
- For a richer flavor, you can use a mix of Parmesan and Romano cheese in the Alfredo sauce.
- If you prefer a lighter version, substitute half-and-half for the heavy cream.
- Ascertain the chicken is at room temperature before cooking to help it cook evenly.
- You can add vegetables like broccoli or spinach to the dish for extra nutrition and color.
- Leftovers can be stored in the refrigerator for up to three days and reheated with a splash of cream to maintain the creamy texture.
Sheet Pan Sausage and Veggies
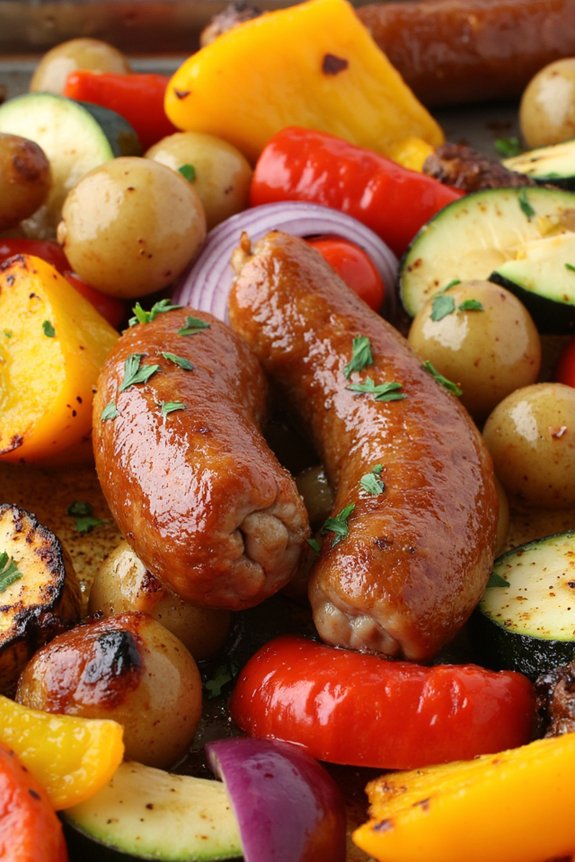
Sheet Pan Sausage and Veggies is a perfect quick and easy dinner recipe that offers a delightful balance of flavors and textures. This dish combines the savory taste of sausage with the natural sweetness of roasted vegetables, creating a meal that isn’t only delicious but also nutritious. By using a single sheet pan, you minimize clean-up time, making this an ideal recipe for busy weeknights.
The beauty of this dish lies in its versatility; you can easily swap out vegetables or adjust the seasoning to suit your taste preferences. This recipe is designed to serve 4-6 people and is perfect for either a family dinner or meal prep for the week. The preparation is straightforward, requiring minimal chopping and with most of the cooking done in the oven, giving you more time to relax or focus on other tasks.
The sausages provide a hearty protein element while the roasted vegetables add a burst of color and flavor, making this a well-rounded meal. It’s a delicious way to incorporate more vegetables into your diet without compromising on taste.
Ingredients (serves 4-6):
- 1 lb (450g) of Italian sausage links
- 2 bell peppers (any color), sliced
- 1 large red onion, sliced
- 1 lb (450g) of baby potatoes, halved
- 2 zucchinis, sliced
- 3 tablespoons olive oil
- 1 tablespoon Italian seasoning
- 1 teaspoon garlic powder
- Salt and pepper to taste
- Fresh parsley for garnish (optional)
Cooking Instructions:
- Preheat the Oven: Preheat your oven to 400°F (200°C). This guarantees the vegetables and sausages cook evenly and develop a nice roasted flavor.
- Prepare the Ingredients: While the oven is heating, slice the bell peppers, red onion, zucchinis, and halve the baby potatoes. Confirming all vegetables are cut to similar sizes helps them cook evenly.
- Combine Ingredients: In a large bowl, toss the sliced vegetables with olive oil, Italian seasoning, garlic powder, and a generous pinch of salt and pepper. Make sure all vegetables are well coated with the seasoning and oil.
- Assemble on the Sheet Pan: Spread the seasoned vegetables evenly on a large baking sheet. Nestle the sausage links among the vegetables, spacing them out to allow for even cooking.
- Roast: Place the sheet pan in the preheated oven and roast for 25-30 minutes. Halfway through cooking, flip the sausages and stir the vegetables to promote even browning. The dish is ready when the sausages are cooked through and the vegetables are tender and caramelized.
- Serve: Once cooked, remove from the oven and let it cool slightly. Garnish with freshly chopped parsley, if desired, before serving.
Extra Tips:
- For added flavor, consider marinating the vegetables in the olive oil and seasoning mix for 15-20 minutes before roasting.
- If you prefer a spicier dish, opt for spicy Italian sausage or add a sprinkle of red pepper flakes to the vegetable mixture.
- To make it a one-pan meal, you can add a can of drained and rinsed chickpeas to the vegetable mix for extra protein and fiber.
- Leftovers can be stored in an airtight container in the refrigerator for up to 3 days and make for a great quick lunch or dinner option. Reheat in the oven for best results.
Spicy Thai Basil Chicken
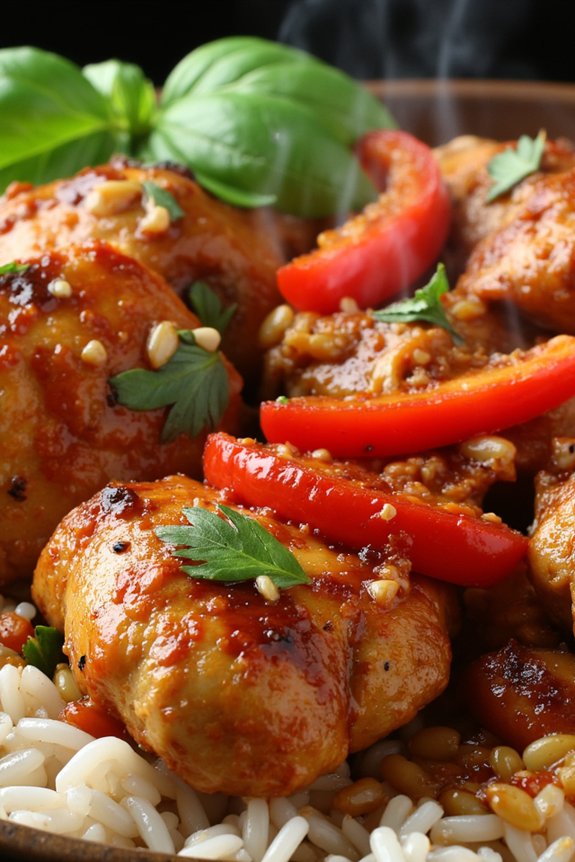
Spicy Thai Basil Chicken is a flavorful and aromatic dish that brings the vibrant tastes of Thailand to your dinner table. Perfect for a quick and satisfying meal, this dish combines the heat of fresh chilies with the aromatic fragrance of Thai basil, creating a symphony of flavors that will tantalize your taste buds.
With its rich, savory sauce coating tender pieces of chicken, this dish pairs wonderfully with steamed jasmine rice or your favorite noodles.
This recipe is designed for a serving size of 4-6 people, making it an ideal choice for family dinners or small gatherings. The preparation is simple, using commonly available ingredients, and can be completed in under 30 minutes. This makes it not only quick and easy but also perfect for those busy weeknights when you want something delicious without spending hours in the kitchen.
Ingredients:
- 1 ½ pounds boneless, skinless chicken thighs, sliced thin
- 2 tablespoons vegetable oil
- 6 cloves garlic, minced
- 4-6 Thai bird chilies, finely chopped (adjust to taste)
- 1 large onion, sliced
- 1 red bell pepper, sliced
- 3 tablespoons soy sauce
- 1 tablespoon oyster sauce
- 1 tablespoon fish sauce
- 2 teaspoons sugar
- 1 cup fresh Thai basil leaves
- Cooked jasmine rice, for serving
Cooking Instructions:
- Prepare the Ingredients: Start by slicing the chicken thighs into thin strips. Mince the garlic, chop the Thai bird chilies, slice the onion, and bell pepper. Set these aside.
- Heat the Oil: In a large pan or wok, heat the vegetable oil over medium-high heat. Add the minced garlic and chopped chilies, stirring for about 30 seconds until fragrant.
- Cook the Chicken: Add the sliced chicken to the pan. Stir-fry the chicken for 4-5 minutes, or until it’s browned and cooked through.
- Add Vegetables: Toss in the sliced onion and bell pepper. Stir-fry for another 2-3 minutes until the vegetables are just tender.
- Make the Sauce: In a small bowl, mix together the soy sauce, oyster sauce, fish sauce, and sugar. Pour this mixture over the chicken and vegetables, stirring well to coat everything evenly.
- Add the Basil: Reduce the heat to low and stir in the fresh Thai basil leaves. Cook for an additional minute, just until the basil is wilted and the flavors are well combined.
- Serve: Serve the Spicy Thai Basil Chicken hot, over a bed of steamed jasmine rice.
Extra Tips:
When cooking Spicy Thai Basil Chicken, it’s important to have all your ingredients prepped and ready to go before you start cooking, as the process moves quickly.
Adjust the number of chilies according to your spice preference; you can also remove the seeds for a milder dish. If Thai basil is unavailable, regular basil can be used as a substitute, though it will alter the flavor slightly.
Finally, confirm that your pan or wok is hot enough before adding the chicken to get a nice sear, which enhances both the texture and taste of the dish.
Simple Caprese Pasta Salad
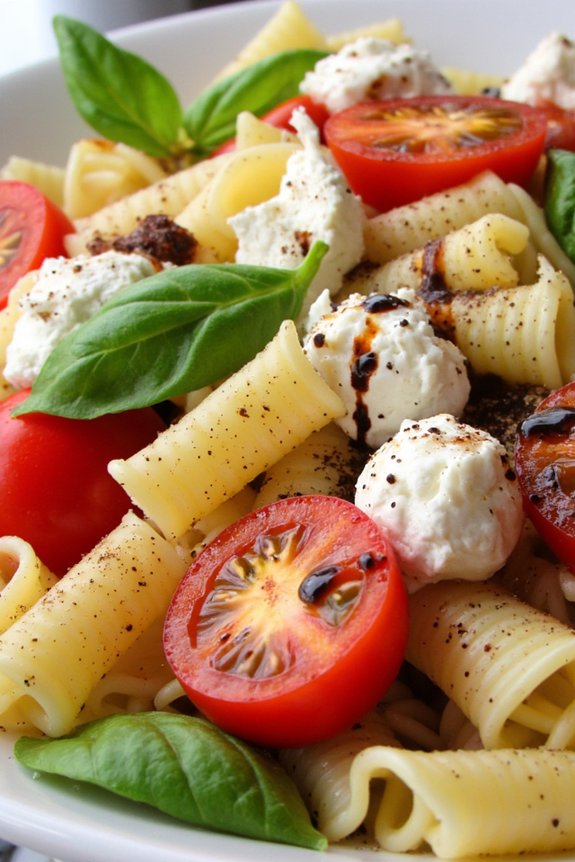
Simple Caprese Pasta Salad is a revitalizing and vibrant dish that seamlessly combines the flavors of fresh tomatoes, creamy mozzarella, and fragrant basil with al dente pasta. This dish is perfect for warm summer evenings or as a side dish for a festive gathering.
With minimal cooking and an abundance of fresh ingredients, this salad brings a taste of Italy to your table in just a few simple steps. Whether you’re looking for a quick weeknight dinner or a dish to impress your guests, this Simple Caprese Pasta Salad is a versatile option that’s both satisfying and easy to prepare.
The harmonious blend of flavors and textures will leave everyone at the table asking for seconds. Paired with a drizzle of balsamic glaze, this salad becomes a show-stopping centerpiece that’s as pleasing to the eye as it’s to the palate.
Ingredients (Serves 4-6):
- 12 ounces of pasta (such as rotini or fusilli)
- 1 pint of cherry tomatoes, halved
- 8 ounces of fresh mozzarella balls, halved
- 1 cup of fresh basil leaves, torn
- 1/4 cup of extra-virgin olive oil
- 2 tablespoons of balsamic vinegar
- Salt and freshly ground black pepper, to taste
- Optional: balsamic glaze for drizzling
Instructions:
1. Cook the Pasta: Begin by boiling a large pot of salted water. Once boiling, add the pasta and cook according to the package instructions until al dente. This usually takes about 8-10 minutes.
Drain the pasta and rinse under cold water to stop the cooking process. Set aside.
2. Prepare the Vegetables and Cheese: While the pasta is cooking, halve the cherry tomatoes and mozzarella balls. Tear the basil leaves into smaller pieces to release their aroma and flavor.
3. Combine Ingredients: In a large mixing bowl, combine the cooked and cooled pasta, cherry tomatoes, mozzarella, and basil. Gently toss the ingredients to guarantee even distribution.
4. Dress the Salad: In a small bowl, whisk together the olive oil, balsamic vinegar, salt, and pepper. Pour the dressing over the pasta salad and gently toss until everything is well coated.
5. Serve: Transfer the pasta salad to a serving dish. For an extra touch, drizzle with balsamic glaze just before serving. This will add a sweet and tangy flavor and enhance the visual appeal of the dish.
Extra Tips:
Feel free to customize this Simple Caprese Pasta Salad by adding other fresh ingredients such as arugula, roasted red peppers, or olives for added depth of flavor.
For a heartier version, grilled chicken or shrimp can be included. Remember to use high-quality olive oil and balsamic vinegar for the best taste. This salad can be made a few hours in advance, allowing the flavors to meld together, but add the basil just before serving to keep it fresh and vibrant.
BBQ Pulled Pork Sandwiches
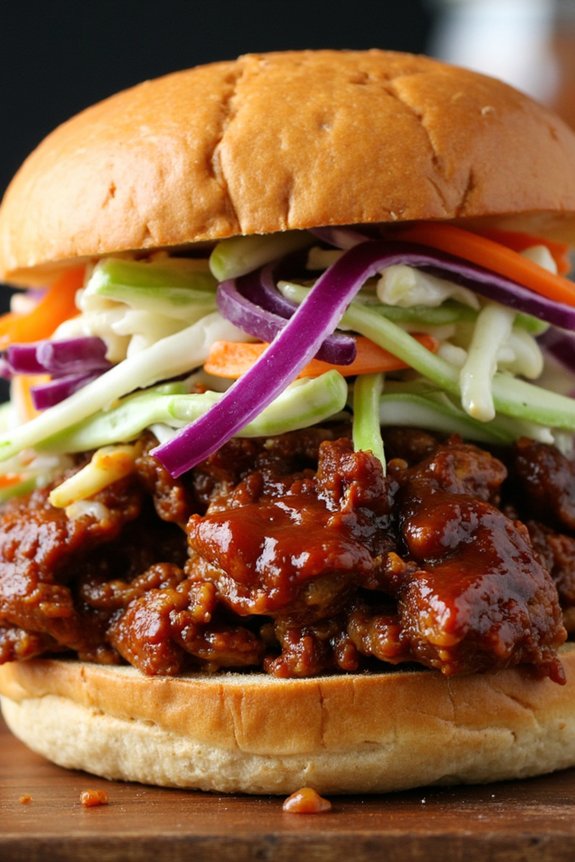
BBQ Pulled Pork Sandwiches are a savory and satisfying meal that can be prepared with minimal effort. They’re perfect for a weeknight dinner or a weekend gathering, bringing together the smoky, sweet flavors of BBQ with the tender, juicy texture of slow-cooked pork. This recipe focuses on simplicity, using a slow cooker to achieve perfectly cooked pork without constant supervision. The result is a dish that feels like a labor of love, but in reality, it requires little more than a few minutes of preparation followed by hours of hands-off cooking.
The key to a great pulled pork sandwich is the balance of flavors and textures. The rich, smoky pork pairs beautifully with a tangy BBQ sauce, while a crisp, fresh coleslaw adds a revitalizing crunch. Serve these sandwiches on soft, toasted buns for the ultimate comfort food experience. This recipe will yield enough sandwiches to serve 4-6 people, making it a great option for family dinners or small gatherings.
Ingredients for 4-6 servings:
- 3 to 4 pounds pork shoulder (also known as pork butt)
- 1 tablespoon smoked paprika
- 1 tablespoon garlic powder
- 1 tablespoon onion powder
- 1 teaspoon salt
- 1 teaspoon black pepper
- 1/2 cup apple cider vinegar
- 1 cup BBQ sauce (store-bought or homemade)
- 6 burger buns
- 2 cups coleslaw (store-bought or homemade)
Cooking Instructions:
- Prepare the Pork: Begin by mixing together the smoked paprika, garlic powder, onion powder, salt, and black pepper in a small bowl. Rub this spice mixture all over the pork shoulder, ensuring it’s evenly coated.
- Slow Cook the Pork: Place the seasoned pork shoulder in a slow cooker. Pour the apple cider vinegar around the pork (not directly on top to avoid washing off the spices). Cover and set the slow cooker to low. Cook for 8-10 hours, or until the pork is tender and easily pulls apart with a fork.
- Shred the Pork: Once the pork is cooked, remove it from the slow cooker and place it on a large cutting board. Use two forks to shred the meat into bite-sized pieces.
- Mix with BBQ Sauce: Transfer the shredded pork back into the slow cooker. Pour the BBQ sauce over the meat, stirring well to combine. Allow the pork to cook on low for an additional 30 minutes to one hour, letting the flavors meld together.
- Prepare the Sandwiches: While the pork is finishing, lightly toast the burger buns. Once the pork is ready, assemble the sandwiches by placing a generous portion of pulled pork onto each bun, topping with coleslaw.
Extra Tips:
For the best flavor, try preparing the pork shoulder and letting it marinate in the spice rub overnight before cooking. This allows the spices to penetrate the meat more deeply.
If you prefer a spicier sandwich, add a dash of cayenne pepper to the spice rub or use a spicy BBQ sauce. For a homemade touch, consider making your own coleslaw with shredded cabbage and carrots mixed in a dressing of mayonnaise, apple cider vinegar, and a pinch of sugar for sweetness.
Cheesy Spinach and Ricotta Stuffed Shells

Cheesy Spinach and Ricotta Stuffed Shells is a delightful dish that combines the creaminess of ricotta with the earthy flavor of spinach, all enveloped in tender pasta shells. This comforting meal is perfect for a family dinner or a gathering with friends. It isn’t only delicious but also quick and easy to prepare, making it a fantastic option for busy weeknights.
The rich tomato sauce perfectly complements the cheesy filling, creating a harmonious blend of flavors that everyone will love. Whether you’re a seasoned cook or a beginner in the kitchen, this recipe will guide you through the process of creating this mouthwatering dish.
The ingredients are simple and readily available, and the preparation requires just a few easy steps. Once you have mastered this recipe, you’ll find yourself turning to it time and again for a satisfying meal that pleases both adults and children alike.
Ingredients (serves 4-6):
- 20 jumbo pasta shells
- 2 cups ricotta cheese
- 1 cup shredded mozzarella cheese
- 1 cup grated Parmesan cheese
- 1 egg
- 2 cups fresh spinach, chopped
- 2 cloves garlic, minced
- 1 teaspoon dried oregano
- 1 teaspoon dried basil
- Salt and pepper to taste
- 3 cups marinara sauce
- 2 tablespoons olive oil
Cooking Instructions:
- Preheat and Prepare: Preheat your oven to 375°F (190°C). In a large pot, bring salted water to a boil and cook the jumbo pasta shells until they’re al dente, according to the package instructions. Drain the shells and set them aside to cool slightly.
- Prepare the Filling: In a large mixing bowl, combine the ricotta cheese, 1/2 cup of mozzarella cheese, 1/2 cup of Parmesan cheese, egg, chopped spinach, minced garlic, oregano, basil, salt, and pepper. Mix the ingredients well until they’re thoroughly combined.
- Stuff the Shells: Lightly grease a 9×13 inch baking dish with olive oil. Fill each cooled pasta shell with the spinach and ricotta mixture using a spoon or piping bag. Arrange the stuffed shells in the prepared baking dish.
- Add Sauce and Cheese: Pour the marinara sauce over the stuffed shells, making sure to cover them evenly. Sprinkle the remaining mozzarella and Parmesan cheese on top of the sauce.
- Bake: Cover the baking dish with aluminum foil and bake in the preheated oven for 25 minutes. Remove the foil and bake for an additional 10 minutes, or until the cheese is melted and bubbly.
- Serve: Once baked, remove from the oven and let it cool for a few minutes before serving. Enjoy your cheesy spinach and ricotta stuffed shells with a side salad or garlic bread.
Extra Tips:
For an added depth of flavor, consider adding a pinch of nutmeg to the ricotta filling. This will enhance the creaminess of the cheese mixture. If you prefer a bit of heat, sprinkle some red pepper flakes over the marinara sauce before baking.
Additionally, you can prepare this dish in advance by assembling the stuffed shells and refrigerating them until you’re ready to bake, making it even more convenient for weeknight dinners.
Savory Beef and Bean Chili
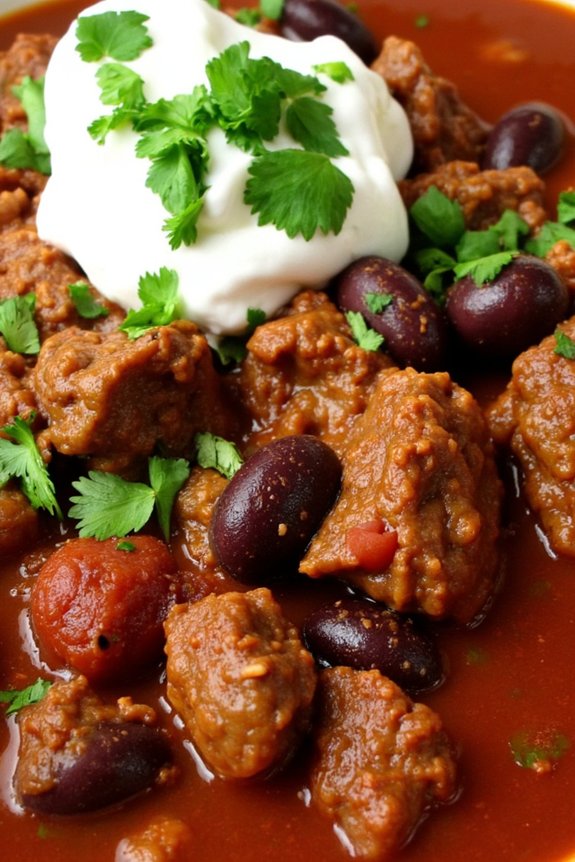
Savory Beef and Bean Chili is a hearty and flavorful dish that’s perfect for a quick and satisfying dinner. This classic chili combines tender ground beef with a medley of beans and spices, resulting in a rich and comforting meal that’s sure to please the whole family.
Whether you’re serving it up for a weeknight dinner or a casual gathering with friends, this chili is sure to become a favorite in your household. The beauty of this recipe lies in its simplicity and speed, making it a great option for those busy evenings when you need something delicious on the table in under an hour.
This recipe for Savory Beef and Bean Chili serves 4-6 people, making it ideal for a family dinner or for having leftovers the next day. The combination of ingredients provides a balanced and flavorful dish that’s both filling and nutritious.
Plus, with just a few pantry staples and some fresh ingredients, you can whip up this meal in no time. Let’s explore the ingredients and step-by-step instructions to create this delightful dish.
Ingredients:
- 1 pound ground beef
- 1 large onion, diced
- 3 cloves garlic, minced
- 1 can (15 oz) kidney beans, drained and rinsed
- 1 can (15 oz) black beans, drained and rinsed
- 1 can (28 oz) diced tomatoes
- 2 tablespoons tomato paste
- 2 tablespoons chili powder
- 1 tablespoon cumin
- 1 teaspoon paprika
- Salt and pepper to taste
- 1 cup beef broth
- 1 tablespoon olive oil
- Optional toppings: shredded cheese, sour cream, chopped green onions, or cilantro
Instructions:
- Prepare the Ingredients: Begin by gathering all your ingredients. Dice the onion and mince the garlic to have them ready for cooking.
- Cook the Beef: In a large pot or Dutch oven, heat the olive oil over medium heat. Add the ground beef and cook until browned, breaking it up with a spoon as it cooks. This should take about 5-7 minutes.
- Sauté the Aromatics: Add the diced onion and minced garlic to the pot with the beef. Sauté for about 3-4 minutes until the onion becomes translucent and the garlic is fragrant.
- Add the Spices: Stir in the chili powder, cumin, paprika, salt, and pepper. Cook for another minute to allow the spices to release their flavors.
- Combine with Beans and Tomatoes: Add the drained and rinsed kidney beans, black beans, diced tomatoes, and tomato paste to the pot. Stir everything together to combine well.
- Simmer the Chili: Pour in the beef broth and bring the mixture to a simmer. Reduce the heat to low, cover the pot, and let it simmer for 20-25 minutes. Stir occasionally to prevent sticking.
- Adjust Seasoning: Taste the chili and adjust the seasoning as needed. Add more salt, pepper, or spices to suit your taste preferences.
- Serve and Garnish: Once the chili is cooked and flavors have melded together, serve it in bowls. Top with optional garnishes like shredded cheese, sour cream, chopped green onions, or cilantro if desired.
Extra Tips:
For a deeper flavor, consider making the chili a day ahead and reheating it before serving. The flavors tend to marry and intensify as the chili sits.
Additionally, if you prefer a spicier chili, feel free to add some chopped jalapeños or a pinch of cayenne pepper. If you have leftovers, this chili freezes well, making it a great make-ahead meal.
Simply portion it into airtight containers and freeze for up to three months. When reheating, you might want to add a splash of water or broth to loosen it up to your desired consistency.