

Looking for fresh and budget-friendly vegetarian dinner ideas to delight your family?
From veggie-packed stir fry with tofu to a hearty lentil shepherd’s pie, these recipes are both satisfying and nourishing.
They cater to diverse tastes without straining your wallet.
Let’s explore these delightful dishes that will transform your dinner table.
Veggie-Packed Stir Fry With Tofu

Veggie-Packed Stir Fry With Tofu is a delightful and budget-friendly dinner option that’s both nutritious and satisfying. This dish is a wonderful way to incorporate a variety of vegetables into your meal, making it colorful and full of flavor. The tofu adds a rich source of protein, making it a complete meal without the need for meat.
Whether you’re serving a family or looking to have leftovers for the next day’s lunch, this dish is sure to please everyone at the table. Stir frying is a quick and efficient cooking method, which keeps the vegetables vibrant and crisp, while the tofu absorbs the delicious flavors of the sauce.
This recipe is versatile, allowing you to use whatever vegetables you have on hand. It’s perfect for those who want to eat healthy without breaking the bank. The following ingredients and instructions will guide you through preparing this scrumptious dish, enough to serve 4-6 people.
Ingredients:
- 1 block (14 oz) firm tofu, drained and cubed
- 2 tablespoons soy sauce
- 1 tablespoon cornstarch
- 2 tablespoons vegetable oil
- 2 cloves garlic, minced
- 1 tablespoon ginger, minced
- 1 red bell pepper, sliced
- 1 cup broccoli florets
- 1 cup snap peas
- 2 carrots, sliced
- 1 cup mushrooms, sliced
- 1/4 cup low-sodium soy sauce
- 2 tablespoons oyster sauce (or vegetarian oyster sauce)
- 1 tablespoon sesame oil
- 1 teaspoon sugar
- Cooked rice or noodles, for serving
- Green onions, sliced, for garnish
- Sesame seeds, for garnish
Cooking Instructions:
- Prepare the Tofu:
- Start by pressing the tofu to remove excess moisture. Wrap the tofu in a clean towel and place something heavy on top, like a frying pan, for about 15 minutes.
- Once pressed, cut the tofu into 1-inch cubes. Toss the cubes with 2 tablespoons of soy sauce and cornstarch until evenly coated.
- Cook the Tofu:
- Heat 1 tablespoon of vegetable oil in a large non-stick skillet or wok over medium-high heat. Add the tofu cubes in a single layer and cook until golden brown on all sides, about 8-10 minutes. Remove the tofu from the skillet and set aside.
- Stir Fry the Vegetables:
- In the same skillet, add the remaining tablespoon of vegetable oil. Add the minced garlic and ginger, and stir fry for about 30 seconds until fragrant.
- Add the bell pepper, broccoli, snap peas, carrots, and mushrooms to the skillet. Stir fry the vegetables for 5-7 minutes, or until they’re tender-crisp.
- Combine Ingredients:
- In a small bowl, mix together the low-sodium soy sauce, oyster sauce, sesame oil, and sugar. Pour this sauce into the skillet with the vegetables and mix well.
- Return the cooked tofu to the skillet and toss everything together until the tofu is well coated and heated through, about 2 minutes.
- Serve:
- Serve the stir fry hot over a bed of cooked rice or noodles. Garnish with sliced green onions and sesame seeds for an extra pop of flavor and texture.
Extra Tips:
For the best results, make sure to use firm tofu and drain it well before cooking to prevent it from becoming soggy.
Feel free to substitute any of the vegetables based on what you have available or prefer. Zucchini, cabbage, or bok choy can be great additions or substitutions.
If you like a bit of heat, consider adding a pinch of red pepper flakes or a sliced chili pepper to the stir fry. Finally, verify your skillet or wok is hot before adding the tofu and vegetables; this helps achieve that perfect stir-fry texture.
Lentil and Vegetable Shepherd’s Pie

Lentil and Vegetable Shepherd’s Pie is a hearty, comforting meal that’s perfect for a family dinner. This vegetarian version of the classic dish is filled with protein-rich lentils and a variety of vegetables, all simmered in a savory sauce and topped with a creamy layer of mashed potatoes. It’s a wholesome and satisfying meal that’s both budget-friendly and packed with nutrients.
Whether you’re a long-time vegetarian or just looking to incorporate more plant-based meals into your diet, this dish is sure to please everyone’s palate.
Not only is this Lentil and Vegetable Shepherd’s Pie delicious, but it’s also quite easy to prepare. The use of lentils as the base provides a meaty texture and rich flavor, while the vegetables add color and variety. The mashed potato topping, golden and slightly crispy after baking, adds the perfect finishing touch. This recipe serves 4-6 people, making it a great option for a family meal or dinner party.
Ingredients:
- 1 cup of dried brown or green lentils
- 4 cups of vegetable broth
- 2 tablespoons olive oil
- 1 large onion, chopped
- 2 garlic cloves, minced
- 3 carrots, diced
- 2 celery stalks, diced
- 1 cup frozen peas
- 1 cup corn kernels
- 2 tablespoons tomato paste
- 1 tablespoon soy sauce
- 1 teaspoon dried thyme
- 1 teaspoon dried rosemary
- Salt and pepper to taste
- 4 large potatoes, peeled and quartered
- 1/4 cup milk (or plant-based milk)
- 2 tablespoons butter (or vegan butter)
Cooking Instructions:
- Prepare the Lentils: Rinse the lentils under cold water. In a large pot, combine the lentils with the vegetable broth. Bring to a boil, then reduce the heat and let simmer for about 20-25 minutes until the lentils are tender but not mushy. Drain any excess liquid and set aside.
- Cook the Vegetables: In a large skillet, heat the olive oil over medium heat. Add the chopped onion and garlic, sautéing until the onion becomes translucent. Add the carrots and celery, cooking for another 5 minutes until they begin to soften.
- Combine Ingredients: Stir in the cooked lentils, frozen peas, corn, tomato paste, soy sauce, dried thyme, and rosemary. Mix well and let the mixture cook for an additional 5 minutes to meld the flavors. Season with salt and pepper to taste.
- Make the Mashed Potatoes: While the lentils and vegetables are cooking, boil the peeled and quartered potatoes in a pot of salted water. Cook until tender, about 15-20 minutes. Drain the water and mash the potatoes with milk and butter until smooth and creamy. Season with salt and pepper.
- Assemble the Pie: Preheat your oven to 400°F (200°C). Spread the lentil and vegetable mixture evenly in a baking dish. Spoon the mashed potatoes over the top, spreading them evenly to cover the entire surface.
- Bake the Pie: Place the baking dish in the preheated oven and bake for 25-30 minutes, until the top is golden brown and slightly crispy. Remove from oven and let cool for a few minutes before serving.
Extra Tips:
For an extra crispy top, you can broil the pie for the last 2-3 minutes of baking, but be sure to keep a close eye on it to prevent burning.
Feel free to customize the vegetable mix based on what you have on hand or prefer—zucchini or mushrooms would make great additions. If you prefer a creamier potato topping, add a little more milk or butter.
This dish can be made ahead of time and reheated, making it an ideal meal for busy weeknights.
Black Bean and Sweet Potato Tacos
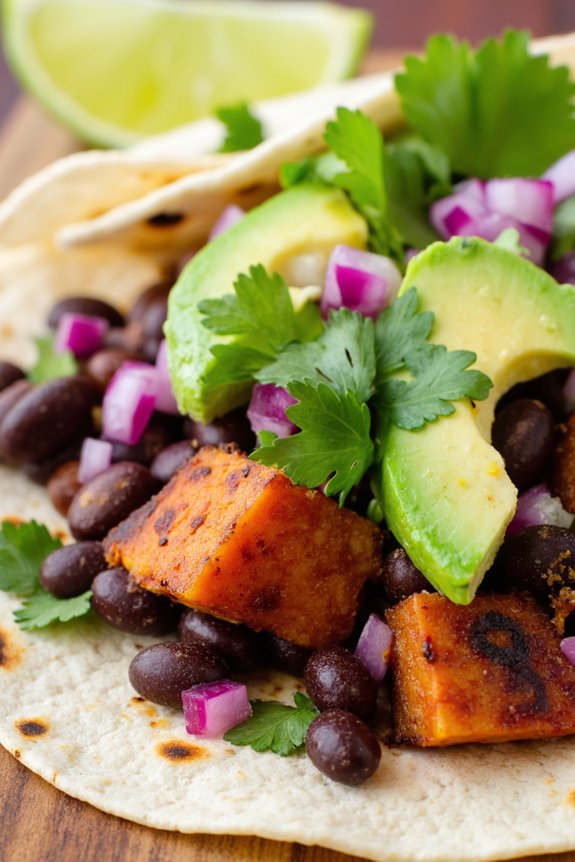
If you’re looking for a budget-friendly meal that’s both delicious and nutritious, Black Bean and Sweet Potato Tacos are a fantastic option. This dish combines the hearty texture of black beans with the natural sweetness of roasted sweet potatoes, creating a satisfying meal that’s both filling and flavorful. Perfect for a family dinner or a casual gathering, these tacos are sure to please vegetarians and meat-eaters alike.
Not only are these tacos easy to make, but they’re also packed with nutrients. Sweet potatoes are rich in vitamins A and C, while black beans provide a good source of protein and fiber. The addition of spices and fresh toppings like avocado and cilantro adds a burst of flavor and color, making these tacos a feast for both the eyes and the palate.
Ingredients (serves 4-6 people):
- 2 large sweet potatoes, peeled and diced
- 2 tablespoons olive oil
- 1 teaspoon ground cumin
- 1 teaspoon smoked paprika
- 1/2 teaspoon chili powder
- Salt and pepper to taste
- 1 (15-ounce) can black beans, drained and rinsed
- 1/2 cup diced red onion
- 1/2 cup chopped fresh cilantro
- 1 avocado, sliced
- 8-12 small corn tortillas
- Lime wedges for serving
Cooking Instructions:
- Preheat the Oven: Preheat your oven to 400°F (200°C) to make sure it’s hot enough to roast the sweet potatoes evenly.
- Prepare the Sweet Potatoes: In a large mixing bowl, combine the diced sweet potatoes with olive oil, cumin, smoked paprika, chili powder, salt, and pepper. Toss the sweet potatoes until they’re evenly coated with the oil and spices.
- Roast the Sweet Potatoes: Spread the seasoned sweet potatoes in a single layer on a baking sheet. Roast in the preheated oven for about 25-30 minutes, or until they’re tender and slightly caramelized, flipping halfway through cooking for even browning.
- Heat the Black Beans: While the sweet potatoes are roasting, place the black beans in a small saucepan over medium heat. Cook for 5-7 minutes, stirring occasionally, until warmed through. You can season the beans with a pinch of salt and pepper if desired.
- Warm the Tortillas: Wrap the corn tortillas in aluminum foil and place them in the oven for the final 5 minutes of the sweet potatoes’ roasting time to warm them. Alternatively, you can warm them on a skillet over low heat for about 30 seconds on each side.
- Assemble the Tacos: Once the sweet potatoes are done, assemble the tacos. Place a generous spoonful of roasted sweet potatoes and black beans onto each tortilla. Top with diced red onion, chopped cilantro, and a few slices of avocado.
- Serve: Serve the tacos immediately with lime wedges on the side for squeezing over the top.
Extra Tips:
For added flavor, consider adding a sprinkle of crumbled feta cheese or a dollop of Greek yogurt to each taco. If you prefer a bit of heat, add sliced jalapeños or a dash of hot sauce.
For a gluten-free option, make sure the corn tortillas are certified gluten-free. Feel free to get creative with toppings—shredded lettuce, diced tomatoes, or roasted corn would all make excellent additions.
Finally, if you have leftover sweet potatoes, they can be stored in the refrigerator for up to three days and make a great addition to salads or grain bowls.
Spinach and Ricotta Stuffed Shells
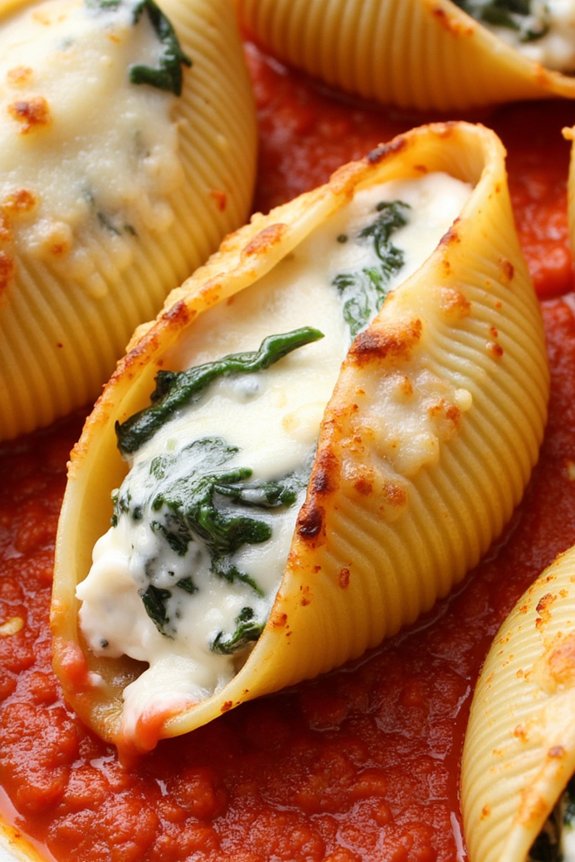
Spinach and Ricotta Stuffed Shells are a delightful and hearty vegetarian dish that’s both budget-friendly and satisfying. This Italian-inspired recipe combines the creamy richness of ricotta cheese with the earthy flavors of spinach, all encased in tender pasta shells. Ideal for a family dinner or a cozy gathering, this dish can be prepared ahead of time and baked just before serving, making it perfect for busy weeknights or relaxed weekends.
The combination of spinach and ricotta cheese isn’t only delicious but also nutritious, providing a good source of vitamins and minerals. The stuffed shells are topped with a zesty marinara sauce and melted mozzarella cheese, adding a layer of flavor and texture that will please even the pickiest eaters. Whether you’re a seasoned cook or a beginner, this recipe is straightforward and easy to follow, ensuring a successful and tasty meal every time.
Ingredients (serving size: 4-6 people):
- 20 jumbo pasta shells
- 2 cups ricotta cheese
- 2 cups fresh spinach, chopped
- 1 cup grated parmesan cheese
- 1 egg
- 2 cups marinara sauce
- 1 cup shredded mozzarella cheese
- Salt and pepper to taste
- 1 tablespoon olive oil
- 2 garlic cloves, minced
- 1 teaspoon dried Italian herbs
Cooking Instructions:
- Prepare the Pasta: Bring a large pot of salted water to a boil. Add the jumbo pasta shells and cook for about 8-10 minutes, or until they’re al dente. Drain and set aside, allowing them to cool slightly.
- Make the Filling: In a large skillet, heat the olive oil over medium heat. Add the minced garlic and sauté for 1-2 minutes until fragrant. Add the chopped spinach and cook until wilted, about 3 minutes. Remove from heat and let cool slightly.
- Mix the Cheese Filling: In a large bowl, combine the ricotta cheese, cooked spinach, grated parmesan cheese, egg, salt, and pepper. Mix until well combined.
- Stuff the Shells: Preheat your oven to 375°F (190°C). Carefully fill each pasta shell with the spinach and ricotta mixture, using a spoon or piping bag for ease.
- Assemble the Dish: Spread 1 cup of marinara sauce on the bottom of a 9×13 inch baking dish. Arrange the stuffed shells in a single layer over the sauce. Pour the remaining marinara sauce over the shells and sprinkle with shredded mozzarella cheese and dried Italian herbs.
- Bake the Shells: Cover the baking dish with aluminum foil and bake in the preheated oven for 25 minutes. Remove the foil and bake for an additional 10 minutes, or until the cheese is bubbly and golden.
- Serve: Remove from the oven and allow to cool for a few minutes before serving. Enjoy your spinach and ricotta stuffed shells warm.
Extra Tips:
For a more robust flavor, consider adding a pinch of nutmeg to the ricotta filling. You can also substitute fresh spinach with frozen spinach if fresh isn’t available, just be sure to thaw and drain it thoroughly before using.
If preferred, homemade marinara sauce can be used to enhance the taste. This dish can be prepared a day ahead; simply cover and refrigerate until ready to bake. Adjust the baking time slightly if baking directly from the refrigerator.
Cauliflower and Chickpea Curry

Cauliflower and Chickpea Curry is a delicious and budget-friendly vegetarian dish that packs a punch of flavor and nutrition. This hearty meal is perfect for those who are looking for a healthy yet satisfying dinner option without breaking the bank. The combination of tender cauliflower florets and protein-rich chickpeas simmered in a fragrant, spiced coconut curry sauce creates a comfort food that’s sure to please the entire family.
Whether you’re a seasoned cook or a beginner in the kitchen, this dish is simple to prepare and is guaranteed to become a staple in your weekly meal rotation. This recipe is designed to serve 4-6 people and can be easily doubled to accommodate larger gatherings or meal prep for the week. The spices in this curry can be adjusted to suit your taste, making it as mild or as spicy as you prefer.
Serve it over a bed of steamed rice or with warm naan bread for a complete and satisfying meal. With its rich flavors and wholesome ingredients, Cauliflower and Chickpea Curry is a delightful way to embrace plant-based cooking without sacrificing taste.
Ingredients (serves 4-6):
- 1 large head of cauliflower, cut into florets
- 2 tablespoons vegetable oil
- 1 large onion, finely chopped
- 3 garlic cloves, minced
- 1-inch piece of ginger, grated
- 1 tablespoon curry powder
- 1 teaspoon ground cumin
- 1 teaspoon ground coriander
- 1/2 teaspoon turmeric
- 1 can (14 oz) coconut milk
- 1 can (15 oz) chickpeas, drained and rinsed
- 1 can (14 oz) diced tomatoes
- Salt to taste
- Freshly ground black pepper to taste
- Fresh cilantro, chopped (for garnish)
- Cooked rice or naan, for serving
Cooking Instructions:
- Prepare the Ingredients: Begin by preparing all your ingredients. Chop the cauliflower into bite-sized florets, finely chop the onion, mince the garlic, and grate the ginger. Drain and rinse the chickpeas to remove any excess liquid and set everything aside.
- Sauté the Aromatics: In a large pot or deep skillet, heat the vegetable oil over medium heat. Add the chopped onion and sauté for about 5 minutes or until it becomes translucent. Add the garlic and ginger to the pan and cook for another 1-2 minutes until fragrant.
- Add the Spices: Stir in the curry powder, cumin, coriander, and turmeric. Cook the spices with the aromatics for about 1 minute to release their flavors, stirring constantly to prevent them from burning.
- Create the Base Sauce: Pour the coconut milk and diced tomatoes into the pot. Stir well to combine the ingredients, ensuring that the spices are evenly distributed throughout the sauce.
- Simmer the Vegetables: Add the cauliflower florets and chickpeas to the pot. Stir to coat them in the sauce. Season with salt and pepper to taste. Cover the pot and let the curry simmer for 20-25 minutes, or until the cauliflower is tender and cooked through.
- Adjust Seasoning and Serve: Taste the curry and adjust the seasoning if necessary. If you prefer a thicker sauce, simmer uncovered for an additional 5 minutes. Serve the curry hot, garnished with fresh cilantro, over a bed of cooked rice or with warm naan on the side.
Extra Tips:
For a creamier curry, use full-fat coconut milk instead of light coconut milk. If you prefer a spicier dish, consider adding a chopped chili pepper or a pinch of cayenne pepper to the spice mix.
This curry can also be customized with additional vegetables like spinach or peas, added during the last few minutes of cooking. Leftovers can be stored in an airtight container in the refrigerator for up to three days, making it an excellent choice for meal prep. Enjoy the versatility and warmth of this flavorful dish!
Zucchini and Corn Fritters

Zucchini and Corn Fritters are a delicious and budget-friendly vegetarian dish that brings together the sweetness of corn and the mild flavor of zucchini in a crispy, golden fritter. Perfect as an appetizer or a main course, these fritters aren’t only easy to make but also incredibly satisfying.
They’re an excellent choice for a family dinner or a casual gathering, where you can serve them with a variety of dips to enhance their flavor. The combination of fresh vegetables, herbs, and spices makes this dish a delightful addition to any meal.
These fritters aren’t only tasty but also nutritious, thanks to the vitamins and minerals found in zucchini and corn. Zucchini is rich in vitamin C and potassium, while corn provides dietary fiber and essential B vitamins. By using simple ingredients, this recipe guarantees that you can enjoy a healthy and hearty meal without breaking the bank.
Additionally, Zucchini and Corn Fritters are versatile and can be customized to suit your preferences, whether you want to make them spicier, add more herbs, or even include some cheese for extra flavor.
Ingredients (Serving size: 4-6 people):
- 2 medium zucchinis, grated
- 1 cup of corn kernels (fresh, frozen, or canned)
- 1/2 cup of all-purpose flour
- 1/4 cup of cornmeal
- 2 large eggs
- 3 green onions, finely chopped
- 2 cloves of garlic, minced
- 1/4 cup of fresh parsley, chopped
- 1 teaspoon of baking powder
- 1 teaspoon of salt
- 1/2 teaspoon of black pepper
- 1/2 teaspoon of paprika
- Olive oil for frying
Cooking Instructions:
- Prepare the Zucchini: Start by grating the zucchini using a box grater. Place the grated zucchini in a clean kitchen towel and squeeze out as much excess moisture as possible. This step is essential to confirm the fritters aren’t soggy.
- Mix the Ingredients: In a large mixing bowl, combine the grated zucchini, corn kernels, flour, cornmeal, eggs, green onions, garlic, parsley, baking powder, salt, pepper, and paprika. Mix well until all ingredients are evenly incorporated.
- Heat the Oil: In a large skillet, heat about 2 tablespoons of olive oil over medium heat. Make sure the oil is hot enough before adding the fritter mixture, as this will help achieve a crispy texture.
- Form the Fritters: Using a large spoon or your hands, scoop approximately 2 tablespoons of the mixture and form it into a patty. Place the patties gently into the hot oil, being careful not to overcrowd the pan.
- Cook the Fritters: Fry the fritters for about 3-4 minutes on each side, or until they’re golden brown and crispy. Adjust the heat if necessary to prevent burning. Once cooked, transfer the fritters to a plate lined with paper towels to absorb any excess oil.
- Serve: Serve the Zucchini and Corn Fritters warm, with your choice of dipping sauce such as sour cream, tzatziki, or a spicy aioli.
Extra Tips:
For the best texture, guarantee that the zucchini is thoroughly drained of excess moisture, as this will prevent the fritters from becoming soggy. Feel free to experiment with additional spices or herbs like cumin, cilantro, or dill to suit your taste preferences.
If you prefer a little heat, add a finely chopped jalapeño to the mixture. These fritters can also be baked in the oven at 400°F (200°C) for about 15-20 minutes, flipping halfway through, for a healthier alternative to frying.
Enjoy your homemade Zucchini and Corn Fritters as a delightful vegetarian option for any meal!
Mushroom and Barley Risotto
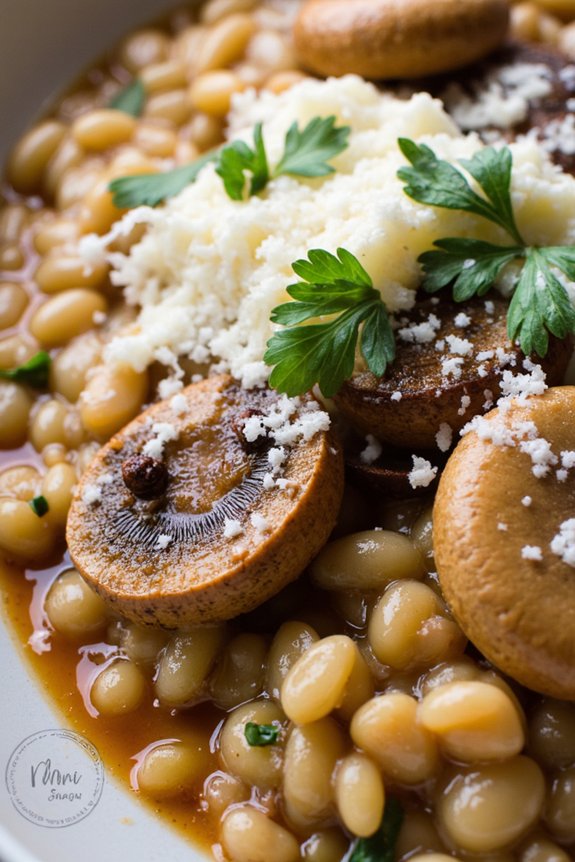
Mushroom and Barley Risotto is a delicious and nutritious vegetarian dish that’s perfect for a budget-friendly dinner. This hearty meal combines the earthy flavors of mushrooms with the nutty texture of barley, creating a satisfying dish that’s both filling and flavorful.
Unlike traditional risotto made with arborio rice, this version uses barley, which not only adds a unique taste but also increases the fiber and nutrient content of the dish. This dish is ideal for a weeknight meal that can be prepared quickly yet still feels like a special treat.
The ingredients are simple and affordable, making this risotto an excellent choice for those looking to enjoy a gourmet meal without breaking the bank. The mushrooms add a rich umami flavor, while the barley provides a chewy texture that complements the creaminess of the dish. This recipe serves 4-6 people, making it perfect for a family dinner or small gathering.
Ingredients:
- 2 tablespoons olive oil
- 1 onion, finely chopped
- 2 cloves garlic, minced
- 1 ½ cups pearl barley
- 8 ounces mushrooms, sliced
- 1 cup white wine
- 4 cups vegetable broth
- ½ cup grated Parmesan cheese
- Salt and pepper to taste
- 2 tablespoons chopped fresh parsley
Instructions:
- Heat the olive oil in a large pot or Dutch oven over medium heat. Add the chopped onion and sauté for about 5 minutes until the onion is translucent and fragrant.
- Add the minced garlic and sliced mushrooms to the pot. Cook for another 5 minutes until the mushrooms are soft and have released their moisture.
- Stir in the pearl barley, ensuring it’s well coated with the oil and mixed with the vegetables.
- Pour in the white wine and let it simmer until the wine has mostly evaporated, stirring occasionally.
- Gradually add the vegetable broth, one cup at a time, allowing the barley to absorb the liquid before adding more. This process should take about 30-40 minutes until the barley is tender and the risotto has a creamy consistency.
- Once the barley is cooked, stir in the grated Parmesan cheese until it’s melted and the risotto is creamy. Season with salt and pepper to taste.
- Remove from heat and garnish with fresh parsley before serving.
Extra Tips:
When making Mushroom and Barley Risotto, it’s important to stir the barley frequently as it cooks. This helps release the starches, creating a creamy texture similar to traditional risotto.
If you prefer a richer flavor, you can substitute some of the vegetable broth with mushroom broth or add a handful of dried porcini mushrooms to the mix. Soaking the dried mushrooms in hot water before adding them to the dish will enhance the umami flavor.
Finally, for a vegan version, you can omit the Parmesan cheese or replace it with a plant-based alternative.
Quinoa and Black Bean Chili

Quinoa and Black Bean Chili is a hearty, nutritious, and budget-friendly vegetarian dish that’s perfect for dinner. This warming chili is packed with plant-based protein and fiber, thanks to the combination of quinoa and black beans. It’s a delicious meal that’s easy to prepare and sure to satisfy even the most discerning palates.
With its rich blend of spices and the natural sweetness of vegetables, this chili becomes a standout dish in any vegetarian repertoire. This recipe is ideal for serving 4-6 people and is perfect for those who are looking to incorporate more plant-based meals into their diet without breaking the bank.
The ingredients are simple and affordable, making it a great option for families or individuals looking to enjoy a wholesome meal without spending too much time or money in the kitchen. Whether you’re a seasoned vegetarian or just exploring meatless meal options, this Quinoa and Black Bean Chili is sure to become a staple in your dinner rotation.
Ingredients (Serves 4-6):
- 1 cup quinoa
- 2 cups vegetable broth or water
- 1 tablespoon olive oil
- 1 medium onion, diced
- 3 cloves garlic, minced
- 1 red bell pepper, diced
- 1 zucchini, diced
- 2 cans (15 oz each) black beans, drained and rinsed
- 1 can (28 oz) crushed tomatoes
- 2 tablespoons tomato paste
- 1 tablespoon chili powder
- 1 teaspoon cumin
- 1 teaspoon smoked paprika
- 1/2 teaspoon cayenne pepper (optional)
- Salt and pepper to taste
- 1/4 cup fresh cilantro, chopped
- Juice of 1 lime
Cooking Instructions:
- Prepare the Quinoa: Rinse the quinoa under cold water using a fine-mesh sieve. In a medium saucepan, combine the quinoa and vegetable broth or water. Bring to a boil over medium-high heat, then reduce the heat to low and simmer, covered, for about 15 minutes or until the quinoa is tender and the liquid is absorbed. Fluff with a fork and set aside.
- Sauté the Vegetables: In a large pot, heat the olive oil over medium heat. Add the diced onion and sauté for about 5 minutes, or until translucent. Add the minced garlic and cook for another minute until fragrant.
- Add the Vegetables: Stir in the diced red bell pepper and zucchini. Cook for about 5 minutes, or until the vegetables begin to soften.
- Combine the Ingredients: Add the drained black beans, crushed tomatoes, and tomato paste to the pot. Stir in the chili powder, cumin, smoked paprika, cayenne pepper (if using), salt, and pepper. Mix well to combine all the ingredients.
- Simmer the Chili: Bring the mixture to a boil, then reduce the heat to low. Cover the pot and let the chili simmer for about 30 minutes, stirring occasionally, to allow the flavors to meld together.
- Add the Quinoa: Once the chili has simmered, stir in the cooked quinoa. Continue to simmer for another 5-10 minutes to heat the quinoa through and allow it to absorb some of the chili flavors.
- Finish and Serve: Remove the pot from the heat. Stir in the fresh cilantro and lime juice. Taste and adjust the seasoning with additional salt and pepper if needed. Serve the chili hot, garnished with extra cilantro and lime wedges if desired.
Extra Tips:
For an extra depth of flavor, consider adding a teaspoon of cocoa powder or a splash of balsamic vinegar to the chili. Both ingredients can enhance the richness and complexity of the dish.
If you prefer a thicker chili, mash some of the black beans with a fork before adding them to the pot. This will naturally thicken the chili without the need for additional thickeners.
Finally, feel free to adjust the heat level by adding more or less cayenne pepper, depending on your preference for spice.
Eggplant Parmesan Casserole
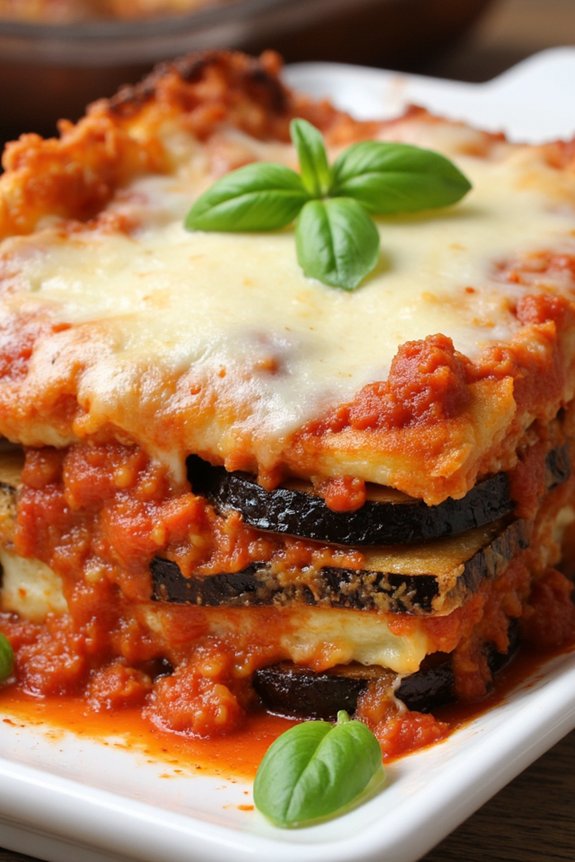
Eggplant Parmesan Casserole is a delightful vegetarian dish that’s both comforting and budget-friendly. This hearty casserole combines layers of tender eggplant slices with rich tomato sauce and gooey cheese, making it a satisfying meal that even meat lovers will enjoy. The dish is a great way to use up fresh eggplants and is perfect for a family dinner or a casual gathering with friends.
Not only is it delicious, but it’s also a wonderful option for those looking to enjoy a meatless meal without compromising on flavor or substance.
This Eggplant Parmesan Casserole recipe is designed to serve 4-6 people and involves simple, affordable ingredients that are easy to find at any grocery store. The preparation involves layering slices of eggplant with marinara sauce and cheese, then baking it to perfection. This dish can be made ahead of time and easily reheated, making it a convenient choice for busy weeknights.
Follow this recipe to create a satisfying meal that will leave everyone at the table asking for seconds.
Ingredients:
- 2 large eggplants
- 2 cups marinara sauce
- 2 cups shredded mozzarella cheese
- 1 cup grated Parmesan cheese
- 1 cup breadcrumbs
- 2 large eggs
- 1/4 cup milk
- Salt and pepper to taste
- Olive oil for drizzling
- Fresh basil leaves for garnish (optional)
Cooking Instructions:
- Preheat and Prepare Ingredients: Begin by preheating your oven to 375°F (190°C). Slice the eggplants into 1/4-inch thick rounds and lightly sprinkle them with salt. Allow them to sit for about 20 minutes to draw out excess moisture. Rinse and pat them dry with a paper towel.
- Coat the Eggplants: In a bowl, whisk together the eggs and milk. In a separate dish, combine the breadcrumbs with a pinch of salt and pepper. Dip each eggplant slice first into the egg mixture, then coat it with the breadcrumb mixture.
- Fry the Eggplants: Heat a drizzle of olive oil in a large skillet over medium heat. Fry the eggplant slices in batches until they’re golden brown on both sides. Remove them from the skillet and place them on a paper towel-lined plate to absorb any excess oil.
- Assemble the Casserole: Spread a layer of marinara sauce at the bottom of a 9×13 inch baking dish. Place a single layer of fried eggplant slices over the sauce. Sprinkle with a portion of the mozzarella and Parmesan cheeses. Repeat the layers until all the ingredients are used, finishing with a layer of cheese on top.
- Bake the Casserole: Cover the dish with aluminum foil and bake in the preheated oven for 25 minutes. Remove the foil and bake for an additional 15 minutes, or until the cheese is bubbly and golden brown.
- Garnish and Serve: Allow the casserole to cool for a few minutes before serving. Garnish with fresh basil leaves if desired.
Extra Tips: For best results, choose firm and glossy eggplants without any blemishes. Salting the eggplant is an essential step to remove bitterness and excess moisture, ensuring a better texture. If you want a slightly healthier version, you can opt to bake the breaded eggplant slices instead of frying them before assembling the casserole.
Leftovers can be stored in an airtight container in the refrigerator for up to 3 days and reheated in the oven for best taste and texture.
Vegetable and Cheese Quesadillas

If you’re searching for a delicious, budget-friendly dinner idea that can satisfy the whole family, seek no further than Vegetable and Cheese Quesadillas. These quesadillas aren’t only simple to prepare but are also packed with flavor and nutrients. They offer a brilliant way to use up any leftover vegetables in your fridge, making them an economical choice for any weeknight dinner.
With a crispy exterior and a gooey, cheesy interior, these quesadillas are sure to become a household favorite. This recipe serves 4-6 people and is perfect for a quick meal when you’re pressed for time. You can easily adapt the ingredients to cater to your family’s preferences, making it a versatile dish that can be enjoyed time and again.
Whether you serve them as a main course or a side dish, these Vegetable and Cheese Quesadillas are bound to please everyone at the table.
Ingredients (serving size: 4-6 people):
- 8 large flour tortillas
- 2 cups shredded cheddar cheese
- 1 cup shredded mozzarella cheese
- 1 red bell pepper, diced
- 1 green bell pepper, diced
- 1 small red onion, thinly sliced
- 1 cup mushrooms, sliced
- 1 zucchini, sliced
- 1 tablespoon olive oil
- 1 teaspoon ground cumin
- 1 teaspoon chili powder
- Salt and pepper to taste
- Optional toppings: sour cream, salsa, guacamole
Cooking Instructions:
- Prep the Vegetables: Begin by washing and chopping all the vegetables. Dice the red and green bell peppers, thinly slice the red onion, and slice the mushrooms and zucchini.
- Cook the Vegetables: Heat the olive oil in a large skillet over medium heat. Add the diced bell peppers, sliced onion, mushrooms, and zucchini to the skillet. Season with ground cumin, chili powder, salt, and pepper. Sauté the vegetables for about 5-7 minutes, or until they’re tender and slightly caramelized. Remove from heat and set aside.
- Assemble the Quesadillas: Place a tortilla on a clean surface. Sprinkle a layer of cheddar and mozzarella cheese over half of the tortilla. Add a generous spoonful of the sautéed vegetable mixture on top of the cheese. Fold the tortilla in half to enclose the filling.
- Cook the Quesadillas: Heat a non-stick skillet over medium heat. Place the assembled quesadilla in the skillet and cook for 2-3 minutes on each side, or until the tortilla is golden brown and the cheese has melted. Repeat this process with the remaining tortillas and filling.
- Serve and Enjoy: Once the quesadillas are cooked, slice them into wedges and serve immediately. Offer sour cream, salsa, or guacamole on the side for dipping, if desired.
Extra Tips:
For a variation in flavor, consider adding other vegetables such as corn, spinach, or black beans. If you prefer a spicier version, include jalapeños or sprinkle in a pinch of red pepper flakes.
To save time, you can prepare the vegetable filling in advance and store it in the fridge for up to two days. When cooking the quesadillas, make sure the skillet isn’t too hot to prevent burning the tortillas before the cheese melts.
If you’re seeking a gluten-free option, substitute the flour tortillas with gluten-free tortillas.
Broccoli and Cheddar Twice-Baked Potatoes

Broccoli and Cheddar Twice-Baked Potatoes are a delicious and budget-friendly vegetarian dinner option that’s sure to satisfy your taste buds. This dish combines the creamy and comforting flavors of classic twice-baked potatoes with the added nutrition and texture of broccoli and the rich taste of cheddar cheese.
Whether you’re looking for a hearty main course or a satisfying side dish, these twice-baked potatoes are perfect for any occasion. This recipe is designed to serve 4-6 people, making it ideal for a family dinner or a small gathering.
The combination of fluffy potato, tender broccoli, and gooey melted cheese creates a harmonious blend of flavors and textures that will have everyone coming back for seconds. Plus, it’s an excellent way to incorporate more vegetables into your meal without sacrificing comfort food appeal.
Ingredients:
- 4 large russet potatoes
- 1 1/2 cups broccoli florets, chopped
- 1 cup cheddar cheese, shredded
- 1/2 cup sour cream
- 1/4 cup milk
- 1/4 cup unsalted butter
- 1 teaspoon garlic powder
- Salt and pepper to taste
- Olive oil
- Optional: chopped green onions for garnish
Cooking Instructions:
- Preheat and Prepare Potatoes: Preheat your oven to 400°F (200°C). Scrub the potatoes thoroughly under running water and pat them dry. Pierce each potato several times with a fork to allow steam to escape during baking.
- Bake the Potatoes: Rub the potatoes with olive oil and sprinkle them with a pinch of salt. Place them on a baking sheet and bake in the preheated oven for about 50-60 minutes or until the potatoes are tender when pierced with a fork.
- Prepare the Broccoli: While the potatoes are baking, steam the broccoli florets until they’re tender but still bright green. This can be done on the stovetop or in the microwave. Set aside.
- Scoop the Potatoes: Once the potatoes are cooked, remove them from the oven and allow them to cool slightly. Cut each potato in half lengthwise and carefully scoop out the flesh into a large mixing bowl, leaving a thin shell of potato around the edges.
- Mash the Potato Filling: Add butter, sour cream, milk, garlic powder, salt, and pepper to the bowl with the potato flesh. Mash until smooth and creamy. Stir in the steamed broccoli and half of the shredded cheddar cheese.
- Stuff the Potato Shells: Spoon the potato-broccoli mixture back into the potato shells, mounding it slightly. Place the stuffed potatoes back on the baking sheet.
- Top with Cheese and Bake Again: Sprinkle the remaining cheddar cheese over the top of the potatoes. Return them to the oven and bake for an additional 15-20 minutes or until the cheese is melted and bubbly.
- Garnish and Serve: Remove the potatoes from the oven and let them cool for a few minutes. Garnish with chopped green onions if desired, and serve warm.
Extra Tips:
When cooking Broccoli and Cheddar Twice-Baked Potatoes, consider using a potato masher or a hand mixer to achieve a smooth and lump-free potato filling.
If you prefer a bit more heat, you can add a pinch of cayenne pepper or a dash of hot sauce to the potato mixture. Additionally, the potatoes can be prepared a day in advance and stored in the refrigerator; just add a few extra minutes to the final baking time.
For a crispy top, consider broiling the potatoes for the last 2-3 minutes of baking. Enjoy your delicious and budget-friendly meal!
Spaghetti With Spinach and Walnut Pesto
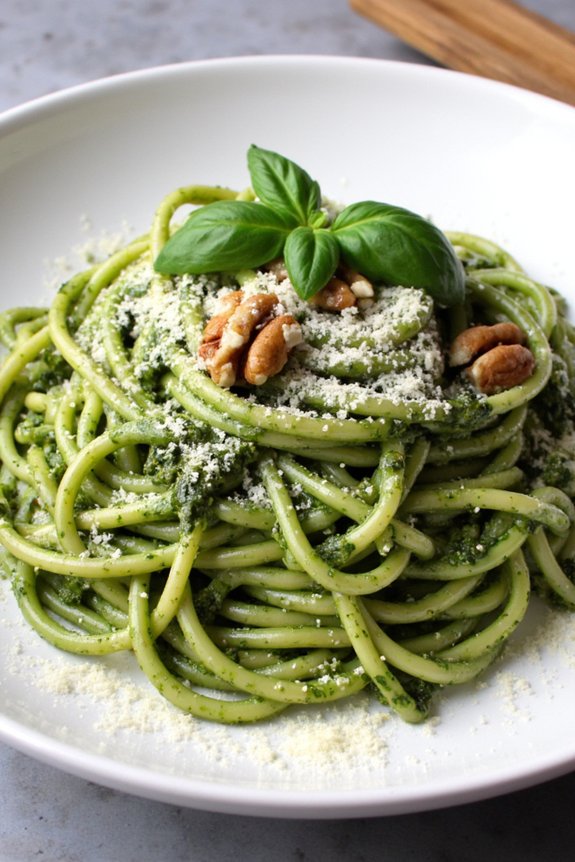
Spaghetti with Spinach and Walnut Pesto is a delightful and budget-friendly vegetarian dish that combines the earthy flavors of spinach and walnuts with the classic comfort of spaghetti. This dish isn’t only easy to prepare but also packed with nutrients, making it a perfect meal for busy weeknights.
The rich green pesto sauce brings a burst of flavor to the pasta, while the walnuts add a satisfying crunch, creating a harmonious blend of textures and tastes. This recipe serves 4-6 people and is perfect for those who enjoy a quick and healthy meal without breaking the bank.
The pesto sauce is made using fresh spinach leaves, which are a great source of iron and vitamins, and walnuts, which provide healthy fats and protein. Tossed with hot spaghetti, this dish is sure to become a family favorite and a staple in your vegetarian recipe collection.
Ingredients:
- 1 pound spaghetti
- 4 cups fresh spinach leaves
- 1 cup walnuts
- 1/2 cup grated Parmesan cheese
- 2 cloves garlic
- 1/2 cup olive oil
- Juice of 1 lemon
- Salt and pepper to taste
- Optional: 1/4 cup chopped fresh basil
Instructions:
1. Cook the Spaghetti: Bring a large pot of salted water to a boil. Add the spaghetti and cook according to the package instructions until al dente. Reserve 1 cup of pasta water and then drain the spaghetti.
2. Prepare the Pesto: While the pasta is cooking, add the spinach, walnuts, Parmesan cheese, garlic, lemon juice, and olive oil into a food processor. Blend until smooth. If the mixture is too thick, add a little pasta water to reach the desired consistency. Season with salt and pepper to taste.
3. Combine and Serve: Return the drained spaghetti to the pot. Add the spinach and walnut pesto to the spaghetti and toss to coat evenly. If the pasta seems dry, add a bit more of the reserved pasta water until you reach the desired consistency.
For an added flavor boost, sprinkle chopped fresh basil over the top before serving, if desired.
4. Garnish and Enjoy: Serve the spaghetti warm, garnished with extra Parmesan cheese and a sprinkle of walnuts for added texture. Enjoy this delicious and nutritious meal with your family and friends.
Extra Tips:
Toasting the walnuts lightly in a dry pan before blending them into the pesto can enhance their flavor, adding a richer, nuttier taste to the sauce.
If you’re looking to make the dish vegan, simply omit the Parmesan cheese or substitute with a vegan cheese alternative. Feel free to adjust the garlic and lemon juice to suit your personal taste preferences.
If you have any leftover pesto, it can be stored in an airtight container in the refrigerator for up to a week, making it a versatile addition to other dishes like sandwiches or salads.
Roasted Vegetable and Couscous Salad
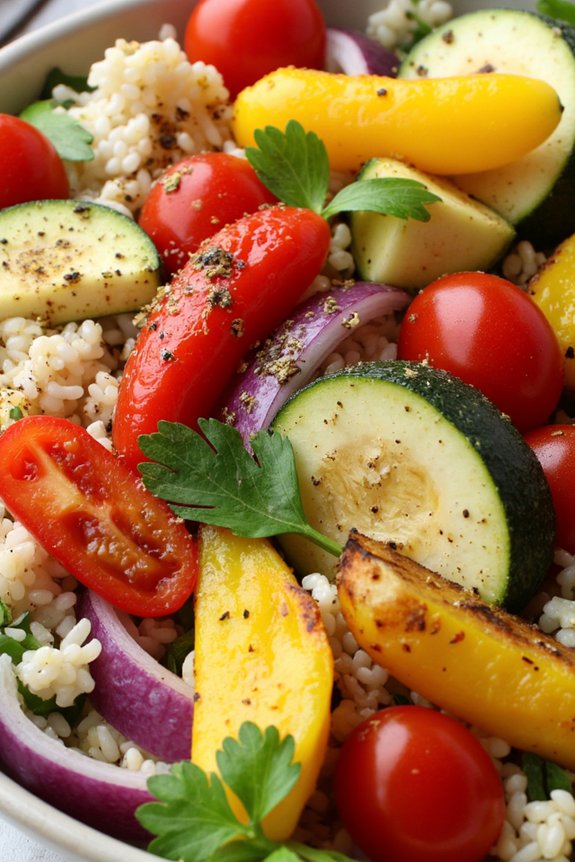
Roasted Vegetable and Couscous Salad is a delightful and hearty vegetarian dish that’s perfect for a budget-friendly dinner. This vibrant salad combines a medley of roasted vegetables with fluffy couscous, resulting in a flavorful and satisfying meal. It’s a versatile dish that can be served warm or cold, making it ideal for any season.
The roasted vegetables add a depth of flavor and a beautiful array of colors, while the couscous provides a light and fluffy base that perfectly complements the vegetables. This dish isn’t only delicious but also highly nutritious and easy to prepare.
With minimal ingredients and simple cooking steps, you can whip up this salad in no time. It’s perfect for those busy weeknight dinners or as a make-ahead meal for lunch. Plus, it’s an excellent way to use up any leftover vegetables you may have in your fridge.
Now, let’s get started on making this delicious Roasted Vegetable and Couscous Salad for 4-6 servings.
Ingredients:
- 1 cup couscous
- 1 1/4 cups vegetable broth
- 2 tablespoons olive oil
- 1 red bell pepper, diced
- 1 yellow bell pepper, diced
- 1 zucchini, sliced
- 1 red onion, cut into wedges
- 1 cup cherry tomatoes, halved
- 2 teaspoons dried oregano
- 1 teaspoon garlic powder
- Salt and pepper to taste
- 1/4 cup chopped fresh parsley
- Juice of 1 lemon
Cooking Instructions:
- Preheat the Oven: Start by preheating your oven to 400°F (200°C). This is crucial for roasting the vegetables to perfection.
- Prepare the Vegetables: In a large mixing bowl, combine the diced red and yellow bell peppers, sliced zucchini, red onion wedges, and halved cherry tomatoes. Drizzle the vegetables with olive oil, then sprinkle with dried oregano, garlic powder, salt, and pepper. Toss everything together until the vegetables are evenly coated with the oil and seasonings.
- Roast the Vegetables: Spread the seasoned vegetables in a single layer on a baking sheet. Roast them in the preheated oven for 20-25 minutes, or until they’re tender and slightly caramelized. Stir halfway through the cooking time to guarantee even roasting.
- Prepare the Couscous: While the vegetables are roasting, bring the vegetable broth to a boil in a medium saucepan. Once boiling, remove the pan from the heat and stir in the couscous. Cover the saucepan with a lid and let it sit for about 5 minutes, allowing the couscous to absorb the broth. Fluff the couscous with a fork once it’s done.
- Combine and Serve: In a large serving bowl, combine the roasted vegetables with the fluffed couscous. Add the chopped fresh parsley and squeeze the juice of one lemon over the top. Toss everything gently to combine. Taste and adjust seasoning with additional salt and pepper if needed.
- Serve: Serve the salad warm or let it cool and serve it as a rejuvenating cold salad. It’s delicious either way!
Extra Tips:
To add more protein to this dish, consider mixing in some canned chickpeas or crumbled feta cheese. Feel free to experiment with different vegetables based on what you have on hand.
This recipe is highly adaptable, so don’t hesitate to personalize it to suit your taste. Additionally, if you prefer a spicier kick, add a pinch of red pepper flakes to the vegetable seasoning.
Remember that allowing the salad to sit for a while before serving can help the flavors meld together beautifully. Enjoy your delicious and budget-friendly Roasted Vegetable and Couscous Salad!
Tomato and Basil Grilled Cheese Sandwiches

Tomato and Basil Grilled Cheese Sandwiches are a delightful twist on the classic comfort food. Perfect for a budget-friendly vegetarian dinner, these sandwiches combine the rich flavors of ripe tomatoes and fresh basil with gooey, melted cheese and crispy, golden bread.
This dish isn’t only easy to prepare but also satisfies your taste buds with its simple yet classic flavor profile. It’s an excellent choice for a quick weeknight meal or a leisurely weekend lunch, providing a wholesome and hearty option that everyone will love.
Incorporating fresh ingredients like tomatoes and basil elevates the traditional grilled cheese sandwich, making it more nutritious and flavorful. The acidity of the tomatoes complements the creaminess of the cheese, while the basil adds a fragrant freshness that ties everything together.
This recipe serves 4-6 people, making it ideal for feeding a family or a small gathering of friends. With just a few ingredients and some basic kitchen skills, you can create a delicious, satisfying meal that won’t break the bank.
Ingredients (Serves 4-6)
- 8-12 slices of whole-grain or sourdough bread
- 16-24 slices of fresh mozzarella cheese
- 2-3 large ripe tomatoes, thinly sliced
- 1 bunch of fresh basil leaves
- 4-6 tablespoons of unsalted butter, softened
- Salt and pepper to taste
Cooking Instructions
- Prepare the Ingredients: Begin by slicing the tomatoes and mozzarella cheese. Wash and pat dry the basil leaves. Lay out all ingredients to make assembly easy.
- Assemble the Sandwiches: Take slices of bread and spread a thin layer of softened butter on one side of each slice. On the unbuttered side, place 2-3 slices of mozzarella cheese, followed by a few slices of tomato, and then a handful of basil leaves. Sprinkle a bit of salt and pepper over the tomatoes and basil. Top with another slice of bread, buttered side facing out.
- Preheat the Pan: Heat a large skillet or griddle over medium heat. Confirm the pan is evenly heated to prevent the bread from burning while allowing the cheese to melt properly.
- Grill the Sandwiches: Place the assembled sandwiches in the skillet, buttered side down. Cook for about 3-4 minutes on each side, or until the bread is golden brown and crispy, and the cheese has melted. Use a spatula to gently press down on the sandwiches to guarantee even cooking.
- Serve: Once cooked, remove the sandwiches from the skillet and let them cool slightly before cutting in half. Serve warm, perhaps with a simple green salad or a bowl of soup.
Extra Tips
For the best results, use high-quality, ripe tomatoes and fresh basil. If you want a bit of extra flavor, consider adding a drizzle of balsamic glaze inside the sandwich before grilling.
Make sure the cheese is room temperature before assembling the sandwiches, as this will help it melt more evenly. If you don’t have fresh mozzarella, another good melting cheese like provolone or Havarti can be used as a substitute.
Finally, keep an eye on the heat level to avoid burning the bread before the cheese melts completely.