

As a busy mom, I know firsthand how challenging dinner time can be when you’re balancing kids’ preferences and your own need for something quick and healthy. That’s why I’ve curated a list of 13 fresh, quick, and easy dinner recipes perfect for families with kids. Think one-pot wonders, colorful stir-fries, and fun mini pizza bagels that are sure to delight everyone at the table. Each recipe is designed to make your evenings a little smoother and a lot more delicious. Ready to find your new go-to family favorite?
One-Pot Cheesy Chicken and Broccoli Pasta

One-Pot Cheesy Chicken and Broccoli Pasta is a delightful and simple meal perfect for busy families with kids. This dish combines tender chicken pieces, nutritious broccoli, and pasta all cooked in a single pot, reducing cleanup time and enhancing flavors.
The creamy cheese sauce ties everything together, making it a comforting and satisfying option that children will love. Plus, with the addition of broccoli, you sneak in some vegetables while keeping the kids happy.
This recipe is designed for 4-6 servings, making it an ideal choice for family dinners. The best part is that it requires minimal preparation and can be ready in under 30 minutes. It’s perfect for those hectic weeknights when you need to get dinner on the table quickly.
The use of one pot guarantees that all the flavors meld together beautifully, and the cheesy sauce brings everything to a delicious conclusion.
Ingredients:
- 2 tablespoons olive oil
- 1 pound boneless, skinless chicken breast, cut into bite-sized pieces
- Salt and black pepper, to taste
- 3 cloves garlic, minced
- 4 cups chicken broth
- 2 cups milk
- 12 ounces pasta (penne or fusilli works well)
- 4 cups broccoli florets
- 2 cups shredded cheddar cheese
- 1/2 cup grated Parmesan cheese
Cooking Instructions:
- Prepare the Chicken: Heat the olive oil in a large pot or Dutch oven over medium-high heat. Season the chicken pieces with salt and black pepper. Add the chicken to the pot and cook until golden brown on all sides, about 5-7 minutes. Remove the chicken from the pot and set aside.
- Sauté the Garlic: In the same pot, add the minced garlic and sauté for about 30 seconds until fragrant. Be sure to stir frequently to prevent burning.
- Add Liquids and Pasta: Pour in the chicken broth and milk, stirring to combine. Bring the mixture to a gentle boil.
- Cook the Pasta and Broccoli: Once the liquid is boiling, add the pasta. Allow the pasta to cook for about 5 minutes, then add the broccoli florets. Continue cooking for another 5-7 minutes, or until the pasta is al dente and the broccoli is tender.
- Incorporate the Chicken and Cheese: Return the cooked chicken to the pot. Gradually stir in the shredded cheddar cheese and grated Parmesan cheese until they melt and form a creamy sauce. Adjust the seasoning with additional salt and black pepper if needed.
- Serve: Once everything is well combined and heated through, serve the pasta hot, garnished with extra Parmesan cheese if desired.
Extra Tips:
When making One-Pot Cheesy Chicken and Broccoli Pasta, confirm that you cut the broccoli into small, evenly sized florets to assure even cooking.
If you prefer a thicker sauce, reduce the amount of chicken broth slightly, or let the pasta sit for a few minutes off the heat to thicken. Additionally, feel free to experiment with different types of cheese for varied flavors; mozzarella or a mix of cheddar and Monterey Jack can add a unique twist.
Adjust the seasonings to suit your family’s taste, and consider using whole wheat pasta for a healthier option.
Quick Beef and Vegetable Stir-Fry
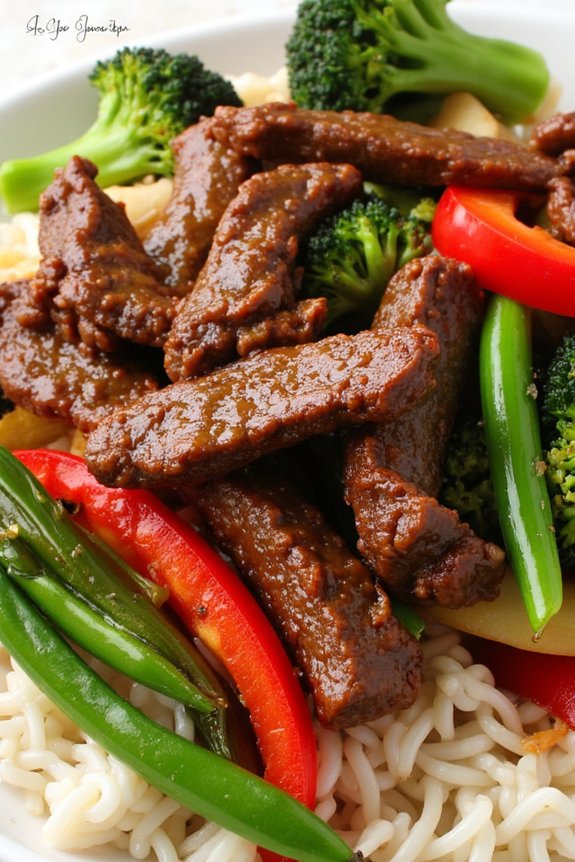
Looking for a quick and nutritious dinner option that the whole family will enjoy? This Quick Beef and Vegetable Stir-Fry is a perfect choice, offering a balance of tender beef and fresh vegetables, all cooked in a savory sauce. In just under 30 minutes, you can have a wholesome meal that’s bound to satisfy both picky eaters and adults alike.
This recipe makes use of simple ingredients that are often found in your pantry or fridge, making it a convenient option for busy weeknights. The beauty of this dish lies in its versatility. You can easily customize it with your family’s favorite vegetables or adjust the spices to suit your taste preferences. Serve it over steamed rice or noodles to complete the meal.
The following recipe serves 4-6 people, making it ideal for a family dinner or for those who love having leftovers for lunch the next day.
Ingredients:
- 1 pound beef sirloin, thinly sliced
- 2 tablespoons soy sauce
- 1 tablespoon cornstarch
- 1 tablespoon vegetable oil
- 2 cloves garlic, minced
- 1 inch piece ginger, minced
- 1 red bell pepper, sliced
- 1 yellow bell pepper, sliced
- 1 cup broccoli florets
- 1 cup sugar snap peas
- 1/4 cup low-sodium soy sauce
- 2 tablespoons oyster sauce
- 1 tablespoon hoisin sauce
- 1 teaspoon sesame oil
- 2 green onions, sliced
- Salt and pepper to taste
- Cooked rice or noodles, for serving
Cooking Instructions:
- Marinate the Beef: In a medium bowl, combine the sliced beef with 2 tablespoons of soy sauce and 1 tablespoon of cornstarch. Mix well to coat the beef evenly. Let it marinate for about 10 minutes while you prepare the other ingredients.
- Prepare the Vegetables: Chop the garlic and ginger, and slice the bell peppers, broccoli, and sugar snap peas. Keep them ready for quick cooking.
- Cook the Beef: Heat 1 tablespoon of vegetable oil in a large skillet or wok over medium-high heat. Once hot, add the marinated beef in a single layer. Cook for about 2-3 minutes until browned, then remove from the pan and set aside.
- Stir-Fry the Vegetables: In the same pan, add the minced garlic and ginger. Sauté for about 30 seconds until fragrant. Then, add the sliced bell peppers, broccoli, and sugar snap peas. Stir-fry for 4-5 minutes until the vegetables are tender-crisp.
- Combine and Season: Return the beef to the pan with the vegetables. Add 1/4 cup low-sodium soy sauce, 2 tablespoons oyster sauce, 1 tablespoon hoisin sauce, and 1 teaspoon sesame oil. Stir everything together and cook for another 2 minutes until the beef is heated through and the sauce coats everything evenly.
- Finish and Serve: Season with salt and pepper to taste, and sprinkle with sliced green onions. Serve the stir-fry immediately over cooked rice or noodles.
Extra Tips:
For the best results, make sure all your ingredients are prepped and ready before you start cooking. Stir-frying is a fast process, so having everything at hand will make cooking more efficient.
If you have picky eaters, feel free to swap out any vegetables they mightn’t like with others such as carrots, zucchini, or mushrooms. For an extra kick, consider adding a pinch of red pepper flakes or a splash of sriracha sauce.
Finally, be mindful of the saltiness of the sauces and adjust the salt and soy sauce according to your taste preference.
Easy Sheet Pan Salmon and Asparagus

If you’re searching for a quick and easy dinner recipe that will please the entire family, seek no further than this Easy Sheet Pan Salmon and Asparagus. This dish isn’t only simple to prepare but also packed with nutrients, making it a healthy choice for a weeknight meal.
The combination of tender salmon and crisp asparagus, all seasoned with lemon and herbs, creates a flavorful and satisfying meal that even picky eaters will enjoy.
One of the best things about this recipe is its minimal cleanup, as everything is cooked on a single sheet pan. It’s perfect for busy parents who want to serve a nutritious dinner without spending hours in the kitchen.
Plus, it’s customizable; you can easily adjust the seasoning or add other vegetables to suit your family’s taste. Whether you’re a novice cook or an experienced chef, this dish is sure to become a staple in your meal rotation.
Ingredients for 4-6 servings:
- 4-6 salmon fillets (4-6 ounces each)
- 1 pound asparagus, trimmed
- 2 tablespoons olive oil
- 1 lemon, sliced
- 1 teaspoon garlic powder
- 1 teaspoon dried dill or fresh dill
- Salt and pepper to taste
- 1 tablespoon fresh parsley, chopped (optional)
Cooking Instructions:
- Preheat the Oven: Start by preheating your oven to 400°F (200°C). This temperature allows the salmon and asparagus to cook evenly and guarantees a slightly crispy texture.
- Prepare the Sheet Pan: Line a large sheet pan with parchment paper or aluminum foil for easy cleanup. Arrange the salmon fillets on one side of the pan and the asparagus on the other side.
- Season the Ingredients: Drizzle olive oil over both the salmon and asparagus. Sprinkle them with garlic powder, dill, salt, and pepper. Arrange the lemon slices over the salmon fillets for added flavor.
- Cook the Dish: Place the sheet pan in the preheated oven and bake for 12-15 minutes. The salmon should be opaque and flake easily with a fork, and the asparagus should be tender-crisp.
- Garnish and Serve: Remove the sheet pan from the oven and sprinkle fresh parsley over the salmon and asparagus if desired. Serve immediately while hot.
Extra Tips:
For an extra burst of flavor, consider adding a splash of white wine or a pinch of red pepper flakes before baking.
If you want to mix it up, try substituting the asparagus with other vegetables like broccoli or cherry tomatoes.
To confirm the salmon doesn’t overcook, keep a close eye on the oven during the last few minutes of cooking.
Finally, if you’re using thicker salmon fillets, you may need to increase the cooking time by a few minutes. Enjoy your delicious and healthful meal!
20-Minute Chicken Caesar Wraps

When you’re juggling the demands of family life, having a go-to quick and delicious dinner recipe can be a lifesaver. Minute Chicken Caesar Wraps are perfect for busy weeknights when you need to get a nutritious meal on the table fast. This recipe combines tender chicken breast with crisp romaine lettuce, creamy Caesar dressing, and a sprinkle of Parmesan cheese, all wrapped up in a soft tortilla.
It’s a meal that both kids and adults will love, offering a delightful combination of flavors and textures in every bite. One of the best things about Minute Chicken Caesar Wraps is their versatility. You can easily adjust the ingredients to suit your family’s tastes or dietary needs.
These wraps are also a fantastic way to use up leftover chicken, making them a budget-friendly option. With minimal prep and cook time, you’ll have dinner ready in just minutes, freeing up more time for family and relaxation.
Ingredients (Serving Size: 4-6 people)
- 1 pound boneless, skinless chicken breasts
- 1 tablespoon olive oil
- Salt and pepper to taste
- 1 teaspoon garlic powder
- 1 teaspoon Italian seasoning
- 6 large flour tortillas
- 1 cup Caesar dressing
- 2 cups chopped romaine lettuce
- 1 cup grated Parmesan cheese
- 1 cup cherry tomatoes, halved
Cooking Instructions
- Prepare the Chicken: Begin by seasoning the chicken breasts with salt, pepper, garlic powder, and Italian seasoning. Heat the olive oil in a large skillet over medium-high heat.
- Cook the Chicken: Once the oil is hot, add the seasoned chicken breasts to the skillet. Cook for about 5-7 minutes on each side, or until the chicken is cooked through and golden brown. Remove the chicken from the skillet and let it rest for a few minutes before slicing it into thin strips.
- Assemble the Wraps: Lay each tortilla flat on a clean surface. Spread a generous tablespoon of Caesar dressing over the center of each tortilla.
- Add the Fillings: Evenly distribute the chopped romaine lettuce, sliced chicken, grated Parmesan cheese, and cherry tomato halves over the dressed tortillas.
- Wrap it Up: Carefully fold in the sides of each tortilla and then roll them up tightly from the bottom to the top, securing the fillings inside.
- Serve: Slice each wrap in half diagonally and serve immediately. Enjoy your Minute Chicken Caesar Wraps warm or cold.
Extra Tips
To save even more time, consider using pre-cooked or rotisserie chicken instead of cooking the chicken breasts from scratch. If you prefer a little extra crunch, add some croutons inside the wrap.
For a healthier option, use whole wheat or spinach tortillas. These wraps also make great leftovers; simply wrap them tightly in foil or plastic wrap and store in the refrigerator for up to two days.
Kid-Friendly Taco Night

Taco night is a beloved tradition in many households, especially for families with children. It’s an interactive meal that allows everyone to customize their tacos with their favorite toppings, making it a hit for picky eaters and adventurous taste buds alike.
This kid-friendly taco recipe is designed to be quick, easy, and fun for the whole family. Perfect for a busy weeknight meal, it brings everyone together around the dinner table, encouraging creativity and conversation.
This recipe is designed to serve 4-6 people, making it ideal for family dinners or small gatherings. The ingredients are simple, with options to modify them according to your family’s preferences. With a few basic cooking techniques, you’ll have a delicious and satisfying meal ready in no time.
So, gather your family and a few pantry staples, and get ready for a taco night that everyone will enjoy!
Ingredients:
- 1 pound ground beef or turkey
- 1 packet taco seasoning
- 2/3 cup water
- 12 small taco shells or tortillas
- 1 cup shredded cheddar cheese
- 1 cup shredded lettuce
- 1 cup diced tomatoes
- 1/2 cup sour cream
- 1/2 cup salsa
- 1/4 cup sliced black olives (optional)
- 1/4 cup chopped green onions (optional)
Cooking Instructions:
- Cook the Meat: In a large skillet over medium heat, brown the ground beef or turkey until fully cooked, breaking it apart with a spoon as it cooks. Drain any excess fat from the pan.
- Season the Meat: Add the taco seasoning packet and 2/3 cup of water to the cooked meat. Stir well to combine and bring the mixture to a simmer. Reduce the heat to low and let it cook for about 5 minutes, stirring occasionally, until the sauce thickens.
- Prepare the Toppings: While the meat is simmering, prepare your taco toppings. Shred the lettuce, dice the tomatoes, and grate the cheese if not pre-shredded. Place each topping in separate bowls for easy assembly.
- Warm the Taco Shells: Preheat your oven to 350°F (175°C). Arrange the taco shells on a baking sheet and warm them in the oven for about 5 minutes, or until they’re heated through and slightly crispy.
- Assemble the Tacos: Once everything is ready, set up a taco assembly line. Let each family member fill their taco shells with the seasoned meat and toppings of their choice, such as cheese, lettuce, tomatoes, sour cream, salsa, olives, and green onions.
Extra Tips:
For an even more engaging taco night, consider setting up a toppings bar with additional options like guacamole, jalapeños, or corn.
If you have younger children, it might be helpful to precut the toppings into smaller pieces to make them easier to handle. Leftovers can be easily repurposed into taco salads or nachos for the next day’s lunch.
If you prefer a vegetarian option, swap the ground meat for black beans or a plant-based meat substitute. Enjoy your taco night with a side of rice and beans for a complete meal!
Simple Spaghetti With Tomato Basil Sauce
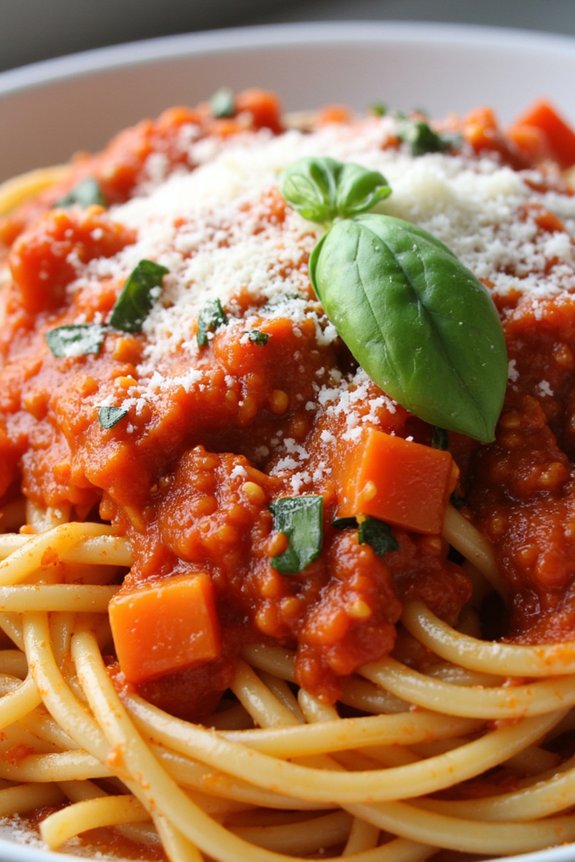
Simple Spaghetti With Tomato Basil Sauce is a classic dish that combines the comforting taste of spaghetti with a fresh and flavorful tomato basil sauce. This easy-to-make recipe is perfect for families with kids, providing a delicious meal that everyone will enjoy.
The simplicity of the ingredients allows the natural flavors to shine through, making it a favorite for busy weeknights. The sauce is made from ripe tomatoes, fresh basil, and just the right amount of garlic, creating a vibrant taste that pairs beautifully with the pasta.
In just under 30 minutes, you can have a wholesome dinner on the table that’s sure to please even the pickiest eaters. This recipe is designed to serve 4-6 people, making it ideal for family dinners.
Ingredients:
- 1 pound (16 oz) spaghetti
- 2 tablespoons olive oil
- 4 cloves garlic, minced
- 6 ripe tomatoes, diced
- 1 teaspoon salt
- 1/2 teaspoon black pepper
- 1/2 teaspoon sugar
- 1/4 cup fresh basil leaves, chopped
- Grated Parmesan cheese (optional, for serving)
Instructions:
- Cook the Spaghetti: Bring a large pot of salted water to a boil. Add the spaghetti and cook according to package instructions until al dente. Drain and set aside.
- Prepare the Sauce: While the spaghetti is cooking, heat the olive oil in a large skillet over medium heat. Add the minced garlic and sauté for about 1 minute or until fragrant, making sure not to burn it.
- Add Tomatoes: Stir in the diced tomatoes, salt, black pepper, and sugar. Allow the mixture to simmer for about 10-15 minutes, stirring occasionally, until the tomatoes break down and the sauce thickens slightly.
- Incorporate Basil: Add the chopped basil to the sauce and stir well. Let the sauce cook for another minute to allow the flavors to meld together.
- Combine with Spaghetti: Add the cooked spaghetti to the skillet and toss to coat the pasta evenly with the sauce. Make sure the spaghetti is thoroughly mixed with the sauce.
- Serve: Serve the spaghetti hot, garnished with grated Parmesan cheese if desired.
Extra Tips:
For added flavor, consider adding a pinch of red pepper flakes to the sauce for a little heat.
If you prefer a smoother sauce, you can use an immersion blender to blend the sauce to your desired consistency before adding the basil.
Additionally, you can enhance the dish by adding cooked Italian sausage or grilled chicken strips for a protein boost.
Freshly grated Parmesan cheese adds a delicious finishing touch, but be sure to add it just before serving to maintain its flavor and texture.
Creamy Spinach and Mushroom Quesadillas

Creamy Spinach and Mushroom Quesadillas are a delightful and nutritious meal option that will satisfy both kids and adults alike. These quesadillas are packed with a rich and creamy filling made from fresh spinach, earthy mushrooms, and melted cheese, all encased in a crispy tortilla. Perfect for busy weeknights, this recipe isn’t only quick and easy to prepare but also offers a great way to incorporate veggies into your family’s diet without compromising on flavor.
The combination of spinach and mushrooms provides a wonderful texture and taste, while the gooey cheese ties everything together in a warm, comforting wrap. This dish can be customized to suit your family’s preferences by adding different types of cheese or spices. Serve these quesadillas with a side of salsa or guacamole for an extra burst of flavor that kids will love to dip into.
Here’s how you can make Creamy Spinach and Mushroom Quesadillas for 4-6 people:
Ingredients:
- 8 large flour tortillas
- 2 tablespoons olive oil
- 1 medium onion, finely chopped
- 2 cloves garlic, minced
- 2 cups fresh spinach, chopped
- 2 cups mushrooms, sliced
- 1 teaspoon salt
- 1/2 teaspoon black pepper
- 1/2 teaspoon ground cumin (optional)
- 1/2 cup sour cream
- 2 cups shredded mozzarella cheese
- Cooking spray or additional olive oil for frying
Instructions:
- Prepare the Filling: Heat the olive oil in a large skillet over medium heat. Add the chopped onion and garlic, sautéing until the onion becomes translucent. This should take about 2-3 minutes.
- Cook the Vegetables: Add the sliced mushrooms to the skillet, cooking for another 5 minutes until they’re soft and have released their moisture. Stir in the chopped spinach and cook until wilted, around 2 minutes.
- Season the Mixture: Season the vegetable mixture with salt, black pepper, and cumin (if using). Mix well to combine all the flavors.
- Add Creaminess: Remove the skillet from heat and stir in the sour cream. This will create a creamy texture that binds the filling together.
- Assemble the Quesadillas: Lay out the flour tortillas and evenly distribute the vegetable mixture onto one half of each tortilla. Sprinkle the shredded mozzarella cheese over the top of the mixture, then fold the tortillas in half.
- Cook the Quesadillas: Heat a non-stick skillet or griddle over medium-high heat and lightly coat with cooking spray or a small amount of olive oil. Place the folded quesadillas onto the skillet, cooking for 2-3 minutes on each side until the tortillas are golden brown and the cheese is melted.
- Serve: Slice the quesadillas into wedges and serve immediately with your choice of salsa or guacamole.
Extra Tips: To save time, you can prepare the filling in advance and store it in the refrigerator for up to two days. When ready to serve, simply reheat the filling before assembling the quesadillas. Experiment with different types of cheeses like cheddar or Monterey Jack for a varied flavor. If you have picky eaters, finely chop the mushrooms and spinach so they’re less noticeable in the filling.
Speedy Veggie Fried Rice
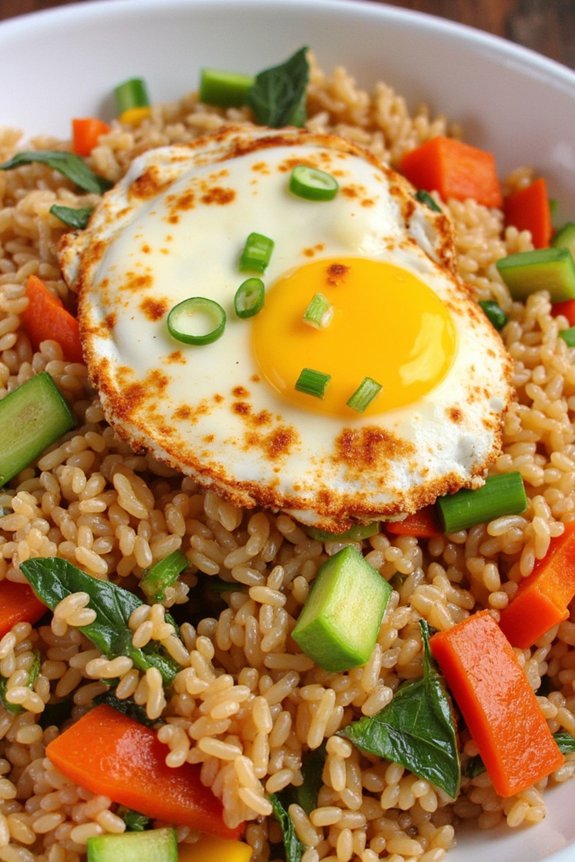
Speedy Veggie Fried Rice is a perfect quick meal for busy families who want something nutritious and delicious. This dish brings together a wonderful mix of colorful vegetables and rice, creating a satisfying and wholesome dinner. It’s a great way to use up leftover rice and veggies in your fridge, reducing waste while providing a meal everyone will enjoy.
With just a few simple ingredients and less than 30 minutes of cooking time, this recipe is ideal for weeknights when you need dinner on the table fast.
This fried rice isn’t only quick to prepare but also very versatile. You can customize it with your family’s favorite vegetables or add a protein like chicken, shrimp, or tofu to make it more filling. The combination of soy sauce and sesame oil gives it a classic Asian flair, making it flavorful enough to please both kids and adults.
Plus, it’s a fun way to get kids involved in cooking by letting them choose the vegetables they want to add, encouraging them to eat more greens.
Ingredients (Serves 4-6):
- 4 cups of cooked jasmine rice (preferably day-old)
- 2 tablespoons vegetable oil
- 1 medium onion, chopped
- 2 cloves garlic, minced
- 1 cup frozen peas and carrots, thawed
- 1 red bell pepper, diced
- 3 tablespoons soy sauce
- 2 teaspoons sesame oil
- 3 large eggs, beaten
- 3 green onions, sliced
- Salt and pepper to taste
Cooking Instructions:
- Prepare the Ingredients: Verify all your vegetables are chopped and ready to go. If you haven’t already, cook and cool the rice ahead of time, as day-old rice yields the best results for fried rice.
- Heat the Oil: In a large skillet or wok, heat the vegetable oil over medium-high heat until shimmering.
- Sauté Aromatics: Add the chopped onion and minced garlic to the pan, stirring frequently until the onion becomes translucent and fragrant, about 2-3 minutes.
- Cook Vegetables: Stir in the peas, carrots, and red bell pepper. Cook for about 3-4 minutes until the vegetables are slightly tender.
- Add the Rice: Increase the heat to high and add the cooked rice to the skillet. Use a spatula to break up any clumps and mix well with the vegetables.
- Season the Rice: Drizzle the soy sauce and sesame oil over the rice, stirring continuously to guarantee even coating and flavor distribution.
- Scramble the Eggs: Push the rice mixture to one side of the pan, creating space to pour the beaten eggs on the other side. Scramble the eggs until fully cooked, then mix them into the rice.
- Finish with Green Onions: Stir in the sliced green onions and adjust seasoning with salt and pepper to taste. Give everything a final toss before removing from heat.
- Serve: Transfer the fried rice to serving bowls and enjoy hot.
Extra Tips:
For the best results, use day-old rice as it’s drier and helps achieve the perfect fried rice texture. If you don’t have leftover rice, spread freshly cooked rice on a baking sheet and let it cool for a bit before using.
Feel free to add your choice of protein like diced chicken, shrimp, or tofu for a more substantial meal. Customize the vegetables based on what you have at home or what your kids prefer, making this dish both flexible and family-friendly.
Instant Pot Macaroni and Cheese

Searching for a comforting, kid-friendly dinner that’s both quick and easy to prepare? Search no more than Instant Pot Macaroni and Cheese. This creamy, cheesy dish is a guaranteed hit with the whole family, and it can be ready in a fraction of the time it would take to cook on the stovetop.
With the convenience of an Instant Pot, you’ll spend less time in the kitchen and more time enjoying the evening with your loved ones. Perfect for busy weeknights, this recipe is sure to become a staple in your household.
This Instant Pot Macaroni and Cheese isn’t only simple to make but also allows for customization to suit your family’s taste preferences. Whether your kids love it extra cheesy or you want to sneak in some veggies, this recipe is versatile enough to accommodate.
Plus, it’s a great way to get your kids involved in the kitchen, allowing them to help with measuring ingredients or stirring the pasta. Get ready to serve a delicious, homemade meal that everyone will love!
Ingredients (Serves 4-6):
- 1 pound elbow macaroni
- 4 cups water
- 1 teaspoon salt
- 2 tablespoons unsalted butter
- 1 cup evaporated milk
- 2 cups shredded cheddar cheese
- 1 cup shredded mozzarella cheese
- 1/2 teaspoon garlic powder
- 1/2 teaspoon onion powder
- 1/2 teaspoon mustard powder
- Salt and pepper to taste
Instructions:
- Prepare the Instant Pot: Begin by adding the elbow macaroni, water, and 1 teaspoon of salt to the Instant Pot. Stir to combine, making certain the pasta is evenly distributed in the water.
- Cook the Pasta: Secure the lid on the Instant Pot and set the valve to sealing. Select the ‘Pressure Cook’ or ‘Manual’ setting and adjust the timer to 4 minutes. Once the cooking time is complete, perform a quick release of the pressure by carefully moving the valve to venting.
- Drain the Pasta: Open the lid and drain any excess water from the pasta, if necessary. Return the pasta to the Instant Pot.
- Add the Ingredients: Stir in the butter until melted, then add the evaporated milk, cheddar cheese, mozzarella cheese, garlic powder, onion powder, and mustard powder. Stir until the cheese is fully melted and the sauce is creamy and coats the pasta.
- Season the Dish: Taste the macaroni and cheese and season with salt and pepper as needed. Mix well to confirm the seasoning is evenly distributed.
- Serve and Enjoy: Serve the mac and cheese hot, garnished with additional cheese or toppings of your choice, such as breadcrumbs or parsley.
Extra Tips:
For an extra creamy texture, you can substitute half-and-half or heavy cream for the evaporated milk. If you want to add some extra nutrition, consider stirring in cooked vegetables like peas or broccoli, or even some cooked bacon for a smoky flavor.
Remember to taste the mac and cheese before serving to verify the seasoning is to your liking, and feel free to adjust the cheese types based on your family’s preferences. This dish is best enjoyed fresh, but any leftovers can be stored in an airtight container in the refrigerator for up to three days. Just reheat gently to maintain the creamy texture.
Baked Chicken Parmesan With Zucchini Noodles

Baked Chicken Parmesan with Zucchini Noodles is a delightful twist on a classic Italian dish that’s sure to please both kids and adults alike. This recipe combines tender chicken breasts coated in crispy breadcrumbs and smothered in marinara sauce and melted cheese, all served over a bed of fresh zucchini noodles. Not only does it offer a healthier alternative to traditional pasta, but it also sneaks in some extra veggies, making it an ideal meal for families looking to enjoy a nutritious yet satisfying dinner.
This dish is perfect for weeknight dinners as it’s both quick to prepare and deeply flavorful. The zucchini noodles, often referred to as “zoodles,” provide a light and invigorating base that perfectly complements the rich and cheesy chicken. This recipe serves 4-6 people, making it an excellent choice for family meals. Plus, it’s a fun way to get kids involved in the kitchen, whether they’re helping to spiralize the zucchini or layer the ingredients.
Ingredients:
- 4-6 boneless, skinless chicken breasts
- 1 cup Italian-style breadcrumbs
- 1/2 cup grated Parmesan cheese
- 2 large eggs
- 2 cups marinara sauce
- 1 1/2 cups shredded mozzarella cheese
- 4 medium zucchinis
- 2 tablespoons olive oil
- Salt and pepper to taste
- Fresh basil leaves for garnish
Cooking Instructions:
- Preheat and Prepare: Preheat your oven to 400°F (200°C). Lightly grease a baking dish with olive oil and set aside.
- Prepare the Chicken: In a bowl, combine the breadcrumbs and Parmesan cheese. In another bowl, beat the eggs. Dip each chicken breast into the beaten eggs, then coat them in the breadcrumb mixture, pressing down to guarantee an even coating.
- Bake the Chicken: Place the coated chicken breasts in the prepared baking dish. Bake in the preheated oven for 20-25 minutes, or until the chicken is cooked through and the coating is golden brown.
- Add Sauce and Cheese: Remove the dish from the oven and spoon marinara sauce over each chicken breast. Sprinkle mozzarella cheese on top and return to the oven. Bake for an additional 10 minutes, or until the cheese is melted and bubbly.
- Prepare Zucchini Noodles: While the chicken is baking, use a spiralizer to turn the zucchinis into noodles. Heat olive oil in a large pan over medium heat. Add zucchini noodles and sauté for 3-4 minutes until tender. Season with salt and pepper.
- Serve: Place a bed of zucchini noodles on each plate and top with a baked chicken parmesan. Garnish with fresh basil leaves and serve immediately.
Extra Tips: To guarantee the zucchini noodles don’t become too watery, avoid overcooking them. You can also pat them dry with a paper towel after spiralizing to remove excess moisture. If you prefer a crispier chicken coating, try broiling the chicken for the last 2-3 minutes of baking. For added flavor, consider mixing some Italian herbs into the breadcrumb mixture. This dish pairs wonderfully with a side salad or garlic bread for an extra special family dinner.
Mini Pizza Bagels

Mini Pizza Bagels are a delightful and easy-to-make dinner option that the whole family will enjoy, especially kids who love getting hands-on with their food. These little bites are perfect for busy weeknights when you need to whip up something quick yet delicious.
With a customizable topping option, each family member can have their own personalized mini pizza bagel, making dinner time fun and interactive. This recipe isn’t only simple but also offers a great opportunity to involve your children in the cooking process, allowing them to create their own mini masterpieces.
The beauty of Mini Pizza Bagels lies in their versatility. They can be made with a variety of toppings to suit any taste preference. Whether you prefer classic pepperoni, a vegetarian delight, or a meat-lover’s special, these mini pizzas can be tailored to your family’s desires.
By using bagels as the base, you get a perfectly crispy crust with minimal effort. Plus, they’re ready in just about 20 minutes from start to finish, making them an ideal choice for a quick family dinner.
Ingredients for 4-6 People:
- 12 mini bagels
- 1 cup pizza sauce
- 2 cups shredded mozzarella cheese
- 1 cup mini pepperoni slices
- ½ cup sliced black olives
- ½ cup diced green bell peppers
- ½ teaspoon dried oregano
- ½ teaspoon garlic powder
Cooking Instructions:
- Preheat the Oven: Start by preheating your oven to 375°F (190°C). This guarantees that your mini pizza bagels will cook evenly and achieve a crispy finish.
- Prepare the Bagels: Slice each mini bagel in half, creating 24 halves. Place them cut side up on a baking sheet lined with parchment paper for easy cleanup.
- Add the Sauce: Spread about 1 tablespoon of pizza sauce evenly over the cut side of each bagel half, guaranteeing full coverage to avoid dry spots.
- Top with Cheese: Sprinkle a generous layer of shredded mozzarella cheese over the sauce on each bagel. This will be the base for your toppings.
- Customize with Toppings: Distribute the mini pepperoni slices, black olives, and diced bell peppers evenly across the bagels. Feel free to add or substitute any toppings your family prefers.
- Season: Lightly sprinkle dried oregano and garlic powder over the top of the bagels for added flavor.
- Bake: Place the baking sheet in the preheated oven and bake for about 10-12 minutes, or until the cheese is melted and bubbly, and the edges of the bagels are golden brown.
- Serve: Remove the mini pizza bagels from the oven and let them cool for a few minutes before serving. Enjoy them warm for the best taste and texture.
Extra Tips:
For the best results, make sure to use fresh bagels as they’ll provide the crispiest base once baked. If you prefer a softer texture, you can slightly underbake them by reducing the cooking time by a couple of minutes.
Additionally, consider setting up a toppings bar with various options like mushrooms, pineapple, or different cheeses to let everyone create their own favorite combinations. This not only makes dinner more interactive but also caters to different tastes and dietary preferences within your family.
15-Minute Shrimp Tacos With Lime Slaw
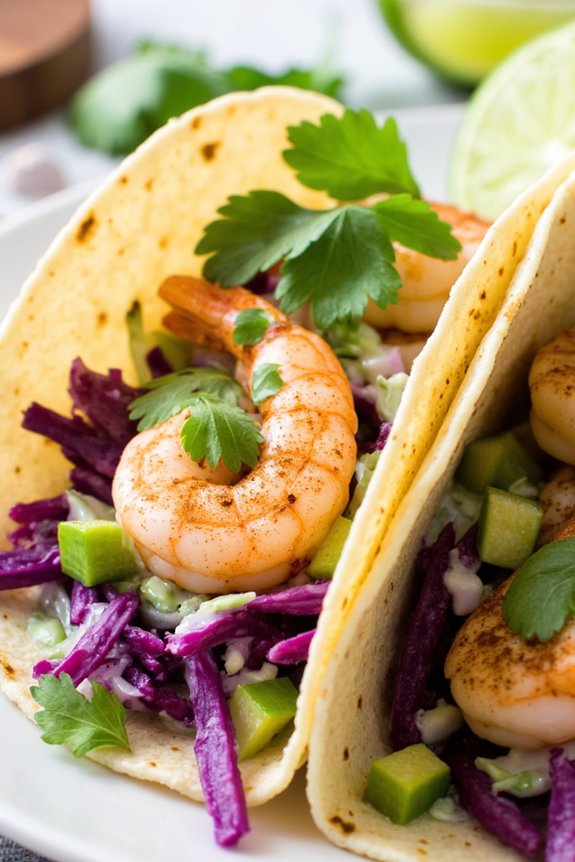
Minute Shrimp Tacos With Lime Slaw are a delightful and quick dinner option perfect for busy weeknights. This dish combines the fresh flavors of shrimp with a zesty lime slaw, creating a meal that isn’t only delicious but also appealing to both kids and adults. The shrimp are seasoned and cooked quickly, making them tender and flavorful, while the lime slaw adds a revitalizing crunch that complements the warm, soft tortillas.
These tacos are sure to become a family favorite, with their vibrant colors and satisfying taste. The beauty of this recipe lies in its simplicity and speed, taking only minutes to prepare. Whether you’re juggling work and family commitments or simply want a meal that everyone will enjoy, these Minute Shrimp Tacos With Lime Slaw offer a solution that doesn’t compromise on taste.
The lime slaw can be made ahead of time, allowing the flavors to meld, and the shrimp can be cooked in just a few minutes, making this a truly efficient meal.
Ingredients (serving size: 4-6 people):
- 1 1/2 pounds of large shrimp, peeled and deveined
- 1 tablespoon olive oil
- 1 teaspoon chili powder
- 1/2 teaspoon garlic powder
- Salt and pepper to taste
- 8-12 small corn or flour tortillas
- 3 cups shredded cabbage (green or red, or a mix)
- 1/4 cup mayonnaise
- 2 tablespoons lime juice
- 1 tablespoon honey
- 1/4 teaspoon salt
- 1/4 cup chopped fresh cilantro
- Lime wedges, for serving
Cooking Instructions:
- Prepare the Lime Slaw: In a large bowl, combine the shredded cabbage, mayonnaise, lime juice, honey, 1/4 teaspoon salt, and chopped cilantro. Mix well until all ingredients are combined. Taste and adjust the seasoning as needed. Set aside to allow the flavors to meld while you prepare the shrimp.
- Season the Shrimp: In a medium bowl, toss the shrimp with olive oil, chili powder, garlic powder, salt, and pepper. Make sure the shrimp are well coated with the seasonings.
- Cook the Shrimp: Heat a large skillet over medium-high heat. Once hot, add the seasoned shrimp in a single layer. Cook for about 2-3 minutes on each side, or until the shrimp are pink and cooked through. Be careful not to overcook the shrimp as they can become rubbery.
- Warm the Tortillas: While the shrimp are cooking, warm the tortillas. You can do this by placing them in a hot, dry skillet for about 30 seconds per side or wrapping them in a damp paper towel and microwaving for about 30 seconds.
- Assemble the Tacos: To assemble, place a generous portion of lime slaw onto each tortilla, followed by a few pieces of shrimp. Serve with lime wedges on the side for an extra burst of citrus flavor.
Extra Tips:
For extra flavor, consider adding some diced avocado or a sprinkle of queso fresco to your tacos. If you prefer a spicier kick, add a dash of hot sauce or sliced jalapeños to the lime slaw.
Fresh shrimp can be substituted with frozen shrimp; just make sure to thaw them completely before cooking. Additionally, these tacos pair wonderfully with a side of black beans or Mexican rice for a more complete meal. Enjoy your Minute Shrimp Tacos With Lime Slaw with your favorite salsa or guacamole for an added layer of flavor.
Quick and Easy Lentil Soup
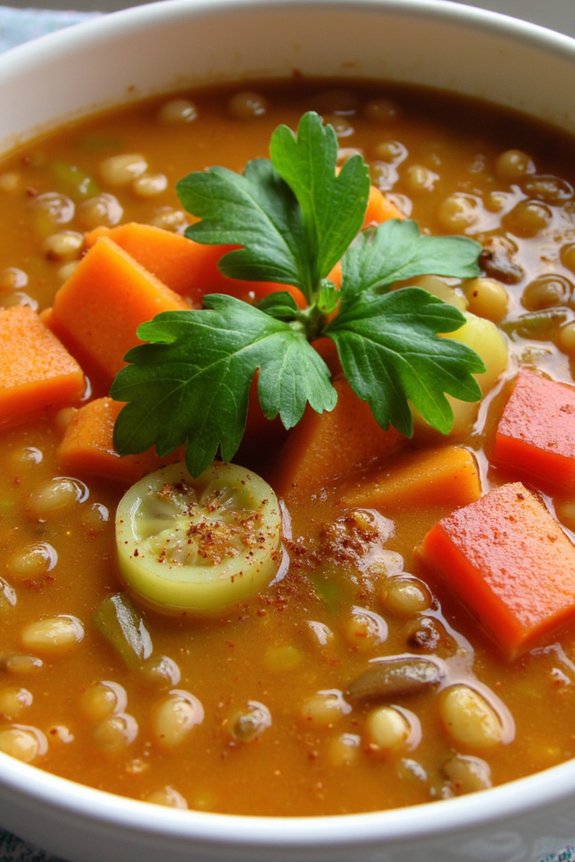
Looking for a hearty, nutritious, and quick meal to satisfy the whole family? This Quick and Easy Lentil Soup is a perfect choice for families with kids. Lentils aren’t only rich in protein and fiber, but they also cook quickly, making them an ideal ingredient for a fast dinner.
This soup is packed with flavor and can be on the table in under an hour, making it a great option for busy weeknights. Plus, it’s a one-pot meal, which means minimal cleanup.
This recipe is designed to serve 4-6 people and is easily adaptable. You can add your family’s favorite vegetables or adjust the spices to suit your taste. The soup’s comforting texture and savory flavors will have even the pickiest eaters asking for seconds.
Whether you’re serving it with a side of crusty bread or enjoying it on its own, this lentil soup is sure to become a family favorite.
Ingredients:
- 1 tablespoon olive oil
- 1 medium onion, diced
- 2 carrots, sliced
- 2 celery stalks, sliced
- 3 garlic cloves, minced
- 1 teaspoon ground cumin
- 1 teaspoon ground coriander
- 1/2 teaspoon turmeric
- 1/4 teaspoon paprika
- 1 1/2 cups dried lentils, rinsed
- 6 cups vegetable broth
- 1 can (14.5 ounces) diced tomatoes
- 1 bay leaf
- Salt and pepper to taste
- 2 tablespoons lemon juice
- 1/4 cup fresh parsley, chopped
Instructions:
- Prepare the Vegetables: Start by heating the olive oil in a large pot over medium heat. Once hot, add the diced onion, sliced carrots, and celery. Sauté for about 5-7 minutes until the vegetables are soft and the onion is translucent.
- Add Aromatics and Spices: Stir in the minced garlic, ground cumin, ground coriander, turmeric, and paprika. Cook for another 1-2 minutes until the spices are fragrant, making sure they don’t burn.
- Incorporate Lentils and Liquid: Add the rinsed lentils to the pot, followed by the vegetable broth, diced tomatoes, and bay leaf. Stir well to combine all ingredients.
- Simmer the Soup: Increase the heat to bring the mixture to a boil, then reduce the heat to low. Cover and let the soup simmer for about 25-30 minutes, or until the lentils are tender.
- Season and Finish: Once the lentils are cooked through, season the soup with salt and pepper to taste. Stir in the lemon juice and chopped parsley, then remove the bay leaf before serving.
Extra Tips:
For an even heartier soup, consider adding chopped potatoes or sweet potatoes.
If you prefer a thicker consistency, you can mash some of the lentils with a potato masher or blend a portion of the soup with an immersion blender.
For added flavor, try topping the soup with a dollop of yogurt or sprinkle of Parmesan cheese.
Adjust the seasonings to your preference and feel free to experiment with additional herbs such as thyme or rosemary.
Enjoy your delicious lentil soup with a side of warm, crusty bread for dipping!