

Looking for new ways to enjoy chicken at family dinner time? From Spicy Honey Garlic Chicken Thighs to Creamy Tuscan Chicken Pasta, these 15 fun recipes promise something for everyone at the table. Lemon Herb Chicken Skewers and Chicken Fajita Quesadillas bring lively flavors, while Baked Parmesan Crusted Chicken and Chicken Alfredo Stuffed Shells offer comforting familiarity. With options like BBQ Chicken Stuffed Sweet Potatoes and Thai Coconut Curry Chicken, family dinners will always be a delightful experience. These recipes are perfect for adding excitement to your meal plans!
Spicy Honey Garlic Chicken Thighs
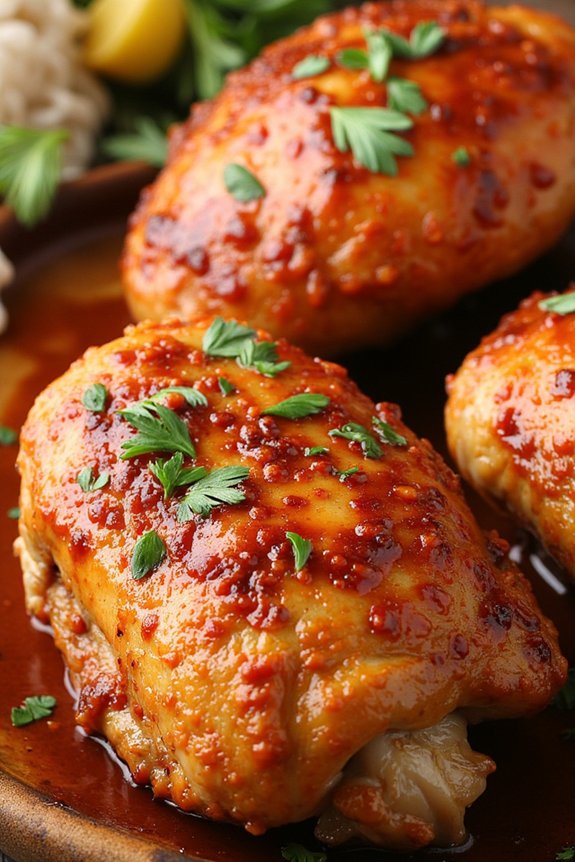
Spicy Honey Garlic Chicken Thighs are a flavorful and satisfying dish that’s perfect for a family dinner. This recipe combines the sweet, sticky taste of honey with the bold flavors of garlic and a hint of heat from chili flakes. The result is a deliciously glazed chicken thigh that’s both tender and juicy, making it a hit for everyone at the table.
Whether you’re hosting a casual weeknight dinner or a special gathering, this dish is sure to impress with its rich taste and appealing aroma. This recipe is designed to serve 4-6 people, making it ideal for a family meal. The chicken thighs are marinated and then baked to perfection, allowing the flavors to meld beautifully.
The combination of ingredients provides a balance of sweet, spicy, and savory notes, ensuring that each bite is a delightful experience. Serve these chicken thighs with a side of steamed rice or roasted vegetables for a complete and satisfying meal.
Ingredients for 4-6 servings:
- 6 bone-in, skinless chicken thighs
- 1/3 cup honey
- 1/4 cup soy sauce
- 1 tablespoon apple cider vinegar
- 4 cloves garlic, minced
- 1 teaspoon ground ginger
- 1 teaspoon chili flakes
- Salt and pepper to taste
- 2 tablespoons olive oil
- 2 tablespoons chopped fresh parsley (optional, for garnish)
Cooking Instructions:
- Prepare the Marinade: In a medium bowl, combine honey, soy sauce, apple cider vinegar, minced garlic, ground ginger, chili flakes, and a pinch of salt and pepper. Mix well until all ingredients are fully integrated.
- Marinate the Chicken: Place the chicken thighs in a large resealable plastic bag or a shallow dish. Pour the marinade over the chicken, ensuring each piece is well coated. Seal the bag or cover the dish, and refrigerate for at least 1 hour, or overnight for best results.
- Preheat the Oven: Preheat your oven to 400°F (200°C). While the oven is heating, remove the chicken from the refrigerator to allow it to come to room temperature.
- Prepare the Baking Dish: Lightly grease a baking dish with olive oil. Arrange the marinated chicken thighs in the dish, skin-side up, ensuring they’re evenly spaced.
- Bake the Chicken: Pour any remaining marinade over the chicken thighs. Bake in the preheated oven for 35-40 minutes, or until the chicken is cooked through and the internal temperature reaches 165°F (74°C).
- Broil for Extra Crispiness (Optional): For a crispier finish, switch the oven to broil for the last 2-3 minutes of cooking. Keep a close eye to prevent burning.
- Garnish and Serve: Remove the chicken from the oven and let it rest for a few minutes. Garnish with chopped fresh parsley before serving.
Extra Tips:
When preparing Spicy Honey Garlic Chicken Thighs, it’s important to allow the chicken to marinate for as long as possible to really absorb the flavors. If you’re short on time, marinating for at least an hour will still yield delicious results.
Be cautious when broiling, as the honey can caramelize quickly and potentially burn. Adjust the level of chili flakes to suit your family’s spice preference, and consider offering additional sauce on the side for those who enjoy a little more heat.
Creamy Tuscan Chicken Pasta
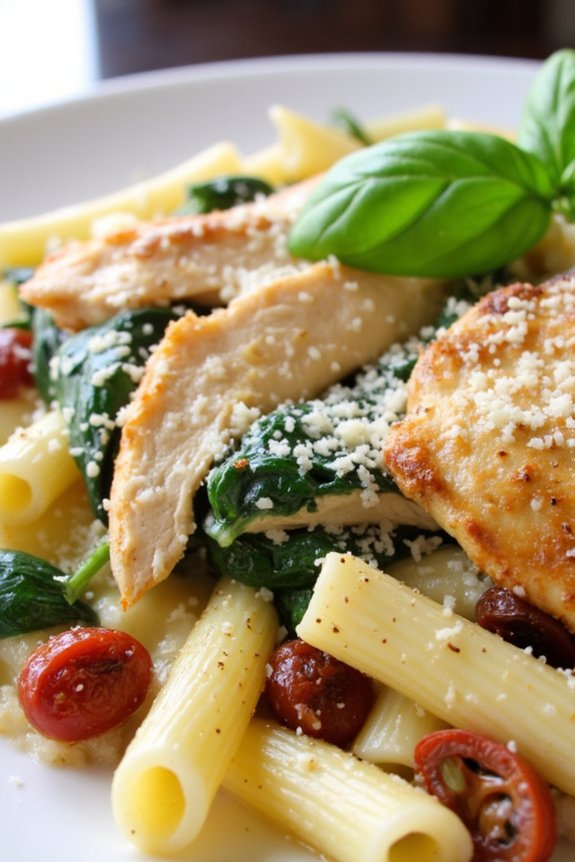
Creamy Tuscan Chicken Pasta is a delightful dish that combines tender chicken, flavorful sun-dried tomatoes, and a creamy sauce with a hint of garlic and spinach. This dish is perfect for family dinners, offering a hearty and satisfying meal that everyone will enjoy.
The combination of savory chicken and rich cream sauce paired with pasta makes it an ideal comfort food, perfect for any time of the year. This recipe serves 4-6 people, making it perfect for a family gathering or a cozy dinner with friends.
The creamy sauce is infused with the earthy flavors of sun-dried tomatoes and fresh spinach, providing a delicious balance to the tender chicken and pasta. Whether you’re a seasoned cook or a beginner, this recipe is easy to follow and sure to impress your dinner guests with its restaurant-quality taste.
Ingredients:
- 1 pound boneless, skinless chicken breasts
- Salt and pepper, to taste
- 2 tablespoons olive oil
- 3 cloves garlic, minced
- 1 cup sun-dried tomatoes, chopped
- 1 cup chicken broth
- 1 cup heavy cream
- 1 teaspoon Italian seasoning
- 1 cup freshly grated Parmesan cheese
- 8 ounces penne pasta
- 2 cups fresh spinach
- Fresh basil, for garnish (optional)
Instructions:
- Prepare the Chicken: Begin by seasoning the chicken breasts with salt and pepper on both sides. In a large skillet over medium-high heat, add olive oil and allow it to heat up.
- Cook the Chicken: Add the chicken breasts to the skillet and cook for about 6-7 minutes on each side, or until fully cooked and golden brown. Remove the chicken from the skillet and set it aside.
- Cook the Pasta: While the chicken is cooking, bring a large pot of salted water to a boil. Add the penne pasta and cook according to the package instructions until al dente. Drain and set aside.
- Sauté Garlic and Sun-Dried Tomatoes: In the same skillet used for the chicken, add the minced garlic and sun-dried tomatoes. Sauté for about 2 minutes, until the garlic is fragrant.
- Make the Sauce: Pour in the chicken broth and scrape any brown bits from the bottom of the skillet. Add the heavy cream and Italian seasoning, stirring to combine. Let the mixture simmer for 3-4 minutes.
- Add Cheese and Spinach: Stir in the Parmesan cheese until it melts completely into the sauce. Add the fresh spinach and cook until wilted, about 2 minutes.
- Combine Everything: Slice the cooked chicken into strips and return it to the skillet. Add the cooked pasta and toss everything together until well coated with the sauce.
- Serve: Divide the pasta into bowls, garnish with fresh basil if desired, and serve immediately.
Extra Tips:
For an even deeper flavor, consider using sun-dried tomatoes packed in oil and reserve a tablespoon of the oil to use in place of the olive oil.
This dish can also be customized by adding mushrooms or substituting the chicken with shrimp for a different protein option. If you prefer a spicier kick, consider adding a pinch of red pepper flakes to the sauce.
To save time, you can prepare the chicken and pasta ahead of time and store them in the refrigerator until you’re ready to assemble the dish.
Lemon Herb Chicken Skewers
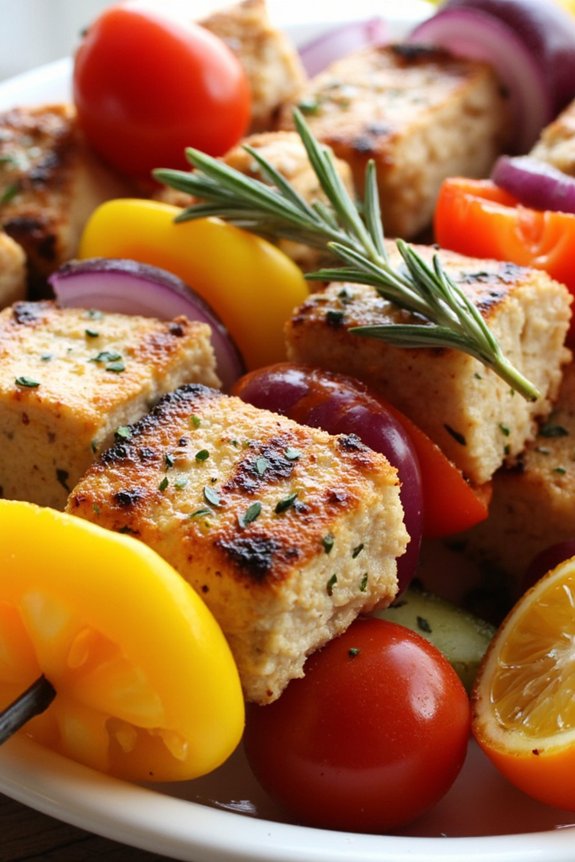
Lemon Herb Chicken Skewers are a delightful addition to any family dinner. They offer a fresh and zesty flavor, perfectly balanced by aromatic herbs, making them a crowd-pleaser for both adults and children. This dish isn’t only delicious but also visually appealing with its vibrant colors and enticing aroma.
Whether you’re hosting a weekend barbecue or simply looking for a quick and easy weekday meal, these skewers are bound to impress your family and friends.
The key to the perfect Lemon Herb Chicken Skewers lies in the marinade, which infuses the chicken with a burst of flavor. By allowing the chicken to soak in this mixture, each bite is tender and juicy, with a subtle hint of citrus and herbs.
Grilling the skewers adds a smoky char that enhances the overall taste, making it a truly delectable experience. This recipe serves 4-6 people, guaranteeing that there’s plenty to go around.
Ingredients:
- 2 lbs boneless, skinless chicken breasts
- 1/4 cup fresh lemon juice
- 2 tablespoons olive oil
- 3 cloves garlic, minced
- 1 tablespoon fresh thyme leaves
- 1 tablespoon fresh rosemary, chopped
- 1 teaspoon salt
- 1/2 teaspoon black pepper
- Zest of 1 lemon
- Wooden or metal skewers
Cooking Instructions:
- Prepare the Marinade: In a mixing bowl, combine the fresh lemon juice, olive oil, minced garlic, thyme leaves, chopped rosemary, salt, black pepper, and lemon zest. Whisk these ingredients together until well blended.
- Marinate the Chicken: Cut the chicken breasts into 1-inch cubes and place them in a resealable plastic bag or a shallow dish. Pour the marinade over the chicken, guaranteeing each piece is well coated. Seal the bag or cover the dish, and refrigerate for at least 1 hour, or up to 4 hours for maximum flavor.
- Soak the Skewers (if using wood): If you’re using wooden skewers, soak them in water for at least 30 minutes before grilling to prevent them from burning.
- Assemble the Skewers: Remove the chicken from the marinade and thread the pieces onto the skewers, leaving a little space between each piece for even cooking.
- Preheat the Grill: Preheat your grill to medium-high heat. If using a charcoal grill, guarantee the coals are evenly distributed and covered with white ash.
- Grill the Skewers: Place the skewers on the grill and cook for about 12-15 minutes, turning occasionally, until the chicken is cooked through and has grill marks. The internal temperature should reach 165°F (75°C).
- Serve: Once cooked, remove the skewers from the grill and let them rest for a few minutes before serving. This allows the juices to redistribute, resulting in juicier chicken.
Extra Tips: For even more flavor, consider adding some vegetables to the skewers, such as bell peppers, cherry tomatoes, or red onions. These can be threaded between the chicken pieces for added color and taste.
If you don’t have access to a grill, these skewers can also be cooked under a broiler in your oven. Just place them on a baking sheet and broil on high, turning occasionally, until cooked through. Always guarantee your chicken reaches the proper internal temperature to ensure food safety.
Baked Parmesan Crusted Chicken
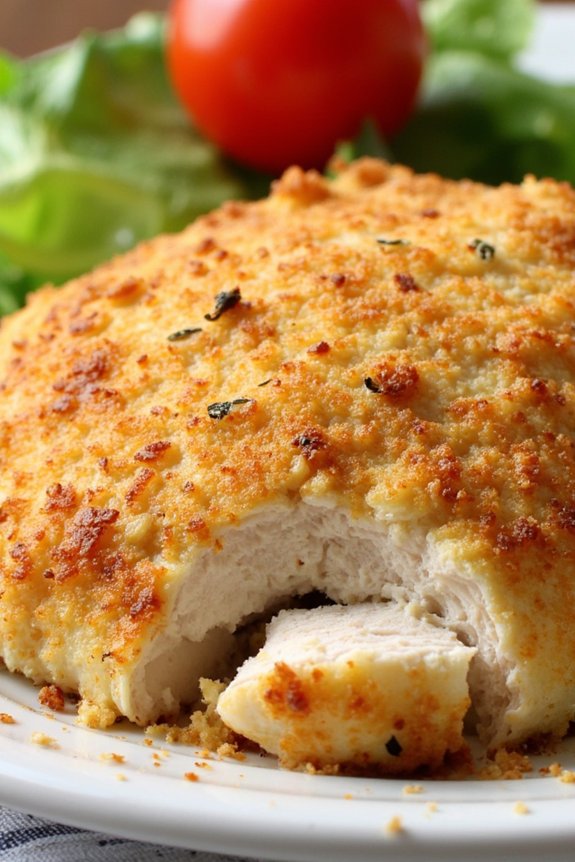
Baked Parmesan Crusted Chicken is a delectable dish that combines the savory flavors of Parmesan cheese with the tender juiciness of chicken. This recipe is perfect for a family dinner, offering a satisfying crunch with every bite while remaining a healthier alternative to fried chicken. The golden-brown crust and cheesy aroma make this dish a hit for both adults and kids.
With minimal preparation time and a straightforward cooking process, it’s an ideal choice for busy weeknights or a casual weekend meal. This dish pairs well with a variety of sides, such as roasted vegetables, mashed potatoes, or a fresh garden salad, making it versatile for various dietary preferences.
The combination of herbs, spices, and cheese not only enhances the flavor of the chicken but also provides a delightful textural contrast that elevates the meal. Whether you’re hosting a small gathering or simply enjoying an intimate family dinner, Baked Parmesan Crusted Chicken is sure to impress and satisfy.
Ingredients for 4-6 servings:
- 4 boneless, skinless chicken breasts
- 1 cup grated Parmesan cheese
- 1 cup panko breadcrumbs
- 1 teaspoon garlic powder
- 1 teaspoon paprika
- 1 teaspoon dried Italian herbs (such as oregano or basil)
- 2 large eggs
- Salt and pepper, to taste
- Cooking spray or olive oil
Cooking Instructions:
- Preheat the Oven: Start by preheating your oven to 400°F (200°C). Line a baking sheet with parchment paper or lightly grease it with cooking spray or olive oil to prevent the chicken from sticking.
- Prepare the Coating: In a shallow dish, combine the grated Parmesan cheese, panko breadcrumbs, garlic powder, paprika, dried Italian herbs, salt, and pepper. Mix well to evenly distribute the seasonings.
- Beat the Eggs: In another shallow dish, beat the eggs until they’re well-combined. This will act as the binding agent for the Parmesan crust.
- Coat the Chicken: Take each chicken breast and dip it into the beaten eggs, making sure it’s fully coated. Then, press the chicken into the Parmesan and breadcrumb mixture, pressing down firmly to guarantee the crust adheres well to the surface of the chicken.
- Arrange on Baking Sheet: Place the coated chicken breasts on the prepared baking sheet, ensuring they’re spaced apart for even cooking.
- Bake the Chicken: Put the baking sheet in the preheated oven and bake for 25-30 minutes, or until the chicken is cooked through and the crust is golden brown. Use a meat thermometer to verify the chicken reaches an internal temperature of 165°F (74°C).
- Rest and Serve: Once cooked, remove the chicken from the oven and let it rest for a few minutes. This will help the juices to redistribute, keeping the chicken moist. Serve hot with your choice of sides.
Extra Tips:
For an even crispier crust, you can toast the panko breadcrumbs in a skillet with a little olive oil before mixing them with the Parmesan cheese. This will give the coating an extra crunch and a deeper flavor.
If you prefer a spicier dish, consider adding a pinch of cayenne pepper to the breadcrumb mixture. Additionally, make certain the chicken breasts are of equal thickness for uniform cooking; you can pound them to an even thickness if needed.
Chicken and Broccoli Stir-Fry
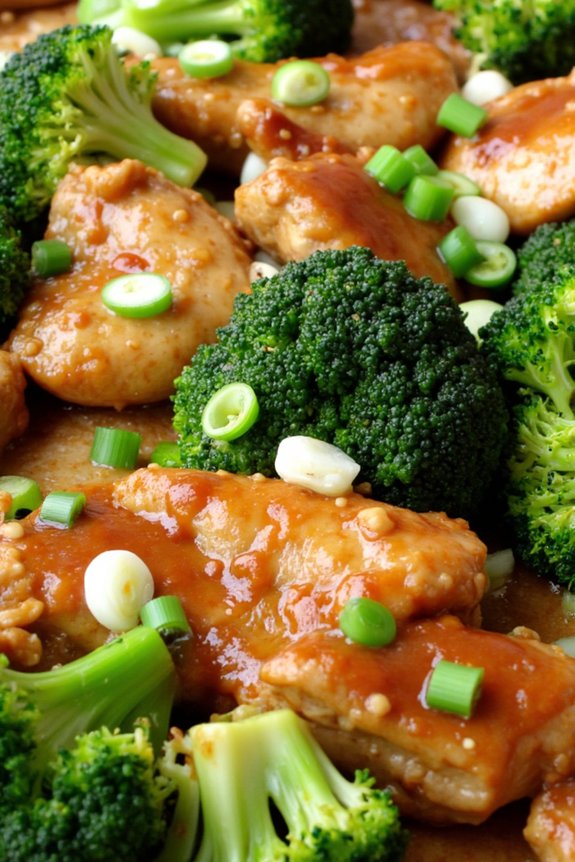
When it comes to family dinner recipes, Chicken and Broccoli Stir-Fry stands out as a quick, nutritious, and delicious option. This dish combines juicy chicken pieces with crisp, vibrant broccoli in a savory sauce, creating a perfect balance of flavors and textures that will delight your taste buds.
Ideal for busy weeknights, this recipe can be prepared in just under 30 minutes, guaranteeing you spend less time in the kitchen and more time enjoying a wholesome meal with your loved ones. This recipe serves 4-6 people and is versatile enough to be paired with steamed rice or noodles for a complete meal.
By using fresh ingredients and a simple cooking technique, this Chicken and Broccoli Stir-Fry offers a healthy alternative to takeout, without compromising on taste. Let’s explore the ingredients and steps needed to create this delectable dish.
Ingredients:
- 1 1/2 pounds boneless, skinless chicken breast, sliced into thin strips
- 4 cups broccoli florets
- 2 tablespoons vegetable oil
- 3 cloves garlic, minced
- 1 tablespoon fresh ginger, minced
- 1/4 cup soy sauce
- 2 tablespoons oyster sauce
- 1 tablespoon cornstarch
- 1 tablespoon water
- 1 tablespoon sesame oil
- 2 tablespoons green onions, sliced
- Salt and pepper to taste
Cooking Instructions:
- Prepare the Chicken and Broccoli: Begin by slicing the chicken breasts into thin strips and cutting the broccoli into bite-sized florets. This guarantees even cooking and makes the dish easier to eat.
- Make the Sauce: In a small bowl, mix together the soy sauce, oyster sauce, cornstarch, and water until smooth. This will be the flavorful sauce that coats the chicken and broccoli.
- Cook the Chicken: Heat 1 tablespoon of vegetable oil in a large pan or wok over medium-high heat. Add the chicken strips, seasoning them with salt and pepper. Stir-fry for about 5-7 minutes until they’re browned and cooked through. Remove the chicken from the pan and set aside.
- Stir-Fry the Broccoli: In the same pan, add the remaining tablespoon of vegetable oil. Add the minced garlic and ginger, cooking for about 30 seconds until fragrant. Add the broccoli florets and stir-fry for 3-4 minutes, until they become bright green and slightly tender.
- Combine and Sauce: Return the chicken to the pan with the broccoli. Pour the sauce over the chicken and broccoli, stirring well to coat everything evenly. Cook for an additional 2-3 minutes until the sauce thickens.
- Finish with Sesame Oil and Green Onions: Drizzle sesame oil over the stir-fry and sprinkle with sliced green onions. Toss everything together for a final time and serve hot.
Extra Tips:
For a more flavorful experience, marinate the chicken slices in a bit of soy sauce and cornstarch for about 15 minutes before cooking. This helps tenderize the chicken and adds an extra layer of flavor.
If you prefer a spicier dish, consider adding a pinch of red pepper flakes or a splash of chili oil. Finally, to retain the vibrant color and nutrition of the broccoli, be careful not to overcook it; the florets should remain crisp-tender. Enjoy your meal!
BBQ Chicken Stuffed Sweet Potatoes

BBQ Chicken Stuffed Sweet Potatoes are a delightful and hearty meal that combines the sweetness of baked sweet potatoes with the savory flavors of barbecued chicken. This dish is perfect for family dinners, offering a balanced and nutritious option that’s certain to satisfy everyone at the table.
The tender chicken mixed with BBQ sauce and topped with a sprinkle of cheese makes each bite irresistibly flavorful. Not only is this recipe delicious, but it’s also simple to make and requires minimal cleanup, making it an excellent choice for busy weeknights.
The combination of ingredients in this dish provides a rich blend of flavors and textures. The naturally sweet and creamy sweet potatoes serve as a perfect vessel for the smoky and tangy BBQ chicken filling.
Whether you’re looking for a quick weeknight dinner or a dish to impress your family, BBQ Chicken Stuffed Sweet Potatoes are certain to be a hit. This recipe is designed to serve 4-6 people, guaranteeing there’s plenty to go around for everyone.
Ingredients:
- 4-6 medium sweet potatoes
- 2 cups cooked, shredded chicken
- 1 cup BBQ sauce
- 1 cup shredded cheddar cheese
- 1/4 cup chopped green onions
- 2 tablespoons olive oil
- Salt and pepper to taste
Cooking Instructions:
- Preheat your oven to 400°F (200°C). While the oven is heating, wash the sweet potatoes thoroughly and prick them several times with a fork to allow steam to escape during baking.
- Place the sweet potatoes on a baking sheet. Rub each potato with a bit of olive oil and sprinkle with salt and pepper. Bake in the preheated oven for 45-60 minutes, or until they’re tender when pierced with a fork.
- While the sweet potatoes are baking, in a medium saucepan over medium heat, combine the shredded chicken and BBQ sauce. Stir well to make sure the chicken is thoroughly coated and heated through. Remove from heat once warmed.
- Once the sweet potatoes are done, remove them from the oven and let them cool slightly. Slice each potato lengthwise, being careful not to cut all the way through.
- Gently fluff the inside of each sweet potato with a fork to create space for the filling. Spoon the BBQ chicken mixture evenly into each sweet potato.
- Top each stuffed sweet potato with shredded cheddar cheese. Return them to the oven for an additional 5-10 minutes, or until the cheese is melted and bubbly.
- Remove from the oven and garnish with chopped green onions before serving.
Extra Tips:
For added flavor, consider incorporating a dash of smoked paprika or cayenne pepper into the BBQ chicken mixture to give it a bit of a spicy kick.
If you prefer a creamier filling, mix in a dollop of sour cream or Greek yogurt with the chicken before stuffing the potatoes. Leftover BBQ chicken can be stored in the fridge for up to 3 days and used for other meals.
Serve with a simple side salad or steamed vegetables to complete the meal.
Thai Coconut Curry Chicken
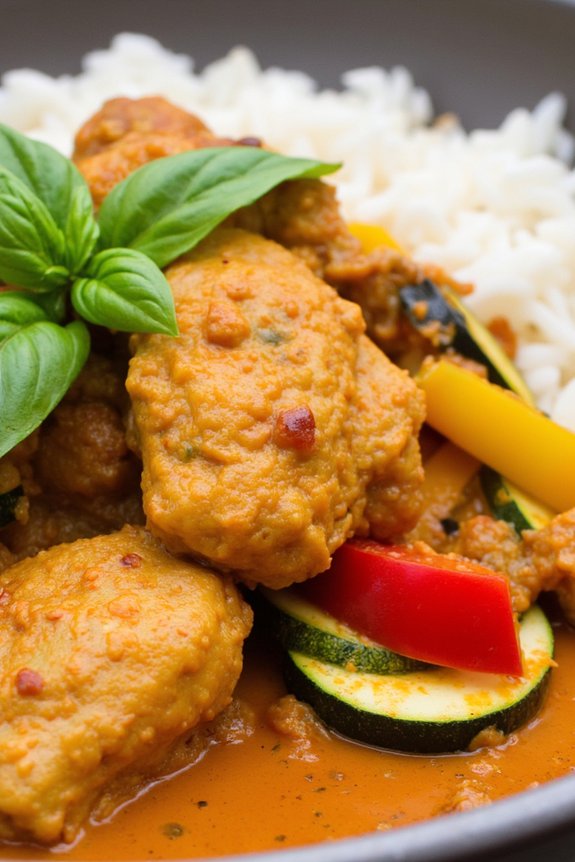
Thai Coconut Curry Chicken is a delightful and aromatic dish that combines tender chicken pieces with a rich, creamy coconut curry sauce infused with traditional Thai flavors. This dish is perfect for family dinners, offering a blend of spicy, sweet, and savory notes that will transport your taste buds to Southeast Asia.
It’s a versatile recipe that can be adjusted to suit various spice levels and is best served with jasmine rice or noodles to soak up the delicious sauce. The beauty of this dish lies in its simplicity and the use of fresh ingredients that come together to create a harmonious balance of flavors.
The coconut milk provides a creamy base, while the curry paste brings heat and depth. Fresh vegetables add a pop of color and nutrition, making this dish not only delicious but also wholesome. Perfect for a family of 4-6 people, this recipe will surely become a weeknight favorite.
Ingredients:
- 2 tablespoons vegetable oil
- 1 onion, sliced
- 3 cloves garlic, minced
- 1 tablespoon fresh ginger, grated
- 1-2 tablespoons red curry paste
- 1.5 pounds boneless, skinless chicken thighs, cut into bite-sized pieces
- 1 red bell pepper, sliced
- 1 yellow bell pepper, sliced
- 1 zucchini, sliced
- 1 can (14 oz) coconut milk
- 1 tablespoon fish sauce
- 1 tablespoon brown sugar
- Juice of 1 lime
- Salt to taste
- Fresh basil leaves for garnish
- Cooked jasmine rice or noodles for serving
Cooking Instructions:
- Prepare the Aromatics: Heat the vegetable oil in a large skillet or wok over medium heat. Add the sliced onion and sauté until translucent, about 3-4 minutes. Stir in the minced garlic and grated ginger, cooking for another minute until fragrant.
- Add the Curry Paste: Add the red curry paste to the skillet and mix it with the onions, garlic, and ginger. Cook for 1-2 minutes, allowing the paste to release its aromas.
- Cook the Chicken: Increase the heat to medium-high and add the chicken pieces to the skillet. Stir well to coat the chicken with the curry paste, and cook until the chicken is browned on all sides, about 5-7 minutes.
- Add Vegetables: Add the sliced bell peppers and zucchini to the skillet. Stir to combine and cook for another 3-4 minutes until the vegetables start to soften.
- Simmer the Curry: Pour in the coconut milk, fish sauce, and brown sugar. Stir well to combine all the ingredients. Bring the mixture to a gentle simmer and let it cook for 10-15 minutes, allowing the flavors to meld and the chicken to cook through.
- Finish with Lime and Seasoning: Squeeze the lime juice over the curry and season with salt to taste. Stir to combine, then remove from heat.
- Serve: Garnish the Thai Coconut Curry Chicken with fresh basil leaves and serve hot over jasmine rice or noodles.
Extra Tips:
To adjust the spice level, you can use more or less curry paste according to your preference. If you like a thicker curry, let it simmer for a bit longer to reduce the sauce.
For an extra rich taste, you can add a spoonful of peanut butter to the curry. Don’t skip the lime juice at the end, as it adds a revitalizing tang that balances the creamy coconut milk. If you have leftovers, this dish tastes even better the next day as the flavors continue to develop.
Chicken Fajita Quesadillas
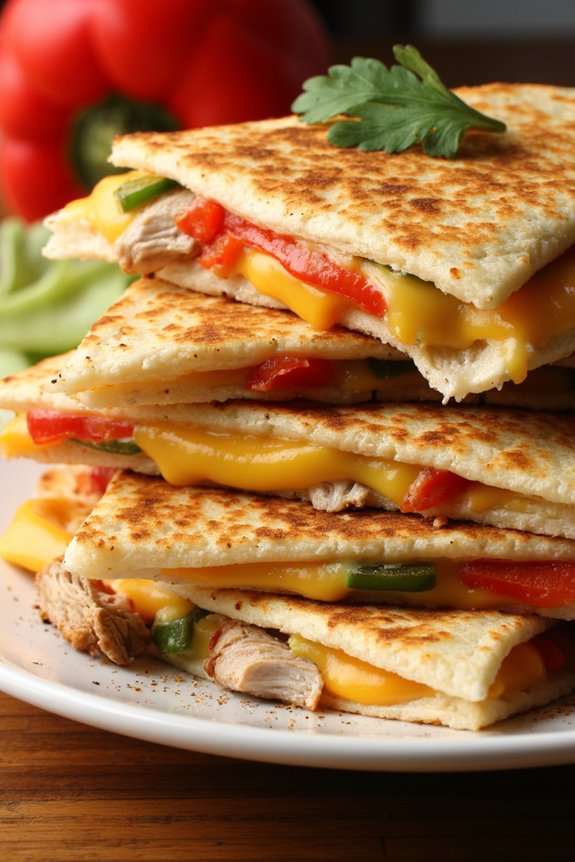
Chicken fajita quesadillas are a delightful fusion of two popular dishes that make for an exciting and satisfying family dinner. This recipe combines the smoky flavors of chicken fajitas with the cheesy goodness of quesadillas, resulting in a meal that’s both delicious and easy to prepare. The key to this dish is the vibrant mix of bell peppers, onions, and perfectly seasoned chicken, all sandwiched between crispy tortillas with melted cheese.
This recipe is perfect for serving 4-6 people, making it an ideal choice for family gatherings or a casual dinner with friends. Whether you’re looking to spice up your usual dinner routine or create a fun, interactive meal, these chicken fajita quesadillas are sure to be a hit. They’re versatile enough to customize with your favorite toppings and can be served with a variety of sides like salsa, sour cream, or guacamole.
Ingredients for 4-6 servings:
- 1 1/2 pounds boneless, skinless chicken breasts
- 1 red bell pepper
- 1 green bell pepper
- 1 yellow bell pepper
- 1 large onion
- 2 tablespoons olive oil
- 1 tablespoon fajita seasoning
- Salt and pepper to taste
- 8 large flour tortillas
- 2 cups shredded cheddar cheese
- 2 cups shredded Monterey Jack cheese
- Optional: salsa, sour cream, guacamole for serving
Cooking Instructions:
- Prepare the Chicken and Vegetables: Start by slicing the chicken breasts into thin strips. Similarly, slice the bell peppers and onion into thin strips. This guarantees even cooking and makes it easier to assemble the quesadillas later.
- Cook the Chicken: In a large skillet, heat 1 tablespoon of olive oil over medium-high heat. Add the chicken strips to the skillet and season with fajita seasoning, salt, and pepper. Cook the chicken for about 6-8 minutes, stirring occasionally, until it’s golden brown and cooked through. Remove the chicken from the skillet and set aside.
- Sauté the Vegetables: In the same skillet, add the remaining tablespoon of olive oil. Add the sliced bell peppers and onion to the skillet and sauté for about 5-7 minutes, until they’re tender and slightly charred. Remove the vegetables from the skillet and set aside.
- Assemble the Quesadillas: Take a flour tortilla and sprinkle a generous amount of cheddar and Monterey Jack cheese on one half. Add a portion of the cooked chicken and sautéed vegetables on top of the cheese. Fold the tortilla in half to create a half-moon shape.
- Cook the Quesadillas: Heat a clean, dry skillet over medium heat. Place the assembled quesadilla in the skillet and cook for about 2-3 minutes on each side, or until the tortilla is crispy and the cheese has melted. Repeat this process with the remaining tortillas.
- Serve: Once cooked, cut the quesadillas into wedges and serve them hot with optional sides like salsa, sour cream, and guacamole.
Extra Tips:
For extra flavor, consider marinating the chicken in the fajita seasoning and olive oil for an hour before cooking. This will enhance the taste and make the chicken even more tender.
Additionally, feel free to experiment with different types of cheese or add in other vegetables based on personal preference. If you like a bit of spice, consider adding some sliced jalapeños to the quesadillas for an extra kick.
Remember to keep a close eye on the quesadillas while cooking to prevent them from burning. Enjoy your meal with a revitalizing side salad or some tortilla chips for a complete dining experience!
Honey Mustard Baked Chicken
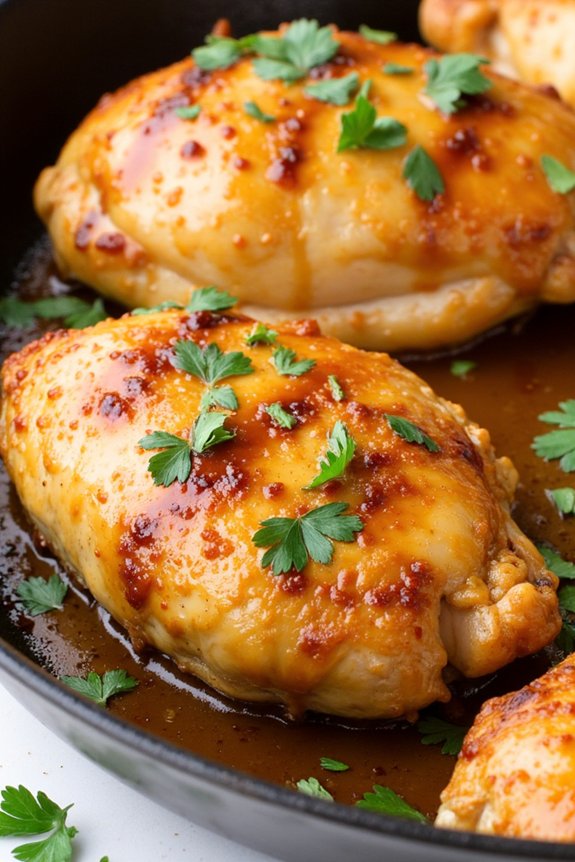
Honey Mustard Baked Chicken is a delightful and easy-to-prepare dish that’s perfect for a family dinner. This recipe combines the tangy sweetness of honey with the sharp and savory flavors of mustard, creating a delicious glaze that perfectly complements the tender chicken. The baking process guarantees that the chicken is cooked evenly, resulting in juicy and flavorful pieces that are sure to please everyone at the table.
This dish isn’t only tasty but also convenient, as it requires minimal preparation and cooks in under an hour. It’s a great option for busy weeknights or a special weekend meal. Serve it with your favorite side dishes like roasted vegetables or a fresh green salad to make it a complete and satisfying meal.
Ingredients for 4-6 servings:
- 4-6 chicken breasts or thighs
- 1/2 cup honey
- 1/4 cup Dijon mustard
- 1/4 cup whole grain mustard
- 2 tablespoons olive oil
- 2 tablespoons lemon juice
- 1 teaspoon garlic powder
- Salt and pepper to taste
- Fresh parsley, chopped (for garnish)
Cooking Instructions:
- Preheat the oven: Set your oven to 375°F (190°C) to warm up while you prepare the chicken.
- Prepare the baking dish: Lightly grease a baking dish with olive oil to prevent the chicken from sticking.
- Make the honey mustard sauce: In a medium bowl, whisk together the honey, Dijon mustard, whole grain mustard, olive oil, lemon juice, and garlic powder until smooth. Season with salt and pepper to taste.
- Arrange the chicken: Place the chicken breasts or thighs in the prepared baking dish in a single layer.
- Coat the chicken: Pour the honey mustard sauce over the chicken, making sure each piece is well covered. Use a spoon or brush to spread the sauce evenly.
- Bake the chicken: Place the dish in the preheated oven and bake for 25-30 minutes for breasts or 35-40 minutes for thighs, or until the chicken is cooked through and reaches an internal temperature of 165°F (74°C).
- Broil for a golden finish: If desired, switch to the broil setting for the last 2-3 minutes of cooking to give the chicken a nice golden-brown finish.
- Garnish and serve: Remove the dish from the oven and let it rest for a few minutes. Sprinkle with fresh parsley before serving.
Extra Tips:
For the best results, choose chicken pieces that are similar in size to guarantee even cooking. If you’re using bone-in chicken, you might need to increase the baking time slightly.
Feel free to adjust the mustard to honey ratio to suit your taste preference. If you like a bit of spice, consider adding a pinch of cayenne pepper to the sauce.
Leftovers can be stored in an airtight container in the refrigerator for up to three days and are delicious when reheated.
Chicken Alfredo Stuffed Shells

Chicken Alfredo Stuffed Shells is a delightful and comforting dish that combines the creamy richness of Alfredo sauce with the savory goodness of chicken, all nestled within tender pasta shells. This recipe is perfect for family dinners, providing a satisfying meal that both adults and kids will love. The stuffed shells are easy to make and can be prepared ahead of time, making them an ideal choice for busy weeknights or special occasions.
The dish features large pasta shells filled with a mixture of shredded chicken, ricotta cheese, and seasonings, all topped with a generous amount of creamy Alfredo sauce and melted mozzarella cheese. Baked to perfection, these stuffed shells offer a deliciously cheesy and savory experience in every bite. With a serving size suitable for 4-6 people, this recipe guarantees everyone at the table will be left satisfied and happy.
Ingredients (Serves 4-6):
- 1 box of jumbo pasta shells
- 2 cups cooked and shredded chicken breast
- 1 cup ricotta cheese
- 1 cup mozzarella cheese, shredded (plus extra for topping)
- 1/2 cup grated Parmesan cheese
- 2 cups Alfredo sauce (store-bought or homemade)
- 1 teaspoon garlic powder
- 1 teaspoon Italian seasoning
- Salt and pepper to taste
- Fresh parsley, chopped (for garnish)
Cooking Instructions:
- Prepare the Pasta Shells: Preheat your oven to 375°F (190°C). Cook the jumbo pasta shells according to the package instructions until al dente. Drain and set aside to cool slightly.
- Make the Filling: In a large mixing bowl, combine the shredded chicken, ricotta cheese, mozzarella cheese, Parmesan cheese, garlic powder, Italian seasoning, salt, and pepper. Mix until all ingredients are well combined.
- Stuff the Shells: Carefully fill each cooked pasta shell with the chicken and cheese mixture. Place the stuffed shells in a single layer in a baking dish.
- Add the Sauce: Pour the Alfredo sauce evenly over the stuffed shells, ensuring all shells are generously coated. Sprinkle additional mozzarella cheese on top for extra cheesiness.
- Bake the Dish: Cover the baking dish with aluminum foil and bake in the preheated oven for 25 minutes. Remove the foil and bake for an additional 10 minutes, or until the cheese is bubbly and golden brown on top.
- Garnish and Serve: Remove the dish from the oven and let it cool for a few minutes. Garnish with chopped fresh parsley before serving.
Extra Tips:
For an even richer flavor, consider adding a pinch of nutmeg to the Alfredo sauce. If you prefer a bit of heat, a dash of red pepper flakes can be mixed into the filling.
This dish can also be made ahead of time; simply prepare the stuffed shells and refrigerate them until ready to bake. When baking from cold, add an additional 5-10 minutes to the baking time to guarantee the dish is heated through.
Pair this meal with a simple green salad or garlic bread for a complete and satisfying family dinner.
Teriyaki Grilled Chicken Bowls
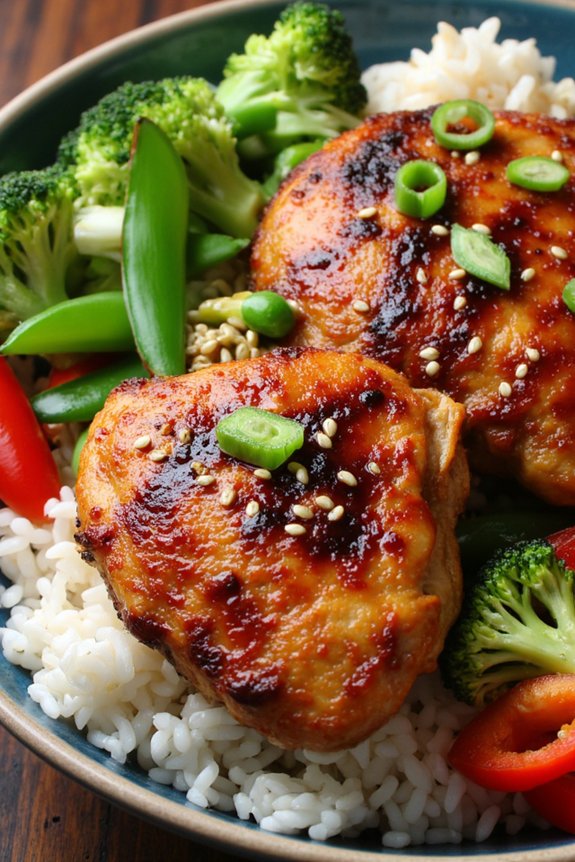
Teriyaki Grilled Chicken Bowls are a delicious and nutritious option for family dinners, combining the savory allure of teriyaki sauce with the wholesome goodness of grilled chicken and vegetables. This dish brings together a beautiful medley of flavors, textures, and colors, making it not only a treat for the taste buds but also a feast for the eyes.
Perfect for gatherings or a simple family meal, these bowls are sure to satisfy everyone at the table with their tantalizing aroma and mouthwatering taste.
Crafting this dish involves marinating juicy chicken thighs in a homemade teriyaki sauce, grilling them to perfection, and serving alongside a bed of fluffy rice and a vibrant assortment of vegetables. The result is a balanced meal that’s both hearty and healthy, ideal for feeding 4-6 people.
By following this recipe, you’ll have a delightful dish that can be customized to suit various preferences, whether you want to add a bit more spice or keep it mild for the kids.
Ingredients:
- 2 pounds boneless, skinless chicken thighs
- 1 cup teriyaki sauce
- 3 cups cooked white or brown rice
- 2 tablespoons sesame oil
- 1 red bell pepper, sliced
- 1 cup broccoli florets
- 1 cup snap peas
- 1 carrot, julienned
- 4 green onions, sliced
- 1 tablespoon sesame seeds
- Salt and pepper to taste
Cooking Instructions:
- Marinate the Chicken: In a large bowl, combine the chicken thighs with teriyaki sauce, ensuring all pieces are well coated. Cover and refrigerate for at least 30 minutes, or up to 4 hours for more intense flavor.
- Prepare the Vegetables: While the chicken is marinating, prepare the vegetables. Slice the red bell pepper, julienne the carrot, and cut the broccoli into florets. Set these aside for grilling.
- Cook the Rice: If you haven’t already, cook the rice according to package instructions. Fluff with a fork and keep warm.
- Grill the Chicken: Preheat your grill to medium-high heat. Remove the chicken from the marinade and place on the grill. Cook for about 6-7 minutes on each side, or until the chicken is cooked through and has a nice char. Remove from the grill and let rest for a few minutes before slicing.
- Grill the Vegetables: While the chicken rests, add sesame oil to a grill pan on medium heat. Add the sliced red bell pepper, broccoli florets, snap peas, and carrots. Season with salt and pepper, then grill for about 5-7 minutes until they’re slightly charred but still crisp.
- Assemble the Bowls: In each bowl, start with a base of cooked rice. Top with sliced grilled chicken and a generous portion of grilled vegetables. Garnish with sliced green onions and a sprinkle of sesame seeds.
Extra Tips:
For the best results, make sure to use fresh vegetables to retain their vibrant color and crisp texture. Feel free to substitute any of the vegetables with your favorites, like zucchini or mushrooms, for a personalized touch.
If you prefer a bit of heat, consider adding a pinch of red pepper flakes to the teriyaki sauce or as a final garnish. Finally, always allow the chicken to rest after grilling to keep it juicy and tender, ensuring each bite is as flavorful as possible.
Crispy Orange Chicken
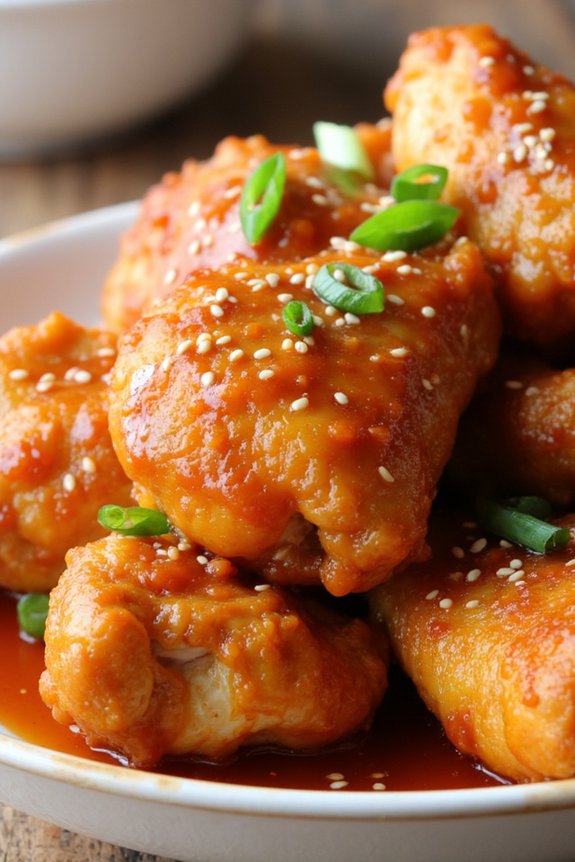
Crispy Orange Chicken is a delightful dish that combines the tangy sweetness of oranges with the savory crunch of perfectly fried chicken. This dish is perfect for family dinners, offering a tantalizing mix of flavors that’s bound to please both kids and adults alike.
The crispy coating of the chicken complements the sticky, citrus-infused sauce, making every bite a burst of deliciousness. Whether you’re a seasoned cook or a kitchen novice, this recipe is straightforward and can easily become a family favorite.
The key to this dish is balancing the sweetness of the orange with the savory notes of soy sauce and the heat from chili flakes. Preparing the chicken involves a simple frying technique to achieve that golden, crispy texture, while the orange sauce is quickly whipped up in a pan, making this a relatively easy meal to prepare on a busy weeknight.
Serve it over a bed of fluffy white rice or alongside steamed vegetables for a complete meal that’s as nutritious as it’s tasty.
Ingredients (Serves 4-6):
- 2 pounds of boneless, skinless chicken thighs or breasts
- 1 cup of cornstarch
- 2 eggs
- 1 cup of all-purpose flour
- Salt and pepper to taste
- 2 tablespoons of vegetable oil
- 1 cup of orange juice
- 1/2 cup of soy sauce
- 1/4 cup of rice vinegar
- 1/2 cup of sugar
- 1 tablespoon of orange zest
- 3 garlic cloves, minced
- 1 tablespoon of grated ginger
- 1 teaspoon of red pepper flakes
- 1 tablespoon of cornstarch mixed with 2 tablespoons of water (for slurry)
- Sesame seeds and chopped green onions for garnish
Cooking Instructions:
- Prepare the Chicken: Cut the chicken into bite-sized pieces. Season with salt and pepper. Set up a dredging station with one bowl of cornstarch, another with beaten eggs, and a third with flour. Dredge the chicken pieces first in cornstarch, then dip in egg, and finally coat with flour.
- Fry the Chicken: Heat vegetable oil in a large frying pan over medium-high heat. Fry the chicken in batches, making sure not to overcrowd the pan. Cook until golden brown and crispy, about 5-7 minutes per side. Remove the chicken and drain on paper towels.
- Make the Orange Sauce: In a separate saucepan, combine orange juice, soy sauce, rice vinegar, sugar, orange zest, minced garlic, and grated ginger. Bring to a simmer over medium heat. Add red pepper flakes for heat.
- Thicken the Sauce: Once the sauce is simmering, add the cornstarch slurry. Stir continuously until the sauce thickens, about 2-3 minutes.
- Combine Chicken and Sauce: Add the fried chicken pieces to the saucepan, stirring to coat each piece evenly with the sauce. Cook for 2-3 more minutes to let the chicken absorb the flavors.
- Garnish and Serve: Remove from heat and garnish with sesame seeds and chopped green onions. Serve hot over rice or with steamed vegetables.
Extra Tips:
For the best results, verify your oil is hot enough before frying the chicken; otherwise, it may absorb too much oil and become soggy.
If you prefer a thicker sauce, adjust the amount of cornstarch slurry to your liking. To enhance the flavor, consider marinating the chicken in soy sauce and orange juice for 30 minutes before dredging. This extra step can make the chicken even more tender and flavorful.
Finally, if you like more heat, increase the amount of red pepper flakes or add a splash of sriracha to the sauce.
Chicken Marsala With Mushrooms
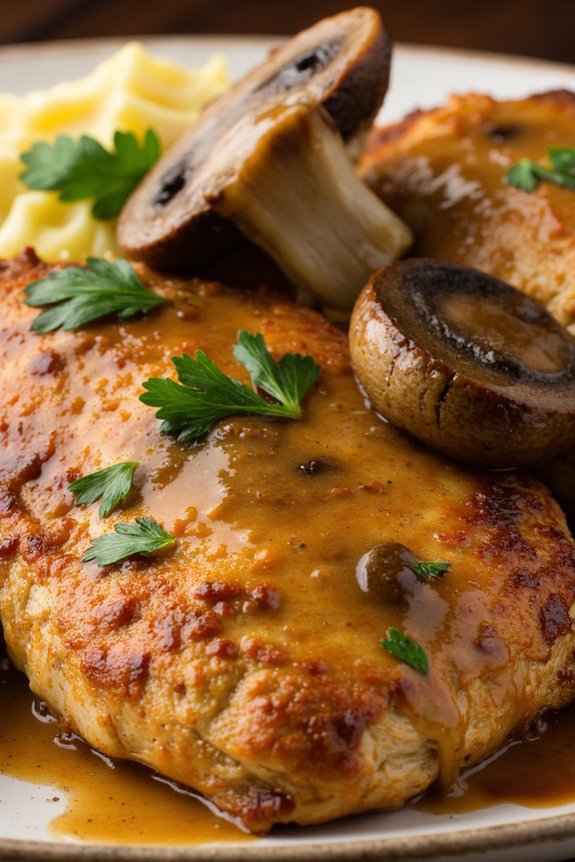
This recipe combines the earthiness of mushrooms with the sweetness of Marsala wine, offering a harmonious balance of flavors. The chicken is first dredged in flour and then pan-seared to a golden brown, creating a lovely crust that holds up well to the sauce. The mushrooms add depth and texture, while the Marsala wine infuses the dish with a distinctive, slightly sweet aroma. Serve it over pasta or alongside some crusty bread to soak up the delicious sauce.
Ingredients (Serves 4-6):
- 4 boneless, skinless chicken breasts
- Salt and pepper, to taste
- 1/2 cup all-purpose flour, for dredging
- 4 tablespoons olive oil
- 2 tablespoons butter
- 8 ounces button or cremini mushrooms, sliced
- 3/4 cup Marsala wine
- 3/4 cup chicken broth
- 1/4 cup heavy cream (optional)
- 2 tablespoons chopped parsley, for garnish
Cooking Instructions:
- Prepare the Chicken: Begin by seasoning the chicken breasts with salt and pepper on both sides. Dredge each chicken breast in the flour, shaking off any excess. This will help create a nice crust on the chicken when cooked.
- Cook the Chicken: In a large skillet, heat 2 tablespoons of olive oil over medium-high heat. Add the chicken breasts and cook for about 4-5 minutes on each side, or until golden brown and cooked through. Remove the chicken from the skillet and set aside.
- Sauté the Mushrooms: In the same skillet, add the remaining olive oil and butter. Once the butter has melted, add the sliced mushrooms. Cook the mushrooms for about 5-7 minutes, stirring occasionally, until they’re browned and have released their moisture.
- Make the Sauce: Pour the Marsala wine into the skillet with the mushrooms, scraping up any brown bits from the bottom of the pan. Allow the wine to simmer and reduce by half, about 3-4 minutes. Add the chicken broth and bring to a simmer.
- Finish the Dish: Return the chicken breasts to the skillet and spoon some sauce over them. Allow the chicken to simmer in the sauce for another 5 minutes. If you prefer a creamier sauce, stir in the heavy cream and let it heat through.
- Garnish and Serve: Remove the skillet from heat and sprinkle the chopped parsley over the chicken and mushrooms. Serve the Chicken Marsala with Mushrooms hot, with your choice of side.
Extra Tips:
When making Chicken Marsala, it’s important to use a good quality Marsala wine for the best flavor. Sweet Marsala will lend the dish a richer, more caramelized taste, while dry Marsala will give it a more savory profile.
If you’re looking to add a bit more texture, consider adding a handful of sliced onions or garlic to the mushrooms. Additionally, make sure not to overcrowd the skillet when cooking the chicken, as this will prevent it from browning properly.
With these tips in mind, you’ll be able to create a delicious and memorable Chicken Marsala With Mushrooms for your family dinner.
Buffalo Chicken Tacos
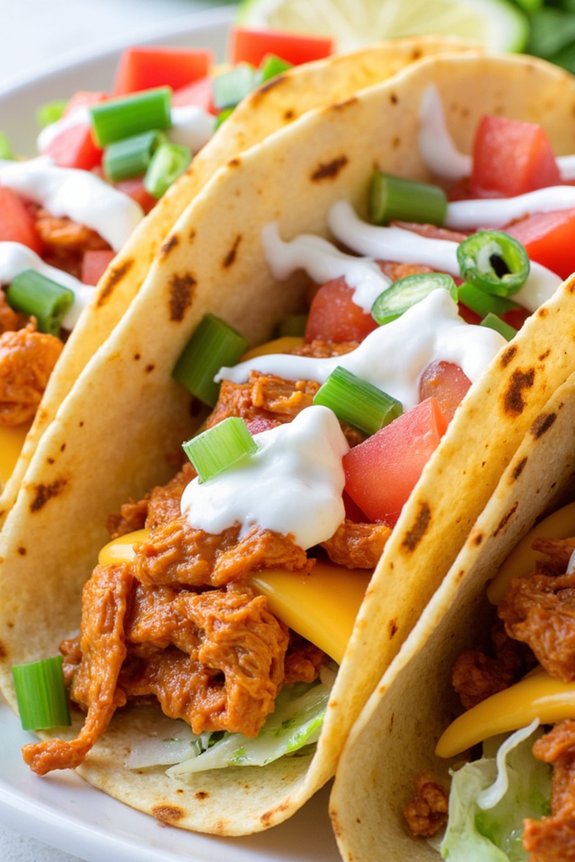
These Buffalo Chicken Tacos are a delightful twist on traditional tacos, offering a spicy kick that’s perfect for a family dinner. The recipe combines the zesty flavors of Buffalo chicken with the fresh, crisp toppings of a classic taco, creating a dish that’s both satisfying and easy to prepare.
Whether you’re a fan of spicy food or just looking to try something new, these tacos are sure to be a hit with everyone at the table.
The key to this dish is the perfectly cooked chicken, which is coated in a tangy Buffalo sauce that balances heat with a hint of sweetness. Paired with fresh toppings like lettuce, tomatoes, and a cooling ranch drizzle, these tacos provide a burst of flavor and texture in every bite.
Ideal for a serving size of 4-6 people, this recipe is perfect for family gatherings or a casual weeknight dinner.
Ingredients for 4-6 servings:
- 1.5 lbs boneless, skinless chicken breasts
- 1 cup Buffalo wing sauce
- 2 tablespoons olive oil
- 8-12 small flour or corn tortillas
- 1 cup shredded lettuce
- 1 cup diced tomatoes
- 1/2 cup shredded cheddar cheese
- 1/4 cup ranch dressing
- 1/4 cup chopped green onions
- Salt and pepper to taste
Cooking Instructions:
- Prepare the Chicken: Start by seasoning the chicken breasts with salt and pepper on both sides. Heat the olive oil in a large skillet over medium-high heat. Once the oil is hot, add the chicken breasts to the skillet.
- Cook the Chicken: Sear the chicken for about 5-6 minutes on each side, or until fully cooked through and no longer pink in the center. The internal temperature should reach 165°F (75°C). Remove the chicken from the skillet and let it rest for a few minutes.
- Shred the Chicken: Once the chicken has rested, use two forks to shred it into bite-sized pieces.
- Add Buffalo Sauce: Return the shredded chicken to the skillet over low heat and pour the Buffalo wing sauce over it. Stir to guarantee the chicken is evenly coated in the sauce. Let it simmer for about 5 minutes to absorb the flavors.
- Prepare Toppings: While the chicken simmers, prepare your taco toppings. Dice the tomatoes, shred the lettuce, and chop the green onions. Set these aside for assembling the tacos.
- Heat the Tortillas: Heat the tortillas in a dry skillet over medium heat for about 30 seconds on each side, or until they’re warm and slightly toasted.
- Assemble the Tacos: To assemble the tacos, place a portion of the Buffalo chicken on each tortilla. Top with shredded lettuce, diced tomatoes, cheddar cheese, and a drizzle of ranch dressing. Garnish with chopped green onions.
Extra Tips:
For a spicier version, consider adding sliced jalapeños or a dash of hot sauce on top of the tacos. If you prefer a milder flavor, use less Buffalo sauce or choose a mild version.
To save time, you can cook the chicken ahead of time and simply reheat it when ready to serve. Additionally, consider serving these tacos with a side of celery sticks or carrot sticks for a fun nod to classic Buffalo chicken wings.
Pineapple Chicken Fried Rice
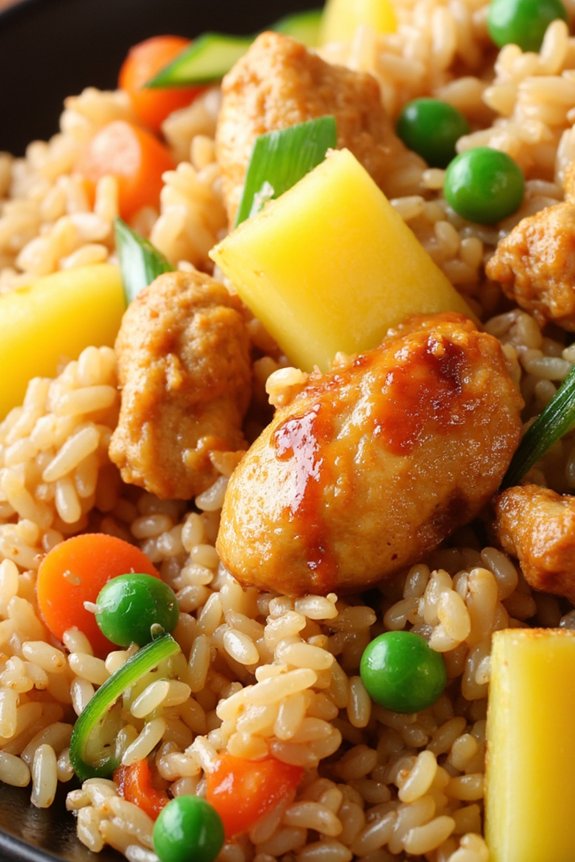
Pineapple Chicken Fried Rice is a delightful combination of savory and sweet flavors that’s sure to be a hit at your family dinner. This dish not only brings the comforting taste of fried rice to the table but also incorporates juicy pineapple and tender chicken, making it a well-rounded and satisfying meal.
The vibrant colors from the vegetables and pineapple chunks add a visual appeal, while the aroma of garlic, ginger, and soy sauce fills your kitchen with an inviting scent. This recipe is perfect for a serving size of 4-6 people, making it ideal for a family gathering or a casual dinner with friends.
The key to mastering this dish lies in preparing all your ingredients before you start cooking, as the process can be quite quick once you begin. Using day-old rice is highly recommended as it provides the best texture for fried rice, preventing it from becoming mushy during cooking.
Ingredients:
- 3 cups of cooked jasmine rice (preferably day-old)
- 1 pound of boneless, skinless chicken breast, diced
- 1 cup of pineapple chunks (fresh or canned)
- 1 cup of mixed vegetables (such as peas, carrots, and corn)
- 3 tablespoons of vegetable oil
- 2 tablespoons of soy sauce
- 2 cloves of garlic, minced
- 1 tablespoon of ginger, grated
- 2 eggs, beaten
- 3 green onions, sliced
- Salt and pepper to taste
Cooking Instructions:
- Prepare the Ingredients: Begin by dicing the chicken breast into bite-sized pieces and chopping the vegetables and pineapple chunks. Make certain the rice is cooked and has cooled down, ideally for at least a few hours or overnight.
- Cook the Chicken: Heat 1 tablespoon of vegetable oil in a large skillet or wok over medium-high heat. Add the diced chicken and cook until browned and fully cooked, about 5-7 minutes. Remove the chicken from the skillet and set it aside.
- Scramble the Eggs: In the same skillet, add another tablespoon of oil. Pour in the beaten eggs and scramble them until fully cooked, breaking them into small pieces with your spatula. Remove the eggs from the skillet and set them aside with the chicken.
- Sauté Aromatics and Vegetables: Add the remaining tablespoon of oil to the skillet. Add the minced garlic and grated ginger, sautéing for about 30 seconds until fragrant. Add the mixed vegetables and cook for 2-3 minutes until they’re tender-crisp.
- Combine Ingredients: Return the cooked chicken and scrambled eggs to the skillet. Add the pineapple chunks and cooked rice, stirring to combine all ingredients thoroughly.
- Season the Rice: Pour the soy sauce over the rice mixture, stirring well to ascertain even distribution. Season with salt and pepper to taste.
- Finish with Green Onions: Add the sliced green onions and give one final stir. Cook for another minute to heat through and combine flavors.
- Serve: Remove from heat and serve immediately, garnishing with additional green onions if desired.
Extra Tips:
To guarantee that your Pineapple Chicken Fried Rice is full of flavor, make sure to use high heat when stir-frying. This will help to achieve that slightly smoky taste characteristic of great fried rice.
If you prefer a spicier dish, consider adding a dash of chili flakes or a teaspoon of your favorite hot sauce. Additionally, feel free to customize the vegetables based on what you have on hand or your family’s preferences.
Using a non-stick skillet or wok can help prevent the rice from sticking and makes cleaning up much easier. Enjoy your flavorful, homemade fried rice!