

Planning family dinners can be tricky when you have picky eaters at home. But don’t worry, I’ve got you covered with some fun and healthy dinner ideas that will make everyone happy. Think about hosting a DIY sushi night or setting up a colorful taco bar where each family member can create their own meal. You can also try mini veggie-packed pizzas or a breakfast-for-dinner omelette bar for a fun twist. Ready to explore more ways to make dinner a hit with the whole family?
Veggie-Packed Mini Pizzas

Veggie-packed mini pizzas are a delightful and nutritious way to satisfy even the pickiest eaters in your family. These bite-sized pizzas are perfect for a family dinner, as they allow everyone to personalize their toppings while guaranteeing a healthy intake of vegetables.
By using whole-grain pita bread as a base, you not only make the preparation quick and easy, but also add a good dose of fiber and nutrients to the meal. This recipe is versatile, allowing you to sneak in veggies like bell peppers, zucchini, and spinach, which blend seamlessly with the classic flavors of pizza.
Perfect for a serving size of 4-6 people, this dish brings everyone together to enjoy their personalized creations. Whether it’s a weeknight dinner or a weekend cooking activity with the kids, these veggie-packed mini pizzas are sure to become a family favorite.
The recipe is simple, and the ingredients are easy to find, making it an ideal choice for a busy family’s menu. Let’s explore the ingredients and steps needed to create these delicious mini pizzas.
Ingredients (serving size: 4-6 people):
- 6 whole-grain pita breads
- 1 cup pizza sauce
- 2 cups shredded mozzarella cheese
- 1 cup bell peppers, chopped (red, green, or yellow)
- 1 cup zucchini, sliced
- 1 cup mushrooms, sliced
- 1 cup baby spinach leaves
- 1 teaspoon dried oregano
- 1 teaspoon garlic powder
- Olive oil spray
Instructions:
- Preheat the Oven: Start by preheating your oven to 400°F (200°C). This guarantees that the mini pizzas cook evenly and the cheese melts perfectly.
- Prepare the Pita Bases: Place the whole-grain pita breads on two large baking sheets. Lightly spray each pita with olive oil to help the edges crisp up in the oven.
- Spread the Sauce: Evenly distribute the pizza sauce onto each pita, using the back of a spoon to spread it out, leaving a small border around the edges.
- Add the Cheese and Veggies: Sprinkle a generous layer of mozzarella cheese over the sauce, then top with your selection of chopped bell peppers, zucchini slices, mushrooms, and baby spinach leaves. Make sure the toppings are evenly spread for consistent cooking.
- Season: Sprinkle the pizzas with dried oregano and garlic powder to enhance the flavors of the veggies and cheese.
- Bake: Place the baking sheets in the preheated oven and bake for 12-15 minutes, or until the cheese is melted and bubbly, and the edges of the pita are golden brown.
- Serve: Remove from oven and allow to cool slightly before slicing each pita into quarters. Serve warm and enjoy your veggie-packed mini pizzas with family.
Extra Tips:
When preparing the veggies, try to slice them uniformly to guarantee even cooking. If your family prefers a little kick, consider adding some red pepper flakes or a sprinkle of black pepper for extra flavor.
Feel free to experiment with different vegetable combinations based on what you have on hand, or let the kids choose their favorites to make the meal more interactive and fun. Additionally, if you want to make the pizzas even more filling, consider adding some lean protein like grilled chicken or turkey pepperoni.
Sneaky Cauliflower Mac and Cheese

Mac and cheese is a classic comfort food that’s a favorite in many households. However, it can be challenging to get picky eaters, especially children, to consume their daily dose of vegetables. This Sneaky Cauliflower Mac and Cheese creatively incorporates cauliflower into the cheesy goodness without compromising on flavor or texture. The creamy sauce made with cauliflower and cheese is so deliciously smooth and cheesy that even the pickiest of eaters won’t suspect they’re actually getting a healthy serving of vegetables with their meal.
This recipe is perfect for families looking for nutritious dinner options that everyone will enjoy. It serves 4-6 people, making it ideal for a family dinner or for leftovers the next day. The subtle addition of cauliflower not only enhances the nutritional value of the dish but also adds a delightful creaminess to the cheese sauce. Follow the instructions below to create a meal that’s both satisfying and secretly healthy.
Ingredients:
- 1 medium head of cauliflower
- 16 oz elbow macaroni
- 2 cups shredded cheddar cheese
- 1/2 cup grated parmesan cheese
- 2 cups milk
- 2 tablespoons butter
- 2 tablespoons all-purpose flour
- 1 teaspoon mustard powder
- Salt and pepper to taste
- 1/2 teaspoon garlic powder
- 1/2 teaspoon onion powder
- Optional: 1/4 cup bread crumbs for topping
Cooking Instructions:
- Prepare the Cauliflower: Cut the cauliflower into florets and steam them until tender, about 10 minutes. Once cooked, transfer the cauliflower to a blender or food processor and puree until smooth. Set aside.
- Cook the Macaroni: In a large pot, bring salted water to a boil. Add the elbow macaroni and cook according to package instructions until al dente. Drain and set aside.
- Make the Cheese Sauce: In a large saucepan over medium heat, melt the butter. Stir in the flour and cook for about 1 minute to create a roux. Gradually whisk in the milk and continue stirring until the mixture thickens, about 3-4 minutes.
- Incorporate Cauliflower: Add the pureed cauliflower to the sauce and stir well to combine. Season with mustard powder, garlic powder, onion powder, salt, and pepper.
- Add Cheese: Stir in the cheddar and parmesan cheeses, mixing until completely melted and the sauce is smooth.
- Combine with Macaroni: Add the cooked macaroni to the cheese sauce, stirring until the pasta is thoroughly coated. Taste and adjust seasonings if necessary.
- Optional Topping: If desired, sprinkle bread crumbs over the top for a crispy texture. Place under the broiler for 2-3 minutes until golden brown and bubbly.
- Serve: Serve immediately while hot, and enjoy the creamy, cheesy goodness with its hidden veggies.
Extra Tips:
For an even creamier texture, consider adding a splash of heavy cream to the sauce before mixing in the cheese. You can also experiment with different types of cheese, like gouda or mozzarella, for a unique flavor profile.
If you’re looking to save time, frozen cauliflower rice can be used as an alternative to fresh cauliflower—just make sure it’s well-drained before pureeing. For an added boost of nutrition, toss in some finely chopped spinach or kale into the sauce, as these greens will blend seamlessly with the flavors.
Colorful Rainbow Veggie Tacos

Tacos are a fantastic way to sneak in a variety of vegetables for picky eaters, and our Colorful Rainbow Veggie Tacos are no exception. This dish isn’t only visually appealing but also packed with flavors and nutrients. By incorporating a spectrum of colorful vegetables, you can make a meal that’s both fun and healthy, enticing even the fussiest of eaters in your family.
These tacos are perfect for a family dinner, offering a multitude of textures and tastes that will have everyone coming back for seconds.
Our Colorful Rainbow Veggie Tacos are designed to serve 4-6 people, making them an ideal choice for a family meal. The preparation involves fresh vegetables, savory seasonings, and a delightful mix of toppings to customize each taco to one’s liking. Serve these vibrant tacos with your favorite salsa or guacamole for an extra burst of flavor.
Whether you’re catering to dietary restrictions or simply looking for a meatless option, this recipe provides a delicious and satisfying solution for the entire family.
Ingredients (Serves 4-6):
- 8-10 corn or flour taco shells
- 1 tablespoon olive oil
- 1 red bell pepper, sliced
- 1 yellow bell pepper, sliced
- 1 green bell pepper, sliced
- 1 cup cherry tomatoes, halved
- 1 medium red onion, sliced
- 1 zucchini, diced
- 1 cup canned black beans, drained and rinsed
- 1 teaspoon ground cumin
- 1 teaspoon chili powder
- Salt and pepper to taste
- 1 cup shredded lettuce
- 1 cup shredded cheddar cheese or vegan cheese
- 1/2 cup fresh cilantro, chopped
- 1 lime, cut into wedges
- Optional: salsa and guacamole for serving
Cooking Instructions:
- Prepare the Vegetables: Start by washing all the vegetables thoroughly. Slice the red, yellow, and green bell peppers into thin strips. Slice the red onion and halve the cherry tomatoes. Dice the zucchini into small cubes.
- Cook the Veggies: Heat the olive oil in a large skillet over medium heat. Add the sliced bell peppers and red onion to the skillet and sauté for 5 minutes, stirring occasionally, until they begin to soften.
- Add Remaining Ingredients: Add the cherry tomatoes, diced zucchini, and black beans to the skillet. Sprinkle with cumin, chili powder, salt, and pepper. Stir well to combine all the ingredients, and cook for an additional 5-7 minutes until the vegetables are tender and the flavors are well mixed.
- Warm the Taco Shells: While the veggies are cooking, warm the taco shells according to the package instructions. This could be done in the oven or on a stovetop for a few minutes until they’re hot and slightly crispy.
- Assemble the Tacos: Once the veggies are cooked, it’s time to assemble the tacos. Start by placing a layer of shredded lettuce on the base of each taco shell. Spoon the cooked vegetable mixture on top, then sprinkle with shredded cheese.
- Garnish and Serve: Top each taco with fresh cilantro and a squeeze of lime juice. Serve immediately with optional salsa and guacamole on the side.
Extra Tips: To make these tacos even more appealing to picky eaters, consider setting up a taco bar where family members can assemble their own tacos with their preferred toppings. This not only makes the meal interactive but also allows everyone to choose what they like best.
If you have any leftovers, the vegetable mixture can be stored in an airtight container in the fridge for up to 3 days, making for easy and quick taco nights later in the week. For added protein, you can also include grilled chicken or tofu alongside the veggies.
Crispy Baked Chicken Tenders

Crispy Baked Chicken Tenders are a delicious and healthy alternative to fried chicken that even the pickiest eaters in your family will love. These tenders are coated in a crunchy, flavorful breadcrumb mixture and baked to perfection, making them a guilt-free meal option.
Using the oven instead of frying guarantees that the chicken remains juicy on the inside while achieving a satisfying crispy exterior. Plus, this dish is quick to prepare and can be served with a variety of dipping sauces to please everyone’s palate.
Perfect for a family dinner, this recipe serves 4-6 people and can be paired with your choice of sides, such as a fresh salad, roasted vegetables, or homemade sweet potato fries. The key to these chicken tenders is the combination of spices and herbs that give them a burst of flavor without overwhelming the natural taste of the chicken.
Whether you’re preparing a weeknight meal or a casual family get-together, these Crispy Baked Chicken Tenders are sure to become a household favorite.
Ingredients:
- 2 pounds of boneless, skinless chicken breasts
- 1 cup all-purpose flour
- 3 large eggs
- 1 tablespoon water
- 2 cups panko breadcrumbs
- 1 teaspoon garlic powder
- 1 teaspoon onion powder
- 1 teaspoon paprika
- 1 teaspoon salt
- 1/2 teaspoon black pepper
- Cooking spray
Cooking Instructions:
- Preheat the Oven: Start by preheating your oven to 400°F (200°C). This guarantees that the chicken tenders will cook evenly and develop a crispy crust.
- Prepare the Chicken: Slice the chicken breasts into strips, roughly 1 inch wide, to create tender-sized pieces. Pat them dry with paper towels to remove any excess moisture.
- Set Up Dredging Station: In three separate shallow dishes, place the flour in the first dish, beat the eggs with water in the second dish, and combine the panko breadcrumbs with garlic powder, onion powder, paprika, salt, and black pepper in the third dish.
- Coat the Chicken: Dredge each chicken strip in the flour, ensuring it’s fully coated. Shake off any excess flour, then dip it into the egg mixture, and finally press it into the breadcrumb mixture, making sure it’s well coated on all sides.
- Prepare the Baking Sheet: Line a baking sheet with parchment paper or lightly grease it with cooking spray. Arrange the coated chicken tenders on the baking sheet, spacing them out to guarantee even cooking.
- Bake the Chicken: Lightly spray the tops of the chicken tenders with cooking spray to help them crisp up. Bake in the preheated oven for 15-20 minutes, flipping halfway through, until the chicken is cooked through and the coating is golden brown and crispy.
- Serve: Once baked, let the chicken tenders rest for a few minutes before serving. This helps the coating to set and makes them easier to handle.
Extra Tips: For even crispier tenders, consider toasting the panko breadcrumbs lightly in a dry skillet before using them in the coating. This adds an extra layer of crunch.
Additionally, if you prefer a spicier kick, add a pinch of cayenne pepper to the breadcrumb mixture. These chicken tenders can also be made ahead of time and stored in the refrigerator for up to 2 days; simply reheat them in the oven before serving to maintain their crispy texture.
Zucchini Noodle Spaghetti
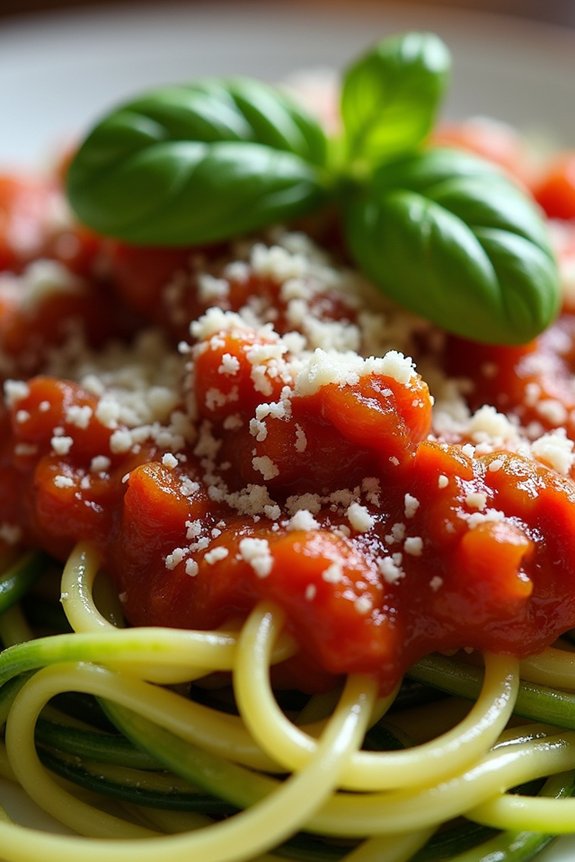
Zucchini Noodle Spaghetti is a delightful twist on the classic pasta dish that’s perfect for families with picky eaters. By substituting traditional spaghetti with zucchini noodles, you offer a low-carb, nutritious alternative that doesn’t skimp on flavor. This dish is an excellent way to sneak more veggies into your family’s diet without sacrificing the beloved taste of spaghetti.
Plus, the vibrant colors and fresh ingredients make it visually appealing, which can help encourage even the fussiest eaters to try something new. This recipe is designed for a serving size of 4-6 people, making it ideal for family dinners or small gatherings.
The zucchini noodles blend seamlessly with a savory tomato-based sauce, enriched with fresh herbs and a hint of garlic. Topped with Parmesan cheese, this dish is a wholesome meal that satisfies both children and adults alike. Whether you’re looking to introduce more vegetables into your meals or simply want to try a lighter version of a classic, Zucchini Noodle Spaghetti is a must-try.
Ingredients for 4-6 people:
- 4 medium zucchinis
- 2 tablespoons olive oil
- 1 onion, finely chopped
- 3 garlic cloves, minced
- 1 can (28 ounces) crushed tomatoes
- 1 tablespoon tomato paste
- 1 teaspoon dried oregano
- 1 teaspoon dried basil
- Salt and pepper to taste
- 1/4 cup grated Parmesan cheese
- Fresh basil leaves for garnish (optional)
Cooking Instructions:
- Prepare the Zucchini Noodles: Using a spiralizer, cut the zucchinis into noodle-like strands. If you don’t have a spiralizer, you can use a vegetable peeler to create long, thin strips. Set aside.
- Cook the Sauce: In a large skillet, heat the olive oil over medium heat. Add the chopped onion and cook until translucent, about 5 minutes. Add the minced garlic and sauté for an additional minute until fragrant.
- Add Tomatoes and Herbs: Stir in the crushed tomatoes, tomato paste, dried oregano, and dried basil. Season with salt and pepper. Bring the sauce to a simmer and let it cook for 15-20 minutes, stirring occasionally, until it thickens slightly.
- Cook the Zucchini Noodles: In a separate large pan, heat a little olive oil over medium heat. Add the zucchini noodles and sauté for 3-5 minutes until they’re tender but still al dente. Be careful not to overcook, as they can become mushy.
- Combine and Serve: Pour the sauce over the cooked zucchini noodles and gently toss to combine. Serve immediately, topped with grated Parmesan cheese and fresh basil leaves if desired.
Extra Tips:
For an extra burst of flavor, consider adding a pinch of red pepper flakes to the sauce for a bit of heat. If you prefer a heartier meal, you can add cooked ground beef or turkey to the sauce.
Make sure the zucchini noodles are drained well after cooking to avoid excess water in your dish. Additionally, you can prepare the sauce ahead of time and simply cook the zucchini noodles when you’re ready to serve, making it a convenient option for busy weeknights.
Sweet Potato and Black Bean Quesadillas

Sweet Potato and Black Bean Quesadillas are a delightful and nutritious meal option that’s perfect for families, especially those with picky eaters. This dish combines the sweetness of roasted sweet potatoes with the earthy flavor of black beans, all wrapped up in a crispy tortilla. It’s a great way to introduce more vegetables into your family’s diet while still keeping the meal fun and flavorful.
With its vibrant colors and cheesy goodness, this quesadilla is sure to please even the fussiest of eaters. This recipe isn’t only easy to prepare but also quite versatile. You can adjust the spices to suit your family’s taste, or even add in some extra veggies if you like. The quesadillas can be served as a main dish or as a hearty appetizer.
They’re perfect for a quick weeknight dinner or a weekend lunch. Plus, they make excellent leftovers and can easily be reheated for a tasty snack. Let’s explore the ingredients and steps needed to create this delicious meal for 4-6 people.
Ingredients:
- 2 large sweet potatoes
- 1 can (15 oz) black beans, drained and rinsed
- 1 cup shredded cheddar cheese
- 1/2 cup chopped fresh cilantro
- 1 teaspoon ground cumin
- 1 teaspoon smoked paprika
- 1/2 teaspoon garlic powder
- 1/2 teaspoon onion powder
- Salt and pepper, to taste
- 8 large flour tortillas
- Olive oil or cooking spray
Instructions:
- Preheat the Oven: Start by preheating your oven to 400°F (200°C). This will be used to roast the sweet potatoes.
- Prepare the Sweet Potatoes: Peel the sweet potatoes and cut them into small cubes. Spread the cubes on a baking sheet, drizzle with olive oil, and season with salt and pepper. Roast in the preheated oven for about 20-25 minutes, or until they’re tender and slightly caramelized. Stir halfway through cooking to guarantee even roasting.
- Prepare the Filling: In a large bowl, combine the roasted sweet potatoes, black beans, cheddar cheese, cilantro, cumin, smoked paprika, garlic powder, and onion powder. Mix well until all the ingredients are evenly distributed.
- Assemble the Quesadillas: Lay out a tortilla and spread about 1/2 cup of the sweet potato and black bean mixture on one half of the tortilla. Fold the tortilla over to enclose the filling. Repeat this process with the remaining tortillas and filling.
- Cook the Quesadillas: Heat a large skillet over medium heat and lightly coat with olive oil or cooking spray. Place a quesadilla in the skillet and cook for about 3-4 minutes on each side, or until the tortilla is golden brown and the cheese has melted. Repeat with the remaining quesadillas.
- Serve: Once cooked, transfer the quesadillas to a cutting board and let them cool for a minute before slicing them into wedges. Serve warm with your choice of salsa, sour cream, or guacamole.
Extra Tips:
To make this dish even more appealing to picky eaters, consider serving the quesadillas with a variety of dipping sauces or toppings, such as sour cream, guacamole, or a mild salsa.
If you’re looking to add more veggies, finely chopped bell peppers or corn can be mixed into the filling. For those who enjoy a bit of spice, a dash of hot sauce or chopped jalapeños can add a nice kick. Quesadillas can also be prepared ahead of time and stored in the refrigerator; simply reheat them in a skillet before serving for a quick meal.
Hidden-Veggie Meatballs

Providing a nutritious and appealing meal for picky eaters can be a challenge, but these Hidden-Veggie Meatballs are a perfect solution. Packed with flavor and secretly filled with vegetables, these meatballs are an excellent way to introduce more nutrients into your family’s diet without sacrificing taste.
The beauty of this dish lies in its ability to hide the veggies in a way that even the most discerning child won’t notice. By blending vegetables into the meatball mixture, you create a wholesome dinner that’s both satisfying and secretly nutritious.
These meatballs are versatile and can be served with a variety of sides, such as pasta, rice, or mashed potatoes, making them a perfect addition to any family dinner. They’re also quick to prepare, making them ideal for busy weeknights.
By using familiar flavors and textures, this recipe helps in gradually acclimating picky eaters to enjoying vegetables. Whether you’re looking to sneak in some extra nutrition or simply want to try a new twist on classic meatballs, these Hidden-Veggie Meatballs are sure to become a family favorite.
Ingredients for 4-6 servings:
- 1 pound ground beef or turkey
- 1 cup finely grated zucchini
- 1/2 cup finely grated carrots
- 1/2 cup finely chopped spinach
- 1/2 cup breadcrumbs
- 1/4 cup grated Parmesan cheese
- 1 egg
- 2 cloves garlic, minced
- 1 teaspoon onion powder
- 1 teaspoon dried Italian herbs
- Salt and pepper to taste
- 1 tablespoon olive oil
- 1 jar (24 oz) of marinara sauce
Instructions:
- Prepare the Vegetables: Begin by grating the zucchini and carrots and finely chopping the spinach. Guarantee they’re finely processed so they blend seamlessly into the meat mixture.
- Combine Ingredients: In a large bowl, mix the ground beef or turkey with the grated zucchini, carrots, chopped spinach, breadcrumbs, Parmesan cheese, egg, garlic, onion powder, Italian herbs, and a dash of salt and pepper. Use your hands to combine thoroughly until the mixture is well incorporated.
- Form Meatballs: Shape the mixture into 1-inch meatballs, aiming for uniform size to guarantee even cooking.
- Brown the Meatballs: Heat the olive oil in a large skillet over medium heat. Once hot, add the meatballs in batches, being careful not to overcrowd the pan. Cook for about 5 minutes, turning occasionally, until they’re browned on all sides.
- Simmer in Sauce: Once all the meatballs are browned, return them to the skillet and pour the marinara sauce over them. Bring the sauce to a gentle simmer, then cover and let cook for an additional 15-20 minutes, or until the meatballs are cooked through.
- Serve: Serve the meatballs hot, with your choice of pasta, rice, or mashed potatoes, and garnish with extra Parmesan cheese if desired.
Extra Tips:
When preparing the veggies, make sure they’re finely grated or chopped to guarantee they blend seamlessly into the meatball mixture. This not only helps to hide them from picky eaters but also guarantees the meatballs hold together better.
If your mixture seems too wet, add a bit more breadcrumbs to firm it up. For an extra flavor boost, consider adding a splash of Worcestershire sauce to the meat mixture. Feel free to experiment by adding different vegetables or spices to suit your family’s taste preferences.
Cheesy Broccoli and Rice Casserole

If you’re seeking a family dinner that pleases even the pickiest of eaters, search no more than this Cheesy Broccoli and Rice Casserole. This dish combines the comfort of melted cheese with the nutritious goodness of broccoli, creating a meal that’s both satisfying and wholesome.
It’s perfect for those evenings when you want to put a healthy meal on the table without the fuss. The creamy texture of the cheese sauce envelops the tender broccoli and fluffy rice, making it a delightful experience for both children and adults.
This casserole isn’t only easy to prepare but also versatile. You can serve it as a main dish or as a side to complement grilled chicken or fish. The ingredients are straightforward and likely to be already in your pantry, making it a convenient option for busy weeknights.
By preparing this dish, you guarantee that your family is getting a balanced meal that’s rich in fiber, vitamins, and minerals, all while enjoying the cheesy, comforting flavors that everyone loves.
Ingredients (Serves 4-6):
- 2 cups broccoli florets
- 1 cup uncooked white or brown rice
- 2 cups shredded cheddar cheese
- 1 can (10.5 oz) cream of mushroom soup
- 1 cup milk
- 1 small onion, finely chopped
- 2 cloves garlic, minced
- 1 tablespoon butter
- 1 teaspoon salt
- 1/2 teaspoon black pepper
- 1/2 teaspoon paprika (optional)
- 1/4 cup grated Parmesan cheese (optional)
Cooking Instructions:
- Prepare the Rice: Begin by cooking the rice according to the package instructions. Once cooked, set it aside and keep it warm.
- Preheat the Oven: While the rice is cooking, preheat your oven to 350°F (175°C).
- Cook the Broccoli: In a large pot, bring water to a boil. Add the broccoli florets and blanch them for about 3 minutes until they’re bright green and tender-crisp. Drain and set aside.
- Sauté Onions and Garlic: In a large skillet, melt the butter over medium heat. Add the chopped onion and minced garlic, sautéing until the onions are translucent and fragrant, about 5 minutes.
- Make the Cheese Sauce: Stir in the cream of mushroom soup and milk into the skillet with the onions and garlic. Add the salt, black pepper, and paprika, if using. Stir continuously until the mixture is smooth and begins to simmer.
- Combine Ingredients: In a large mixing bowl, combine the cooked rice, broccoli, cheese sauce, and 1 1/2 cups of shredded cheddar cheese. Mix well until everything is evenly coated.
- Assemble the Casserole: Transfer the mixture into a greased 9×13-inch baking dish. Sprinkle the remaining cheddar cheese and Parmesan cheese over the top.
- Bake: Place the casserole in the preheated oven and bake for 25-30 minutes, or until the cheese is bubbly and golden on top.
- Serve: Once cooked, remove the casserole from the oven and let it cool for a few minutes before serving.
Extra Tips:
For a bit of variety, you can add cooked chicken or turkey to the casserole for added protein. If you prefer a spicier kick, consider adding a pinch of cayenne pepper to the cheese sauce.
To save time, you can use frozen broccoli instead of fresh—just be sure to thaw and drain it well before adding it to the dish. And for those who enjoy a crunchy topping, sprinkle some breadcrumbs mixed with melted butter on top before baking.
This casserole can also be prepared a day ahead and stored in the fridge, then baked when you’re ready to eat, making it an excellent make-ahead meal.
DIY Sushi Night With Veggie Options

Gather your family for an exciting and interactive DIY Sushi Night that even the pickiest eaters will enjoy. This healthy and fun meal offers a chance to get creative with fresh, colorful vegetables rolled into delicious sushi. By making sushi at home, you can tailor each roll to suit individual preferences and dietary needs, guaranteeing that everyone leaves the table happy and satisfied.
Plus, it’s a great way to introduce kids to new flavors and textures in an engaging hands-on experience.
In this recipe, we’ll explore how to make veggie sushi rolls that are vibrant and packed with essential nutrients. These rolls feature a variety of fresh vegetables, perfectly seasoned sushi rice, and seaweed sheets. The beauty of DIY sushi is that you can customize it with whatever ingredients you have on hand, making it a versatile option for family dinners.
Get ready to roll up your sleeves and plunge into this delicious veggie sushi adventure!
Ingredients for 4-6 people:
- 2 cups sushi rice
- 2 1/2 cups water
- 1/4 cup rice vinegar
- 2 tablespoons sugar
- 1 teaspoon salt
- 6 sheets of nori (seaweed)
- 1 cucumber, julienned
- 1 avocado, sliced
- 1 red bell pepper, julienned
- 1 carrot, peeled and julienned
- 1 cup baby spinach leaves
- Soy sauce for dipping
- Pickled ginger for serving (optional)
- Wasabi (optional)
Cooking Instructions:
- Prepare the Sushi Rice: Rinse the sushi rice under cold water until the water runs clear. This removes excess starch and helps the rice cook evenly. In a medium pot, combine the rinsed rice and water. Bring to a boil, then reduce heat to low, cover, and simmer for 15 minutes.
- Remove from heat and let it stand, covered, for 10 minutes.
- Season the Rice: In a small bowl, mix rice vinegar, sugar, and salt until dissolved. Transfer the cooked rice to a large mixing bowl and gently fold in the vinegar mixture using a wooden spatula. Be careful not to mash the rice. Allow it to cool to room temperature.
- Prepare the Vegetables: While the rice cools, prepare your vegetables. Julienne the cucumber, red bell pepper, and carrot. Slice the avocado and set out the baby spinach leaves. Arrange all vegetables on a platter for easy access during assembly.
- Assemble the Sushi Rolls: Place a sheet of nori on a bamboo sushi mat, shiny side down. Wet your hands to prevent sticking, then spread a thin, even layer of rice over the nori, leaving a 1-inch border at the top.
- Arrange a line of cucumber, avocado, bell pepper, carrot, and spinach across the center of the rice.
- Roll the Sushi: Using the bamboo mat, carefully lift the edge of the nori closest to you and roll it over the vegetables, pressing gently to form a tight roll. Continue rolling until you reach the border.
- Wet the edge of the nori with a little water to seal the roll.
- Slice and Serve: Using a sharp knife, slice the roll into 1-inch pieces, wiping the blade with a damp cloth between cuts to guarantee clean slices. Arrange the sushi pieces on a platter. Serve with soy sauce, pickled ginger, and wasabi on the side.
Extra Tips:
To assure success with your DIY Sushi Night, make sure the sushi rice is completely cooled before you start rolling; warm rice can make the nori soggy.
If you don’t have a bamboo mat, use a clean kitchen towel to help shape your rolls. Encourage family members to experiment with different vegetable combinations and dipping sauces to find their favorite flavors.
Breakfast-for-Dinner Omelette Bar

There’s something delightfully fun about turning the usual breakfast staple into an evening affair with a Breakfast-for-Dinner Omelette Bar. This concept is perfect for families with picky eaters because it allows each person to tailor their omelette to their specific tastes. By setting up an array of ingredients, you encourage creativity and guarantee everyone gets exactly what they want on their plate. Not only does this make meal prep easier, but it also transforms dinner into a more interactive and engaging experience.
The omelette bar is a versatile way to sneak in healthy ingredients while still catering to finicky taste buds. Load up on a variety of fresh vegetables, proteins, and cheeses, so there’s something for everyone. Whether it’s the classic combination of ham and cheddar or a more adventurous mix of spinach and feta, the possibilities are endless. This flexibility makes it easy to accommodate dietary preferences and restrictions, turning your kitchen into a space of culinary exploration.
Ingredients (Serves 4-6 people):
- 12 large eggs
- 1/4 cup milk
- Salt and pepper to taste
- 1 cup diced cooked ham
- 1 cup shredded cheddar cheese
- 1 cup chopped fresh spinach
- 1 cup sliced mushrooms
- 1 cup diced bell peppers
- 1/2 cup diced onions
- 1/2 cup crumbled feta cheese
- 1/2 cup cooked and crumbled bacon
- 1/4 cup chopped fresh herbs (such as parsley, chives, or basil)
- Olive oil or butter for cooking
Instructions:
- Prepare the Ingredients: Begin by laying out all your chosen ingredients in separate bowls. This makes it easy for everyone to see their options and select their favorites.
- Whisk the Eggs: In a large mixing bowl, crack the eggs and add the milk, salt, and pepper. Whisk the mixture until it’s well combined and slightly frothy.
- Preheat the Pan: Place a non-stick skillet over medium heat and add a small amount of olive oil or butter. Allow it to heat until it begins to shimmer or sizzle slightly.
- Cook the Omelette: Pour a portion of the egg mixture (about 1/2 cup per omelette) into the hot skillet. Tilt the pan to guarantee the eggs cover the bottom of the pan evenly.
- Add Fillings: As the edges of the eggs begin to set, add your desired fillings. Be sure to spread them evenly over one half of the omelette.
- Fold and Finish: Once the eggs are mostly set, use a spatula to gently fold the omelette in half over the fillings. Allow it to cook for another 1-2 minutes, until the cheese melts and the eggs are fully cooked.
- Serve Immediately: Carefully slide the omelette onto a plate and serve immediately. Repeat the process for additional servings.
Extra Tips:
When preparing a Breakfast-for-Dinner Omelette Bar, consider using a variety of colored vegetables to make the selection more visually appealing. This can entice picky eaters to try something new.
To make the cooking process even smoother, pre-cook any raw ingredients such as bacon or mushrooms, as they take longer to cook than the eggs. Additionally, using non-stick cookware can prevent the omelettes from sticking and tearing.
Finally, encourage family members to experiment with different combinations of ingredients, which can turn dinner into a fun and creative activity.