

When it comes to feeding a crowd, I always look for recipes that are both hearty and satisfying. There’s something special about a classic beef lasagna or a creamy chicken Alfredo bake that brings everyone together. These dishes create a cozy and welcoming atmosphere, perfect for making memories. But did you know there are even more options to explore? I’ve put together a list of favorites that might just become your new go-to when you want to impress.
Classic Beef Lasagna

Lasagna is a comforting and hearty dish that has been cherished by families around the world for generations. This classic beef lasagna recipe is perfect for a family dinner, offering layers of rich meat sauce, creamy béchamel, and tender pasta sheets, all topped with a generous amount of cheese that bubbles to perfection in the oven.
Whether you’re preparing it for a special occasion or a regular weeknight meal, this recipe serves 4-6 people and is sure to become a household favorite.
The secret to a great lasagna lies in the quality of its ingredients and the time taken to develop flavors. For the meat sauce, a combination of ground beef and aromatic vegetables is simmered with tomatoes and herbs for a robust and savory base. A smooth and velvety béchamel sauce layers beautifully with the meat, creating a creamy contrast that elevates the dish.
Topped with a blend of mozzarella and Parmesan cheeses, this lasagna bakes to a golden perfection, making it irresistible for anyone at the dinner table.
Ingredients (Serves 4-6):
- 9 lasagna noodles
- 1 tablespoon olive oil
- 1 pound ground beef
- 1 onion, finely chopped
- 2 cloves garlic, minced
- 1 can (28 ounces) crushed tomatoes
- 2 tablespoons tomato paste
- 1 teaspoon dried oregano
- 1 teaspoon dried basil
- Salt and pepper to taste
- 2 tablespoons butter
- 2 tablespoons all-purpose flour
- 2 cups milk
- 1/4 teaspoon nutmeg
- 2 cups shredded mozzarella cheese
- 1/2 cup grated Parmesan cheese
Cooking Instructions:
- Preheat the Oven: Preheat your oven to 375°F (190°C).
- Cook the Noodles: In a large pot of salted boiling water, cook the lasagna noodles according to package instructions until al dente. Drain and set aside.
- Prepare the Meat Sauce: In a large skillet, heat olive oil over medium heat. Add the chopped onion and garlic, sautéing until soft and translucent. Add the ground beef and cook until browned. Stir in the crushed tomatoes, tomato paste, oregano, basil, salt, and pepper. Let simmer for about 15 minutes, allowing the flavors to meld together.
- Make the Béchamel Sauce: In a saucepan, melt butter over medium heat. Stir in the flour and cook for 1-2 minutes to form a roux. Gradually whisk in the milk, continuing to whisk until the mixture thickens. Season with nutmeg, salt, and pepper.
- Assemble the Lasagna: In a baking dish, spread a thin layer of meat sauce. Place a layer of noodles over the sauce, followed by more meat sauce, then a layer of béchamel. Repeat the layers, ending with a layer of noodles topped with remaining béchamel sauce.
- Top with Cheese: Sprinkle mozzarella and Parmesan cheese evenly over the top layer.
- Bake the Lasagna: Cover the baking dish with aluminum foil and bake in the preheated oven for 25 minutes. Remove the foil and bake for an additional 15 minutes, or until the cheese is golden and bubbly.
- Rest and Serve: Allow the lasagna to rest for 10 minutes before slicing and serving. This resting time helps the layers set and makes serving easier.
Extra Tips:
For the best results, prepare the meat sauce in advance, allowing it to sit overnight for deeper flavors. If you prefer a richer béchamel, substitute some of the milk with cream.
To add a touch of freshness, consider topping the lasagna with fresh basil leaves just before serving. Additionally, using freshly grated cheese rather than pre-shredded versions can enhance the overall taste and texture of your lasagna, making it even more delectable for your family to enjoy.
Creamy Chicken Alfredo Bake

If you’re looking for a comforting and delicious meal to serve your family, this Creamy Chicken Alfredo Bake is a perfect choice. This dish combines tender chicken, rich Alfredo sauce, and perfectly cooked pasta, all baked to golden perfection with a delightful topping of melted cheese.
It’s a hearty meal that’s sure to please both kids and adults, making it a great option for family dinners or gatherings. The recipe is designed to serve 4-6 people, making it suitable for a weeknight dinner or a small dinner party.
The creamy sauce, combined with the savory flavors of garlic and Parmesan cheese, provides a restaurant-quality experience in the comfort of your home. Plus, it’s an easy dish to prepare, allowing you to spend more time with your family and less time in the kitchen.
Ingredients (Serves 4-6):
- 2 cups cooked chicken, shredded or diced
- 12 oz fettuccine or penne pasta
- 3 cups heavy cream
- 1 cup grated Parmesan cheese
- 2 cups shredded mozzarella cheese
- 3 tablespoons butter
- 3 cloves garlic, minced
- 2 tablespoons all-purpose flour
- 1 teaspoon salt
- 1/2 teaspoon black pepper
- 1/2 teaspoon dried Italian seasoning
- 1 tablespoon chopped fresh parsley (optional for garnish)
Cooking Instructions:
- Preheat the Oven: Begin by preheating your oven to 375°F (190°C) to guarantee it’s ready for baking once you’ve prepared the dish.
- Cook the Pasta: In a large pot of boiling salted water, cook the pasta according to package instructions until al dente. Drain the pasta and set it aside.
- Prepare the Alfredo Sauce: In a large saucepan, melt the butter over medium heat. Add the minced garlic and sauté for about 1 minute until it becomes fragrant.
- Thicken the Sauce: Stir in the flour, salt, pepper, and Italian seasoning, and cook for another minute to form a roux. Slowly whisk in the heavy cream, making sure there are no lumps. Continue to cook, stirring constantly, until the sauce begins to thicken.
- Add Cheese: Reduce the heat to low and gradually stir in the Parmesan cheese until it’s fully melted and the sauce is smooth.
- Combine Ingredients: In a large mixing bowl, combine the cooked pasta, shredded chicken, and Alfredo sauce. Mix well to make certain the pasta and chicken are fully coated with the sauce.
- Assemble the Bake: Transfer the mixture into a greased 9×13 inch baking dish. Sprinkle the shredded mozzarella cheese evenly over the top.
- Bake: Place the dish in the preheated oven and bake for about 20-25 minutes, or until the cheese is melted and bubbly, and the top is golden brown.
- Garnish and Serve: Remove the bake from the oven and let it cool for a few minutes. Garnish with chopped fresh parsley, if desired, before serving.
Extra Tips:
When making the Creamy Chicken Alfredo Bake, feel free to customize it according to your family’s preferences. You can add vegetables such as broccoli or spinach for extra nutrition or use different types of pasta if you prefer.
If you’re short on time, rotisserie chicken makes an excellent quick substitute for cooked chicken. Additionally, for a more flavorful dish, consider adding a pinch of nutmeg to the Alfredo sauce, which complements the creaminess beautifully.
Enjoy your meal with a side of garlic bread or a crisp green salad to round out the dinner experience.
Slow-Cooker Beef Stew
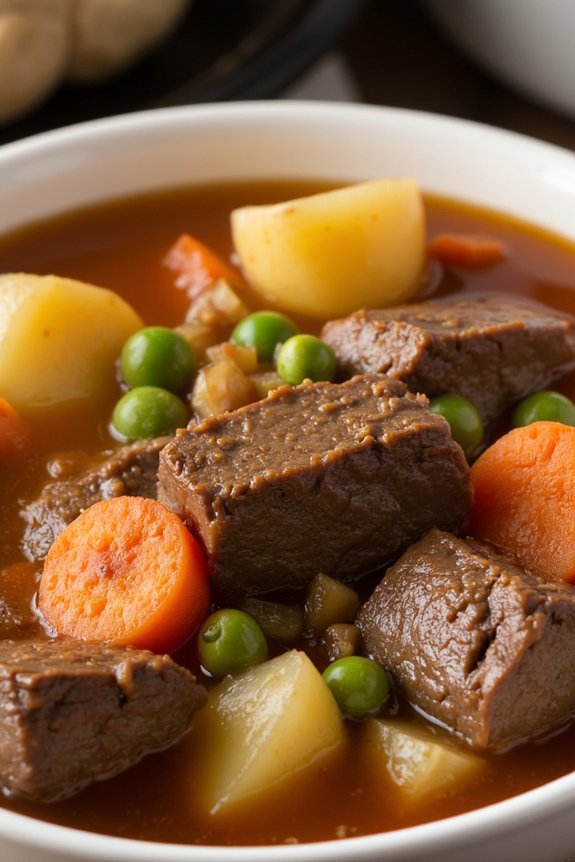
There’s nothing quite like a hearty beef stew to warm up the family on a chilly evening. Slow-Cooker Beef Stew is a comforting, classic dish that combines tender chunks of beef with an assortment of vegetables, all simmered in a rich, flavorful broth.
This recipe is perfect for busy families, as it requires minimal prep work and allows you to set it and forget it, letting the slow cooker do all the work while you go about your day.
This particular recipe serves 4-6 people, making it ideal for a family dinner with leftovers for lunch the next day. By using a slow cooker, the beef becomes incredibly tender, and the vegetables soak up all the delicious flavors of the stew. It’s a meal that not only satisfies your hunger but also brings the family together around the dinner table.
Ingredients (serves 4-6):
- 2 pounds beef chuck, cut into 1-inch cubes
- 1/4 cup all-purpose flour
- Salt and pepper, to taste
- 2 tablespoons olive oil
- 4 cups beef broth
- 1 cup red wine (optional)
- 3 tablespoons tomato paste
- 2 tablespoons Worcestershire sauce
- 2 cloves garlic, minced
- 1 teaspoon dried thyme
- 1 teaspoon dried rosemary
- 4 large carrots, peeled and sliced
- 4 medium potatoes, peeled and diced
- 1 large onion, chopped
- 2 stalks celery, chopped
- 1 cup frozen peas
Cooking Instructions:
- Prepare the Beef: In a large mixing bowl, toss the beef cubes with flour, salt, and pepper until they’re evenly coated. This will help thicken the stew as it cooks.
- Brown the Beef: Heat the olive oil in a large skillet over medium-high heat. Add the beef cubes in batches, browning them on all sides. This step is essential for developing flavor. Transfer the browned beef to the slow cooker.
- Deglaze the Pan: In the same skillet, pour in the red wine (if using) and scrape up any browned bits from the bottom of the pan. This is known as deglazing and adds wonderful depth to the stew. Pour the liquid into the slow cooker.
- Combine Ingredients: Add the beef broth, tomato paste, Worcestershire sauce, garlic, thyme, and rosemary to the slow cooker. Stir to combine all the ingredients.
- Add Vegetables: Place the carrots, potatoes, onion, and celery on top of the beef mixture in the slow cooker. Don’t stir, as you want the vegetables to remain on top.
- Cook the Stew: Cover the slow cooker and cook on low for 8-10 hours, or on high for 4-6 hours, until the meat is tender and the vegetables are cooked through.
- Add Peas: About 30 minutes before serving, stir in the frozen peas. Cover and let them heat through.
- Serve: Once everything is cooked, give the stew a good stir to combine all the ingredients. Taste and adjust seasoning with salt and pepper if necessary. Serve hot and enjoy!
Extra Tips:
To guarantee the best flavor, don’t skip the browning step for the beef, as it adds a depth of flavor that’s hard to replicate otherwise.
If you prefer a thicker stew, you can mix 2 tablespoons of cornstarch with 2 tablespoons of cold water and stir it into the stew about 30 minutes before serving.
Additionally, feel free to customize the vegetables based on your preferences or what you have on hand. For a more robust flavor, consider adding a bay leaf during cooking, which can be removed before serving.
Grilled Lemon Herb Chicken
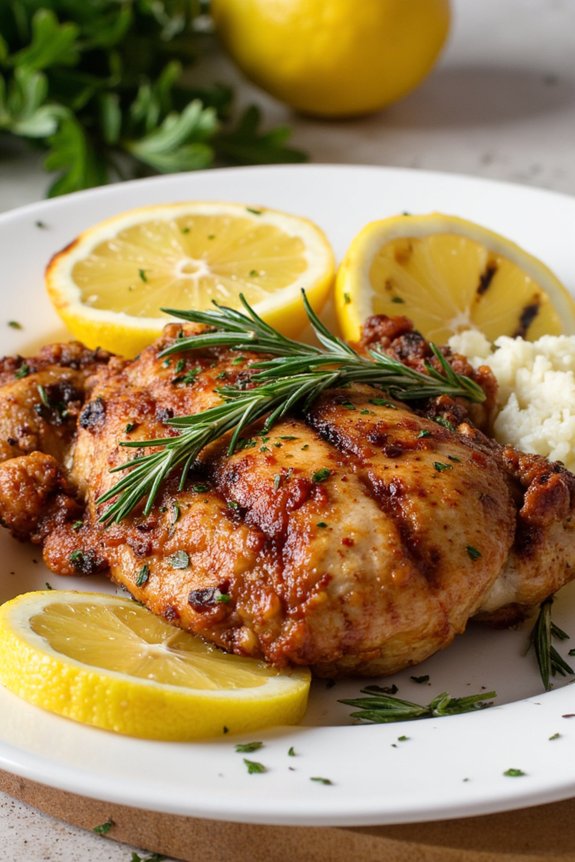
Grilled Lemon Herb Chicken is a flavorful and aromatic dish perfect for a hearty family dinner. The combination of fresh herbs and zesty lemon infuses the chicken with a vibrant taste that pairs well with a variety of side dishes.
Whether you’re cooking for a weekday meal or a weekend gathering, this recipe is bound to impress your family and friends. The process involves marinating the chicken to absorb all the delicious flavors, and then grilling it to perfection for a juicy and tender result.
This recipe is designed to serve 4-6 people, making it ideal for a family meal. The ingredients are simple and easy to find, guaranteeing that you can prepare this dish without any hassle. The grilling method adds a smoky flavor to the chicken, enhancing the overall taste.
With a few fresh ingredients and a little bit of time, you can create a meal that’s both satisfying and healthy.
Ingredients:
- 4-6 boneless, skinless chicken breasts
- 1/4 cup olive oil
- Juice of 2 lemons
- 3 cloves garlic, minced
- 1 tablespoon fresh rosemary, chopped
- 1 tablespoon fresh thyme, chopped
- 1 tablespoon fresh parsley, chopped
- Salt and pepper to taste
- Lemon wedges for serving (optional)
Cooking Instructions:
- Prepare the Marinade: In a medium-sized mixing bowl, combine the olive oil, lemon juice, minced garlic, chopped rosemary, thyme, and parsley. Add salt and pepper to taste, then whisk the mixture until well combined.
- Marinate the Chicken: Place the chicken breasts in a large resealable plastic bag or a shallow dish. Pour the marinade over the chicken, guaranteeing each piece is well coated. Seal the bag or cover the dish with plastic wrap, and refrigerate for at least 1-2 hours, or overnight for more intense flavor.
- Preheat the Grill: Preheat your grill to medium-high heat. If using a charcoal grill, guarantee the coals are evenly distributed and have reached a consistent temperature.
- Grill the Chicken: Remove the chicken from the marinade, allowing any excess to drip off. Place the chicken on the grill, and cook for about 6-7 minutes on each side, or until the internal temperature reaches 165°F (75°C). This guarantees the chicken is cooked through and safe to eat.
- Rest the Chicken: Once grilled, transfer the chicken to a serving platter and let it rest for 5 minutes. This allows the juices to redistribute, keeping the chicken moist.
- Serve the Dish: Serve the grilled lemon herb chicken with lemon wedges on the side, if desired. Pair it with your favorite sides like grilled vegetables, a fresh green salad, or rice for a complete meal.
Extra Tips:
For a more robust flavor, consider marinating the chicken overnight. When grilling, make sure the grill grates are clean and lightly oiled to prevent the chicken from sticking.
If you prefer a smokier taste, you can add wood chips to the grill. Keep an eye on the chicken to prevent overcooking, which can lead to dryness. Using a meat thermometer is a great way to guarantee the chicken is cooked just right.
Enjoy experimenting with different herbs to suit your taste!
Vegetarian Stuffed Bell Peppers
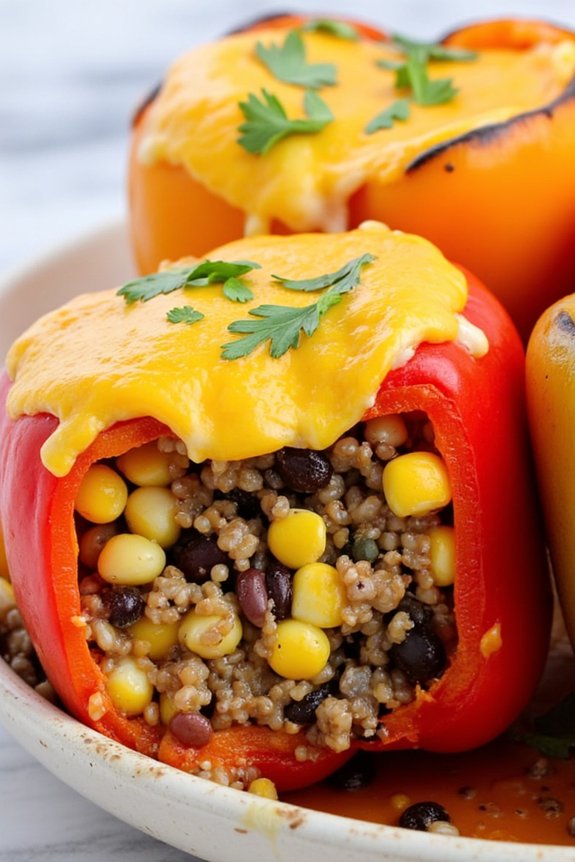
Vegetarian stuffed bell peppers are a delightful and satisfying dish perfect for a hearty family dinner. These peppers are packed with a flavorful mixture of quinoa, black beans, and a medley of vegetables, making them not only delicious but also nutritious. This recipe embraces the vibrant colors and natural sweetness of bell peppers, creating a visually appealing and mouth-watering dish that everyone will love.
Whether you’re a vegetarian or simply looking to enjoy a meat-free meal, these stuffed bell peppers are bound to become a family favorite.
In this recipe, the bell peppers serve as a perfect vessel for the savory filling, which is seasoned with aromatic spices and fresh herbs. Complete with a topping of melted cheese, these stuffed peppers are baked to perfection, resulting in a tender and flavorful dish. This recipe yields enough for 4-6 servings, making it ideal for a family dinner. It’s easy to prepare and can be customized with your choice of vegetables or grains, allowing you to make it your own.
Ingredients (Serves 4-6):
- 6 large bell peppers, any color
- 1 cup quinoa, rinsed
- 2 cups vegetable broth
- 1 can (15 oz) black beans, drained and rinsed
- 1 cup corn kernels, fresh or frozen
- 1 medium onion, diced
- 2 cloves garlic, minced
- 1 teaspoon ground cumin
- 1 teaspoon chili powder
- 1/2 teaspoon smoked paprika
- Salt and pepper to taste
- 1 cup shredded cheddar cheese
- 1/4 cup fresh cilantro, chopped
- 2 tablespoons olive oil
- Juice of 1 lime
Cooking Instructions:
- Prepare the Bell Peppers: Preheat your oven to 375°F (190°C). Slice the tops off the bell peppers and remove the seeds and membranes. Lightly brush the outside of each pepper with olive oil and place them upright in a baking dish.
- Cook the Quinoa: In a medium saucepan, bring the vegetable broth to a boil. Add the rinsed quinoa, reduce the heat to low, cover, and simmer for about 15 minutes or until the quinoa is cooked and the liquid is absorbed. Fluff with a fork and set aside.
- Sauté the Vegetables: In a large skillet, heat the olive oil over medium heat. Add the diced onion and garlic, sautéing until the onion becomes translucent, about 5 minutes. Stir in the cumin, chili powder, and smoked paprika.
- Combine Filling Ingredients: Add the cooked quinoa, black beans, corn, lime juice, salt, and pepper to the skillet. Mix well to combine all ingredients evenly. Cook for an additional 5 minutes to allow flavors to meld.
- Stuff the Peppers: Carefully spoon the quinoa mixture into each prepared bell pepper, packing the filling down gently. Top each pepper with a generous portion of shredded cheddar cheese.
- Bake and Serve: Cover the baking dish with foil and bake in the preheated oven for about 30 minutes. Remove the foil and bake for an additional 10 minutes, or until the cheese is golden and bubbly. Garnish with fresh cilantro before serving.
Extra Tips:
To guarantee even cooking, choose bell peppers that are similar in size and shape. You can also parboil the peppers for a few minutes before stuffing to make them extra tender.
For added flavor, consider incorporating other vegetables like zucchini or mushrooms into the filling. If you prefer a little heat, add some diced jalapeños to the mixture.
Finally, these stuffed peppers can be made ahead of time and refrigerated; simply reheat them in the oven before serving.
Hearty Shepherd’s Pie

Hearty Shepherd’s Pie is a classic comfort food that brings warmth and joy to any family dinner. This dish is perfect for those chilly evenings when you need something filling and satisfying. With its rich layers of savory meat, creamy mashed potatoes, and crisp baked topping, Shepherd’s Pie is sure to become a family favorite.
Traditionally made with ground lamb, this version also works beautifully with ground beef or turkey, allowing for flexibility based on your family’s preferences. The hearty vegetables such as carrots, peas, and corn add a delightful texture and flavor, ensuring each bite is as delicious as the final one.
This recipe is designed to serve 4-6 people, making it ideal for a family gathering or for ensuring there are leftovers for the next day. The preparation involves creating a flavorful meat filling, topped with a smooth layer of mashed potatoes, and baked to perfection. With a little bit of preparation and attention to detail, you can create a Shepherd’s Pie that will have everyone asking for seconds.
Ingredients:
- 1 1/2 pounds ground lamb or beef
- 1 large onion, diced
- 2 cloves garlic, minced
- 2 carrots, diced
- 1 cup frozen peas
- 1 cup corn kernels
- 2 tablespoons tomato paste
- 1 cup beef broth
- 1 teaspoon Worcestershire sauce
- 1 teaspoon fresh thyme leaves
- Salt and pepper to taste
- 4 cups mashed potatoes (prepared from about 2 pounds of potatoes)
- 1/2 cup shredded cheddar cheese (optional)
Cooking Instructions:
- Prepare the Filling: In a large skillet over medium heat, cook the ground lamb or beef until browned. Drain any excess fat. Add the diced onion and minced garlic, cooking until the onion is soft and translucent, about 5 minutes.
- Add Vegetables and Flavoring: Stir in the diced carrots, cooking for another 3-4 minutes. Add the tomato paste, and cook for 1-2 minutes to deepen the flavor. Pour in the beef broth, Worcestershire sauce, and sprinkle with thyme leaves. Stir in the peas and corn, then season with salt and pepper to taste. Let the mixture simmer on low heat for about 10 minutes until the sauce thickens slightly.
- Prepare the Mashed Potatoes: While the filling simmers, prepare your mashed potatoes if not pre-made. Boil peeled and chopped potatoes in salted water until tender, about 15 minutes. Drain and mash with butter, milk, and a pinch of salt until smooth and creamy.
- Assemble the Shepherd’s Pie: Preheat your oven to 400°F (200°C). Spread the meat and vegetable mixture into the bottom of a baking dish. Carefully spoon the mashed potatoes over the top, spreading them evenly with a spatula. If desired, sprinkle shredded cheddar cheese on top for an extra layer of flavor.
- Bake: Place the assembled Shepherd’s Pie into the preheated oven. Bake for 25-30 minutes, or until the top is golden brown and the filling is bubbling around the edges.
Extra Tips:
For a smoother mashed potato topping, be sure to thoroughly mash the potatoes, removing any lumps. You can also add a bit of cream cheese for an extra creamy texture.
If you prefer a bit of a crust on top, use a fork to create small peaks in the mashed potatoes before baking. These will crisp up nicely in the oven. Finally, let the pie rest for a few minutes before serving to allow the filling to set slightly, making it easier to serve neat slices.
Baked Ziti With Sausage
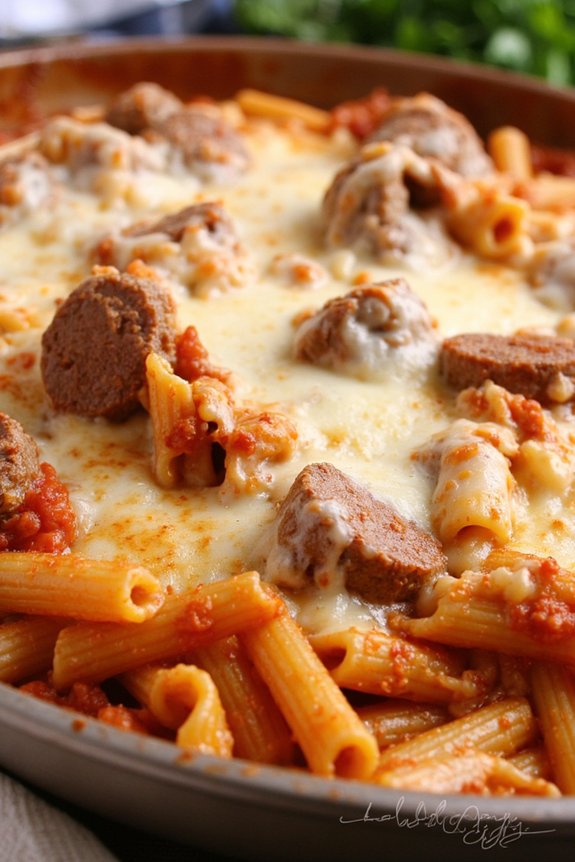
Baked Ziti with Sausage is a classic Italian-American dish that’s perfect for a hearty family dinner. This comforting casserole combines al dente pasta with savory sausage, rich tomato sauce, and gooey melted cheese. It’s a dish that brings warmth and a sense of togetherness to the dining table, ideal for gatherings or a cozy night in. The combination of flavors and textures guarantees that everyone will go back for seconds.
The dish isn’t only delicious but also straightforward to prepare, making it a favorite for busy families. Whether you’re an experienced cook or a beginner, this recipe offers a delightful balance of ease and satisfaction. With a few simple ingredients, you’ll create a meal that’s both filling and full of flavor. It’s a go-to recipe that can easily become a staple in your household. The following recipe serves 4-6 people.
Ingredients:
- 1 pound ziti pasta
- 1 pound Italian sausage (mild or spicy, as preferred)
- 1 jar (24 ounces) marinara or tomato sauce
- 1 cup ricotta cheese
- 2 cups shredded mozzarella cheese
- 1/2 cup grated Parmesan cheese
- 1 tablespoon olive oil
- 2 cloves garlic, minced
- 1 teaspoon dried oregano
- 1 teaspoon dried basil
- Salt and pepper to taste
Cooking Instructions:
- Preheat the Oven: Preheat your oven to 375°F (190°C) to make sure it’s ready for baking.
- Cook the Pasta: In a large pot, bring salted water to a boil. Add the ziti pasta and cook until al dente, about 8-10 minutes. Drain and set aside.
- Prepare the Sausage: In a large skillet, heat the olive oil over medium heat. Add the Italian sausage, breaking it into smaller pieces with a spatula. Cook until browned and cooked through, about 5-7 minutes.
- Add Garlic and Sauce: Add the minced garlic to the sausage and cook for another minute until fragrant. Pour in the marinara sauce, then stir in the dried oregano and basil. Let the mixture simmer for 5 minutes to allow the flavors to meld.
- Mix with Pasta: In a large mixing bowl, combine the cooked pasta with the sausage and sauce mixture. Stir in half of the mozzarella cheese and all of the ricotta cheese. Season with salt and pepper to taste.
- Assemble the Dish: In a greased 9×13 inch baking dish, pour in the pasta mixture and spread it evenly. Sprinkle the remaining mozzarella cheese and all of the Parmesan cheese over the top.
- Bake the Ziti: Place the baking dish in the preheated oven and bake for 25-30 minutes, or until the cheese is bubbly and golden brown on top.
- Cool and Serve: Allow the baked ziti to cool for a few minutes before serving. This will help the layers set and make it easier to serve.
Extra Tips:
For a richer flavor, consider using a combination of sweet and spicy Italian sausage to balance the heat and sweetness. You can also add vegetables like spinach or bell peppers for added nutrition and flavor variety.
If you have leftovers, Baked Ziti with Sausage reheats well and can be stored in the refrigerator for up to three days. To make this dish ahead of time, assemble it without baking, cover, and refrigerate. When ready to serve, bake as instructed, adding a few extra minutes if needed.
Barbecue Pulled Pork Sandwiches
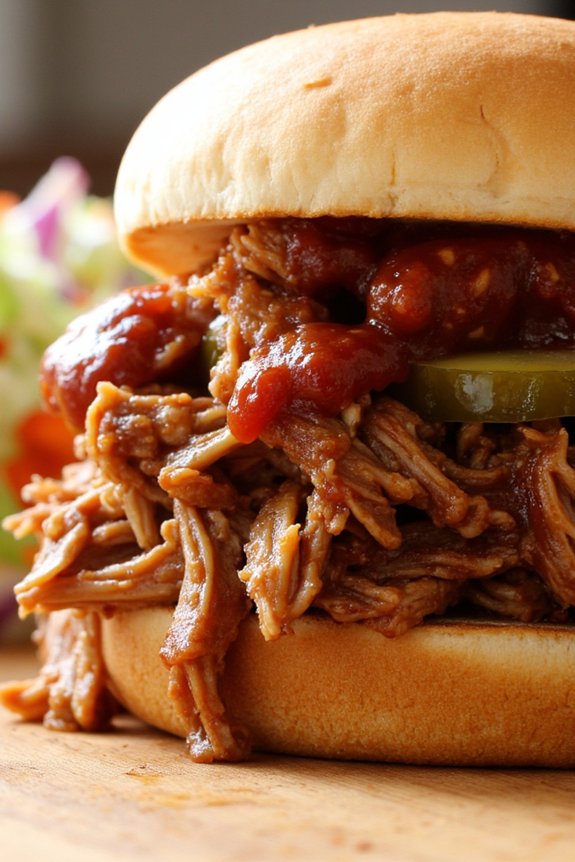
Barbecue Pulled Pork Sandwiches are a classic, mouthwatering dish perfect for a hearty family dinner. This recipe transforms a simple pork shoulder into tender, flavorful pulled pork that’s certain to satisfy. Whether it’s a weekend gathering or a casual weeknight meal, these sandwiches are a crowd-pleaser that comes together with a few essential ingredients and some time.
The combination of smoky, tangy barbecue sauce with the succulent pork, all piled on a soft bun, makes for an unforgettable dining experience.
The secret to the perfect pulled pork sandwich lies in slow cooking the meat until it’s fall-apart tender and then infusing it with a rich barbecue sauce. This method not only enhances the flavors but also guarantees that each bite is juicy and packed with taste.
Serve these sandwiches with a side of coleslaw or pickles to add a revitalizing crunch, and you’ve got a complete meal that will leave everyone at the table satisfied.
Ingredients (Serves 4-6):
- 3-4 pounds pork shoulder (also known as pork butt)
- 1 tablespoon olive oil
- Salt and pepper to taste
- 1 large onion, sliced
- 3 cloves garlic, minced
- 1 cup barbecue sauce
- 1/2 cup chicken broth
- 1 tablespoon brown sugar
- 1 tablespoon apple cider vinegar
- 1 teaspoon smoked paprika
- 1 teaspoon chili powder
- 6 hamburger buns
- Optional: Coleslaw or pickles for serving
Cooking Instructions:
- Prepare the Pork: Start by rubbing the pork shoulder with olive oil, then season generously with salt, pepper, smoked paprika, and chili powder. This step guarantees that the meat develops a flavorful crust as it cooks.
- Sear the Pork: Heat a large skillet over medium-high heat. Add the pork shoulder and sear on all sides until browned, about 4-5 minutes per side. This step locks in the juices and adds depth of flavor to the meat.
- Slow Cook the Pork: Transfer the seared pork to a slow cooker. Add sliced onions, minced garlic, chicken broth, barbecue sauce, brown sugar, and apple cider vinegar. Cover and cook on low for 8-10 hours or high for 4-5 hours, until the pork is tender and easily shredded with a fork.
- Shred the Pork: Once cooked, remove the pork from the slow cooker and shred it using two forks. Return the shredded pork to the slow cooker and stir into the sauce, allowing it to soak up the flavors.
- Assemble the Sandwiches: Toast the hamburger buns lightly, if desired. Pile the pulled pork onto each bun. Add coleslaw or pickles if you like a bit of crunch and extra flavor contrast.
- Serve and Enjoy: Serve the sandwiches warm with additional barbecue sauce on the side, if desired.
Extra Tips:
For an even deeper flavor, marinate the pork shoulder with the spices and olive oil overnight in the refrigerator. If you prefer a smoky taste, consider adding a few drops of liquid smoke to the slow cooker.
Always taste the pork before serving and adjust the seasoning or sauce to your preference. For an effortless cleanup, use a slow cooker liner.
Finally, if you’re in a hurry, this recipe can also be adapted for use in a pressure cooker – simply adjust cooking times according to the manufacturer’s instructions.
Chicken and Vegetable Stir-Fry
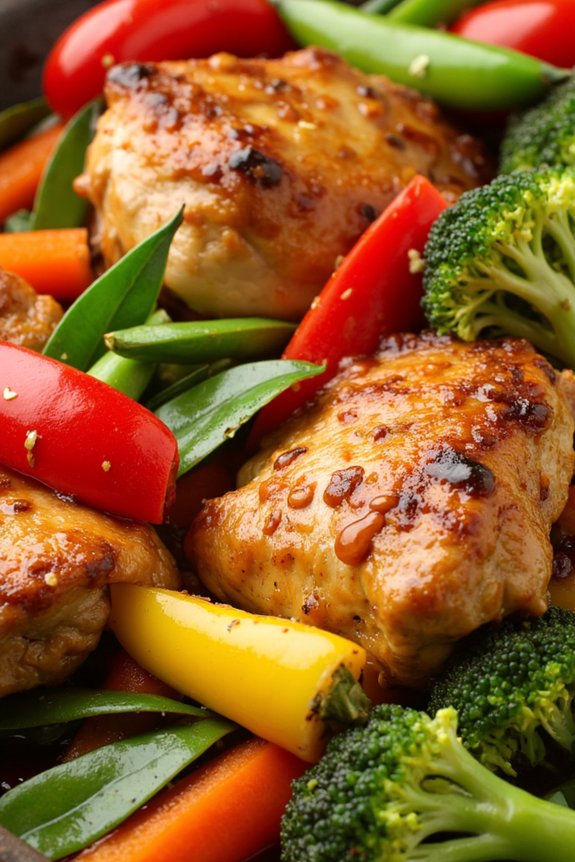
Chicken and Vegetable Stir-Fry is a vibrant and flavorful dish perfect for a family dinner. This dish offers a delightful combination of tender chicken, fresh vegetables, and a savory sauce, all cooked to perfection in a hot wok or skillet. It’s a healthy and quick meal option that will satisfy everyone’s taste buds and leave them asking for seconds.
With a balance of protein, vitamins, and minerals, this dish not only pleases the palate but also keeps your family nourished and energized. Ideal for serving 4-6 people, this stir-fry can be customized to include your family’s favorite vegetables.
The key to a successful stir-fry is preparing all the ingredients in advance and cooking over high heat to guarantee the chicken remains juicy and the vegetables stay crisp. The combination of soy sauce, garlic, and ginger gives the dish its distinctive Asian flair, making it a family favorite and a weekly staple in many households.
Ingredients:
- 1.5 pounds boneless, skinless chicken breasts, sliced thinly
- 2 tablespoons vegetable oil
- 1 large onion, sliced
- 1 red bell pepper, sliced
- 1 yellow bell pepper, sliced
- 1 cup broccoli florets
- 1 cup snap peas
- 2 carrots, julienned
- 3 cloves garlic, minced
- 1 tablespoon fresh ginger, minced
- 1/3 cup soy sauce
- 2 tablespoons oyster sauce
- 2 tablespoons cornstarch
- 1 tablespoon sesame oil
- 1 teaspoon sugar
- Salt and pepper to taste
- Cooked rice, for serving
Cooking Instructions:
- Prepare Ingredients: Begin by slicing the chicken breasts into thin strips and season lightly with salt and pepper. Set aside. Prepare all the vegetables by slicing the onions and bell peppers, cutting the broccoli into small florets, and julienning the carrots. Mince the garlic and ginger.
- Heat the Oil: In a large wok or skillet, heat 2 tablespoons of vegetable oil over medium-high heat until it shimmers.
- Cook the Chicken: Add the sliced chicken to the hot oil in a single layer. Stir-fry for about 5-6 minutes, or until the chicken is browned and cooked through. Remove the chicken from the pan and set aside.
- Stir-Fry Vegetables: In the same wok, add the onions and stir-fry for about 1 minute. Add the garlic and ginger, and continue to stir-fry for an additional 30 seconds until fragrant. Next, add the bell peppers, broccoli, snap peas, and carrots. Stir-fry the vegetables for about 3-4 minutes, or until they’re tender-crisp.
- Combine Ingredients: Return the cooked chicken to the pan with the vegetables. In a small bowl, mix the soy sauce, oyster sauce, cornstarch, sesame oil, and sugar. Pour the sauce over the chicken and vegetables, stirring continuously to coat everything evenly.
- Thicken the Sauce: Allow the sauce to simmer for 2-3 minutes, or until it thickens to your desired consistency. Adjust the seasoning with additional salt and pepper if needed.
- Serve: Serve the chicken and vegetable stir-fry hot over a bed of cooked rice.
Extra Tips:
To guarantee your stir-fry is perfect every time, make sure your wok or skillet is very hot before adding the ingredients. This high heat is essential for achieving that signature sear and keeping the vegetables crisp.
You can swap out vegetables according to the season or your family’s preferences, such as adding mushrooms, zucchini, or bok choy. For a gluten-free option, use tamari instead of soy sauce.
Finally, marinating the chicken briefly in a bit of soy sauce and cornstarch before cooking can enhance its flavor and tenderness.
Meatball Marinara Subs

Meatball Marinara Subs are a delightful and filling option for a hearty family dinner. These subs combine juicy homemade meatballs with rich marinara sauce, all nestled in a soft sub roll and topped with melted cheese. Perfect for a casual family night or a quick weekend meal, these subs are sure to please both kids and adults alike.
The comforting blend of flavors and textures makes this dish a crowd favorite, and it’s a great way to bring everyone to the table for a satisfying meal.
Making Meatball Marinara Subs from scratch is a rewarding experience that doesn’t have to be overly complicated. With a little prep work and some kitchen basics, you can create a meal that tastes like it came from your favorite Italian deli.
This recipe yields 4-6 servings, making it perfect for larger families or smaller gatherings with leftovers for the next day. The homemade meatballs are seasoned to perfection, and the marinara sauce is simmered to a rich, aromatic finish. Topped with gooey cheese and nestled in a fresh sub roll, this dish is sure to become a regular in your family dinner rotation.
Ingredients (Serves 4-6):
- 1 pound ground beef
- 1/2 pound ground pork
- 1/2 cup breadcrumbs
- 1/4 cup grated Parmesan cheese
- 1/4 cup chopped fresh parsley
- 2 cloves garlic, minced
- 1 egg
- Salt and pepper to taste
- 1 tablespoon olive oil
- 2 cups marinara sauce
- 6 sub rolls
- 1 cup shredded mozzarella cheese
- 1/4 cup grated Parmesan cheese (for topping)
- Fresh basil leaves (optional for garnish)
Instructions:
- Prepare the Meatballs:
- In a large mixing bowl, combine the ground beef, ground pork, breadcrumbs, Parmesan cheese, parsley, minced garlic, and egg. Season with salt and pepper.
- Use your hands to mix the ingredients until just combined, being careful not to overwork the meat.
- Form the mixture into golf ball-sized meatballs, placing them on a plate or baking sheet.
- Cook the Meatballs:
- Heat the olive oil in a large skillet over medium heat.
- Add the meatballs to the skillet in batches, cooking each side until browned, about 6-8 minutes total. Transfer them to a plate and set aside.
- Simmer in Marinara Sauce:
- In the same skillet, pour in the marinara sauce and bring it to a simmer over medium heat.
- Add the browned meatballs into the sauce, ensuring they’re submerged. Cover and let them simmer for 15-20 minutes, or until cooked through.
- Prepare the Subs:
- Preheat your oven’s broiler to high.
- Split the sub rolls and lay them open on a baking sheet.
- Spoon the meatballs and sauce evenly into each sub roll.
- Add Cheese and Broil:
- Sprinkle the shredded mozzarella and additional Parmesan cheese over the meatballs.
- Place the subs under the broiler for 2-3 minutes, or until the cheese is bubbly and golden brown.
- Serve and Garnish:
- Remove from the oven, let cool slightly, and garnish with fresh basil leaves if desired.
- Serve immediately and enjoy!
Extra Tips:
To enhance the flavor of your Meatball Marinara Subs, consider making your own marinara sauce from scratch using fresh tomatoes, garlic, and herbs. If you’re short on time, a high-quality store-bought sauce will still yield delicious results.
When forming meatballs, wet your hands with a little water to prevent the mixture from sticking. Finally, for an extra touch of flavor, you can toast the sub rolls lightly before adding the meatballs and sauce. This will provide a nice crunch and keep the rolls from getting too soggy.
Cheesy Broccoli Casserole

Cheesy Broccoli Casserole is a classic comfort food dish that’s perfect for a family dinner. This recipe combines tender broccoli florets with a rich, creamy cheese sauce for a dish that’s both hearty and satisfying. The casserole is topped with a crunchy breadcrumb topping that adds a delightful texture contrast to the creamy filling.
Whether you’re looking for a side dish to complement your main course or a standalone vegetarian meal, this Cheesy Broccoli Casserole is guaranteed to please everyone at the table.
This dish isn’t only delicious but also simple to prepare, making it an ideal choice for busy weeknights or special family gatherings. The creamy cheese sauce can be made from scratch to enhance the flavors of the fresh broccoli, while the breadcrumb topping adds an inviting golden-brown finish to the casserole.
Serve this dish alongside roasted meats, or enjoy it on its own with a simple side salad for a well-rounded meal. With its cheesy goodness and comforting warmth, Cheesy Broccoli Casserole will quickly become a family favorite.
Ingredients for 4-6 servings:
- 6 cups broccoli florets
- 2 tablespoons butter
- 2 tablespoons all-purpose flour
- 1 ½ cups milk
- 2 cups shredded cheddar cheese
- 1 teaspoon garlic powder
- ½ teaspoon onion powder
- Salt and pepper to taste
- ½ cup breadcrumbs
- 2 tablespoons grated Parmesan cheese
- 1 tablespoon olive oil
Cooking Instructions:
- Preheat the Oven: Start by preheating your oven to 375°F (190°C) to guarantee it’s ready for baking the casserole once assembled.
- Prepare the Broccoli: Bring a large pot of salted water to a boil. Add the broccoli florets and blanch them for 3-4 minutes until they’re bright green and tender-crisp. Drain the broccoli and set it aside.
- Make the Cheese Sauce: In a medium saucepan over medium heat, melt the butter. Stir in the flour and cook for about 1 minute to form a roux. Gradually whisk in the milk, confirming there are no lumps. Continue to cook, stirring frequently, until the sauce has thickened.
- Add Cheese and Seasonings: Remove the sauce from heat and stir in the shredded cheddar cheese, garlic powder, onion powder, salt, and pepper. Mix until the cheese is fully melted and the sauce is smooth.
- Combine Broccoli and Sauce: In a large mixing bowl, combine the blanched broccoli with the cheese sauce. Toss until the broccoli is evenly coated.
- Prepare the Casserole Dish: Transfer the broccoli and cheese mixture into a greased 9×13-inch casserole dish, spreading it out evenly.
- Make the Topping: In a small bowl, combine breadcrumbs, grated Parmesan cheese, and olive oil. Mix until the breadcrumbs are moistened.
- Top and Bake: Sprinkle the breadcrumb mixture evenly over the casserole. Place the casserole in the preheated oven and bake for 20-25 minutes, or until the top is golden brown and crispy.
- Serve: Allow the casserole to cool for a few minutes before serving. This will allow the cheese sauce to set slightly, making it easier to portion out.
Extra Tips:
For an added depth of flavor, consider using a blend of cheeses, such as Gruyère or Monterey Jack, along with cheddar in the cheese sauce. If you prefer a bit of spice, add a pinch of cayenne pepper or a few dashes of hot sauce to the sauce mixture.
To save time, you can prepare the casserole ahead of time and store it in the refrigerator, then bake it when you’re ready to serve. Adjust the seasoning to your taste, and don’t be afraid to experiment with additional vegetables, such as cauliflower or carrots, to make this casserole your own.