

As a busy mom who loves serving healthy yet crispy meals, my air fryer has become my best friend in the kitchen. With it, I can whip up family favorites like crispy chicken tenders and lemon garlic salmon without the extra oil. These dishes are not only nutritious but also quick to prepare, making them perfect for hectic evenings. If you’re looking for meal ideas that will bring joy to your table, you’re in the right place. Let’s explore some easy and delicious recipes that will have everyone asking for seconds!
Crispy Air Fryer Chicken Tenders

Crispy Air Fryer Chicken Tenders are a delightful, healthier alternative to traditional fried chicken tenders. Using an air fryer reduces the need for excessive oil, resulting in a crispy and flavorful coating without the added calories. This dish is perfect for dinner as it’s quick to prepare and certain to be a hit with both kids and adults.
The chicken tenders are seasoned and coated with a crunchy mixture, guaranteeing each bite is packed with taste and texture. Perfect for a family dinner, this recipe serves 4-6 people and is versatile enough to pair with a variety of side dishes, such as a fresh salad or roasted vegetables.
The air fryer not only makes the cooking process faster but also guarantees even cooking, giving you perfectly crispy chicken tenders every time. Whether you’re looking for a quick weeknight meal or a fun dish for a weekend gathering, these air fryer chicken tenders are a must-try.
Ingredients:
- 1.5 pounds of chicken tenders
- 1 cup of all-purpose flour
- 1 teaspoon of garlic powder
- 1 teaspoon of onion powder
- 1 teaspoon of smoked paprika
- 1 teaspoon of salt
- 1/2 teaspoon of black pepper
- 2 large eggs
- 2 tablespoons of milk
- 2 cups of panko breadcrumbs
- Cooking spray
Instructions:
- Prepare the Chicken: Start by patting the chicken tenders dry with paper towels. This helps the coating stick better. Set them aside on a plate.
- Set Up the Breading Stations: In one shallow bowl, mix the flour, garlic powder, onion powder, smoked paprika, salt, and pepper. In a second bowl, whisk together the eggs and milk until well combined. In a third bowl, place the panko breadcrumbs.
- Bread the Chicken: Take one chicken tender at a time, dredge it in the flour mixture, ensuring it’s well coated on all sides. Shake off any excess flour. Then, dip it into the egg mixture, allowing any excess to drip off. Finally, press the chicken tender into the panko breadcrumbs, pressing gently to guarantee the breadcrumbs adhere.
- Preheat the Air Fryer: Set your air fryer to 400°F (200°C) and let it preheat for about 5 minutes.
- Cook in Batches: Lightly spray the air fryer basket with cooking spray. Place the breaded chicken tenders in a single layer in the basket, ensuring they don’t touch. Lightly spray the tops of the tenders with cooking spray for added crispiness.
- Air Fry the Tenders: Cook the chicken tenders for 10-12 minutes, flipping them halfway through the cooking time, until they’re golden brown and cooked through. The internal temperature should reach 165°F (74°C).
- Serve: Remove the chicken tenders from the air fryer and let them rest for a few minutes before serving with your choice of dipping sauces or sides.
Extra Tips:
For even crispier chicken tenders, consider double coating them by repeating the flour and egg steps before applying the panko breadcrumbs. If you prefer a spicier kick, add a pinch of cayenne pepper to the seasoning mix.
Remember not to overcrowd the air fryer basket, as this can prevent the tenders from cooking evenly. If necessary, cook in batches to guarantee each tender is perfectly crispy.
Air Fryer Lemon Garlic Salmon
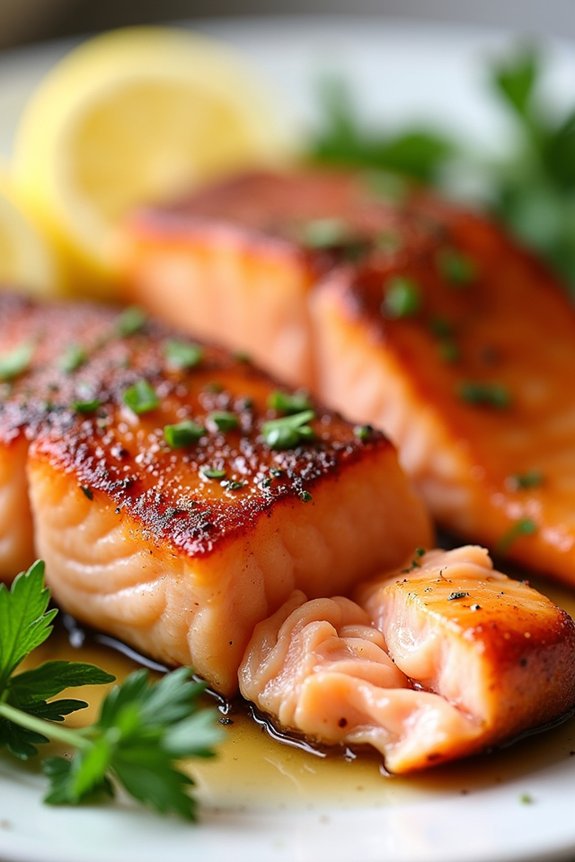
If you’re looking for a healthy and delicious family dinner that can be made with minimal fuss, Air Fryer Lemon Garlic Salmon is the perfect dish. This recipe combines the rich flavors of fresh salmon with the zesty and aromatic notes of lemon and garlic, creating a meal that’s not only nutritious but also bursting with flavor.
The air fryer helps to cook the salmon to perfection, providing a crispy exterior while keeping the interior moist and tender. This recipe is ideal for a family dinner, serving 4-6 people, and is sure to impress even the pickiest eaters.
Air Fryer Lemon Garlic Salmon is also incredibly easy to prepare, making it a great option for busy weeknights. With just a few simple ingredients and a quick cooking time, you can have a satisfying and wholesome meal on the table in under 30 minutes.
Plus, using an air fryer cuts down on the need for excessive oil, making this dish a healthier alternative to traditional frying methods. It’s a great way to enjoy the health benefits of salmon, which is rich in omega-3 fatty acids, protein, and essential nutrients, without compromising taste or convenience.
Ingredients (Serves 4-6):
- 4-6 salmon fillets (6-8 ounces each)
- 2 lemons, juiced
- 4 cloves garlic, minced
- 2 tablespoons olive oil
- 1 teaspoon salt
- 1/2 teaspoon black pepper
- 1 teaspoon dried parsley
- Lemon slices for garnish (optional)
- Fresh parsley for garnish (optional)
Cooking Instructions:
- Prepare the Marinade: In a small bowl, combine the lemon juice, minced garlic, olive oil, salt, black pepper, and dried parsley. Mix well until all ingredients are fully incorporated.
- Marinate the Salmon: Place the salmon fillets in a shallow dish or a resealable plastic bag. Pour the marinade over the salmon, making sure each fillet is thoroughly coated. Let the salmon marinate in the refrigerator for at least 15 minutes to allow the flavors to penetrate the fish.
- Preheat the Air Fryer: While the salmon is marinating, preheat your air fryer to 400°F (200°C). This usually takes about 3-5 minutes.
- Arrange the Salmon in the Air Fryer: Once preheated, remove the salmon from the marinade and place the fillets in the air fryer basket in a single layer. Avoid overcrowding the basket to guarantee even cooking.
- Cook the Salmon: Air fry the salmon at 400°F (200°C) for 8-10 minutes, depending on the thickness of the fillets. The salmon should be cooked through and easily flake with a fork. If necessary, cook for an additional 1-2 minutes.
- Garnish and Serve: Once cooked, carefully remove the salmon from the air fryer and transfer to a serving platter. Garnish with lemon slices and fresh parsley, if desired. Serve immediately.
Extra Tips:
When choosing salmon fillets, opt for fresh, wild-caught salmon for the best flavor and nutritional value. If you prefer a more intense lemon flavor, consider adding lemon zest to the marinade.
Make sure to preheat the air fryer, as this guarantees that the salmon cooks evenly and achieves a nice crispy texture. If your air fryer has a smaller basket, you may need to cook the salmon in batches.
To keep the first batch warm while cooking the second, cover the cooked salmon loosely with foil. Enjoy your Air Fryer Lemon Garlic Salmon with a side of steamed vegetables or a fresh salad for a complete and wholesome meal.
Air Fryer Stuffed Bell Peppers

Air Fryer Stuffed Bell Peppers are a delicious and healthy dinner option that’s perfect for families looking for a nutritious meal. This dish combines colorful bell peppers with a savory filling of ground turkey, quinoa, and vegetables, providing a balanced meal full of protein, fiber, and vitamins. Not only does it taste great, but using an air fryer also makes the cooking process quick and efficient, locking in flavors while keeping the dish light and healthy.
These stuffed bell peppers are versatile and can be customized to suit different taste preferences. You can easily swap out ingredients or adjust the seasonings to fit your family’s liking. Whether you’re trying to incorporate more vegetables into your meals or simply looking for a new way to enjoy bell peppers, this recipe is sure to become a family favorite.
Here’s how to make Air Fryer Stuffed Bell Peppers for 4-6 people:
Ingredients:
- 6 large bell peppers
- 1 pound ground turkey
- 1 cup cooked quinoa
- 1 medium onion, diced
- 2 cloves garlic, minced
- 1 cup canned diced tomatoes, drained
- 1 teaspoon Italian seasoning
- 1 cup shredded mozzarella cheese
- Salt and pepper to taste
- Olive oil spray
Cooking Instructions:
- Prepare the Bell Peppers: Begin by washing the bell peppers thoroughly. Cut the tops off and remove the seeds and membranes inside. Lightly spray the outside of the peppers with olive oil spray to guarantee they cook evenly and don’t stick to the air fryer basket.
- Cook the Filling: Heat a non-stick skillet over medium heat. Add the ground turkey and cook until browned, breaking it into small pieces with a spatula. Add the diced onion and minced garlic, cooking until the onion is translucent.
- Combine Ingredients: In a large bowl, combine the cooked quinoa, cooked turkey mixture, drained diced tomatoes, Italian seasoning, salt, and pepper. Mix thoroughly until all ingredients are well incorporated.
- Stuff the Peppers: Spoon the filling mixture into each bell pepper, packing it tightly. Be sure to leave a little space at the top for the cheese.
- Air Fry the Peppers: Preheat the air fryer to 360°F (182°C). Place the stuffed peppers in the air fryer basket, making sure they’re upright and not touching each other. Air fry for 10 minutes.
- Add Cheese and Finish Cooking: Carefully remove the basket and sprinkle the top of each pepper with shredded mozzarella cheese. Return the basket to the air fryer and cook for an additional 5 minutes, or until the cheese is melted and bubbly.
- Serve: Allow the peppers to cool for a few minutes before serving. They can be garnished with fresh herbs or served with a side salad for a complete meal.
Extra Tips:
When selecting bell peppers, try to choose ones that are similar in size so they cook evenly. If you prefer a vegetarian option, you can substitute the ground turkey with black beans or chickpeas. Additionally, if you like a bit of spice, consider adding a pinch of crushed red pepper flakes to the filling.
Be sure to adjust the cooking time slightly if your air fryer model is different or if you’re using smaller peppers. Enjoy your healthy Air Fryer Stuffed Bell Peppers!
Zucchini Fries in the Air Fryer

Elevate your family dinner with a healthy twist by making Zucchini Fries in the Air Fryer. This recipe is a delightful alternative to traditional fries, providing a crispy, flavorful snack that even picky eaters will enjoy. The air fryer cooks the zucchini to perfection, guaranteeing a crunchy exterior while keeping the inside tender and juicy. Not only is this dish delicious, but it’s also a great way to incorporate more vegetables into your family’s diet without compromising on taste.
These Zucchini Fries are easy to prepare and require minimal ingredients, making them a perfect addition to any meal. Serve them as a side dish or enjoy them as a snack with your favorite dipping sauce. With just a few simple steps, you’ll have a plate of scrumptious, guilt-free fries that will leave everyone asking for seconds. This recipe yields enough for 4-6 people, making it ideal for a family gathering or dinner.
Ingredients:
- 3 medium zucchinis
- 1 cup all-purpose flour
- 2 large eggs
- 1 cup panko breadcrumbs
- 1/2 cup grated Parmesan cheese
- 1 teaspoon garlic powder
- 1 teaspoon onion powder
- 1 teaspoon paprika
- Salt and pepper to taste
- Cooking spray
Instructions:
- Prepare the Zucchinis: Begin by washing the zucchinis thoroughly. Cut them into fry-shaped pieces, approximately 3 inches long and 1/2 inch thick, guaranteeing they’re uniform in size for even cooking.
- Set Up Breading Station: In three separate shallow bowls, place the all-purpose flour in the first, whisk the eggs in the second, and combine the panko breadcrumbs, Parmesan cheese, garlic powder, onion powder, paprika, salt, and pepper in the third.
- Coat the Zucchini: Dredge each zucchini piece in flour, shaking off any excess. Then, dip it into the beaten eggs, allowing any excess to drip off. Finally, coat it thoroughly with the breadcrumb mixture, pressing gently to adhere.
- Preheat the Air Fryer: Preheat your air fryer to 400°F (200°C) for about 5 minutes. This guarantees the zucchini fries will cook evenly and become crispy.
- Arrange the Fries: Lightly coat the air fryer basket with cooking spray. Place the zucchini fries in a single layer in the basket, making sure they don’t touch or overlap to allow for even cooking. You may need to cook in batches depending on the size of your air fryer.
- Cook the Zucchini Fries: Air fry the zucchini fries for 10-12 minutes, flipping them halfway through the cooking time to guarantee both sides are crispy and golden brown.
- Serve and Enjoy: Once cooked, carefully remove the zucchini fries from the air fryer and serve immediately with your favorite dipping sauce, such as marinara or ranch.
Extra Tips:
For an extra crispy finish, lightly spray the breaded zucchini fries with cooking spray before placing them in the air fryer. If you find the fries are browning too quickly, reduce the temperature slightly or check them a minute earlier than the suggested time.
When cutting the zucchini, try to keep the pieces as uniform as possible for consistent cooking. Finally, feel free to adjust the seasoning to suit your taste, adding a bit of cayenne pepper for a spicy kick or some Italian herbs for an aromatic touch.
Air Fryer Shrimp Tacos

If you’re looking for a quick, delicious, and healthy dinner option for your family, these Air Fryer Shrimp Tacos are a perfect choice. Using an air fryer not only reduces the amount of oil needed but also guarantees the shrimp are cooked to perfection, with a crispy exterior and tender inside.
Paired with a tangy slaw and wrapped in soft tortillas, these tacos are sure to be a hit with both kids and adults alike. They’re perfect for a busy weeknight or a relaxed weekend dinner.
The beauty of this dish lies in its simplicity and the fresh flavors that come together to create a satisfying meal. The shrimp is seasoned with a blend of spices that bring out its natural sweetness, while the slaw adds a revitalizing crunch.
These tacos aren’t only easy to make but also customizable, allowing you to add your family’s favorite toppings such as avocado, fresh cilantro, or a squeeze of lime juice. This recipe serves 4-6 people, making it ideal for family dinners or small gatherings.
Ingredients for Air Fryer Shrimp Tacos (serves 4-6):
- 1 1/2 pounds large shrimp, peeled and deveined
- 2 tablespoons olive oil
- 1 teaspoon garlic powder
- 1 teaspoon smoked paprika
- 1/2 teaspoon cumin
- 1/2 teaspoon salt
- 1/4 teaspoon black pepper
- 8-12 small corn or flour tortillas
- 2 cups shredded cabbage or coleslaw mix
- 1/4 cup mayonnaise
- 1 tablespoon lime juice
- 1 teaspoon honey
- Optional toppings: avocado slices, chopped cilantro, lime wedges, salsa
Cooking Instructions:
- Prepare the Shrimp: In a large bowl, combine the olive oil, garlic powder, smoked paprika, cumin, salt, and black pepper. Add the shrimp to the bowl and toss until they’re evenly coated with the seasoning.
- Preheat the Air Fryer: Set your air fryer to 400°F (200°C) and allow it to preheat for about 3-5 minutes.
- Cook the Shrimp: Place the seasoned shrimp in a single layer in the air fryer basket. Cook for 8-10 minutes, shaking the basket halfway through, until the shrimp are pink and opaque.
- Prepare the Slaw: While the shrimp are cooking, in a separate bowl, mix the shredded cabbage, mayonnaise, lime juice, and honey. Stir until well combined and set aside.
- Warm the Tortillas: In a dry skillet over medium heat, warm the tortillas for about 30 seconds on each side until they’re pliable.
- Assemble the Tacos: Fill each tortilla with a few shrimp, a scoop of slaw, and any additional toppings you desire such as avocado slices, cilantro, or a squeeze of lime.
Extra Tips:
When cooking the shrimp in the air fryer, avoid overcrowding the basket to guarantee even cooking. You may need to cook the shrimp in batches depending on the size of your air fryer.
For a spicier kick, consider adding a pinch of cayenne pepper to the shrimp seasoning. If you prefer a creamier slaw, increase the amount of mayonnaise, or for a lighter version, substitute Greek yogurt.
These tacos are versatile, so feel free to experiment with different toppings and sauces to suit your family’s taste preferences. Enjoy your meal with a side of black beans or Mexican rice for a complete dinner experience.
Air Fryer Cauliflower Steaks

Air Fryer Cauliflower Steaks are a delicious and healthy option for family dinners, offering a flavorful alternative to traditional meals. This dish capitalizes on the versatility of cauliflower, transforming it into hearty steaks that are both satisfying and nutritious.
Air frying the cauliflower allows you to achieve a perfectly crispy exterior while maintaining a tender interior, all without the need for excessive oil. This method not only enhances the natural flavors of the cauliflower but also keeps the meal light and healthy, making it perfect for those looking to enjoy a guilt-free dinner.
This recipe is designed to serve 4-6 people, making it ideal for a family meal or small gathering. The preparation is simple and requires only a few ingredients, most of which you likely already have at home. By using an air fryer, you can cut down on cooking time and guarantee an evenly cooked dish with minimal effort.
Whether you’re a seasoned vegetarian or someone looking to incorporate more plant-based meals into your diet, these Air Fryer Cauliflower Steaks are sure to become a favorite in your dinner rotation.
Ingredients (Serves 4-6):
- 2 large heads of cauliflower
- 3 tablespoons olive oil
- 1 teaspoon smoked paprika
- 1 teaspoon garlic powder
- 1 teaspoon onion powder
- 1 teaspoon salt
- 1/2 teaspoon black pepper
- 1/4 teaspoon cayenne pepper (optional, for heat)
- Fresh parsley, chopped (for garnish)
- Lemon wedges (for serving)
Cooking Instructions:
- Prepare the Cauliflower:
- Begin by removing the outer leaves from the cauliflower heads and trim the stem ends. Cut each cauliflower head into 1-inch thick slices. You should get about 2-3 steaks per head, depending on size. Reserve any smaller florets that break off for another use.
- Season the Steaks:
- In a small bowl, mix together the olive oil, smoked paprika, garlic powder, onion powder, salt, black pepper, and cayenne pepper. Brush this mixture generously over both sides of each cauliflower steak, making sure they’re well coated.
- Preheat the Air Fryer:
- Preheat your air fryer to 375°F (190°C). This typically takes about 3-5 minutes, depending on your air fryer model.
- Cook the Cauliflower Steaks:
- Place the seasoned cauliflower steaks in the air fryer basket, ensuring they’re in a single layer and not overcrowded. You may need to cook them in batches. Air fry for 15-20 minutes, flipping halfway through, until the edges are golden brown and crispy, and the center is tender.
- Serve:
- Once cooked, remove the cauliflower steaks from the air fryer and garnish with freshly chopped parsley. Serve immediately with lemon wedges on the side for an added burst of freshness.
Extra Tips:
For best results, select cauliflower heads that are firm and heavy for their size, with tightly packed florets. This will guarantee that the steaks hold together well during cooking.
If you’re preparing cauliflower steaks for the first time, be gentle when cutting the slices to minimize breakage. Depending on the size of your air fryer, you may need to cook in multiple batches, so keep the cooked steaks warm in a low oven until ready to serve.
Feel free to customize the seasoning to your taste; adding a sprinkle of nutritional yeast can impart a cheesy flavor without any dairy. Enjoy these Air Fryer Cauliflower Steaks as a main course or a hearty side dish.
Air Fryer Turkey Meatballs

Air Fryer Turkey Meatballs are a healthy and delicious option for your family dinners, providing a lean source of protein packed with flavor.
These meatballs are a versatile dish that can be enjoyed on their own, with a side of vegetables, or paired with your favorite pasta. Cooking them in an air fryer guarantees they’re crispy on the outside while remaining juicy and tender on the inside, making them a delightful addition to your meal rotation.
Preparing these turkey meatballs is quick and straightforward, making them perfect for busy weeknights when time is of the essence. The air fryer not only reduces cooking time but also cuts down on the amount of oil needed, offering a healthier alternative to traditional frying methods.
With a blend of herbs and spices, these meatballs are flavorful and satisfying, sure to be a hit with both kids and adults alike.
Ingredients for 4-6 Servings:
- 1 pound ground turkey
- 1/4 cup breadcrumbs
- 1/4 cup grated Parmesan cheese
- 1 large egg
- 2 cloves garlic, minced
- 1 tablespoon Italian seasoning
- 1/2 teaspoon salt
- 1/4 teaspoon black pepper
- Cooking spray
Cooking Instructions:
- Prepare the Mixture: In a large bowl, combine the ground turkey, breadcrumbs, Parmesan cheese, egg, minced garlic, Italian seasoning, salt, and black pepper. Mix thoroughly using your hands or a spatula until all ingredients are well incorporated.
- Shape the Meatballs: Using your hands, form the mixture into meatballs approximately 1 to 1.5 inches in diameter. Aim for uniform size to guarantee even cooking. You should yield about 16-20 meatballs.
- Preheat the Air Fryer: Set your air fryer to 400°F (200°C) and allow it to preheat for about 3-5 minutes to guarantee it reaches the desired temperature.
- Arrange the Meatballs: Lightly spray the air fryer basket with cooking spray to prevent sticking. Place the meatballs in a single layer in the basket, making sure they don’t touch or overlap.
- Cook the Meatballs: Cook the meatballs in the air fryer for 10-12 minutes, turning them halfway through the cooking time. They should be golden brown and have an internal temperature of 165°F (74°C) when done.
- Serve and Enjoy: Once cooked, remove the meatballs from the air fryer and let them rest for a few minutes before serving. Pair them with your favorite dipping sauce or as part of a larger meal.
Extra Tips:
For an extra burst of flavor, consider adding finely chopped fresh herbs like parsley or basil to the meatball mixture.
If you find the mixture too sticky when forming the meatballs, wet your hands slightly to make handling easier.
Additionally, you can prepare the meatballs in advance and freeze them raw or cooked for quick meals in the future. Just be sure to adjust cooking times if you’re starting from frozen.
Air Fryer Sweet Potato Wedges

Air Fryer Sweet Potato Wedges are a delicious and healthy alternative to traditional fried potatoes, offering a perfect balance of crispy exteriors and tender, flavorful interiors. These wedges are an excellent choice for a family dinner, as they’re simple to prepare and packed with nutrients. Sweet potatoes are rich in fiber, vitamins, and antioxidants, making them a healthy addition to your meal.
Cooking them in an air fryer reduces the need for excessive oil, lowering the overall calorie content while still providing that desirable crisp texture. Perfect for serving alongside grilled meats or as a standalone dish, Air Fryer Sweet Potato Wedges are versatile and can be seasoned to suit your family’s taste preferences.
Whether you prefer a classic combination of salt and pepper or a more adventurous mix of spices, these wedges are sure to please even the pickiest eaters. Plus, the quick cooking time in the air fryer means you can have this delicious side dish ready in no time, making it ideal for busy weeknights or relaxed family gatherings.
Ingredients (serving size: 4-6 people):
- 4 large sweet potatoes
- 2 tablespoons olive oil
- 1 teaspoon garlic powder
- 1 teaspoon smoked paprika
- 1/2 teaspoon salt
- 1/2 teaspoon black pepper
- Optional: fresh parsley for garnish
Cooking Instructions:
- Prepare the Sweet Potatoes: Begin by washing and peeling the sweet potatoes. Cut them into wedges, guaranteeing each piece is approximately the same size for even cooking.
- Season the Wedges: In a large mixing bowl, combine the sweet potato wedges with olive oil, garlic powder, smoked paprika, salt, and black pepper. Toss the wedges until they’re evenly coated with the oil and seasonings.
- Preheat the Air Fryer: Set your air fryer to 400°F (200°C) and allow it to preheat for about 5 minutes. This will ascertain the wedges start cooking immediately, helping them achieve a crispy texture.
- Arrange in the Air Fryer: Place the seasoned sweet potato wedges in a single layer in the air fryer basket. Avoid overcrowding to ascertain even cooking; you may need to cook in batches depending on the size of your air fryer.
- Cook the Wedges: Cook the sweet potato wedges for 15-20 minutes, shaking the basket halfway through to ascertain they cook evenly. They should be golden brown and crispy on the outside.
- Serve and Garnish: Once cooked, remove the sweet potato wedges from the air fryer and transfer them to a serving dish. Optionally, garnish with fresh parsley for added flavor and presentation.
Extra Tips:
For even crispier wedges, soak the cut sweet potatoes in cold water for 30 minutes before seasoning. This helps to remove excess starch, which can prevent them from becoming crispy.
Dry the wedges thoroughly before adding the oil and spices. If you prefer spicier wedges, consider adding a pinch of cayenne pepper or red pepper flakes to the seasoning mix. Remember, cooking times may vary slightly depending on the size and model of your air fryer, so keep an eye on the wedges during the last few minutes of cooking to prevent them from burning.
Air Fryer Falafel Wraps

Air Fryer Falafel Wraps are a delicious and healthy option for a satisfying family dinner. These wraps are a perfect blend of crispy falafels, fresh vegetables, and creamy tahini sauce, all wrapped up in a soft flatbread. The air fryer guarantees that the falafels are crispy on the outside and tender on the inside without the need for deep-frying, making them a healthier choice for the whole family.
With simple ingredients and a quick cooking time, Air Fryer Falafel Wraps are an ideal meal for busy weeknights. The falafels are made from chickpeas, herbs, and spices, offering a protein-rich filling that’s both nutritious and flavorful. When combined with crunchy lettuce, juicy tomatoes, and invigorating cucumber slices, these wraps become a well-rounded meal that everyone will love.
The creamy tahini sauce adds a tangy and nutty flavor that complements the falafels perfectly. Serve these wraps for dinner, and enjoy a meal that’s not only delicious but also packed with health benefits.
Ingredients for 4-6 servings:
- 2 cups canned chickpeas, drained and rinsed
- 1 small onion, finely chopped
- 3 cloves garlic, minced
- 1/4 cup fresh parsley, chopped
- 1/4 cup fresh cilantro, chopped
- 2 teaspoons ground cumin
- 1 teaspoon ground coriander
- 1 teaspoon baking powder
- 1/4 cup all-purpose flour
- Salt and pepper to taste
- Olive oil spray
- 6 flatbreads or pita bread
- 1 cup lettuce, shredded
- 2 tomatoes, sliced
- 1 cucumber, sliced
- 1/2 cup tahini sauce
Cooking Instructions:
- Prepare the Falafel Mixture: In a food processor, combine the chickpeas, onion, garlic, parsley, cilantro, cumin, coriander, baking powder, flour, salt, and pepper. Pulse the mixture until it’s well combined but still slightly chunky. Be careful not to over-process, as you want some texture.
- Shape the Falafels: Use your hands to form the mixture into small balls or patties, about 1 to 1.5 inches in diameter. Place them on a tray lined with parchment paper.
- Preheat the Air Fryer: Set your air fryer to 375°F (190°C) and let it preheat for about 5 minutes.
- Cook the Falafels: Lightly spray the falafels with olive oil and place them in the air fryer basket in a single layer. You may need to cook them in batches if they don’t all fit at once. Air fry the falafels for 12-15 minutes, flipping them halfway through, until they’re golden brown and crispy.
- Assemble the Wraps: Warm the flatbreads or pita bread in the air fryer for about 2 minutes. Lay each flatbread on a plate and place a few pieces of lettuce, tomato slices, and cucumber slices in the center. Add 3-4 falafels on top of the vegetables.
- Add the Sauce: Drizzle the tahini sauce generously over the falafels and vegetables. Fold the sides of the flatbread over the filling to create a wrap. Secure with a toothpick if needed.
Extra Tips: For the best results, make sure that the falafel mixture isn’t too wet; if it seems too moist, add a little more flour to achieve the right consistency. Additionally, if you prefer spicier falafels, feel free to add a pinch of cayenne pepper or crushed red pepper flakes to the mixture.
To keep the wraps warm until serving, you can wrap them in aluminum foil and place them in a low-temperature oven. Enjoy these wraps with a side of hummus for an extra flavor boost!
Air Fryer Veggie Stir-Fry
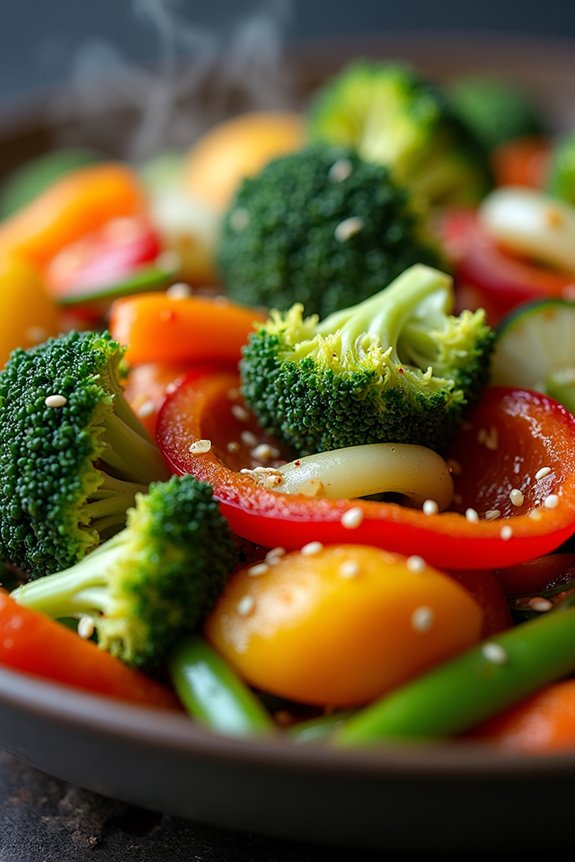
Air Fryer Veggie Stir-Fry is a delightful, quick, and healthy dinner option for anyone looking to bring more vegetables into their family’s diet. This recipe combines a colorful array of fresh vegetables, soy sauce, and a hint of garlic to create a flavorful dish that’s ready in under 30 minutes.
By using an air fryer, you retain the nutrients of the vegetables while achieving a slightly crispy texture and reducing the need for excessive oil, making it a perfect choice for a nutritious family meal.
This dish serves 4-6 people and is perfect for those busy weeknights when you need something quick yet wholesome. Whether you’re a seasoned pro at using an air fryer or just getting started, this recipe is easy to follow and yields delicious results every time. The combination of vibrant vegetables not only provides a visual appeal but also guarantees a variety of nutrients in each serving.
Ingredients (for 4-6 people):
- 2 cups broccoli florets
- 1 red bell pepper, sliced
- 1 yellow bell pepper, sliced
- 1 zucchini, sliced
- 1 cup snap peas
- 2 carrots, julienned
- 2 tablespoons olive oil
- 3 tablespoons soy sauce
- 2 cloves garlic, minced
- 1 tablespoon sesame seeds
- Salt and pepper to taste
- Optional: 1 tablespoon freshly grated ginger
- Optional: 1 tablespoon honey for added sweetness
Cooking Instructions:
- Prepare the Vegetables: Wash and cut the broccoli, bell peppers, zucchini, snap peas, and carrots as directed. Confirm all the vegetables are similar in size to promote even cooking.
- Preheat the Air Fryer: Set your air fryer to 375°F (190°C) and allow it to preheat for about 3-5 minutes.
- Mix the Sauce: In a small bowl, combine the olive oil, soy sauce, minced garlic, sesame seeds, and, if using, freshly grated ginger and honey. Stir well to make sure the ingredients are well mixed.
- Combine Ingredients: In a large mixing bowl, place all the prepared vegetables. Drizzle the sauce over the vegetables and toss them until they’re evenly coated with the mixture.
- Air Fry the Vegetables: Place the coated vegetables into the air fryer basket, spreading them out as evenly as possible. Cook for 10-12 minutes, shaking the basket halfway through to guarantee even cooking.
- Season and Serve: Once the vegetables are cooked and slightly crispy, remove them from the air fryer. Season with salt and pepper to taste and serve immediately.
Extra Tips:
For an added crunch and flavor, consider topping the stir-fry with a sprinkle of toasted nuts such as almonds or cashews before serving.
If you prefer a spicier dish, add a dash of red pepper flakes or a splash of sriracha to the sauce before tossing with the vegetables.
Air Fryer Spicy Chickpeas

Air Fryer Spicy Chickpeas are a delicious and healthy addition to any family dinner. This recipe transforms simple chickpeas into a crispy, spicy delight that’s perfect for snacking or as a flavorful topping for salads and bowls. The air fryer method guarantees that the chickpeas are evenly cooked and crunchy without the need for excessive oil, making it a guilt-free treat that can be enjoyed by everyone at the table.
Plus, with its quick and easy preparation, you can whip this dish up in no time, making it ideal for busy weeknights. Packed with protein and fiber, these spicy chickpeas not only satisfy your taste buds but also provide essential nutrients.
Chickpeas are a versatile legume that readily absorb flavors, making them an excellent canvas for a variety of seasonings. In this recipe, a blend of spices gives the chickpeas a kick that’s not overpowering but enough to get your taste buds dancing. Whether you’re serving them as a side dish or including them as part of a main course, these spicy chickpeas are sure to become a family favorite.
Ingredients (serves 4-6):
- 2 cans (15 oz each) of chickpeas, drained and rinsed
- 2 tablespoons olive oil
- 2 teaspoons smoked paprika
- 1 teaspoon cayenne pepper
- 1 teaspoon garlic powder
- 1 teaspoon onion powder
- 1 teaspoon ground cumin
- 1 teaspoon salt
- ½ teaspoon black pepper
Cooking Instructions:
- Preheat the Air Fryer: Before you begin preparing the chickpeas, preheat your air fryer to 400°F (200°C). This guarantees that the chickpeas start cooking immediately when placed inside, resulting in a crispier texture.
- Prepare the Chickpeas: Drain and rinse the canned chickpeas thoroughly. Pat them dry using a kitchen towel or paper towels to remove as much moisture as possible. This step is vital for achieving a crispy finish.
- Season the Chickpeas: In a large mixing bowl, combine the dried chickpeas with olive oil, smoked paprika, cayenne pepper, garlic powder, onion powder, ground cumin, salt, and black pepper. Toss the chickpeas until they’re evenly coated with the spice mixture.
- Air Fry the Chickpeas: Transfer the seasoned chickpeas into the air fryer basket in a single layer, guaranteeing they aren’t overcrowded. Cook the chickpeas at 400°F (200°C) for 15-20 minutes, shaking the basket halfway through to guarantee even cooking. The chickpeas should be golden brown and crispy when done.
- Serve and Enjoy: Once cooked, remove the chickpeas from the air fryer and let them cool slightly before serving. They can be enjoyed warm or at room temperature, making them a flexible addition to any meal.
Extra Tips:
To get the crispiest chickpeas, verify they’re completely dry before seasoning and air frying. You can also experiment with different spice blends to suit your family’s taste preferences.
If you’re not a fan of too much heat, reduce the cayenne pepper, or substitute it with a milder chili powder. These chickpeas can be stored in an airtight container for up to 3 days, though they’re best enjoyed fresh for maximum crunchiness.
Air Fryer Eggplant Parmesan

Air Fryer Eggplant Parmesan is a delightful and healthier twist on the traditional Italian dish that the whole family can enjoy. This version uses an air fryer to achieve a crispy, golden crust without the excess oil typically required for frying. The eggplant slices are breaded and cooked to perfection, creating a dish that maintains all the flavors you love while being lighter and more nutritious.
Perfect for busy weeknights or a cozy family dinner, this recipe showcases how an air fryer can be a versatile tool in preparing delicious and healthy meals.
Eggplant Parmesan in the air fryer isn’t only quick to make but also keeps your kitchen mess-free compared to traditional frying methods. The eggplant slices are coated in a flavorful mixture of breadcrumbs and Parmesan cheese, which crisps up beautifully in the air fryer, while the inside remains tender and succulent.
Topped with marinara sauce and melted mozzarella cheese, this dish is sure to become a family favorite. With just a few simple ingredients, you can bring this classic Italian comfort food to your table in a healthier way.
Ingredients (Serves 4-6):
- 2 medium eggplants, sliced into 1/4-inch rounds
- 1 cup all-purpose flour
- 3 large eggs, beaten
- 1 1/2 cups Italian-style breadcrumbs
- 1 cup grated Parmesan cheese
- 2 cups marinara sauce
- 2 cups shredded mozzarella cheese
- Salt and pepper to taste
- Cooking spray or olive oil spray
- Fresh basil for garnish (optional)
Cooking Instructions:
- Prepare the Eggplant: Slice the eggplants into 1/4-inch thick rounds. Lay the slices on a baking sheet and sprinkle both sides with salt. Let them sit for about 15-20 minutes to draw out excess moisture. Afterward, pat the slices dry with paper towels.
- Set Up Breading Station: Prepare three shallow dishes. In the first dish, place the flour. In the second dish, beat the eggs. In the third dish, combine the breadcrumbs and grated Parmesan cheese.
- Bread the Eggplant: Dip each eggplant slice first in the flour, shaking off any excess. Then, dip it into the beaten eggs, allowing any excess to drip off. Finally, coat it with the breadcrumb and Parmesan mixture, pressing gently to confirm the coating sticks well.
- Preheat the Air Fryer: Preheat your air fryer to 375°F (190°C) for about 5 minutes.
- Cook the Eggplant: Lightly spray the air fryer basket with cooking spray. Arrange the breaded eggplant slices in a single layer without overlapping. Spray the tops with cooking spray. Air fry for 8-10 minutes, flipping halfway through, until the eggplant is golden brown and crispy.
- Assemble the Dish: Once all the eggplant slices are cooked, layer them in a baking dish or directly in the air fryer basket (if it fits). Spoon marinara sauce over each slice and sprinkle with mozzarella cheese.
- Melt the Cheese: Return the assembled eggplant Parmesan to the air fryer and cook at 350°F (175°C) for an additional 3-5 minutes until the cheese is melted and bubbly.
- Serve: Garnish with fresh basil if desired and serve hot.
Extra Tips:
For best results, confirm the eggplant slices are evenly coated with breadcrumbs to achieve a uniform crispness. If you prefer a spicier kick, try adding a pinch of red pepper flakes to the breadcrumb mixture.
Also, make sure to not overcrowd the air fryer basket; cook in batches if necessary for the crispiest results. If you have leftover marinara sauce, serve it on the side for dipping. Finally, always preheat your air fryer for even cooking and ideal crispiness.
Air Fryer Honey Mustard Pork Chops

The Air Fryer Honey Mustard Pork Chops are a delightful blend of sweet and savory flavors that come together to create a mouthwatering meal perfect for family dinners.
This dish capitalizes on the efficiency and health benefits of air frying, offering a juicy and succulent pork chop with a perfectly caramelized exterior. The honey mustard glaze provides a tangy sweetness that complements the natural flavors of the pork, making it an irresistible option for any day of the week.
Not only is this dish incredibly flavorful, but it’s also quick and easy to prepare, making it a perfect choice for busy families.
With the air fryer, you can achieve a crispy texture without the need for excessive oil, allowing you to enjoy all the taste without the guilt. This recipe is designed to serve 4-6 people, guaranteeing everyone at the table can savor the deliciousness of these honey mustard pork chops.
Ingredients (Serves 4-6):
- 4-6 pork chops, bone-in or boneless
- 1/2 cup honey
- 1/4 cup Dijon mustard
- 2 tablespoons olive oil
- 2 tablespoons apple cider vinegar
- 2 garlic cloves, minced
- 1 teaspoon salt
- 1/2 teaspoon black pepper
- Cooking spray
Cooking Instructions:
- Prepare the Marinade: In a medium bowl, whisk together the honey, Dijon mustard, olive oil, apple cider vinegar, minced garlic, salt, and black pepper. Mix until all ingredients are well combined and set aside.
- Marinate the Pork Chops: Place the pork chops in a large resealable plastic bag or shallow dish. Pour the honey mustard marinade over the pork chops, making sure they’re evenly coated. Seal the bag or cover the dish and let the pork chops marinate in the refrigerator for at least 30 minutes, or up to 2 hours for more intense flavor.
- Preheat the Air Fryer: Preheat your air fryer to 375°F (190°C) for about 5 minutes. This step guarantees even cooking of the pork chops.
- Prepare the Air Fryer Basket: Lightly spray the air fryer basket with cooking spray to prevent sticking. Arrange the pork chops in a single layer in the basket, making sure they don’t overlap.
- Cook the Pork Chops: Air fry the pork chops for 12-15 minutes, flipping them halfway through the cooking time. Use a meat thermometer to confirm the internal temperature reaches 145°F (63°C) for safe consumption.
- Rest and Serve: Remove the pork chops from the air fryer and let them rest for 5 minutes before serving. This allows the juices to redistribute, resulting in tender and juicy pork chops.
Extra Tips:
When selecting pork chops, opt for ones that are about 1-inch thick for the best results in the air fryer. Thicker chops will stay juicier during cooking.
If you prefer a spicier kick, consider adding a teaspoon of red pepper flakes to the marinade. For added flavor, garnish the cooked pork chops with fresh herbs like parsley or thyme before serving.
Remember to clean your air fryer basket thoroughly after cooking to maintain its performance and longevity.
Air Fryer Roasted Brussels Sprouts
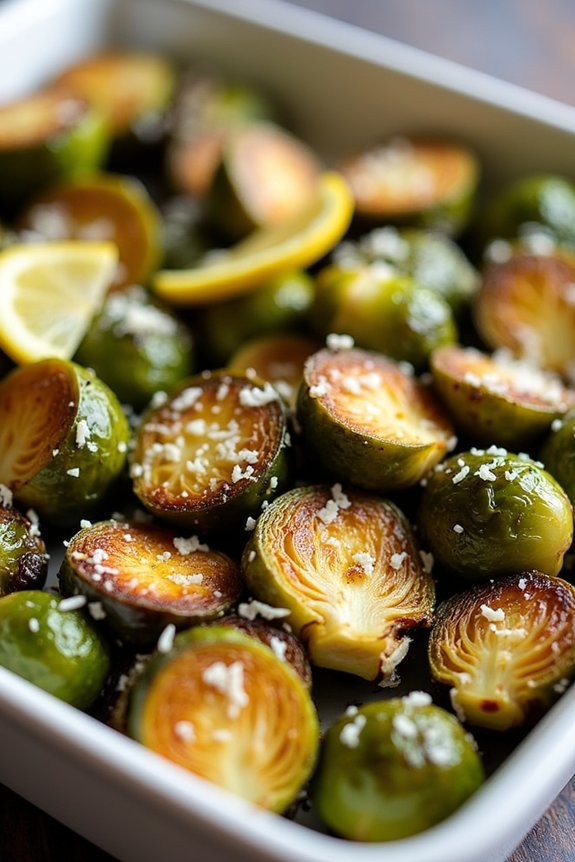
Air Fryer Roasted Brussels Sprouts are a healthy, delicious, and easy-to-make side dish that perfectly complements any family dinner. This recipe transforms the humble Brussels sprout into a crispy, caramelized delight with a tender interior, making it an irresistible addition to your meal. The use of an air fryer not only speeds up the cooking process but also guarantees even cooking with minimal oil, making it a healthier alternative to traditional roasting methods.
This recipe serves 4-6 people and requires just a few simple ingredients that you likely already have in your pantry. The Brussels sprouts are seasoned with a mix of olive oil, garlic, and Parmesan cheese, giving them a savory and aromatic flavor profile. With just a few minutes of prep and cooking time, Air Fryer Roasted Brussels Sprouts can easily become a staple on your dinner table.
Ingredients:
- 1.5 pounds Brussels sprouts, trimmed and halved
- 2 tablespoons olive oil
- 3 cloves garlic, minced
- Salt to taste
- Black pepper to taste
- 1/4 cup grated Parmesan cheese
- Lemon wedges for serving (optional)
Cooking Instructions:
- Prepare the Brussels Sprouts: Begin by trimming the ends of the Brussels sprouts and removing any yellow or damaged outer leaves. Cut each Brussels sprout in half lengthwise to guarantee even cooking.
- Season the Sprouts: In a large mixing bowl, combine the halved Brussels sprouts with olive oil, minced garlic, salt, and black pepper. Toss everything together until the sprouts are evenly coated with the seasoning.
- Preheat the Air Fryer: Set your air fryer to 375°F (190°C) and allow it to preheat for about 3-5 minutes. Preheating guarantees the Brussels sprouts start cooking immediately, giving them a nice crispy texture.
- Cook the Brussels Sprouts: Place the seasoned Brussels sprouts in the air fryer basket in a single layer, guaranteeing they aren’t overcrowded. Cook for 15-18 minutes, shaking the basket halfway through to guarantee even cooking. The sprouts should be golden brown and crispy on the outside.
- Add Parmesan Cheese: Once the Brussels sprouts are cooked, transfer them back to the mixing bowl and sprinkle with grated Parmesan cheese. Toss until the cheese is evenly distributed and slightly melted from the heat of the sprouts.
- Serve: Transfer the Brussels sprouts to a serving dish and serve immediately. Optionally, garnish with lemon wedges for an added burst of freshness.
Extra Tips:
For best results, guarantee your Brussels sprouts are of similar size to cook evenly. If they vary in size, consider cutting larger ones into quarters.
If you prefer a bit of spice, add a pinch of red pepper flakes when seasoning the sprouts. Remember, the key to crispy Brussels sprouts isn’t overcrowding the air fryer basket; if necessary, cook them in batches to achieve the desired texture. Enjoy this healthy side dish with your favorite main course!