

Gather around the kitchen table and let’s celebrate the vibrant flavors of Mexican cuisine. From spicy beef tacos to creamy guacamole, these recipes are all about bringing joy and warmth to your family dinners. Each dish carries a piece of tradition, perfect for creating colorful evenings filled with laughter. Let’s explore these 15 Mexican family dinner recipes that promise to turn any meal into a fiesta. Get ready to enjoy the rich aromas and delightful tastes that make Mexican food so special.
Classic Chicken Enchiladas

Chicken enchiladas are a staple in Mexican cuisine, known for their rich flavors and comforting textures. This classic dish features tender shredded chicken wrapped in soft corn tortillas, smothered in a vibrant and flavorful enchilada sauce, and topped with melted cheese.
Typically served with refried beans and Mexican rice, these enchiladas are a favorite at family dinners and gatherings. The combination of savory chicken, tangy sauce, and creamy cheese makes for an irresistible meal that’s both satisfying and delightful.
Preparing classic chicken enchiladas begins with roasting or boiling chicken until it’s perfectly tender, then shredding it to create the filling. The enchilada sauce, often made from scratch, is a crucial component that brings the dish to life with its aromatic blend of spices and tomatoes.
Once assembled, the enchiladas are baked until bubbly and golden brown, creating a dish that’s as visually appealing as it’s delicious. Perfect for serving 4-6 people, this recipe will guide you through making a family favorite that’s sure to be a hit at any dinner table.
Ingredients:
- 2 cups cooked, shredded chicken
- 12 corn tortillas
- 2 cups enchilada sauce
- 2 cups shredded cheese (such as Monterey Jack or cheddar)
- 1 cup chopped onion
- 1 cup sour cream
- 1/4 cup chopped cilantro (optional)
- Olive oil for frying
- Salt and pepper to taste
Cooking Instructions:
- Preheat the Oven: Begin by preheating your oven to 375°F (190°C). This guarantees that your enchiladas will bake evenly.
- Prepare the Enchilada Sauce: If using homemade sauce, make sure it’s ready. Otherwise, pour the store-bought enchilada sauce into a saucepan and warm it over low heat.
- Cook the Chicken: If the chicken isn’t cooked yet, boil or roast it until fully cooked and tender. Once done, shred the chicken using two forks and season with salt and pepper.
- Sauté the Onions: In a frying pan, heat a small amount of olive oil over medium heat. Add the chopped onions and sauté until they’re soft and translucent, about 5 minutes.
- Warm the Tortillas: Lightly fry each corn tortilla in a bit of olive oil for a few seconds on each side until they’re pliable. This prevents them from cracking when rolled.
- Assemble the Enchiladas: Spread a thin layer of enchilada sauce on the bottom of a baking dish. Take a warm tortilla, fill it with shredded chicken and a sprinkle of sautéed onions, roll it up, and place it seam-side down in the dish. Repeat with remaining tortillas.
- Add the Sauce and Cheese: Once all the tortillas are rolled, pour the remaining enchilada sauce over the top of the enchiladas, ensuring they’re well-covered. Sprinkle the shredded cheese evenly over the top.
- Bake: Place the baking dish in the preheated oven and bake for 20-25 minutes, or until the cheese is melted and bubbly.
- Serve: Remove from oven and let cool slightly. Garnish with cilantro and serve hot with sour cream on the side.
Extra Tips:
For an added depth of flavor, consider roasting the chicken with spices such as cumin and chili powder before shredding. If you prefer spicier enchiladas, add diced green chilies or jalapeños to the filling.
To avoid soggy enchiladas, make sure to slightly fry the tortillas before assembling, as this creates a barrier that prevents too much sauce absorption. Finally, make sure to let the enchiladas cool for a few minutes after baking, as this allows the flavors to meld together and makes serving easier.
Spicy Beef Tacos
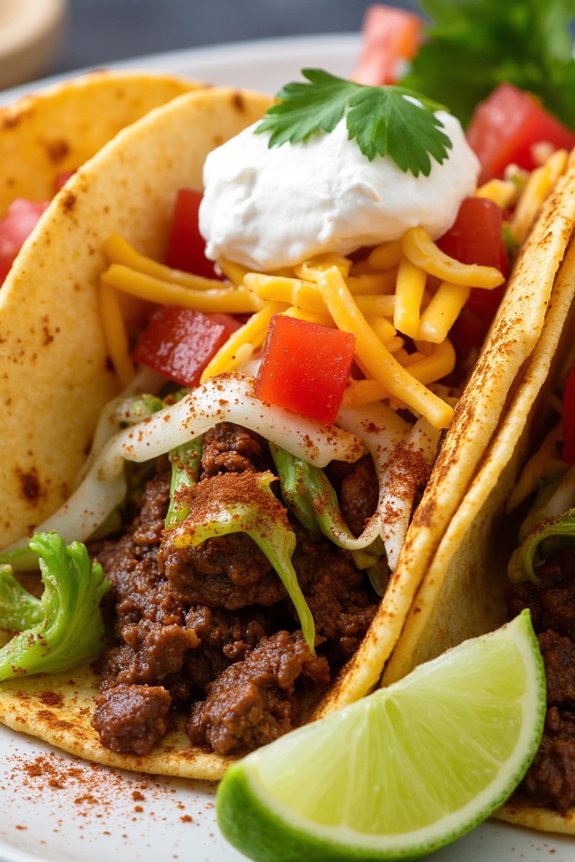
Spicy Beef Tacos are a beloved staple in Mexican cuisine, offering a delightful balance of flavors and textures with each bite. These tacos are perfect for family dinners, where everyone can enjoy customizing their own taco with a variety of toppings.
The key to a great taco is the seasoned beef filling, which is cooked with spices to achieve a rich, savory taste. Paired with fresh toppings and warm corn tortillas, these tacos make for a satisfying and delicious meal.
Preparing Spicy Beef Tacos for a serving size of 4-6 people is a straightforward process that involves cooking the beef with a special blend of spices, assembling the tacos, and garnishing them with your favorite toppings. This recipe guarantees that everyone at the table can enjoy a flavorful and authentic Mexican dinner.
By following the steps below, you can create a festive and mouthwatering meal that will surely be a hit with family and friends.
Ingredients:
- 1 ½ pounds ground beef
- 1 tablespoon olive oil
- 1 medium onion, finely chopped
- 3 cloves garlic, minced
- 1 tablespoon chili powder
- 1 teaspoon ground cumin
- 1 teaspoon smoked paprika
- ½ teaspoon cayenne pepper
- Salt and pepper to taste
- 12 small corn tortillas
- 1 cup shredded lettuce
- 1 cup diced tomatoes
- 1 cup shredded cheddar cheese
- ½ cup sour cream
- ½ cup chopped fresh cilantro
- Lime wedges for serving
Instructions:
- Prepare the Beef Mixture:
- In a large skillet, heat the olive oil over medium heat. Add the finely chopped onion and sauté until translucent, about 5 minutes. Stir in the minced garlic and cook for an additional minute until fragrant.
- Cook the Ground Beef:
- Increase the heat to medium-high and add the ground beef to the skillet. Cook, breaking it apart with a spatula, until it’s browned and cooked through, about 8-10 minutes.
- Season the Beef:
- Drain any excess fat from the skillet. Reduce the heat to medium and add the chili powder, ground cumin, smoked paprika, cayenne pepper, salt, and pepper. Stir well to coat the beef evenly with the spices. Cook for another 2-3 minutes to allow the flavors to meld.
- Warm the Tortillas:
- While the beef is cooking, warm the corn tortillas in a dry skillet over medium heat for about 30 seconds on each side, or until they’re pliable and slightly browned. Alternatively, you can wrap them in a damp paper towel and microwave for 30 seconds.
- Assemble the Tacos:
- Place a spoonful of the beef mixture onto each tortilla. Top with shredded lettuce, diced tomatoes, and shredded cheddar cheese. Add a dollop of sour cream and a sprinkle of chopped fresh cilantro.
- Serve and Enjoy:
- Serve the tacos immediately with lime wedges on the side for squeezing over the top, allowing everyone to add a burst of fresh citrus flavor.
Extra Tips:
When cooking Spicy Beef Tacos, adjust the spiciness to your preference by modifying the amount of cayenne pepper. For a milder version, reduce the cayenne or omit it altogether.
To enhance the flavor, consider using fresh ground spices or adding a splash of lime juice to the beef mixture. Remember to keep the tortillas warm and covered to prevent them from drying out while assembling the tacos.
With these tips, you can customize your tacos to suit your taste, making them even more enjoyable for your family dinner.
Savory Pork Carnitas
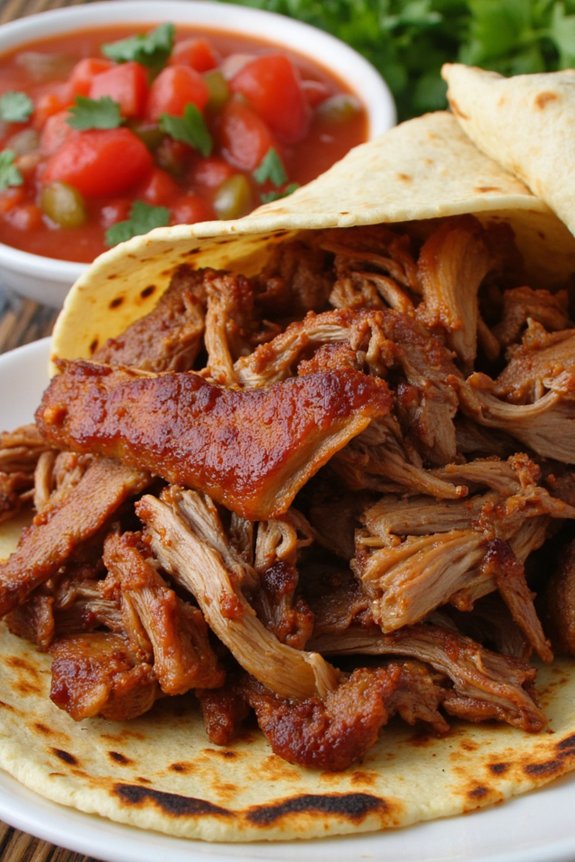
Savory Pork Carnitas is a classic Mexican dish known for its tender, flavorful pork that’s slow-cooked until it practically melts in your mouth. Traditionally, pork shoulder is the cut of choice for making carnitas, as it has the right amount of fat to keep the meat juicy during the cooking process. The result is shredded pork that’s crispy on the outside and tender on the inside, perfect for filling tacos, burritos, or simply enjoying on its own with some warm tortillas and fresh salsa.
Making Pork Carnitas at home is a rewarding experience, allowing you to infuse the meat with your choice of spices and aromatics. While the cooking process requires some time, the results are well worth the effort. The dish is versatile enough to be adapted to your taste preferences, whether you like it spicy, herbaceous, or with a hint of citrus.
Here’s a recipe for making Savory Pork Carnitas that serves 4-6 people.
Ingredients:
- 3 pounds pork shoulder, cut into large chunks
- 1 tablespoon salt
- 1 teaspoon freshly ground black pepper
- 1 tablespoon ground cumin
- 1 onion, peeled and quartered
- 2 cloves garlic, minced
- 1 orange, juiced
- 1 lime, juiced
- 1 cup chicken broth
- 2 bay leaves
- 1 teaspoon dried oregano
- 1 tablespoon vegetable oil
Cooking Instructions:
- Prepare the Pork: Start by seasoning the pork shoulder chunks with salt, pepper, and ground cumin. Make sure the spices are evenly distributed over the meat to guarantee a well-seasoned base.
- Sear the Meat: Heat the vegetable oil in a large, heavy-bottomed pot or Dutch oven over medium-high heat. Add the pork chunks in batches, making sure not to overcrowd the pot. Sear each piece until it’s browned on all sides, which should take about 5 minutes per batch. Remove the browned pork and set aside.
- Add Aromatics: In the same pot, add the onion and garlic, sautéing for about 2 minutes until they become fragrant and slightly softened.
- Deglaze the Pot: Pour in the orange juice, lime juice, and chicken broth, using a wooden spoon to scrape up any browned bits from the bottom of the pot. This step will add depth of flavor to the dish.
- Slow Cook the Pork: Return the seared pork to the pot, along with bay leaves and oregano. Bring the mixture to a simmer, cover, and reduce the heat to low. Let the pork cook for about 2.5 to 3 hours, or until the meat is tender and easily shreds with a fork.
- Crisp the Pork: Once cooked, remove the pork from the pot and shred it using two forks. Preheat the oven to 425°F (220°C). Spread the shredded pork in an even layer on a baking sheet and bake for about 10-15 minutes, or until the edges are crispy and golden brown.
Extra Tips:
When cooking Savory Pork Carnitas, it’s important to maintain a low and slow cooking process to guarantee the pork becomes tender.
If you prefer a spicier dish, you can add a chopped jalapeño or a pinch of chili powder during the cooking process. For a more citrusy flavor, add additional lime or orange zest to the pork before crisping it in the oven.
Authentic Pozole Rojo
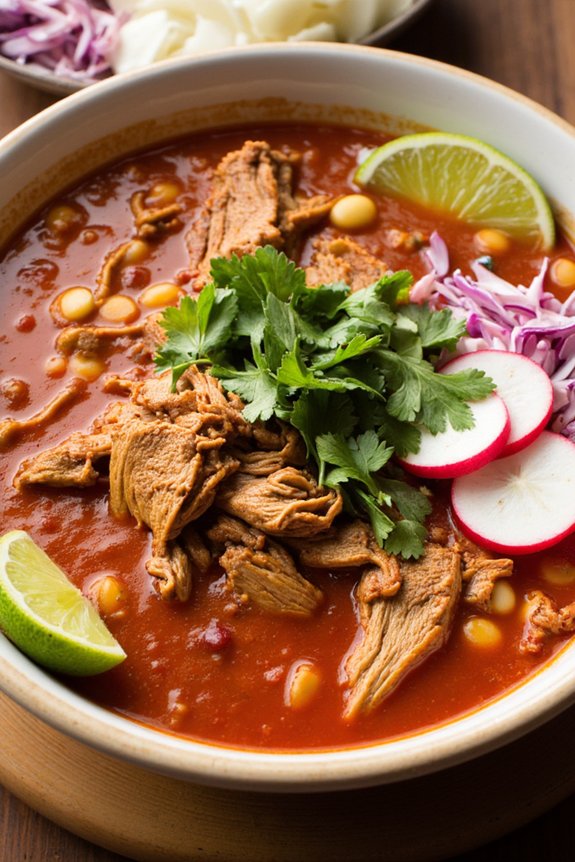
Authentic Pozole Rojo is a traditional Mexican soup that’s both hearty and flavorful, perfect for a family dinner. This dish is known for its rich, red broth made from dried chiles, giving it a distinct and vibrant color. Pozole Rojo typically features hominy (dried corn kernels that have been treated to remove the hull and germ), tender pork, and a medley of spices, creating a comforting meal that’s both satisfying and nourishing.
The preparation of this dish is a true labor of love, often reserved for special occasions or family gatherings, making it a beloved staple in Mexican cuisine. The roots of Pozole Rojo stretch back to ancient Mesoamerican cultures, where it was originally prepared as part of ceremonial rituals. Today, it’s enjoyed by families all over Mexico and beyond, often accompanied by an array of garnishes and sides such as sliced radishes, shredded cabbage, lime wedges, and tostadas.
The complexity of flavors and textures make Pozole Rojo a truly unique dish that embodies the rich culinary heritage of Mexico. Whether you’re a seasoned cook or a beginner looking to explore new flavors, this recipe will guide you through the process of creating a delicious and authentic Pozole Rojo.
Ingredients (Serves 4-6):
- 2 pounds pork shoulder, cut into large chunks
- 1 large onion, quartered
- 8 cups water
- 4 garlic cloves, peeled
- 3 bay leaves
- Salt to taste
- 2 tablespoons vegetable oil
- 6 dried guajillo chiles, stemmed and seeded
- 2 dried ancho chiles, stemmed and seeded
- 1 tablespoon dried oregano
- 1 tablespoon ground cumin
- 1 (29-ounce) can hominy, drained and rinsed
- Toppings: shredded cabbage, sliced radishes, chopped cilantro, lime wedges, diced onion
Cooking Instructions:
1. Prepare the Broth:
In a large pot, add the pork shoulder, onion, garlic cloves, bay leaves, and 8 cups of water. Bring to a boil over medium-high heat. Once boiling, reduce heat to low, cover, and let simmer for about 1.5 to 2 hours, or until the pork is tender and easily pulls apart. Skim off any foam that surfaces during cooking.
2. Prepare the Chile Sauce:
While the pork is cooking, heat a skillet over medium heat and add the vegetable oil. Toast the guajillo and ancho chiles until they’re fragrant, about 1-2 minutes on each side. Be careful not to burn them. Once toasted, transfer to a bowl and cover with hot water. Let them soak for about 20 minutes until they’re softened.
3. Blend the Chiles:
Drain the soaked chiles and place them in a blender along with the remaining garlic cloves, oregano, ground cumin, and a pinch of salt. Add about 1 cup of the pork broth and blend until smooth. If the mixture is too thick, add more broth to achieve a smooth consistency. Strain the chile sauce through a fine-mesh sieve to remove any remaining solid pieces.
4. Combine and Simmer:
Once the pork is tender, remove it from the pot and shred it using two forks. Return the shredded pork to the pot along with the drained hominy. Pour the strained chile sauce into the pot, stirring to combine. Season with additional salt if needed. Let the pozole simmer for another 30 minutes to allow the flavors to meld together.
5. Serve:
Ladle the pozole into bowls and serve with your choice of toppings like shredded cabbage, sliced radishes, chopped cilantro, lime wedges, and diced onion. Enjoy with a side of tostadas or warm tortillas.
Extra Tips:
When selecting dried chiles, look for ones that are pliable and a deep red color for the best flavor. If you want a spicier pozole, consider adding a few dried árbol chiles to the mix. For a richer broth, you can substitute some of the water with chicken or vegetable broth.
Pozole Rojo can be made a day in advance; in fact, it often tastes better the next day as the flavors continue to develop. When reheating, add a bit of water or broth if the soup has thickened too much.
Flavorful Chiles Rellenos

Chiles Rellenos, a traditional Mexican dish, is a delightful blend of roasted poblano peppers stuffed with cheese or meat, coated in a fluffy egg batter, and then fried to perfection. This dish offers a burst of flavors and textures, combining the smoky heat of the peppers with the creamy richness of the filling. Perfect for a family dinner, Chiles Rellenos can be served as a standalone dish or paired with rice, beans, or a fresh salad to make a complete meal.
The heart of this recipe is the poblano pepper, which is known for its mild heat and rich flavor. When roasted, the skin of the poblano becomes easy to peel, revealing a tender flesh that’s perfect for stuffing. The filling can vary from cheese to a savory meat mixture, depending on personal preference. A key step in this recipe is the preparation of the egg batter, which should be light and airy to create that classic, golden crust that Chiles Rellenos are known for. This recipe serves 4-6 people, making it ideal for sharing with family and friends.
Ingredients for 4-6 servings:
- 6 large poblano peppers
- 1 cup of shredded cheese (such as Monterey Jack or queso fresco)
- 1 cup of all-purpose flour
- 4 large eggs, separated
- 1 teaspoon of salt
- 1 teaspoon of pepper
- Vegetable oil for frying
- 1 cup of tomato sauce
- 1 onion, finely chopped
- 2 cloves of garlic, minced
- Optional: cooked ground beef or chicken for filling
- Optional: fresh cilantro for garnish
Cooking Instructions:
- Roasting the Peppers: Preheat your oven to 400°F (200°C). Place the poblano peppers on a baking sheet and roast them in the oven for about 15-20 minutes, turning occasionally, until the skins are blistered and charred. Once roasted, place the peppers in a bowl and cover with plastic wrap for 10 minutes to steam. This will make peeling the skins easier.
- Peeling and Preparing the Peppers: After steaming, carefully peel the skin off the peppers. Make a small slit down the side of each pepper and remove the seeds and membranes, being careful not to tear the peppers.
- Stuffing the Peppers: Stuff each pepper with the shredded cheese and optional meat filling. Close the slits carefully and set the peppers aside.
- Preparing the Batter: In a mixing bowl, beat the egg whites until stiff peaks form. In another bowl, whisk the egg yolks with salt and pepper. Gently fold the yolks into the whites, being careful not to deflate the mixture.
- Coating the Peppers: Place the flour in a shallow dish. Lightly coat each stuffed pepper in flour, then dip them into the egg batter, verifying they’re fully covered.
- Frying the Peppers: In a large skillet, heat vegetable oil over medium-high heat. Carefully place the battered peppers in the hot oil and fry until golden brown on all sides, about 3-4 minutes per side. Remove and drain on paper towels.
- Preparing the Sauce: In a saucepan, sauté the chopped onion and garlic until soft. Add the tomato sauce and simmer for 5 minutes. Pour the sauce over the cooked peppers before serving.
Extra Tips:
When making Chiles Rellenos, it’s important to handle the peppers gently after roasting to avoid tearing them. If you prefer less heat, make sure to remove all the seeds and membranes from the inside of the peppers. For a vegetarian option, omit the meat and include additional vegetables or beans in the filling.
To achieve the best batter consistency, confirm your egg whites are whipped to stiff peaks before folding in the yolks. Serve immediately after frying for the crispiest texture.
Fresh Shrimp Ceviche

Fresh Shrimp Ceviche is a classic Mexican dish that combines the fresh, zesty flavors of lime and cilantro with the tender, juicy texture of shrimp. This dish is perfect for a light appetizer or a revitalizing main course, particularly during the warmer months.
Originating from coastal regions, ceviche highlights the natural flavors of seafood without the need for cooking with heat. Instead, the acidity from lime juice cures the shrimp, creating a delightful fusion of taste and texture.
Preparing Fresh Shrimp Ceviche is both simple and rewarding, making it an ideal choice for family dinners or gatherings. The dish’s vibrant appearance, with colorful bits of tomato, onion, and avocado, not only makes it visually appealing but also guarantees a flavor-packed experience with every bite.
Whether you’re a seasoned cook or a novice in the kitchen, this ceviche recipe is sure to impress and satisfy your culinary cravings.
Ingredients (serving size: 4-6 people):
- 2 pounds fresh shrimp, peeled and deveined
- 1 cup freshly squeezed lime juice
- 1 cup chopped fresh cilantro
- 1 medium red onion, finely diced
- 3 ripe tomatoes, diced
- 1 jalapeño, seeded and finely chopped
- 2 medium avocados, diced
- Salt to taste
- Black pepper to taste
- Tortilla chips for serving (optional)
Cooking Instructions:
- Prepare the Shrimp: Begin by cutting the peeled and deveined shrimp into bite-sized pieces. Place them in a large glass or ceramic bowl.
- Marinate the Shrimp: Pour the freshly squeezed lime juice over the shrimp, guaranteeing they’re fully submerged. Cover the bowl with plastic wrap and refrigerate for about 30 minutes to 1 hour, stirring occasionally. The lime juice will cook the shrimp, turning them opaque and firm.
- Combine the Vegetables: While the shrimp is marinating, in a separate bowl, combine the diced red onion, tomatoes, jalapeño, and cilantro. Mix well to guarantee the flavors blend together.
- Mix the Ceviche: Once the shrimp have turned opaque, remove the bowl from the refrigerator. Drain excess lime juice, but leave some for flavor. Add the onion, tomato, jalapeño, and cilantro mixture to the shrimp. Stir gently to combine.
- Add Avocado and Seasonings: Gently fold in the diced avocados into the shrimp mixture. Season the ceviche with salt and black pepper to taste. Adjust lime juice and cilantro if necessary to suit your preference.
- Serve: Transfer the ceviche to a serving bowl or individual cups. Garnish with extra cilantro if desired. Serve with tortilla chips for added crunch, or enjoy it on its own.
Extra Tips:
When making Fresh Shrimp Ceviche, freshness is key. Confirm that the shrimp is as fresh as possible to achieve the best flavor.
You can prepare the ceviche a few hours in advance, but it’s best enjoyed the same day to maintain the freshness of the ingredients. If you’re sensitive to spice, consider using only half a jalapeño or omit it completely.
Remember that the lime juice’s acidity levels can vary, so taste the ceviche before serving and adjust the lime juice accordingly to guarantee a balanced, tangy taste.
Traditional Tamales
Tamales are a traditional Mexican dish that has been cherished across generations. These delightful packages are made with a flavorful masa dough, typically filled with meats, cheeses, or vegetables, and wrapped in corn husks before being steamed to perfection.
The process of making tamales can be a labor of love, often enjoyed as a family activity, especially during festive occasions or family gatherings. While tamales can vary greatly depending on regional preferences and available ingredients, this recipe will guide you to making a classic version suitable for a cozy family dinner.
In this recipe, we’ll be preparing tamales filled with a savory pork and red chili sauce, perfect for serving 4-6 people. The combination of tender pork, rich chili sauce, and soft masa creates a symphony of flavors and textures that will transport you to the heart of Mexico.
Whether you’re a seasoned tamale maker or a first-timer, this step-by-step guide will assist you in creating tamales that are sure to impress your friends and family.
Ingredients (serves 4-6):
- 2 pounds pork shoulder, cut into chunks
- 2 dried ancho chilies
- 2 dried guajillo chilies
- 3 cloves garlic
- 1 teaspoon cumin seeds
- 1 teaspoon dried oregano
- 1 teaspoon salt
- 1 teaspoon pepper
- 4 cups masa harina
- 2 ½ cups chicken broth
- 1 cup lard or vegetable shortening
- 1 teaspoon baking powder
- 1 tablespoon salt (for masa)
- 24 dried corn husks
Cooking Instructions:
- Prepare the Corn Husks: Soak the corn husks in warm water for at least 30 minutes until they’re pliable. This will make them easier to handle and fold.
- Cook the Pork: In a large pot, place the pork chunks and cover them with water. Bring to a boil, then reduce the heat and simmer for about 1.5 hours, or until the pork is tender. Remove the pork and shred it, reserving 2 cups of the cooking liquid.
- Prepare the Chili Sauce: Remove the stems and seeds from the ancho and guajillo chilies. Toast them in a dry skillet over medium heat until fragrant. Soak the toasted chilies in hot water for about 15 minutes until softened.
- Blend the Sauce: In a blender, combine the softened chilies, garlic, cumin seeds, oregano, salt, pepper, and 1 cup of the reserved pork cooking liquid. Blend until smooth.
- Cook the Sauce: In a saucepan, heat a little oil over medium heat. Add the blended chili sauce and simmer for about 10 minutes until thickened. Mix the shredded pork into the sauce and set aside.
- Prepare the Masa: In a large bowl, combine masa harina, baking powder, and salt. In a separate bowl, beat the lard or shortening until fluffy. Gradually add the masa harina mixture and chicken broth, beating until a dough forms. The masa should be smooth and spreadable.
- Assemble the Tamales: Lay a soaked corn husk flat. Spread about 2 tablespoons of masa in the center, leaving space at the edges. Place 1 tablespoon of the pork filling in the center of the masa. Fold the sides of the husk over the filling, then fold up the bottom to encase the tamale.
- Steam the Tamales: Arrange the tamales upright in a steamer basket. Steam over simmering water for about 1 to 1.5 hours, or until the masa is firm and easily pulls away from the husk.
- Serve and Enjoy: Allow the tamales to rest for a few minutes before serving. Serve with your favorite salsa or hot sauce on the side.
Extra Tips:
When making tamales, verify that the masa dough is the right consistency by doing a “float test.” Drop a small ball of masa into a glass of water; if it floats, the masa is ready. This guarantees that your tamales will be light and fluffy.
Additionally, if you’re short on time, consider preparing the pork filling a day in advance to help streamline the process. And remember, tamales can be stored in the refrigerator for a few days or frozen for longer storage, making them a convenient make-ahead meal!
Zesty Sopa De Tortilla
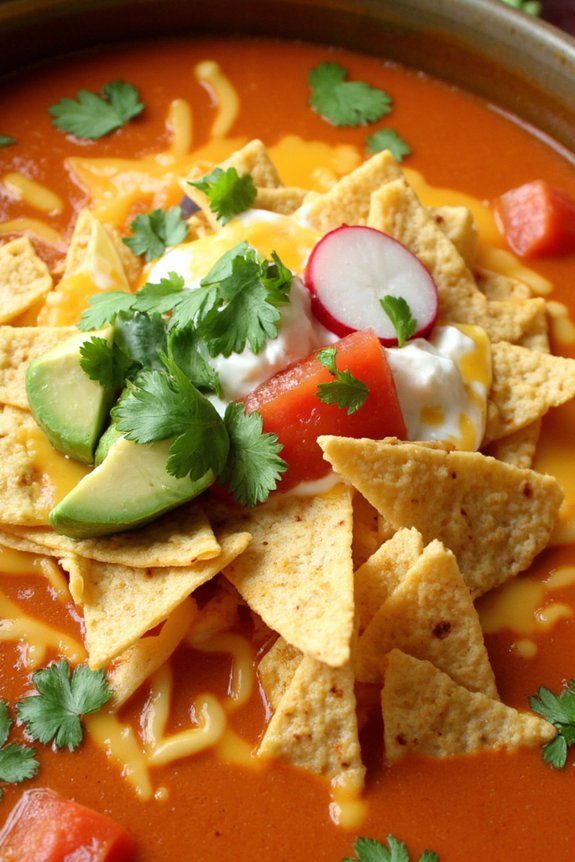
Zesty Sopa De Tortilla is a delightful Mexican soup that’s both comforting and invigorating. It combines the rich flavors of roasted tomatoes, aromatic herbs, and spices, with the satisfying crunch of tortilla strips. This soup is typically served with a variety of toppings, allowing each person to customize their bowl to their liking. It’s an excellent choice for family dinners, offering a warm and hearty meal that brings everyone together around the table.
The key to a perfect Zesty Sopa De Tortilla is the balance of flavors and textures. The broth is infused with the zesty tang of lime, the subtle heat of chili, and the earthiness of cumin, creating a symphony of tastes that dance on the palate. Crispy tortilla strips provide a delightful contrast to the smoothness of the soup, while toppings like avocado, cheese, and fresh cilantro add layers of complexity.
Whether you’re new to Mexican cuisine or a seasoned enthusiast, this recipe is sure to become a cherished favorite.
Ingredients (Serves 4-6):
- 8 corn tortillas, cut into strips
- 3 tablespoons vegetable oil
- 1 medium onion, chopped
- 3 cloves garlic, minced
- 1 jalapeño, seeded and chopped
- 4 cups chicken broth
- 1 can (14.5 ounces) diced tomatoes, undrained
- 1 teaspoon ground cumin
- 1 teaspoon dried oregano
- Salt and freshly ground black pepper, to taste
- 1 lime, juiced
- 1 avocado, diced
- 1 cup shredded Monterey Jack cheese
- 1/2 cup fresh cilantro, chopped
- Optional: sour cream and sliced radishes for garnish
Instructions:
- Prepare the Tortilla Strips: Preheat the oven to 375°F (190°C). Spread the tortilla strips on a baking sheet, drizzle with 1 tablespoon of vegetable oil, and toss to coat. Bake for 10-12 minutes or until crispy and golden. Set aside.
- Sauté Aromatics: In a large pot, heat the remaining 2 tablespoons of vegetable oil over medium heat. Add the chopped onion, garlic, and jalapeño. Sauté for about 5 minutes until the onion is translucent and the mixture is fragrant.
- Create the Soup Base: Pour in the chicken broth and add the diced tomatoes with their juice. Stir in the cumin, oregano, salt, and pepper. Bring the mixture to a boil, then reduce the heat and let it simmer for 15-20 minutes to allow the flavors to meld.
- Add Lime Juice: Stir in the lime juice, adjusting the amount to your taste preference. Let the soup simmer for another 5 minutes.
- Assemble the Soup: Ladle the soup into bowls. Top each serving with a handful of crispy tortilla strips, diced avocado, shredded cheese, and chopped cilantro. Add a dollop of sour cream and a few slices of radish if desired.
Extra Tips:
For an added smoky flavor, consider roasting the jalapeño and tomatoes before adding them to the soup. You can also experiment with different types of cheese, such as queso fresco, for a unique twist. If you prefer a spicier soup, leave the seeds in the jalapeño or add a pinch of cayenne pepper.
Finally, this soup can easily be made vegetarian by substituting vegetable broth for chicken broth and adding beans or corn for extra substance.
Hearty Chicken Mole

Chicken Mole is a traditional Mexican dish that combines tender chicken with a rich, complex sauce made from a blend of chiles, spices, chocolate, and nuts. The sauce is known for its deep, savory-sweet flavor and velvety texture, making this dish a perfect centerpiece for a family dinner.
Originating from the Puebla and Oaxaca regions of Mexico, mole sauce is often considered a labor of love due to the time and care it requires to achieve its signature depth of flavor. While there are many variations of mole, this recipe offers a hearty and approachable version that balances the earthy spices with a hint of sweetness, making it a delightful choice for a comforting meal.
Preparing Chicken Mole can be a rewarding culinary experience, as it involves layering flavors to create a harmonious blend that complements the chicken perfectly. Though it may seem challenging at first glance, with patience and attention to detail, even a novice cook can master this delicious dish.
Perfect for serving 4-6 people, this recipe will guide you through the process of creating a hearty Chicken Mole that will impress your family or guests. The key is to prepare all the ingredients in advance and follow the steps carefully to achieve the best results.
Ingredients:
- 3 lbs chicken pieces (thighs and drumsticks preferred)
- 2 tablespoons vegetable oil
- 1 large onion, chopped
- 3 cloves garlic, minced
- 3 dried ancho chiles, stemmed and seeded
- 3 dried pasilla chiles, stemmed and seeded
- 1/4 cup almonds
- 1/4 cup raisins
- 1/4 cup sesame seeds
- 1 teaspoon ground cinnamon
- 1/2 teaspoon ground allspice
- 1/2 teaspoon ground cloves
- 2 cups chicken broth
- 1/4 cup Mexican chocolate, chopped (or substitute with bittersweet chocolate)
- Salt and pepper to taste
- Fresh cilantro, for garnish
Instructions:
- Prepare the Chiles: Toast the ancho and pasilla chiles in a dry skillet over medium heat until they become fragrant, about 1-2 minutes. Be careful not to burn them. Once toasted, place them in a bowl and cover with hot water. Let them soak for about 15 minutes until they become soft.
- Brown the Chicken: In a large pot or Dutch oven, heat vegetable oil over medium-high heat. Season the chicken pieces with salt and pepper, then add them to the pot. Brown the chicken on all sides, about 6-8 minutes total, then remove from the pot and set aside.
- Cook the Aromatics: In the same pot, add chopped onions and minced garlic. Sauté until the onions become translucent, about 5 minutes.
- Blend the Sauce: Drain the soaked chiles and add them to a blender along with the sautéed onions and garlic, almonds, raisins, sesame seeds, cinnamon, allspice, cloves, and 1 cup of chicken broth. Blend until smooth.
- Simmer the Sauce: Pour the blended mixture back into the pot. Add the remaining chicken broth and the chopped chocolate. Stir continuously until the chocolate is melted and fully incorporated. Bring the sauce to a simmer.
- Combine Chicken and Sauce: Return the browned chicken pieces to the pot, nestling them in the sauce. Cover and simmer on low heat for about 45 minutes to 1 hour, or until the chicken is cooked through and tender.
- Finish and Serve: Taste and adjust seasoning with salt and pepper as needed. Serve the Chicken Mole hot, garnished with fresh cilantro. It pairs beautifully with rice or warm tortillas.
Extra Tips:
When preparing Chicken Mole, patience is key. Allow the sauce to simmer and reduce slowly to develop the rich flavors characteristic of a good mole.
If you don’t have access to Mexican chocolate, you can substitute with bittersweet chocolate for a similar depth of flavor. Be sure to toast the chiles lightly to avoid any bitterness, and always soak them until they’re fully softened for easier blending.
Consider making the mole sauce a day in advance, as the flavors tend to deepen and improve overnight.
Cheesy Quesadillas

Cheesy Quesadillas are a delightful and simple dish that brings the authentic flavors of Mexico into your home. Perfect for a family dinner, these quesadillas are loaded with gooey cheese and can be customized with an array of fillings like sautéed vegetables, chicken, or beef. They’re incredibly versatile and can be served as a main course or a hearty snack.
Whether you’re looking for a quick meal or planning a Mexican-themed dinner night, cheesy quesadillas are sure to satisfy everyone’s taste buds.
The magic of cheesy quesadillas lies in their simplicity and the quality of ingredients used. The key is to use fresh tortillas and a good melting cheese such as Oaxaca, Monterey Jack, or cheddar. These quesadillas are cooked on a skillet to achieve a crispy, golden-brown exterior, while the interior remains soft and filled with melted cheese.
These quesadillas can be served with a side of salsa, guacamole, or sour cream, adding even more flavor to each bite. Let’s explore the recipe for cheesy quesadillas serving 4-6 people.
Ingredients:
- 8 large flour tortillas
- 2 cups shredded Oaxaca cheese (or Monterey Jack/cheddar)
- 1 cup cooked chicken breast, shredded (optional)
- 1 cup sautéed bell peppers and onions (optional)
- 1 tablespoon olive oil or butter
- Salt and pepper to taste
- Salsa, guacamole, and sour cream for serving
Cooking Instructions:
- Prepare the Ingredients: Begin by shredding the cheese and any other fillings you’d like to use, such as cooked chicken or sautéed vegetables. Make sure everything is ready to go for easy assembly.
- Heat the Skillet: Place a large skillet or griddle over medium heat and add a small amount of olive oil or butter. Allow it to heat up until it starts to sizzle, which will help achieve a crispy texture on the tortillas.
- Assemble the Quesadillas: Lay a flour tortilla flat on a clean surface. Sprinkle a generous amount of shredded cheese over one half of the tortilla, then add any additional fillings like chicken or vegetables. Fold the tortilla in half to cover the fillings.
- Cook the Quesadillas: Carefully place the folded tortilla into the hot skillet. Cook for about 2-3 minutes on each side, or until the tortilla is golden brown and the cheese is melted. Use a spatula to press down gently to guarantee even cooking.
- Repeat the Process: Remove the cooked quesadilla from the skillet and set it aside. Repeat the process with the remaining tortillas and fillings, adding more oil or butter to the skillet as needed.
- Serve and Enjoy: Cut the quesadillas into wedges and serve them hot with salsa, guacamole, and sour cream on the side. Enjoy the cheesy goodness!
Extra Tips: For the best results, use freshly made tortillas if possible, as they offer a superior texture and flavor. Feel free to experiment with different cheeses or add spices like cumin or chili powder to the filling for an extra kick.
If you have leftovers, they can be stored in the refrigerator and reheated on a skillet or in the oven to retain their crispiness. Always serve cheesy quesadillas immediately after cooking to enjoy their full flavor and texture.
Mexican Street Corn Salad

Mexican Street Corn Salad is a delightful twist on the classic elote, or Mexican street corn. This dish brings all the flavors of traditional street corn into a fresh, vibrant salad that’s perfect for family dinners or gatherings.
It’s a wonderful side dish that combines the sweetness of corn with the tanginess of lime, the creamy texture of mayonnaise, and a touch of spice from chili powder. The addition of fresh herbs and cheese enhances the dish, making it an irresistible option for any meal.
This recipe serves 4-6 people and is easy to prepare, allowing you to enjoy the rich flavors of Mexican cuisine in your own home. The salad is a great accompaniment to any Mexican-inspired meal, bringing color and taste to your table. Whether served warm or cold, this salad is sure to be a hit with family and friends.
Ingredients:
- 6 ears of corn, husked
- 1/4 cup mayonnaise
- 1/4 cup sour cream
- 1/2 cup cotija cheese, crumbled
- 1/2 teaspoon chili powder
- 1/4 teaspoon smoked paprika
- 2 tablespoons lime juice (about 1 lime)
- 1/4 cup fresh cilantro, chopped
- Salt and pepper to taste
- 1 clove garlic, minced
- 1 jalapeño, seeded and finely chopped (optional)
- 1 tablespoon olive oil
Cooking Instructions:
1. Prepare the Corn: Preheat your grill or a grill pan over medium-high heat. Brush the ears of corn with olive oil and grill them for about 10-12 minutes, turning occasionally, until they’re charred and cooked through.
Alternatively, you can roast the corn in a preheated oven at 400°F (200°C) for about 15-20 minutes, turning halfway through. Once cooked, let the corn cool slightly.
2. Cut the Corn Kernels: Carefully cut the corn kernels off the cobs using a sharp knife. Place the kernels in a large mixing bowl.
3. Mix the Dressing: In a separate bowl, combine mayonnaise, sour cream, lime juice, minced garlic, chili powder, smoked paprika, and a pinch of salt and pepper. Mix well until all ingredients are fully incorporated.
4. Assemble the Salad: Pour the dressing over the corn kernels. Add the crumbled cotija cheese, chopped cilantro, and optional jalapeño. Toss everything together until the corn is well coated with the dressing and other ingredients are evenly distributed.
5. Serve the Salad: Transfer the salad to a serving dish. Sprinkle a little extra cotija cheese and chili powder on top for garnish, if desired. Serve immediately or chill in the refrigerator for up to an hour for a cooler salad.
Extra Tips:
For the best flavor, use fresh corn on the cob when it’s in season. If fresh corn is unavailable, you can substitute with canned or frozen corn, but be sure to drain and dry it well before using.
Adjust the level of spice to suit your taste by modifying the amount of chili powder or adding more jalapeño. This salad pairs beautifully with grilled meats or can be enjoyed on its own as a light, revitalizing dish.
For an extra burst of flavor, consider adding a sprinkle of Tajín seasoning or a dash of hot sauce before serving.
Homemade Guacamole and Salsa
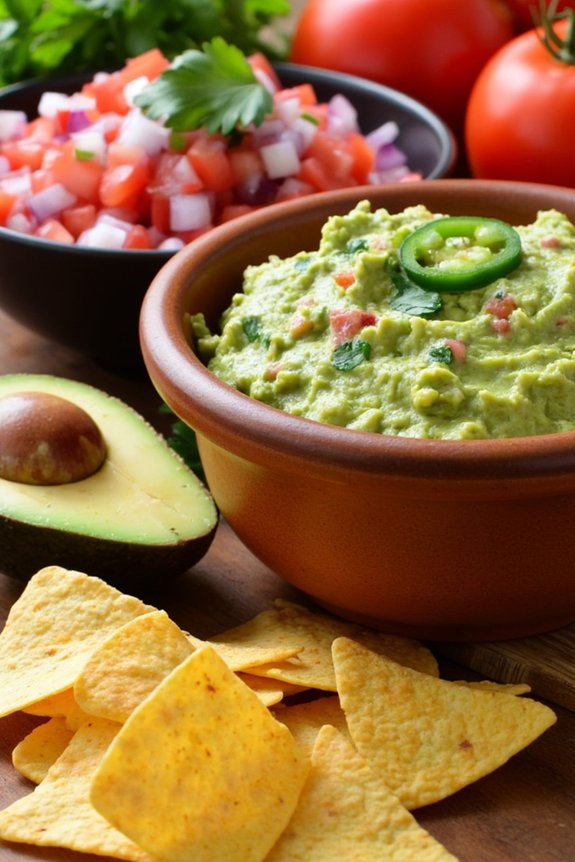
Guacamole and salsa are two quintessential dips in Mexican cuisine, each bringing its own burst of flavors and textures to complement a wide array of dishes. Whether you’re hosting a family dinner, a casual gathering, or simply looking to elevate your taco night, these two recipes are sure to be crowd-pleasers.
Guacamole, with its creamy and smooth texture, pairs perfectly with the fresh and zesty notes of salsa, creating a harmonious duo that can be served with tortilla chips, tacos, or as a topping for grilled meats.
To make these dishes truly shine, the quality and freshness of the ingredients are essential. Avocados should be ripe yet firm, tomatoes should be juicy and flavorful, and herbs should be fresh and aromatic. The beauty of homemade guacamole and salsa lies in their simplicity and their ability to be customized to your taste preference. Adjust the heat, the acidity, or even add a twist of your own to make these classic dips uniquely yours.
Ingredients for Guacamole and Salsa (serves 4-6):
*Guacamole:*
- 3 ripe avocados
- 1 lime, juiced
- 1 small red onion, finely chopped
- 1-2 medium jalapeños, seeds removed and finely chopped
- 2 Roma tomatoes, diced
- 1/4 cup fresh cilantro, chopped
- Salt and pepper to taste
Salsa:
- 4 medium ripe tomatoes, diced
- 1/2 medium red onion, finely chopped
- 1-2 jalapeños, seeds removed and finely chopped
- 1 clove garlic, minced
- 1/4 cup fresh cilantro, chopped
- Juice of 1 lime
- Salt and pepper to taste
Cooking Instructions:
*Guacamole:*
- Prepare the Avocados: Cut the avocados in half, remove the pits, and scoop the flesh into a bowl. Use a fork to mash the avocados to your desired consistency.
- Add Lime Juice: Immediately add the lime juice to the avocados to prevent browning and to add a revitalizing tang.
- Mix in Ingredients: Stir in the finely chopped red onion, jalapeños, Roma tomatoes, and cilantro. Mix until well combined.
- Season: Add salt and pepper to taste, adjusting as necessary to suit your preference.
- Chill and Serve: Cover the guacamole with plastic wrap directly on the surface to prevent browning and refrigerate until ready to serve.
*Salsa:*
- Combine Ingredients: In a large bowl, combine the diced tomatoes, red onion, jalapeños, minced garlic, and cilantro.
- Add Lime Juice: Squeeze lime juice over the mixture and stir to combine, ensuring all ingredients are well mixed.
- Season: Add salt and pepper to taste. Adjust the seasoning as desired.
- Chill: Cover and refrigerate the salsa for at least 30 minutes to allow the flavors to meld together.
- Serve: Serve chilled with tortilla chips or as a topping for your favorite Mexican dishes.
Extra Tips:
When preparing these dips, the ripeness of the avocados is vital for a creamy guacamole; they should yield to gentle pressure but not be too mushy. If you prefer a chunkier guacamole, mash the avocados less and mix the ingredients more gently.
For the salsa, feel free to experiment with different types of tomatoes or add a hint of sweetness with a pinch of sugar if desired. Both dishes can be made a few hours in advance; however, it’s best to consume guacamole within a day to enjoy its fresh flavor.
Also, taste as you go, adjusting lime juice, salt, and heat to suit your family’s palate. Enjoy these vibrant, lively dips as part of your Mexican family dinner spread!
Smoky Barbacoa Beef
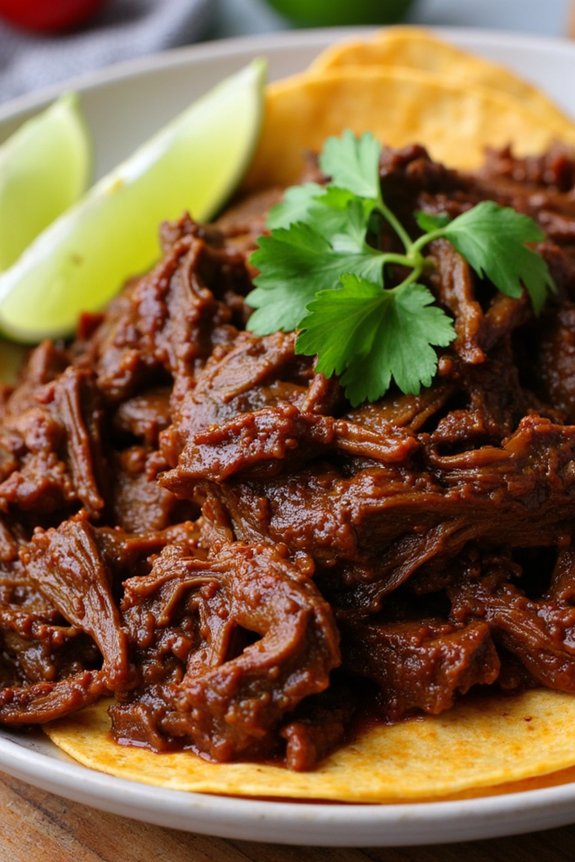
Barbacoa is a traditional Mexican dish known for its robust flavors and tender, juicy meat. This Smoky Barbacoa Beef recipe brings a rich blend of spices and a smoky essence that makes it a perfect centerpiece for a family dinner. Typically slow-cooked to perfection, the beef becomes melt-in-the-mouth tender, infused with aromatic herbs and spices that tantalize your taste buds.
Whether served in tacos, burritos, or as a standalone dish, this barbacoa promises a deliciously satisfying meal. The key to a great barbacoa lies in the quality of the beef and the balance of spices. This recipe uses a blend of dried chilies to create a smoky and slightly spicy flavor, complemented by the warmth of cumin, cloves, and oregano.
Slow-cooking the beef in this mixture allows the spices to deeply penetrate the meat, resulting in a dish that’s both flavorful and comforting. Ideal for serving 4-6 people, this recipe guarantees there’s plenty to share at your next family gathering.
Ingredients (Serves 4-6):
- 3 lbs beef chuck roast
- 3 dried guajillo chilies
- 2 dried ancho chilies
- 1 medium onion, quartered
- 4 cloves garlic
- 2 tbsp apple cider vinegar
- 2 tbsp lime juice
- 2 tsp ground cumin
- 1 tsp dried oregano
- 1/2 tsp ground cloves
- 1 cup beef broth
- 2 bay leaves
- Salt and pepper to taste
- Optional: fresh cilantro, lime wedges, and tortillas for serving
Instructions:
- Prepare the Chilies: Remove the stems and seeds from the dried guajillo and ancho chilies. Toast them lightly in a dry skillet over medium heat until they become fragrant, about 1-2 minutes. This step enhances their smoky flavor.
- Make the Sauce: In a blender, combine the toasted chilies, onion, garlic, apple cider vinegar, lime juice, cumin, oregano, cloves, and beef broth. Blend until smooth, creating a rich and flavorful sauce.
- Season the Beef: Season the beef chuck roast generously with salt and pepper on all sides. This creates a flavorful crust as it cooks.
- Sear the Beef: In a large skillet, heat a bit of oil over medium-high heat. Sear the beef on all sides until browned, about 3-4 minutes per side. This step locks in the juices and adds depth to the dish.
- Slow Cook: Place the seared beef in a slow cooker or a large Dutch oven. Pour the blended sauce over the beef, making sure it’s well-coated. Add the bay leaves. Cover and cook on low heat for 8-10 hours, or until the beef is incredibly tender and falls apart easily.
- Shred the Beef: Once cooked, remove the bay leaves. Use two forks to shred the beef directly in the pot, mixing it with the sauce to absorb all the flavors.
- Serve: Serve the smoky barbacoa beef warm, garnished with fresh cilantro and lime wedges. Enjoy it in tortillas or as part of a larger meal spread.
Extra Tips:
For the best results, use a good quality beef chuck roast, as this cut becomes tender and flavorful when slow-cooked. If you prefer a spicier dish, add more chilies or include a pinch of cayenne pepper to the sauce.
Additionally, consider making the barbacoa a day in advance; the flavors often develop and intensify when allowed to sit overnight. Leftovers can be stored in the refrigerator for up to three days or frozen for up to three months, making it a versatile dish for meal prep.
Crispy Fish Tacos
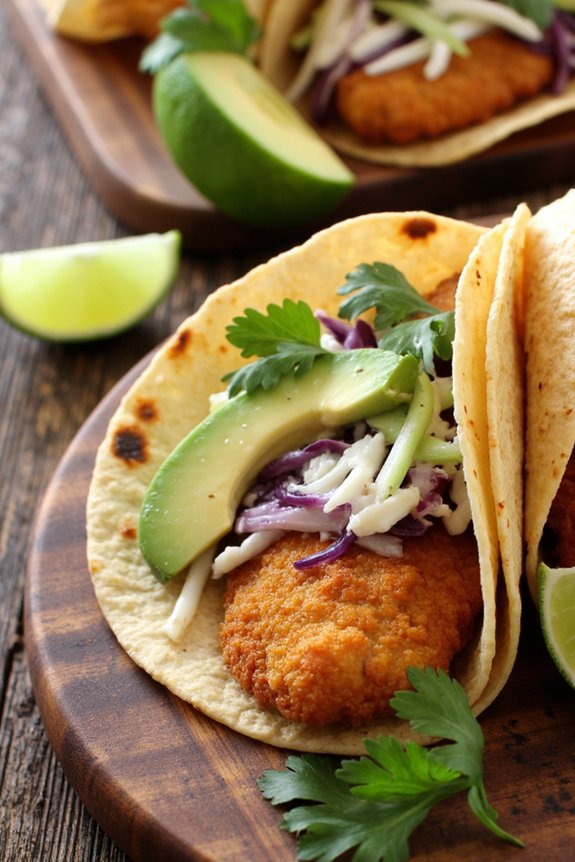
Crispy Fish Tacos are a delightful addition to any Mexican family dinner. These tacos bring together the perfect balance of textures and flavors, with the crispy, flaky fish nestled inside a warm tortilla, complemented by a revitalizing slaw and tangy sauces. This dish isn’t only delicious but also quick and simple to prepare, making it an excellent choice for both weeknight dinners and casual gatherings.
The key to achieving the perfect crispy fish lies in the batter, which should be light yet sturdy enough to encase the fish in a golden, crunchy shell. Whether you’re a fan of traditional Mexican cuisine or just looking to add a new twist to your taco night, these Crispy Fish Tacos are sure to please.
Serve them with a variety of toppings, such as avocado slices, lime wedges, and a sprinkle of fresh cilantro, to let your guests customize their tacos to their liking. The following recipe serves 4-6 people and includes all the ingredients and detailed steps needed to recreate this delightful dish at home.
Ingredients:
- 1 ½ pounds of white fish fillets (such as cod or tilapia)
- 1 cup all-purpose flour
- 1 cup cornmeal
- 1 tablespoon chili powder
- 1 teaspoon garlic powder
- 1 teaspoon salt
- ½ teaspoon black pepper
- 1 teaspoon baking powder
- 1 cup cold beer
- Vegetable oil, for frying
- 12 small corn tortillas
- 2 cups shredded cabbage
- ½ cup mayonnaise
- 2 tablespoons lime juice
- 1 teaspoon honey
- Salt and pepper, to taste
- 1 avocado, sliced
- Lime wedges, for serving
- Fresh cilantro, for garnish
Instructions:
- Prepare the Fish: Cut the fish fillets into strips about 1 inch wide and pat them dry with paper towels. This helps to guarantee that the batter sticks well to the fish.
- Make the Batter: In a large bowl, combine the flour, cornmeal, chili powder, garlic powder, salt, pepper, and baking powder. Gradually whisk in the cold beer until you have a smooth batter. The consistency should be similar to pancake batter.
- Heat the Oil: In a deep skillet or frying pan, heat about 2 inches of vegetable oil over medium-high heat until it reaches 375°F (190°C).
- Fry the Fish: Dip each piece of fish into the batter, allowing any excess to drip off, and carefully place it into the hot oil. Fry in batches to avoid overcrowding the pan, turning occasionally, until the fish is golden brown and cooked through, about 3-4 minutes per batch. Use a slotted spoon to transfer the fish to a paper towel-lined plate to drain any excess oil.
- Prepare the Slaw: In a medium bowl, mix together the shredded cabbage, mayonnaise, lime juice, honey, salt, and pepper. Toss until the cabbage is well-coated and set aside.
- Warm the Tortillas: In a dry skillet, warm the corn tortillas over medium heat for about 30 seconds on each side, until they’re pliable.
- Assemble the Tacos: Place a few pieces of crispy fish in each tortilla. Top with a generous amount of slaw, avocado slices, and a sprinkle of cilantro.
- Serve: Serve immediately with lime wedges on the side for squeezing over the tacos.
Extra Tips:
For the best results, make sure that the oil is at the right temperature before frying the fish; this will help achieve the desired crispiness. You can test the oil by dropping a small amount of batter into it—if it sizzles and floats to the surface, the oil is ready.
Don’t overcrowd the pan while frying to maintain the oil temperature. If you prefer a spicier kick, consider adding a pinch of cayenne pepper to the batter. Finally, freshly made tacos are always best; try to serve them as soon as they’re assembled to keep the fish crispy.
Sweet Cinnamon Churros

Churros, a popular Mexican dessert, are crispy on the outside and soft on the inside, coated in a sweet cinnamon-sugar mixture. These delightful treats are often enjoyed with a cup of hot chocolate or coffee, making them a perfect conclusion to a Mexican family dinner. The magic of churros lies in their simplicity and the comforting aroma of cinnamon that fills the kitchen as they cook.
Making churros at home is easier than you might think and a fun activity to involve family members. This recipe will guide you through the process of creating these delicious treats for a serving size of 4-6 people. You’ll find that the ingredients are quite basic, and the steps are straightforward, guaranteeing that even novice cooks can achieve churro perfection.
Ingredients:
- 1 cup water
- 2 1/2 tablespoons white sugar
- 1/2 teaspoon salt
- 2 tablespoons vegetable oil
- 1 cup all-purpose flour
- 2 quarts oil for frying
- 1/2 cup white sugar, or to taste
- 1 teaspoon ground cinnamon
Instructions:
- Prepare the Dough: In a medium saucepan, combine 1 cup of water, 2 1/2 tablespoons of sugar, 1/2 teaspoon of salt, and 2 tablespoons of vegetable oil. Bring the mixture to a boil over medium heat. Once boiling, remove from heat and add in the flour all at once. Stir with a wooden spoon until the mixture forms a ball and pulls away from the sides of the pan.
- Heat the Oil: In a large, heavy-duty pot or deep fryer, heat 2 quarts of oil to 375°F (190°C). This temperature is essential for achieving the perfect texture, so use a thermometer to monitor it if possible.
- Pipe the Churros: Fill a piping bag fitted with a star tip with the churro dough. Carefully pipe strips of dough into the hot oil, about 4 inches long, cutting the dough with scissors as needed. Fry the churros in batches to avoid overcrowding the pot, which can lower the oil temperature.
- Fry Until Golden: Cook the churros until golden brown, which should take about 2-3 minutes. Use a slotted spoon to turn them occasionally for even cooking. Once done, remove the churros from the oil and drain them on paper towels.
- Coat with Cinnamon Sugar: In a shallow dish, mix 1/2 cup of sugar with 1 teaspoon of ground cinnamon. While the churros are still warm, roll them in the cinnamon-sugar mixture until thoroughly coated.
Extra Tips:
When making churros, confirm the dough is smooth and lump-free before piping, as this will give them their characteristic texture and appearance. If you don’t have a piping bag, a sturdy plastic bag with a corner snipped off can work as a substitute.
Also, be cautious with the hot oil; excessive oil temperature can cause the churros to burn on the outside while remaining undercooked inside. Finally, consider serving churros with a side of chocolate sauce or dulce de leche for an extra indulgent treat.