

Looking for quick and budget-friendly dinner ideas? I’ve rounded up some fantastic sheet pan dinners that are perfect for a family meal with minimal cleanup. Think juicy lemon herb chicken paired with vibrant veggies or savory sausage with sweet peppers and potatoes. These recipes are perfect for those busy nights when you want to enjoy more time with your loved ones and less time in the kitchen. Ready to explore these mouthwatering options?
Lemon Herb Chicken and Veggies
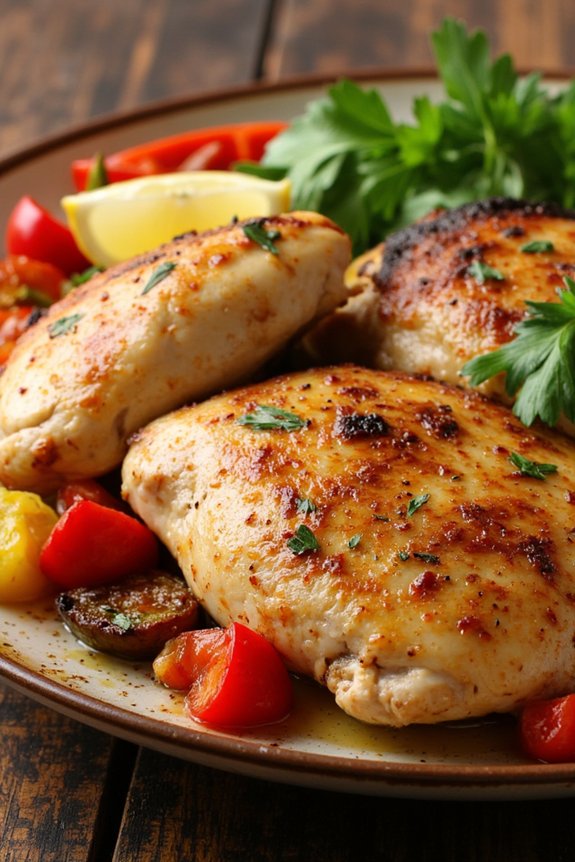
Lemon Herb Chicken and Veggies is a perfect sheet pan dinner for those busy weeknights when you want something quick, healthy, and delicious. This dish combines succulent chicken breasts with a medley of colorful vegetables, all roasted to perfection with a revitalizing lemon and herb marinade. Not only does this meal provide a balanced nutritional profile, but it also enhances your dinner table with its vibrant presentation and delightful aroma.
This recipe is designed to serve 4-6 people, making it suitable for family dinners or small gatherings. The simplicity of using just one sheet pan guarantees minimal cleanup, allowing you more time to enjoy your meal and the company of your loved ones. The key to this dish is the marinade, which infuses the chicken and vegetables with a bright, zesty flavor that’s both satisfying and energizing.
Ingredients:
- 4 boneless, skinless chicken breasts
- 1 pound baby potatoes, halved
- 1 red bell pepper, sliced
- 1 yellow bell pepper, sliced
- 1 zucchini, sliced
- 1 red onion, sliced
- 1/4 cup olive oil
- 3 tablespoons fresh lemon juice
- 2 teaspoons lemon zest
- 3 garlic cloves, minced
- 1 teaspoon dried oregano
- 1 teaspoon dried thyme
- 1 teaspoon salt
- 1/2 teaspoon black pepper
- 1/4 cup fresh parsley, chopped (for garnish)
Cooking Instructions:
- Preheat Oven: Preheat your oven to 400°F (200°C) to make sure it’s hot and ready for roasting.
- Prepare Marinade: In a small bowl, combine the olive oil, lemon juice, lemon zest, minced garlic, oregano, thyme, salt, and black pepper. Whisk together until well blended.
- Marinate Chicken: Place the chicken breasts in a large resealable plastic bag or a shallow dish. Pour half of the marinade over the chicken, making sure each piece is well coated. Seal the bag or cover the dish, and let it marinate in the refrigerator for at least 30 minutes, or up to 2 hours for more flavor.
- Prepare Vegetables: While the chicken is marinating, place the potatoes, bell peppers, zucchini, and onion on a large sheet pan. Drizzle the remaining marinade over the vegetables and toss them to coat evenly.
- Arrange on Sheet Pan: Remove the chicken from the marinade and place them on the sheet pan, nestled among the vegetables.
- Roast: Place the sheet pan in the preheated oven and roast for approximately 25-30 minutes, or until the chicken reaches an internal temperature of 165°F (75°C) and the vegetables are tender and slightly caramelized.
- Garnish and Serve: Remove from the oven and let it rest for a few minutes. Garnish with fresh chopped parsley before serving.
Extra Tips:
For best flavor, try to marinate the chicken for at least 2 hours if time permits. This allows the lemon and herbs to deeply penetrate the meat, resulting in more flavorful chicken.
You can also customize the vegetables based on your preference or seasonal availability – broccoli, asparagus, or cherry tomatoes can be great additions. Additionally, make sure your sheet pan is large enough to spread out the ingredients in a single layer for even cooking and caramelization.
Sausage and Peppers With Potatoes
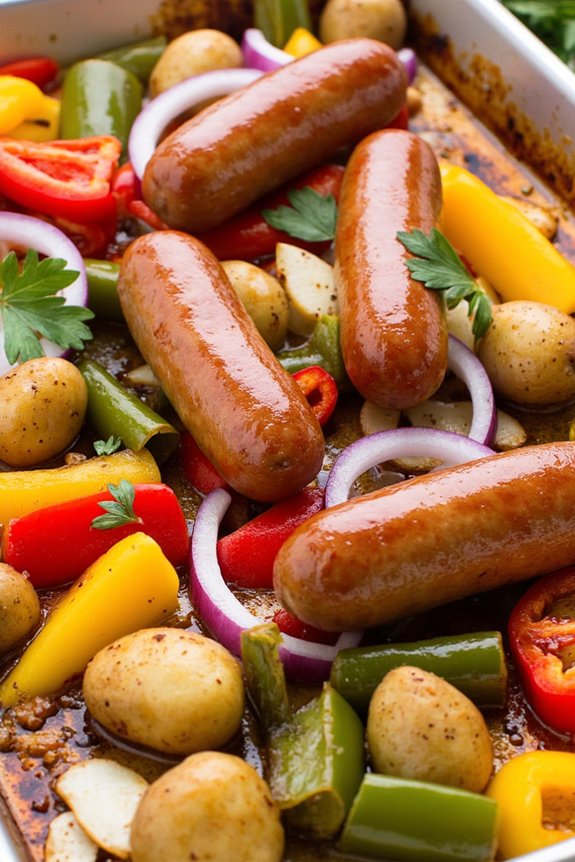
Sausage and Peppers With Potatoes is a hearty and flavorful sheet pan dinner that’s perfect for a busy weeknight or a casual family dinner. This dish combines juicy sausages, colorful bell peppers, and tender potatoes, all roasted together to create a meal that’s both simple and satisfying. The beauty of this recipe lies in its minimal preparation and the way the ingredients come together to infuse each other with flavor as they roast.
By using a sheet pan, you’ll enjoy an easy cleanup and a delightful blend of textures and tastes. The sausages get a crispy exterior, while the peppers become sweet and tender, and the potatoes turn golden brown and deliciously soft on the inside. This recipe serves 4-6 people, making it ideal for families or for those who love having leftovers.
Ingredients:
- 1.5 pounds of Italian sausage links
- 3 large bell peppers (assorted colors), sliced
- 1.5 pounds of baby potatoes, halved
- 1 large red onion, sliced
- 3 tablespoons olive oil
- 1 teaspoon garlic powder
- 1 teaspoon dried oregano
- 1 teaspoon dried basil
- Salt and pepper to taste
- Fresh parsley, chopped (for garnish)
Instructions:
- Preheat the Oven: Begin by preheating your oven to 400°F (200°C). This temperature guarantees that the sausages cook through while the vegetables and potatoes achieve a crispy exterior.
- Prepare the Ingredients: Slice the bell peppers and red onion, and halve the baby potatoes. Place them in a large mixing bowl.
- Season the Vegetables: Drizzle the olive oil over the sliced vegetables and potatoes. Add the garlic powder, oregano, basil, salt, and pepper. Toss everything together until the vegetables and potatoes are well-coated.
- Arrange on Sheet Pan: Spread the seasoned vegetables and potatoes evenly on a large sheet pan. Make sure they’re in a single layer to guarantee even cooking.
- Add the Sausages: Nestle the Italian sausage links among the vegetables on the sheet pan. Ensure they’re spaced apart to allow even cooking and browning.
- Roast in the Oven: Place the sheet pan in the preheated oven and roast for about 35-40 minutes. Halfway through cooking, around 20 minutes in, give everything a good stir to promote even browning and cooking.
- Check for Doneness: After 35-40 minutes, check that the sausages are cooked through (an internal temperature of 160°F or 71°C) and that the potatoes are fork-tender. If necessary, continue roasting for an additional 5-10 minutes.
- Serve and Garnish: Once done, remove the sheet pan from the oven. Serve the sausage and peppers with potatoes hot, garnished with freshly chopped parsley for added flavor and color.
Extra Tips:
For an extra burst of flavor, consider adding a splash of balsamic vinegar to the vegetables before roasting. If you prefer a spicier dish, opt for hot Italian sausages or add a pinch of red pepper flakes to the vegetable seasoning.
Additionally, you can prep the ingredients ahead of time, making it even quicker to assemble on a busy weeknight. Leftovers can be stored in an airtight container in the refrigerator for up to three days and reheated in the oven or microwave.
Honey Garlic Shrimp With Broccoli
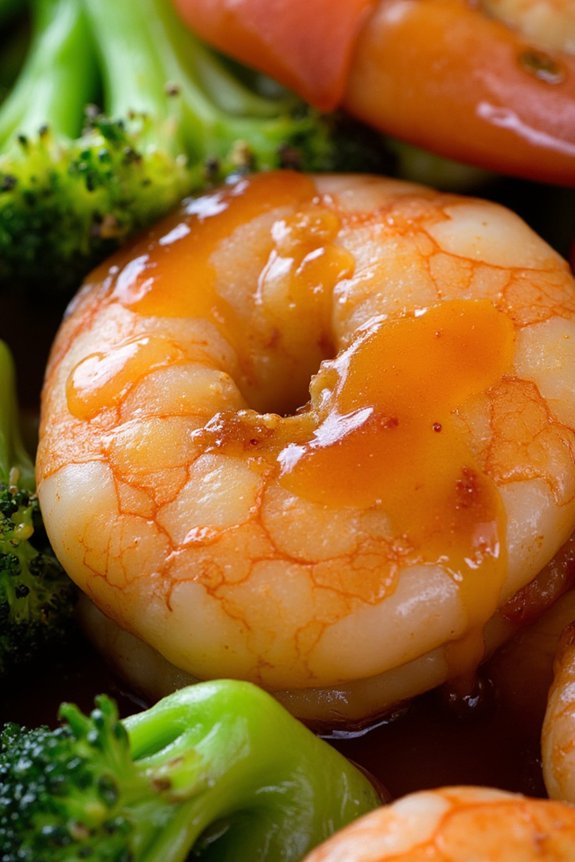
Honey Garlic Shrimp With Broccoli is a delightful sheet pan dinner that combines succulent shrimp with tender broccoli, all coated in a sweet and savory honey garlic glaze. This dish is perfect for busy weeknights as it’s quick to prepare and requires minimal cleanup.
The combination of honey and garlic infuses the shrimp and broccoli with a rich, irresistible flavor that will have everyone coming back for seconds. This recipe isn’t only delicious but also nutritious, as it’s packed with protein from the shrimp and vitamins from the broccoli.
The use of a sheet pan makes it incredibly convenient, as everything cooks together in the oven, allowing you to focus on other tasks while dinner is being prepared. Whether you’re cooking for family or friends, this Honey Garlic Shrimp With Broccoli is sure to be a hit.
Ingredients (Serves 4-6)
- 1 ½ pounds large shrimp, peeled and deveined
- 4 cups broccoli florets
- 3 tablespoons olive oil
- ¼ cup honey
- 4 cloves garlic, minced
- 2 tablespoons soy sauce
- 1 tablespoon lemon juice
- 1 teaspoon crushed red pepper flakes (optional)
- Salt and pepper to taste
- Cooked rice or quinoa, for serving (optional)
Cooking Instructions
- Preheat the Oven: Preheat your oven to 400°F (200°C). Line a large sheet pan with parchment paper or lightly grease it with cooking spray to prevent sticking.
- Prepare the Marinade: In a medium-sized bowl, whisk together the olive oil, honey, minced garlic, soy sauce, lemon juice, red pepper flakes (if using), salt, and pepper. This will form a delicious and aromatic glaze for the shrimp and broccoli.
- Marinate the Shrimp: Add the peeled and deveined shrimp to the bowl with the marinade. Toss the shrimp until they’re well coated, and let them sit for about 10 minutes to absorb the flavors.
- Arrange Broccoli and Shrimp on the Sheet Pan: Spread the broccoli florets evenly on the prepared sheet pan. Place the marinated shrimp on top of the broccoli, ensuring they’re spread out in a single layer.
- Bake the Dish: Place the sheet pan in the preheated oven and bake for 12-15 minutes, or until the shrimp are pink and opaque and the broccoli is tender-crisp. Stir halfway through the cooking time to guarantee even cooking.
- Serve and Enjoy: Remove the sheet pan from the oven and let it cool slightly. Serve the Honey Garlic Shrimp With Broccoli over cooked rice or quinoa if desired, and drizzle any remaining glaze over the top for extra flavor.
Extra Tips
For the best results, use fresh shrimp if available, as they’ve a firmer texture and better taste than frozen ones. If using frozen shrimp, make sure they’re fully thawed and patted dry before marinating.
Additionally, cutting the broccoli into similar-sized florets ensures even cooking. Feel free to customize the spice level by adjusting the amount of crushed red pepper flakes to your preference. If you prefer a slightly caramelized finish, broil the dish for an additional 1-2 minutes at the end of baking.
BBQ Chicken and Sweet Potato Wedges
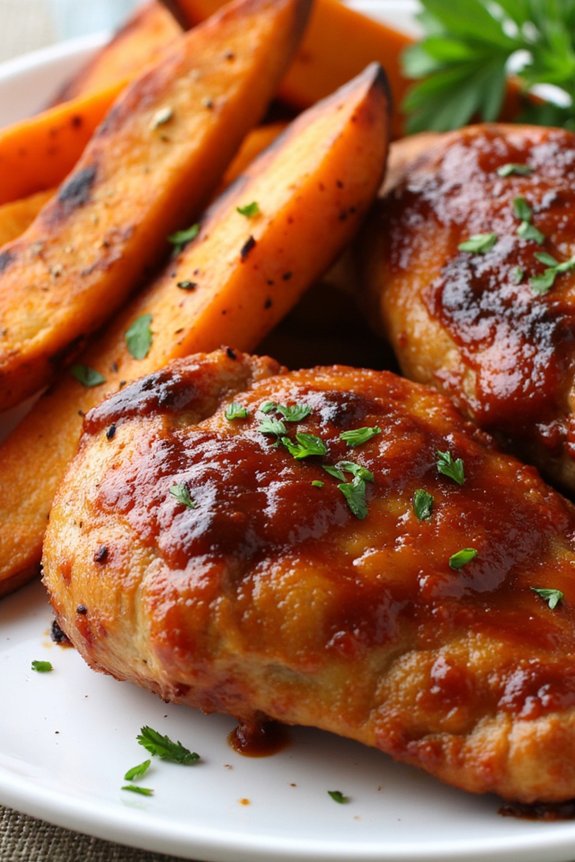
Sheet pan dinners are an effortless way to create a delicious and nutritious meal with minimal cleanup. One of the best combinations is BBQ Chicken and Sweet Potato Wedges. This dish offers the perfect balance of savory and sweet flavors, with juicy BBQ chicken paired with crispy sweet potato wedges. It’s a family-friendly meal that can be prepared quickly for a weeknight dinner or a casual gathering with friends.
BBQ Chicken and Sweet Potato Wedges isn’t only easy to make but also versatile. You can use your favorite BBQ sauce and adjust the seasoning to suit your taste preferences. The sweet potatoes add a natural sweetness that complements the tangy BBQ sauce perfectly. Plus, cooking everything on one sheet pan makes the process straightforward, allowing you to enjoy more time with your loved ones and less time in the kitchen.
Ingredients for 4-6 servings:
- 4 boneless, skinless chicken breasts
- 1 cup BBQ sauce
- 2 large sweet potatoes
- 2 tablespoons olive oil
- 1 teaspoon garlic powder
- 1 teaspoon paprika
- 1 teaspoon salt
- 1/2 teaspoon black pepper
- Fresh parsley for garnish (optional)
Cooking Instructions:
- Preheat the Oven: Preheat your oven to 400°F (200°C). This will guarantee that the chicken and sweet potatoes cook evenly and acquire a nice, crispy texture.
- Prepare the Sweet Potatoes: Wash and peel the sweet potatoes. Cut them into wedges, ensuring they’re roughly the same thickness for even cooking. Place the wedges in a large bowl.
- Season the Sweet Potatoes: Add olive oil, garlic powder, paprika, salt, and black pepper to the bowl with sweet potatoes. Toss well to coat the wedges evenly with the seasoning.
- Arrange the Sweet Potatoes: Spread the sweet potato wedges in a single layer on one side of a large sheet pan. Make sure they aren’t overcrowded to allow proper roasting.
- Prepare the Chicken: Pat the chicken breasts dry with paper towels. Place them on the other side of the sheet pan, leaving some space between each piece for even cooking.
- Add BBQ Sauce: Brush each chicken breast generously with BBQ sauce, ensuring they’re well-coated. Reserve some sauce for brushing later if desired.
- Bake: Place the sheet pan in the preheated oven and bake for 25-30 minutes. Halfway through cooking, flip the sweet potato wedges for even browning. Check the chicken’s internal temperature; it should reach 165°F (74°C) when fully cooked.
- Broil (Optional): If you prefer a caramelized finish, switch the oven to the broil setting for the last 2-3 minutes. Keep a close eye to prevent burning.
- Garnish and Serve: Remove the sheet pan from the oven and let it rest for a few minutes. Garnish with fresh parsley if desired. Serve the BBQ chicken with sweet potato wedges on the side.
Extra Tips:
For an added depth of flavor, marinate the chicken in the BBQ sauce for a few hours before cooking. You can also experiment with different BBQ sauces, such as smoky or spicy varieties, to tailor the dish to your taste.
If you want a bit more crunch, consider sprinkling some breadcrumbs over the sweet potato wedges before baking. Additionally, always verify that the chicken is cooked through but not overcooked to retain its juiciness.
Enjoy your meal with a side salad or steamed vegetables for a complete, balanced dinner.
Pork Chops With Apples and Onions
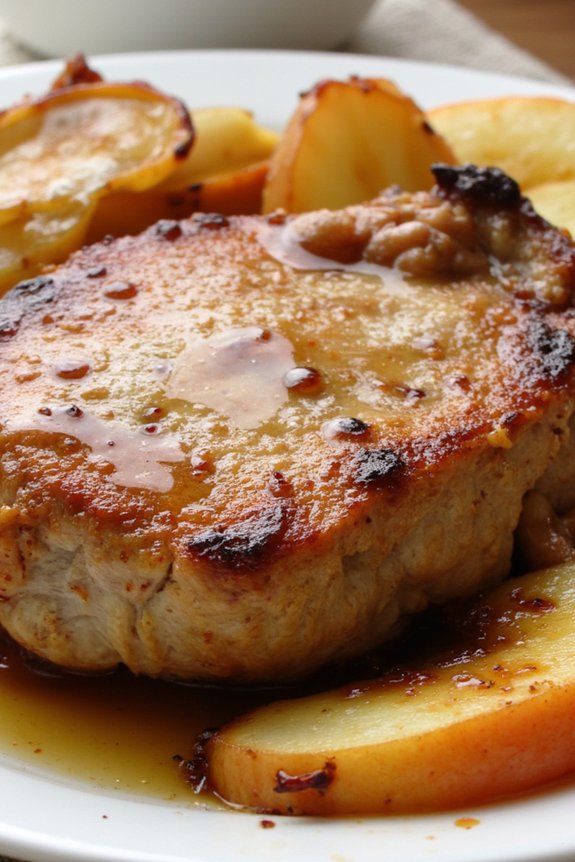
Pork Chops With Apples and Onions is a delightful sheet pan dinner that combines savory and sweet flavors in a harmonious blend. Perfect for busy weeknights or a cozy family dinner, this dish features succulent pork chops cooked alongside caramelized apples and onions. The natural sweetness of the apples complements the savory pork, while the onions add depth and a mild sharpness to the overall flavor profile.
The beauty of this dish lies in its simplicity—everything is cooked together on a single pan, minimizing cleanup and maximizing flavor. This recipe serves 4-6 people and is a fantastic choice for those looking to put a wholesome and satisfying meal on the table with minimal fuss. The combination of tender meat and the sweet, savory medley of fruits and vegetables creates a balanced meal that will please even the pickiest eaters.
With just a few ingredients and straightforward preparation, Pork Chops With Apples and Onions is sure to become a staple in your dinner rotation.
Ingredients:
- 4-6 bone-in pork chops
- 2 large apples, cored and sliced
- 1 large onion, sliced
- 2 tablespoons olive oil
- 1 tablespoon maple syrup
- 1 teaspoon dried thyme
- Salt and pepper to taste
Cooking Instructions:
1. Preheat the Oven:
Preheat your oven to 400°F (200°C). This guarantees that the oven is hot enough to properly cook the pork chops and caramelize the apples and onions.
2. Prepare the Ingredients:
While the oven is preheating, core and slice the apples into thin wedges. Slice the onion into similar-sized pieces. This will assure even cooking.
3. Season the Pork Chops:
Pat the pork chops dry with a paper towel. Season both sides generously with salt, pepper, and dried thyme. This will enhance the flavor of the meat.
4. Arrange on the Sheet Pan:
Place the pork chops on a large sheet pan, ensuring they aren’t overcrowded. Arrange the apple slices and onion slices around the pork chops.
5. Drizzle and Toss:
Drizzle the olive oil and maple syrup over the pork chops, apples, and onions. Use your hands or a spatula to toss the apples and onions gently, ensuring they’re well-coated with the oil and syrup.
6. Bake in the Oven:
Place the sheet pan in the preheated oven and bake for 25-30 minutes, or until the internal temperature of the pork chops reaches 145°F (63°C) and the apples and onions are caramelized and tender.
7. Rest and Serve:
Remove the sheet pan from the oven and let the pork chops rest for a few minutes before serving. This allows the juices to redistribute throughout the meat, making it more tender.
Extra Tips:
For best results, choose pork chops that are at least 1-inch thick to prevent them from drying out during cooking. Feel free to experiment with different types of apples; tart varieties like Granny Smith will provide a nice contrast to the sweet onions.
If you prefer a bit more sweetness, you can add an extra drizzle of maple syrup just before serving. Additionally, try adding a splash of apple cider vinegar to the apples and onions before roasting for a tangy twist.
Balsamic Glazed Salmon With Asparagus
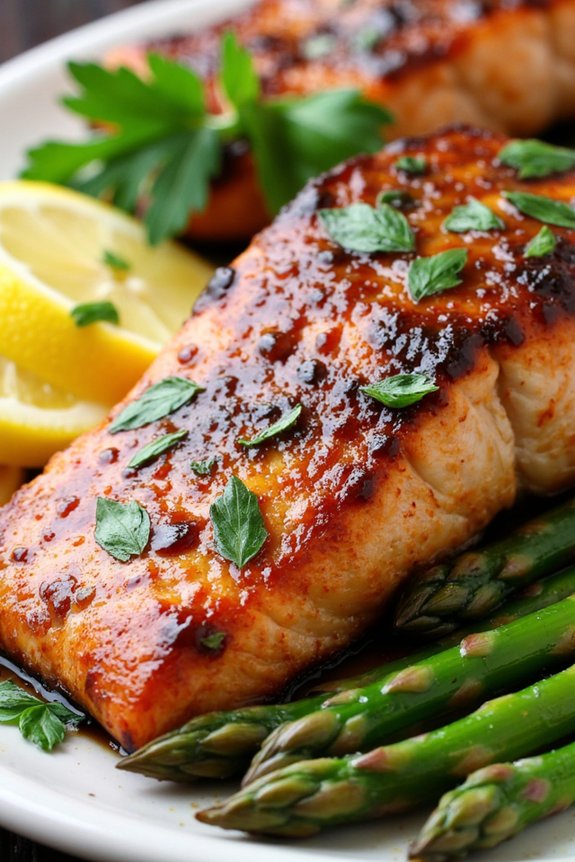
Balsamic Glazed Salmon with Asparagus is a delightful and healthy sheet pan dinner that offers a harmonious blend of flavors and textures. The savory richness of the salmon pairs beautifully with the slightly sweet and tangy balsamic glaze, while the fresh asparagus adds a crisp, earthy contrast.
This dish not only looks beautiful on the plate but also provides a nutritious meal that’s perfect for weeknight dinners or special occasions alike. With everything cooked on one pan, it minimizes cleanup and maximizes convenience, making it a go-to recipe for busy cooks who still want to serve something delicious and impressive.
This recipe is perfect for serving 4-6 people, making it ideal for family dinners or small gatherings. The combination of salmon and asparagus creates a balance of protein, fiber, and essential nutrients, making it a wholesome meal option.
Plus, the preparation and cooking process are straightforward, allowing even novice cooks to achieve great results. With just a few simple ingredients and minimal preparation, this Balsamic Glazed Salmon with Asparagus will quickly become a favorite in your culinary repertoire.
Ingredients for 4-6 servings:
- 4-6 salmon fillets, skin-on
- 1 pound asparagus, trimmed
- 1/4 cup balsamic vinegar
- 2 tablespoons honey
- 3 tablespoons olive oil, divided
- 3 cloves garlic, minced
- Salt and pepper, to taste
- 1 lemon, sliced
- Fresh parsley, chopped, for garnish
Cooking Instructions:
- Preheat the Oven: Preheat your oven to 400°F (200°C). Line a large sheet pan with parchment paper or lightly grease it with cooking spray to prevent sticking.
- Prepare the Balsamic Glaze: In a small bowl, whisk together the balsamic vinegar, honey, 2 tablespoons of olive oil, and minced garlic until well combined. Season the mixture with a pinch of salt and pepper.
- Arrange the Ingredients: Place the salmon fillets on one side of the prepared sheet pan, skin-side down. Arrange the trimmed asparagus spears on the other side of the pan. Drizzle the remaining tablespoon of olive oil over the asparagus. Sprinkle both the salmon and asparagus with salt and pepper to taste.
- Apply the Glaze: Pour the balsamic glaze over the salmon fillets, guaranteeing they’re evenly coated. Reserve a small amount of glaze for serving, if desired.
- Add Lemon Slices: Place lemon slices over the salmon and asparagus for added flavor. The lemons will also enhance the presentation of the dish.
- Bake: Place the sheet pan in the preheated oven and bake for 15-20 minutes, or until the salmon is cooked through and flakes easily with a fork, and the asparagus is tender-crisp.
- Serve: Once cooked, remove the sheet pan from the oven. Transfer the salmon and asparagus to plates, and drizzle any reserved glaze over the top. Garnish with freshly chopped parsley before serving.
Extra Tips:
For best results, choose salmon fillets that are similar in size and thickness to guarantee even cooking. If you prefer a thicker glaze, you can simmer the balsamic mixture on the stovetop for a few minutes to reduce and thicken it before applying it to the salmon.
Additionally, feel free to substitute the asparagus with other vegetables like broccoli or green beans, adjusting the cooking time as needed. Finally, keep an eye on the salmon towards the end of the cooking time to avoid overcooking, as this can result in a dry texture. Enjoy your meal with a side of rice or a fresh salad for a complete and satisfying dinner.
Teriyaki Chicken and Pineapple
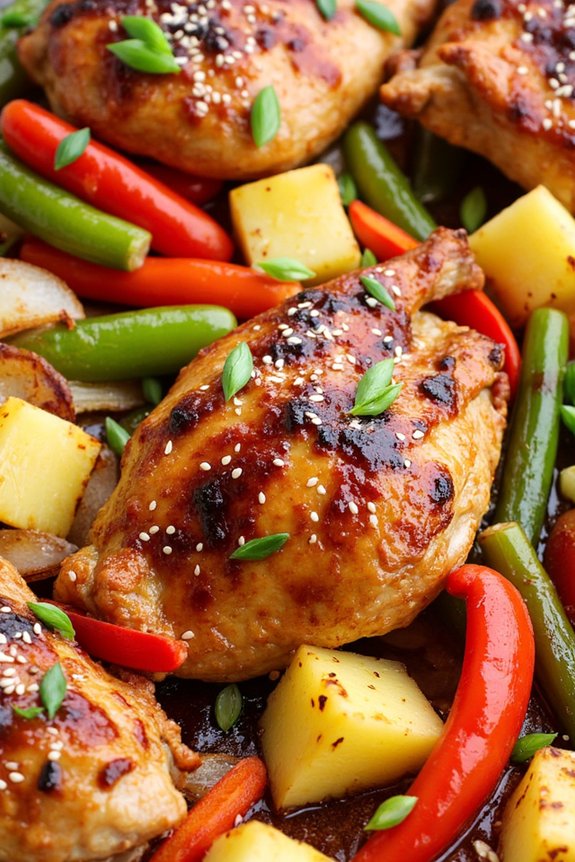
If you’re looking for a quick and easy dinner that’s full of flavor, the Teriyaki Chicken and Pineapple Sheet Pan Dinner is a fantastic choice. This dish combines the savory taste of teriyaki chicken with the sweet and tangy flavor of pineapple, creating a delightful balance that will satisfy your taste buds.
The best part? It’s all cooked on one sheet pan, making cleanup a breeze. Whether you’re hosting a family dinner or simply craving a delicious weeknight meal, this recipe is bound to please everyone at the table.
Perfect for serving a group of 4-6 people, this sheet pan dinner isn’t only convenient but also nutritious. Loaded with colorful bell peppers and hearty chunks of chicken, the dish offers a variety of textures and flavors.
Plus, the addition of pineapple adds a tropical twist that makes this meal both unique and memorable. Gather your ingredients, preheat your oven, and get ready to enjoy a meal that’s simple to prepare and absolutely delicious.
Ingredients:
- 1.5 pounds boneless, skinless chicken thighs, cut into chunks
- 1 cup teriyaki sauce
- 2 cups pineapple chunks (fresh or canned, drained)
- 2 large bell peppers (red, green, or yellow), sliced
- 1 large red onion, sliced
- 2 tablespoons olive oil
- Salt and pepper to taste
- 1 tablespoon sesame seeds (optional)
- 2 tablespoons chopped green onions (optional)
Cooking Instructions:
- Preheat the Oven: Begin by preheating your oven to 400°F (200°C). This guarantees the oven is hot enough to cook everything evenly.
- Prepare the Chicken: In a large bowl, combine the chicken chunks with the teriyaki sauce, making sure every piece is well coated. Allow it to marinate for at least 15 minutes for enhanced flavor.
- Arrange Ingredients on the Sheet Pan: On a large sheet pan, spread the marinated chicken chunks evenly. Add the pineapple chunks, sliced bell peppers, and red onion around the chicken. Drizzle olive oil over the vegetables and sprinkle with salt and pepper.
- Bake: Place the sheet pan in the preheated oven and bake for 25-30 minutes. Check to confirm the chicken is cooked through and the vegetables are tender.
- Garnish and Serve: Once done, remove the sheet pan from the oven. If desired, sprinkle sesame seeds and chopped green onions over the dish for added flavor and presentation. Serve hot and enjoy!
Extra Tips:
For best results, try not to overcrowd the sheet pan, as this can cause the chicken and vegetables to steam rather than roast, affecting the texture.
If you prefer a spicier version, consider adding a dash of crushed red pepper flakes to the marinade. Leftovers can be stored in an airtight container in the refrigerator for up to 3 days, making this dish a great option for meal prep.
Sheet Pan Nachos With Ground Beef
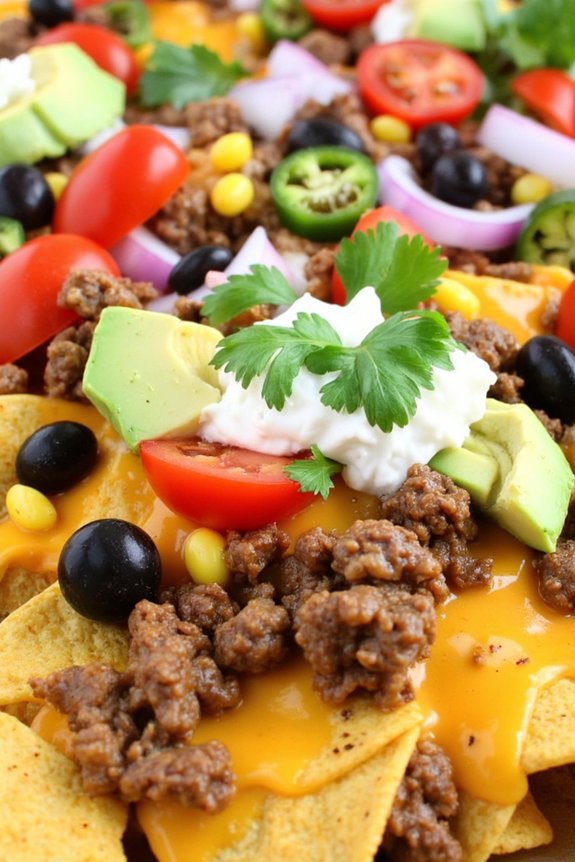
Sheet Pan Nachos With Ground Beef is a delightful and easy-to-make dish that brings together the flavors of classic nachos in a convenient one-pan format. This recipe is perfect for a casual family dinner or a fun gathering with friends. By using a sheet pan, you can guarantee even cooking and a crispy texture to the chips, while the melted cheese and savory toppings make this meal irresistible.
With minimal prep and cleanup, this dish is a winner for busy weeknights or spontaneous get-togethers. The beauty of Sheet Pan Nachos lies in its versatility. You can customize the toppings according to your preferences, adding various vegetables, different types of cheese, or even switching out the ground beef for another protein like chicken or turkey.
This recipe serves 4-6 people, making it ideal for sharing. Once you assemble the ingredients and follow the simple steps, you’ll have a mouthwatering dish ready in no time.
Ingredients (serves 4-6):
- 1 pound ground beef
- 1 packet taco seasoning
- 1 bag tortilla chips (about 12 ounces)
- 2 cups shredded cheddar cheese
- 1 cup black beans, rinsed and drained
- 1 cup corn kernels (fresh, canned, or frozen)
- 1/2 cup sliced jalapeños
- 1/2 cup diced tomatoes
- 1/4 cup sliced black olives
- 1/4 cup chopped red onion
- 1/4 cup chopped fresh cilantro
- 1 avocado, diced
- Sour cream, for serving
- Salsa, for serving
Cooking Instructions:
- Preheat Oven: Begin by preheating your oven to 400°F (200°C) to guarantee it’s hot and ready for cooking the nachos.
- Cook Ground Beef: In a large skillet over medium heat, cook the ground beef until it’s browned and fully cooked, about 6-8 minutes. Drain excess fat and stir in the taco seasoning according to the package instructions. Set aside.
- Prepare Sheet Pan: Line a large sheet pan with parchment paper or lightly grease it. Spread the tortilla chips evenly across the pan to form a single layer.
- Layer Ingredients: Sprinkle the cooked ground beef evenly over the tortilla chips. Follow with an even layer of black beans, corn, sliced jalapeños, diced tomatoes, black olives, and red onion.
- Add Cheese: Generously sprinkle the shredded cheddar cheese over the top of the layered ingredients.
- Bake: Place the sheet pan in the preheated oven and bake for 10-12 minutes, or until the cheese is fully melted and bubbly.
- Garnish and Serve: Remove the nachos from the oven and garnish with freshly chopped cilantro and diced avocado. Serve immediately with sides of sour cream and salsa.
Extra Tips:
When preparing Sheet Pan Nachos, consider using freshly grated cheese as it melts more evenly compared to pre-shredded cheese, which often contains anti-caking agents.
If you prefer a smoky flavor, try using a mix of cheddar and smoked gouda cheese. Additionally, if you want an extra kick, you can add a sprinkle of cayenne pepper to the taco-seasoned beef.
To save time, canned corn and black beans work well, but make sure to drain them thoroughly to prevent sogginess. Enjoy experimenting with different toppings to make this dish uniquely yours!
Mediterranean Roasted Vegetables and Chickpeas
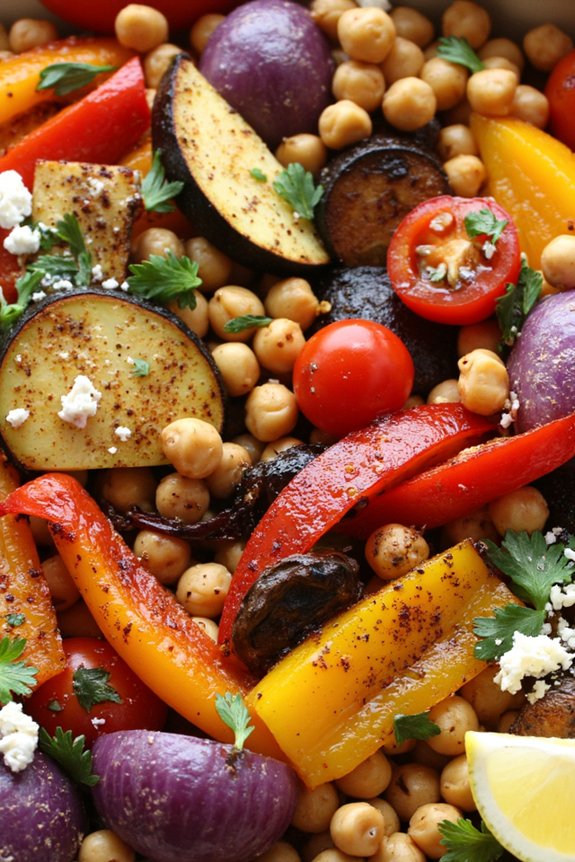
The Mediterranean Roasted Vegetables and Chickpeas dish is a vibrant and healthy meal that brings together the rich flavors of the Mediterranean. This sheet pan dinner is perfect for a quick weeknight meal, providing a balanced combination of protein, fiber, and a burst of lively flavors.
The roasted vegetables and chickpeas are seasoned with aromatic herbs and spices, creating a delicious and satisfying dish that’s both nutritious and easy to make.
This recipe is designed to serve 4-6 people, making it an excellent choice for family dinners or small gatherings. The preparation is simple, and the cooking process requires minimal supervision, letting you attend to other tasks while the oven does the work.
The result is a beautiful medley of colors and textures, with the chickpeas offering a satisfying crunch and the vegetables becoming perfectly tender and caramelized. Serve it as a standalone dish or alongside some crusty bread or quinoa for an added touch.
Ingredients (Serves 4-6):
- 1 large red bell pepper
- 1 large yellow bell pepper
- 1 medium zucchini
- 1 medium red onion
- 1 pint cherry tomatoes
- 1 can (15 oz) chickpeas, drained and rinsed
- 3 tablespoons olive oil
- 1 tablespoon balsamic vinegar
- 2 teaspoons dried oregano
- 1 teaspoon dried thyme
- 1 teaspoon smoked paprika
- 1/2 teaspoon garlic powder
- Salt and pepper to taste
- 1/4 cup fresh parsley, chopped
- 1/4 cup crumbled feta cheese (optional)
- Lemon wedges for serving
Cooking Instructions:
- Preheat the Oven: Preheat your oven to 425°F (220°C). This guarantees the vegetables and chickpeas roast properly and develop a nice caramelization.
- Prepare the Vegetables: Wash and cut the red and yellow bell peppers into strips. Slice the zucchini into rounds and cut the red onion into wedges. Halve the cherry tomatoes. Place all the vegetables on a large sheet pan.
- Add the Chickpeas: Drain and rinse the chickpeas thoroughly. Pat them dry with a paper towel to remove excess moisture and add them to the sheet pan with the vegetables.
- Season the Mixture: Drizzle the olive oil and balsamic vinegar over the vegetables and chickpeas. Sprinkle with oregano, thyme, smoked paprika, garlic powder, salt, and pepper. Toss everything together until well combined and evenly coated.
- Roast in the Oven: Spread the mixture in a single layer on the sheet pan. Place in the preheated oven and roast for 25-30 minutes, stirring halfway through, until the vegetables are tender and caramelized.
- Garnish and Serve: Once roasted, remove the pan from the oven. Sprinkle with fresh parsley and crumbled feta cheese, if using. Serve warm with lemon wedges on the side for a revitalizing citrusy touch.
Extra Tips:
For an added layer of flavor, consider marinating the chickpeas in olive oil, lemon juice, and your choice of herbs for about 30 minutes before cooking. This will infuse them with more depth and enhance the overall taste of the dish.
Additionally, you can customize the vegetables based on seasonality or personal preference, such as adding eggplant or mushrooms. If you prefer a spicier kick, a pinch of red pepper flakes can be included in the seasoning.
To guarantee even cooking, cut the vegetables into similar sizes. Enjoy your Mediterranean feast!
Pesto Chicken With Cherry Tomatoes

Pesto Chicken With Cherry Tomatoes is a delightful and easy-to-make sheet pan dinner that brings together vibrant flavors and colors. This dish combines the nutty, herbaceous taste of pesto with juicy cherry tomatoes and tender chicken, all cooked on a single sheet pan for minimal cleanup. Ideal for busy weeknights or a casual gathering, this meal is sure to become a family favorite with its simplicity and deliciousness.
The beauty of this recipe is its versatility and the minimal time required for preparation and cooking. The pesto sauce, made from fresh basil, garlic, pine nuts, Parmesan cheese, and olive oil, infuses the chicken with rich, aromatic flavors. Meanwhile, the cherry tomatoes burst with sweetness as they roast, complementing the savory pesto and succulent chicken perfectly. With just a few simple steps, you can have a satisfying and healthy dinner ready to serve in no time.
Ingredients (Serves 4-6):
- 6 boneless, skinless chicken breasts
- 1 cup pesto sauce
- 2 pints cherry tomatoes
- 2 tablespoons olive oil
- Salt and pepper to taste
- 1/4 cup grated Parmesan cheese
- 1 tablespoon lemon juice
- Fresh basil leaves for garnish
Cooking Instructions:
- Preheat the Oven: Begin by preheating your oven to 400°F (200°C). This guarantees that the oven is at the right temperature when the chicken is ready to be cooked.
- Prepare the Chicken: Place the chicken breasts on a large sheet pan. Season both sides with salt and pepper to taste. Then, spread about 2 tablespoons of pesto sauce over each chicken breast, making sure to coat them evenly.
- Add Cherry Tomatoes: In a bowl, toss the cherry tomatoes with olive oil, a pinch of salt, and a dash of pepper. Scatter the seasoned cherry tomatoes around the chicken breasts on the sheet pan.
- Bake the Dish: Place the sheet pan in the preheated oven and bake for about 25-30 minutes, or until the chicken is cooked through and reaches an internal temperature of 165°F (74°C).
- Finish with Parmesan and Lemon: Once cooked, remove the sheet pan from the oven. Drizzle the lemon juice over the chicken and tomatoes and sprinkle grated Parmesan cheese over the top.
- Garnish and Serve: Garnish with fresh basil leaves and serve immediately. Enjoy the Pesto Chicken With Cherry Tomatoes with your favorite side, such as crusty bread or a fresh salad.
Extra Tips:
For an extra burst of flavor, you can marinate the chicken in the pesto sauce for a few hours or overnight before cooking. If you prefer a creamier texture, consider adding a dollop of ricotta or mozzarella cheese on top of each chicken breast before baking.
Additionally, if you want a bit more color and flavor, try adding a few thin slices of red onion or bell pepper to the mix of cherry tomatoes. This dish can also be easily adjusted for a larger crowd by simply doubling the ingredients and using an additional sheet pan.
Italian Sausage and Gnocchi Bake
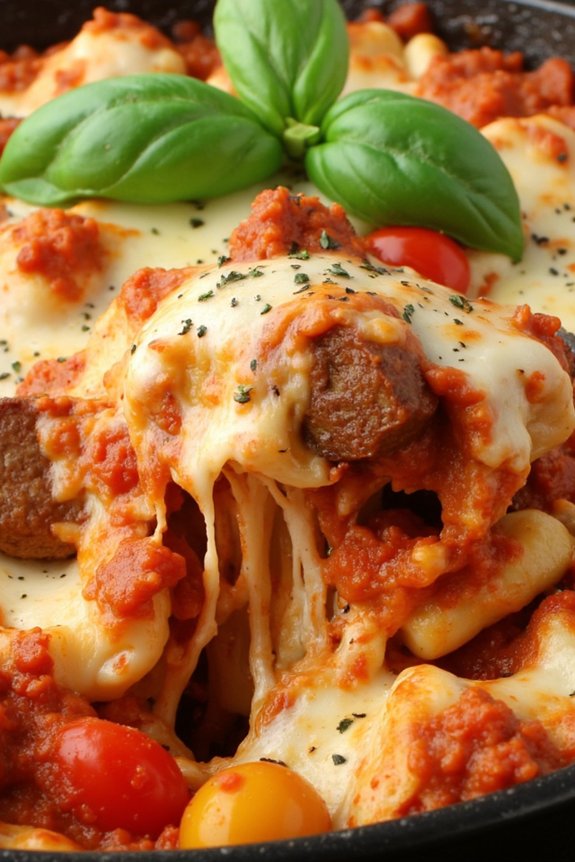
This Italian Sausage and Gnocchi Bake is a delightful and hearty meal that combines classic Italian flavors into a simple, fuss-free dish. Perfect for busy weeknights or a lazy weekend dinner, this one-pan meal requires minimal prep and cleanup.
The combination of spicy Italian sausage, pillowy gnocchi, and colorful vegetables creates a comforting and satisfying meal that the whole family will love. Each bite is bursting with flavor, thanks to the aromatic herbs and rich tomato sauce that tie everything together.
Cooking this dish on a sheet pan allows for even roasting, guaranteeing that the gnocchi retains its chewy texture while the sausages and vegetables caramelize beautifully. The addition of mozzarella cheese on top gives it a delightful gooey finish, making it irresistible.
Serve this Italian Sausage and Gnocchi Bake with a simple side salad or a crusty piece of bread to soak up the delicious sauce. This recipe serves 4-6 people, making it an ideal choice for family dinners or when entertaining friends.
Ingredients for 4-6 people:
- 1 pound Italian sausage links, sliced
- 1 pound gnocchi
- 1 red bell pepper, sliced
- 1 yellow bell pepper, sliced
- 1 red onion, sliced
- 1 cup cherry tomatoes, halved
- 2 cups marinara sauce
- 1 teaspoon dried oregano
- 1 teaspoon dried basil
- 1/2 teaspoon garlic powder
- Salt and pepper to taste
- 1 cup shredded mozzarella cheese
- Fresh basil leaves for garnish
- Olive oil for drizzling
Cooking Instructions:
- Preheat the oven: Start by preheating your oven to 400°F (200°C). This will guarantee that the ingredients cook evenly and the cheese melts perfectly.
- Prepare the ingredients: In a large bowl, combine the sliced Italian sausage, gnocchi, red and yellow bell peppers, red onion, and cherry tomatoes. Drizzle with olive oil, then sprinkle with oregano, basil, garlic powder, salt, and pepper. Toss everything together until well coated.
- Assemble the dish: Spread the mixture evenly onto a large sheet pan. Make sure the ingredients are in a single layer to guarantee even cooking.
- Add the sauce: Pour the marinara sauce over the mixture and gently toss to coat. This will infuse the ingredients with rich, savory flavors as they cook.
- Bake in the oven: Place the sheet pan in the preheated oven and bake for 25-30 minutes, or until the sausage is cooked through and the vegetables are tender.
- Add the cheese: Remove the sheet pan from the oven and sprinkle the shredded mozzarella cheese evenly over the top. Return the pan to the oven for an additional 5-7 minutes, or until the cheese is melted and bubbly.
- Garnish and serve: Once the cheese is melted, remove the sheet pan from the oven. Garnish with fresh basil leaves before serving hot.
Extra Tips:
To customize this Italian Sausage and Gnocchi Bake, feel free to swap in your favorite vegetables or add extras like mushrooms or zucchini. If you prefer a milder dish, opt for sweet Italian sausage instead of spicy.
For an extra crispy finish, place the pan under the broiler for the last 2-3 minutes of cooking, watching closely to prevent burning. Remember to let the dish cool slightly before serving to allow the flavors to meld and make serving easier.
Veggie-Stuffed Bell Peppers
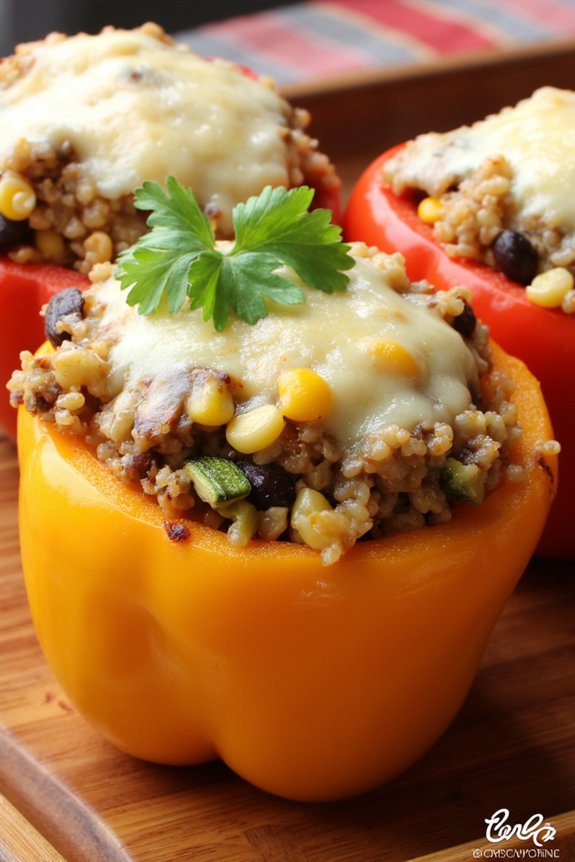
Veggie-stuffed bell peppers are a colorful and nutritious option for a sheet pan dinner that’s both satisfying and easy to prepare. This dish combines tender bell peppers with a wholesome filling of vegetables and grains, making it perfect for vegetarians or anyone looking to incorporate more plant-based meals into their diet.
With its beautiful presentation and savory filling, veggie-stuffed bell peppers are ideal for a family dinner or a gathering with friends. The beauty of this recipe lies in its versatility; you can customize the filling based on what you have on hand or what your family prefers.
The peppers act as a natural vessel, holding the ingredients together while adding a sweet and mild flavor. The combination of grains, beans, and vegetables not only makes it hearty but also rich in fiber and protein. This recipe serves 4-6 people, making it an excellent choice for meal prep or feeding a crowd.
Ingredients:
- 6 large bell peppers (any color)
- 1 cup quinoa
- 2 cups vegetable broth
- 1 tablespoon olive oil
- 1 small onion, diced
- 2 cloves garlic, minced
- 1 zucchini, diced
- 1 cup corn kernels (fresh, frozen, or canned)
- 1 can (15 oz) black beans, drained and rinsed
- 1 teaspoon cumin
- 1 teaspoon chili powder
- Salt and pepper to taste
- 1 cup shredded cheese (cheddar, Monterey Jack, or your choice)
- Fresh cilantro for garnish (optional)
Cooking Instructions:
- Preheat Oven and Prepare Peppers: Preheat your oven to 375°F (190°C). Wash the bell peppers and cut the tops off. Remove the seeds and membranes inside.
- Cook Quinoa: In a medium saucepan, combine quinoa and vegetable broth. Bring to a boil, reduce heat to low, cover, and simmer for about 15 minutes or until the quinoa is fluffy and the liquid is absorbed.
- Sauté Vegetables: While the quinoa is cooking, heat olive oil in a large skillet over medium heat. Add the diced onion and garlic, sautéing until the onion is translucent. Add the zucchini and corn, cooking for 5 minutes until the vegetables are tender.
- Mix Filling: In a large bowl, combine the cooked quinoa, sautéed vegetables, black beans, cumin, chili powder, salt, and pepper. Stir in half of the shredded cheese.
- Stuff Peppers: Place the bell peppers in a sheet pan. Spoon the quinoa and vegetable mixture into each pepper, packing it tightly. Sprinkle the remaining cheese on top of each stuffed pepper.
- Bake: Cover the sheet pan with foil and bake in the preheated oven for 30 minutes. Remove the foil and bake for an additional 10 minutes until the cheese is melted and bubbly.
- Garnish and Serve: Remove the peppers from the oven and let them cool slightly. Garnish with fresh cilantro if desired before serving.
Extra Tips:
For a more robust flavor, consider roasting the peppers slightly before stuffing them; this can enhance their sweetness and add a slight char. If you prefer a spicier dish, add a chopped jalapeño or a pinch of cayenne pepper to the filling.
Leftovers store well in the refrigerator for up to three days, making them a great option for meal prep. When reheating, cover with foil to prevent the peppers from drying out.