

There’s something so comforting about cooking with a cast iron skillet. It’s like a warm hug for your taste buds. From the savory aroma of skillet lemon herb chicken with vibrant veggies to the rich flavors of a slow-cooked lamb stew, these dishes have a rustic charm. They evoke a sense of cozy togetherness. Let’s explore these heartwarming recipes that feel like home.
Skillet Lemon Herb Chicken and Vegetables
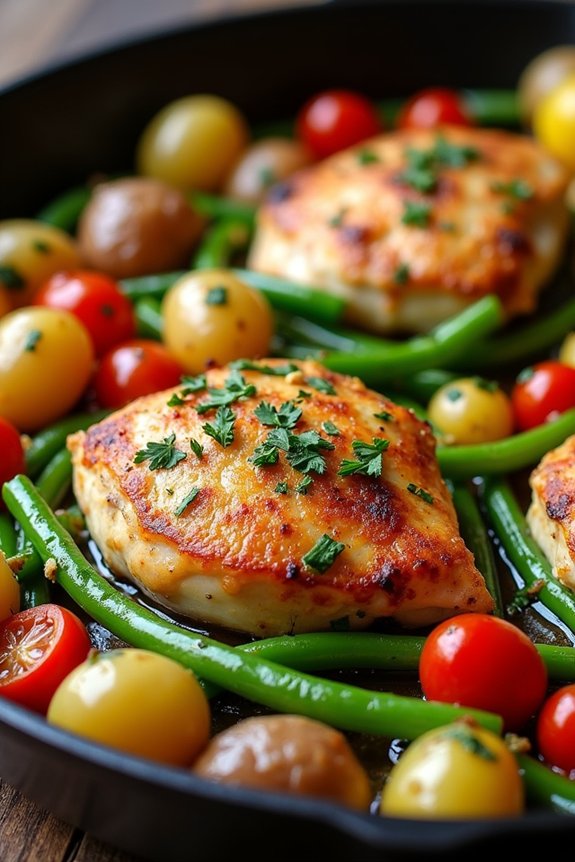
Enjoy a delightful and nutritious meal with this Skillet Lemon Herb Chicken and Vegetables recipe, perfect for a rustic and healthy dinner. This dish combines the zesty flavor of lemon with aromatic herbs to create a mouthwatering chicken dish that’s both invigorating and satisfying.
The use of a cast iron skillet not only enhances the flavors but also guarantees an even cook, making this meal a wonderful addition to your culinary repertoire. This recipe is perfect for a family dinner or a small gathering, as it serves 4-6 people.
The combination of tender chicken thighs, fresh vegetables, and a burst of citrusy lemon makes it a wholesome dish that everyone will love. The skillet method allows the chicken to sear beautifully while the vegetables soak up all the juicy flavors.
Whether you’re a seasoned cook or a novice in the kitchen, this recipe is simple to follow and delivers impressive results.
Ingredients (serves 4-6):
- 6 bone-in, skin-on chicken thighs
- Salt and black pepper to taste
- 2 tablespoons olive oil
- 1 lemon, zested and juiced
- 4 garlic cloves, minced
- 1 teaspoon dried oregano
- 1 teaspoon dried thyme
- 1 teaspoon dried rosemary
- 1 pound baby potatoes, halved
- 2 cups green beans, trimmed
- 1 red bell pepper, sliced
- 1 cup cherry tomatoes, halved
- Fresh parsley, chopped (for garnish)
Cooking Instructions:
1. Preheat and Season: Preheat your oven to 400°F (200°C). Season the chicken thighs generously with salt and black pepper on both sides.
2. Sear the Chicken: In a large cast iron skillet, heat the olive oil over medium-high heat. Once hot, place the chicken thighs skin-side down and sear for about 5-7 minutes until the skin is golden brown and crispy.
Flip the chicken and sear the other side for an additional 3-4 minutes. Remove the chicken from the skillet and set aside.
3. Prepare the Vegetables: In the same skillet, add the minced garlic, lemon zest, and juice. Stir for about 30 seconds until fragrant. Add the oregano, thyme, and rosemary, then stir in the baby potatoes, green beans, red bell pepper, and cherry tomatoes.
Season with additional salt and pepper to taste.
4. Combine and Bake: Nestle the seared chicken thighs back into the skillet among the vegetables. Transfer the skillet to the preheated oven and bake for 25-30 minutes, or until the chicken is cooked through and the vegetables are tender.
5. Garnish and Serve: Once done, remove the skillet from the oven. Let the dish rest for a few minutes before garnishing with fresh parsley. Serve warm, directly from the skillet for a rustic touch.
Extra Tips:
For best results, make sure your cast iron skillet is well-seasoned to prevent sticking and to enhance the flavor. If you prefer, boneless chicken breasts can be used instead of thighs, but they may require a shorter cooking time, so keep an eye on them to avoid drying out.
Feel free to experiment with different vegetables based on what’s in season or your personal preference. This dish pairs beautifully with a side of crusty bread or a simple green salad. Enjoy your rustic, flavorful meal!
Cast Iron Seared Steak With Garlic Butter
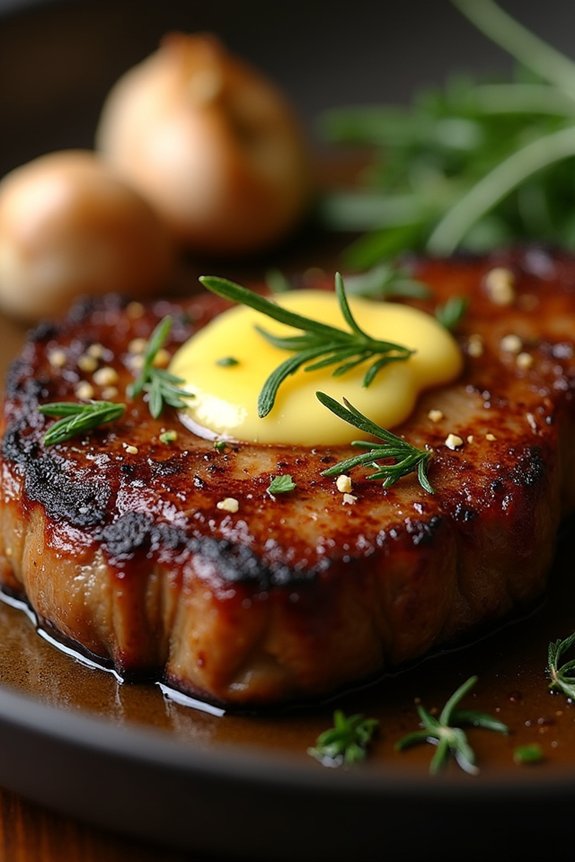
Cooking a perfect steak is an art, and using a cast iron skillet is one of the best methods to achieve a restaurant-quality meal at home. The secret to a mouthwatering steak lies in the sear, which locks in the juices and creates a beautifully caramelized crust. This recipe for Cast Iron Seared Steak with Garlic Butter pairs the rich flavors of a well-seared steak with the creamy goodness of garlic-infused butter, creating a deliciously rustic and healthy dinner option.
Ideal for a family gathering or an intimate dinner party, this dish is sure to impress with its simplicity and depth of flavor.
In this recipe, you’ll learn how to select the perfect cut of steak, season it to perfection, and use your trusty cast iron skillet to achieve an even sear. The garlic butter adds a luscious, aromatic finish to the steak, enhancing its natural flavors without overwhelming them. This dish serves 4-6 people, making it an excellent choice for entertaining guests or treating your family to a special meal.
With minimal ingredients and straightforward instructions, this recipe is perfect for both novice and experienced home cooks looking to elevate their culinary skills.
Ingredients (serving size: 4-6 people):
- 4 ribeye or New York strip steaks (about 1-inch thick)
- Salt and freshly ground black pepper
- 2 tablespoons olive oil
- 4 tablespoons unsalted butter
- 4 garlic cloves, minced
- 1 tablespoon fresh thyme leaves
- 1 tablespoon fresh rosemary leaves
Cooking Instructions:
- Preparation: Remove the steaks from the refrigerator about 30 minutes before cooking to allow them to reach room temperature. Pat them dry with paper towels to remove excess moisture. Season both sides generously with salt and freshly ground black pepper.
- Preheat Skillet: Place your cast iron skillet on medium-high heat and allow it to heat for about 5 minutes. The skillet should be very hot before you begin cooking the steaks.
- Searing the Steaks: Add the olive oil to the hot skillet. Carefully place the steaks in the skillet, guaranteeing they don’t crowd each other. Cook for 3-4 minutes on one side without moving them to develop a nice crust. Flip the steaks and continue cooking for another 3-4 minutes for medium-rare, or adjust the time based on your preferred level of doneness.
- Add Garlic Butter: While the steaks are cooking on the second side, add the butter, minced garlic, thyme, and rosemary to the skillet. Tilt the skillet slightly and use a spoon to baste the steaks with the melted garlic butter mixture continuously for about 1 minute.
- Rest the Steaks: Once the steaks reach your desired doneness, remove them from the skillet and place them on a cutting board. Let them rest for at least 5 minutes to allow the juices to redistribute.
- Serve: Slice the steaks against the grain and serve with the remaining garlic butter from the skillet spooned over the top.
Extra Tips:
For the best results, confirm your steaks are of uniform thickness to cook evenly. A high-quality meat thermometer can help you achieve the perfect doneness: 130°F for medium-rare and 140°F for medium.
Remember, the steak will continue to cook a bit after being removed from the heat, so plan accordingly. If you prefer a stronger garlic flavor, you can increase the amount of garlic or infuse the butter with garlic ahead of time.
Finally, make sure your cast iron skillet is well-seasoned to prevent sticking and guarantee even cooking.
Rustic Vegetable and Quinoa Casserole
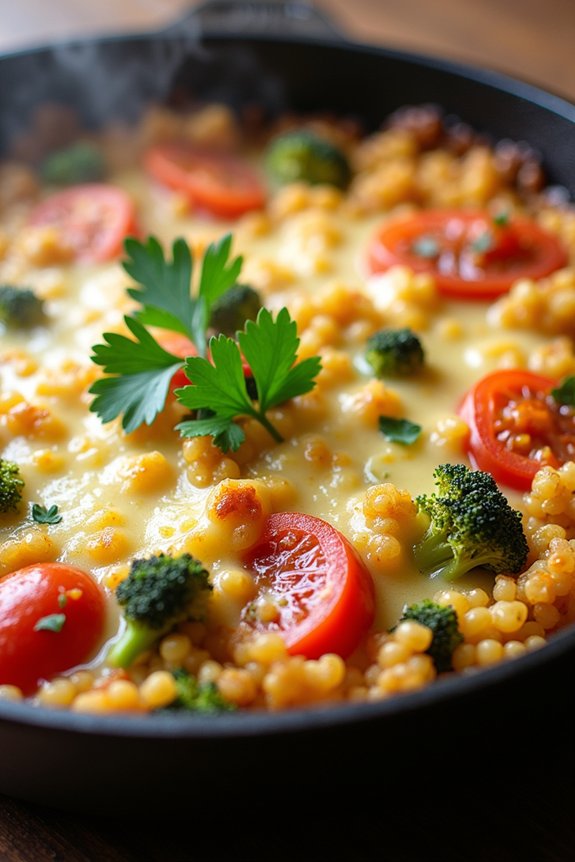
If you’re looking for a healthy and hearty dish that brings a touch of rustic charm to your dinner table, this Rustic Vegetable and Quinoa Casserole is the perfect choice. Using a cast iron skillet, this dish combines the earthy flavors of seasonal vegetables with protein-rich quinoa, all baked together to create a comforting and nourishing meal.
The beauty of this casserole lies in its simplicity and adaptability, allowing you to use whatever vegetables you have on hand, making it a versatile staple in your meal rotation. Not only is this casserole packed with nutrients, but it also offers a delightful texture contrast with the creamy quinoa and the roasted vegetables.
The cast iron skillet enhances the flavors by evenly distributing heat, ensuring that each bite is perfectly cooked. Whether you’re serving it as a main course or a side dish, this Rustic Vegetable and Quinoa Casserole is sure to impress with its wholesome goodness and rustic appeal.
Ingredients for 4-6 servings:
- 1 cup quinoa, rinsed
- 2 cups vegetable broth
- 1 tablespoon olive oil
- 1 onion, chopped
- 2 cloves garlic, minced
- 1 zucchini, sliced
- 1 red bell pepper, chopped
- 1 cup cherry tomatoes, halved
- 1 cup broccoli florets
- 1 teaspoon dried thyme
- 1 teaspoon dried oregano
- Salt and pepper to taste
- 1 cup shredded mozzarella cheese
- 1/4 cup grated Parmesan cheese
- Fresh parsley, chopped (for garnish)
Cooking Instructions:
- Preheat and Prepare Quinoa: Preheat your oven to 375°F (190°C). In a medium saucepan, combine the rinsed quinoa and vegetable broth. Bring to a boil over medium-high heat, then reduce the heat to low and cover. Simmer for about 15 minutes, or until the quinoa is cooked and the liquid is absorbed. Set aside.
- Sauté Vegetables: While the quinoa is cooking, heat the olive oil in a cast iron skillet over medium heat. Add the chopped onion and sauté for 3-4 minutes until translucent. Stir in the minced garlic and cook for another minute.
- Add Remaining Vegetables: Add the zucchini, red bell pepper, cherry tomatoes, and broccoli florets to the skillet. Sauté for about 5-7 minutes, or until the vegetables are slightly tender. Season with dried thyme, oregano, salt, and pepper.
- Combine and Assemble: Remove the skillet from the heat and stir in the cooked quinoa, mixing everything thoroughly. Sprinkle the mozzarella and Parmesan cheese evenly over the top of the mixture.
- Bake the Casserole: Transfer the skillet to the preheated oven and bake for 20-25 minutes, or until the cheese is melted and bubbly with a golden crust.
- Serve: Remove from the oven and let it cool for a few minutes. Garnish with fresh parsley before serving.
Extra Tips:
For a more robust flavor, consider roasting the vegetables in the oven before adding them to the casserole. This will enhance their sweetness and add a slight caramelization.
You can also add a variety of herbs or spices to the quinoa while it cooks for an extra layer of flavor. If you prefer a vegan version, simply omit the cheese or substitute it with your favorite plant-based cheese alternatives.
Finally, this casserole can be made ahead of time and reheated, making it an excellent option for meal prep or busy weeknights.
One-Pan Tuscan Shrimp and White Beans
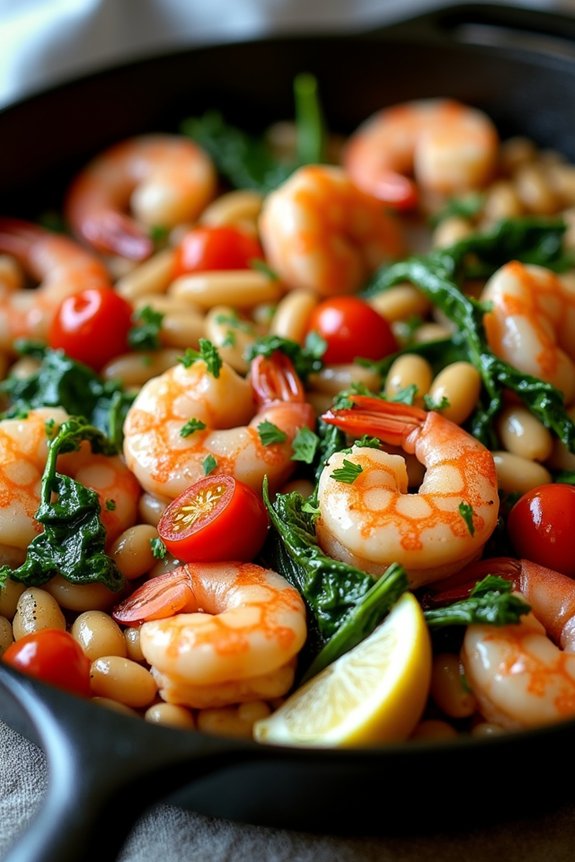
The One-Pan Tuscan Shrimp and White Beans dish is a delightful combination of flavors that brings the rustic charm of Tuscany right to your dinner table. This healthy, hearty meal is perfect for a cozy family dinner or an elegant gathering with friends. The dish features succulent shrimp, tender white beans, and an array of vibrant vegetables, all cooked together in a cast iron skillet to enhance the flavors and provide a satisfying, nutritious meal.
With its rich and savory taste, this dish captures the essence of Italian cuisine and is sure to become a favorite in your household.
What makes this recipe truly special is its simplicity and the ability to prepare everything in just one pan, minimizing cleanup and maximizing convenience. The use of a cast iron skillet not only brings out the flavors of the ingredients but also allows for even cooking, making it an ideal tool for creating this Tuscan-inspired masterpiece.
The combination of fresh herbs, garlic, and a hint of lemon guarantees each bite is bursting with flavor, while the creaminess of the white beans complements the delicate texture of the shrimp. This dish can be served as a standalone meal or paired with crusty bread or a side salad for an extra touch.
Ingredients (Serves 4-6):
- 2 tablespoons olive oil
- 1 pound large shrimp, peeled and deveined
- 3 cloves garlic, minced
- 1 teaspoon dried oregano
- 1 teaspoon dried thyme
- 1/2 teaspoon red pepper flakes
- 1 (15-ounce) can of white beans, drained and rinsed
- 1 cup cherry tomatoes, halved
- 2 cups baby spinach
- 1/4 cup chicken or vegetable broth
- Juice of 1 lemon
- Salt and pepper to taste
- Fresh parsley, chopped, for garnish
Cooking Instructions:
- Prepare the Shrimp: Heat 1 tablespoon of olive oil in a large cast iron skillet over medium-high heat. Add the shrimp to the skillet and season with salt, pepper, and half of the minced garlic. Cook for about 2-3 minutes on each side until the shrimp is pink and opaque. Remove the shrimp from the skillet and set aside.
- Sauté the Aromatics: In the same skillet, add the remaining tablespoon of olive oil. Add the rest of the garlic, oregano, thyme, and red pepper flakes. Sauté for about 1 minute until the garlic is fragrant, being careful not to burn it.
- Cook the Vegetables and Beans: Add the cherry tomatoes to the skillet and cook for 3-4 minutes until they start to soften. Stir in the white beans and chicken or vegetable broth, and bring the mixture to a simmer for another 3-4 minutes, allowing the beans to absorb the flavors.
- Combine and Finish: Add the baby spinach to the skillet, stirring until wilted. Return the shrimp to the pan, and pour in the lemon juice. Toss everything together until well combined and heated through, about 2 minutes.
- Serve: Taste and adjust seasoning with additional salt and pepper if needed. Garnish with fresh chopped parsley before serving. Enjoy your One-Pan Tuscan Shrimp and White Beans hot.
Extra Tips:
When preparing the shrimp, verify they’re thoroughly dried with a paper towel before cooking to achieve a nice sear. If you prefer a spicier dish, increase the amount of red pepper flakes.
This dish is also versatile and can accommodate additional vegetables like zucchini or bell peppers if desired. For a creamier texture, mash some of the white beans with the back of a spoon before adding the spinach.
Finally, using fresh herbs will enhance the dish’s flavor profile, but dried herbs work perfectly if that’s what you have on hand.
Baked Herb-Crusted Salmon With Asparagus
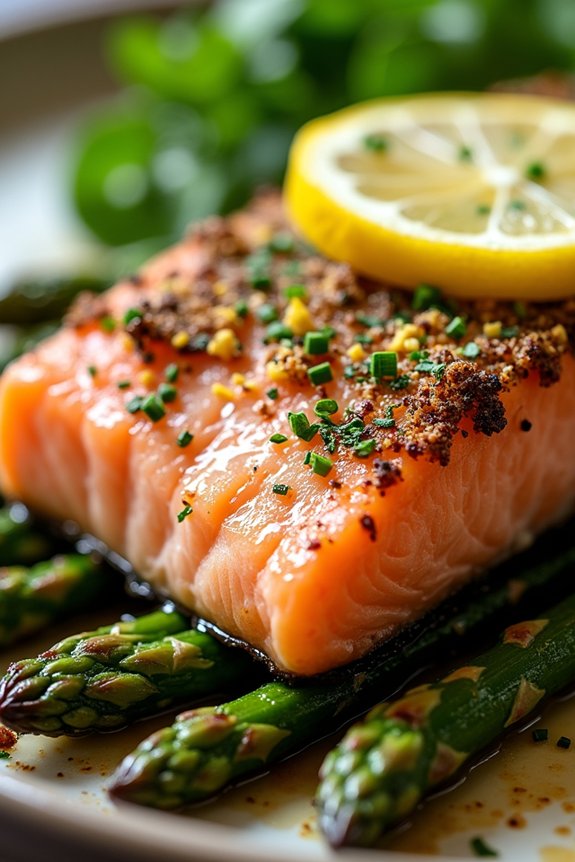
Baked Herb-Crusted Salmon With Asparagus is a delightful and nutritious dish perfect for a cozy dinner. The earthy flavors of the herbs blend beautifully with the richness of the salmon, while the tender asparagus adds a fresh, vibrant touch.
Cooking this dish in a cast iron skillet not only enhances the flavors but also guarantees an even cooking process, giving the salmon a perfectly crispy exterior and a succulent interior. This meal isn’t only healthy but also simple to prepare, making it an ideal choice for a rustic yet elegant dinner.
This recipe serves 4-6 people and involves a straightforward preparation process that yields a dish both visually appealing and satisfyingly delicious. The herb crust, made with a mix of fresh herbs, garlic, and breadcrumbs, creates a flavorful coating that complements the natural taste of the salmon.
Paired with the subtly charred asparagus, the dish is a feast for the senses, perfect for a special occasion or an everyday indulgence.
Ingredients:
- 4-6 salmon fillets, skin-on
- 1 pound asparagus, trimmed
- 2 tablespoons olive oil
- 1 cup fresh breadcrumbs
- 1/4 cup parsley, chopped
- 1/4 cup dill, chopped
- 1/4 cup chives, chopped
- 3 cloves garlic, minced
- Zest of 1 lemon
- Juice of 1 lemon
- Salt and pepper to taste
Instructions:
- Preheat the Oven: Begin by preheating your oven to 400°F (200°C) to guarantee a hot environment for the salmon to cook evenly.
- Prepare the Herb Crust: In a medium bowl, combine the breadcrumbs, parsley, dill, chives, minced garlic, lemon zest, salt, and pepper. Mix well to guarantee the herbs and breadcrumbs are evenly distributed.
- Coat the Salmon: Pat the salmon fillets dry with a paper towel. Brush each fillet lightly with olive oil, then press the herb mixture firmly onto the top of each fillet, guaranteeing a generous and even coating.
- Prepare the Asparagus: Toss the trimmed asparagus in a bowl with a tablespoon of olive oil, a pinch of salt, and pepper until evenly coated.
- Arrange in the Skillet: Place the salmon fillets skin-side down in a cast iron skillet. Arrange the asparagus around the salmon fillets, guaranteeing they’re evenly distributed.
- Bake the Dish: Transfer the skillet to the preheated oven and bake for 15-20 minutes, or until the salmon is cooked through and the herb crust is golden brown. The asparagus should be tender and slightly charred.
- Finish and Serve: Once cooked, remove the skillet from the oven and drizzle the lemon juice over the salmon and asparagus. Serve immediately for best results.
Extra Tips:
For an even more flavorful dish, consider marinating the salmon in lemon juice and olive oil for 30 minutes before adding the herb crust. This will enhance the citrus notes and add moisture to the fish.
Make sure not to overcrowd the skillet to allow the heat to circulate properly, guaranteeing even cooking. If you prefer extra-crispy asparagus, you can broil the dish for the last 2 minutes of cooking, but keep a close eye to prevent burning.
Hearty Beef and Mushroom Ragout
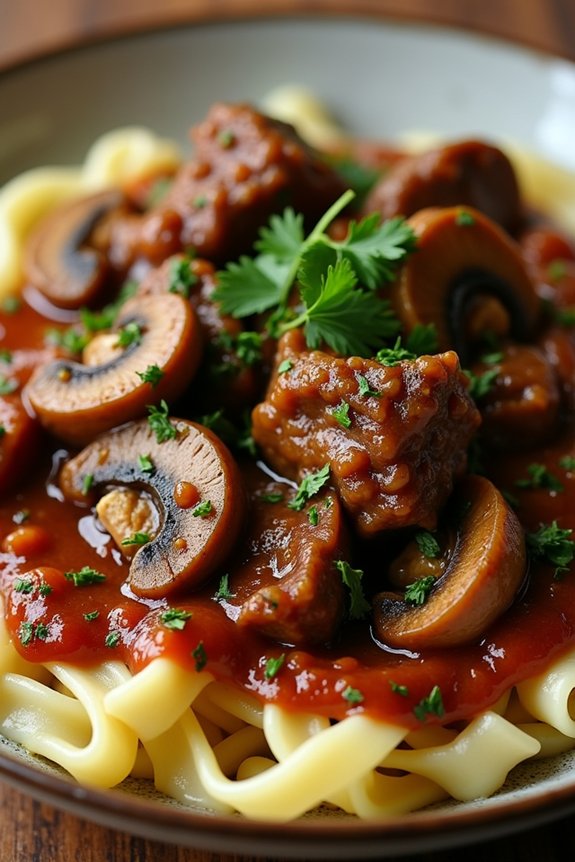
This Hearty Beef and Mushroom Ragout is a deliciously rustic dish that’s perfect for a nourishing dinner. It’s packed with savory flavors and can be cooked entirely in a single cast iron skillet, making for an easy cleanup. The combination of tender beef chunks, earthy mushrooms, and rich sauce makes this ragout exceptionally comforting.
Whether you’re serving it over mashed potatoes, pasta, or with a side of crusty bread, this dish is sure to satisfy even the hungriest of eaters. The key to this dish lies in the slow cooking process, which allows the flavors to meld together beautifully. The beef becomes incredibly tender, while the mushrooms add a depth of flavor that complements the rich sauce.
The use of a cast iron skillet guarantees even cooking and enhances the overall taste with its superior heat retention. This recipe serves 4-6 people, making it ideal for a family dinner or a small gathering with friends.
Ingredients:
- 2 pounds beef chuck, cut into 1-inch cubes
- 2 tablespoons olive oil
- 1 large onion, chopped
- 3 cloves garlic, minced
- 1 pound mushrooms, sliced
- 2 tablespoons tomato paste
- 1 cup beef broth
- 1 cup red wine
- 2 teaspoons fresh thyme leaves
- 2 bay leaves
- Salt and pepper, to taste
- 2 tablespoons fresh parsley, chopped (for garnish)
Cooking Instructions:
- Prepare the Cast Iron Skillet: Preheat your oven to 325°F (165°C). Heat the olive oil in a large cast iron skillet over medium-high heat.
- Brown the Beef: Season the beef cubes with salt and pepper. Add them to the skillet in batches to avoid crowding, and brown on all sides. This should take about 5-7 minutes per batch. Once browned, remove the beef from the skillet and set aside.
- Sauté the Vegetables: In the same skillet, add the chopped onions and minced garlic. Sauté for about 3-4 minutes until the onions are translucent and fragrant.
- Cook the Mushrooms: Add the sliced mushrooms to the skillet and cook for another 5 minutes, or until they release their moisture and start to brown.
- Develop the Sauce: Stir in the tomato paste, making sure to coat the vegetables evenly. Pour in the red wine and beef broth, scraping up any browned bits from the bottom of the skillet for added flavor.
- Combine Ingredients: Return the browned beef to the skillet, along with the fresh thyme and bay leaves. Stir everything together and bring the mixture to a simmer.
- Braise in the Oven: Cover the skillet with a lid or aluminum foil and transfer it to the preheated oven. Allow the ragout to braise for 2-2.5 hours, or until the beef is tender and the sauce has thickened.
- Finish the Dish: Once cooked, remove the bay leaves. Taste and adjust the seasoning with salt and pepper as needed. Garnish with freshly chopped parsley before serving.
Extra Tips:
For the best results, choose a well-marbled cut of beef like chuck, as it will become tender and flavorful with slow cooking. If you prefer a thicker sauce, you can remove the lid during the last 30 minutes of cooking to let it reduce further.
Additionally, feel free to add other root vegetables like carrots or parsnips for added texture and flavor. This ragout can also be made a day in advance, as the flavors tend to deepen and improve with time.
Cast Iron Ratatouille With Fresh Basil
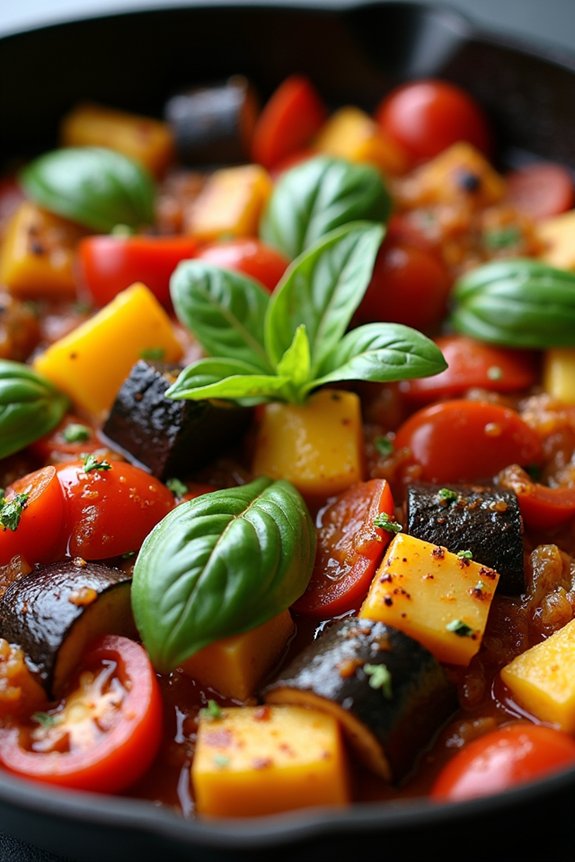
Ratatouille is a classic French Provençal stewed vegetable dish that’s both comforting and healthy. When cooked in a cast iron skillet, the vegetables develop a deep, rich flavor and maintain a satisfying texture. This rustic dish is vibrant with colors and flavors from a variety of fresh vegetables, making it a perfect choice for a wholesome family dinner. The addition of fresh basil enhances the aromatic profile and brings a revitalizing note to this hearty meal.
Cooking ratatouille in a cast iron skillet not only elevates the flavor but also gives it a rustic charm, making it a delightful centerpiece for any dinner table. The key to a perfect Cast Iron Ratatouille With Fresh Basil is using fresh, seasonal vegetables and allowing them to caramelize slightly in the skillet, which adds depth and complexity to the dish. This recipe is enough to serve 4-6 people, making it great for gatherings or family meals.
Ingredients (serving size: 4-6 people):
- 2 tablespoons olive oil
- 1 large eggplant, diced
- 2 zucchinis, sliced
- 1 yellow bell pepper, diced
- 1 red bell pepper, diced
- 1 large onion, chopped
- 3 cloves garlic, minced
- 4 large tomatoes, diced
- Salt and pepper to taste
- 1 teaspoon dried thyme
- 1 teaspoon dried oregano
- 1/2 cup fresh basil leaves, torn
- Grated Parmesan cheese (optional, for serving)
Cooking Instructions:
- Prepare the Vegetables: Start by washing all your vegetables thoroughly. Dice the eggplant, slice the zucchinis, and dice the bell peppers. Chop the onion and mince the garlic. Dice the tomatoes and set everything aside.
- Heat the Skillet: Place your cast iron skillet over medium heat and add the olive oil. Allow it to heat up until it shimmers, which will take about 2 minutes.
- Cook the Vegetables: Add the onions and garlic to the skillet and sauté for about 3 minutes until they become translucent and fragrant.
- Add the Eggplant and Peppers: Introduce the diced eggplant and bell peppers to the skillet. Stir occasionally and cook for about 5-7 minutes until they begin to soften.
- Incorporate Zucchini and Tomatoes: Add the sliced zucchini and diced tomatoes to the mixture. Stir well to combine all the vegetables.
- Season the Dish: Sprinkle the salt, pepper, dried thyme, and oregano over the vegetable mixture. Stir well to guarantee even distribution of the seasoning.
- Simmer the Ratatouille: Lower the heat to a simmer, cover the skillet, and let the ratatouille cook for about 20-25 minutes. Stir occasionally to prevent sticking, and cook until all the vegetables are tender and flavors meld together.
- Finish with Fresh Basil: Remove the skillet from heat, and stir in the torn fresh basil leaves. Allow the residual heat to wilt the basil slightly.
- Serve: Serve the ratatouille warm, optionally topping each serving with grated Parmesan cheese for added richness.
Extra Tips:
For best results, use a well-seasoned cast iron skillet to prevent sticking and enhance the dish’s flavors. Feel free to adjust the seasoning to your taste; a bit of red pepper flakes can add a nice kick if you enjoy a bit of heat.
Ratatouille can also be made ahead of time and reheated, as the flavors often deepen when allowed to sit. If you have leftovers, consider using them as a filling for omelets or as a topping for crusty bread.
Savory Chicken and Spinach Stuffed Peppers
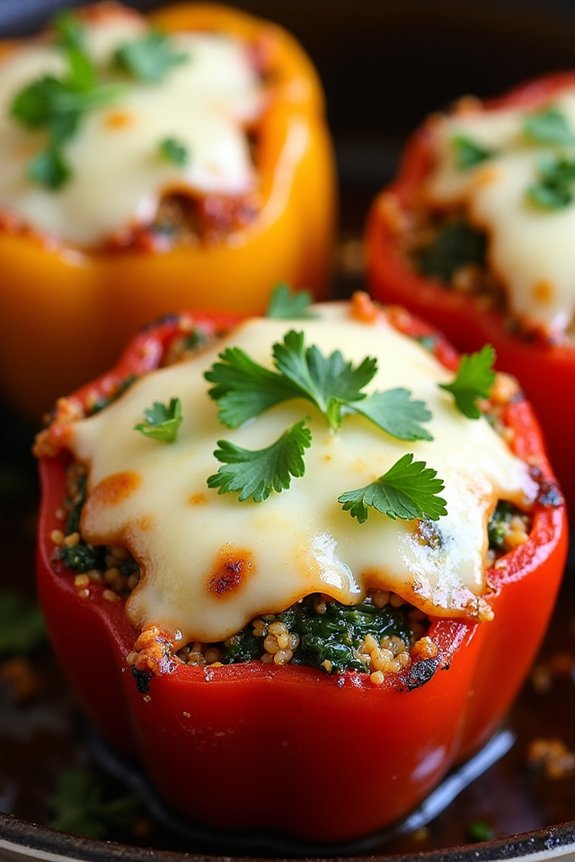
Crafting a meal that’s both healthy and rustic often calls for the robust versatility of cast iron cookware. One dish that fits this bill perfectly is Savory Chicken and Spinach Stuffed Peppers. This dish combines the earthy, rich flavors of spinach and the tender juiciness of chicken, all beautifully encased within the sweet embrace of bell peppers. The cast iron skillet not only guarantees even cooking but also enhances the flavors, giving the stuffed peppers a slightly charred and smoky taste that’s simply irresistible.
Perfect for a family dinner or a gathering of friends, these stuffed peppers are a delightful way to enjoy a nutrient-packed meal. The combination of lean protein, vibrant vegetables, and a medley of seasonings makes this dish not only healthy but also incredibly satisfying. Plus, the presentation is as appealing as the taste, making it a great choice for impressing guests without the hassle of a complicated recipe. With a serving size of 4-6 people, this recipe is both generous and filling, assuring everyone leaves the table happy and content.
Ingredients (serves 4-6):
- 4 large bell peppers (red, yellow, or green)
- 2 tablespoons olive oil
- 1 pound ground chicken
- 1 medium onion, diced
- 2 cloves garlic, minced
- 2 cups fresh spinach, chopped
- 1 cup cooked quinoa
- 1 cup tomato sauce
- 1 teaspoon dried oregano
- 1 teaspoon smoked paprika
- Salt and pepper to taste
- 1 cup shredded mozzarella cheese
- 2 tablespoons fresh parsley, chopped
Cooking Instructions:
- Preheat the Oven: Preheat your oven to 375°F (190°C). This guarantees that the oven is hot enough to properly cook the stuffed peppers once they’re ready.
- Prepare the Bell Peppers: Slice the tops off the bell peppers and remove the seeds and membranes. Lightly brush the outside of the peppers with olive oil and set them aside.
- Cook the Filling: In your sturdy cast iron skillet, heat 1 tablespoon of olive oil over medium heat. Add the diced onion and cook until translucent, about 5 minutes. Stir in the garlic and cook for an additional minute until fragrant.
- Add the Chicken: Increase the heat to medium-high and add the ground chicken. Cook until the chicken is browned and cooked through, breaking it up with a spoon as it cooks.
- Incorporate the Spinach and Quinoa: Lower the heat to medium, then add the chopped spinach. Stir until the spinach is wilted. Add the cooked quinoa and mix well to combine.
- Season the Filling: Pour in the tomato sauce, then add the dried oregano, smoked paprika, salt, and pepper. Stir everything together and let it simmer for about 5 minutes, allowing the flavors to meld.
- Stuff the Peppers: Carefully spoon the filling mixture into each prepared bell pepper, packing it down gently with the back of the spoon.
- Bake the Peppers: Place the stuffed peppers upright in the cast iron skillet. Cover the skillet with aluminum foil and bake for 25 minutes.
- Add Cheese and Finish Baking: Remove the foil, sprinkle the tops of the peppers with shredded mozzarella cheese, and return to the oven. Bake uncovered for an additional 10-15 minutes, or until the cheese is melted and bubbly.
- Garnish and Serve: Once done, remove the skillet from the oven and let the peppers cool slightly. Garnish with freshly chopped parsley before serving.
Extra Tips:
When cooking this dish, be sure to choose bell peppers that can stand upright on their own, as this will make stuffing and baking them easier. If your peppers are slightly uneven, you can trim the bottoms just enough to create a flat surface, taking care not to cut through to the cavity.
Additionally, feel free to adjust the seasonings and cheese to your personal preference, and consider adding a bit of crushed red pepper flakes if you enjoy a bit of heat. Using freshly grated cheese will melt better and provide a richer flavor compared to pre-shredded varieties. Enjoy this hearty dish with a side salad or crusty bread for a complete meal.
Rustic Pork Chops With Apple-Onion Compote
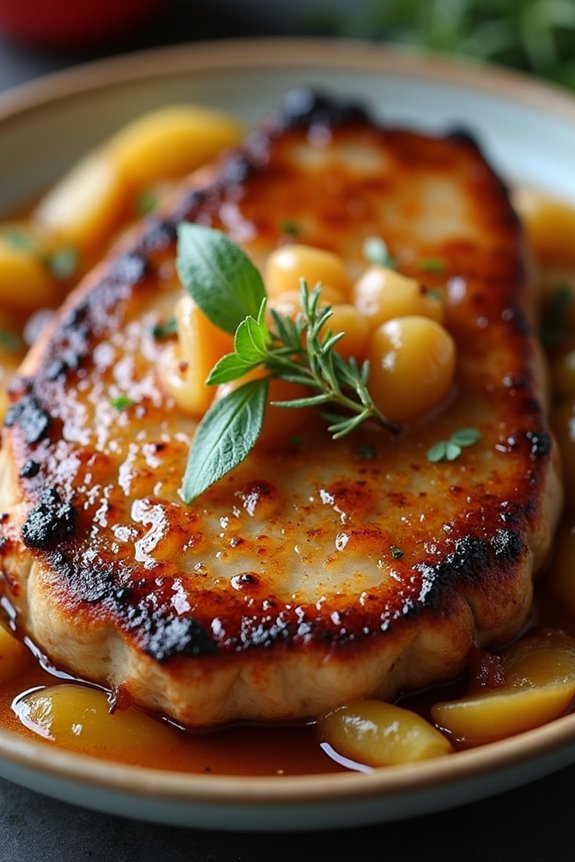
Bring a touch of rustic charm to your dinner table with these hearty pork chops paired with a delightful apple-onion compote. This dish is perfect for those evenings when you want to enjoy a satisfying meal that’s both wholesome and comforting. The savory flavors of the pork meld beautifully with the sweet and tangy compote, creating a balance that’s sure to please the palate.
Utilizing a cast iron skillet not only enhances the cooking process but also adds an authentic rustic feel to the meal. Cooking with a cast iron skillet allows for even heat distribution, guaranteeing that the pork chops are cooked to perfection with a nice sear on the outside while remaining juicy inside.
The apple-onion compote, made with fresh apples and onions, adds a layer of complexity to the dish with its sweet and savory notes. This recipe is perfect for serving 4-6 people, making it an excellent choice for a family dinner or a small gathering of friends. Prepare to impress your guests with this simple yet mouthwatering dish.
Ingredients (Serves 4-6):
- 4-6 bone-in pork chops, about 1 inch thick
- Salt and freshly ground black pepper, to taste
- 2 tablespoons olive oil
- 2 tablespoons unsalted butter
- 2 large onions, thinly sliced
- 3 large apples (preferably Granny Smith), peeled, cored, and sliced
- 1/4 cup apple cider vinegar
- 1/4 cup chicken broth
- 1 tablespoon brown sugar
- 1 teaspoon fresh thyme leaves
- 1/2 teaspoon ground cinnamon
Cooking Instructions:
- Prepare the Pork Chops: Begin by patting the pork chops dry with paper towels to guarantee a good sear. Season both sides generously with salt and freshly ground black pepper.
- Preheat the Skillet: Heat the cast iron skillet over medium-high heat. Add olive oil and let it heat until it shimmers.
- Sear the Pork Chops: Place the pork chops in the skillet, making sure not to overcrowd them. Sear for about 3-4 minutes on each side, or until they’re golden brown. Remove the pork chops from the skillet and set them aside.
- Cook the Onions: In the same skillet, add the butter. Once melted, add the sliced onions and cook over medium heat for about 5 minutes, stirring occasionally, until they’re soft and translucent.
- Add the Apples: Stir in the sliced apples and continue to cook for another 5 minutes, allowing them to soften slightly.
- Make the Compote: Add the apple cider vinegar, chicken broth, brown sugar, thyme, and cinnamon to the skillet. Stir to combine and bring to a simmer.
- Combine and Finish Cooking: Return the pork chops to the skillet, nestling them into the compote. Reduce the heat to low and cover the skillet. Allow the pork chops to cook for an additional 10-15 minutes, or until they reach an internal temperature of 145°F.
- Rest and Serve: Once cooked, remove the skillet from the heat and let the pork chops rest for a few minutes. Serve the pork chops topped with the apple-onion compote.
Extra Tips:
When cooking with a cast iron skillet, guarantee it’s well-seasoned to prevent sticking and to enhance the flavor of the dish. If you prefer a slightly thicker compote, you can simmer the apple-onion mixture a bit longer before adding the pork chops back into the skillet.
Additionally, feel free to experiment with different types of apples to alter the sweetness and texture of the compote. This dish pairs beautifully with a side of mashed potatoes or roasted vegetables for a complete rustic meal.
Vegetable-Packed Shakshuka With Feta

Vegetable-Packed Shakshuka With Feta is a vibrant and nutritious dish that brings together the robust flavors of Mediterranean cuisine. Traditionally, shakshuka is comprised of poached eggs nestled in a spicy tomato sauce; this version enhances the classic with an assortment of fresh vegetables and creamy feta, adding more texture and flavor to each bite.
Cooking this dish in a cast iron skillet not only adds a rustic appeal but also guarantees even heat distribution, resulting in perfectly cooked eggs and a rich, savory sauce. Whether you’re serving it for breakfast, brunch, or dinner, this shakshuka is sure to impress with its colorful presentation and delightful taste.
Perfect for a family meal or a small gathering, this recipe serves 4-6 people. The combination of hearty vegetables, tangy feta, and aromatic spices makes it a satisfying meal on its own or when paired with crusty bread.
The preparation involves a blend of sautéed onions, bell peppers, and zucchini, simmered in a rich tomato sauce spiced with cumin and paprika. Once the sauce is ready, eggs are gently poached in the sauce and topped with crumbled feta and fresh herbs, creating a dish that’s as beautiful as it’s delicious.
Ingredients:
- 2 tablespoons olive oil
- 1 large onion, thinly sliced
- 2 bell peppers (any color), thinly sliced
- 1 zucchini, diced
- 4 cloves garlic, minced
- 2 teaspoons ground cumin
- 2 teaspoons smoked paprika
- 1/4 teaspoon cayenne pepper (optional, for extra heat)
- 2 cans (14 ounces each) crushed tomatoes
- Salt and pepper to taste
- 6 large eggs
- 1 cup crumbled feta cheese
- Fresh parsley or cilantro for garnish
Instructions:
- Preheat and Prepare Vegetables: Preheat your oven to 375°F (190°C). Heat the olive oil in a large cast iron skillet over medium heat. Add the sliced onions and bell peppers, sautéing for about 5 minutes until they begin to soften.
- Cook the Vegetables: Add the diced zucchini and continue to cook for another 3-4 minutes. Stir in the minced garlic, ground cumin, smoked paprika, and cayenne pepper if using. Cook for about 1 minute, until the spices are fragrant.
- Simmer the Sauce: Pour in the crushed tomatoes and season with salt and pepper. Stir well and bring the mixture to a simmer. Let it cook for about 10-15 minutes, stirring occasionally, until the sauce thickens slightly.
- Poach the Eggs: Make small wells in the sauce with the back of a spoon and crack an egg into each well. Be careful not to break the yolks. Sprinkle the crumbled feta cheese over the top.
- Bake Until Eggs Are Set: Carefully transfer the skillet to the preheated oven. Bake for 7-10 minutes, or until the eggs are cooked to your liking. Keep an eye on them to guarantee the yolks remain runny if preferred.
- Garnish and Serve: Remove the skillet from the oven and let it cool slightly. Garnish with fresh parsley or cilantro before serving. Serve directly from the skillet with crusty bread or over a bed of cooked grains.
Extra Tips: When cooking shakshuka, it’s important to monitor the eggs closely while they’re baking to avoid overcooking. The cast iron skillet retains heat well, which can continue cooking the eggs even after they’ve been removed from the oven.
If you prefer your egg yolks runny, keep a close eye during the last few minutes of baking. Additionally, feel free to customize your shakshuka by adding other vegetables like spinach or eggplant, or by adjusting the spice level to suit your taste.
Slow-Cooked Lamb Stew With Root Vegetables
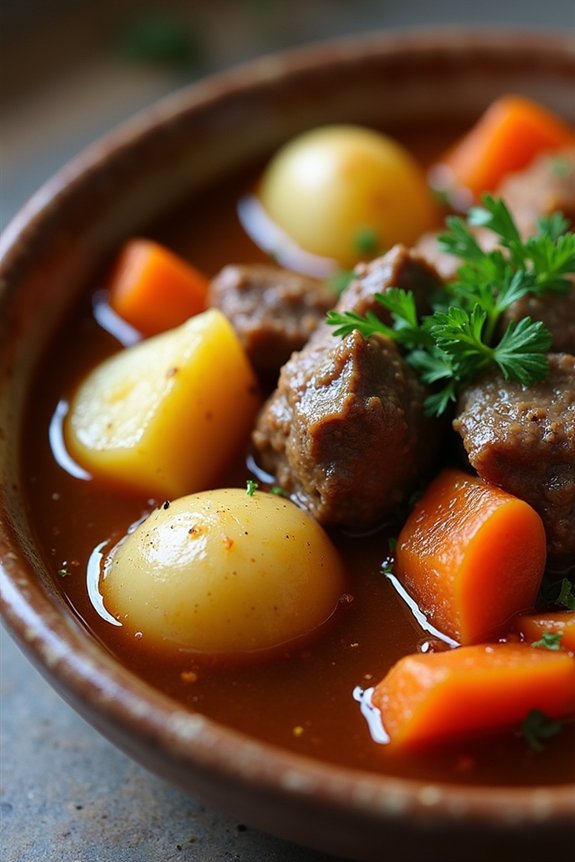
Experience the comforting and robust flavors of a Slow-Cooked Lamb Stew with Root Vegetables, perfect for a rustic and healthy dinner. This dish, cooked in a cast iron pot, combines the richness of tender lamb with the earthy sweetness of root vegetables such as carrots, parsnips, and potatoes.
The slow-cooking process allows the flavors to meld beautifully, creating a hearty and satisfying meal that’s both nourishing and delicious. Ideal for a cozy evening with family or friends, this lamb stew is a wonderful option for those looking to enjoy a wholesome meal.
The cast iron pot not only retains heat efficiently but also enhances the depth of flavors, making this recipe a must-try for any culinary enthusiast. The following recipe serves 4-6 people, guaranteeing there’s plenty to go around.
Ingredients:
- 2 lbs lamb shoulder, cut into 2-inch cubes
- 2 tablespoons olive oil
- 1 large onion, chopped
- 3 garlic cloves, minced
- 3 carrots, peeled and cut into chunks
- 2 parsnips, peeled and cut into chunks
- 4 medium potatoes, peeled and quartered
- 1 tablespoon tomato paste
- 4 cups beef or lamb stock
- 1 cup red wine
- 2 bay leaves
- 1 teaspoon dried thyme
- Salt and pepper to taste
- Fresh parsley, chopped (for garnish)
Instructions:
1. Preheat and Prepare Ingredients:
Preheat your oven to 325°F (160°C). Begin by seasoning the lamb cubes with salt and pepper to taste. This step guarantees the meat is well-seasoned and flavorful throughout the cooking process.
2. Brown the Lamb:
Heat the olive oil in a large cast iron pot over medium-high heat. Add the lamb cubes in batches, browning them on all sides. This step is vital as it seals in the juices and adds depth to the stew.
Once browned, remove the lamb and set aside.
3. Sauté Aromatics:
In the same pot, reduce the heat to medium and add the chopped onion and minced garlic. Sauté until the onion is translucent and the garlic is fragrant, about 5 minutes. This creates a flavor base for the stew.
4. Incorporate Tomato Paste:
Stir in the tomato paste, making sure it coats the onions and garlic. Cooking the paste for a minute enhances its sweetness and reduces acidity.
5. Deglaze the Pot:
Pour in the red wine to deglaze the pot, scraping up any browned bits from the bottom. Allow the wine to simmer for a few minutes to reduce slightly and intensify the flavor.
6. Add Remaining Ingredients:
Return the browned lamb to the pot, along with the carrots, parsnips, and potatoes. Pour in the beef or lamb stock, add bay leaves and thyme. Stir to combine all ingredients, making sure the liquid covers the meat and vegetables.
7. Slow Cook the Stew:
Once combined, cover the pot with a lid and transfer to the preheated oven. Allow the stew to cook for 2.5 to 3 hours, or until the lamb is tender and the vegetables are cooked through.
8. Finishing Touches:
Remove the pot from the oven and discard the bay leaves. Taste and adjust seasoning with additional salt and pepper if needed. Garnish with fresh parsley before serving.
Extra Tips:
For an even deeper flavor, marinate the lamb in the red wine and herbs overnight before cooking. Guarantee the meat is thoroughly browned in the initial stages to maximize flavor.
If the stew’s consistency is too thick, add a bit more stock or water. Conversely, if it’s too thin, allow it to simmer on the stovetop uncovered to reduce. Always let the stew rest for a few minutes before serving to allow the flavors to settle.