

When the summer heat becomes unbearable, I find myself looking for refreshing dinner options that require little to no cooking. I’ve gathered a collection of quick and easy cold recipes perfect for those scorching evenings. Think Mediterranean Chickpea Salad or Vietnamese Summer Rolls, each offering delightful flavors with minimal fuss. These dishes can effortlessly elevate your summer dinners into a cool culinary experience. Let’s explore these tasty recipes that promise to make your evenings a bit more enjoyable.
Mediterranean Chickpea Salad
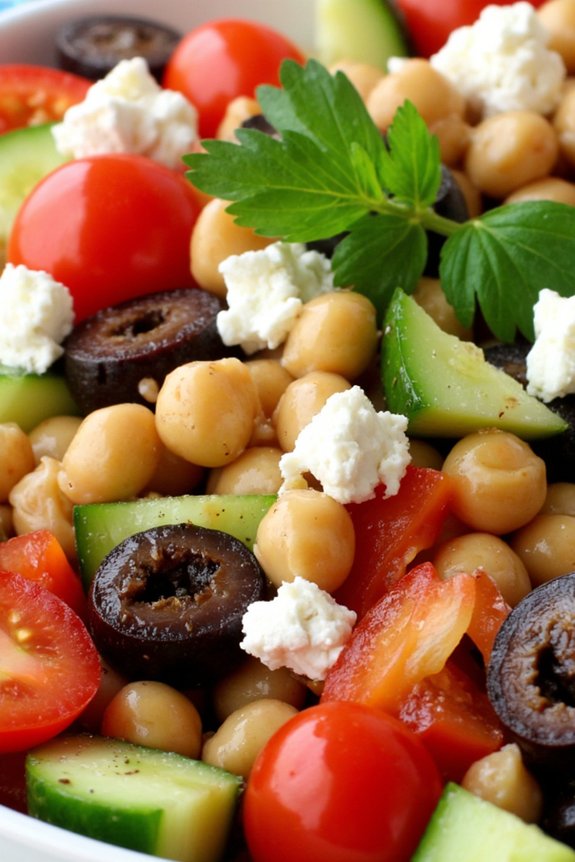
When the weather is unbearably hot, the last thing you want to do is turn on the stove. That’s when a revitalizing, no-cook meal like Mediterranean Chickpea Salad comes to the rescue. This vibrant salad is packed with protein-rich chickpeas, fresh vegetables, and infused with the bold flavors of lemon, olive oil, and herbs.
It’s not only quick to prepare but also incredibly satisfying, making it a perfect dish for a light dinner or a hearty lunch.
The Mediterranean Chickpea Salad isn’t just about its taste; it’s also about its versatility. You can easily adapt the ingredients to your liking or based on what you have on hand. The combination of crunchy cucumbers, juicy tomatoes, and briny olives creates a delightful texture that pairs beautifully with creamy feta cheese.
This salad is best served cold, making it an ideal option for those sweltering summer evenings when you crave something cool and nourishing.
Ingredients for 4-6 servings:
- 2 cans (15 oz each) chickpeas, drained and rinsed
- 1 large cucumber, diced
- 1 pint cherry tomatoes, halved
- 1 small red onion, finely chopped
- 1 red bell pepper, diced
- 1/2 cup Kalamata olives, pitted and sliced
- 1/2 cup crumbled feta cheese
- 1/4 cup fresh parsley, chopped
- 1/4 cup fresh mint leaves, chopped
- 1/4 cup olive oil
- Juice of 1 large lemon
- Salt and black pepper to taste
Cooking Instructions:
- Prepare the Chickpeas: Start by draining and rinsing the canned chickpeas thoroughly in a colander. This helps remove any excess sodium and guarantees they’re clean.
- Chop the Vegetables: Dice the cucumber and red bell pepper into small, bite-sized pieces. Halve the cherry tomatoes and finely chop the red onion. Place all the chopped vegetables in a large mixing bowl.
- Add Olives and Feta: Slice the Kalamata olives and add them to the bowl along with the crumbled feta cheese. This will add a rich, salty flavor to your salad.
- Mix in the Herbs: Add the chopped fresh parsley and mint leaves to the salad. These herbs will give the dish a fresh, aromatic touch.
- Make the Dressing: In a small bowl, whisk together the olive oil and lemon juice. Season with salt and black pepper to taste. Adjust the seasoning as needed.
- Combine and Toss: Pour the dressing over the salad ingredients in the large mixing bowl. Gently toss everything together until well combined and the dressing evenly coats the salad.
- Chill and Serve: Allow the salad to chill in the refrigerator for at least 30 minutes before serving. This will let the flavors meld together beautifully. Serve cold and enjoy!
Extra Tips:
For an added crunch, consider adding a handful of toasted pine nuts or sunflower seeds to the salad. If you prefer a bit of heat, sprinkle in a pinch of red pepper flakes.
This salad can be made a day in advance, just keep the dressing separate until you’re ready to serve to prevent the vegetables from getting soggy. And remember, feel free to mix in other seasonal vegetables or proteins like grilled chicken for a more substantial meal.
Vietnamese Summer Rolls
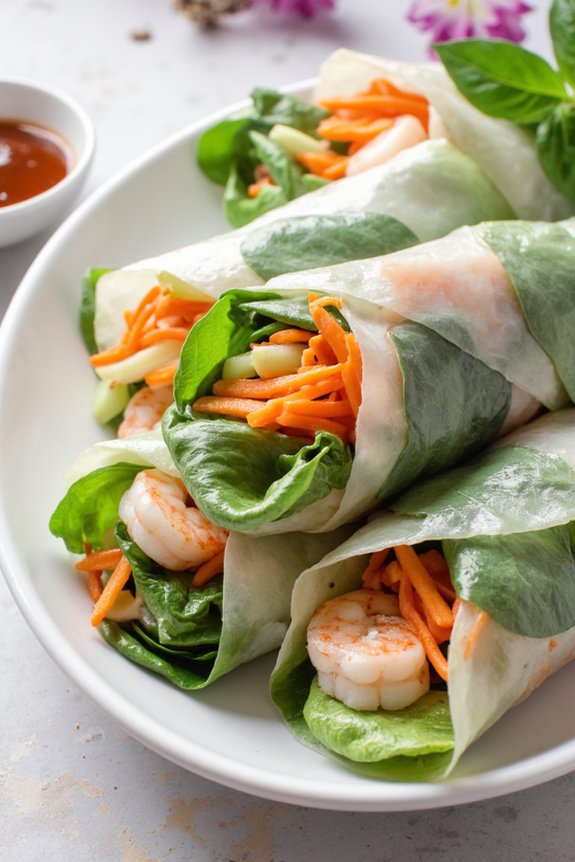
Vietnamese Summer Rolls, also known as Gỏi Cuốn, are a revitalizing and healthy dish perfect for hot weather. These rolls are a delightful combination of fresh vegetables, herbs, and proteins wrapped in delicate rice paper. They’re typically served with a tangy, savory dipping sauce, making them a popular appetizer or light meal that’s both satisfying and nutritious.
The beauty of Vietnamese Summer Rolls lies in their versatility; you can easily customize them with your favorite ingredients to suit your taste preferences. This recipe is designed to serve 4-6 people and includes a mix of fresh shrimp, crisp vegetables, and fragrant herbs. The preparation is straightforward, and though it involves a bit of assembly, it doesn’t require cooking, making it an ideal choice for a no-cook meal on a hot summer day.
Gather your ingredients, and let’s get started on making this classic Vietnamese dish.
Ingredients for 4-6 people:
- 12-18 rice paper wrappers
- 1 pound of shrimp, peeled, deveined, cooked, and halved
- 2 cups of cooked vermicelli noodles
- 1 cup of fresh mint leaves
- 1 cup of fresh cilantro leaves
- 1 cup of fresh basil leaves
- 1 cucumber, julienned
- 1 carrot, julienned
- 1 red bell pepper, julienned
- 1 head of lettuce, leaves separated
- 1/4 cup of crushed peanuts (optional)
- Dipping sauce (such as hoisin-peanut sauce or nuoc cham)
Cooking Instructions:
- Prepare the Ingredients: Begin by preparing all your ingredients. Cook the vermicelli noodles according to package instructions, then rinse under cold water and drain. Julienne the cucumber, carrot, and red bell pepper into thin strips. Rinse and dry the mint, cilantro, and basil leaves.
- Set Up Your Rolling Station: Fill a large shallow dish or pie plate with warm water. This will be used to soften the rice paper wrappers. Set up your rolling station with all the ingredients within easy reach: softened rice papers, shrimp, noodles, herbs, vegetables, and lettuce.
- Soften the Rice Paper: Working one at a time, dip a rice paper wrapper into the warm water for about 15-20 seconds until it becomes pliable. Don’t over-soak, as it will continue to soften after removing from the water.
- Assemble the Rolls: Lay the softened rice paper flat on a clean, damp surface. Start by placing a few lettuce leaves on the bottom third of the paper. Layer with a small handful of noodles, a few shrimp halves, and a selection of julienned vegetables and herbs.
- Roll the Summer Roll: Gently fold the sides of the rice paper over the filling, then roll it up tightly from the bottom, ensuring the filling is snug and secure. The rice paper will stick to itself, sealing the roll.
- Repeat and Serve: Repeat the process with the remaining rice paper wrappers and fillings. Once all rolls are assembled, arrange them on a serving platter. Sprinkle with crushed peanuts if using, and serve immediately with your choice of dipping sauce.
Extra Tips:
When making Vietnamese Summer Rolls, it’s important to have all your ingredients prepped and ready before you begin assembling. The rice paper wrappers can become sticky, so working on a damp surface helps.
You can also experiment with fillings such as tofu, chicken, or even mango for a sweet twist. If you’re making them in advance, cover with a damp paper towel and plastic wrap to keep them fresh. Serve them with a variety of dipping sauces to cater to different tastes.
Caprese Stuffed Avocados
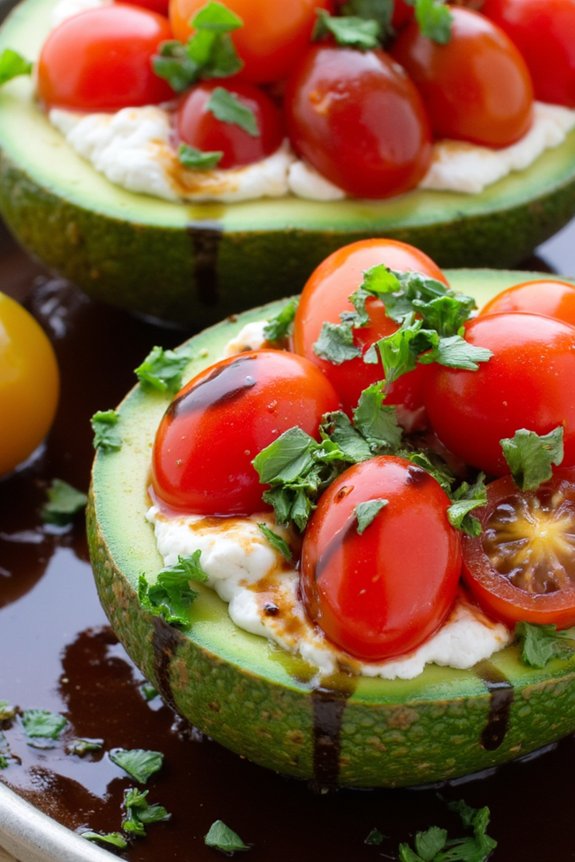
Caprese Stuffed Avocados are a revitalizing and nutritious dish perfect for hot weather. This delightful recipe combines the creamy texture of avocados with the vibrant flavors of a classic Caprese salad. The combination of ripe tomatoes, fresh mozzarella, and fragrant basil creates a symphony of taste that’s both satisfying and light, making it an ideal choice for a cold dinner on a warm evening.
This dish isn’t only easy to prepare but also visually appealing, making it a great option for entertaining guests or enjoying a quiet dinner at home. This recipe serves 4-6 people and is perfect for those who want a quick, no-cook meal that still feels gourmet. The avocados act as natural bowls, cradling the delicious Caprese mixture, which is drizzled with balsamic glaze for an added touch of tangy sweetness.
With minimal preparation and no need for cooking, Caprese Stuffed Avocados are a go-to choice for anyone looking to keep cool while indulging in a wholesome and flavorful meal.
Ingredients:
- 3 ripe avocados
- 1 cup cherry tomatoes, halved
- 1 cup fresh mozzarella balls (bocconcini), halved
- 1/4 cup fresh basil leaves, chopped
- 2 tablespoons extra-virgin olive oil
- 1 tablespoon balsamic glaze
- Salt and pepper, to taste
Instructions:
- Prepare the Avocados: Carefully cut the avocados in half lengthwise and remove the pits. Use a spoon to gently scoop out some of the flesh, creating a small well in each half. Set the scooped avocado aside in a bowl.
- Make the Caprese Mixture: In a medium-sized bowl, combine the cherry tomatoes, mozzarella balls, and chopped basil. Add the scooped avocado flesh from the previous step. Drizzle with olive oil and season with salt and pepper to taste. Gently toss the ingredients to evenly coat them with the oil and seasoning.
- Stuff the Avocados: Spoon the Caprese mixture into the wells of each avocado half, evenly distributing the filling among the avocados.
- Drizzle with Balsamic Glaze: Finish the dish by drizzling balsamic glaze over the stuffed avocados for an extra layer of flavor.
- Serve Immediately: Arrange the stuffed avocados on a serving platter or individual plates and serve immediately, guaranteeing the freshest taste and texture.
Extra Tips:
When selecting avocados, choose ones that yield slightly to gentle pressure, indicating they’re ripe but not overripe. This guarantees they hold their shape when filled. For a bit of variation, consider adding a sprinkle of pine nuts or a dash of lemon juice to enhance the flavors further.
If you prefer a more pronounced balsamic flavor, you can increase the amount of balsamic glaze to your liking. Additionally, this dish can be assembled shortly before serving to maintain the bright green color of the avocados and the freshness of the ingredients.
Cold Sesame Peanut Noodles
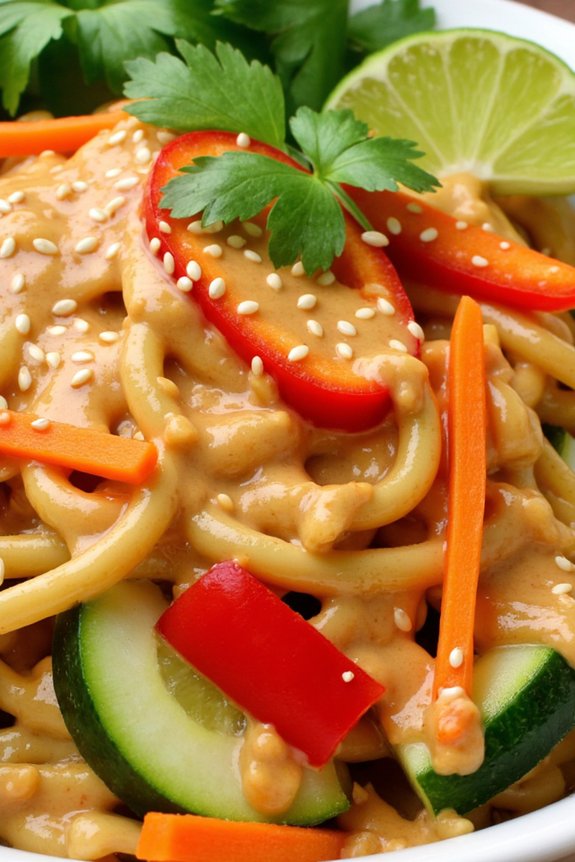
Cold Sesame Peanut Noodles are the perfect dish for hot weather, offering an invigorating yet satisfying meal that requires minimal cooking. This dish combines the richness of peanut butter with the nutty flavor of sesame oil, creating a creamy, savory sauce that clings to the noodles perfectly. The addition of fresh vegetables adds a delightful crunch, while the hint of lime provides a zesty kick that balances the flavors beautifully.
It’s an ideal meal for those looking to enjoy a hearty dish without turning on the stove for too long. Perfect for a summer gathering or a simple family dinner, Cold Sesame Peanut Noodles can be prepared in advance and chilled until ready to serve. The noodles soak up the flavors as they sit, making the dish even more delicious over time.
It’s easy to customize with your favorite vegetables and proteins, ensuring everyone at the table has something they love. Plus, the leftovers make for a great lunch the next day, so consider doubling the recipe if you want to enjoy it again.
Ingredients (serving size: 4-6 people):
- 1 pound of spaghetti or rice noodles
- 1/2 cup smooth peanut butter
- 1/4 cup soy sauce
- 2 tablespoons sesame oil
- 2 tablespoons rice vinegar
- 2 tablespoons honey
- 1 tablespoon grated ginger
- 2 cloves garlic, minced
- 1 teaspoon chili paste (optional)
- 1/4 cup water
- 1 red bell pepper, thinly sliced
- 1 cucumber, julienned
- 2 carrots, julienned
- 4 green onions, sliced
- Sesame seeds, for garnish
- Fresh cilantro, for garnish
- Lime wedges, for serving
Instructions:
- Cook the Noodles: Begin by cooking the noodles according to the package instructions until they’re al dente. Drain them and rinse under cold water to stop the cooking process. This will also help in making sure the noodles are cold for the salad.
- Prepare the Sauce: In a medium bowl, whisk together the peanut butter, soy sauce, sesame oil, rice vinegar, honey, grated ginger, minced garlic, chili paste (if using), and water. Mix until smooth and creamy. Adjust the consistency with a bit more water if needed to make it pourable.
- Mix the Noodles and Sauce: In a large mixing bowl, combine the cooked noodles and the prepared sauce. Toss them together until the noodles are well coated with the sauce.
- Add the Vegetables: Add the sliced bell pepper, julienned cucumber, julienned carrots, and sliced green onions to the noodle mixture. Toss everything together until well combined.
- Chill the Noodles: Cover the bowl with plastic wrap or a lid and refrigerate for at least 30 minutes to allow the flavors to meld. This step is essential for enhancing the taste of the dish.
- Serve and Garnish: Once chilled, remove from the refrigerator. Serve the noodles in bowls, garnished with sesame seeds, fresh cilantro, and lime wedges on the side for squeezing.
Extra Tips:
For a protein boost, consider adding grilled chicken, shrimp, or tofu to the Cold Sesame Peanut Noodles. Feel free to substitute almond butter or cashew butter if you prefer a different nut flavor.
If you like extra heat, add more chili paste or a sprinkle of red pepper flakes. This dish is highly versatile, so use whatever fresh vegetables you have on hand to keep it exciting and colorful. Remember to taste the sauce before mixing it with the noodles to adjust seasoning according to your preference.
Greek Yogurt Chicken Salad Wraps
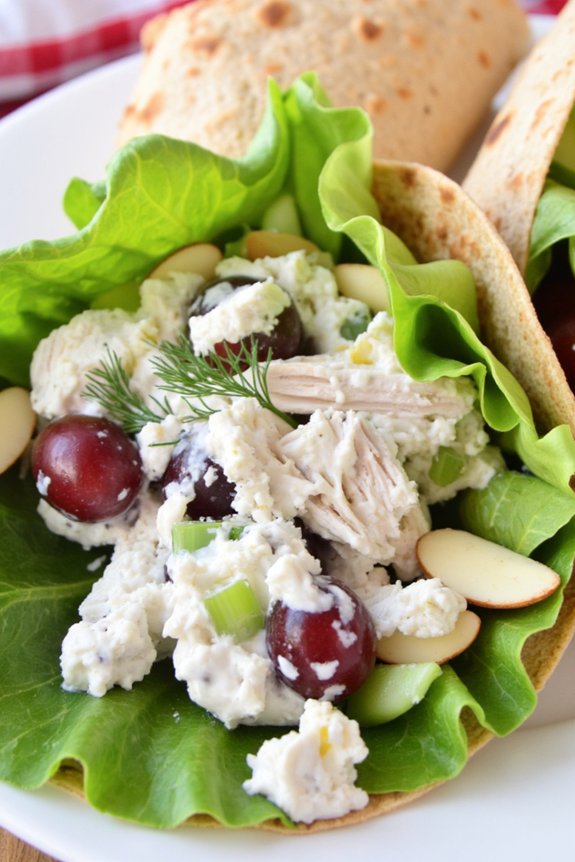
Greek Yogurt Chicken Salad Wraps are a revitalizing and delicious meal perfect for hot weather. This dish combines the creamy texture of Greek yogurt with tender shredded chicken, crunchy vegetables, and a hint of seasoning, all wrapped in a soft tortilla.
It’s a healthy alternative to traditional mayonnaise-based chicken salads and is packed with protein and flavor. Ideal for lunch or a light dinner, these wraps are easy to prepare and can be made ahead of time, making them perfect for busy days or outdoor gatherings.
The versatility of Greek Yogurt Chicken Salad Wraps allows you to customize them according to your taste preferences. You can add various herbs, nuts, or fruits to elevate the flavors and add a personal touch.
Whether you’re looking for a quick meal to impress your guests or a nutritious option to enjoy with your family, these wraps are sure to satisfy. Plus, they’re a great way to use up leftover chicken and veggies, reducing waste and maximizing flavor.
Ingredients (Serving Size: 4-6 people):
- 3 cups cooked chicken breast, shredded
- 1 cup Greek yogurt
- 1 tablespoon Dijon mustard
- 1 tablespoon lemon juice
- 1 teaspoon garlic powder
- 1 teaspoon onion powder
- Salt and pepper to taste
- 1 cup celery, finely chopped
- 1 cup red grapes, halved
- 1/2 cup almonds, sliced
- 1/4 cup fresh dill, chopped
- 6 large lettuce leaves
- 6 whole wheat tortillas
Instructions:
- Prepare the Chicken: Begin by shredding the cooked chicken breast into bite-sized pieces. If you have leftover grilled or roasted chicken, this is the perfect opportunity to use it.
- Mix the Dressing: In a large mixing bowl, combine Greek yogurt, Dijon mustard, lemon juice, garlic powder, onion powder, salt, and pepper. Stir well until the ingredients are fully blended into a creamy dressing.
- Assemble the Salad: Add the shredded chicken to the bowl with the dressing. Mix until the chicken is well-coated. Then, fold in the chopped celery, halved grapes, sliced almonds, and fresh dill. Confirm all ingredients are evenly distributed throughout the salad.
- Prepare the Wraps: Lay a lettuce leaf on each tortilla. Spoon a generous amount of the chicken salad mixture onto the lettuce. Roll the tortilla tightly around the filling, tucking in the sides as you go to form a wrap.
- Serve and Enjoy: Cut the wraps diagonally in half for easy handling. Serve immediately or refrigerate for up to 2 hours to allow flavors to meld together before serving.
Extra Tips:
For an extra burst of flavor, consider adding a teaspoon of honey to the dressing for a touch of sweetness that complements the tangy yogurt and savory chicken.
If you’re looking to add more crunch, try incorporating diced apples or cucumbers. Additionally, these wraps can be made gluten-free by using gluten-free tortillas or enjoyed as a salad without the wrap.
Adjust the seasoning to your liking and don’t hesitate to experiment with different herbs or spices to make the dish your own.
Gazpacho With Fresh Herbs
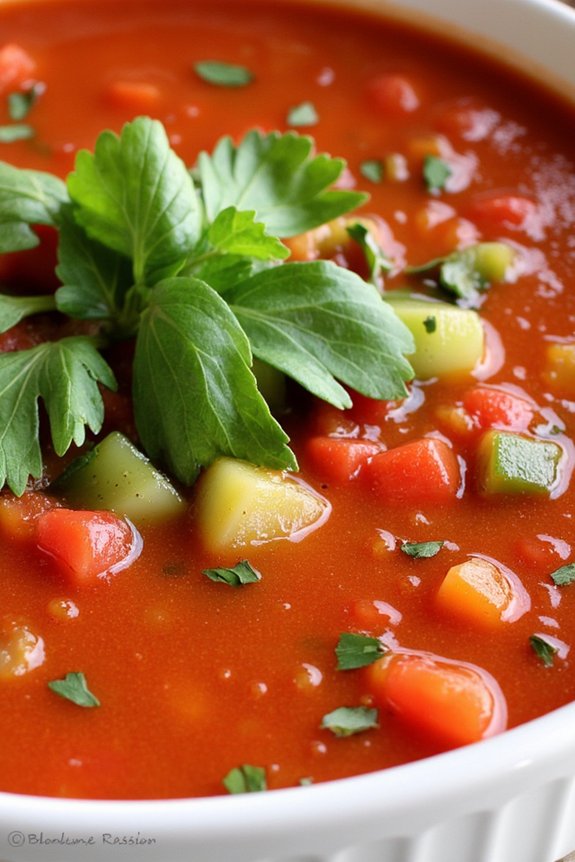
Gazpacho With Fresh Herbs is a revitalizing and flavorful cold soup that’s perfect for hot weather. Originating from Spain, this dish is celebrated for its vibrant colors and fresh ingredients. Gazpacho isn’t only delicious but also incredibly healthy, as it’s packed with vitamins and antioxidants from the variety of vegetables it includes. The addition of fresh herbs elevates the flavor profile, providing a fragrant and aromatic twist to this classic summer dish.
This no-cook recipe is ideal for those days when you want to avoid turning on the stove. It’s best served chilled, making it a delightful starter or a light main course. With minimal preparation time and a blend of fresh produce, Gazpacho With Fresh Herbs is a go-to recipe for anyone looking to enjoy something light yet satisfying on a warm day.
Ingredients (serving size: 4-6 people):
- 2 pounds ripe tomatoes
- 1 cucumber
- 1 red bell pepper
- 1 green bell pepper
- 1 small red onion
- 2 cloves of garlic
- 1/4 cup fresh parsley
- 1/4 cup fresh basil
- 1/4 cup fresh cilantro
- 3 tablespoons red wine vinegar
- 1/4 cup extra virgin olive oil
- Salt and pepper to taste
- 1 cup tomato juice
- 1 teaspoon smoked paprika
- Juice of 1 lime
Cooking Instructions:
- Prepare the Vegetables: Start by washing all the vegetables thoroughly. Core the tomatoes, deseed the bell peppers, and peel the cucumber. Chop the tomatoes, cucumber, bell peppers, and onion into large chunks.
- Blend the Base: In a blender, add the chopped tomatoes, cucumber, red and green bell peppers, and red onion. Blend until the mixture is smooth. If needed, do this step in batches to avoid overfilling the blender.
- Add the Flavorings: Mince the garlic and add it to the blender along with the fresh parsley, basil, and cilantro. Pour in the red wine vinegar, extra virgin olive oil, and lime juice. Blend again until the herbs are well incorporated.
- Season the Soup: Add the tomato juice to the blended mixture, and season with smoked paprika, salt, and pepper. Blend once more to verify that everything is well mixed and the flavors are evenly distributed.
- Chill the Gazpacho: Transfer the soup to a large container or bowl, cover, and refrigerate for at least 2 hours. This chilling time allows the flavors to meld and the gazpacho to reach the desired cold temperature.
- Serve and Enjoy: Once chilled, give the gazpacho a good stir before serving. Pour it into bowls or glasses, and garnish with additional fresh herbs or a drizzle of olive oil if desired.
Extra Tips: For the best flavor, use the ripest tomatoes you can find, as they’re the star of the dish. Feel free to adjust the level of acidity by varying the amount of vinegar and lime juice to your taste preference. If you prefer a chunky texture, reserve some of the vegetables, chop them finely, and stir them into the soup just before serving. This dish can be made a day in advance, as the flavors will continue to develop and improve over time.
Tuna Niçoise Salad
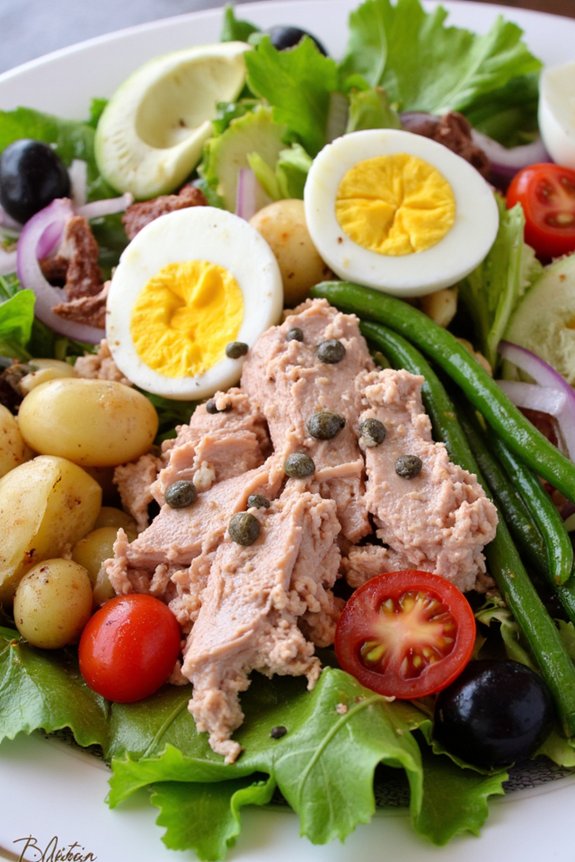
Tuna Niçoise Salad is a classic French dish that’s perfect for a revitalizing and satisfying meal during hot weather. This salad is a delightful medley of flavors and textures, featuring tender tuna, crisp vegetables, and a tangy vinaigrette. It’s not only visually appealing but also packed with nutrients, making it a wholesome choice for lunch or dinner.
The beauty of Tuna Niçoise Salad lies in its versatility; you can adapt it to your taste by adding more of the ingredients you love or by trying different dressings.
Preparing Tuna Niçoise Salad for a group of 4-6 people is a breeze, and it’s a dish that can be made ahead of time, allowing the flavors to meld beautifully. Whether you’re hosting a summer gathering or just want a light yet satisfying meal, this salad will surely impress your guests and family.
The key is to use fresh, high-quality ingredients to bring out the best in each component of the salad. Serve it with a chilled glass of white wine or iced tea to enhance your dining experience.
Ingredients for 4-6 servings:
- 2 cans of high-quality tuna in olive oil, drained
- 4 large eggs
- 12 ounces of small new potatoes
- 8 ounces of green beans, trimmed
- 1 small red onion, thinly sliced
- 1/2 cup of black olives, preferably Niçoise
- 6 cups of mixed salad greens
- 2 tomatoes, cut into wedges
- 4 anchovy fillets (optional)
- 1/4 cup of capers
- Salt and pepper to taste
- 1/4 cup of extra-virgin olive oil
- 2 tablespoons of red wine vinegar
- 1 tablespoon of Dijon mustard
- 1 clove of garlic, minced
Instructions:
1. Prepare the Eggs and Potatoes: Begin by boiling the eggs. Place them in a saucepan, cover with water, and bring to a boil. Once boiling, turn off the heat and let the eggs sit for 9 minutes. Transfer to a bowl of ice water to cool.
Meanwhile, in a separate pot, boil the potatoes in salted water for about 15 minutes or until tender. Drain and set aside to cool slightly before slicing them into halves or quarters.
2. Cook the Green Beans: In the same pot used for the potatoes, add the green beans and cook for about 3-4 minutes until they’re crisp-tender. Drain and immediately transfer to a bowl of ice water to stop the cooking process and preserve their bright color.
3. Make the Dressing: In a small bowl, whisk together the olive oil, red wine vinegar, Dijon mustard, minced garlic, salt, and pepper. Adjust seasoning to taste.
4. Assemble the Salad: On a large serving platter or in a big salad bowl, arrange the salad greens as a base. Add the sliced potatoes, green beans, tomatoes, red onion, olives, and capers.
Peel the cooled eggs, cut them into halves or quarters, and place them on top. Flake the tuna over the salad, and if using, add the anchovy fillets.
5. Dress the Salad: Drizzle the vinaigrette evenly over the salad. Toss gently to combine, ensuring all ingredients are coated in the dressing. Serve immediately or chill for 30 minutes to enhance the flavors.
Extra Tips:
For the best Tuna Niçoise Salad, choose high-quality canned tuna, preferably packed in olive oil, as it adds richness and depth to the salad. If you prefer your eggs a bit softer, reduce the cooking time slightly.
Blanching the green beans in ice water is essential to maintain their vibrant color and crispness. Feel free to customize the salad by adding other fresh vegetables like bell peppers or radishes.
Cucumber Avocado Soup
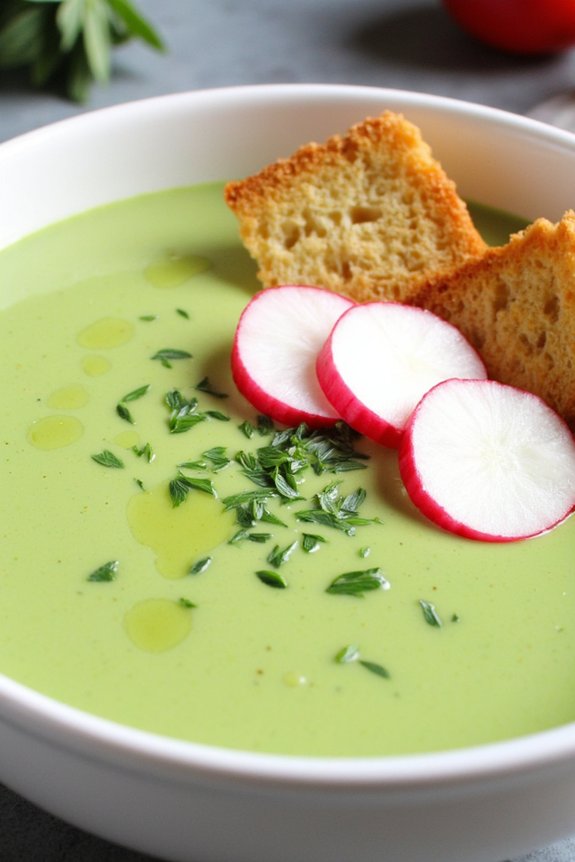
Cucumber Avocado Soup is a revitalizing and cooling dish perfect for hot weather. This chilled soup combines the smooth, creamy texture of avocados with the crisp, hydrating nature of cucumbers, making it not only delicious but also incredibly nourishing. Ideal for lunch or a light dinner, this soup is quick to prepare and doesn’t require any cooking. It’s a fantastic way to take advantage of fresh summer produce and enjoy a meal that will help you stay cool.
The flavors in Cucumber Avocado Soup are bright and invigorating, with the addition of lime juice adding a pleasant zing. Fresh herbs like dill or cilantro can be used to enhance the taste, while Greek yogurt or sour cream provides a slight tanginess and creamy consistency. This dish isn’t only vegan-friendly but also gluten-free, making it suitable for a variety of dietary preferences. Serve it as an appetizer or pair it with a salad for a complete meal that will keep you satisfied without overheating your kitchen.
Ingredients (Serves 4-6):
- 3 large cucumbers, peeled and chopped
- 2 ripe avocados, peeled and pitted
- 1/2 cup Greek yogurt or sour cream
- 1/4 cup fresh lime juice
- 2 tablespoons olive oil
- 1 clove garlic, minced
- 1/2 cup fresh dill or cilantro leaves
- 1 teaspoon salt
- 1/2 teaspoon black pepper
- 1 cup cold water
- Optional: 1 jalapeño, seeded and chopped (for spice)
- Garnish: extra fresh herbs, sliced radishes, or croutons
Instructions:
- Prepare the Ingredients: Begin by washing and peeling the cucumbers. Chop them into chunks and set aside. Halve the avocados, remove the pits, scoop out the flesh, and place in a blender or food processor.
- Blend the Base: Add the chopped cucumbers, Greek yogurt (or sour cream), fresh lime juice, olive oil, minced garlic, and fresh herbs to the blender with the avocado. Add salt and pepper to taste.
- Adjust the Consistency: Pour in the cold water gradually, blending the mixture until it reaches your desired consistency. If you prefer a thicker soup, use less water; for a thinner soup, add a bit more.
- Add Spice (Optional): If you enjoy a bit of heat, add the chopped jalapeño and blend until smooth. Taste and adjust seasoning if necessary.
- Chill the Soup: Transfer the soup to a large bowl or container and refrigerate for at least an hour to allow the flavors to meld and the soup to chill thoroughly.
- Serve: Once chilled, serve the soup in bowls. Garnish with extra fresh herbs, sliced radishes, or croutons for added texture and flavor.
Tips: For best results, use ripe avocados and fresh cucumbers, as they’re the stars of this dish. If the soup is too thick after chilling, simply stir in a bit more cold water to loosen it up. This soup can be made a day in advance, allowing the flavors to develop even more. If you prefer a dairy-free version, substitute the Greek yogurt or sour cream with a plant-based alternative. Enjoy your revitalizing Cucumber Avocado Soup as a delightful way to beat the heat!
Italian Antipasto Platter
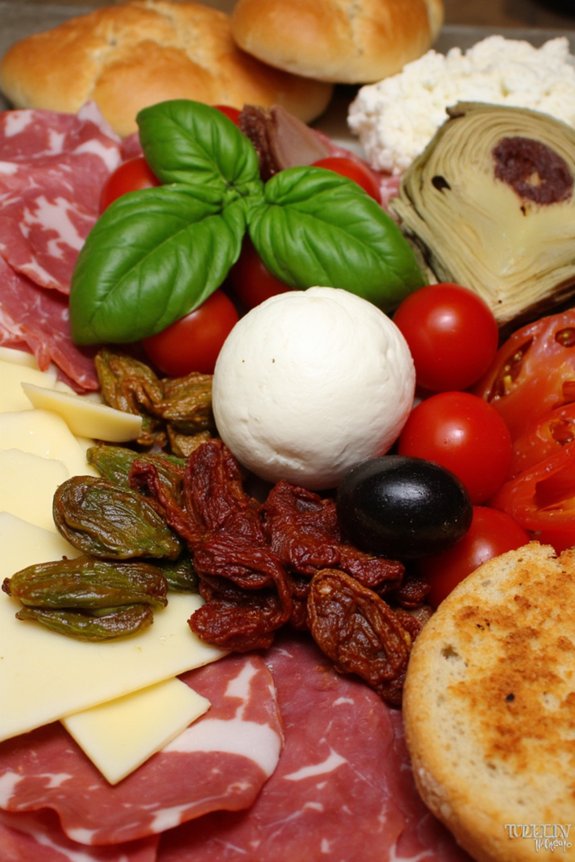
When the weather heats up, a cold Italian Antipasto Platter is the perfect dish to satisfy your appetite without turning up the oven. This delightful arrangement of Italian cured meats, cheeses, marinated vegetables, and olives isn’t only visually appealing but also a burst of flavors and textures that will tantalize your taste buds.
It’s a versatile offering that can serve as a starter for a larger meal or a light dinner on its own, making it ideal for hot weather dining.
The beauty of an antipasto platter lies in its simplicity and adaptability. You can customize it to suit your preferences by including your favorite Italian delicacies. The combination of savory meats, creamy cheeses, and tangy vegetables creates a harmonious blend that’s both satisfying and invigorating.
Plus, assembling the platter requires minimal effort, allowing you to spend more time with family and friends. This recipe serves 4-6 people, making it perfect for small gatherings or family meals.
Ingredients:
- 100g Prosciutto
- 100g Salami
- 100g Mortadella
- 150g Mozzarella cheese balls
- 150g Provolone cheese slices
- 1 cup marinated artichoke hearts
- 1 cup mixed olives
- 1 roasted red pepper, sliced
- 1 cup cherry tomatoes
- 1 small jar of sun-dried tomatoes
- 1 small bunch of fresh basil leaves
- 1 loaf of crusty Italian bread or a baguette
- Olive oil (for drizzling)
- Balsamic glaze (optional, for drizzling)
Instructions:
- Prepare the Base: Start by selecting a large serving platter or wooden board that will comfortably hold all your ingredients. If you prefer, line the platter with parchment paper for easier cleanup.
- Arrange the Meats: Lay out the prosciutto, salami, and mortadella in separate sections on the platter. You can fold or roll the meats for an attractive presentation. This will create a rustic, inviting look that encourages sampling.
- Add the Cheeses: Place the mozzarella balls and provolone slices near the meats, making sure they’re easily accessible. You can drizzle a bit of olive oil over the mozzarella for added flavor.
- Include the Vegetables: Arrange the marinated artichoke hearts, roasted red pepper slices, cherry tomatoes, and sun-dried tomatoes around the meats and cheeses. This will add color and vibrancy to your platter.
- Scatter the Olives: Distribute the mixed olives throughout the platter. Their briny flavor will complement the other ingredients beautifully.
- Garnish with Basil: Tuck fresh basil leaves in between the various components of the platter. Not only do they add a fresh aroma, but they also enhance the overall visual appeal.
- Serve with Bread: Slice the loaf of crusty Italian bread or baguette and place it alongside the platter. Drizzle the bread with olive oil and, if desired, a touch of balsamic glaze.
- Final Touches: Before serving, give the platter a final drizzle of olive oil and, if you like, some balsamic glaze for an extra touch of flavor.
Extra Tips:
For a successful Italian Antipasto Platter, confirm that all ingredients are fresh and high-quality, as this will greatly impact the overall taste.
Feel free to experiment with different types of meats and cheeses based on your preference. If you want to add a bit more zest, consider including a tangy mustard or a spicy pepper relish on the side.
Shrimp and Mango Lettuce Wraps
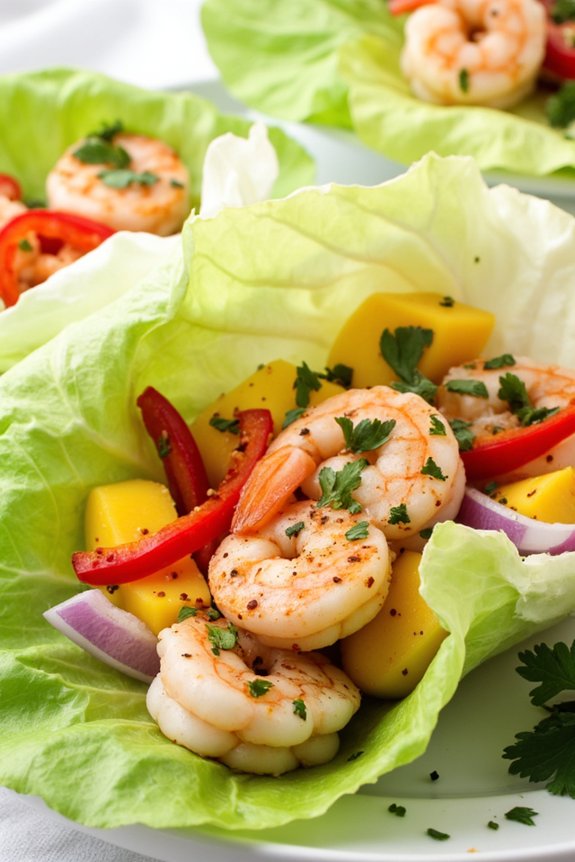
As the temperature rises, there’s nothing more invigorating than a light and flavorful meal that doesn’t require turning on the stove. Shrimp and Mango Lettuce Wraps offer a perfect blend of sweet, tangy, and savory flavors, all nestled in crisp lettuce leaves.
This dish combines succulent shrimp with juicy mango chunks, crisp vegetables, and a zesty dressing, creating a vibrant and healthy meal option for those hot days when you want to keep things cool and simple.
Perfect for a casual lunch or a light dinner, these wraps aren’t only easy to make but also packed with nutrition. The shrimp offers a lean source of protein, while the mango adds a burst of vitamins and antioxidants.
The recipe is versatile and can be adjusted to suit your taste preferences, making it an ideal choice for serving 4-6 people. Gather your ingredients and get ready to enjoy these delightful wraps that are sure to become a summer favorite.
Ingredients (Serving size: 4-6 people)
- 1 pound large shrimp, peeled and deveined
- 2 ripe mangoes, peeled and diced
- 1 red bell pepper, thinly sliced
- 1/2 red onion, thinly sliced
- 1/4 cup fresh cilantro, chopped
- 1 lime, juiced
- 1 tablespoon honey
- 1 tablespoon olive oil
- 1 teaspoon salt
- 1/2 teaspoon black pepper
- 1 head of butter lettuce or iceberg lettuce, leaves separated
- Optional: Sriracha or chili flakes for a spicy kick
Instructions
- Prepare the Shrimp: Begin by boiling a pot of water. Once boiling, add the shrimp and cook for 2-3 minutes until they turn pink and opaque. Drain and rinse under cold water to stop the cooking process. Set aside to cool.
- Make the Mango Mixture: In a large bowl, combine the diced mangoes, red bell pepper, and red onion. Add the chopped cilantro and mix well.
- Prepare the Dressing: In a small bowl, whisk together the lime juice, honey, olive oil, salt, and black pepper until well combined.
- Assemble the Wraps: Once the shrimp have cooled, add them to the mango mixture. Pour the dressing over the top and gently toss everything together to guarantee the shrimp and vegetables are evenly coated.
- Prepare the Lettuce: Wash and dry the lettuce leaves thoroughly. Select the largest and most intact leaves to use as wraps.
- Serve: To assemble, spoon a generous amount of the shrimp and mango mixture onto each lettuce leaf. If desired, add a drizzle of Sriracha or a sprinkle of chili flakes for extra heat. Serve immediately.
Extra Tips
When selecting mangoes, look for ones that are slightly soft to the touch but not mushy, as they’ll provide the best flavor and texture.
If you’re making these wraps ahead of time, keep the shrimp and mango mixture and lettuce leaves separate until just before serving to prevent the lettuce from wilting.
For an added crunch, consider topping the wraps with crushed peanuts or crispy wonton strips. Adjust the level of spice to your preference, and enjoy these wraps as an invigorating appetizer or a light main course.
Zucchini Noodle Pesto Salad
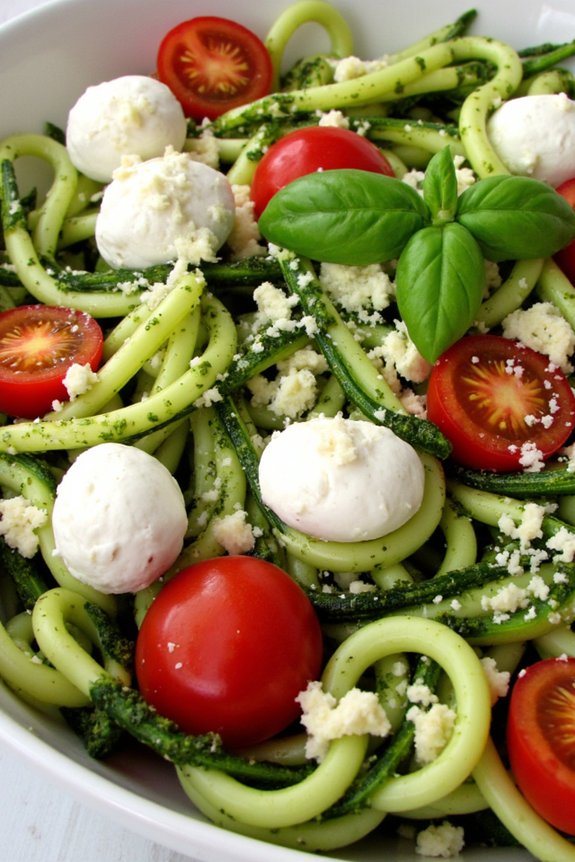
Zucchini Noodle Pesto Salad is a revitalizing dish perfect for those hot summer days when you crave something light yet satisfying. This salad combines the fresh, crisp taste of zucchini noodles with the rich and aromatic flavors of homemade basil pesto, cherry tomatoes, and creamy mozzarella. Not only is this dish simple to prepare, but it also requires no cooking, making it an ideal choice for a quick lunch or dinner that won’t heat up your kitchen.
This vibrant and healthy salad is packed with nutrients, offering a delicious way to enjoy your vegetables. The zucchini noodles, often referred to as “zoodles,” provide a low-carb alternative to traditional pasta, while the pesto adds a punch of flavor with its blend of fresh basil, garlic, pine nuts, and Parmesan cheese. You can serve this dish as a standalone meal or as a side to grilled meats or fish for a fuller dining experience.
Ingredients for 4-6 servings:
- 4 medium zucchinis
- 2 cups fresh basil leaves
- 1/2 cup grated Parmesan cheese
- 1/3 cup pine nuts
- 2 cloves garlic
- 1/2 cup extra virgin olive oil
- Salt and pepper to taste
- 1 pint cherry tomatoes, halved
- 8 oz fresh mozzarella balls, halved
- Juice of 1 lemon
Cooking Instructions:
- Prepare the zucchini noodles: Use a spiralizer or a julienne peeler to create noodles from the zucchinis. If you don’t have these tools, a regular vegetable peeler will work to create long, thin strips. Place the zucchini noodles in a large mixing bowl.
- Make the pesto sauce: In a food processor, combine the basil leaves, Parmesan cheese, pine nuts, and garlic. Pulse until the ingredients are finely chopped. Gradually add the olive oil while the processor is running, until the pesto reaches a smooth consistency. Season with salt and pepper to taste.
- Combine the ingredients: Add the pesto to the bowl with the zucchini noodles. Toss until the noodles are well coated with the pesto sauce. Add the halved cherry tomatoes and mozzarella balls to the bowl and gently mix until all ingredients are evenly distributed.
- Add lemon juice: Squeeze the juice of one lemon over the salad for a fresh, tangy finish. Toss the salad once more to verify the lemon juice is well mixed.
- Serve: Transfer the salad to a serving dish or individual plates. You can garnish with additional grated Parmesan or fresh basil leaves if desired.
Extra Tips:
When making the zucchini noodles, it’s important to use medium-sized zucchinis to guarantee the noodles hold their shape without becoming too watery. If your zucchinis are particularly large or watery, you can lightly salt them and let them sit in a colander for about 10 minutes to draw out moisture before patting them dry with a paper towel. This step helps prevent the salad from becoming soggy.
Additionally, for a nut-free alternative, you can substitute sunflower seeds for pine nuts in the pesto. Enjoy your Zucchini Noodle Pesto Salad immediately for the freshest flavor and texture, as the zucchini noodles can become limp if left to sit for too long.
Spicy Black Bean and Corn Tacos
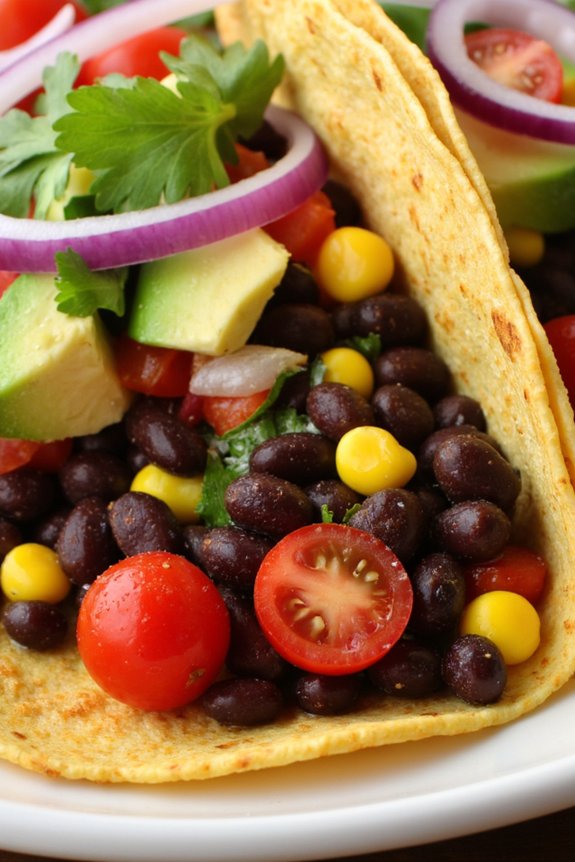
Spicy Black Bean and Corn Tacos are the perfect solution for a revitalizing, no-cook meal during hot weather. These tacos are bursting with flavor and texture, thanks to a combination of black beans, sweet corn, and a kick of spice. They’re not only delicious but also packed with nutrients, making them a healthy choice for any meal.
With minimal preparation and no need to turn on the stove, these tacos are ideal for those sweltering days when you want to keep things cool in the kitchen. The beauty of this dish lies in its simplicity and versatility. You can easily adjust the level of spiciness to suit your taste, add your favorite toppings, or even turn it into a taco salad by serving it over a bed of greens.
Whether you’re hosting a casual summer gathering or just looking for a quick, satisfying meal for your family, these Spicy Black Bean and Corn Tacos are sure to hit the spot. Perfect for serving 4-6 people, this recipe can be easily doubled or halved depending on your needs.
Ingredients for 4-6 people:
- 2 cans (15 oz each) black beans, drained and rinsed
- 1 can (15 oz) corn kernels, drained
- 1 small red onion, finely chopped
- 1 red bell pepper, diced
- 1 jalapeño pepper, seeded and finely chopped
- 2 cloves garlic, minced
- Juice of 2 limes
- 1 tablespoon olive oil
- 1 teaspoon ground cumin
- 1 teaspoon chili powder
- Salt and pepper to taste
- 8-12 small corn tortillas
- 1 cup cherry tomatoes, quartered
- 1 ripe avocado, diced
- Fresh cilantro leaves for garnish
Instructions:
- Prepare the Bean and Corn Mixture: In a large mixing bowl, combine the black beans, corn, red onion, red bell pepper, jalapeño, and garlic. Mix well to guarantee all ingredients are evenly distributed.
- Season the Mixture: Add the lime juice, olive oil, cumin, and chili powder to the bowl. Stir the ingredients thoroughly to coat the bean and corn mixture with the seasoning. Adjust the seasoning with salt and pepper to taste.
- Warm the Tortillas: Wrap the corn tortillas in a damp paper towel and microwave them for about 30 seconds to 1 minute until they’re soft and pliable. Alternatively, you can warm them on a dry skillet over medium heat for a few seconds on each side.
- Assemble the Tacos: Spoon a generous amount of the bean and corn mixture onto each tortilla. Top with cherry tomatoes and diced avocado. Garnish with fresh cilantro leaves.
- Serve: Serve immediately as a revitalizing cold dish, perfect for a hot day. Enjoy these tacos with your favorite salsa or hot sauce, if desired.
Extra Tips:
For an added layer of flavor, consider adding a sprinkle of queso fresco or crumbled feta cheese on top of the tacos. If you’re sensitive to spice, you can omit the jalapeño or reduce the amount.
These tacos are also great with a side of lime wedges to squeeze over the top just before eating, enhancing the freshness. If you prefer a bit more crunch, a handful of shredded lettuce can be added as a topping. Adjust the ingredients according to what you have on hand—this recipe is highly adaptable!
Watermelon Feta and Mint Salad
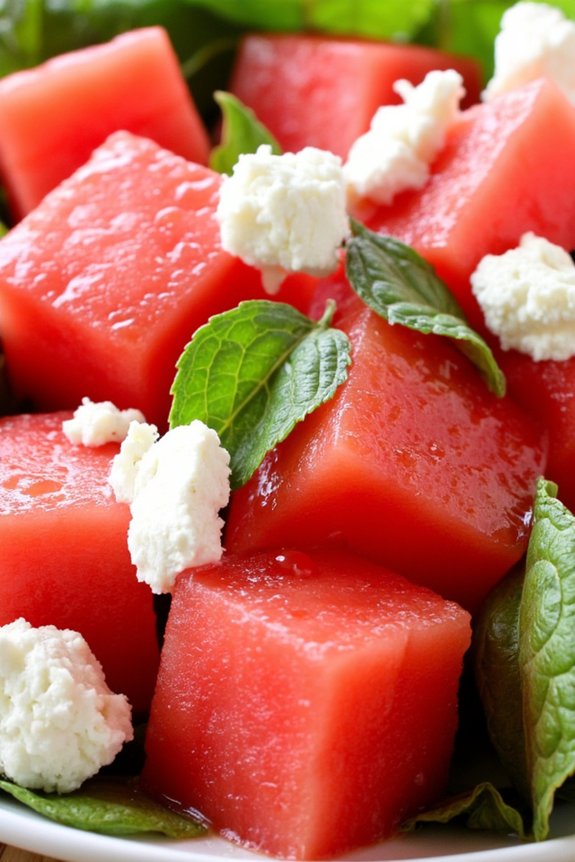
Watermelon Feta and Mint Salad is a revitalizing and easy-to-make dish perfect for hot weather. This salad combines the juicy sweetness of watermelon with the tangy creaminess of feta cheese and the fresh zing of mint, creating a delightful balance of flavors.
It’s a great option for a light lunch or as a side dish at a summer barbecue. The cool, hydrating properties of watermelon make this salad an ideal choice when temperatures soar, while the feta cheese adds a satisfying richness.
This dish not only bursts with flavor, but it’s also visually appealing with its vibrant mix of colors. The salad is quick to prepare and requires no cooking, making it a convenient choice for those hot days when you want to keep the kitchen cool.
Plus, it’s highly customizable; you can add other ingredients like arugula or cucumber to suit your taste. Serve it chilled for the best experience, and enjoy the revitalizing combination of tastes and textures.
Ingredients for 4-6 servings:
- 1 small seedless watermelon, cubed
- 1 cup crumbled feta cheese
- 1/2 cup fresh mint leaves, chopped
- 1/4 cup extra-virgin olive oil
- 2 tablespoons fresh lime juice
- Salt and pepper to taste
Instructions:
- Prepare the Watermelon: Start by cutting the watermelon into bite-sized cubes. Remove any seeds if needed. Place the watermelon cubes in a large mixing bowl.
- Add Feta Cheese: Crumble the feta cheese over the watermelon cubes. Verify the cheese is evenly distributed to get a bit of feta in every bite.
- Incorporate Mint: Wash and chop the fresh mint leaves. Add them to the watermelon and feta mixture, and gently toss to combine.
- Make the Dressing: In a small bowl, whisk together the extra-virgin olive oil, fresh lime juice, and a pinch of salt and pepper. Adjust the seasoning according to your preference.
- Combine and Toss: Pour the dressing over the watermelon mixture. Gently toss the salad to verify all ingredients are well coated with the dressing.
- Chill and Serve: Transfer the salad to a serving platter or bowl. Cover and refrigerate for at least 30 minutes to allow the flavors to meld. Serve chilled for best results.
Extra Tips:
For an extra burst of flavor, consider adding a sprinkle of chili flakes to the salad for a bit of heat. If you prefer a more savory taste, include thinly sliced red onions or olives.
When selecting a watermelon, choose one that feels heavy for its size and has a hollow sound when tapped, indicating ripeness. This salad is best enjoyed fresh, so try to prepare it just before serving to maintain the watermelon’s crisp texture.