

When summer evenings arrive, there’s nothing better than gathering with family for a meal that’s quick and filled with seasonal flavors. Picture juicy grilled peaches with savory prosciutto, or the refreshing crunch of a watermelon and feta salad. These dishes bring vibrant colors to the table, offering a perfect way to relax together. Are you curious about the rest of the lineup?
Grilled Peach and Prosciutto Salad
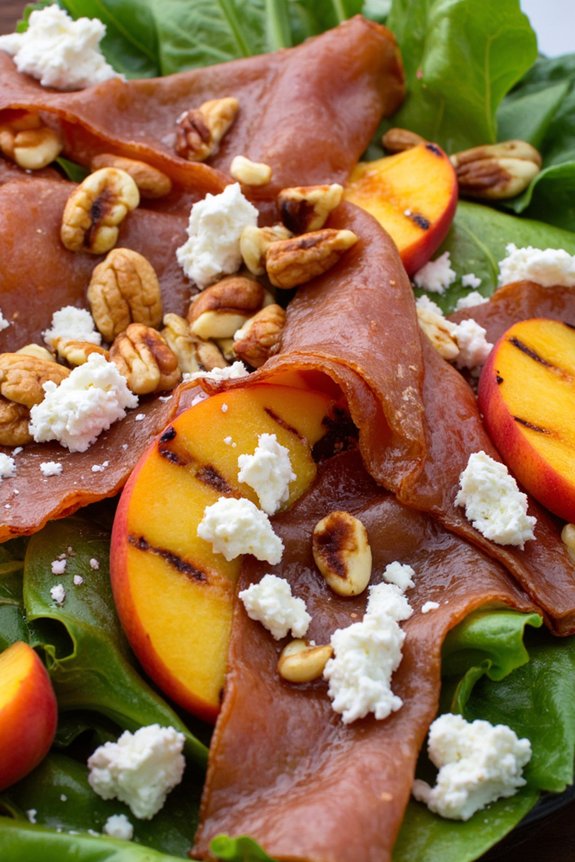
Grilled Peach and Prosciutto Salad is a delightful summer dish that combines the sweet juiciness of ripe peaches with the savory richness of prosciutto. This salad is perfect for those warm evenings when you want something light yet satisfying. The grilling process enhances the peaches’ natural sweetness, while the prosciutto adds a salty depth that pairs beautifully with the fruit.
The addition of fresh greens and a tangy dressing brings all the flavors together, creating a harmonious balance that will leave your taste buds craving more. This salad isn’t only delicious but also visually stunning, making it a great option for entertaining guests or enjoying a special family meal.
With just a few simple ingredients, you can create a dish that looks and tastes gourmet. The combination of textures and flavors in this salad is sure to impress, and it’s easy to customize with your favorite greens or additional toppings if desired. Now, let’s plunge into the list of ingredients and instructions to prepare this invigorating Grilled Peach and Prosciutto Salad for 4-6 people.
Ingredients:
- 4 ripe peaches
- 8 slices of prosciutto
- 6 cups mixed salad greens (such as arugula, spinach, or mesclun mix)
- 1/4 cup olive oil
- 2 tablespoons balsamic vinegar
- 1/4 cup crumbled goat cheese or feta
- 1/4 cup walnuts or pecans, toasted
- Salt and pepper to taste
Instructions:
- Prepare the Peaches: Begin by washing and drying the peaches. Cut each peach in half and remove the pit. Brush the cut sides lightly with olive oil to prevent sticking to the grill.
- Grill the Peaches: Preheat your grill to medium-high heat. Place the peaches cut side down on the grill. Grill them for about 3-4 minutes or until they’ve nice grill marks and are slightly softened. Remove from the grill and let them cool slightly.
- Arrange the Salad: On a large serving platter or individual plates, evenly distribute the mixed salad greens. Tear the prosciutto into bite-sized pieces and scatter them over the greens.
- Add Peaches and Cheese: Once the peaches are cool enough to handle, slice each half into wedges. Arrange the peach slices over the salad. Sprinkle the crumbled goat cheese (or feta) over the top.
- Prepare the Dressing: In a small bowl, whisk together the olive oil, balsamic vinegar, salt, and pepper. Adjust seasoning to taste.
- Dress and Serve: Drizzle the dressing over the salad. Top with the toasted nuts for added crunch. Serve immediately, allowing everyone to savor the mix of textures and flavors.
Extra Tips: When grilling peaches, make sure they’re ripe but firm to guarantee they hold up well on the grill. If you don’t have access to a grill, you can use a grill pan on the stovetop to achieve a similar effect.
Feel free to experiment with different types of nuts or cheeses to suit your preference. This salad can be adapted to include seasonal fruits or a drizzle of honey for added sweetness. Enjoy this salad as a main course or pair it with grilled chicken or fish for a more substantial meal.
Lemon Herb Grilled Chicken Skewers
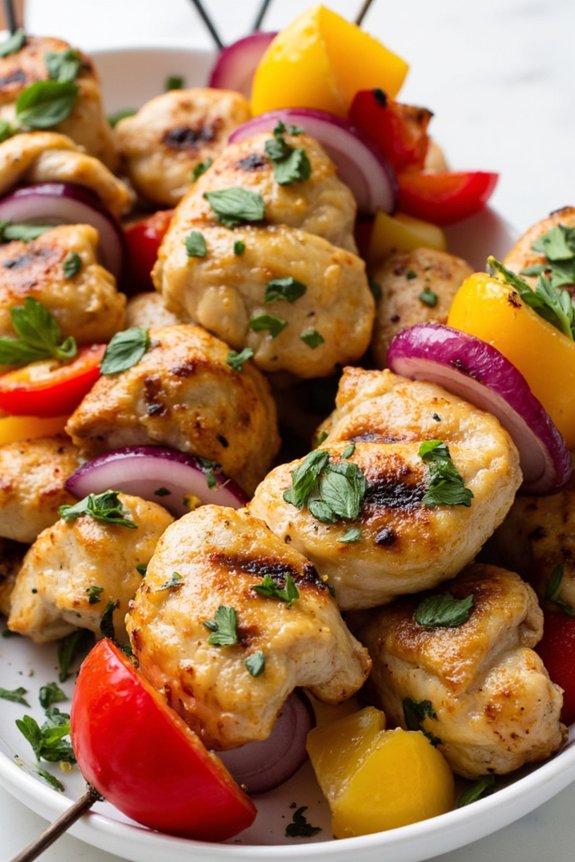
Lemon Herb Grilled Chicken Skewers are a perfect addition to your summer dinner menu. These skewers are flavorful, juicy, and easy to prepare, making them an ideal choice for outdoor gatherings or a simple family meal. The combination of fresh herbs and zesty lemon infuses the chicken with a bright, invigorating taste that will delight your taste buds.
Whether you’re hosting a barbecue or just looking for a quick weeknight meal, these skewers are sure to impress.
Preparing Lemon Herb Grilled Chicken Skewers involves marinating chicken pieces in a mixture of lemon juice, olive oil, garlic, and a variety of fresh herbs. This marinade not only tenderizes the chicken but also imparts a burst of flavor.
Once marinated, the chicken is threaded onto skewers and grilled to perfection. Serve these skewers with a side of grilled vegetables or a fresh salad for a complete and balanced summer meal.
Ingredients (serving size: 4-6 people):
- 2 pounds boneless, skinless chicken breasts, cut into 1-inch cubes
- 1/4 cup olive oil
- Juice of 2 lemons
- Zest of 1 lemon
- 4 cloves garlic, minced
- 2 tablespoons fresh parsley, chopped
- 2 tablespoons fresh basil, chopped
- 1 tablespoon fresh rosemary, chopped
- 1 tablespoon fresh thyme, chopped
- Salt and pepper to taste
- Wooden or metal skewers
Cooking Instructions:
- Prepare the Marinade: In a large bowl, whisk together the olive oil, lemon juice, lemon zest, minced garlic, chopped parsley, basil, rosemary, thyme, salt, and pepper. Make sure the ingredients are well combined to create a uniform marinade.
- Marinate the Chicken: Add the cubed chicken pieces to the marinade, guaranteeing each piece is thoroughly coated. Cover the bowl with plastic wrap and refrigerate for at least 1 hour, allowing the flavors to penetrate the chicken. For best results, marinate for up to 4 hours.
- Prepare the Skewers: If using wooden skewers, soak them in water for about 30 minutes to prevent them from burning on the grill. If using metal skewers, this step can be skipped.
- Thread the Chicken: Remove the marinated chicken from the refrigerator. Thread the chicken pieces onto the skewers, leaving a small space between each piece to guarantee even cooking.
- Preheat the Grill: Preheat your grill to medium-high heat. Brush the grill grates with a little oil to prevent sticking.
- Grill the Skewers: Place the chicken skewers on the grill and cook for about 10-12 minutes, turning occasionally, until the chicken is cooked through and has nice grill marks. The internal temperature of the chicken should reach 165°F (75°C).
- Serve Immediately: Once cooked, remove the skewers from the grill and let them rest for a couple of minutes. Serve the skewers hot with your choice of sides.
Extra Tips: For an added layer of flavor, consider adding some chunks of bell peppers or red onions to the skewers alongside the chicken. This not only enhances the taste but also adds a vibrant color to your presentation.
If you prefer a bit of spice, sprinkle some red pepper flakes into the marinade. Always make sure your grill is properly preheated to avoid the chicken sticking to the grates.
Finally, using fresh herbs is key to achieving the best flavor, but dried herbs can be used in a pinch if fresh ones are unavailable.
Summer Vegetable Pasta Primavera
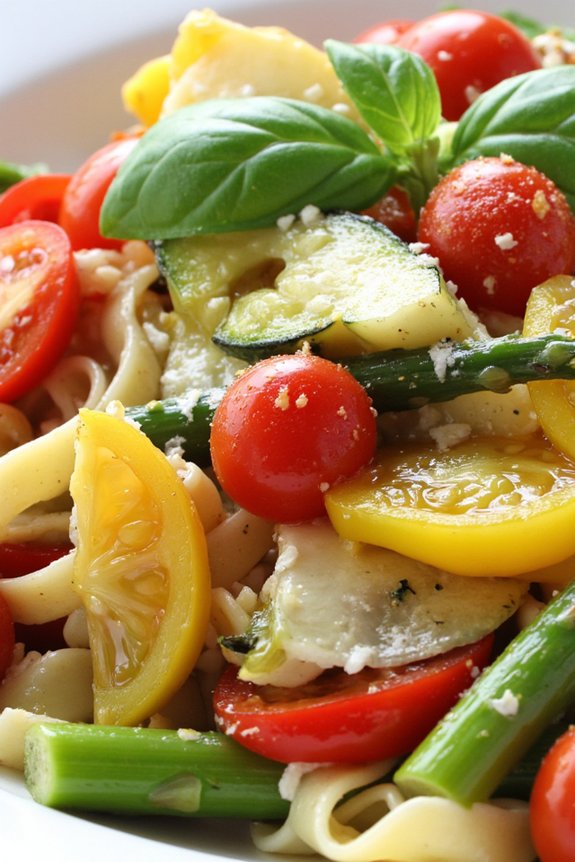
Summer Vegetable Pasta Primavera is a delightful and vibrant dish that perfectly captures the essence of the season. It isn’t only colorful and fresh but also easy to prepare, making it an ideal choice for a summer dinner. The dish combines a variety of fresh summer vegetables with al dente pasta, all tossed in a light and flavorful sauce. This recipe is perfect for those who want to enjoy a healthy and satisfying meal without spending too much time in the kitchen.
The beauty of Summer Vegetable Pasta Primavera lies in its versatility and the opportunity to use whatever fresh produce is available. This version includes a mix of zucchini, bell peppers, cherry tomatoes, and asparagus, ensuring a burst of flavor and color in every bite. With the addition of garlic, olive oil, and a hint of lemon juice, this dish is both invigorating and comforting. To make it suitable for a serving size of 4-6 people, simply follow the ingredient list and instructions below.
Ingredients:
- 12 ounces of pasta (such as penne or fettuccine)
- 2 tablespoons olive oil
- 3 cloves garlic, minced
- 1 medium zucchini, sliced
- 1 red bell pepper, thinly sliced
- 1 yellow bell pepper, thinly sliced
- 1 cup cherry tomatoes, halved
- 1 bunch asparagus, trimmed and cut into 2-inch pieces
- Salt and pepper to taste
- 1/2 cup grated Parmesan cheese
- Juice of 1 lemon
- Fresh basil leaves for garnish
Instructions:
- Boil the Pasta: Begin by bringing a large pot of salted water to a boil. Add the pasta and cook according to the package instructions until al dente. Drain the pasta, reserving about 1/2 cup of the pasta water, and set aside.
- Prepare the Vegetables: While the pasta is cooking, heat the olive oil in a large skillet over medium heat. Add the minced garlic and sauté for about 1 minute until fragrant.
- Sauté the Vegetables: Add the zucchini, bell peppers, and asparagus to the skillet. Cook for about 5-7 minutes, stirring occasionally, until the vegetables are tender-crisp.
- Add Tomatoes: Add the cherry tomatoes to the skillet and cook for an additional 2 minutes until they just begin to soften.
- Combine Pasta and Vegetables: Add the cooked pasta to the skillet along with the reserved pasta water. Toss everything together to combine, allowing the pasta to absorb some of the flavors.
- Season and Serve: Season with salt and pepper to taste. Stir in the Parmesan cheese and lemon juice, tossing to coat the pasta and vegetables evenly. Remove from heat.
- Garnish: Serve the pasta primavera hot, garnished with fresh basil leaves for an extra burst of flavor.
Tips: When making Summer Vegetable Pasta Primavera, feel free to experiment with different vegetables based on what’s in season or what you have on hand. Adding a pinch of red pepper flakes can give the dish a little kick, if desired. For a creamier sauce, consider adding a splash of cream or a dollop of ricotta cheese.
Caprese Stuffed Avocados
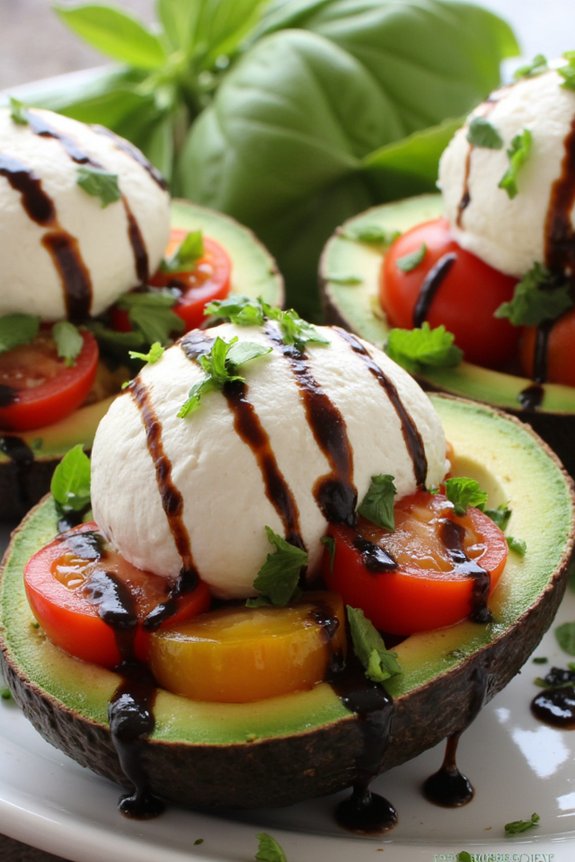
Caprese Stuffed Avocados are a delightful and invigorating summer dish that combines the creamy texture of ripe avocados with the classic Italian flavors of Caprese salad. Perfect for a light dinner or a satisfying appetizer, this dish is sure to impress your family and friends with its vibrant colors and rich taste.
The combination of juicy tomatoes, fresh mozzarella, and fragrant basil with a drizzle of balsamic glaze creates a harmonious blend of flavors that complement the buttery smoothness of the avocados. This recipe isn’t only delicious but also quick and easy to prepare, making it an ideal choice for those warm summer evenings when you want something light yet fulfilling.
The Caprese Stuffed Avocados aren’t only visually appealing but also packed with healthy fats, making it a nutritious choice for a meal. Whether you’re hosting a summer dinner party or simply enjoying a quiet evening at home, these stuffed avocados are bound to become a favorite.
Ingredients (serving size: 4-6 people):
- 4 ripe avocados
- 1 cup cherry tomatoes, halved
- 1 cup fresh mozzarella balls, halved
- 1/4 cup fresh basil leaves, chopped
- 2 tablespoons extra-virgin olive oil
- 2 tablespoons balsamic glaze
- Salt and pepper to taste
Cooking Instructions:
- Prepare the Avocados: Carefully cut the avocados in half lengthwise and remove the pits. Gently scoop out a small amount of the flesh to create a larger cavity for the filling. Set the avocado halves aside on a serving platter.
- Make the Filling: In a medium-sized bowl, combine the cherry tomatoes, mozzarella balls, and chopped basil. Drizzle with the extra-virgin olive oil and season with salt and pepper. Gently toss the mixture to guarantee the ingredients are evenly coated and well combined.
- Stuff the Avocados: Spoon the Caprese filling into each avocado half, dividing the mixture equally among them. Press down lightly to guarantee the filling stays in place.
- Add the Finishing Touches: Drizzle the balsamic glaze over the stuffed avocados. This not only adds a touch of sweetness but also enhances the overall flavor profile of the dish.
- Serve and Enjoy: Serve the Caprese Stuffed Avocados immediately for the best taste and texture. They can be served as a main dish or as a side to complement other summer dishes.
Extra Tips:
When selecting avocados, choose ones that yield slightly to gentle pressure to guarantee they’re ripe and ready to eat. If your avocados aren’t ripe yet, you can speed up the ripening process by placing them in a paper bag with a banana.
For a more vibrant presentation, consider using heirloom cherry tomatoes of different colors. If you prefer a bit of extra flavor, feel free to add a sprinkle of red pepper flakes or a squeeze of lemon juice to the filling. Always serve the dish immediately to prevent the avocados from browning.
Spicy Shrimp Tacos With Mango Salsa
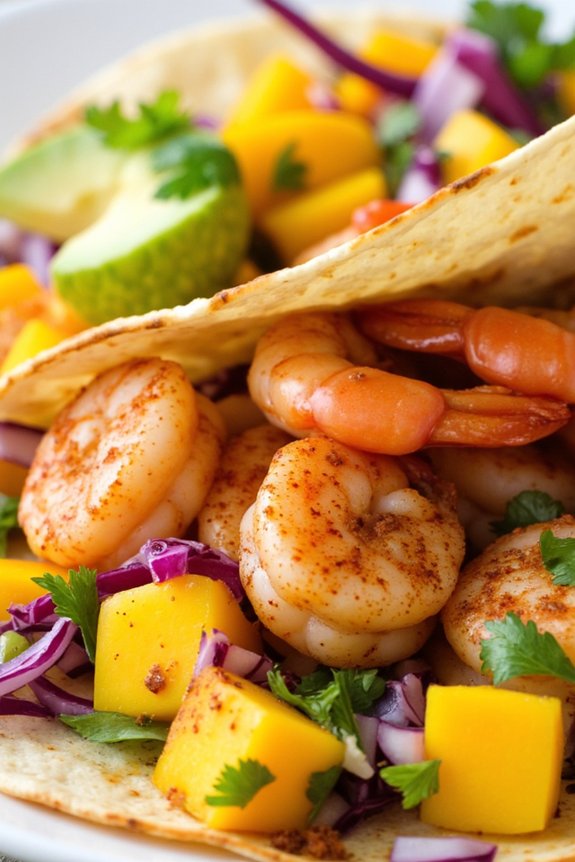
Spicy Shrimp Tacos with Mango Salsa are a fantastic way to bring vibrant flavors and a touch of heat to your summer dinner table. This dish combines perfectly seasoned, succulent shrimp with a revitalizing mango salsa that adds a sweet and tangy contrast. The combination of spicy and sweet, along with the texture of the shrimp and the crunch of fresh toppings, makes for a delightful meal that’s sure to impress your family and friends.
Whether you’re hosting a backyard barbecue or simply enjoying a weeknight meal, these tacos are a surefire hit. The key to this dish is in the balance of flavors and textures. The shrimp are marinated in a blend of spices that bring out their natural sweetness while adding a kick of heat.
Meanwhile, the mango salsa provides a revitalizing and juicy counterpart with its mix of ripe mangoes, zesty lime, and fresh cilantro. When all these elements are wrapped up in a warm tortilla, every bite is a burst of summer in your mouth. This recipe serves 4-6 people, making it perfect for a small gathering or family meal.
Ingredients:
- 1 1/2 lbs large shrimp, peeled and deveined
- 2 tablespoons olive oil
- 2 teaspoons chili powder
- 1 teaspoon ground cumin
- 1 teaspoon smoked paprika
- 1/2 teaspoon garlic powder
- 1/4 teaspoon cayenne pepper
- Salt and pepper to taste
- 1 ripe mango, peeled and diced
- 1/2 red onion, finely chopped
- 1/2 cup fresh cilantro, chopped
- 1 jalapeño, seeded and diced
- Juice of 2 limes
- 8-10 small corn tortillas
- Optional toppings: shredded cabbage, sliced avocado, sour cream
Instructions:
- Prepare the Shrimp: In a large bowl, combine the olive oil, chili powder, cumin, smoked paprika, garlic powder, cayenne pepper, salt, and pepper. Add the shrimp to the bowl and toss until they’re evenly coated with the spice mixture. Let the shrimp marinate for at least 15 minutes to absorb the flavors.
- Make the Mango Salsa: In another bowl, combine the diced mango, red onion, cilantro, jalapeño, and lime juice. Stir gently to mix all the ingredients. Season with salt and pepper to taste. Set aside to let the flavors meld together.
- Cook the Shrimp: Heat a large skillet over medium-high heat. Add the shrimp in a single layer and cook for about 2-3 minutes on each side, or until they’re pink and opaque. Be careful not to overcook them, as they can become tough.
- Warm the Tortillas: While the shrimp are cooking, warm the corn tortillas in a dry skillet over medium heat for about 30 seconds on each side, or until they’re pliable. Alternatively, you can wrap them in a damp paper towel and microwave for 30 seconds.
- Assemble the Tacos: Place a few shrimp on each tortilla and top with a generous spoonful of mango salsa. Add optional toppings like shredded cabbage, sliced avocado, or a dollop of sour cream for extra flavor and texture.
- Serve and Enjoy: Serve the tacos immediately while the shrimp are still warm and the salsa is fresh.
Extra Tips:
For the best results, choose ripe mangoes for the salsa as they provide the sweetest flavor. If you prefer a milder salsa, remove the seeds from the jalapeño or substitute it with a milder pepper.
Additionally, if you have extra time, letting the shrimp marinate for up to an hour can enhance the flavor even more. For a gluten-free option, verify your corn tortillas are certified gluten-free. Enjoy your Spicy Shrimp Tacos with Mango Salsa with a cold beverage to complement the spicy notes.
BBQ Chicken Flatbreads

BBQ Chicken Flatbreads are a delightful addition to your summer dinner repertoire. Combining the smoky flavors of grilled chicken with the tangy sweetness of barbecue sauce, these flatbreads are a hit for both casual family meals and outdoor gatherings.
The crispiness of the flatbread base contrasts beautifully with the tender chicken, and the addition of fresh vegetables and cheese makes it a well-rounded dish. Perfect for those warm summer evenings, these flatbreads are both satisfying and easy to make.
Preparing BBQ Chicken Flatbreads is a straightforward process that allows you to enjoy the essence of barbecue without the need for a full grill session. The key is to use pre-cooked chicken, such as rotisserie or grilled chicken breast, which saves time and effort.
These flatbreads can be customized to suit your taste preferences by adding your favorite toppings. Whether you’re hosting a get-together or simply enjoying a quiet meal at home, these flatbreads are sure to delight everyone at the table.
Ingredients (Serves 4-6):
- 4 flatbreads or naan
- 2 cups cooked chicken, shredded
- 1 cup barbecue sauce
- 1 red onion, thinly sliced
- 1 red bell pepper, thinly sliced
- 2 cups shredded mozzarella cheese
- 1/2 cup chopped cilantro
- 1 tablespoon olive oil
- Salt and pepper to taste
Cooking Instructions:
- Preheat the Oven: Begin by preheating your oven to 400°F (200°C). This will guarantee the flatbreads are cooked evenly and the cheese melts perfectly.
- Prepare the Chicken: In a medium-sized bowl, combine the shredded chicken with 3/4 cup of barbecue sauce. Mix well until the chicken is evenly coated with the sauce.
- Assemble the Flatbreads: Place the flatbreads on a large baking sheet. Brush each flatbread lightly with olive oil. This helps create a crispy base when baked.
- Add Toppings: Evenly distribute the barbecue chicken mixture over each flatbread. Top with sliced red onions and red bell peppers. Sprinkle a generous amount of mozzarella cheese over the top.
- Bake: Place the baking sheet in the preheated oven and bake for 10-12 minutes, or until the cheese is melted and bubbly and the edges of the flatbreads are golden brown.
- Garnish and Serve: Remove the flatbreads from the oven and let them cool slightly. Garnish with chopped cilantro for a fresh flavor. Slice the flatbreads into portions and serve warm.
Extra Tips:
For an extra layer of flavor, consider grilling the flatbreads for a few minutes on each side before assembling. This step adds a delightful charred taste that enhances the overall dish.
If you prefer a spicier version, use a spicy barbecue sauce or add sliced jalapeños to the toppings. Additionally, experiment with different cheese varieties such as gouda or cheddar for a unique twist.
Remember to keep an eye on the baking time, as ovens can vary, to prevent the flatbreads from becoming too crispy.
Watermelon and Feta Salad
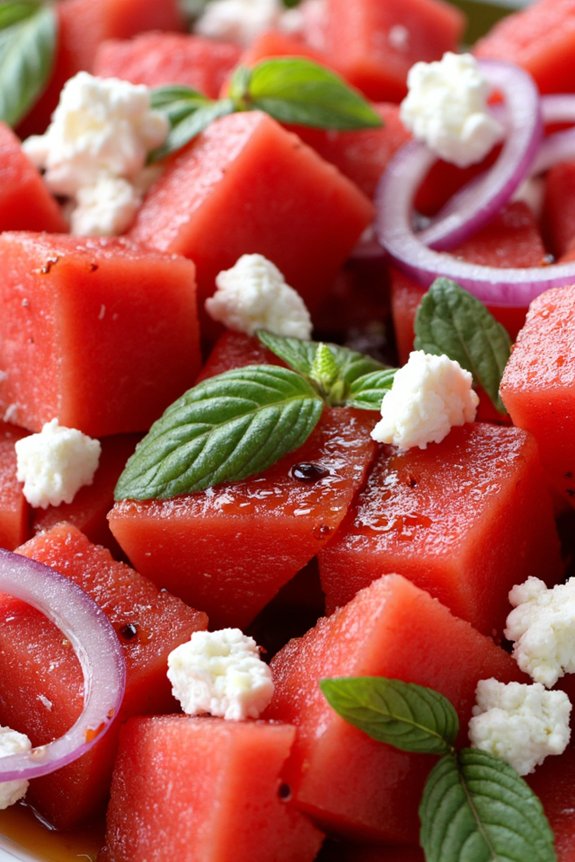
Summer brings with it the bounty of fresh produce, and there’s no better way to celebrate the season than with an invigorating Watermelon and Feta Salad. This dish combines the sweet juiciness of watermelon with the tangy creaminess of feta cheese, making it a perfect accompaniment to any summer meal.
The addition of fresh mint and a light drizzle of balsamic glaze elevates this salad to a new level of sophistication, making it both a feast for the eyes and the taste buds.
Ideal for a serving size of 4-6 people, this recipe requires minimal preparation and can be assembled in just a few minutes. It’s a versatile dish that can be served as a starter, a side dish, or even as a light main course for those hot summer evenings.
The contrasting flavors and textures of this Watermelon and Feta Salad make it a crowd-pleaser at any gathering.
Ingredients:
- 1 small seedless watermelon
- 1 cup feta cheese, crumbled
- 1/2 red onion, thinly sliced
- 1/4 cup fresh mint leaves
- 3 tablespoons extra virgin olive oil
- 2 tablespoons balsamic glaze
- Salt and pepper to taste
Instructions:
- Prepare the Watermelon: Begin by cutting the watermelon into bite-sized cubes. Aim for uniform pieces so that every bite is consistent. Transfer the watermelon cubes into a large mixing bowl.
- Add the Feta Cheese: Crumble the feta cheese over the watermelon cubes. Make sure to distribute the cheese evenly to guarantee every serving gets a good mix of flavors.
- Incorporate the Red Onion: Thinly slice the red onion and add it to the bowl. The onion adds a slight sharpness that complements the sweetness of the watermelon and the creaminess of the feta.
- Mix in the Mint Leaves: Tear the fresh mint leaves by hand and sprinkle them over the salad. The mint brings an invigorating aroma and flavor to the dish.
- Dress the Salad: Drizzle the extra virgin olive oil over the salad, followed by the balsamic glaze. Toss the ingredients gently to coat them evenly, taking care not to break the watermelon cubes.
- Season and Serve: Finish by adding salt and pepper to taste. Give the salad one final gentle toss and serve immediately. The salad is best enjoyed fresh, when the flavors are vibrant.
Extra Tips:
For a more intense flavor, consider marinating the red onion slices in a bit of balsamic vinegar for about 10 minutes before adding them to the salad. This will mellow the onion’s sharpness and enhance the overall taste.
Additionally, if you prefer a creamier texture, you can substitute the feta cheese with goat cheese. Finally, make sure that the watermelon is well-chilled before making the salad, as this enhances its invigorating quality, especially on a hot summer day.
Creamy Pesto Zucchini Noodles
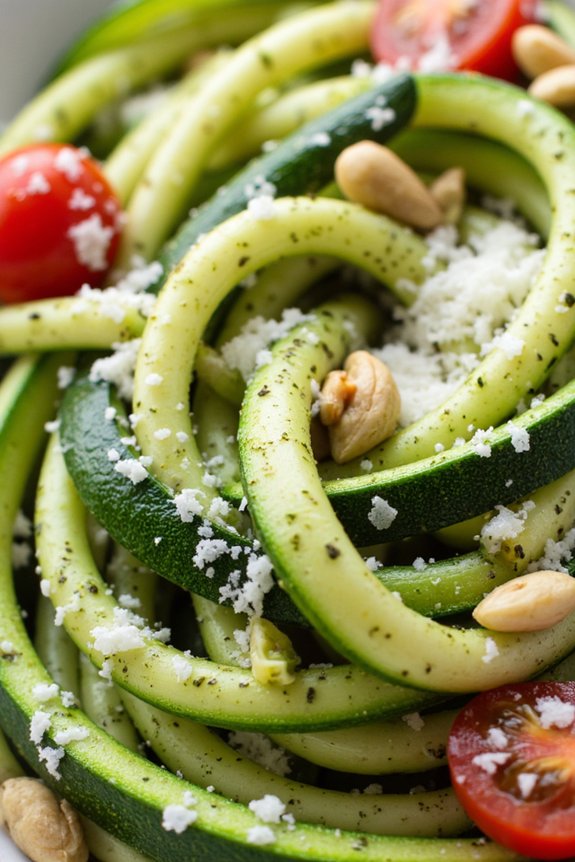
Creamy Pesto Zucchini Noodles is a delightful and invigorating dish perfect for a summer dinner. It’s a healthy alternative to traditional pasta, using spiralized zucchini noodles, also known as “zoodles,” which are tossed in a luscious and aromatic homemade creamy pesto sauce. This dish isn’t only light and nutritious but also packed with flavor, making it a favorite among both pasta lovers and health enthusiasts.
The creamy pesto sauce, made with fresh basil, pine nuts, garlic, Parmesan cheese, and a touch of cream, coats the zucchini noodles beautifully, creating a satisfying meal that feels indulgent yet light.
The beauty of Creamy Pesto Zucchini Noodles lies in its simplicity and ease of preparation. This recipe is perfect for those warm summer evenings when you want something delicious that doesn’t require a lot of time in the kitchen.
With just a few fresh ingredients, you can create a dish that’s both vibrant and satisfying. Whether you’re serving it as a main course or a side dish, the flavors of the pesto shine through, complemented by the tender, yet slightly crunchy texture of the zucchini noodles.
Let’s go through the ingredients and steps needed to create this delightful dish for 4-6 people.
Ingredients:
- 4 medium zucchini
- 2 cups fresh basil leaves
- 1/2 cup grated Parmesan cheese
- 1/3 cup pine nuts
- 2 cloves garlic
- 1/2 cup olive oil
- 1/4 cup heavy cream
- Salt and pepper to taste
- Optional: cherry tomatoes, halved
- Optional: extra Parmesan cheese for garnish
Instructions:
- Prepare the Zucchini Noodles: Wash the zucchini thoroughly. Using a spiralizer, create long, thin noodles from the zucchini. If you don’t have a spiralizer, you can use a vegetable peeler to make thin, ribbon-like strips. Set the zoodles aside in a large bowl.
- Make the Pesto Sauce: In a food processor, combine the basil leaves, Parmesan cheese, pine nuts, and garlic. Pulse a few times to combine the ingredients. While the processor is running, slowly add the olive oil in a steady stream until the mixture is smooth and emulsified. Taste and season with salt and pepper as needed.
- Combine the Pesto and Cream: In a small saucepan over low heat, warm the heavy cream gently. Add the prepared pesto sauce to the cream and stir until well combined. Be careful not to overheat; you just want the sauce to be warm enough to coat the noodles.
- Mix the Zoodles and Sauce: Pour the creamy pesto sauce over the prepared zucchini noodles. Toss gently until all the noodles are well coated with the sauce. If you’re using cherry tomatoes, add them now and mix them in.
- Serve the Dish: Transfer the creamy pesto zucchini noodles to serving plates. Garnish with extra Parmesan cheese if desired. Serve immediately for the best texture and flavor.
Extra Tips:
When making Creamy Pesto Zucchini Noodles, it’s important to serve the dish immediately after preparing to maintain the best texture of the noodles, as they can become watery if they sit for too long.
If you prefer a thicker sauce, you can reduce the amount of cream or let it simmer slightly longer to thicken. For added protein, consider topping the dish with grilled chicken or shrimp.
This dish is also easily adaptable for those with dietary restrictions; for example, you can substitute nutritional yeast for Parmesan to make it vegan. Enjoy this vibrant summer dish with a glass of chilled white wine for a complete dining experience.
Honey Lime Grilled Salmon
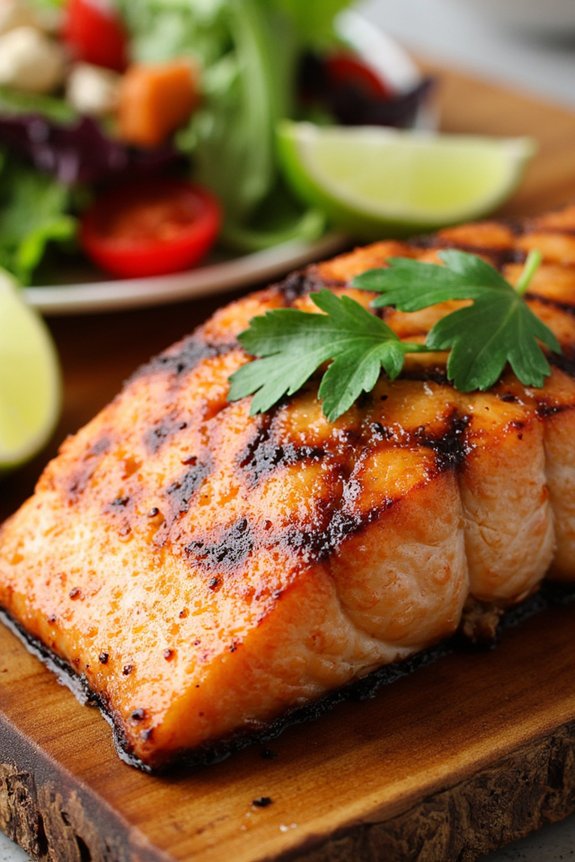
Summer is the perfect time to enjoy light and invigorating meals, and Honey Lime Grilled Salmon is a delightful choice. This dish combines the rich flavors of salmon with the sweet and tangy notes of honey and lime, creating a mouthwatering meal that’s both nutritious and delicious. Grilling the salmon enhances its natural flavors and adds a smoky depth that’s perfectly complemented by the zesty marinade.
Whether you’re hosting a backyard barbecue or simply enjoying a quiet dinner on the patio, this recipe is sure to impress your family and friends. The preparation is simple and quick, making it ideal for those warm summer evenings when you want to spend more time outside and less time in the kitchen.
The key to this recipe is the marinade, which infuses the salmon with flavor and helps to keep it moist during grilling. Served with a side of fresh salad or grilled vegetables, Honey Lime Grilled Salmon is a wholesome meal that captures the essence of summer dining.
Ingredients (Serves 4-6):
- 4-6 salmon fillets (about 6 oz each)
- 1/4 cup honey
- 1/4 cup freshly squeezed lime juice
- Zest of 1 lime
- 2 tablespoons olive oil
- 2 cloves garlic, minced
- 1 teaspoon salt
- 1/2 teaspoon black pepper
- 1/4 teaspoon red pepper flakes (optional)
- Lime wedges and fresh cilantro for garnish
Cooking Instructions:
- Prepare the Marinade: In a small bowl, whisk together the honey, lime juice, lime zest, olive oil, minced garlic, salt, black pepper, and red pepper flakes (if using) until well combined.
- Marinate the Salmon: Place the salmon fillets in a shallow dish or a resealable plastic bag. Pour the marinade over the salmon, making sure each fillet is well coated. Seal the bag or cover the dish with plastic wrap and refrigerate for at least 30 minutes, or up to 2 hours for maximum flavor.
- Preheat the Grill: Preheat your grill to medium-high heat. If using a charcoal grill, prepare the coals for direct grilling. Lightly oil the grill grates to prevent the salmon from sticking.
- Grill the Salmon: Remove the salmon from the marinade, allowing any excess to drip off. Place the fillets on the preheated grill, skin-side down. Close the grill lid and cook for about 4-5 minutes per side, or until the salmon is opaque and flakes easily with a fork. Avoid flipping the salmon too often to ensure it stays intact.
- Garnish and Serve: Once cooked, remove the salmon from the grill and transfer it to a serving platter. Garnish with lime wedges and fresh cilantro before serving. Enjoy the grilled salmon hot with your choice of sides.
Extra Tips:
For the best results, choose fresh salmon fillets with bright, firm flesh and a mild scent. If you prefer a slightly crispier texture, you can brush the salmon fillets with a bit of olive oil before grilling.
Keep a close eye on the salmon while grilling to prevent overcooking, as this can cause the fillets to become dry. If you don’t have access to a grill, you can also cook the salmon in a grill pan on the stovetop or bake it in the oven. Enjoy this dish with a chilled glass of white wine or a light summer cocktail for a complete summer dining experience.
Sweet Corn and Black Bean Quesadillas

Sweet Corn and Black Bean Quesadillas are a delightful and satisfying meal option, perfect for a summer evening. This dish combines the natural sweetness of fresh corn with the hearty texture of black beans, all enclosed in a crispy, golden tortilla. The combination isn’t only delicious but also brings a vibrant array of colors to your plate, making it visually appealing as well.
These quesadillas are easy to prepare, making them an ideal choice for both busy weeknights and relaxed weekend dinners. The flavors of the sweet corn and black beans are enhanced by the addition of spices and cheese, creating a rich and savory filling. The quesadillas can be served alone or alongside a fresh salad or guacamole for an added layer of flavor and texture.
This dish can easily be customized to suit your taste preferences, whether you want to add a bit of heat with jalapeños or keep it mild for a family-friendly meal. With a serving size of 4-6 people, you can enjoy these quesadillas with family or friends, and they’re sure to be a hit.
Ingredients for 4-6 servings:
- 2 cups fresh or frozen sweet corn kernels
- 1 can (15 oz) black beans, drained and rinsed
- 1 red bell pepper, diced
- 1 cup shredded cheddar or Monterey Jack cheese
- 1/4 cup chopped fresh cilantro
- 1 teaspoon ground cumin
- 1/2 teaspoon chili powder
- Salt and pepper, to taste
- 8 large flour tortillas
- 2 tablespoons vegetable oil
- Optional toppings: sour cream, salsa, guacamole
Cooking Instructions:
- Prepare the Filling: In a large bowl, combine the sweet corn, black beans, diced red bell pepper, shredded cheese, and chopped cilantro. Season the mixture with ground cumin, chili powder, salt, and pepper. Mix well to verify the ingredients are evenly distributed.
- Assemble the Quesadillas: Lay out the flour tortillas on a flat surface. Spoon a generous amount of the corn and black bean mixture onto one half of each tortilla. Fold the tortillas in half to cover the filling and press gently to flatten.
- Cook the Quesadillas: Heat a tablespoon of vegetable oil in a large skillet over medium heat. Carefully place the assembled quesadillas in the skillet, cooking them in batches if necessary. Cook each side for about 3-4 minutes, or until the tortillas are golden brown and the cheese has melted.
- Serve the Quesadillas: Once cooked, remove the quesadillas from the skillet and let them sit for a minute to cool slightly. Cut them into wedges and serve immediately with optional toppings like sour cream, salsa, or guacamole.
Extra Tips: For best results, use fresh corn during the summer months when it’s in season, as it will offer the sweetest flavor. If using frozen corn, be sure to thaw it completely and drain any excess water before adding it to the filling.
When cooking the quesadillas, adjust the heat as necessary to verify the tortillas become crispy without burning. Additionally, feel free to experiment with different cheeses or add ingredients like cooked chicken or sautéed onions to customize the dish to your liking.
Enjoy your Sweet Corn and Black Bean Quesadillas hot off the skillet for the ultimate summer meal experience.
Thai Basil Beef Lettuce Wraps
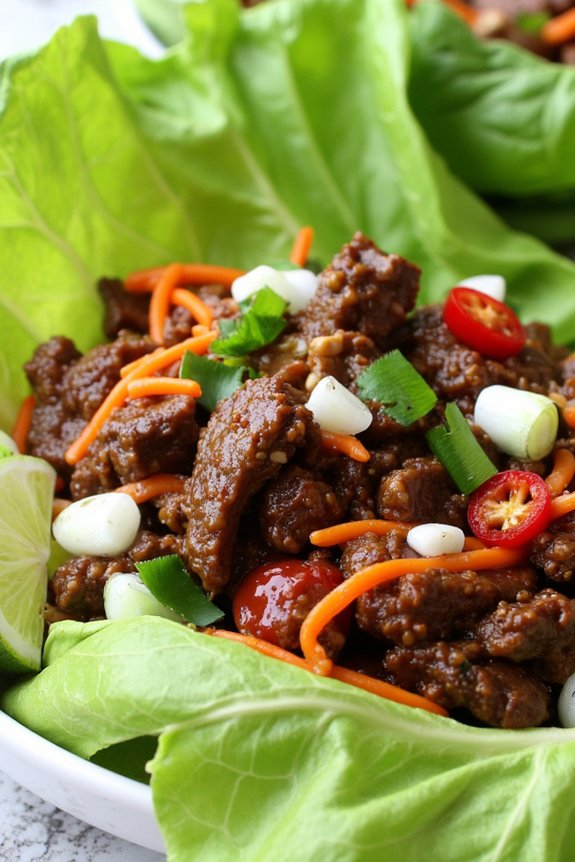
Thai Basil Beef Lettuce Wraps are an ideal dish for a rejuvenating and flavorful summer dinner. This dish combines tender ground beef with the aromatic essence of fresh Thai basil and a blend of savory sauces, all wrapped in crisp lettuce leaves. It’s a wonderful fusion of textures and flavors, offering a satisfying yet light meal that’s perfect for warm evenings.
The wraps aren’t only easy to prepare but also allow for customization, making them a great option for both family dinners and casual gatherings.
The key to this dish lies in the balance of flavors—sweet, salty, spicy, and aromatic. The beef is cooked with a mixture of garlic, ginger, and chili, then tossed with soy sauce and fish sauce for a deeply savory taste. Fresh Thai basil adds an anise-like aroma and a pop of freshness that elevates the entire dish.
Served in crunchy lettuce cups, these wraps are both healthy and delicious, providing a delightful contrast to the rich beef mixture. This recipe serves 4-6 people, offering a delightful meal that everyone will enjoy.
Ingredients:
- 1 tablespoon vegetable oil
- 1 pound ground beef
- 4 cloves garlic, minced
- 1 tablespoon fresh ginger, minced
- 2 red chilies, sliced (or to taste)
- 3 tablespoons soy sauce
- 1 tablespoon fish sauce
- 2 tablespoons brown sugar
- 1 cup fresh Thai basil leaves
- 1 head of butter lettuce, leaves separated
- 1/2 cup chopped green onions
- 1/2 cup shredded carrots
- 1 lime, cut into wedges
Cooking Instructions:
- Prepare the Ingredients: Begin by prepping all your ingredients. Mince the garlic and ginger, slice the chilies, and wash and separate the lettuce leaves. Verify all your ingredients are ready to go before you start cooking.
- Cook the Beef: Heat the vegetable oil in a large skillet over medium-high heat. Add the ground beef and cook until it’s browned and cooked through, breaking it up with a spatula as it cooks, about 5-7 minutes.
- Add Aromatics: Once the beef is cooked, add the minced garlic, ginger, and sliced chilies. Stir well and cook for another 2 minutes, allowing the flavors to meld together.
- Season the Beef: Stir in the soy sauce, fish sauce, and brown sugar. Mix well to confirm the beef is evenly coated with the sauce. Cook for another 3-4 minutes, letting the flavors infuse into the beef.
- Add Thai Basil: Turn off the heat and immediately add the fresh Thai basil leaves. Stir them into the beef mixture until they’re wilted and well incorporated.
- Assemble the Wraps: Lay out the lettuce leaves on a serving platter. Spoon the beef mixture into each leaf, ensuring an even distribution. Top with chopped green onions and shredded carrots for added crunch and flavor.
- Serve: Serve the wraps immediately with lime wedges on the side for squeezing over the top, adding a fresh citrusy note.
Extra Tips:
For the best results, make sure to use fresh Thai basil, as it has a distinct flavor that’s key to the authenticity of this dish. If Thai basil is unavailable, sweet basil can be used as a substitute, though the flavor will be slightly different.
Adjust the amount of chili to suit your spice preference, and feel free to add more vegetables like bell peppers or mushrooms to the beef mixture for added texture and nutrition. When serving, provide extra lettuce leaves so guests can make additional wraps if desired.
Coconut Lime Chicken Curry

Indulge in the vibrant flavors of Coconut Lime Chicken Curry, a dish that perfectly balances the creamy richness of coconut milk with the zesty punch of fresh lime. This dish is a delightful fusion of tropical tastes, ideal for a summer dinner that promises to transport your taste buds to an exotic destination.
The tender pieces of chicken are simmered to perfection in a fragrant curry sauce, infused with aromatic spices and fresh herbs, creating a symphony of flavors that will leave you wanting more. This Coconut Lime Chicken Curry isn’t only delicious but also surprisingly easy to prepare, making it a great choice for both weeknight dinners and special gatherings.
The harmonious blend of ingredients guarantees a satisfying and nourishing meal that can be enjoyed by the whole family. With its vibrant colors and enticing aroma, this curry is a feast for the senses, offering a perfect balance of spice, creaminess, and citrusy freshness.
Ingredients for 4-6 servings:
- 1 ½ pounds (about 680g) boneless, skinless chicken thighs, cut into chunks
- 1 tablespoon vegetable oil
- 1 large onion, finely chopped
- 3 cloves garlic, minced
- 1 tablespoon fresh ginger, grated
- 2 tablespoons red curry paste
- 1 can (13.5 oz) coconut milk
- 1 cup chicken broth
- 1 tablespoon fish sauce
- 2 tablespoons lime juice
- 1 tablespoon brown sugar
- 1 red bell pepper, sliced
- 1 cup sugar snap peas
- 1 lime, sliced for garnish
- Fresh cilantro, chopped for garnish
- Salt and pepper to taste
- Cooked jasmine rice, for serving
Cooking Instructions:
- Prepare the Ingredients: Start by cutting the chicken thighs into bite-sized chunks. Chop the onion, mince the garlic, and grate the ginger. Slice the red bell pepper and set aside.
- Sauté Aromatics: In a large skillet or pot, heat the vegetable oil over medium heat. Add the chopped onion and sauté for about 3-4 minutes until it becomes translucent. Add the minced garlic and grated ginger, and continue cooking for an additional 1-2 minutes until fragrant.
- Cook the Chicken: Add the chicken chunks to the skillet. Sauté until they’re browned on all sides, approximately 5-7 minutes. Make sure the chicken is fully cooked through.
- Add the Curry Paste: Stir in the red curry paste, making sure that all the chicken pieces are well coated. Cook for another 2 minutes to allow the flavors to meld together.
- Create the Sauce: Pour in the coconut milk and chicken broth, stirring to combine. Add the fish sauce, lime juice, and brown sugar. Bring the mixture to a gentle simmer.
- Add Vegetables: Add the sliced red bell pepper and sugar snap peas to the curry. Stir well and let them cook in the sauce for about 5 minutes, or until the vegetables are tender but still crisp.
- Season and Garnish: Taste the curry and adjust the seasoning with salt and pepper as needed. Before serving, garnish with fresh cilantro and lime slices for an extra burst of flavor.
- Serve: Serve the Coconut Lime Chicken Curry hot over a bed of cooked jasmine rice to soak up all the delicious sauce.
Extra Tips:
For a more intense lime flavor, consider adding some lime zest along with the lime juice. If you prefer a spicier curry, add a chopped chili or a dash of cayenne pepper when adding the curry paste.
To make the dish vegetarian, substitute the chicken with tofu or chickpeas and use vegetable broth instead of chicken broth. Remember, the quality of your coconut milk can greatly affect the creaminess of the curry, so choose a good-quality brand for the best results. Enjoy your tropical escape with every bite!
Berry and Goat Cheese Salad
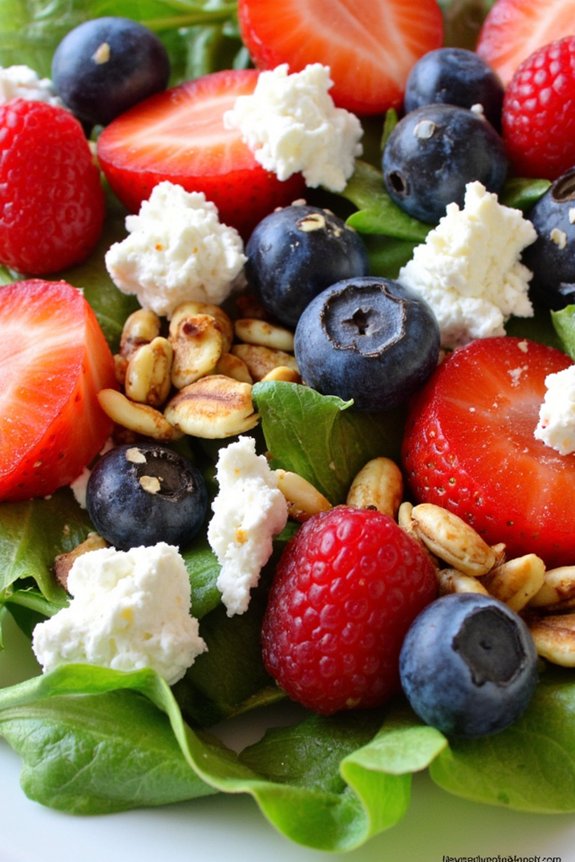
Indulge in the invigorating flavors of summer with a vibrant Berry and Goat Cheese Salad, a perfect addition to any warm-weather meal. This delightful dish combines the sweetness of fresh berries with the creamy, tangy profile of goat cheese, laced with the crunch of nuts and the crispness of mixed greens.
It’s a nutritious and visually appealing salad that’s both satisfying and light. Ideal for a summer dinner, this salad isn’t only simple to prepare but also brings a burst of color and flavor to your table.
Whether you’re hosting a casual gathering or an elegant dinner, this Berry and Goat Cheese Salad can be served as a standalone starter or a side dish. The combination of ingredients in this recipe strikes a perfect balance, with the berries providing a burst of sweetness, the goat cheese adding a rich creaminess, and the nuts offering a satisfying crunch.
The citrusy dressing ties everything together, enhancing the natural flavors and making each bite a delightful experience.
Ingredients (Serving size: 4-6 people)
- 6 cups mixed greens (such as arugula, spinach, and lettuce)
- 1 cup fresh strawberries, hulled and sliced
- 1 cup fresh blueberries
- 1/2 cup fresh raspberries
- 1/2 cup crumbled goat cheese
- 1/2 cup chopped walnuts or pecans
- 1/4 cup extra-virgin olive oil
- 2 tablespoons balsamic vinegar
- 1 tablespoon honey
- 1 teaspoon Dijon mustard
- Salt and freshly ground black pepper to taste
Cooking Instructions
- Prepare the Greens: Begin by thoroughly washing and drying the mixed greens. Once dried, place them in a large salad bowl to create the base for your salad.
- Add the Berries: Gently wash the strawberries, blueberries, and raspberries. Hull and slice the strawberries. Add all the berries to the salad bowl with the greens, distributing them evenly.
- Add the Goat Cheese and Nuts: Crumble the goat cheese over the top of the salad. Sprinkle the chopped walnuts or pecans evenly across the salad for texture and flavor.
- Make the Dressing: In a small mixing bowl, whisk together the olive oil, balsamic vinegar, honey, and Dijon mustard until well combined. Season with salt and freshly ground black pepper to taste.
- Dress the Salad: Drizzle the dressing over the salad just before serving. Toss gently to combine all the ingredients, ensuring the dressing coats the salad evenly without breaking up the delicate berries and cheese.
- Serve and Enjoy: Transfer the salad to a serving platter or individual plates and enjoy this invigorating dish as a vibrant starter or side.
Extra Tips:
For the best flavor, use the freshest berries available, preferably in-season ones that are plump and sweet. Feel free to substitute or add other fruits such as blackberries or pomegranate seeds for variety.
Toasting the nuts in a dry skillet for a few minutes can bring out their natural oils and enhance their flavor. Adjust the amount of honey in the dressing to suit your taste preference. If desired, you can also experiment with adding a sprinkle of fresh herbs like mint or basil for an additional burst of flavor.