

There’s nothing quite like gathering around the dinner table on a relaxed evening with family, savoring a warm, wholesome meal that brings everyone closer. I love exploring recipes that combine comfort and nutrition, like a hearty vegetable and lentil soup or a creamy chicken and mushroom casserole. Imagine the aroma filling your home, inviting everyone to linger a bit longer. Curious about more cozy dinner ideas that make family nights special?
Hearty Vegetable and Lentil Soup
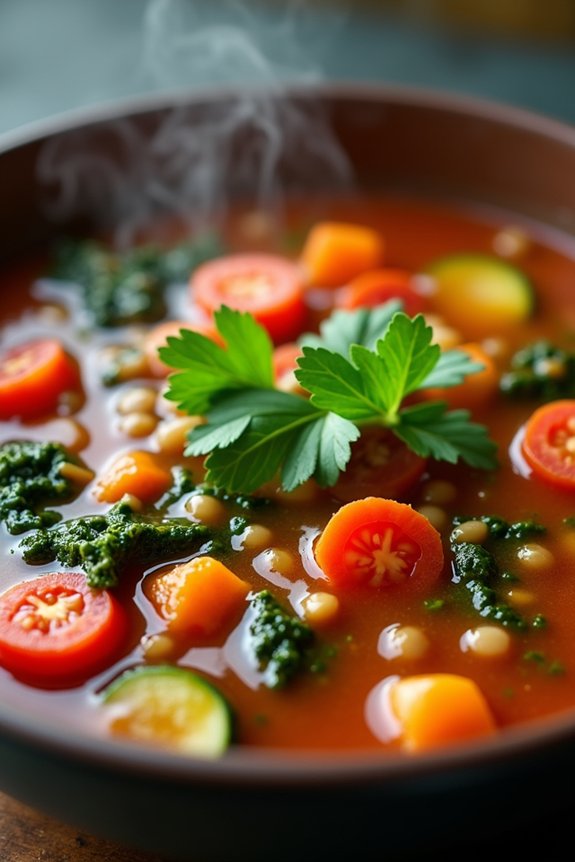
As the temperatures drop and evenings become cooler, there’s nothing more comforting than a bowl of hearty vegetable and lentil soup. This cozy dinner option isn’t only nourishing but also brimming with vibrant flavors that the whole family will enjoy. Packed with nutrients, this soup is a perfect way to incorporate more vegetables into your family’s diet, while the lentils provide a substantial dose of protein and fiber, keeping everyone satisfied and energized.
This recipe is ideal for a family of 4-6 people, making it a great choice for a weeknight dinner or a leisurely weekend meal. It’s simple to prepare and can be made with ingredients you likely already have in your pantry and fridge. Whether you’re a seasoned chef or a novice in the kitchen, this soup will come together effortlessly, leaving you with a delicious and wholesome meal to share with your loved ones.
Ingredients for 4-6 servings:
- 2 tablespoons olive oil
- 1 large onion, diced
- 2 cloves garlic, minced
- 2 carrots, sliced
- 2 stalks celery, chopped
- 1 red bell pepper, chopped
- 1 zucchini, diced
- 1 cup dried green or brown lentils, rinsed
- 1 teaspoon dried thyme
- 1 teaspoon ground cumin
- 1/2 teaspoon smoked paprika
- 6 cups vegetable broth
- 1 can (14 oz) diced tomatoes
- Salt and black pepper, to taste
- 2 cups kale or spinach, chopped
- 2 tablespoons lemon juice
- Fresh parsley, chopped (for garnish)
Instructions:
- Sauté the Aromatics: In a large pot, heat the olive oil over medium heat. Add the diced onion and cook for about 4-5 minutes until it becomes soft and translucent. Stir in the minced garlic and cook for another minute until fragrant.
- Add the Vegetables: Add the sliced carrots, chopped celery, red bell pepper, and diced zucchini to the pot. Stir well and let the vegetables cook for about 5-7 minutes, until they begin to soften.
- Incorporate the Lentils and Spices: Stir in the rinsed lentils, dried thyme, ground cumin, and smoked paprika. Mix everything together to guarantee the lentils and spices are well incorporated with the vegetables.
- Simmer the Soup: Pour in the vegetable broth and the canned diced tomatoes, including their juices. Season with salt and black pepper to taste. Bring the mixture to a boil, then reduce the heat to low and cover the pot. Let the soup simmer for about 25-30 minutes, or until the lentils are tender.
- Add Greens and Season: Once the lentils are cooked, stir in the chopped kale or spinach and let it wilt for about 5 minutes. Add the lemon juice and adjust the seasoning with more salt and pepper if needed.
- Serve: Ladle the soup into bowls and garnish with freshly chopped parsley. Serve hot with crusty bread or a side salad for a complete meal.
Extra Tips:
When preparing the Hearty Vegetable and Lentil Soup, feel free to customize the vegetables based on what you have on hand or what’s in season. You can add or substitute ingredients like sweet potatoes, squash, or green beans to suit your family’s preferences.
If you prefer a thicker soup, use an immersion blender to slightly puree a portion of the soup before adding the greens. This dish also freezes well, so consider making a double batch to enjoy at a later date.
Creamy Chicken and Mushroom Casserole

Creamy Chicken and Mushroom Casserole is a delightful dish that combines tender chicken, earthy mushrooms, and a rich, creamy sauce, all baked to perfection. This casserole is perfect for cozy family dinners, offering a comforting meal that satisfies both the taste buds and the soul.
The creamy sauce is infused with flavors of garlic and herbs, while the succulent chicken and mushrooms add depth and texture to the dish. With a golden, cheesy crust on top, this casserole is sure to become a favorite in your household.
Not only is this casserole delicious, but it’s also incredibly easy to prepare, making it an ideal choice for busy weeknights. It can be assembled in advance and baked right before dinner time, allowing you to spend more quality moments with your family.
The combination of chicken and mushroom in a creamy sauce is a classic pairing that never fails to impress. Plus, this dish is versatile and can be customized with your favorite herbs and seasonings. Let’s explore the recipe to create this comforting dish that serves 4-6 people.
Ingredients:
- 1.5 pounds of boneless, skinless chicken breasts, cut into bite-sized pieces
- 2 cups of sliced mushrooms (button or cremini)
- 1 medium onion, finely chopped
- 3 cloves of garlic, minced
- 2 tablespoons of olive oil
- 1 tablespoon of butter
- 1 cup of heavy cream
- 1 cup of chicken broth
- 1 cup of shredded mozzarella cheese
- 1/2 cup of grated parmesan cheese
- 1 teaspoon of dried thyme
- 1 teaspoon of dried parsley
- Salt and pepper to taste
- 1/4 cup of all-purpose flour
Instructions:
- Preheat the Oven: Preheat your oven to 375°F (190°C) to get it ready for baking the casserole.
- Sauté the Chicken: In a large skillet, heat the olive oil over medium-high heat. Add the chicken pieces and season with salt and pepper. Cook until they’re golden brown on all sides, about 5-7 minutes. Remove the chicken from the skillet and set aside.
- Cook the Vegetables: In the same skillet, add butter. Once melted, add the chopped onion and sauté for 2-3 minutes until it becomes translucent. Add the minced garlic and sliced mushrooms, and cook until the mushrooms are tender and browned, about 5 minutes.
- Make the Sauce: Sprinkle the flour over the mushroom mixture and stir well to combine. Gradually pour in the chicken broth, stirring constantly to avoid lumps. Then add the heavy cream, thyme, and parsley. Bring the mixture to a gentle simmer, allowing it to thicken slightly.
- Combine Ingredients: Return the cooked chicken to the skillet and mix well to coat the chicken with the creamy mushroom sauce. Adjust seasoning with additional salt and pepper if needed.
- Assemble the Casserole: Transfer the chicken and mushroom mixture into a greased baking dish. Sprinkle the top with mozzarella and parmesan cheese evenly.
- Bake the Casserole: Place the baking dish in the preheated oven and bake for 20-25 minutes, or until the cheese has melted and turned golden brown.
- Serve and Enjoy: Once baked, remove the casserole from the oven and let it rest for a few minutes before serving. This dish pairs well with a side of green salad or crusty bread.
Extra Tips:
For an extra burst of flavor, consider adding a splash of white wine to the sauce before simmering. It adds a nice depth to the creamy mixture.
If you prefer a bit of a kick, a pinch of crushed red pepper flakes can be added along with the herbs. This casserole can also be made with leftover cooked chicken or turkey, making it a perfect dish for using up holiday leftovers.
Finally, feel free to substitute the cheese with any of your favorites like Swiss or Gruyere for a different flavor profile.
One-Pot Beef and Barley Stew
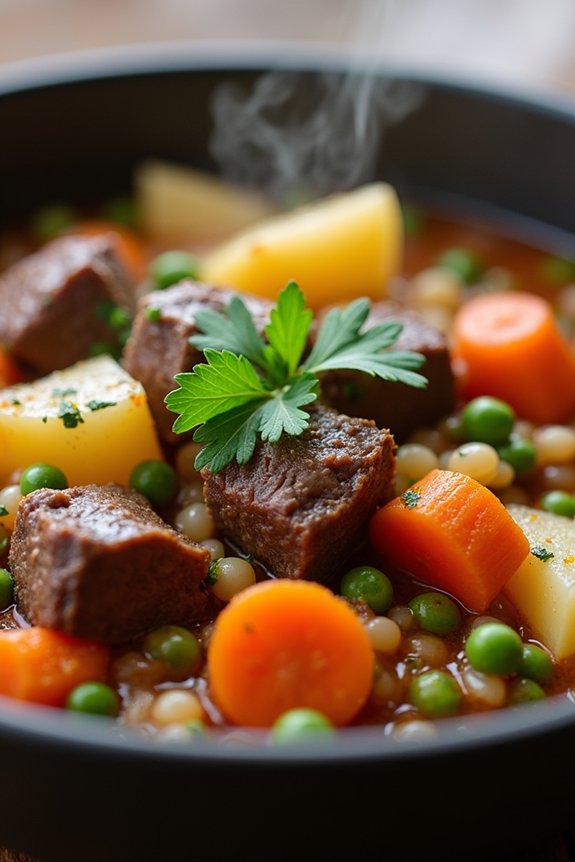
Warm up your family’s evening with a hearty and comforting One-Pot Beef and Barley Stew. This dish is perfect for cozy dinners and will fill your home with inviting aromas. The combination of tender beef, wholesome barley, and a medley of vegetables creates a rich and satisfying meal.
Best of all, it requires minimal cleanup, as everything is cooked in one pot, making it ideal for busy households. This stew serves 4-6 people and is an excellent choice for a family dinner that doesn’t compromise on flavor. The beef is simmered to perfection, becoming melt-in-your-mouth tender, while the barley adds a delightful texture and nutty flavor.
The stew is further enhanced by an assortment of vegetables, making it a well-rounded and nutritious meal. Gather your ingredients and let’s get cooking!
Ingredients:
- 2 tablespoons olive oil
- 1 ½ pounds beef stew meat, cut into 1-inch cubes
- Salt and pepper to taste
- 1 large onion, chopped
- 3 cloves garlic, minced
- 3 carrots, sliced
- 2 celery stalks, sliced
- 1 cup pearl barley
- 6 cups beef broth
- 1 tablespoon tomato paste
- 1 teaspoon dried thyme
- 1 bay leaf
- 2 cups chopped potatoes
- 1 cup frozen peas
- Fresh parsley for garnish
Cooking Instructions:
- Prepare the Beef: Heat the olive oil in a large pot over medium-high heat. Season the beef stew meat with salt and pepper. Add the beef to the pot in batches, browning on all sides. Remove the beef and set aside.
- Sauté Vegetables: In the same pot, add the chopped onion, garlic, carrots, and celery. Sauté for about 5 minutes until the vegetables are softened and the onion is translucent.
- Combine Ingredients: Return the browned beef to the pot. Stir in the pearl barley, beef broth, tomato paste, thyme, and bay leaf. Add the chopped potatoes.
- Simmer the Stew: Bring the mixture to a boil. Reduce the heat to low, cover the pot, and let it simmer for about 1 hour, or until the beef is tender and the barley is cooked through. Stir occasionally to prevent sticking.
- Add Final Ingredients: Remove the bay leaf. Stir in the frozen peas and cook for another 5 minutes until the peas are heated through.
- Serve: Ladle the stew into bowls, garnish with fresh parsley, and serve hot.
Extra Tips:
For added depth of flavor, you can deglaze the pot with a splash of red wine after browning the beef and before adding the vegetables. This will lift any flavorful bits stuck to the bottom of the pot.
Additionally, if you prefer a thicker stew, you can mix a tablespoon of cornstarch with a bit of cold water and stir it into the stew in the last 10 minutes of cooking. For those who like a bit of spice, a pinch of red pepper flakes can be added along with the thyme. Enjoy your cozy meal!
Baked Salmon With Quinoa and Spinach
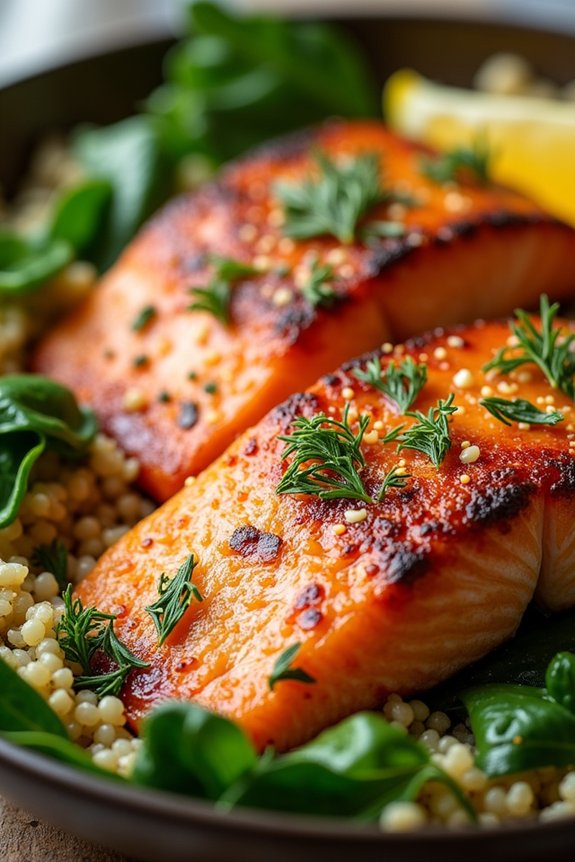
Baked Salmon With Quinoa and Spinach is a delightful and nutritious dish that’s perfect for a cozy family dinner. This recipe combines the rich flavors of baked salmon with the earthy taste of quinoa and the fresh, vibrant flavor of spinach. It’s a dish that’s not only flavorful but also filled with protein, omega-3 fatty acids, and essential vitamins, making it a well-rounded meal for the whole family.
This dish is easy to prepare and requires minimal ingredients, making it a convenient option for busy weeknights. The salmon is seasoned and baked to perfection, while the quinoa is cooked until fluffy and mixed with fresh spinach for a healthy side. The combination of these ingredients not only satisfies the palate but also guarantees a balanced nutritional intake for everyone at the table.
Ingredients for 4-6 servings:
- 4 salmon fillets (about 6 oz each)
- 1 cup quinoa
- 2 cups baby spinach leaves
- 2 tablespoons olive oil
- 2 cloves garlic, minced
- 1 lemon (zested and juiced)
- Salt and pepper to taste
- 2 cups vegetable or chicken broth
- 1 tablespoon fresh dill, chopped (optional)
Cooking Instructions:
- Preheat the Oven: Start by preheating your oven to 400°F (200°C) to make sure it’s hot enough to properly bake the salmon.
- Prepare the Salmon: Place the salmon fillets on a baking sheet lined with parchment paper. Drizzle 1 tablespoon of olive oil over the fillets, then season with salt, pepper, and lemon zest. If you like, sprinkle some fresh dill over the top for added flavor.
- Bake the Salmon: Bake the salmon in the preheated oven for 15-20 minutes, or until the fish is opaque and flakes easily with a fork.
- Cook the Quinoa: While the salmon is baking, rinse the quinoa under cold water. In a medium saucepan, bring the vegetable or chicken broth to a boil. Add the quinoa, cover, and reduce the heat to low. Simmer for about 15 minutes or until the quinoa is fluffy and the liquid is absorbed.
- Prepare the Spinach: In a large skillet, heat the remaining tablespoon of olive oil over medium heat. Add the minced garlic and sauté for about 1 minute until fragrant. Add the spinach and toss until wilted, about 2-3 minutes.
- Combine Quinoa and Spinach: Once the quinoa is cooked, fluff it with a fork and stir in the wilted spinach and lemon juice. Mix well to combine.
- Serve: Plate the quinoa and spinach mixture, then top with the baked salmon fillets. Garnish with additional lemon slices and dill if desired.
Extra Tips:
For an extra burst of flavor, consider marinating the salmon in lemon juice, olive oil, and herbs for at least an hour before baking. This will infuse the fish with more flavor and add depth to the dish.
Also, feel free to experiment with additional herbs and spices that suit your family’s taste preferences, such as paprika or cumin. If you prefer a creamier texture for the quinoa, you can stir in a tablespoon of butter or a splash of cream just before serving.
Enjoy your meal with a side of steamed vegetables or a fresh salad to complete this wholesome dinner.
Slow Cooker Turkey Chili

Slow Cooker Turkey Chili is the perfect dish for a cozy family dinner. This hearty and flavorful chili isn’t only delicious but also incredibly easy to prepare, making it an ideal option for busy weeknights. By using a slow cooker, you can let the rich flavors develop throughout the day while you go about your daily tasks, and then come home to a warm, comforting meal that’s ready to serve.
Made with lean ground turkey, a variety of beans, and a blend of spices, this chili is both nutritious and satisfying, sure to be a hit with both adults and kids alike. This recipe serves 4-6 people, making it an excellent choice for family gatherings or when you want leftovers for the next day.
The combination of different beans adds texture and nutrition, while the turkey provides a lighter alternative to traditional beef chili. Simply prep the ingredients in the morning or early afternoon, set your slow cooker, and let it work its magic. When dinner time arrives, you’ll have a delicious, warming meal ready to enjoy with minimal effort.
Ingredients:
- 1 pound ground turkey
- 1 can (15 oz) black beans, drained and rinsed
- 1 can (15 oz) kidney beans, drained and rinsed
- 1 can (15 oz) diced tomatoes
- 1 can (6 oz) tomato paste
- 1 cup chicken broth
- 1 medium onion, diced
- 2 cloves garlic, minced
- 1 bell pepper, diced
- 2 tablespoons chili powder
- 1 teaspoon cumin
- 1 teaspoon paprika
- 1 teaspoon salt
- 1/2 teaspoon black pepper
- 1/2 teaspoon cayenne pepper (optional, for heat)
- Toppings: shredded cheese, sour cream, diced avocado, chopped cilantro (optional)
Instructions:
- Brown the Turkey: In a large skillet over medium heat, cook the ground turkey until it’s browned and cooked through. Break it into small pieces with a spatula as it cooks. Once done, drain any excess fat and transfer the turkey to the slow cooker.
- Prepare the Vegetables: Add the diced onion, minced garlic, and diced bell pepper to the skillet used for the turkey. Sauté for 3-4 minutes until the onion is translucent and the vegetables are slightly softened.
- Combine Ingredients: Transfer the sautéed vegetables to the slow cooker. Add the black beans, kidney beans, diced tomatoes, tomato paste, and chicken broth. Stir to combine.
- Season the Chili: Add the chili powder, cumin, paprika, salt, black pepper, and cayenne pepper to the slow cooker. Stir well to guarantee all the spices are evenly distributed.
- Cook the Chili: Cover the slow cooker and set it on low heat. Let the chili cook for 6-8 hours, or on high heat for 3-4 hours. Stir occasionally if possible, to help the flavors meld together.
- Serve: Once the cooking time is complete, taste and adjust the seasoning if necessary. Serve the turkey chili hot, topped with shredded cheese, sour cream, diced avocado, and chopped cilantro as desired.
Extra Tips:
For a thicker chili, you can mash some of the beans against the side of the slow cooker with a spoon to release their starches. If you prefer a spicier dish, feel free to add more cayenne pepper or even some chopped jalapeños.
This chili is also very versatile, so feel free to add other vegetables like corn or carrots to suit your family’s taste. Leftovers can be stored in an airtight container in the refrigerator for up to 3 days, and the flavors tend to improve over time, making it a great meal to enjoy later in the week.
Veggie-Packed Stuffed Bell Peppers

Looking for a cozy dinner idea that’s both nutritious and satisfying for the whole family? Veggie-Packed Stuffed Bell Peppers are a colorful and delicious choice! This dish is perfect for showcasing a variety of vegetables while providing a warm, hearty meal. The bell peppers act as vibrant vessels, holding a flavorful filling made with grains, vegetables, and cheese. This recipe not only looks stunning on the dinner table but also offers a great way to incorporate more veggies into your family’s diet.
This recipe is designed to be easy to prepare, making it ideal for a busy weeknight or a relaxed weekend dinner. By using ingredients like quinoa or brown rice, beans, and a medley of chopped vegetables, you create a nutrient-dense filling that’s both satisfying and healthy. The addition of melted cheese on top of each pepper adds a comforting touch, making these stuffed bell peppers a hit with both kids and adults. Gather your family around the table and enjoy this wholesome, delicious meal together.
Ingredients (Serves 4-6):
- 6 large bell peppers (any color)
- 1 cup quinoa or brown rice (uncooked)
- 1 can (15 oz) black beans, drained and rinsed
- 1 cup corn kernels (fresh, frozen, or canned)
- 1 cup cherry tomatoes, diced
- 1 medium zucchini, diced
- 1 small onion, finely chopped
- 2 cloves garlic, minced
- 1 teaspoon cumin
- 1 teaspoon smoked paprika
- Salt and pepper to taste
- 1 cup shredded cheddar cheese
- 2 tablespoons olive oil
- Fresh cilantro or parsley for garnish (optional)
Cooking Instructions:
- Prepare the Oven and Bell Peppers: Preheat your oven to 375°F (190°C). Slice the tops off the bell peppers and remove the seeds and membranes. Arrange the peppers upright in a baking dish.
- Cook the Quinoa or Rice: In a medium saucepan, cook the quinoa or brown rice according to package instructions. Once cooked, set aside to cool slightly.
- Sauté the Vegetables: In a large skillet, heat olive oil over medium heat. Add the onion and garlic and sauté for 2-3 minutes until softened. Add the zucchini and cook for another 5 minutes until tender.
- Combine Ingredients for Filling: In a large mixing bowl, combine the cooked quinoa or rice, black beans, corn, cherry tomatoes, sautéed vegetables, cumin, smoked paprika, salt, and pepper. Mix until everything is well combined.
- Stuff the Peppers: Generously fill each bell pepper with the prepared vegetable and grain mixture. Press down gently to pack the filling.
- Bake the Peppers: Cover the dish with aluminum foil and bake in the preheated oven for 30 minutes. Remove the foil, sprinkle shredded cheddar cheese on top of each pepper, and bake for an additional 10-15 minutes, or until the cheese is melted and bubbly.
- Garnish and Serve: Once done, remove the peppers from the oven and let them cool slightly. Garnish with fresh cilantro or parsley if desired, and serve warm.
Extra Tips:
When preparing Veggie-Packed Stuffed Bell Peppers, feel free to customize the filling with your family’s favorite veggies or proteins. For a spicier version, add some diced jalapeños or a dash of hot sauce to the filling mixture.
You can also prepare the peppers ahead of time and store them in the refrigerator, making it easy to pop them in the oven just before dinner. If you want to make them even more filling, consider adding cooked ground turkey or chicken to the mix.
Enjoy these versatile stuffed peppers that are sure to become a family favorite!
Sweet Potato and Black Bean Enchiladas

Sweet Potato and Black Bean Enchiladas are a delightful and nutritious dish perfect for a cozy family dinner. The combination of the natural sweetness from sweet potatoes and the earthy, hearty flavor of black beans creates a satisfying and rich filling. Wrapped in warm corn tortillas and smothered in a zesty enchilada sauce, this dish isn’t only delicious but also healthy and filling, making it a great option for both meat-lovers and vegetarians alike.
The enchiladas are easy to prepare and can be customized to suit different tastes by adding toppings like avocado, cilantro, or cheese. This recipe serves 4-6 people and is perfect for a weeknight meal or a weekend gathering. With its vibrant colors and bold flavors, Sweet Potato and Black Bean Enchiladas are sure to become a favorite in your household.
Ingredients
- 2 medium sweet potatoes, peeled and cubed
- 1 tablespoon olive oil
- Salt and pepper, to taste
- 1 teaspoon ground cumin
- 1 teaspoon smoked paprika
- 1 can (15 oz) black beans, drained and rinsed
- 1 cup corn kernels (fresh, frozen, or canned)
- 2 cups enchilada sauce
- 8-10 corn tortillas
- 1 cup shredded cheese (cheddar, Monterey Jack, or a blend)
- Optional toppings: sliced avocado, chopped cilantro, sour cream, lime wedges
Cooking Instructions
- Prepare the Sweet Potatoes: Preheat your oven to 400°F (200°C). Toss the cubed sweet potatoes with olive oil, salt, pepper, cumin, and smoked paprika. Spread them out on a baking sheet and roast for 20-25 minutes, or until they’re tender and slightly caramelized. Remove from the oven and set aside.
- Prepare the Filling: In a large mixing bowl, combine the roasted sweet potatoes, black beans, and corn. Mix gently to guarantee the ingredients are evenly distributed.
- Warm the Tortillas: Wrap the corn tortillas in a damp paper towel and microwave for about 30 seconds to make them pliable. This will help prevent them from cracking when you roll them.
- Assemble the Enchiladas: Spread a thin layer of enchilada sauce on the bottom of a 9×13-inch baking dish. Spoon about 1/4 cup of the sweet potato and black bean mixture into each tortilla, roll it up, and place it seam-side down in the baking dish. Continue this process until all the tortillas are filled and placed side by side in the dish.
- Add the Sauce and Cheese: Pour the remaining enchilada sauce evenly over the rolled tortillas. Sprinkle the shredded cheese on top.
- Bake the Enchiladas: Cover the dish with aluminum foil and bake in the preheated oven for 20 minutes. Remove the foil and bake for an additional 5-10 minutes, or until the cheese is melted and bubbly.
- Serve and Enjoy: Once baked, remove from the oven and let cool slightly. Serve warm with your choice of toppings like sliced avocado, chopped cilantro, sour cream, and lime wedges.
Extra Tips
To make this dish even more flavorful, consider adding a diced onion or some minced garlic to the sweet potato mixture before roasting. For a spicier kick, you can blend in some chopped jalapeños to the filling or use a hotter enchilada sauce.
If you’re making this dish in advance, prepare the enchiladas up to the baking step and store them in the refrigerator for up to 24 hours before baking. This will allow the flavors to meld together even more and save you time on the day of serving.
Classic Chicken Pot Pie

Classic Chicken Pot Pie is the epitome of comfort food, offering a warm, savory filling nestled beneath a flaky, golden crust. This dish is perfect for a cozy family dinner, as it combines tender chicken, fresh vegetables, and a rich, creamy sauce.
The beauty of chicken pot pie lies in its ability to transform simple ingredients into a heartwarming meal that satisfies the soul and brings everyone to the table. Whether you’re preparing it for a weekday dinner or a special occasion, this timeless recipe is bound to become a family favorite.
The beauty of making Classic Chicken Pot Pie is its versatility — you can adjust the ingredients to suit your family’s preferences or dietary needs. The dish can be prepared using store-bought pie crusts for convenience or homemade pastry for those who like to put a personal touch into their cooking.
This recipe serves 4-6 people, making it an ideal choice for family gatherings or leftovers for the next day. Now, let’s gather the ingredients and walk through the steps to create this delightful dish.
Ingredients (serves 4-6):
- 2 cups cooked chicken, chopped or shredded
- 1 cup frozen peas
- 1 cup diced carrots
- 1 cup diced potatoes
- 1/2 cup diced onion
- 1/2 cup unsalted butter
- 1/2 cup all-purpose flour
- 2 cups chicken broth
- 1 cup milk
- Salt and pepper to taste
- 1/2 teaspoon dried thyme
- 1/2 teaspoon dried rosemary
- 1 double pie crust (store-bought or homemade)
- 1 egg, beaten (for egg wash)
Cooking Instructions:
- Preheat the Oven: Start by preheating your oven to 425°F (220°C) to guarantee it reaches the right temperature for baking the pie.
- Cook the Vegetables: In a large saucepan, melt the butter over medium heat. Add the onions, carrots, and potatoes, and sauté until the onions are translucent and the vegetables begin to soften, about 5 minutes.
- Make the Sauce: Sprinkle the flour over the cooked vegetables and stir well to coat them. Gradually add the chicken broth and milk, stirring constantly until the mixture begins to thicken. This usually takes about 5-7 minutes.
- Add the Chicken and Peas: Stir in the cooked chicken, frozen peas, thyme, rosemary, salt, and pepper. Cook for an additional 3-4 minutes until the mixture is well combined and heated through.
- Prepare the Pie Crust: Roll out one of the pie crusts and place it into a 9-inch pie dish. Trim the edges as needed. Pour the chicken and vegetable mixture into the prepared pie crust.
- Top with Second Crust: Roll out the second pie crust and lay it over the filling. Seal the edges by crimping them with a fork or your fingers. Cut several slits in the top crust to allow steam to escape.
- Apply Egg Wash: Brush the top crust with the beaten egg to give it a golden, glossy finish once baked.
- Bake the Pie: Place the pie on a baking sheet to catch any drips and bake in the preheated oven for 30-35 minutes, or until the crust is golden brown and the filling is bubbling.
- Cool and Serve: Allow the pie to cool for at least 10 minutes before serving. This will help the filling set and make it easier to slice.
Extra Tips:
For the best results, confirm that the chicken is cooked and the vegetables are slightly tender before adding them to the pie. This will prevent the filling from becoming too watery.
If you prefer a more herby flavor, you can add extra thyme and rosemary or incorporate fresh herbs. Additionally, using a combination of light and dark chicken meat can add more depth to the flavor.
If you like a thicker crust, roll out the dough slightly thicker than usual, but be careful not to make it too thick, or it may not cook through properly. Enjoy your cozy dinner with a side salad or some freshly baked bread.
Butternut Squash and Sage Risotto

A warm, comforting dish perfect for cozy family dinners, Butternut Squash and Sage Risotto combines creamy arborio rice with the sweet, earthy flavors of butternut squash and the aromatic notes of fresh sage. This dish isn’t only delicious but also visually appealing with its vibrant orange hue and fragrant aroma.
Ideal for cooler evenings, it brings the family together with its rich taste and hearty texture. This risotto is an excellent way to incorporate seasonal ingredients into your meal, making it a go-to dish during fall and winter months. The combination of tender butternut squash and the subtle earthiness of sage creates a symphony of flavors that are both comforting and sophisticated.
Whether you’re hosting a dinner party or simply cooking for your family, this dish is sure to impress.
Ingredients for 4-6 servings:
- 1 small butternut squash, peeled, seeded, and cubed
- 2 tablespoons olive oil
- Salt and pepper to taste
- 6 cups chicken or vegetable broth
- 2 tablespoons unsalted butter
- 1 small onion, finely chopped
- 2 cloves garlic, minced
- 1 1/2 cups arborio rice
- 1/2 cup dry white wine
- 1/2 cup grated Parmesan cheese
- 2 tablespoons fresh sage leaves, finely chopped
- Optional: additional Parmesan cheese and sage leaves for garnish
Instructions:
- Prepare the Butternut Squash: Preheat your oven to 400°F (200°C). Toss the cubed butternut squash with 1 tablespoon of olive oil, salt, and pepper. Spread evenly on a baking sheet and roast for 20-25 minutes, or until the squash is tender and golden brown. Set aside.
- Heat the Broth: While the squash is roasting, pour the broth into a saucepan and bring it to a simmer over low heat. Keep it warm throughout the cooking process.
- Start the Risotto Base: In a large skillet or saucepan, heat the remaining 1 tablespoon of olive oil and 2 tablespoons of butter over medium heat. Add the chopped onion and cook until translucent, about 5 minutes. Stir in the minced garlic and cook for an additional minute.
- Cook the Rice: Add the arborio rice to the onions and garlic, stirring well to coat the rice with the oil and butter. Toast the rice for about 2-3 minutes, until it becomes slightly translucent around the edges.
- Deglaze with Wine: Pour in the white wine and stir constantly until the wine is fully absorbed by the rice.
- Add the Broth Gradually: Begin adding the warm broth to the rice, one ladle at a time, stirring frequently. Allow each ladle of broth to be absorbed before adding the next. Continue this process for about 18-20 minutes, or until the rice is creamy and tender with a slight bite (al dente).
- Incorporate the Squash and Cheese: Once the rice is cooked, stir in the roasted butternut squash, grated Parmesan cheese, and chopped sage leaves. Mix until the squash is evenly distributed and the cheese has melted into the risotto.
- Final Seasoning: Taste and adjust seasoning with salt and pepper. Remove from heat and let the risotto sit for a minute or two before serving.
- Serve: Spoon the risotto onto plates or into bowls. Garnish with additional Parmesan cheese and sage leaves if desired.
Extra Tips:
For best results, use a heavy-bottomed pan to guarantee even cooking and prevent the risotto from sticking. It’s important to stir continuously while adding the broth to release the starches from the rice, which gives the risotto its creamy texture.
Don’t rush the process; allowing the flavors to develop as the rice absorbs the broth is key. If you prefer a vegetarian version, simply use vegetable broth instead of chicken broth. Additionally, you can experiment by adding other herbs, such as thyme or rosemary, to complement the sage and butternut squash.
Lemon Herb Roasted Chicken With Vegetables
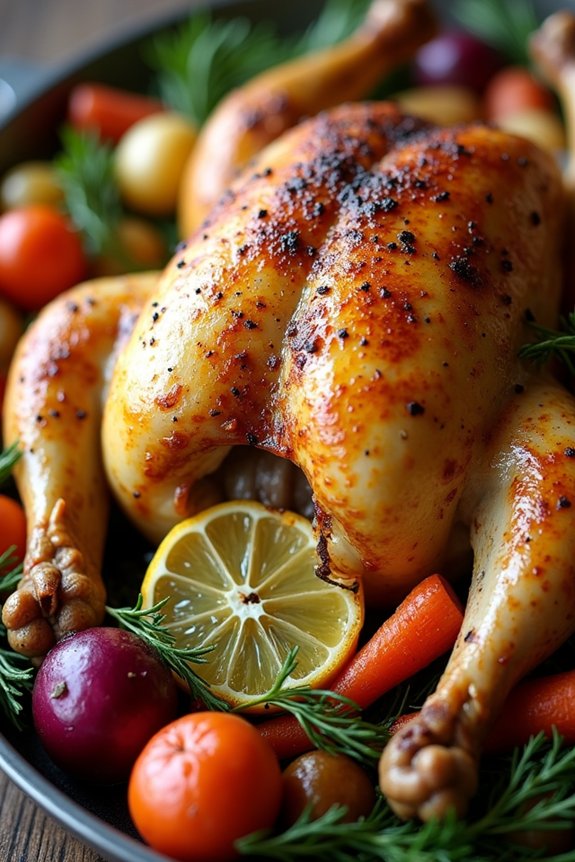
Lemon Herb Roasted Chicken With Vegetables is a classic and comforting dish perfect for a family dinner. The combination of juicy, tender chicken seasoned with fragrant herbs and fresh lemon, paired with perfectly roasted vegetables, makes for a hearty meal that’s both nutritious and delicious. This recipe is designed to serve 4-6 people, making it ideal for family gatherings or a cozy dinner with friends.
The key to this dish lies in the balance of flavors and the cooking technique that guarantees the chicken is moist and the vegetables are flavorful and crisp. By roasting the chicken and vegetables together, the flavors meld beautifully, creating a harmonious meal that will delight your taste buds. The lemon not only adds brightness but also helps to tenderize the chicken, while the herbs infuse a wonderful aroma and depth of flavor.
Ingredients for 4-6 Servings:
- 1 whole chicken (4-5 pounds)
- 4 tablespoons olive oil
- 3 lemons (2 for juice and zest, 1 sliced)
- 1 tablespoon fresh thyme leaves
- 1 tablespoon fresh rosemary, chopped
- 4 garlic cloves, minced
- Salt and pepper to taste
- 1 pound baby potatoes, halved
- 4 carrots, sliced into thick rounds
- 2 red onions, quartered
- 1 cup chicken broth
Cooking Instructions:
- Preheat the Oven: Preheat your oven to 425°F (220°C). This high heat is essential for achieving a crispy skin on the chicken while making sure the meat remains juicy.
- Prepare the Chicken: Pat the chicken dry with paper towels. In a small bowl, combine the olive oil, juice of 2 lemons, zest of 2 lemons, thyme leaves, rosemary, minced garlic, salt, and pepper. Rub this mixture all over the chicken, including under the skin and inside the cavity for maximum flavor.
- Stuff the Chicken: Place lemon slices inside the cavity of the chicken. This will infuse the meat with extra lemon flavor as it roasts.
- Prepare the Vegetables: In a large roasting pan, toss the baby potatoes, carrots, and red onions with a drizzle of olive oil, salt, and pepper. Spread them evenly around the pan to guarantee even cooking.
- Roast the Chicken and Vegetables: Place the chicken on top of the vegetables in the roasting pan. Pour the chicken broth around the vegetables to keep them moist and prevent them from burning. Roast in the preheated oven for about 1.5 hours, or until the chicken reaches an internal temperature of 165°F (74°C).
- Rest and Serve: Once cooked, remove the chicken from the oven and let it rest for 10-15 minutes before carving. This allows the juices to redistribute, assuring moist meat. Serve the chicken alongside the roasted vegetables for a complete meal.
Extra Tips:
- For extra crispy skin, make sure the chicken is as dry as possible before applying the seasoning mixture.
- You can prepare the seasoning mixture ahead of time and marinate the chicken for a few hours in the refrigerator for deeper flavor.
- Consider adding other vegetables such as parsnips or sweet potatoes to the roasting pan for variety.
- If you prefer, you can use dried herbs instead of fresh, but reduce the quantity by half as dried herbs are more potent.
- Use any leftovers to make a delicious chicken salad or sandwiches the next day.
Savory Mushroom and Spinach Lasagna

Savory Mushroom and Spinach Lasagna is a delightful twist on the classic Italian dish, perfect for a cozy family dinner. This lasagna combines earthy mushrooms with nutrient-rich spinach, layered between sheets of pasta and creamy béchamel sauce, all topped with a generous amount of melted cheese. The combination of flavors and textures makes this dish both comforting and satisfying, making it ideal for those nights when you want to serve something hearty and delicious. The savory aroma that fills the kitchen as it bakes is sure to draw everyone to the table.
Whether you’re a seasoned cook or trying your hand at lasagna for the first time, this recipe is easy to follow and bound to become a family favorite. The key to a good lasagna lies in the balance of ingredients and the patience to let it bake to perfection. Get ready to impress your loved ones with a wholesome meal that brings together the goodness of vegetables and the indulgence of cheese in every bite.
Ingredients for 4-6 servings:
- 12 lasagna noodles
- 2 tablespoons olive oil
- 2 cloves garlic, minced
- 1 onion, chopped
- 16 ounces mushrooms, sliced
- 10 ounces fresh spinach
- 1/2 teaspoon salt
- 1/4 teaspoon black pepper
- 1/4 teaspoon nutmeg
- 2 cups ricotta cheese
- 1 egg
- 2 cups béchamel sauce (homemade or store-bought)
- 2 cups shredded mozzarella cheese
- 1 cup grated Parmesan cheese
Cooking Instructions:
- Preheat the Oven: Begin by preheating your oven to 375°F (190°C) to make sure it’s fully ready when your lasagna is assembled.
- Cook the Lasagna Noodles: Boil the lasagna noodles in a large pot of salted water according to the package instructions until al dente. Drain and lay them flat on a clean towel to prevent sticking.
- Sauté the Vegetables: Heat olive oil in a large skillet over medium heat. Add the minced garlic and chopped onion, sautéing until the onion becomes translucent. Add the sliced mushrooms and cook for about 5 minutes, or until they release their moisture and start to brown.
- Add Spinach and Seasoning: Add fresh spinach to the skillet and cook until wilted. Season the mixture with salt, black pepper, and nutmeg. Stir well and remove from heat.
- Prepare the Ricotta Mixture: In a separate bowl, combine ricotta cheese with the egg, mixing until smooth. This will help bind the layers together as they bake.
- Assemble the Lasagna: Spread a thin layer of béchamel sauce at the bottom of a 9×13-inch baking dish. Lay down a layer of lasagna noodles, followed by half of the mushroom and spinach mixture, half of the ricotta mixture, and a sprinkle of mozzarella cheese. Repeat the layers, finishing with a layer of noodles topped with béchamel sauce, remaining mozzarella, and Parmesan cheese.
- Bake the Lasagna: Cover the dish with aluminum foil and bake in the preheated oven for 25 minutes. Remove the foil and bake for an additional 15 minutes, or until the top is golden and bubbly.
- Let it Rest: Once baked, remove the lasagna from the oven and let it rest for about 10 minutes before slicing. This allows the layers to set and makes serving easier.
Extra Tips:
For an added depth of flavor, consider using a mix of different mushrooms such as cremini, shiitake, or portobello. If you prefer a bit more heat, a pinch of red pepper flakes can be added to the vegetable sauté.
When making the béchamel sauce from scratch, make sure it’s smooth and lump-free by whisking continuously as it cooks. Finally, if you have leftovers, this lasagna reheats beautifully and can be a wonderful next-day meal.
Cozy Chickpea and Tomato Curry

Chickpea and Tomato Curry is a comforting, hearty dish perfect for a family dinner. This recipe combines tender chickpeas with juicy tomatoes and a blend of aromatic spices to create a rich, flavorful curry. It’s not only delicious but also nourishing, making it an ideal choice for those cozy nights in with loved ones.
The creamy texture of the coconut milk balances perfectly with the spices, creating a well-rounded meal that everyone will enjoy. This curry isn’t only delightful but also versatile. It’s a great option for vegetarians and can easily be made vegan by using plant-based yogurt or cream.
Serve it over a bed of fluffy basmati rice or with warm naan bread to soak up all the delicious flavors. This recipe serves 4-6 people, ensuring there’s enough to share or perhaps even to save some for leftovers.
Ingredients (serves 4-6):
- 2 tablespoons vegetable oil
- 1 large onion, finely chopped
- 3 cloves garlic, minced
- 1 tablespoon fresh ginger, grated
- 1 teaspoon cumin seeds
- 1 teaspoon ground coriander
- 1 teaspoon turmeric
- 1 teaspoon garam masala
- 1/2 teaspoon cayenne pepper (adjust to taste)
- 2 cans (14 oz each) chickpeas, drained and rinsed
- 1 can (14 oz) diced tomatoes
- 1 can (14 oz) full-fat coconut milk
- Salt to taste
- Fresh cilantro, chopped (for garnish)
- Cooked basmati rice or naan (for serving)
Instructions:
- Prepare the Aroma Base: Heat the vegetable oil in a large saucepan over medium heat. Add the chopped onion and sauté until it becomes translucent, about 5-7 minutes. Stir in the minced garlic and grated ginger, cooking for another 1-2 minutes until fragrant.
- Add the Spices: Sprinkle the cumin seeds, ground coriander, turmeric, garam masala, and cayenne pepper over the onion mixture. Stir continuously for about 1 minute to toast the spices, releasing their full aroma.
- Incorporate Chickpeas and Tomatoes: Add the drained chickpeas and diced tomatoes to the saucepan, stirring well to coat them with the spice mixture. Allow the ingredients to cook together for about 5 minutes, letting the flavors meld.
- Simmer the Curry: Pour in the coconut milk and season with salt to taste. Bring the mixture to a gentle simmer. Reduce the heat to low and let the curry cook for 20-25 minutes, stirring occasionally, until the chickpeas are tender and the sauce has thickened to your liking.
- Final Touches: Taste the curry and adjust seasoning if necessary. Remove the saucepan from heat and let it sit for a few minutes to allow the flavors to develop further. Garnish with fresh cilantro before serving.
Extra Tips:
For a deeper flavor, consider preparing the curry a day ahead and allowing it to rest in the refrigerator overnight; the flavors will intensify as they meld together.
If you prefer a thicker curry, mash some of the chickpeas with the back of a spoon as it simmers. Additionally, for a touch of sweetness, consider adding a teaspoon of sugar or a splash of lime juice for a slight tang.
Adjust the cayenne pepper to suit your heat preference, and remember that freshly cooked basmati rice or warm naan bread will complement this dish beautifully.
Warm Farro Salad With Roasted Vegetables
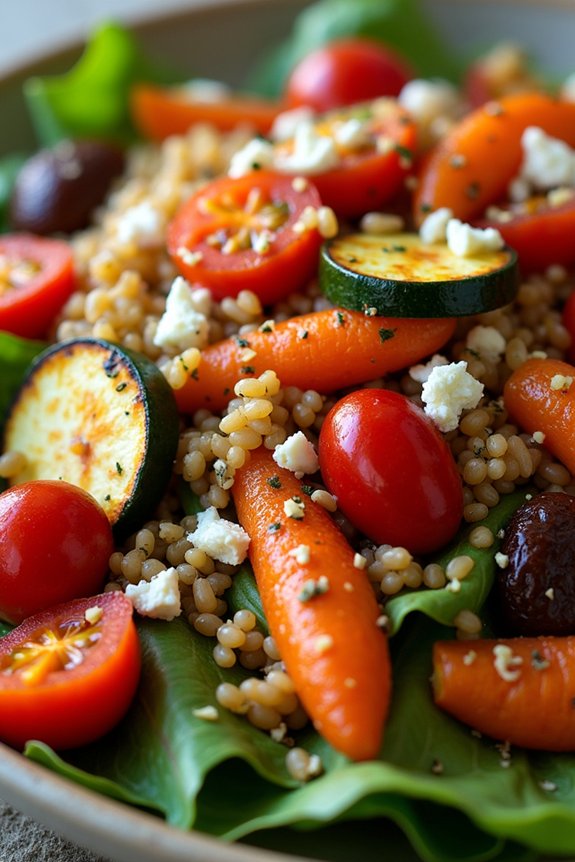
For a cozy family dinner, this Warm Farro Salad with Roasted Vegetables serves as a hearty and nutritious option that’s both delicious and filling. The nutty flavor of farro blends perfectly with the sweetness of roasted vegetables, creating a delightful combination that brings warmth to the dinner table.
This dish not only satisfies the taste buds but also provides a wide array of nutrients, making it a perfect choice for health-conscious families looking to enjoy a comforting meal together.
The preparation of this dish involves cooking farro until tender and roasting a medley of seasonal vegetables to enhance their natural sweetness. By combining these elements with a light vinaigrette, the salad becomes a symphony of flavors and textures.
Whether served as a main course or a side dish, this salad is sure to be a family favorite. It serves 4-6 people, making it ideal for a family meal or a small gathering with friends.
Ingredients:
- 1 1/2 cups farro
- 3 cups water or vegetable broth
- 2 medium carrots, diced
- 1 red bell pepper, chopped
- 1 zucchini, sliced
- 1 red onion, quartered
- 2 cups cherry tomatoes, halved
- 3 tablespoons olive oil
- Salt and pepper, to taste
- 1 teaspoon dried thyme
- 1 teaspoon dried rosemary
- 1/4 cup balsamic vinegar
- 1 tablespoon Dijon mustard
- 1 tablespoon honey
- 3 cups mixed greens
- 1/4 cup feta cheese, crumbled (optional)
- 1/4 cup toasted almonds or walnuts (optional)
Cooking Instructions:
- Preheat the Oven: Start by preheating your oven to 400°F (200°C) to roast the vegetables.
- Cook the Farro: Rinse the farro under cold water. In a medium saucepan, combine the farro with 3 cups of water or vegetable broth. Bring to a boil, then reduce the heat to a simmer. Cook for about 25-30 minutes or until the farro is tender but still chewy. Drain any excess liquid and set aside.
- Prepare the Vegetables: On a large baking sheet, toss the diced carrots, chopped red bell pepper, sliced zucchini, quartered red onion, and halved cherry tomatoes with 2 tablespoons of olive oil. Season with salt, pepper, dried thyme, and dried rosemary. Spread the vegetables evenly on the baking sheet.
- Roast the Vegetables: Place the baking sheet in the preheated oven and roast for 20-25 minutes, or until the vegetables are tender and slightly caramelized. Stir once halfway through cooking for even roasting.
- Make the Vinaigrette: In a small bowl, whisk together the balsamic vinegar, Dijon mustard, honey, and the remaining 1 tablespoon of olive oil until well combined. Season with salt and pepper to taste.
- Assemble the Salad: In a large serving bowl, combine the cooked farro, roasted vegetables, and mixed greens. Drizzle the vinaigrette over the salad and toss gently to combine. If using, sprinkle the salad with crumbled feta cheese and toasted almonds or walnuts for added flavor and crunch.
- Serve Warm: Serve the salad warm, allowing the flavors to meld together. Enjoy this dish as a comforting main course or a delightful side.
Extra Tips:
For a more robust flavor, consider adding roasted garlic cloves to the vegetable mix. This recipe is versatile, so feel free to swap out vegetables based on what you have on hand or what’s in season.
If you prefer a vegan version, simply omit the feta cheese or replace it with a vegan alternative. To save time, you can cook the farro and roast the vegetables ahead of time, then combine and heat them just before serving.
This dish pairs beautifully with grilled chicken or fish, making it a versatile addition to your dinner repertoire.