

There’s something truly satisfying about turning leftovers into fresh, delicious family meals. With our busy lives, it’s amazing how yesterday’s dinner can be transformed into something entirely new and exciting. Whether it’s last night’s roast becoming a comforting casserole or extra turkey turning into vibrant tacos, the possibilities are endless. Let’s explore some creative ways to give those leftovers a second chance at the dinner table.
Chicken and Rice Casserole
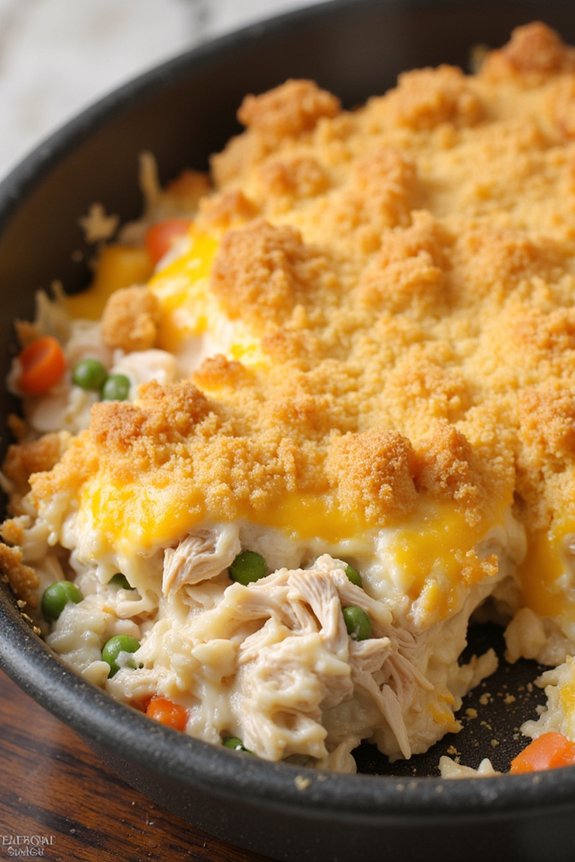
Transform your leftover chicken into a comforting Chicken and Rice Casserole that the whole family will love. This dish is perfect for a cozy family dinner, bringing together the hearty flavors of seasoned chicken, savory vegetables, and creamy rice, all baked to perfection.
Not only is this recipe a great way to reduce food waste, but it’s also a budget-friendly meal that can be prepared effortlessly with ingredients you likely already have in your kitchen.
This Chicken and Rice Casserole is designed to serve 4-6 people, making it ideal for a family meal or for entertaining guests. The creamy texture of the casserole, combined with the satisfying crunch of the breadcrumb topping, creates a delightful contrast that will have everyone asking for seconds.
Plus, you can easily customize this recipe by adding your favorite vegetables or adjusting the seasonings to suit your taste.
Ingredients (Serves 4-6):
- 3 cups cooked rice
- 2 cups cooked chicken, shredded
- 1 cup frozen peas and carrots
- 1 can (10.5 oz) cream of mushroom soup
- 1 cup chicken broth
- 1 cup shredded cheddar cheese
- 1/2 cup chopped onion
- 1/2 cup milk
- 1 tablespoon olive oil
- 1 teaspoon garlic powder
- 1/2 teaspoon salt
- 1/2 teaspoon black pepper
- 1 cup breadcrumbs
- 2 tablespoons butter, melted
Cooking Instructions:
- Preheat the Oven: Start by preheating your oven to 350°F (175°C). This guarantees the casserole will bake evenly.
- Sauté the Onion: In a large skillet, heat the olive oil over medium heat. Add the chopped onion and sauté until it becomes translucent, about 5 minutes.
- Mix the Ingredients: In a large mixing bowl, combine the cooked rice, shredded chicken, sautéed onions, frozen peas and carrots, cream of mushroom soup, chicken broth, milk, garlic powder, salt, and black pepper. Stir until all the ingredients are evenly mixed.
- Assemble the Casserole: Transfer the mixture into a greased 9×13 inch baking dish. Spread it out evenly with a spatula.
- Add Cheese and Topping: Sprinkle the shredded cheddar cheese evenly over the top of the casserole. In a small bowl, mix the breadcrumbs with the melted butter, then sprinkle this mixture over the cheese to create a crunchy topping.
- Bake the Casserole: Place the baking dish in the preheated oven and bake for 25-30 minutes, or until the top is golden brown and the casserole is heated through.
- Cool and Serve: Allow the casserole to cool for a few minutes before serving. This will help it set and make it easier to cut into portions.
Extra Tips:
For a more colorful and nutritious casserole, consider adding other vegetables such as bell peppers or mushrooms. If you prefer a bit of spice, you can incorporate diced jalapeños or a dash of cayenne pepper.
To guarantee the casserole doesn’t dry out, cover it with aluminum foil for the first 15 minutes of baking, then remove the foil to achieve a crispy topping. Leftovers can be stored in the refrigerator for up to three days and reheated in the oven or microwave.
Beef Stir-Fry With Vegetables
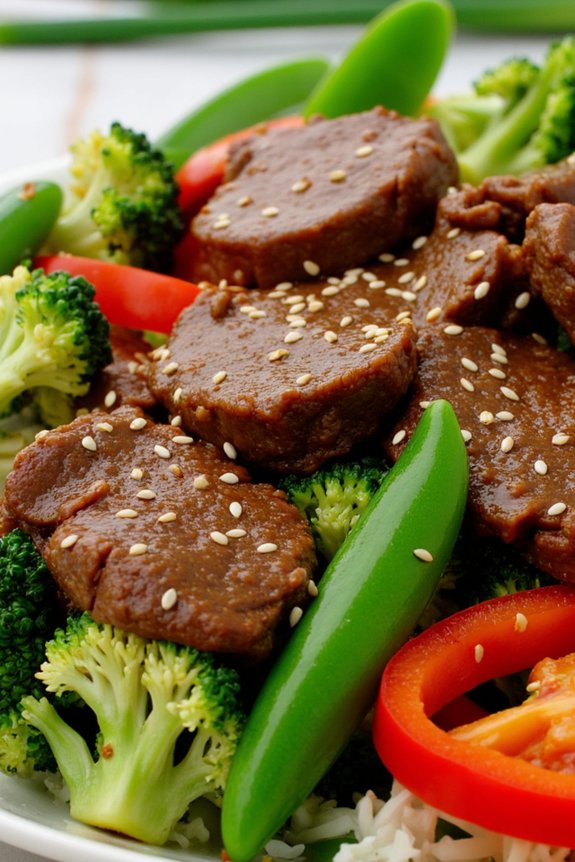
Beef stir-fry with vegetables is a delicious and simple way to repurpose leftover beef into a fresh and vibrant meal. This dish offers a perfect balance of savory beef, crisp vegetables, and a flavorful sauce, making it a family favorite for busy weeknights.
Utilizing leftovers not only helps to reduce waste but also saves time and effort in the kitchen, allowing you to create a nutritious and satisfying dinner without starting from scratch.
This recipe is designed to serve 4-6 people and can easily be adapted to suit your family’s preferences by incorporating a variety of vegetables or adjusting the seasoning to taste. The key to a successful stir-fry is in the preparation: having all your ingredients ready and cooking at a high temperature to guarantee everything is cooked evenly and retains its natural flavors.
With these simple steps, you can transform your leftovers into a delicious meal that will leave everyone at the table asking for seconds.
Ingredients (Serves 4-6):
- 2 cups cooked beef, thinly sliced
- 2 tablespoons vegetable oil
- 1 onion, sliced
- 2 cloves garlic, minced
- 1 bell pepper, sliced
- 2 cups broccoli florets
- 1 cup snap peas
- 2 tablespoons soy sauce
- 1 tablespoon oyster sauce
- 1 tablespoon cornstarch
- 1/2 cup beef stock or water
- Salt and pepper to taste
- Cooked rice or noodles, for serving
- Sesame seeds and chopped green onions, for garnish
Cooking Instructions:
- Prepare the sauce: In a small bowl, mix together the soy sauce, oyster sauce, and cornstarch with the beef stock or water. Stir until the cornstarch is fully dissolved, then set aside.
- Heat the oil: In a large wok or frying pan, heat the vegetable oil over medium-high heat until it’s shimmering.
- Sauté aromatics: Add the sliced onion and minced garlic to the pan, sautéing for about 1-2 minutes until the onion becomes translucent and the garlic is fragrant.
- Cook the vegetables: Add the bell pepper, broccoli florets, and snap peas to the pan. Stir-fry for about 3-4 minutes, until the vegetables are crisp-tender.
- Add the beef: Add the sliced beef to the vegetables, stirring well to combine. Cook for an additional 2 minutes to heat the beef through.
- Add the sauce: Pour the prepared sauce over the beef and vegetables, stirring continuously to coat everything evenly. Cook for another 1-2 minutes until the sauce thickens and everything is well coated.
- Season and serve: Taste and adjust the seasoning with salt and pepper as needed. Serve immediately over cooked rice or noodles, garnished with sesame seeds and chopped green onions.
Extra Tips:
To guarantee the best texture, cut the vegetables into uniform sizes so they cook evenly. If you’re using tougher vegetables such as carrots or cauliflower, consider blanching them briefly before stir-frying.
While reheating the beef, be careful not to overcook it to prevent it from becoming tough. Also, feel free to add your favorite vegetables or adjust the sauce ingredients based on what you have on hand. This recipe is highly versatile and can accommodate a variety of flavors and textures.
Turkey Tacos With Fresh Salsa

Transform your leftover turkey into a delicious and vibrant meal with Turkey Tacos with Fresh Salsa. This recipe is perfect for a quick weeknight dinner or a fun family gathering. The combination of seasoned turkey and fresh, zesty salsa creates a flavor explosion in every bite.
Not only is this dish easy to prepare, but it also allows you to creatively use ingredients you might already have at home, reducing waste and maximizing flavor.
Turkey Tacos with Fresh Salsa is a versatile dish that can be customized to your taste. Whether you prefer a bit of heat or a milder flavor, you can adjust the salsa and toppings to suit your preferences. This recipe serves 4-6 people, making it ideal for a family meal. Gather your ingredients, and let’s get started on creating a meal that everyone will love.
Ingredients:
- 3 cups cooked turkey, shredded
- 1 tablespoon olive oil
- 1 packet taco seasoning
- 12 small corn tortillas
- 1 cup shredded lettuce
- 1 cup shredded cheese (cheddar or Mexican blend)
- 1 cup sour cream
- 1 lime, cut into wedges
For the Fresh Salsa:
- 2 medium tomatoes, diced
- 1 small onion, finely chopped
- 1 jalapeño, seeded and minced
- 1/4 cup fresh cilantro, chopped
- Juice of 1 lime
- Salt and pepper to taste
Instructions:
- Prepare the Salsa: In a medium bowl, combine the diced tomatoes, onion, jalapeño, and cilantro. Squeeze the juice of one lime over the mixture and season with salt and pepper to taste. Mix well and set aside to allow the flavors to meld.
- Heat the Turkey: In a large skillet, heat the olive oil over medium heat. Add the shredded turkey and the taco seasoning to the skillet. Stir to combine and heat the turkey thoroughly, about 5-7 minutes. If the mixture seems dry, add a little water or chicken broth.
- Warm the Tortillas: While the turkey is heating, warm the corn tortillas. You can do this by placing them in a dry skillet over medium heat for about 30 seconds on each side, or by wrapping them in a damp paper towel and microwaving for about 30 seconds.
- Assemble the Tacos: Place a portion of the seasoned turkey onto each tortilla. Top with a generous spoonful of fresh salsa, followed by shredded lettuce, cheese, and a dollop of sour cream.
- Serve and Enjoy: Arrange the tacos on a platter and serve with lime wedges on the side for extra zest.
Extra Tips:
For the best flavor, prepare the fresh salsa at least 30 minutes in advance to allow the ingredients to fully integrate.
If you like your tacos with a kick, consider adding a few dashes of hot sauce or extra jalapeño. To save time, you can use pre-made salsa, but homemade is always more flavorful.
Finally, if you have extra turkey, you can freeze it for future meals or use it to make a turkey salad for lunch the next day.
Vegetable Soup With Herb Dumplings

Vegetable Soup With Herb Dumplings is a comforting and hearty dish that transforms simple leftovers into a delightful family meal. This recipe is perfect for using up any cooked or raw vegetables you have sitting in your fridge, turning them into a warm and satisfying soup. The addition of herb dumplings brings a fluffy, savory element that complements the flavors of the vegetables beautifully.
This dish isn’t only a great way to reduce food waste, but it also provides a nutritious meal that can be enjoyed by everyone at the table. This recipe serves 4-6 people and is ideal for a family dinner. The vegetable soup is versatile, allowing you to incorporate whatever vegetables you have on hand, while the herb dumplings add a deliciously soft texture to the dish.
With a bit of broth, some seasonings, and a few simple ingredients, you can have a comforting bowl of soup ready in no time. The herb dumplings are easy to make and can be customized with your favorite herbs, adding a fresh and aromatic touch to the soup.
Ingredients:
- 2 tablespoons olive oil
- 1 onion, chopped
- 2 garlic cloves, minced
- 3 carrots, sliced
- 2 celery stalks, sliced
- 1 bell pepper, diced
- 2 cups of assorted leftover vegetables (such as peas, corn, green beans)
- 1 can (14 oz) diced tomatoes
- 6 cups vegetable broth
- 1 teaspoon dried thyme
- 1 teaspoon dried basil
- Salt and pepper to taste
For the Herb Dumplings:
- 1 cup all-purpose flour
- 2 teaspoons baking powder
- 1/2 teaspoon salt
- 1/2 cup milk
- 2 tablespoons butter, melted
- 2 tablespoons fresh herbs (such as parsley, chives, or dill), chopped
Cooking Instructions:
- Prepare the Soup Base: In a large pot, heat the olive oil over medium heat. Add the chopped onion and minced garlic, sautéing until the onion becomes translucent and fragrant.
- Add Vegetables: Stir in the sliced carrots, celery, and diced bell pepper. Cook for about 5 minutes, until the vegetables begin to soften.
- Incorporate Leftovers: Add the leftover vegetables you have on hand, stirring them into the mixture. Season with dried thyme, basil, salt, and pepper.
- Simmer the Soup: Pour in the diced tomatoes and vegetable broth. Bring the mixture to a boil, then reduce the heat and let it simmer for 20 minutes, allowing the flavors to meld.
- Make the Dumpling Dough: While the soup is simmering, prepare the herb dumplings. In a bowl, combine the flour, baking powder, and salt. Stir in the milk, melted butter, and fresh herbs until a dough forms.
- Add Dumplings to Soup: Drop spoonfuls of the dumpling dough into the simmering soup. Cover the pot and let the dumplings cook for 10-12 minutes, until they’re cooked through and fluffy.
- Serve: Once the dumplings are done, taste the soup and adjust the seasoning if necessary. Serve hot and enjoy!
Extra Tips:
When making the dumplings, make sure not to over-mix the dough, as this can make them dense rather than light and fluffy. Feel free to customize the soup with whatever vegetables you have available, and if you prefer a bit of spice, add a pinch of red pepper flakes for some heat.
If your soup becomes too thick, simply add a bit more broth or water to reach your desired consistency. Enjoy the process of repurposing your leftovers into this delicious and warming meal!
Pork Fried Rice
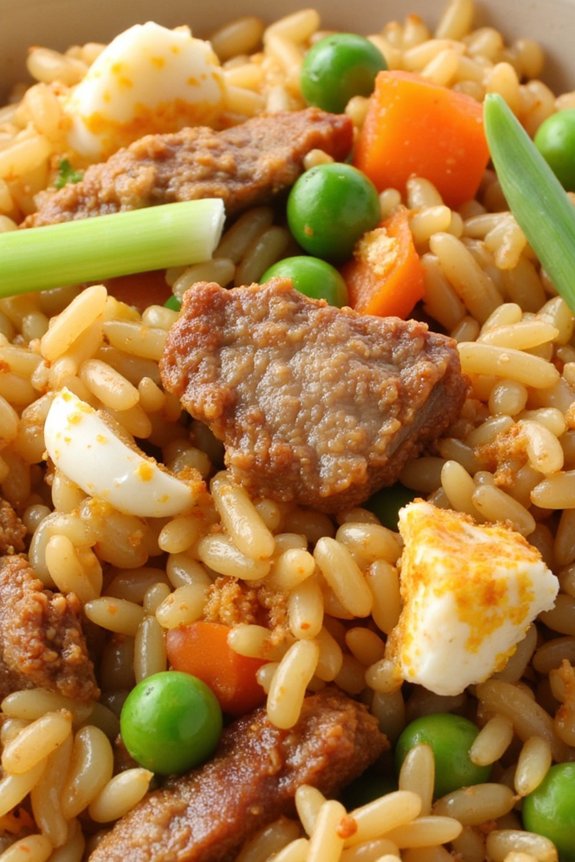
Pork fried rice is a delicious and convenient way to transform leftover pork into a satisfying meal the whole family will enjoy. The beauty of this dish lies in its simplicity and versatility, allowing you to incorporate whatever vegetables and seasonings you have on hand. It’s a perfect option for a quick weeknight dinner that doesn’t compromise on flavor. By using cold, day-old rice, the grains remain separate and fry up beautifully, guaranteeing a perfect texture every time.
Not only is pork fried rice a time-saver, but it also helps reduce food waste. You can use leftover pork roast, chops, or tenderloin, as well as any vegetables that need to be used up. The combination of savory pork, aromatic vegetables, and a slightly sweet and salty sauce makes this dish a family favorite. Plus, it all comes together in one pan, making cleanup a breeze. This recipe serves 4-6 people, making it ideal for a family dinner.
Ingredients:
- 3 cups cooked white rice (preferably day-old)
- 2 cups cooked pork, diced
- 2 tablespoons vegetable oil
- 1 small onion, diced
- 2 cloves garlic, minced
- 1 cup frozen peas and carrots mix
- 3 eggs, beaten
- 3 tablespoons soy sauce
- 1 tablespoon oyster sauce
- 1 teaspoon sesame oil
- 2 green onions, sliced
- Salt and pepper to taste
Instructions:
- Prepare the Ingredients: Begin by dicing the cooked pork into small, bite-sized pieces. If your rice is freshly cooked, spread it out on a baking sheet and refrigerate it for at least 30 minutes to cool and dry out, which helps achieve the right texture when frying.
- Heat the Oil: In a large skillet or wok, heat the vegetable oil over medium-high heat. Once the oil is hot, add the diced onion and minced garlic. Sauté them for about 2 minutes until the onion becomes translucent and the garlic is fragrant.
- Cook the Vegetables: Add the frozen peas and carrots to the pan. Stir-fry for another 2-3 minutes until the vegetables are warmed through and slightly tender.
- Add the Pork: Push the vegetables to the side of the pan and add the diced pork. Stir-fry the pork for 2 minutes to heat it through and let it absorb some flavor from the pan.
- Scramble the Eggs: Create a well in the center of the skillet by pushing the pork and vegetables to the sides. Pour the beaten eggs into the well and scramble them until fully cooked. Mix the eggs with the pork and vegetables.
- Combine with Rice: Add the cold rice to the skillet, breaking up any clumps. Stir everything together and let the rice cook for a couple of minutes, guaranteeing it’s heated through and starts to develop a slight crisp.
- Season the Dish: Pour in the soy sauce, oyster sauce, and sesame oil. Stir well to guarantee the rice is evenly coated with the sauces. Add salt and pepper to taste.
- Finish with Green Onions: Finally, sprinkle the sliced green onions over the top and give the fried rice one last stir. Serve hot and enjoy!
Extra Tips:
When making pork fried rice, day-old rice is key. Freshly cooked rice is too moist and can become mushy when fried. If you don’t have leftover rice, cook a batch, spread it on a tray, and refrigerate it to cool quickly.
Feel free to customize the recipe by adding other leftover vegetables or proteins you have on hand, such as bell peppers, broccoli, or shrimp. Additionally, adjust the seasoning to your taste by adding more soy sauce or a dash of chili sauce for some heat. Enjoy your delicious, no-waste meal!
Spaghetti Frittata

Spaghetti Frittata is a delightful and inventive way to transform leftover spaghetti into a hearty and satisfying dish. This recipe is perfect for a family dinner, providing a delicious meal that’s both budget-friendly and quick to prepare. With a crispy golden crust and a creamy, flavorful interior, spaghetti frittata is sure to please everyone at the table.
It’s an excellent option for using up leftover pasta, and you can easily customize it with whatever ingredients you have on hand, making it a versatile dish that can be adapted to suit your tastes.
The beauty of a spaghetti frittata lies in its simplicity and adaptability. Whether you’ve got leftover spaghetti with marinara sauce, carbonara, or even a simple aglio e olio, you can transform it into a new and exciting dish. The combination of pasta, eggs, and cheese creates a rich and satisfying meal that can be enjoyed for breakfast, lunch, or dinner.
Plus, it’s an excellent way to sneak in some vegetables or protein, such as spinach, mushrooms, or ham, making it a well-rounded and nutritious option for the whole family.
Ingredients (serving size: 4-6 people):
- 3 cups cooked spaghetti (leftover)
- 6 large eggs
- 1/2 cup grated Parmesan cheese
- 1 cup shredded mozzarella cheese
- 1/2 cup milk
- 1/2 cup diced ham or cooked bacon (optional)
- 1/2 cup chopped spinach or any preferred vegetable
- 1/2 teaspoon salt
- 1/4 teaspoon black pepper
- 1 tablespoon olive oil
- 1 tablespoon butter
Cooking Instructions:
- Preheat the Oven: Begin by preheating your oven to 375°F (190°C). This will make certain that the oven is hot enough to cook the frittata evenly.
- Prepare the Egg Mixture: In a large mixing bowl, crack the eggs and whisk them together with milk, Parmesan cheese, salt, and black pepper until the mixture is smooth and well combined.
- Add Spaghetti and Ingredients: Gently fold the cooked spaghetti into the egg mixture, making sure it’s well coated. Add in the mozzarella cheese, diced ham or bacon, and chopped spinach or any preferred vegetables, and mix until everything is evenly distributed.
- Heat the Pan: On the stovetop, heat the olive oil and butter in a large, oven-safe skillet over medium heat. The combination of oil and butter will help create a nice crust on the bottom of the frittata.
- Cook the Frittata: Pour the spaghetti and egg mixture into the heated skillet, spreading it out evenly. Cook on the stovetop for about 5 minutes, or until the edges begin to set and pull away slightly from the sides of the pan.
- Bake: Transfer the skillet to the preheated oven and bake for 20-25 minutes, or until the frittata is fully set and the top is golden brown. You can test for doneness by inserting a toothpick into the center; it should come out clean.
- Cool and Serve: Once cooked, remove the frittata from the oven and allow it to cool for a few minutes. Slice into wedges and serve warm, either by itself or with a side salad for a complete meal.
Extra Tips:
When making spaghetti frittata, it’s important to let it cool slightly before slicing to allow it to set fully and make cutting easier. You can experiment with different cheese types like cheddar or feta to change the flavor profile.
If you don’t have an oven-safe skillet, you can transfer the mixture to a greased baking dish before baking. Additionally, feel free to add herbs like basil or parsley for extra flavor. This dish is also great for meal prep, as it can be stored in the refrigerator for up to 3 days and reheated for a quick meal.
Shepherd’s Pie With Mashed Potatoes
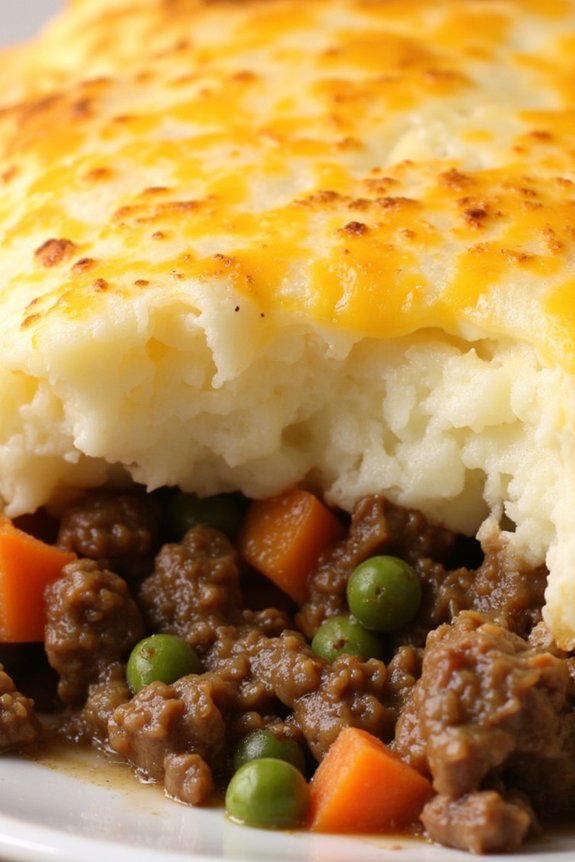
Shepherd’s Pie With Mashed Potatoes is a delicious and heartwarming dish that makes excellent use of leftovers, transforming them into a hearty meal perfect for family dinners. This classic comfort food combines a savory meat filling with a creamy mashed potato topping, creating a satisfying layered dish that’s both filling and full of flavor.
Traditionally made with lamb, this recipe offers flexibility, allowing you to use whatever meat and vegetables you have on hand, making it an ideal choice for using up leftovers in a creative and delicious way.
The beauty of Shepherd’s Pie lies in its simplicity and adaptability. With just a few basic ingredients, you can recreate this timeless dish in your own kitchen, making it perfect for feeding a family of 4-6 people.
Leftover roasted meats, vegetables, and mashed potatoes come together in a harmonious blend that’s rich and comforting. Whether you’re using leftover beef, turkey, or even a plant-based alternative, Shepherd’s Pie is sure to be a hit at your dinner table.
Ingredients (serving size: 4-6 people):
- 2 cups of leftover roasted meat (lamb, beef, or turkey) or plant-based alternative, diced
- 1 onion, diced
- 2 carrots, diced
- 1 cup peas (fresh or frozen)
- 2 cups leftover mashed potatoes
- 1 cup beef or vegetable broth
- 2 tablespoons tomato paste
- 2 tablespoons Worcestershire sauce
- 1 tablespoon olive oil
- Salt and pepper to taste
- 1 cup shredded cheese (optional)
Cooking Instructions:
- Preheat the oven: Begin by preheating your oven to 375°F (190°C).
- Prepare the filling: In a large skillet, heat the olive oil over medium heat. Add the diced onion and carrots, sautéing until the onions become translucent and the carrots are tender, about 5-7 minutes.
- Add meat and seasonings: Stir in the diced leftover meat, peas, tomato paste, Worcestershire sauce, and beef or vegetable broth. Mix well to combine and let it simmer for about 5 minutes, allowing the flavors to meld together. Season with salt and pepper to your taste.
- Assemble the pie: Transfer the meat and vegetable mixture into a baking dish, spreading it evenly across the bottom. Gently spread the leftover mashed potatoes over the top of the meat mixture, making sure it’s evenly covered. If desired, sprinkle shredded cheese over the mashed potatoes for an extra cheesy layer.
- Bake the pie: Place the baking dish in the preheated oven and bake for 25-30 minutes, or until the top is golden brown and the filling is bubbling around the edges.
- Serve: Remove from the oven and allow it to cool slightly before serving. Enjoy your Shepherd’s Pie With Mashed Potatoes warm.
Extra Tips:
For a more flavorful Shepherd’s Pie, consider adding herbs such as thyme or rosemary to the meat mixture.
If you like a crispy topping, you can broil the pie for an additional 2-3 minutes after baking.
To guarantee your mashed potatoes spread easily, allow them to come to room temperature before assembling the pie.
Finally, Shepherd’s Pie can be made ahead of time and stored in the refrigerator; just bake it before serving for a quick and convenient meal.
Fish Tacos With Cabbage Slaw
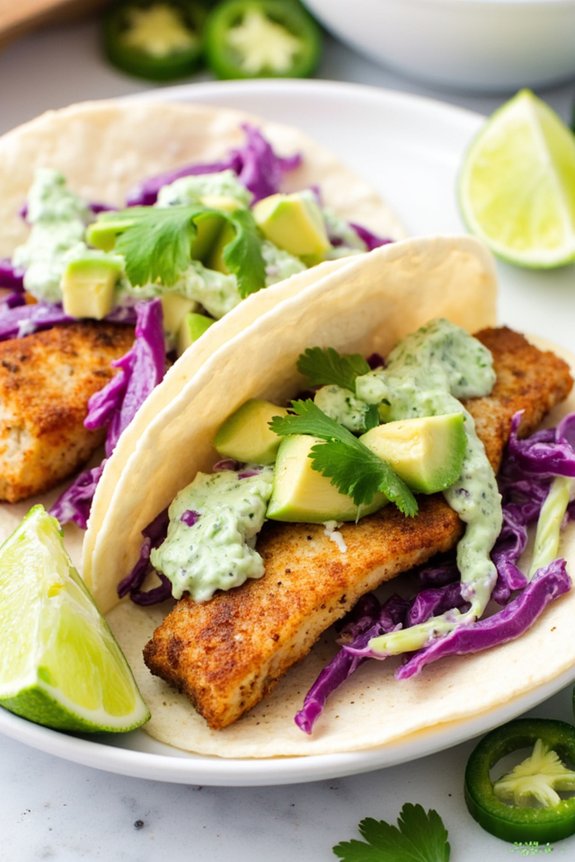
Fish Tacos With Cabbage Slaw are a delightful way to make use of leftover fish while creating a light and delicious meal for your family. This dish combines the flakiness of fish with the crispness of cabbage slaw, wrapped in a soft tortilla. Perfect for a family dinner, this recipe can be easily adjusted to suit your taste preferences.
Whether you have leftover grilled, baked, or even fried fish, this recipe will help you transform it into a flavorful Mexican-inspired dish.
This recipe serves 4-6 people, making it ideal for a family gathering. The cabbage slaw adds a rejuvenating crunch to the fish tacos, and the creamy dressing ties everything together beautifully. You can customize the toppings to your liking, adding ingredients like avocado, fresh cilantro, or a squeeze of lime for extra flavor. The combination of textures and flavors will have everyone reaching for seconds.
Ingredients:
- 2 cups leftover cooked fish (grilled, baked, or fried)
- 8-12 corn or flour tortillas
- 2 cups shredded cabbage (green or purple)
- 1/4 cup mayonnaise
- 1 tablespoon lime juice
- 1 teaspoon honey
- 1/4 teaspoon salt
- 1/4 teaspoon black pepper
- 1/2 teaspoon cumin powder
- 1/4 cup chopped fresh cilantro
- Optional toppings: diced avocado, sliced jalapeños, lime wedges
Cooking Instructions:
- Prepare the Cabbage Slaw: In a large bowl, combine the shredded cabbage, mayonnaise, lime juice, honey, salt, and black pepper. Mix well until the cabbage is evenly coated in the dressing. Set aside to allow the flavors to meld.
- Season the Fish: If your leftover fish isn’t already seasoned, sprinkle it with a little salt, pepper, and cumin powder to enhance its flavor. This step is optional but recommended for added taste.
- Warm the Fish: In a skillet over medium heat, gently reheat the leftover fish. Be careful not to overcook it, as this could cause it to become dry. Flake the fish into bite-sized pieces using a fork.
- Warm the Tortillas: Heat the tortillas in a dry skillet over medium heat for about 30 seconds on each side, or until they’re warm and pliable. You can also wrap them in a damp paper towel and microwave them for about 30 seconds.
- Assemble the Tacos: Place a portion of the flaked fish onto each tortilla. Top with a generous helping of cabbage slaw. Add any additional toppings you like, such as avocado slices, jalapeños, or a squeeze of fresh lime juice.
- Serve: Arrange the tacos on a serving platter and sprinkle with chopped fresh cilantro for a burst of color and flavor. Serve immediately while the tortillas and fish are warm.
Extra Tips:
When preparing Fish Tacos With Cabbage Slaw, it’s important to avoid overcooking the fish during reheating to maintain its moisture and tenderness.
If you have leftover grilled or smoked fish, these will add an extra layer of flavor to the dish. Feel free to experiment with the slaw by adding ingredients like shredded carrots or radishes for more color and crunch.
To save time, you can prepare the cabbage slaw in advance and store it in the fridge until you’re ready to assemble the tacos.
Lentil and Quinoa Stuffed Peppers
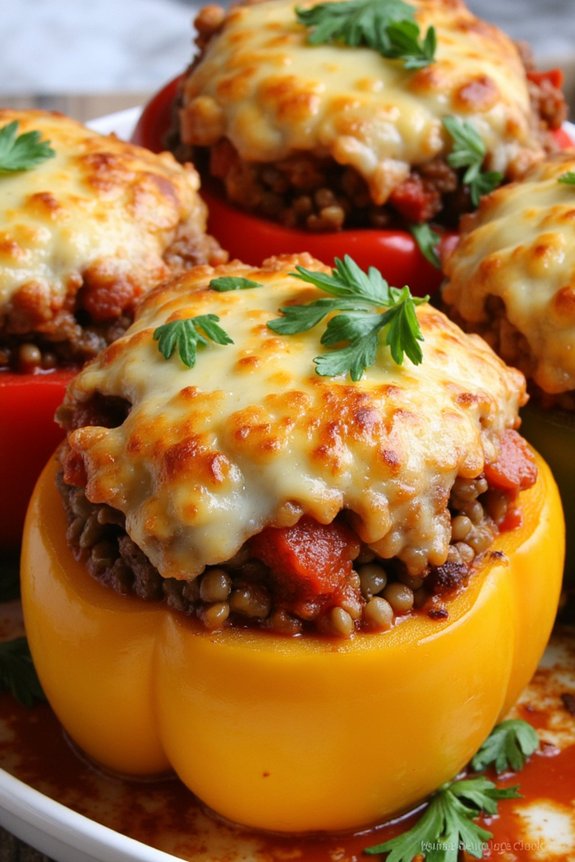
Lentil and Quinoa Stuffed Peppers are a delicious and nutritious way to repurpose leftovers into a hearty family meal. This dish combines the wholesome goodness of lentils and quinoa with the vibrant flavors of bell peppers, creating a meal that’s not only satisfying but also packed with protein and fiber. Perfect for a family dinner, this recipe is designed to serve 4-6 people, making it an ideal choice for gatherings or a cozy night in.
The beauty of Lentil and Quinoa Stuffed Peppers lies in its versatility. You can easily incorporate any leftover grains or legumes you have on hand, adapting the recipe to suit your taste and pantry. The stuffed peppers can be prepared in advance and simply baked when you’re ready, making them a convenient option for busy weeknights.
With a blend of spices and a touch of cheese, these peppers come out of the oven bubbling and flavorful, ready to delight your family’s taste buds.
Ingredients (serves 4-6):
- 6 large bell peppers
- 1 cup cooked lentils
- 1 cup cooked quinoa
- 1 small onion, finely chopped
- 2 cloves garlic, minced
- 1 can diced tomatoes (14 oz)
- 1 teaspoon ground cumin
- 1 teaspoon smoked paprika
- 1 cup shredded mozzarella cheese
- 2 tablespoons olive oil
- Salt and pepper to taste
- Fresh parsley for garnish
Cooking Instructions:
- Preheat the Oven: Begin by preheating your oven to 375°F (190°C). This guarantees that it’s hot enough to cook the stuffed peppers evenly.
- Prepare the Peppers: Wash the bell peppers thoroughly. Slice off the tops and remove the seeds and membranes from inside, creating a clean cavity for the stuffing.
- Cook the Aromatics: In a large skillet, heat the olive oil over medium heat. Add the chopped onion and garlic, sautéing until the onion becomes translucent and fragrant, about 3-4 minutes.
- Combine the Filling: Add the cooked lentils, quinoa, and canned diced tomatoes to the skillet. Stir in the cumin, smoked paprika, salt, and pepper. Cook for another 5 minutes, allowing the flavors to meld together.
- Stuff the Peppers: Carefully spoon the lentil and quinoa mixture into each bell pepper, filling them generously. Place the stuffed peppers upright in a baking dish.
- Add the Cheese: Sprinkle shredded mozzarella cheese over the top of each stuffed pepper, covering the filling.
- Bake: Cover the baking dish with foil and bake in the preheated oven for 30 minutes. Remove the foil and bake for an additional 10-15 minutes, until the cheese is melted and bubbly.
- Garnish and Serve: Once baked, remove the peppers from the oven and let them cool slightly. Garnish with fresh parsley before serving.
Extra Tips:
For an added depth of flavor, consider roasting the bell peppers briefly before stuffing them. This can give them a slight char and enhance their sweetness.
Also, feel free to experiment with different types of cheese or add a sprinkle of your favorite herbs for variation. If you’re aiming for a spicier kick, a pinch of chili flakes can be included in the filling mixture.
Ham and Cheese Quesadillas

Ham and Cheese Quesadillas are a delightful twist on the traditional Mexican dish, perfect for using up leftover ham. These quesadillas are quick to make and are a hit with both adults and kids alike. The combination of melty cheese and savory ham, encased in a crispy tortilla, creates a mouthwatering meal that’s both satisfying and easy on the wallet.
Whether you’re looking for a simple weeknight dinner or a fun way to repurpose leftovers, this recipe is sure to become a family favorite. This dish is versatile, allowing you to customize it with your family’s favorite ingredients. You can add vegetables like bell peppers or spinach for a nutritional boost, or spice it up with jalapeños for a kick.
Pair these quesadillas with a side of salsa, guacamole, or sour cream for dipping, and you have a complete meal that’s both delicious and nutritious. Plus, with a preparation time of just 30 minutes, Ham and Cheese Quesadillas make for a quick and easy dinner solution on busy nights.
Ingredients (Serves 4-6):
- 8 large flour tortillas
- 2 cups of shredded leftover ham
- 2 cups of shredded cheese (cheddar or a cheese blend)
- 1/2 cup of chopped green onions
- 1/2 cup of chopped bell peppers (optional)
- 1 tablespoon of butter or oil for cooking
- Salt and pepper to taste
Instructions:
- Prepare Ingredients: Start by gathering all your ingredients. Shred your leftover ham if not already done, and chop any additional vegetables you wish to include, such as green onions or bell peppers.
- Assemble Quesadillas: Lay out the tortillas on a clean surface. Evenly distribute the shredded ham, cheese, green onions, and bell peppers (if using) on one half of each tortilla. Season with a pinch of salt and pepper.
- Fold Tortillas: Fold the empty half of the tortilla over the filled side to create a half-moon shape. Press down gently to keep the fillings in place.
- Heat the Pan: In a large skillet or griddle, heat the butter or oil over medium heat. Once hot, carefully place one or two quesadillas in the pan, depending on the size of your skillet.
- Cook Quesadillas: Cook each quesadilla for about 3-4 minutes on one side, until the bottom is golden brown and crispy. Carefully flip using a spatula and cook the other side for an additional 3-4 minutes, ensuring the cheese is fully melted.
- Serve: Once cooked, remove the quesadillas from the pan and let them cool slightly. Slice into wedges and serve with your choice of salsa, guacamole, or sour cream.
Extra Tips:
For an extra crispy quesadilla, brush a thin layer of oil or melted butter on the outside of the tortillas before cooking. This will help achieve a golden, crunchy texture.
If you’re in a rush, you can also use a sandwich press or quesadilla maker for quicker cooking. Feel free to experiment with different types of cheese for varied flavors. If you prefer a spicier kick, consider adding jalapeños or a sprinkle of chili flakes to the filling.
Barbecue Pulled Pork Pizza

Barbecue Pulled Pork Pizza is a delightful and creative way to transform your leftover pulled pork into a mouthwatering meal that the entire family will enjoy. This dish combines the smoky, savory flavors of pulled pork with the tangy sweetness of barbecue sauce, all atop a crispy pizza crust. It’s perfect for a quick dinner and can be customized with your favorite toppings to suit everyone’s taste.
Whether you’re hosting a casual get-together or simply looking for a new family favorite, this pizza is sure to satisfy. This recipe serves 4-6 people and is a great option for using up any leftover pulled pork you have from a previous meal.
With just a few additional ingredients, you can have a delicious pizza ready in no time. The key to this dish is balancing the flavors of the pulled pork with the other toppings, creating a harmonious blend of textures and tastes. Let’s explore the ingredients you’ll need and the steps to make this delicious Barbecue Pulled Pork Pizza.
Ingredients:
- 1 pre-made pizza crust (12-14 inches)
- 1 1/2 cups leftover pulled pork
- 1 cup barbecue sauce
- 2 cups shredded mozzarella cheese
- 1/2 cup sliced red onion
- 1/2 cup sliced bell peppers (any color)
- 1/4 cup chopped fresh cilantro (optional)
- Olive oil for brushing
- Cornmeal or flour for dusting
Cooking Instructions:
- Preheat the Oven: Preheat your oven to 450°F (230°C). If you have a pizza stone, place it in the oven to heat up as well, which will guarantee a crispy crust.
- Prepare the Pizza Crust: Lightly dust a pizza peel or baking sheet with cornmeal or flour to prevent sticking. Place the pre-made pizza crust on the prepared surface. Brush the crust lightly with olive oil to enhance its flavor and help it crisp up in the oven.
- Assemble the Pizza: Spread the barbecue sauce evenly over the pizza crust, leaving a small border around the edges. Distribute the leftover pulled pork evenly over the sauce, ensuring that there’s enough pork in every bite.
- Add the Toppings: Sprinkle the shredded mozzarella cheese over the pulled pork. Add the sliced red onions and bell peppers on top of the cheese. These vegetables will add a fresh crunch and additional flavor to the pizza.
- Bake the Pizza: Carefully transfer the pizza to the preheated oven or pizza stone. Bake for 12-15 minutes, or until the crust is golden brown and the cheese is bubbly and slightly browned.
- Garnish and Serve: Once the pizza is baked, remove it from the oven and let it cool for a minute. Sprinkle chopped fresh cilantro over the top for a burst of herbal freshness, if desired. Slice and serve the pizza hot.
Extra Tips:
For an added layer of flavor, consider drizzling a little extra barbecue sauce over the finished pizza before serving. If you prefer a spicier kick, try adding sliced jalapeños or a sprinkle of red pepper flakes.
Additionally, if you have more leftovers, feel free to incorporate other ingredients like corn or pineapple for a unique twist. Remember to adjust the amount of cheese and toppings to suit your personal preference and the size of your pizza crust. Enjoy your Barbecue Pulled Pork Pizza with a side salad or coleslaw for a complete meal.
Curry Chicken Salad Wraps

Transform your leftover chicken into a delightful meal with Curry Chicken Salad Wraps. This dish brings a vibrant twist to traditional chicken salad by infusing it with bold curry flavors, offering a tasty and convenient way to make use of leftovers. The wraps are perfect for lunch or a light dinner, combining the creamy, spiced chicken salad with crisp vegetables, all wrapped in a soft tortilla.
It’s a quick, no-fuss recipe that’s both satisfying and full of flavor. The curry chicken salad wraps aren’t only easy to make but also customizable, allowing you to adjust the ingredients based on what you have at home. By using leftover chicken, you save time and reduce waste, making this a sustainable and economical meal option.
The curry powder adds a warm and aromatic touch, while the mayonnaise keeps the chicken salad rich and creamy. Serve these wraps to your family for a delicious meal that will leave everyone asking for seconds.
Ingredients (serves 4-6 people):
- 3 cups of leftover cooked chicken, shredded
- 1/2 cup mayonnaise
- 1 tablespoon curry powder
- 1 tablespoon honey
- 1/4 cup plain yogurt
- 1/2 cup diced celery
- 1/4 cup chopped red onion
- 1/4 cup raisins or dried cranberries
- 1/4 cup chopped fresh cilantro
- Salt and pepper to taste
- 4-6 large flour tortillas
- 1 cup mixed greens or lettuce
- 1/2 cup shredded carrot
Cooking Instructions:
- Prepare the Chicken Salad: In a large bowl, combine the shredded chicken, mayonnaise, curry powder, honey, and plain yogurt. Mix well until the chicken is evenly coated with the creamy dressing.
- Add Vegetables and Seasoning: Stir in the diced celery, chopped red onion, raisins or dried cranberries, and chopped cilantro. Mix thoroughly to guarantee all ingredients are well incorporated. Season the salad with salt and pepper to taste, adjusting the seasoning as preferred.
- Assemble the Wraps: Lay out the flour tortillas on a clean surface. Evenly distribute the chicken salad mixture onto each tortilla, placing it in the center. Add a handful of mixed greens or lettuce and a sprinkle of shredded carrot on top of the chicken salad.
- Wrap It Up: Fold in the sides of each tortilla, then roll it up tightly from the bottom to secure the filling. Slice each wrap in half on a diagonal for easier handling and serving.
- Serve and Enjoy: Arrange the wraps on a platter and serve immediately. They can be enjoyed warm or cold, depending on your preference.
Extra Tips:
For an extra crunch, consider adding chopped nuts such as almonds or cashews to the chicken salad. If you prefer a spicier kick, add a dash of cayenne pepper or a few drops of hot sauce.
The wraps can be prepared in advance and stored in the refrigerator for a few hours, making them perfect for meal prepping. Just be sure to wrap them tightly in plastic wrap to keep them fresh. If you have any leftover filling, it can be served as a salad on its own, making for a versatile and delicious dish.
Savory Bread Pudding With Sauteed Greens
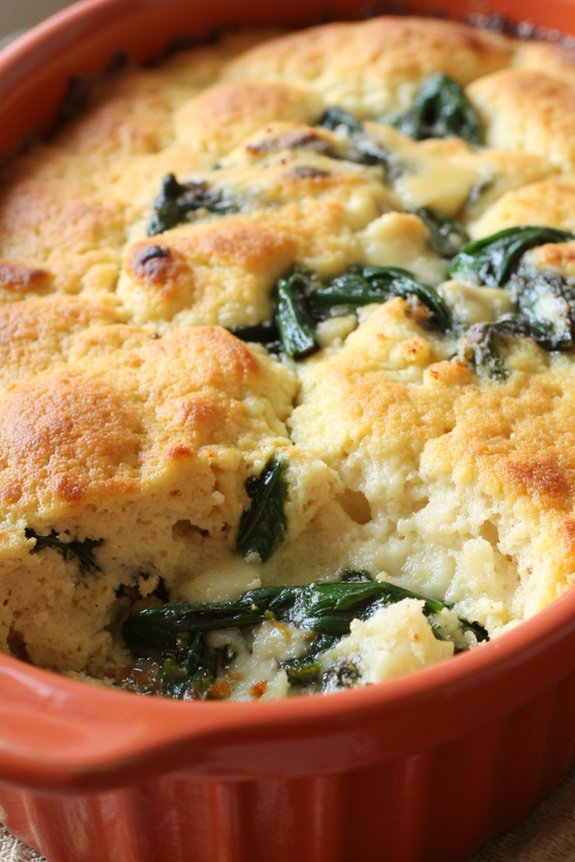
Savory Bread Pudding With Sauteed Greens is a delightful way to transform leftover bread and greens into a comforting and flavorful dish. Perfect for family dinners, this recipe combines the rustic charm of bread pudding with the freshness of sautéed greens. The bread soaks up a rich, custardy mixture, while the greens add a burst of color and nutrients, creating a harmonious balance between creamy and earthy flavors.
This dish is an excellent choice for using up any stale bread you have lingering in your kitchen. The savory bread pudding can be served as a main course or a side dish, making it versatile for any meal. Not only is it a great way to minimize food waste, but it also brings a satisfying warmth to the table, inviting everyone to dig in and enjoy.
Ingredients (Serves 4-6)
- 6 cups stale bread, cubed
- 2 tablespoons olive oil
- 1 onion, finely chopped
- 2 cloves garlic, minced
- 4 cups mixed greens (such as spinach, kale, or Swiss chard), roughly chopped
- 4 large eggs
- 2 cups milk
- 1 cup grated cheese (such as Gruyère or cheddar)
- 1 teaspoon salt
- 1/2 teaspoon black pepper
- 1/4 teaspoon nutmeg
- 1/2 cup grated Parmesan cheese
Cooking Instructions
- Preheat the Oven: Start by preheating your oven to 350°F (175°C). Grease a 9×13-inch baking dish with butter or cooking spray to prevent sticking.
- Sauté the Greens: In a large skillet, heat the olive oil over medium heat. Add the chopped onion and cook until translucent, about 5 minutes. Stir in the minced garlic and cook for an additional minute. Add the mixed greens and sauté until wilted, about 3-4 minutes. Remove from heat and set aside.
- Prepare the Bread: Place the cubed bread in a large mixing bowl. In a separate bowl, whisk together the eggs, milk, grated cheese, salt, black pepper, and nutmeg until well combined.
- Combine Ingredients: Pour the egg mixture over the bread cubes and gently toss to guarantee the bread is evenly coated. Let it sit for about 10 minutes to allow the bread to absorb the liquid.
- Assemble the Pudding: Add the sautéed greens to the bread mixture and gently fold until well distributed. Transfer the mixture to the prepared baking dish and spread it out evenly. Sprinkle the top with grated Parmesan cheese.
- Bake: Place the baking dish in the preheated oven and bake for 40-45 minutes, or until the top is golden brown and the center is set. A knife inserted into the center should come out clean.
- Serve: Allow the bread pudding to cool slightly before serving. Cut into squares and enjoy warm.
Extra Tips
For the best results, use a hearty, crusty bread like sourdough or a rustic loaf, as it will hold up well to the custard mixture without becoming too soggy.
Feel free to experiment with different types of greens or add in other leftover vegetables you have on hand, such as mushrooms or bell peppers, to enhance the flavor and texture.
If you prefer a richer dish, substitute half-and-half or cream for part of the milk. Remember to taste and adjust the seasoning to your preference before baking.