

Hey lovely readers! Are you on the hunt for quick and easy dinner recipes that don’t involve pasta? I’ve got you covered with 13 delicious options that will keep your family happy and satisfied. From a creamy chicken and rice casserole to lemon herb grilled fish, there’s something here for everyone. Let’s explore these yummy recipes together.
Creamy Chicken and Rice Casserole

Creamy Chicken and Rice Casserole is a comforting and hearty dish that’s perfect for a family dinner. It’s a simple yet delicious recipe that combines tender chicken, creamy sauce, and fluffy rice, all baked together to perfection. This casserole isn’t only flavorful but also a convenient one-dish meal that saves time on both cooking and cleaning.
With its rich, creamy texture and savory taste, it’s bound to become a family favorite. This recipe is ideal for those busy weeknights when you need to get dinner on the table quickly. With minimal prep and a short cooking time, you can have a satisfying meal ready in under an hour.
The use of pantry staples and easily accessible ingredients makes this dish both affordable and accessible. Serve it with a side salad or steamed vegetables for a complete meal that will please everyone at the table.
Ingredients (Serves 4-6):
- 2 cups cooked chicken, shredded
- 1 1/2 cups uncooked white rice
- 3 cups chicken broth
- 1 cup frozen peas
- 1 cup carrots, diced
- 1 cup heavy cream
- 1/2 cup shredded cheddar cheese
- 1/2 cup diced onion
- 1 teaspoon garlic powder
- 1 teaspoon salt
- 1/2 teaspoon black pepper
- 1 tablespoon olive oil
- 1 tablespoon butter
- 1/4 cup grated Parmesan cheese
Cooking Instructions:
- Preheat the Oven: Start by preheating your oven to 375°F (190°C) to get it ready for baking the casserole.
- Cook the Rice: In a medium saucepan, bring the chicken broth to a boil. Add the rice, reduce the heat to low, cover, and simmer for 15-20 minutes until the rice is tender and has absorbed most of the liquid. Remove from heat and let it sit.
- Prepare the Chicken Mixture: In a large skillet over medium heat, add olive oil and butter. Once melted, add the diced onion and sauté until translucent, about 3-4 minutes. Stir in the cooked chicken, garlic powder, salt, and black pepper. Cook for another 2-3 minutes to combine the flavors.
- Combine Ingredients: In a large mixing bowl, combine the cooked rice, chicken mixture, frozen peas, carrots, heavy cream, and cheddar cheese. Mix everything well to guarantee the ingredients are evenly distributed.
- Assemble the Casserole: Grease a 9×13 inch baking dish. Pour the mixture into the dish, spreading it evenly. Sprinkle the grated Parmesan cheese over the top for a golden, crispy finish.
- Bake the Casserole: Place the baking dish in the preheated oven and bake for 25-30 minutes, or until the top is golden brown and the casserole is bubbling around the edges.
- Let it Cool: Remove the casserole from the oven and let it cool for a few minutes before serving. This will allow the dish to set and make it easier to serve.
Extra Tips:
For added flavor, consider adding a pinch of thyme or rosemary to the chicken mixture. You can also switch up the vegetables based on what you have on hand; broccoli or bell peppers make great additions.
If you prefer a lighter version, substitute the heavy cream with half-and-half or milk, and reduce the amount of cheese. This dish can be made ahead of time and stored in the refrigerator for up to 2 days before baking. Just be sure to increase the baking time by about 10 minutes if baking from cold.
Lemon Herb Grilled Fish With Vegetables
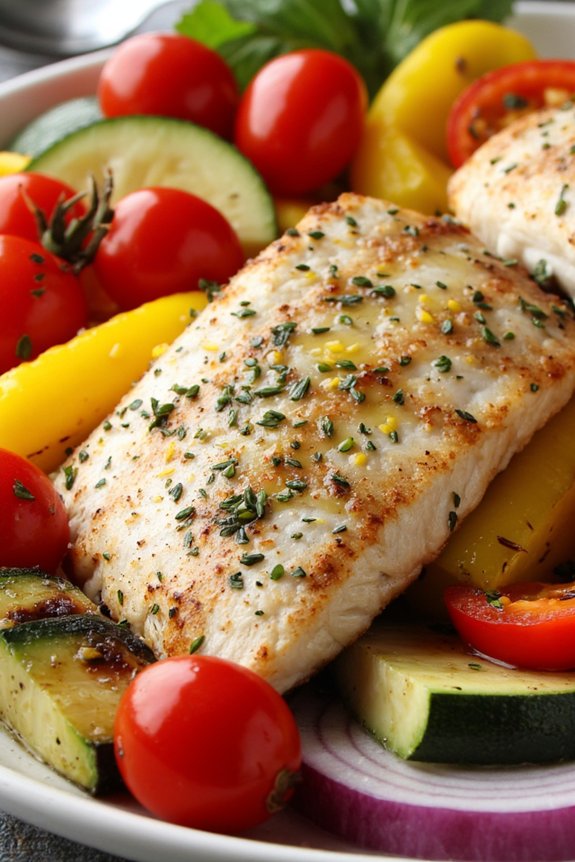
Lemon Herb Grilled Fish With Vegetables is a delightful dish that combines the fresh flavors of the ocean with the vibrant tastes of seasonal vegetables. This recipe is perfect for a quick and easy dinner that’s both healthy and satisfying. The fish is marinated in a zesty lemon herb mixture, which infuses it with a tangy and aromatic flavor. Grilling the fish brings out its natural sweetness, while also giving it a slightly smoky flavor that pairs beautifully with the crisp, tender vegetables.
Accompanying the lemon herb grilled fish are a medley of colorful vegetables that complement the dish perfectly. These vegetables are seasoned and grilled alongside the fish, allowing them to soak up the delicious flavors from the marinade and the grill. This recipe is designed to serve 4-6 people, making it ideal for family dinners or small gatherings. The combination of protein and vegetables guarantees a balanced meal that’s both nutritious and delicious.
Ingredients (Serves 4-6):
- 4 fish fillets (such as tilapia, cod, or salmon)
- 2 lemons, juiced and zested
- 3 tablespoons olive oil
- 3 cloves garlic, minced
- 1 tablespoon fresh thyme, chopped
- 1 tablespoon fresh parsley, chopped
- Salt and pepper to taste
- 2 zucchini, sliced
- 1 red bell pepper, sliced
- 1 yellow bell pepper, sliced
- 1 red onion, sliced
- 1 cup cherry tomatoes, halved
Cooking Instructions:
- Prepare the Marinade: In a small bowl, mix together the lemon juice, lemon zest, olive oil, minced garlic, thyme, parsley, salt, and pepper. Stir well to combine all the ingredients into a smooth marinade.
- Marinate the Fish: Place the fish fillets in a shallow dish and pour half of the marinade over them. Make sure each fillet is well coated. Cover the dish with plastic wrap and refrigerate for at least 20 minutes to allow the flavors to penetrate the fish.
- Preheat the Grill: While the fish is marinating, preheat your grill to medium-high heat. This guarantees that the grill is hot enough to cook the fish evenly and give it a nice char.
- Prepare the Vegetables: In a large bowl, toss the sliced zucchini, red and yellow bell peppers, red onion, and cherry tomatoes with the remaining marinade. Ensure that all the vegetables are evenly coated.
- Grill the Fish and Vegetables: Place the marinated fish fillets and vegetables on the preheated grill. Cook the fish for about 4-5 minutes on each side, or until it flakes easily with a fork. Grill the vegetables, turning occasionally, until they’re tender and slightly charred, about 10-12 minutes.
- Serve: Arrange the grilled fish and vegetables on a large platter. Garnish with additional parsley if desired, and serve immediately for the best flavor.
Extra Tips:
When grilling fish, it’s important to use a clean, well-oiled grill grate to prevent the fish from sticking. If you’re using a grill basket, it can make flipping the fish and vegetables much easier.
Additionally, feel free to experiment with different herbs and spices in the marinade to suit your taste preferences. If you prefer a spicier dish, adding a pinch of red pepper flakes can provide an extra kick.
Remember that the cooking time for fish may vary depending on the thickness of the fillets, so always check for doneness.
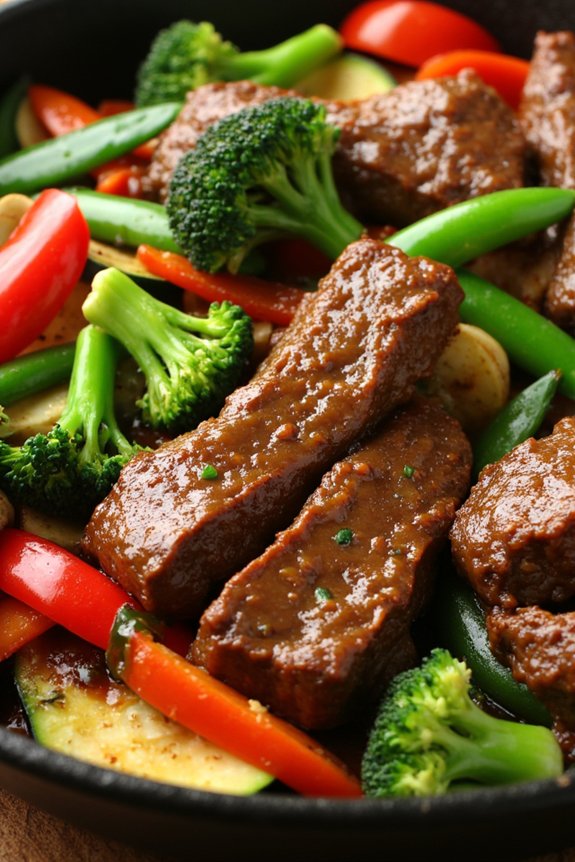
Teriyaki Beef and Broccoli Stir-Fry

Teriyaki Beef and Broccoli Stir-Fry is a delightful dish that combines savory, sweet, and umami flavors with tender beef and crisp broccoli. This quick and easy meal is perfect for busy weeknights when you want something nutritious and satisfying without spending hours in the kitchen.
The combination of succulent beef slices and fresh broccoli tossed in a rich teriyaki sauce makes for a comforting meal that pairs wonderfully with steamed rice or noodles.
This recipe serves 4-6 people and is designed to be both flavorful and efficient, using minimal ingredients to maximize taste. The key to a successful stir-fry is to prepare all the ingredients before you start cooking, as the process is fast-paced and requires constant attention.
With this dish, you’ll enjoy the perfect balance of protein and vegetables, offering a wholesome option that will surely become a family favorite.
Ingredients:
- 1 1/2 pounds beef sirloin or flank steak, thinly sliced
- 4 cups broccoli florets
- 3 tablespoons vegetable oil, divided
- 1/2 cup soy sauce
- 1/4 cup water
- 1/4 cup brown sugar
- 2 tablespoons rice vinegar
- 2 teaspoons minced garlic
- 1 teaspoon minced ginger
- 2 tablespoons cornstarch
- 2 tablespoons cold water
- 1/4 teaspoon red pepper flakes (optional)
- Cooked rice or noodles, for serving
Instructions:
- Prepare the beef and broccoli: Slice the beef thinly against the grain for tenderness and set aside. Wash the broccoli and cut it into florets, making sure they’re similar in size for even cooking.
- Make the teriyaki sauce: In a bowl, mix the soy sauce, 1/4 cup water, brown sugar, rice vinegar, minced garlic, minced ginger, and red pepper flakes (if using). Stir until the sugar dissolves and set the sauce aside.
- Cook the beef: Heat 2 tablespoons of vegetable oil in a large skillet or wok over medium-high heat. Add the sliced beef in batches to avoid overcrowding, cooking each batch for about 2-3 minutes until browned. Remove the beef from the skillet and set aside.
- Cook the broccoli: In the same skillet, add the remaining 1 tablespoon of vegetable oil. Add the broccoli florets and stir-fry for about 3-4 minutes until they’re vibrant green and just tender.
- Combine beef and broccoli with sauce: Return the beef to the skillet with the broccoli. Pour in the teriyaki sauce and bring to a simmer.
- Thicken the sauce: In a small bowl, mix the cornstarch with 2 tablespoons of cold water until smooth. Pour the cornstarch mixture into the skillet and stir well. Allow the sauce to thicken, cooking for an additional 2-3 minutes.
- Serve: Serve the Teriyaki Beef and Broccoli Stir-Fry hot over cooked rice or noodles.
Extra Tips:
For the best results, make sure that your beef is very thinly sliced; partially freezing the meat beforehand can make slicing easier.
When cooking, keep the skillet hot to achieve a nice sear on the beef without overcooking it. For those who prefer a bit of heat, adjusting the amount of red pepper flakes can tailor the dish to your spice preference.
Finally, consider adding other vegetables like bell peppers or snap peas for added color and nutrients.
Savory Baked Dijon Chicken Thighs

Savory Baked Dijon Chicken Thighs are a delightful and easy option for a weeknight dinner that will please the whole family. This dish combines the rich flavors of Dijon mustard, fresh herbs, and garlic to create a mouthwatering meal that’s both flavorful and comforting. By baking the chicken thighs, you guarantee they stay juicy and tender, with a deliciously crispy skin that’s sure to impress.
The beauty of this recipe lies in its simplicity, requiring minimal prep time and basic ingredients that you likely already have in your kitchen. Whether you’re a novice cook or a seasoned chef, these Savory Baked Dijon Chicken Thighs can be prepared with ease, making them a perfect choice for any occasion. With just a few simple steps, you’ll have a wholesome and satisfying meal ready to serve in under an hour.
Ingredients (serving size: 4-6 people):
- 8 bone-in, skin-on chicken thighs
- 1/2 cup Dijon mustard
- 1/4 cup olive oil
- 3 tablespoons honey
- 4 cloves garlic, minced
- 1 tablespoon fresh rosemary, finely chopped
- 1 tablespoon fresh thyme, finely chopped
- Salt and pepper, to taste
- Lemon wedges, for serving (optional)
Cooking Instructions:
- Preheat the Oven: Start by preheating your oven to 400°F (200°C). This guarantees that it reaches the right temperature while you prepare the chicken.
- Prepare the Marinade: In a medium bowl, whisk together the Dijon mustard, olive oil, honey, minced garlic, chopped rosemary, and thyme. Season the mixture with salt and pepper to taste.
- Coat the Chicken: Place the chicken thighs in a large bowl or a zip-top plastic bag. Pour the marinade over the chicken, making sure each piece is completely coated. Let it marinate for at least 15 minutes to allow the flavors to penetrate the meat.
- Arrange the Chicken: Line a baking sheet with parchment paper or lightly grease it with oil. Arrange the marinated chicken thighs on the baking sheet, skin side up, guaranteeing they aren’t touching each other for even cooking.
- Bake the Chicken: Place the baking sheet in the preheated oven and bake for 35-40 minutes, or until the chicken is cooked through and the skin is golden and crispy. The internal temperature should reach 165°F (74°C).
- Rest and Serve: Once baked, remove the chicken from the oven and let it rest for a few minutes before serving. This allows the juices to redistribute, keeping the chicken moist. Serve with lemon wedges on the side for an extra burst of flavor, if desired.
Extra Tips:
For an even more robust flavor, consider marinating the chicken for a few hours or overnight in the refrigerator. If you prefer a spicier kick, add a pinch of cayenne pepper or a splash of hot sauce to the marinade.
When serving, pair the chicken with a side of roasted vegetables or a fresh salad for a complete meal. Additionally, using a meat thermometer guarantees the chicken is perfectly cooked without overbaking, resulting in tender and juicy thighs every time.
Honey Garlic Shrimp and Quinoa

Looking for a quick and easy dinner recipe that’s both healthy and delicious? Try our Honey Garlic Shrimp and Quinoa recipe. This dish combines succulent shrimp marinated in a sweet and savory honey garlic sauce, served over a bed of fluffy quinoa.
It’s perfect for a weeknight meal, offering a satisfying mix of protein, fiber, and flavor. Plus, it’s ready in just 30 minutes, making it an ideal choice for busy evenings.
The honey garlic shrimp is the star of the show, bringing a rich and flavorful punch with every bite. Paired with quinoa, which is a fantastic source of plant-based protein and essential nutrients, this dish isn’t only tasty but also nutritious.
Whether you’re cooking for your family or hosting a small dinner party, this recipe will surely impress.
Ingredients (serves 4-6):
- 1 1/2 pounds large shrimp, peeled and deveined
- 1 cup quinoa
- 2 cups water
- 1/3 cup honey
- 1/4 cup soy sauce
- 1 tablespoon minced garlic
- 1 teaspoon minced fresh ginger
- 2 tablespoons olive oil
- 1 tablespoon cornstarch
- 2 tablespoons cold water
- Salt and pepper to taste
- Sliced green onions and sesame seeds for garnish (optional)
Cooking Instructions:
1. Prepare the Quinoa: Rinse the quinoa under cold water to remove its natural coating, which can be bitter. In a medium saucepan, combine the quinoa and 2 cups of water. Bring to a boil over medium-high heat, then reduce the heat to low, cover, and simmer for 15-20 minutes until the quinoa is tender and the water is absorbed.
Remove from heat and let it sit, covered, for an additional 5 minutes. Fluff with a fork before serving.
2. Marinate the Shrimp: In a medium bowl, mix together honey, soy sauce, minced garlic, and ginger. Add the shrimp to the bowl and toss to coat evenly. Let the shrimp marinate for at least 10 minutes, but no longer than 30 minutes.
3. Cook the Shrimp: Heat olive oil in a large skillet over medium-high heat. Remove the shrimp from the marinade, reserving the marinade for later. Add the shrimp to the skillet in a single layer and cook for 1-2 minutes on each side until they turn pink and opaque.
Remove the shrimp from the skillet and set aside.
4. Make the Sauce: In a small bowl, mix cornstarch with 2 tablespoons of cold water until smooth. Pour the reserved marinade into the skillet. Bring it to a boil, then reduce heat and stir in the cornstarch slurry. Simmer until the sauce thickens, about 2 minutes.
5. Combine and Serve: Return the cooked shrimp to the skillet and toss to coat in the sauce. Season with salt and pepper to taste. Serve the shrimp over the prepared quinoa, garnished with sliced green onions and sesame seeds if desired.
Extra Tips:
When cooking quinoa, make sure to rinse it thoroughly to eliminate any bitterness. If you’re short on time, you can use pre-cooked quinoa or even substitute it with rice or another grain of your choice.
For added flavor, consider using low-sodium soy sauce to control the saltiness of the dish. To enhance the presentation, garnish with fresh herbs like cilantro or parsley.
This dish pairs well with steamed vegetables or a fresh salad for a complete meal.
Hearty Turkey and Vegetable Soup

Hearty Turkey and Vegetable Soup is the perfect comfort food for a cozy evening, offering both nutrition and warmth. This recipe combines the rich flavors of turkey with a medley of fresh vegetables, creating a nourishing meal that’s both satisfying and wholesome.
Whether you’re looking to use up leftover turkey or simply craving a steaming bowl of soup, this recipe is quick, easy, and guaranteed to become a family favorite.
The beauty of this soup lies in its versatility. You can easily adapt it to include your favorite vegetables or whatever you have on hand. The combination of lean turkey, carrots, celery, and potatoes creates a hearty base, while herbs and spices infuse the broth with depth and richness.
Best of all, this recipe makes enough to serve 4-6 people, perfect for a family dinner or for meal prepping for the week ahead.
Ingredients (Serves 4-6):
- 1 pound ground turkey
- 2 tablespoons olive oil
- 1 large onion, chopped
- 3 cloves garlic, minced
- 3 carrots, sliced
- 3 celery stalks, sliced
- 2 potatoes, diced
- 1 zucchini, sliced
- 1 cup frozen peas
- 6 cups chicken or turkey broth
- 1 teaspoon dried thyme
- 1 teaspoon dried oregano
- Salt and pepper to taste
- 1 bay leaf
- 2 tablespoons fresh parsley, chopped (optional)
Cooking Instructions:
- Prepare the Ingredients: Begin by gathering and preparing all your ingredients. Chop the onion, mince the garlic, slice the carrots, celery, and zucchini, and dice the potatoes. This guarantees a smooth cooking process.
- Brown the Turkey: Heat the olive oil in a large pot over medium heat. Add the ground turkey and cook until browned, breaking it into smaller pieces with a spoon. This should take about 5-7 minutes. Once browned, remove the turkey from the pot and set it aside.
- Sauté the Vegetables: In the same pot, add the chopped onion and minced garlic. Sauté for about 2 minutes until they become fragrant and the onion is translucent. Then, add the sliced carrots, celery, and potatoes. Cook for an additional 5 minutes, stirring occasionally.
- Combine Ingredients: Return the browned turkey to the pot. Add the zucchini, frozen peas, and pour in the chicken or turkey broth. Stir well to combine all ingredients.
- Season and Simmer: Add the dried thyme, oregano, bay leaf, salt, and pepper to the pot. Stir to distribute the seasonings evenly. Bring the soup to a boil, then reduce the heat to low and let it simmer for 20-25 minutes, or until the vegetables are tender.
- Final Touches: Remove the bay leaf from the soup. Taste and adjust the seasoning if necessary. If desired, stir in fresh parsley before serving for an added burst of flavor and color.
Extra Tips:
For an even richer flavor, consider adding a splash of white wine after sautéing the onions and garlic. This adds a depth of flavor that pairs beautifully with the turkey and vegetables.
If you prefer a thicker soup, mash some of the potatoes within the pot to naturally thicken the broth. Additionally, feel free to customize this recipe by adding other seasonal vegetables or herbs that you enjoy.
This soup also freezes well, making it a great option for meal prep; simply cool completely before transferring to airtight containers for freezing.
Easy Beef and Vegetable Skillet
The Easy Beef and Vegetable Skillet is a perfect go-to recipe for those busy weeknights when you want something quick, delicious, and nutritious. This one-pan meal combines tender beef with a medley of colorful vegetables, all cooked together in a savory sauce.
The beauty of this dish lies in its simplicity and versatility, allowing you to use whatever vegetables you have on hand. It’s not only a time-saver but also a healthy option that the whole family will love.
With minimal preparation and cooking time, this dish is ready in under 30 minutes, making it ideal for dinner on the go. The ingredients are straightforward and can be modified to suit your taste or dietary preferences.
Serve this savory skillet meal with a side of steamed rice, quinoa, or even pasta for a complete and satisfying dinner. Not only is it a budget-friendly option, but it also packs a punch of flavors that will make it a staple in your weekly meal rotation.
Ingredients (Serves 4-6):
- 1 1/2 pounds of beef sirloin, thinly sliced
- 2 tablespoons olive oil
- 1 large onion, sliced
- 2 cloves garlic, minced
- 2 cups broccoli florets
- 1 red bell pepper, sliced
- 1 zucchini, sliced
- 1 cup snap peas
- 1/4 cup soy sauce
- 1 tablespoon Worcestershire sauce
- 1 tablespoon cornstarch
- 1/4 cup water
- Salt and pepper to taste
- Optional: Red pepper flakes for heat
Cooking Instructions:
- Prepare the Ingredients: Begin by slicing the beef sirloin into thin strips. Then, chop and slice the vegetables, including the onion, garlic, broccoli, bell pepper, zucchini, and snap peas. This step guarantees that everything is ready to be added to the skillet when needed.
- Sear the Beef: Heat the olive oil in a large skillet over medium-high heat. Once the oil is hot, add the sliced beef. Season with salt and pepper to taste. Cook the beef for about 4-5 minutes until browned on all sides but not fully cooked through. Remove the beef from the skillet and set aside.
- Cook the Vegetables: In the same skillet, add the sliced onion and minced garlic. Sauté for about 2 minutes until the onion becomes translucent. Add the broccoli, red bell pepper, zucchini, and snap peas. Stir-fry the vegetables for about 5-7 minutes until they’re tender-crisp.
- Make the Sauce: In a small bowl, whisk together the soy sauce, Worcestershire sauce, cornstarch, and water. Make sure the cornstarch is fully dissolved to avoid any lumps.
- Combine and Cook: Return the beef to the skillet with the vegetables. Pour the sauce mixture over the beef and vegetables. Stir everything together to coat the ingredients evenly with the sauce. Cook for an additional 3-4 minutes, or until the beef is cooked through and the sauce has thickened.
- Serve: Remove from heat and serve immediately. Sprinkle with optional red pepper flakes if you prefer some heat. Pair with your choice of rice, quinoa, or pasta.
Extra Tips:
For the best results, make sure to slice the beef thinly against the grain; this will guarantee tenderness. Feel free to use other vegetables like mushrooms, carrots, or baby corn depending on your preference.
If you prefer a gluten-free option, substitute the soy sauce with tamari. Remember, the key to a quick cook time is to have all your ingredients prepped and ready before you start cooking. Enjoy your flavorful and satisfying Easy Beef and Vegetable Skillet!
Simple Lemon Herb Roasted Chicken
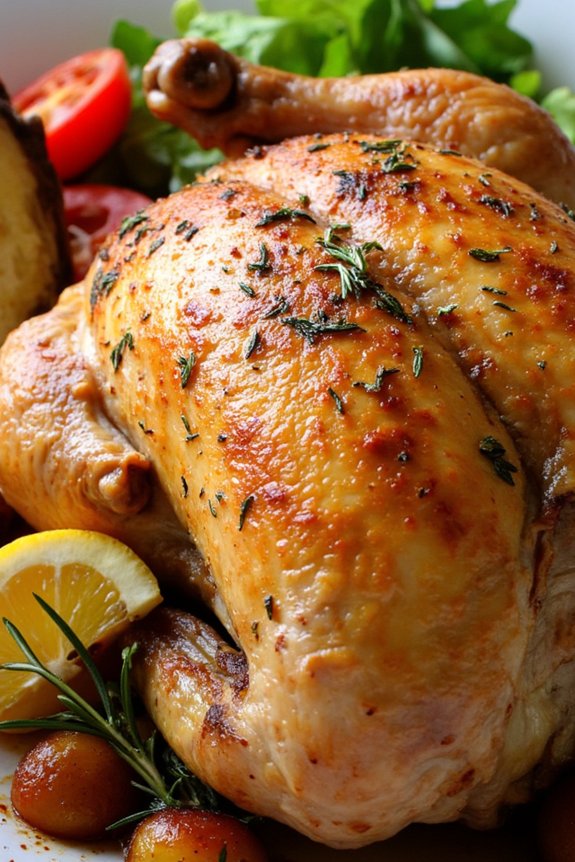
Lemon Herb Roasted Chicken is a classic and delightful dish that’s perfect for a cozy family dinner or a special gathering. This recipe combines the crispiness of perfectly roasted chicken with the revitalizing flavor of lemon and the aromatic blend of herbs. The preparation is straightforward, making it an excellent option for cooks of all skill levels who want to impress without spending hours in the kitchen.
The key to this dish is in the balance of flavors—zesty lemon, fragrant herbs, and the savory goodness of the chicken itself. Roasting the chicken at a high temperature guarantees a crispy skin, while the lemon and herbs infuse the meat with flavor, keeping it juicy and tender. The aroma that fills your kitchen as this Lemon Herb Roasted Chicken cooks is simply irresistible, making it a favorite go-to recipe for any occasion.
Serve it alongside roasted vegetables or a fresh salad for a complete meal that will have everyone asking for seconds.
Ingredients (Serves 4-6):
- 1 whole chicken (approximately 4-5 pounds)
- 2 lemons
- 4 tablespoons olive oil
- 4 cloves garlic, minced
- 2 teaspoons salt
- 1 teaspoon black pepper
- 2 tablespoons fresh rosemary, chopped
- 2 tablespoons fresh thyme, chopped
- 1 tablespoon fresh parsley, chopped
- 1 large onion, quartered
- Optional: additional herbs for garnish
Cooking Instructions:
- Preheat the Oven: Start by preheating your oven to 425°F (220°C). This high temperature will help give the chicken a crispy, golden-brown skin.
- Prepare the Chicken: Remove the giblets from the chicken and pat it dry with paper towels. Drying the chicken helps to achieve crispier skin.
- Season the Chicken: In a small bowl, mix together the olive oil, minced garlic, salt, black pepper, rosemary, thyme, and parsley. Rub this mixture all over the chicken, making sure to get under the skin for maximum flavor.
- Add Lemon and Onion: Cut one lemon into slices and stuff it inside the cavity of the chicken along with the quartered onion. This will add moisture and flavor from the inside out.
- Truss the Chicken: Tie the legs of the chicken together with kitchen twine. This helps the chicken cook evenly and keeps the flavor inside.
- Roast the Chicken: Place the chicken on a roasting pan or a large oven-proof skillet. Squeeze the juice of the second lemon over the top of the chicken and place it in the preheated oven. Roast for about 1 to 1.5 hours, or until the internal temperature reaches 165°F (75°C) and the juices run clear when the thickest part is pierced.
- Rest Before Serving: Once roasted, remove the chicken from the oven and let it rest for at least 10-15 minutes before carving. This allows the juices to redistribute, resulting in a juicier chicken.
Extra Tips:
For the best results, choose a chicken that’s fresh and of good quality. If you have time, let the chicken marinate in the herb mixture overnight for deeper flavor.
When roasting, use a meat thermometer to guarantee the chicken is perfectly cooked without drying it out. Finally, if the skin starts to brown too quickly, cover the chicken loosely with aluminum foil to prevent burning while it finishes cooking.
Mild Chicken and Vegetable Curry

Indulge in a comforting bowl of Mild Chicken and Vegetable Curry, a perfect blend of tender chicken pieces and a medley of colorful vegetables, all enveloped in a fragrant, creamy curry sauce.
This dish promises a delightful balance of flavors without overwhelming spice, making it an excellent choice for family dinners and gatherings. Whether you’re a seasoned home cook or a kitchen newbie, this recipe is both simple and satisfying, offering a delicious meal in under an hour.
Ideal for serving 4-6 people, this curry is a fantastic way to incorporate healthy vegetables into your meal without compromising on taste. The curry can be served over steamed rice or warm naan bread, making it a versatile addition to your dinner table.
The gentle spices and creamy texture are sure to please even the pickiest eaters, while still capturing the essence of traditional curry dishes. Prepare to impress your guests or enjoy a quiet family dinner with this quick and easy recipe.
Ingredients:
- 1.5 lbs (about 700g) boneless, skinless chicken breasts, cubed
- 1 tbsp vegetable oil
- 1 large onion, finely chopped
- 3 cloves garlic, minced
- 1 tbsp fresh ginger, grated
- 2 tbsp mild curry powder
- 1 tsp ground cumin
- 1 tsp ground coriander
- 1 cup coconut milk
- 1 cup chicken broth
- 2 medium carrots, sliced
- 1 bell pepper, chopped (any color)
- 1 cup frozen peas
- Salt and pepper to taste
- Fresh cilantro, chopped, for garnish
Cooking Instructions:
- Prepare the Ingredients: Begin by cutting the chicken into bite-sized cubes. Chop the onion, mince the garlic, grate the ginger, and slice the carrots and bell pepper.
- Cook the Chicken: Heat the vegetable oil in a large pan or pot over medium heat. Add the cubed chicken and cook until browned on all sides, about 5-7 minutes. Remove the chicken from the pan and set aside.
- Sauté the Aromatics: In the same pan, add the chopped onion and sauté for 2-3 minutes until it becomes translucent. Add the minced garlic and grated ginger, stirring for another minute until fragrant.
- Add Spices: Sprinkle the mild curry powder, ground cumin, and ground coriander over the onion mixture. Stir well to coat the onions and allow the spices to toast slightly, releasing their aromas.
- Create the Sauce: Pour in the coconut milk and chicken broth, stirring to combine with the spices. Bring the mixture to a gentle simmer.
- Cook the Vegetables: Add the sliced carrots and bell pepper to the pan. Cover and let them cook for about 8-10 minutes until they start to soften.
- Combine Everything: Return the browned chicken to the pan along with the frozen peas. Stir everything together and let it simmer uncovered for another 10 minutes, or until the chicken is fully cooked and the vegetables are tender.
- Season and Serve: Taste and adjust the seasoning with salt and pepper as needed. Garnish with fresh cilantro before serving. Enjoy your curry over rice or with naan.
Extra Tips:
For a richer flavor, consider marinating the chicken in a mixture of yogurt and a pinch of curry powder for at least 30 minutes before cooking.
If you prefer a thicker curry, you can reduce the sauce by simmering it longer, or mix a tablespoon of cornstarch with water and stir it into the sauce.
Feel free to swap in your favorite vegetables or add a bit of chili for some extra heat. Remember, this dish is versatile, so make it your own!
Herb-Crusted Baked Salmon

Herb-Crusted Baked Salmon is a delightful and nutritious dish that combines the rich, buttery flavor of salmon with a crisp, flavorful herb crust. This recipe is perfect for a quick and easy dinner, as it requires minimal preparation and can be on your table in under 30 minutes. The herb crust not only adds a wonderful texture but also infuses the salmon with aromatic flavors, making it a standout dish for any occasion.
This dish is versatile and can be paired with a variety of side dishes, such as a fresh salad, steamed vegetables, or fluffy rice, to create a complete and satisfying meal. Whether you’re hosting a dinner party or simply preparing a family meal, Herb-Crusted Baked Salmon is sure to impress with its elegant presentation and exquisite taste. Follow this simple recipe to serve 4-6 people and enjoy a restaurant-quality meal in the comfort of your own home.
Ingredients for 4-6 Servings:
- 4-6 salmon fillets (about 6 ounces each)
- 1 cup breadcrumbs
- 2 tablespoons fresh parsley, chopped
- 2 tablespoons fresh dill, chopped
- 1 tablespoon fresh thyme, chopped
- 2 cloves garlic, minced
- 1 lemon, zested and juiced
- 3 tablespoons olive oil
- Salt and pepper to taste
Cooking Instructions:
- Preheat the Oven: Preheat your oven to 400°F (200°C) to guarantee it’s hot and ready for baking the salmon.
- Prepare the Herb Crust: In a medium-sized bowl, combine the breadcrumbs, parsley, dill, thyme, and minced garlic. Add the lemon zest and mix well to distribute the flavors evenly.
- Add Olive Oil: Drizzle the olive oil over the breadcrumb mixture and stir until the breadcrumbs are moistened and form a crumbly, cohesive mixture. Season the mixture with salt and pepper to taste.
- Prepare the Salmon Fillets: Place the salmon fillets on a baking sheet lined with parchment paper or lightly greased. Squeeze a little lemon juice over each fillet to enhance the flavor.
- Apply the Herb Crust: Generously spread the herb crust mixture over the top of each salmon fillet, pressing down gently to make sure it adheres well.
- Bake the Salmon: Transfer the baking sheet to the preheated oven and bake for 12-15 minutes, or until the salmon is cooked through and the crust is golden brown. The salmon should flake easily with a fork when done.
- Serve: Remove the salmon from the oven and let it rest for a few minutes before serving. Garnish with additional fresh herbs or lemon slices if desired.
Extra Tips:
For an even crispier crust, you can broil the salmon for an additional 1-2 minutes at the end of the baking time, keeping a close eye to prevent burning.
If you prefer a more intense lemon flavor, add a bit of lemon juice to the herb crust mixture.
To promote even cooking, try to use salmon fillets of similar thickness.
If your fillets have skin, consider leaving it on during baking for added moisture and flavor, removing it before serving if desired.
Quick Beef and Pepper Stir-Fry

Quick Beef and Pepper Stir-Fry is a delightful and speedy dinner option that’s perfect for busy weeknights. This dish combines tender slices of beef with vibrant bell peppers, all coated in a savory sauce that’s certain to satisfy your taste buds.
The beauty of this recipe lies in its simplicity and the fact that it can be prepared in under 30 minutes, making it a lifesaver when you’re short on time but still want to enjoy a hearty and flavorful meal.
This stir-fry isn’t only quick to prepare but also versatile, allowing you to customize it according to your preferences. You can choose your favorite color of bell peppers to add more color to the dish or adjust the level of spice to suit your taste.
Served over a bed of steamed rice or noodles, this Quick Beef and Pepper Stir-Fry makes for a complete and satisfying meal that will please both kids and adults alike.
Ingredients (Serving Size: 4-6 people):
- 1 pound beef sirloin or flank steak, thinly sliced
- 2 tablespoons soy sauce
- 1 tablespoon cornstarch
- 2 tablespoons vegetable oil
- 1 large red bell pepper, sliced
- 1 large green bell pepper, sliced
- 1 medium onion, sliced
- 3 cloves garlic, minced
- 1 tablespoon ginger, minced
- 3 tablespoons oyster sauce
- 1 tablespoon hoisin sauce
- 1 teaspoon sesame oil
- Salt and pepper to taste
- Cooked rice or noodles, for serving
Instructions:
- Marinate the Beef: In a medium bowl, combine the thinly sliced beef with soy sauce and cornstarch. Mix until the beef is well-coated and let it marinate for about 10 minutes. This step helps to tenderize the meat and infuse it with flavor.
- Prepare the Stir-Fry Sauce: In a small bowl, whisk together the oyster sauce, hoisin sauce, and sesame oil. Set aside. This will serve as the savory sauce that coats the beef and vegetables during cooking.
- Cook the Beef: Heat 1 tablespoon of vegetable oil in a large skillet or wok over medium-high heat. Once hot, add the marinated beef in a single layer, cooking for about 2-3 minutes on each side until browned and just cooked through. Remove the beef from the skillet and set aside.
- Stir-Fry the Vegetables: In the same skillet, add the remaining tablespoon of vegetable oil. Add the sliced onions, and sauté for about 2 minutes until they begin to soften. Then add the minced garlic and ginger, stirring for an additional 30 seconds until fragrant.
- Add Bell Peppers: Add the sliced red and green bell peppers to the skillet, stirring frequently for about 3-4 minutes until they’re tender-crisp.
- Combine Ingredients: Return the cooked beef to the skillet with the vegetables. Pour the prepared stir-fry sauce over the beef and vegetables. Stir well to combine, allowing the sauce to coat everything evenly. Season with salt and pepper to taste.
- Serve: Remove from heat and serve immediately over a bed of steamed rice or noodles.
Extra Tips:
For best results, make sure to slice the beef against the grain, which will help in achieving a more tender texture. If you prefer a spicier dish, consider adding a pinch of red pepper flakes or a dash of hot sauce to the stir-fry sauce.
You can also add additional vegetables like broccoli or snap peas for more variety. Remember to keep the heat fairly high while cooking to guarantee that the vegetables remain crisp and the beef sears properly.
Enjoy your Quick Beef and Pepper Stir-Fry fresh off the stove for the best flavor and texture!
Mediterranean Stuffed Bell Peppers
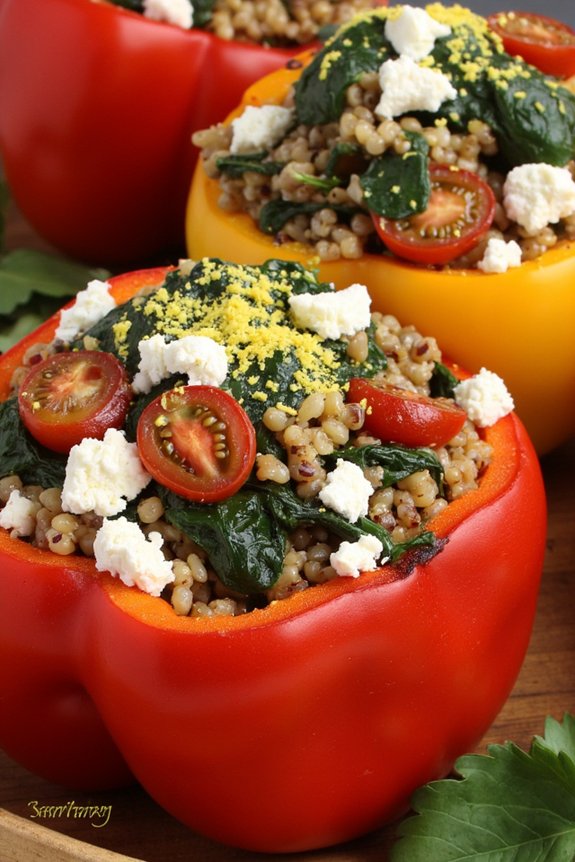
Mediterranean Stuffed Bell Peppers are a delectable combination of fresh vegetables, aromatic herbs, and savory grains, all baked to perfection inside tender bell peppers. This dish brings the rich, vibrant flavors of the Mediterranean right to your dining table. It’s not only a feast for the eyes but also a healthy and satisfying meal that everyone will love.
Perfect for a quick weeknight dinner, these stuffed peppers are easy to prepare and can be customized to suit your taste preferences. Whether you’re looking for a vegetarian option or a dish that can incorporate protein like ground turkey or beef, these Mediterranean Stuffed Bell Peppers are versatile enough to accommodate.
The filling is a delightful blend of quinoa, tomatoes, spinach, and feta cheese, seasoned with fragrant herbs like oregano and basil. This recipe serves 4-6 people, making it an excellent choice for a family meal or a small dinner party.
Ingredients:
- 6 large bell peppers (any color)
- 1 cup quinoa
- 2 cups vegetable broth
- 1 tablespoon olive oil
- 1 small onion, diced
- 2 cloves garlic, minced
- 1 cup cherry tomatoes, halved
- 1 cup fresh spinach, chopped
- 1 teaspoon dried oregano
- 1 teaspoon dried basil
- Salt and pepper to taste
- 1 cup crumbled feta cheese
- 1/4 cup chopped fresh parsley
- Juice of 1 lemon
Cooking Instructions:
- Preheat the Oven: Preheat your oven to 375°F (190°C). This allows your oven to reach the correct temperature while you prepare the other ingredients.
- Prepare the Quinoa: Rinse the quinoa under cold water. In a medium saucepan, combine the quinoa and vegetable broth. Bring to a boil, then reduce the heat to low, cover, and let it simmer for about 15 minutes, or until the quinoa is fluffy and the liquid is absorbed. Set it aside.
- Prepare the Bell Peppers: Cut the tops off the bell peppers and remove the seeds and membranes. Lightly brush the outside of the peppers with a bit of olive oil to help them cook evenly. Place them upright in a baking dish.
- Cook the Vegetables: In a large skillet, heat the olive oil over medium heat. Add the diced onion and cook until translucent, about 5 minutes. Stir in the garlic and cook for another 1-2 minutes. Add the cherry tomatoes and spinach, cooking until the spinach is wilted.
- Mix the Filling: In a large bowl, combine the cooked quinoa, the vegetable mixture, oregano, basil, salt, and pepper. Stir in the crumbled feta cheese and fresh parsley.
- Stuff the Peppers: Spoon the quinoa mixture into each pepper, packing it in tightly. Drizzle the lemon juice over the stuffed peppers for extra flavor.
- Bake: Cover the baking dish with foil and bake in the preheated oven for 30 minutes. Remove the foil and continue to bake for another 10-15 minutes, or until the peppers are tender and the tops are slightly browned.
- Serve: Allow the peppers to cool slightly before serving. Garnish with additional parsley or feta if desired.
Extra Tips:
To ascertain your Mediterranean Stuffed Bell Peppers have the best flavor, try roasting the peppers briefly before stuffing them to enhance their sweetness and texture. If you prefer a meat option, you can add cooked ground turkey or beef to the filling.
For a vegan version, simply omit the feta cheese or substitute it with a dairy-free alternative. Feel free to experiment with other grains such as couscous or rice, and adjust the herbs and spices to suit your personal taste.
This dish can also be prepared ahead of time, making it convenient for busy evenings—just stuff the peppers and store them in the fridge until you’re ready to bake.
Light Chicken and Spinach Soup
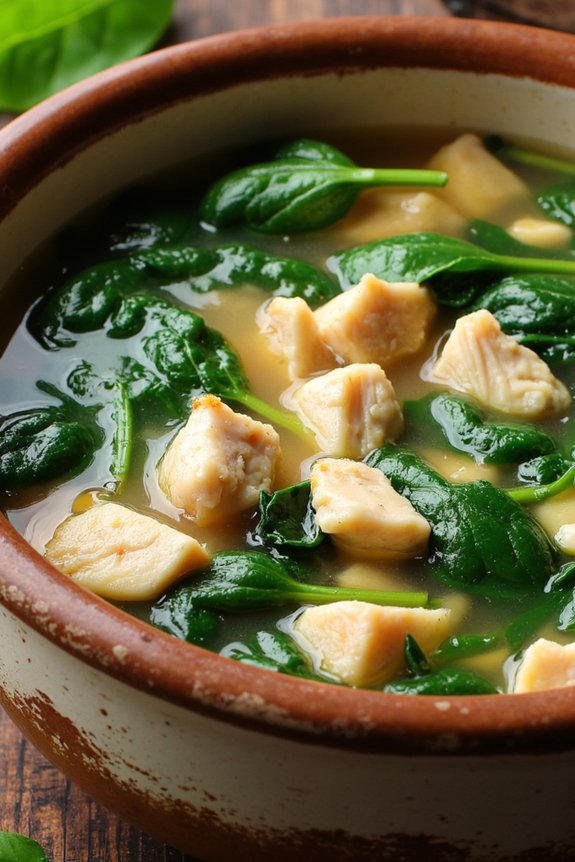
If you’re searching for a wholesome, delicious, and quick meal to add to your dinner rotation, seek no further than this Light Chicken and Spinach Soup. Perfect for busy weeknights, it’s a hearty and nutritious dish that doesn’t compromise on flavor. The savory aroma of simmering chicken, garlic, and fresh spinach creates a comforting atmosphere in the kitchen, making this soup a family favorite.
With just a few simple ingredients, you can whip up a meal that’s both satisfying and nourishing. This soup isn’t only quick and easy to prepare but also packed with protein and vitamins, making it an excellent option for those aiming to maintain a healthy diet. Spinach is rich in iron and calcium, while chicken provides lean protein that helps to keep you full and energized.
Whether you’re serving it as a main course or a starter, this Light Chicken and Spinach Soup is sure to please everyone at the table.
Ingredients (Serves 4-6):
- 1 tablespoon olive oil
- 1 medium onion, chopped
- 2 cloves garlic, minced
- 1 pound boneless, skinless chicken breasts, cut into small cubes
- 6 cups chicken broth
- 1 teaspoon dried thyme
- 1 teaspoon dried oregano
- 1 bay leaf
- Salt and pepper to taste
- 3 cups fresh spinach leaves
- 1 cup cooked small pasta (optional)
- 1 lemon, juiced
Cooking Instructions:
- Prepare the Ingredients: Begin by chopping the onion and mincing the garlic. Cut the chicken breasts into small, bite-sized cubes. Wash and drain the spinach leaves thoroughly.
- Sauté Aromatics: In a large pot, heat the olive oil over medium heat. Add the chopped onion and garlic, sautéing until the onion is translucent and the garlic is fragrant, about 3-4 minutes.
- Cook the Chicken: Add the cubed chicken to the pot. Cook, stirring occasionally, until the chicken is lightly browned on all sides, approximately 5-7 minutes.
- Add Broth and Seasonings: Pour in the chicken broth, then add the dried thyme, oregano, and bay leaf. Season with salt and pepper to taste. Stir well to combine.
- Simmer the Soup: Bring the mixture to a boil, then reduce the heat to low. Cover the pot and let the soup simmer for 15-20 minutes, allowing the flavors to meld together.
- Incorporate Spinach and Pasta: Remove the bay leaf, then add the fresh spinach leaves to the pot. Stir until the spinach is wilted, about 2 minutes. If using, add the cooked pasta and stir to combine.
- Finish with Lemon Juice: Just before serving, stir in the fresh lemon juice to add a bright, revitalizing note.
Extra Tips:
For added depth of flavor, consider using homemade chicken broth if you have it on hand. You can also switch up the greens by substituting kale or Swiss chard for spinach.
To make the soup heartier, add more cooked pasta or even some white beans. If you’re in a pinch, rotisserie chicken can be used instead of cooking the chicken from scratch, saving even more time.
Remember to taste the soup before serving and adjust the seasoning if necessary, as the saltiness can vary depending on the broth used.