

Welcome to a collection of delightful dinner ideas that don’t require cheese. If you’re like me and always on the lookout for quick, no-fuss recipes, you’re in the right place. Think of a Hearty Vegetable Stir-Fry sizzling with vibrant colors or the refreshing aroma of Lemon Herb Grilled Chicken filling your kitchen. These recipes, like Spaghetti Aglio E Olio and Savory Lentil Soup, are perfect for those busy weeknights. I’m excited to share these culinary gems with you!
Hearty Vegetable Stir-Fry
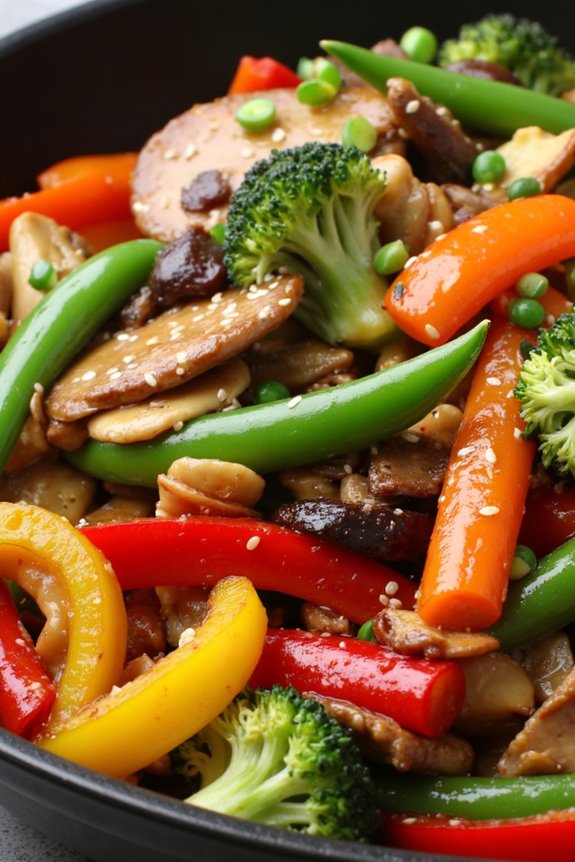
A Hearty Vegetable Stir-Fry is a delicious and nutritious dish that can be prepared quickly, making it the perfect choice for a no-cheese dinner. This recipe is packed with vibrant vegetables, providing a variety of flavors and textures that are sure to satisfy. The key to a successful stir-fry is using fresh ingredients and cooking them just long enough to keep them crisp and colorful.
This dish is versatile and can be customized with your favorite vegetables or whatever you have on hand. The Hearty Vegetable Stir-Fry serves 4-6 people and is a great way to enjoy a nutritious meal without any cheese. This recipe includes a mixture of colorful vegetables such as bell peppers, broccoli, and carrots, all tossed in a savory sauce that complements the natural sweetness of the veggies.
Serve it over rice or noodles for a complete meal, or enjoy it on its own as a wholesome side dish.
Ingredients:
- 2 tablespoons vegetable oil
- 1 large onion, sliced
- 2 cloves garlic, minced
- 1 tablespoon fresh ginger, grated
- 1 red bell pepper, sliced
- 1 yellow bell pepper, sliced
- 1 cup broccoli florets
- 1 cup snap peas
- 2 carrots, julienned
- 1 cup mushrooms, sliced
- 1/4 cup soy sauce
- 2 tablespoons sesame oil
- 1 tablespoon rice vinegar
- 1 tablespoon honey or maple syrup
- 1 tablespoon cornstarch mixed with 2 tablespoons water
- Salt and pepper to taste
- Sesame seeds and chopped green onions for garnish
Instructions:
- Prepare the Vegetables: Wash and chop all your vegetables. Slice the onion, mince the garlic, grate the ginger, slice the bell peppers, cut the broccoli into florets, julienne the carrots, and slice the mushrooms.
- Heat the Oil: In a large wok or skillet, heat the vegetable oil over medium-high heat until it’s shimmering.
- Sauté Aromatics: Add the sliced onions, garlic, and grated ginger to the pan. Stir-fry for about 1-2 minutes until the onions become translucent and the mixture is fragrant.
- Add Vegetables: Add the bell peppers, broccoli, snap peas, carrots, and mushrooms. Stir-fry for 5-7 minutes, or until the vegetables are tender-crisp.
- Prepare the Sauce: In a small bowl, mix together the soy sauce, sesame oil, rice vinegar, honey or maple syrup, and the cornstarch mixture.
- Combine Sauce and Vegetables: Pour the sauce over the vegetables in the pan. Stir well to coat all the vegetables evenly. Cook for another 2-3 minutes, allowing the sauce to thicken slightly.
- Season and Serve: Season with salt and pepper to taste. Transfer the stir-fry to a serving platter and garnish with sesame seeds and chopped green onions. Serve immediately over rice or noodles if desired.
Extra Tips:
For a successful stir-fry, make sure all your ingredients are prepared and ready before you start cooking, as the process goes quickly. Keep the heat high to achieve a good sear on the vegetables, which enhances their flavor and texture.
Feel free to substitute or add other vegetables based on your preference, such as zucchini or baby corn. If you prefer a bit of heat, you can add a pinch of red pepper flakes or a splash of hot sauce to the sauce mixture. Enjoy your Hearty Vegetable Stir-Fry as a healthy, cheese-free option for dinner!
Lemon Herb Grilled Chicken
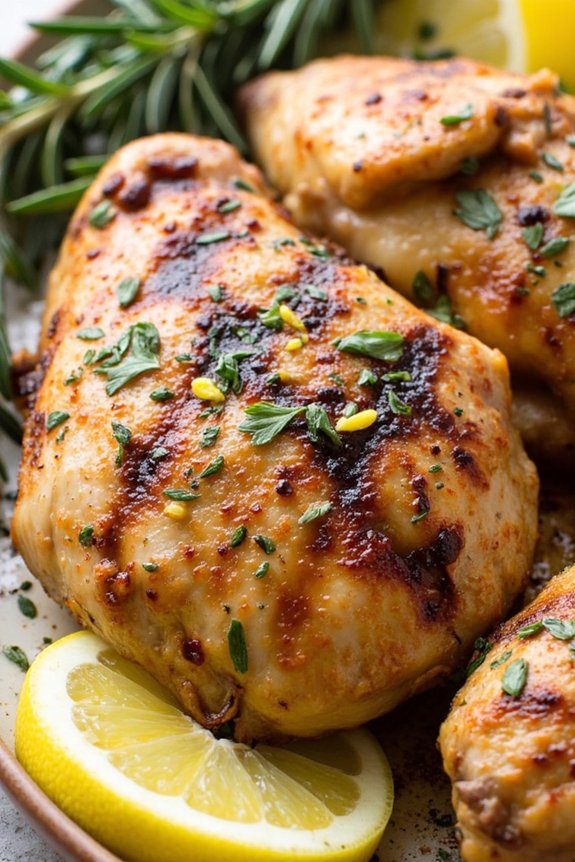
If you’re looking for a delicious and satisfying no cheese dinner option, this Lemon Herb Grilled Chicken is perfect for you. Bursting with flavors from fresh herbs and tangy lemon, this dish is a wonderful addition to any meal plan. Ideal for a summer barbecue or a simple family dinner, the grilled chicken remains juicy and tender, thanks to the flavorful marinade.
Whether you’re serving it with a fresh salad or alongside some roasted vegetables, this recipe is sure to become a favorite in your household.
The key to achieving the perfect Lemon Herb Grilled Chicken lies in the marinade, which infuses the meat with zest and aromatic herbs. Preparing this dish is straightforward and requires minimal ingredients, making it a great go-to recipe for busy weeknights. This recipe serves 4-6 people, guaranteeing there’s enough to delight everyone at the table.
Ingredients:
- 4-6 boneless, skinless chicken breasts
- 1/2 cup olive oil
- Juice of 2 lemons
- Zest of 1 lemon
- 4 cloves garlic, minced
- 2 tablespoons fresh rosemary, chopped
- 2 tablespoons fresh thyme, chopped
- 1 tablespoon fresh parsley, chopped
- 1 teaspoon salt
- 1/2 teaspoon black pepper
Cooking Instructions:
- Prepare the Marinade: In a large mixing bowl, combine olive oil, lemon juice, lemon zest, minced garlic, chopped rosemary, thyme, parsley, salt, and black pepper. Whisk the ingredients together until well blended.
- Marinate the Chicken: Place the chicken breasts in a large resealable plastic bag or shallow dish. Pour the marinade over the chicken, confirming each piece is thoroughly coated. Seal the bag or cover the dish and refrigerate for at least 1 hour, or up to 4 hours for more intense flavor.
- Preheat the Grill: About 15 minutes before grilling, preheat your grill to medium-high heat. Lightly oil the grill grates to prevent the chicken from sticking.
- Grill the Chicken: Remove the chicken from the marinade and place it on the preheated grill. Cook for about 6-7 minutes per side, or until the internal temperature reaches 165°F (75°C) and the chicken is no longer pink inside.
- Rest and Serve: Once cooked, remove the chicken from the grill and let it rest for a few minutes to retain its juices. Serve hot, garnished with additional fresh herbs and lemon slices if desired.
Extra Tips:
For the best results, allow the chicken to marinate for a minimum of one hour; however, if time permits, letting it sit for a few hours enhances the flavors even more.
Always preheat the grill to guarantee even cooking, and avoid opening the grill too frequently to maintain a consistent temperature. If you don’t have access to an outdoor grill, a grill pan or even a broiler can be used as an alternative.
Finally, remember to let the chicken rest after grilling to lock in the juices, resulting in a more succulent and flavorful dish.
Spaghetti Aglio E Olio
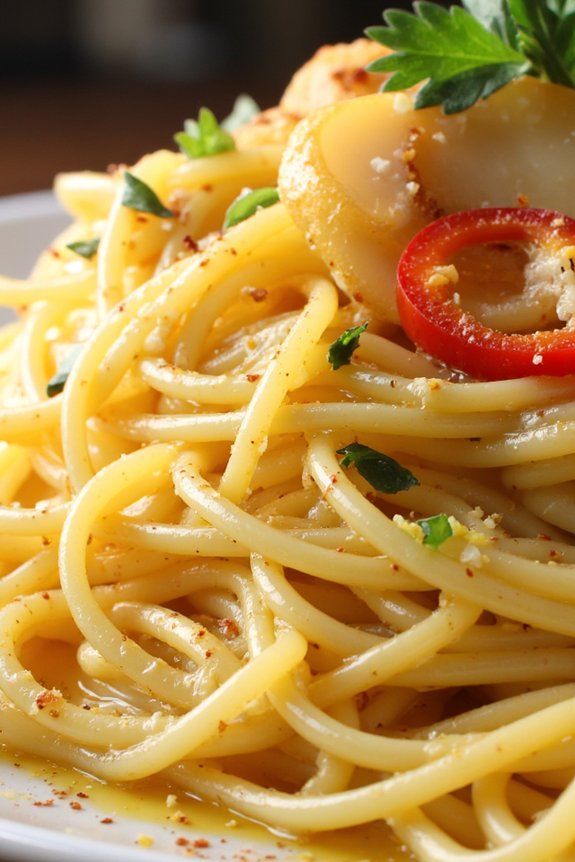
Spaghetti Aglio E Olio is a classic Italian dish that’s simple yet incredibly flavorful, perfect for a quick dinner without the need for cheese. This dish highlights the rich flavors of garlic and olive oil, combined with a hint of red pepper flakes for a slight kick. Originating from Naples, Spaghetti Aglio E Olio has become a beloved staple around the world due to its minimal ingredients and ease of preparation.
Whether you’re a seasoned chef or a beginner in the kitchen, this recipe is both accessible and satisfying.
The beauty of Spaghetti Aglio E Olio lies in its simplicity and the use of high-quality ingredients. The key components of the dish are spaghetti, garlic, olive oil, and red pepper flakes, all of which work together to create a harmonious blend of flavors.
The garlic is gently sautéed in the olive oil, infusing it with a rich aroma, while the red pepper flakes add just the right amount of heat to balance the dish. This no-cheese recipe is perfect for those looking to enjoy a delicious meal without dairy, and it can be prepared in under 30 minutes, making it an ideal choice for a busy weeknight dinner.
Ingredients (Serves 4-6):
- 1 pound spaghetti
- 1/2 cup extra-virgin olive oil
- 8-10 cloves garlic, thinly sliced
- 1 teaspoon red pepper flakes
- Salt, to taste
- Freshly ground black pepper, to taste
- 1/4 cup fresh parsley, chopped
- Zest of 1 lemon (optional)
Instructions:
- Cook the Spaghetti: Begin by bringing a large pot of salted water to a boil. Add the spaghetti and cook according to the package instructions until al dente. Reserve 1 cup of the pasta cooking water, then drain the spaghetti.
- Sauté the Garlic: While the pasta is cooking, heat the olive oil in a large pan over medium heat. Add the sliced garlic and cook gently, stirring frequently, until the garlic is golden and fragrant, approximately 2-3 minutes. Be careful not to let the garlic burn, as this will result in a bitter taste.
- Add the Red Pepper Flakes: Stir in the red pepper flakes and cook for an additional 30 seconds to release their flavor into the oil.
- Combine Pasta and Garlic Oil: Add the cooked spaghetti to the pan with the garlic oil. Toss the pasta to coat it evenly with the oil and garlic. If the pasta seems dry, gradually add some of the reserved pasta cooking water until the desired consistency is reached.
- Season and Serve: Season the pasta with salt and freshly ground black pepper to taste. Stir in the chopped parsley and lemon zest, if using, for added brightness. Serve immediately, garnishing with additional parsley if desired.
Extra Tips:
To guarantee the best results with your Spaghetti Aglio E Olio, use high-quality extra-virgin olive oil, as it’s a central flavor component of the dish.
When slicing the garlic, aim for uniform thin slices to guarantee even cooking and prevent burning. If you prefer a milder heat, adjust the amount of red pepper flakes to your taste.
Additionally, the reserved pasta water is an essential element for achieving the perfect sauce consistency, so don’t skip this step. Enjoy your delicious, cheese-free meal!
Savory Lentil Soup

Savory Lentil Soup is a hearty, nutritious dish perfect for those seeking a comforting meal without any cheese. Packed with protein-rich lentils and a medley of vegetables, this soup is both filling and flavorful. It’s an excellent choice for a no-cheese dinner menu, offering a warm, satisfying option that everyone at the table can enjoy.
This recipe serves 4-6 people and is ideal for a cozy family dinner. The combination of spices and herbs infuses the soup with a depth of flavor that complements the earthy taste of lentils. Whether you’re making it for a weeknight meal or a weekend gathering, Savory Lentil Soup is sure to please.
Ingredients:
- 2 tablespoons olive oil
- 1 large onion, chopped
- 3 cloves garlic, minced
- 2 carrots, diced
- 2 celery stalks, diced
- 1 teaspoon ground cumin
- 1 teaspoon ground coriander
- 1/2 teaspoon smoked paprika
- 1 cup dried lentils, rinsed
- 6 cups vegetable broth
- 1 can (14.5 oz) diced tomatoes
- 2 bay leaves
- Salt and pepper to taste
- 2 tablespoons fresh parsley, chopped
Instructions:
1. Prepare the Base: In a large pot, heat the olive oil over medium heat. Add the chopped onion and sauté for about 5 minutes, until the onion becomes translucent.
Stir in the minced garlic, diced carrots, and diced celery. Cook for another 5 minutes, stirring occasionally, until the vegetables begin to soften.
2. Add Spices: Sprinkle in the ground cumin, ground coriander, and smoked paprika. Stir well to coat the vegetables with the spices, and cook for 1-2 minutes until the spices are fragrant.
3. Incorporate Lentils and Liquids: Add the rinsed lentils to the pot, followed by the vegetable broth and diced tomatoes. Stir well to combine all the ingredients.
Drop in the bay leaves and bring the mixture to a boil.
4. Simmer the Soup: Once boiling, reduce the heat to low, cover the pot, and let the soup simmer for about 30-35 minutes, or until the lentils are tender.
Stir occasionally to prevent sticking.
5. Season and Serve: Remove the bay leaves and season the soup with salt and pepper to taste. Stir in the fresh parsley right before serving.
Ladle the soup into bowls and enjoy while hot.
Extra Tips:
For an added depth of flavor, consider using a homemade vegetable broth instead of store-bought. If you prefer a thicker consistency, you can blend a portion of the soup and then mix it back in.
Additionally, feel free to customize the soup by adding other vegetables like spinach or zucchini, or adjusting the spices to suit your taste preferences.
This soup can be stored in the fridge for up to four days or frozen for a longer shelf life, making it a convenient option for meal prep.
Coconut Curry Shrimp
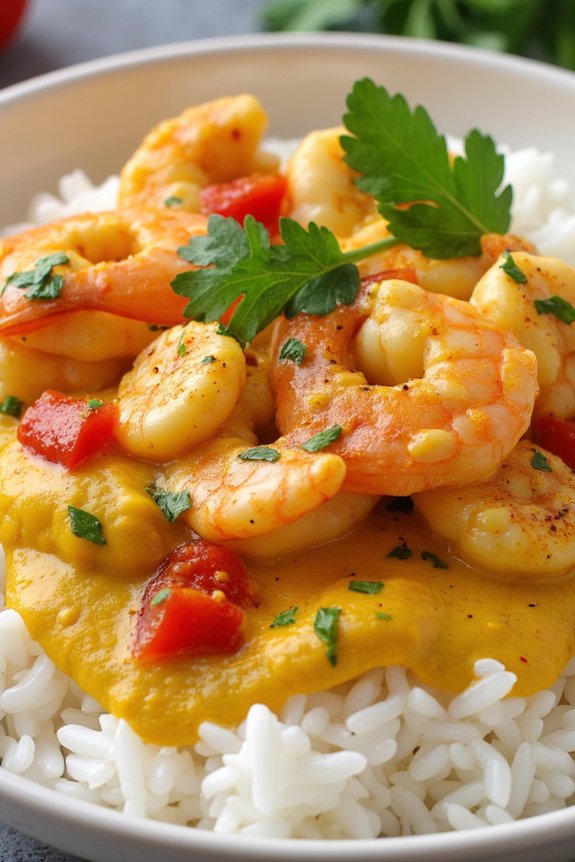
Coconut Curry Shrimp is a delightful dish that combines the rich flavors of coconut milk with the spicy and aromatic elements of curry. This recipe is perfect for a weeknight dinner or a special occasion, providing a burst of flavors that are certain to satisfy your taste buds.
The creamy texture of the coconut milk complements the tender shrimp, while the curry spices add depth and warmth to the dish. Whether you’re a seasoned home cook or a beginner, this recipe is straightforward to follow and will result in a delicious meal that’s both comforting and exotic.
Serving a group of 4-6 people, Coconut Curry Shrimp is an excellent choice for those looking to enjoy a no-cheese dinner option. The key to this dish is in balancing the flavors of the curry with the sweetness of the coconut milk and the freshness of the shrimp.
Each bite promises a combination of creamy, spicy, and savory notes that will leave everyone wanting more. It’s not only quick to prepare but also a healthy option, as shrimp is a great source of lean protein.
Ingredients:
- 2 pounds of large shrimp, peeled and deveined
- 2 tablespoons of vegetable oil
- 1 large onion, finely chopped
- 3 cloves of garlic, minced
- 1 tablespoon of fresh ginger, grated
- 2 tablespoons of curry powder
- 1 teaspoon of ground cumin
- 1 teaspoon of ground coriander
- 1/2 teaspoon of cayenne pepper (optional, for heat)
- 1 can (14 ounces) of coconut milk
- 1 cup of diced tomatoes
- 1 tablespoon of fish sauce
- Salt and pepper to taste
- Juice of 1 lime
- 1/4 cup of chopped fresh cilantro
- Cooked rice, for serving
Cooking Instructions:
- Prepare the Shrimp: Rinse the shrimp under cold water and pat them dry with paper towels. Confirm they’re fully peeled and deveined.
- Sauté Aromatics: In a large skillet or wok, heat the vegetable oil over medium heat. Add the chopped onion and sauté until it becomes translucent, about 5 minutes. Stir in the minced garlic and grated ginger, cooking for an additional 1 minute until fragrant.
- Add Spices: Sprinkle in the curry powder, ground cumin, ground coriander, and cayenne pepper (if using). Stir well to coat the onion mixture, allowing the spices to toast slightly for about 2 minutes.
- Simmer Sauce: Pour in the coconut milk and diced tomatoes, stirring to combine. Bring the mixture to a simmer, then reduce the heat to low. Add the fish sauce, salt, and pepper, adjusting the seasoning to taste.
- Cook the Shrimp: Gently add the shrimp to the coconut curry sauce. Cook for about 5-7 minutes, or until the shrimp are pink and opaque, stirring occasionally to confirm even cooking.
- Finish the Dish: Remove the skillet from heat and stir in the lime juice. Garnish with fresh cilantro before serving.
- Serve: Serve the Coconut Curry Shrimp over a bed of cooked rice for a complete meal.
Extra Tips:
When cooking Coconut Curry Shrimp, it’s important to not overcook the shrimp as they can become rubbery. Keep an eye on them and remove from heat as soon as they turn pink and opaque.
If you prefer a thicker sauce, let the coconut curry simmer a bit longer before adding the shrimp. Adjust the level of spiciness by altering the amount of cayenne pepper used, or omit it altogether for a milder dish.
For added flavor, consider adding a dash of soy sauce or a pinch of sugar to enhance the sweetness and umami of the curry.
Balsamic Glazed Salmon
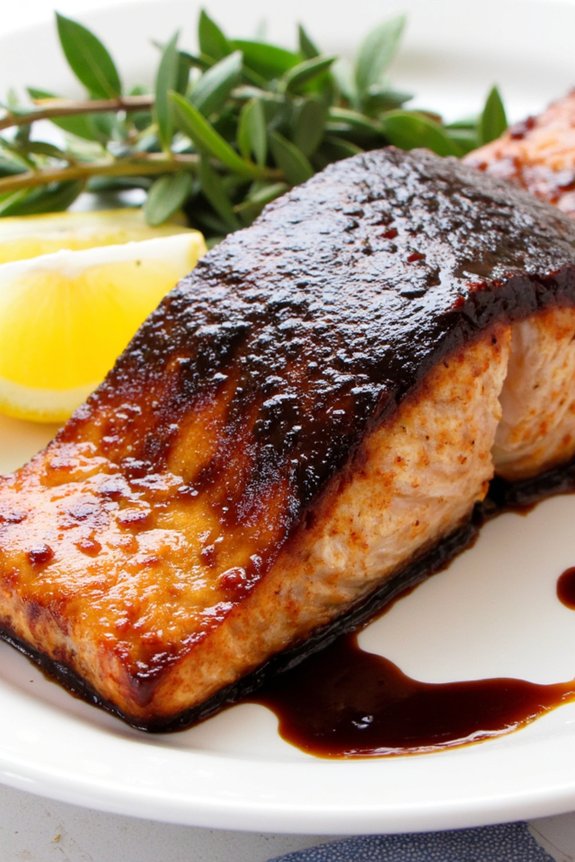
Balsamic Glazed Salmon is a delightful dish that combines the rich, savory flavor of salmon with a sweet and tangy balsamic glaze. This recipe is ideal for a nutritious dinner that doesn’t require cheese, while still delivering a burst of flavors with each bite. The balsamic glaze not only enhances the natural taste of the salmon but also adds an elegant touch to the presentation.
Perfect for a family dinner or a small gathering, this dish is both simple and impressive. Cooking Balsamic Glazed Salmon involves creating a luscious glaze with balsamic vinegar, honey, and a hint of garlic, which is then brushed over the salmon before baking. This method guarantees the fish remains moist and flavorful.
The dish pairs beautifully with a variety of sides, such as steamed vegetables or a light salad, making it a versatile choice for any occasion. With a preparation time of under an hour, you can enjoy this gourmet meal without spending all evening in the kitchen.
Ingredients (Serves 4-6):
- 4-6 salmon fillets (about 6 ounces each)
- 1/2 cup balsamic vinegar
- 2 tablespoons honey
- 2 cloves garlic, minced
- Salt, to taste
- Black pepper, to taste
- 1 tablespoon olive oil
- Fresh thyme, for garnish (optional)
- Lemon wedges, for serving (optional)
Cooking Instructions:
- Preheat and Prepare: Preheat your oven to 400°F (200°C). Line a baking sheet with parchment paper or aluminum foil for easy cleanup.
- Make the Glaze: In a small saucepan over medium heat, combine the balsamic vinegar, honey, and minced garlic. Stir continuously until the mixture comes to a boil, then reduce the heat and let it simmer until it thickens slightly, about 5-7 minutes.
- Prepare the Salmon: Pat the salmon fillets dry with paper towels. Place them skin-side down on the prepared baking sheet. Season them with salt and black pepper.
- Apply the Glaze: Use a brush to apply the balsamic glaze generously over each salmon fillet. Reserve a portion of the glaze for serving.
- Bake the Salmon: Bake the salmon in the preheated oven for 12-15 minutes, or until the fish flakes easily with a fork and is cooked through.
- Serve: Remove the salmon from the oven and let it rest for a few minutes. Drizzle with the reserved glaze and garnish with fresh thyme and lemon wedges if desired.
Extra Tips:
To ascertain the salmon is perfectly cooked, keep an eye on its color and texture. The flesh should be opaque and easily flake with a fork. If you prefer a slightly caramelized top, you can switch the oven to broil for the last 2 minutes of cooking.
Remember to keep the salmon fillets spaced evenly on the baking sheet to ensure even cooking. If you have leftover glaze, it can be stored in the refrigerator for up to a week and used for other dishes like chicken or roasted vegetables.
Moroccan Chickpea Stew
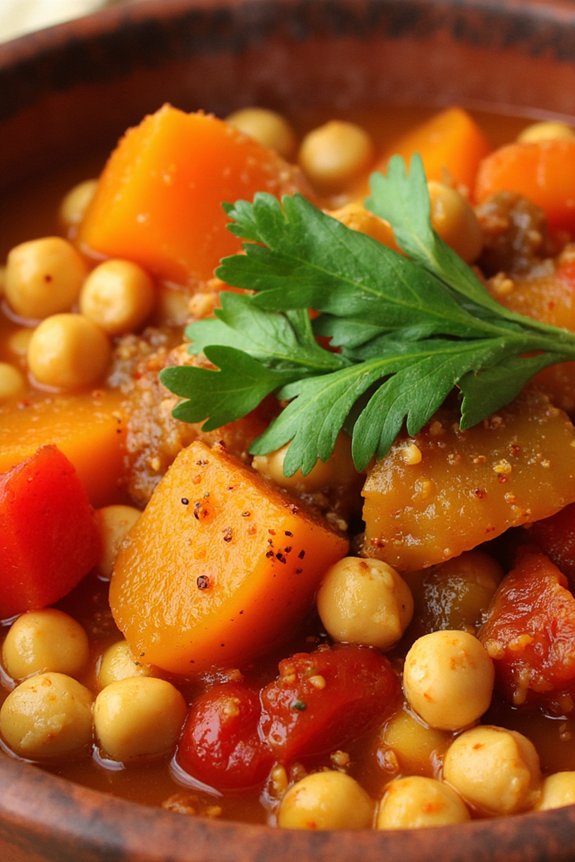
Moroccan Chickpea Stew is a flavorful and hearty dish that brings the vibrant tastes of Morocco to your dinner table without the use of cheese. This stew is a wonderful combination of chickpeas, vegetables, and aromatic spices, making it both nutritious and satisfying.
It’s perfect for a cozy family dinner and can easily be prepared in advance, allowing the flavors to meld together beautifully over time. The dish is naturally vegan and gluten-free, appealing to a variety of dietary preferences.
The Moroccan Chickpea Stew is rich in protein and fiber, thanks to the chickpeas, while the variety of spices such as cumin, coriander, and cinnamon add depth and warmth. With a serving size of 4-6 people, this stew is perfect for sharing or for enjoying leftovers the next day.
Ingredients (Serves 4-6)
- 2 tablespoons olive oil
- 1 large onion, chopped
- 3 cloves garlic, minced
- 2 teaspoons ground cumin
- 1 teaspoon ground coriander
- 1/2 teaspoon ground cinnamon
- 1/4 teaspoon cayenne pepper
- 2 large carrots, diced
- 1 large red bell pepper, chopped
- 2 cans (15 ounces each) chickpeas, drained and rinsed
- 1 can (14 ounces) diced tomatoes
- 3 cups vegetable broth
- 1/2 cup dried apricots, chopped
- Salt and pepper to taste
- 1 lemon, juiced
- 1/4 cup fresh cilantro, chopped
Cooking Instructions
- Heat the Oil: In a large pot or Dutch oven, heat the olive oil over medium heat. Add the chopped onion and sauté for about 5 minutes, or until the onion becomes translucent.
- Add Garlic and Spices: Stir in the minced garlic, ground cumin, ground coriander, ground cinnamon, and cayenne pepper. Cook for an additional minute, stirring constantly to prevent the garlic from burning and to allow the spices to become fragrant.
- Incorporate Vegetables: Add the diced carrots and chopped red bell pepper to the pot. Stir well to coat the vegetables with the spice mixture. Cook for about 5 minutes, or until the vegetables begin to soften.
- Add Chickpeas and Tomatoes: Stir in the drained and rinsed chickpeas and the can of diced tomatoes. Mix well to combine all the ingredients.
- Pour in Broth and Apricots: Add the vegetable broth and chopped dried apricots to the pot. Bring the mixture to a boil, then reduce the heat to low and let it simmer uncovered for about 30 minutes, or until the vegetables are tender and the flavors have melded together.
- Season and Finish: Season the stew with salt and pepper to taste. Stir in the lemon juice and chopped cilantro just before serving to add brightness and a fresh hint of flavor.
Extra Tips
For a thicker stew, mash some of the chickpeas with the back of a spoon against the side of the pot. This will naturally thicken the stew without the need for additional thickening agents.
If you prefer a spicier dish, you can increase the amount of cayenne pepper or add a pinch of red pepper flakes. This stew pairs wonderfully with a side of couscous or warm flatbread to soak up the delicious broth.
Enjoy experimenting with different vegetables or even adding a handful of spinach or kale towards the end of cooking for extra greens.
Garlic Butter Steak Bites

Garlic Butter Steak Bites are a delicious and simple dish perfect for a quick and satisfying dinner. These flavorful steak bites are cooked to perfection in a rich garlic butter sauce, making them an irresistible option for any steak lover.
The combination of tender, juicy steak with the aromatic essence of garlic and the creamy richness of butter creates a mouthwatering experience that’s bound to please everyone at the table. This dish isn’t only easy to prepare, but it also requires minimal ingredients, making it an ideal choice for a no-fuss weeknight meal.
Ideal for serving 4-6 people, Garlic Butter Steak Bites can be paired with a variety of sides, such as roasted vegetables, mashed potatoes, or a crisp salad, to complete the meal. The key to this dish is selecting a good quality steak and guaranteeing it’s cooked just right to maintain its tenderness and flavor.
Whether you’re an experienced cook or a beginner, this recipe is straightforward and quick, allowing you to enjoy a delicious steak dinner without the hassle of complex cooking techniques.
Ingredients:
- 2 pounds of steak (such as sirloin or ribeye), cut into 1-inch cubes
- 4 tablespoons unsalted butter
- 6 cloves of garlic, minced
- Salt and black pepper to taste
- 1 tablespoon olive oil
- 2 tablespoons fresh parsley, chopped
Cooking Instructions:
- Prepare the Steak: Begin by patting the steak cubes dry with paper towels. Season them generously with salt and black pepper on all sides to enhance the natural flavor of the meat.
- Heat the Pan: In a large skillet, heat the olive oil over medium-high heat. The oil should be hot enough to create a good sear on the steak pieces.
- Cook the Steak: Add the steak cubes to the hot skillet in a single layer, ensuring they aren’t overcrowded. Allow them to sear for about 2-3 minutes on each side until they develop a golden-brown crust. Work in batches if necessary to avoid steaming the meat.
- Make the Garlic Butter: Once all the steak bites are cooked, reduce the heat to medium and add the butter to the skillet. Let it melt and then add the minced garlic. Cook for about 30 seconds until fragrant, being careful not to burn the garlic.
- Combine and Serve: Return the cooked steak bites to the skillet, tossing them in the garlic butter to coat evenly. Remove from heat and garnish with fresh parsley before serving.
Extra Tips:
For the best results, choose a steak with good marbling, such as ribeye or sirloin, as this will guarantee the steak bites remain juicy and flavorful.
Make sure not to overcrowd the pan when cooking the steak; this will help achieve a nice sear. You can also add a splash of lemon juice or a pinch of red pepper flakes to the garlic butter for an extra layer of flavor.
Let the steak rest for a few minutes before serving to allow the juices to redistribute, guaranteeing tender and juicy bites.
Thai Basil Chicken
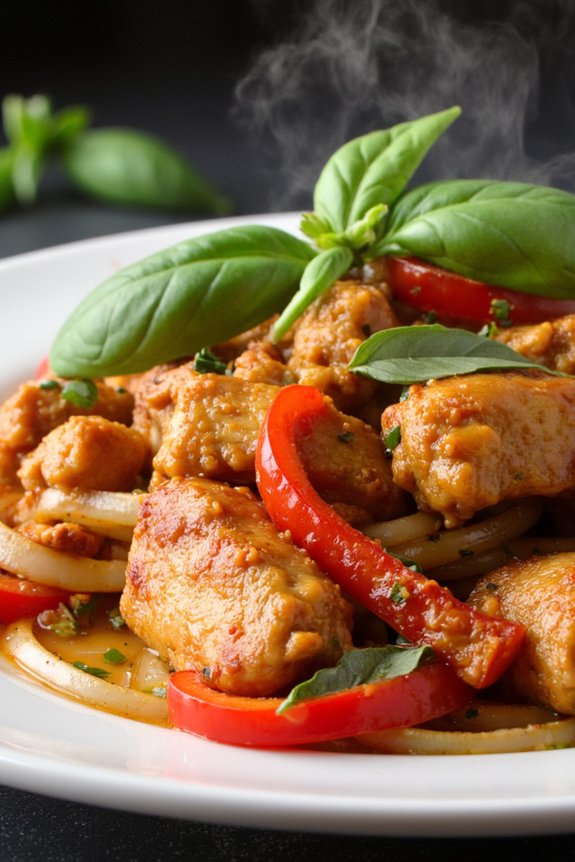
Thai Basil Chicken is a delicious and flavorful dish that combines tender chicken with aromatic herbs and spices. This dish is a staple in Thai cuisine, known for its vibrant flavors and enticing aroma. The key ingredient, Thai basil, adds a distinct anise-like flavor that sets this dish apart.
It’s a perfect no-cheese dinner option for those looking to enjoy a healthy and satisfying meal that’s both quick to prepare and a delightful treat for the taste buds.
This recipe is designed to serve 4-6 people and can be easily adjusted to suit individual preferences. Thai Basil Chicken can be served over steamed jasmine rice or with noodles for a complete meal. The dish offers a harmonious blend of spicy, savory, and sweet flavors, making it a crowd-pleaser for both family meals and gatherings.
Let’s explore the ingredients and steps needed to create this delectable dish.
Ingredients for 4-6 servings:
- 1 1/2 pounds boneless, skinless chicken thighs, cut into bite-sized pieces
- 2 tablespoons vegetable oil
- 6 cloves garlic, minced
- 4-6 Thai bird’s eye chilies, sliced (adjust to taste)
- 1 red bell pepper, sliced
- 1 onion, sliced
- 2 tablespoons soy sauce
- 1 tablespoon fish sauce
- 1 tablespoon oyster sauce
- 1 teaspoon sugar
- 1 cup fresh Thai basil leaves
- Cooked jasmine rice or noodles (for serving)
Cooking Instructions:
- Prepare the Chicken: Start by cutting the boneless, skinless chicken thighs into bite-sized pieces. Confirm they’re uniformly sized for even cooking.
- Heat the Oil: In a large skillet or wok, heat the vegetable oil over medium-high heat. Once the oil is hot, add the minced garlic and sliced Thai bird’s eye chilies. Sauté for about 30 seconds until fragrant, being careful not to burn the garlic.
- Cook the Chicken: Add the chicken pieces to the skillet. Stir-fry for about 5-7 minutes until the chicken is cooked through and no longer pink in the center.
- Add Vegetables: Stir in the sliced red bell pepper and onion. Continue to stir-fry for another 3-4 minutes until the vegetables are tender-crisp.
- Season the Dish: Add the soy sauce, fish sauce, oyster sauce, and sugar to the skillet. Stir well to coat the chicken and vegetables evenly with the sauces.
- Incorporate Basil: Finally, add the fresh Thai basil leaves to the skillet. Stir-fry for an additional 1-2 minutes until the basil is wilted and the flavors have melded together.
- Serve: Serve the Thai Basil Chicken hot over cooked jasmine rice or noodles, confirming each serving includes a good mix of chicken, vegetables, and basil.
Extra Tips:
When preparing Thai Basil Chicken, it’s important to use fresh Thai basil to achieve the authentic flavor. If Thai bird’s eye chilies are too spicy for your taste, you can reduce the amount or substitute with milder chilies.
Make sure to have all your ingredients prepped and ready before you start cooking, as the dish comes together quickly. Additionally, using a wok or large skillet ensures even cooking and allows the ingredients to develop their full flavor.
Enjoy this dish right after cooking for the best taste experience.
Teriyaki Tofu Bowls
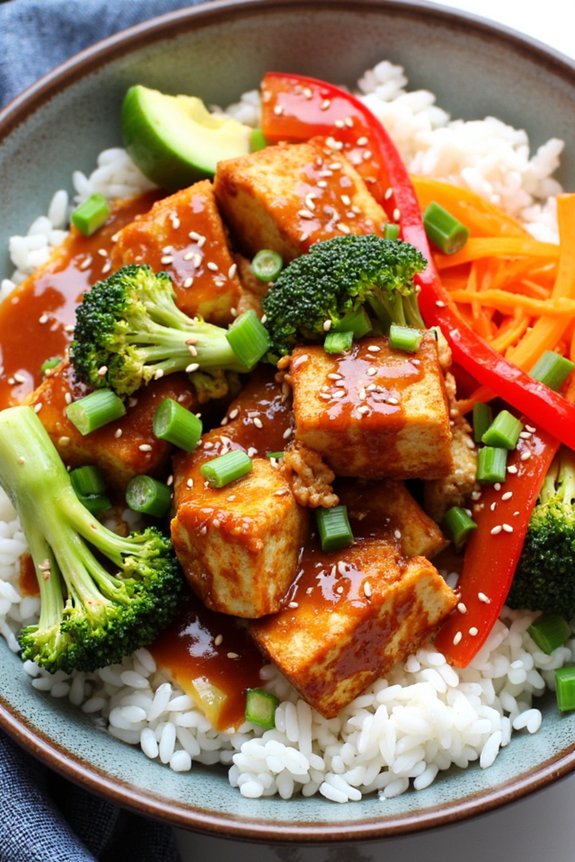
Teriyaki Tofu Bowls are a delicious and satisfying option for those looking to enjoy a flavorful meal without the inclusion of cheese. The dish combines crispy tofu cubes with a homemade teriyaki sauce, served over a bed of rice and accompanied by a variety of fresh, colorful vegetables. The combination of textures and flavors makes this a delightful meal that isn’t only nutritious but also visually appealing.
Perfect for a weeknight dinner or a meal prep option, these bowls are sure to please anyone, whether they’re tofu enthusiasts or new to plant-based eating.
Crafting a Teriyaki Tofu Bowl involves marinating tofu in a savory sauce, pan-frying it to golden perfection, and pairing it with an array of vegetables such as broccoli, bell peppers, and carrots. The homemade teriyaki sauce brings a sweet and tangy contrast to the dish, while the rice acts as a comforting base.
This recipe is designed to serve 4-6 people, making it a great option for family dinners or gatherings with friends. The ingredients are simple and easily accessible, guaranteeing you can create this delicious meal without hassle.
Ingredients (Serves 4-6):
- 2 blocks (14 oz each) of firm tofu, pressed and cubed
- 1 cup soy sauce
- 1/2 cup mirin
- 1/4 cup brown sugar
- 2 tablespoons rice vinegar
- 2 tablespoons sesame oil
- 2 cloves garlic, minced
- 1 tablespoon fresh ginger, grated
- 1 tablespoon cornstarch
- 1/4 cup water
- 3 cups cooked jasmine rice
- 2 cups broccoli florets
- 1 red bell pepper, sliced
- 1 cup shredded carrots
- 2 tablespoons vegetable oil (for frying tofu)
- 2 tablespoons sesame seeds
- 2 green onions, sliced
Cooking Instructions:
- Prepare the Tofu: Begin by pressing the tofu to remove excess moisture. Cut the tofu into 1-inch cubes. This will help the tofu absorb more flavor and achieve a crispy texture when cooked.
- Make the Teriyaki Sauce: In a medium saucepan, combine soy sauce, mirin, brown sugar, rice vinegar, sesame oil, garlic, and ginger. Bring the mixture to a simmer over medium heat, stirring occasionally. In a small bowl, mix the cornstarch and water to create a slurry, then add it to the saucepan. Continue to cook until the sauce thickens, about 3-5 minutes. Set aside.
- Cook the Tofu: Heat vegetable oil in a large non-stick skillet over medium-high heat. Add the tofu cubes in a single layer and cook until all sides are golden brown and crispy, approximately 8-10 minutes. Remove tofu from the skillet and set aside.
- Sauté the Vegetables: In the same skillet, add a bit more oil if necessary, and sauté the broccoli, bell pepper, and carrots until they’re tender-crisp, about 5-7 minutes.
- Combine Ingredients: Add the cooked tofu back into the skillet with the vegetables. Pour the teriyaki sauce over the tofu and vegetables, stirring gently to make sure everything is well-coated.
- Assemble the Bowls: Divide the cooked rice among serving bowls. Top each bowl with the teriyaki tofu and vegetable mixture. Garnish with sesame seeds and sliced green onions.
Extra Tips:
For the best results, make certain the tofu is thoroughly pressed to remove as much water as possible, which helps achieve a crispy texture when frying.
Feel free to swap in vegetables of your choice or whatever is in season, such as snap peas or bok choy, for added variety. Additionally, if you prefer a spicier kick, add a dash of chili flakes to the teriyaki sauce.
This dish can also be made ahead and stored in the refrigerator for up to three days, making it an excellent option for meal prep.
Honey Mustard Pork Chops

Honey Mustard Pork Chops are a delicious and savory option for a no cheese dinner that will satisfy everyone’s taste buds. This dish combines the sweetness of honey with the tangy flavor of mustard, creating a perfect balance that enhances the natural taste of the pork. The succulent pork chops are marinated in a rich honey mustard glaze, then cooked to perfection, resulting in a tender and juicy main course that pairs well with a variety of sides.
Whether you’re hosting a family dinner or looking for a quick weeknight meal, Honey Mustard Pork Chops are an excellent choice. This recipe is simple to prepare and requires minimal ingredients, making it an easy addition to your dinner repertoire. In just a few steps, you can have a mouthwatering dish on the table that will impress even the pickiest eaters.
Ingredients for 4-6 servings:
- 4 to 6 bone-in pork chops, about 1 inch thick
- 1/2 cup honey
- 1/4 cup Dijon mustard
- 2 tablespoons olive oil
- 3 cloves garlic, minced
- 1 tablespoon apple cider vinegar
- 1 teaspoon salt
- 1/2 teaspoon black pepper
- Fresh parsley, chopped (for garnish)
Cooking Instructions:
- Prepare the Marinade: In a medium bowl, whisk together the honey, Dijon mustard, olive oil, minced garlic, apple cider vinegar, salt, and black pepper until well combined.
- Marinate the Pork Chops: Place the pork chops in a large resealable plastic bag or shallow dish. Pour the honey mustard marinade over the chops, making certain they’re evenly coated. Seal the bag or cover the dish and refrigerate for at least 1 hour, or overnight for more intense flavor.
- Preheat the Oven: Preheat your oven to 375°F (190°C).
- Sear the Pork Chops: Heat a large oven-safe skillet over medium-high heat. Remove the pork chops from the marinade, letting the excess drip off, and sear them in the skillet for about 2-3 minutes on each side, until they’re golden brown.
- Bake the Pork Chops: Transfer the skillet to the preheated oven and bake for 15-20 minutes, or until the internal temperature of the pork chops reaches 145°F (63°C).
- Rest and Serve: Remove the pork chops from the oven and let them rest for 5 minutes before serving. Garnish with freshly chopped parsley for an added touch of flavor and color.
Extra Tips:
For the best results, choose pork chops of equal thickness to guarantee even cooking. If you’re short on time, marinating the pork chops for at least 30 minutes will still impart a good amount of flavor.
When searing, make sure not to overcrowd the skillet to allow the chops to brown properly. If you don’t have an oven-safe skillet, you can transfer the seared pork chops to a baking dish before placing them in the oven.
Adjust the amount of honey and mustard to suit your taste preferences, and feel free to experiment with additional spices or herbs for a personalized touch.
Vegetable Paella
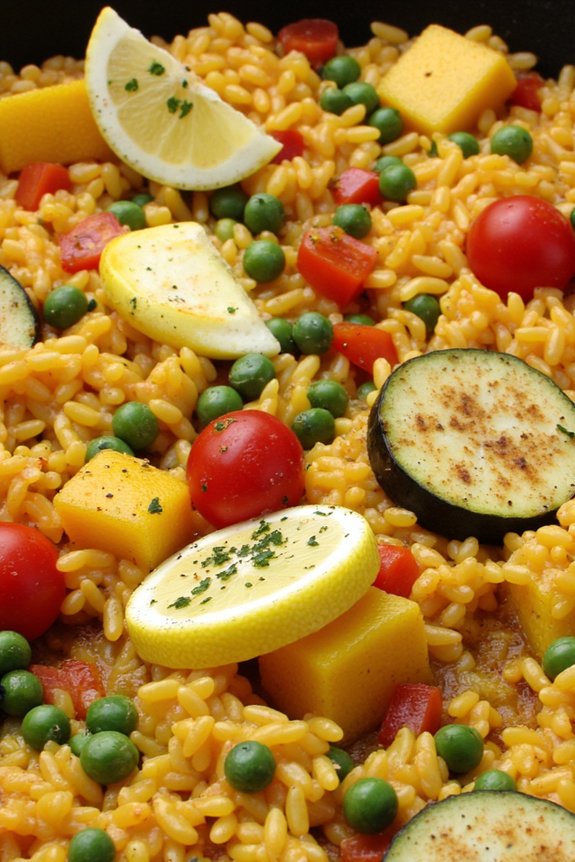
Vegetable Paella is a vibrant, flavorful dish hailing from the Valencia region of Spain. Traditionally made with seafood or meat, this version focuses on the rich, earthy flavors of fresh vegetables, making it a perfect option for those seeking a no-cheese dinner recipe. This vegetable paella is infused with aromatic spices and herbs, creating a satisfying and hearty meal that caters to both vegetarians and anyone looking for a lighter, cheese-free alternative.
The beauty of this dish lies in its simplicity and the ability to customize it with seasonal vegetables. With a base of saffron-infused rice, the vegetables are cooked to perfection, offering a medley of textures and colors that are as pleasing to the eye as they’re to the palate. This recipe serves 4-6 people, making it ideal for a family dinner or a small gathering with friends.
Ingredients:
- 2 tablespoons olive oil
- 1 large onion, finely chopped
- 3 garlic cloves, minced
- 1 red bell pepper, sliced
- 1 yellow bell pepper, sliced
- 1 zucchini, diced
- 1 cup cherry tomatoes, halved
- 1 teaspoon smoked paprika
- 1/4 teaspoon saffron threads
- 2 cups Arborio or Bomba rice
- 4 cups vegetable broth
- 1 cup frozen peas
- Salt and pepper to taste
- 1 lemon, cut into wedges
- Fresh parsley, chopped for garnish
Instructions:
- Prepare the Saffron Infusion: Begin by soaking the saffron threads in a small bowl with a few tablespoons of warm water. Let it sit while you prepare the other ingredients. This helps release the full flavor and color of the saffron.
- Cook the Aromatics: Heat the olive oil in a large, shallow paella pan or a wide skillet over medium heat. Add the chopped onion and sauté for about 5 minutes until it becomes translucent. Stir in the minced garlic and continue cooking for another 1 minute, making sure the garlic doesn’t burn.
- Sauté the Vegetables: Add the red and yellow bell peppers, zucchini, and cherry tomatoes to the pan. Cook for about 5-7 minutes, stirring occasionally, until the vegetables start to soften.
- Incorporate the Spices and Rice: Sprinkle the smoked paprika over the vegetables and stir to coat evenly. Add the Arborio or Bomba rice and saffron along with its soaking liquid. Stir well to combine all the ingredients, allowing the rice to absorb the flavors for 2 minutes.
- Simmer the Paella: Pour in the vegetable broth, making certain the rice is evenly distributed across the pan. Bring the mixture to a gentle simmer and cook uncovered for about 20 minutes, or until the rice is tender and the liquid has mostly evaporated. Don’t stir the rice during this time, as this helps create the traditional crispy bottom known as ‘socarrat.’
- Add the Finishing Touches: Scatter the frozen peas over the top of the paella and continue cooking for an additional 5 minutes. Season with salt and pepper to taste. If the rice needs more cooking, add a bit more broth and continue simmering.
- Garnish and Serve: Once the paella is cooked, remove it from the heat. Let it rest for 5 minutes before serving. Garnish with fresh parsley and serve with lemon wedges on the side for an added zesty flavor.
Extra Tips: To achieve the perfect texture, use a wide, shallow pan to ensure even cooking. The socarrat is a cherished feature of paella, so resist the urge to stir the rice once the broth has been added. If you prefer a spicier dish, consider adding a pinch of cayenne pepper or a chopped chili along with the smoked paprika. Remember, the quality of the saffron and rice greatly influences the overall flavor, so opt for the best you can find. Enjoy your vibrant, no-cheese vegetable paella!