

There’s nothing quite like summer evenings with the sky painted in shades of gold. Gathering the family around the table with fresh, vibrant flavors is pure joy. Last summer, our go-to was grilled lemon herb chicken skewers filled with zesty goodness. Looking for more quick and sunny recipes to brighten your family days? Let’s explore some delightful options together!
Grilled Lemon Herb Chicken Skewers
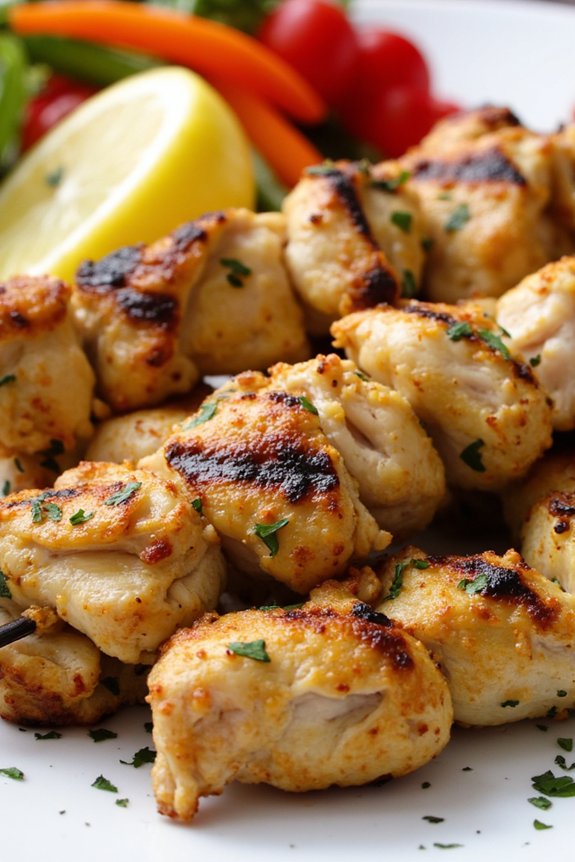
Grilled Lemon Herb Chicken Skewers are a delightful summer dish that combines the invigorating flavors of lemon and fresh herbs with the smoky char of the grill. Perfect for a backyard barbecue or a casual family dinner, these skewers are easy to prepare and sure to impress. The chicken is marinated to absorb the vibrant tastes of lemon juice, garlic, and an assortment of herbs, resulting in tender, juicy bites that burst with flavor.
To make these skewers, start by preparing a flavorful marinade that will infuse the chicken with citrusy and herbal notes. Allow the chicken to marinate for at least an hour to guarantee the flavors penetrate the meat thoroughly. Grilling the skewers gives them a delicious smoky aroma and irresistible grill marks, making them an appetizing centerpiece for your summer dinner table. Serve them alongside grilled vegetables or a fresh salad for a complete meal.
Ingredients for 4-6 servings:
- 2 pounds boneless, skinless chicken breasts
- 1/4 cup olive oil
- 1/4 cup freshly squeezed lemon juice
- 3 cloves garlic, minced
- 1 tablespoon lemon zest
- 2 teaspoons dried oregano
- 1 teaspoon dried thyme
- 1 teaspoon dried rosemary
- Salt and pepper to taste
- Wooden or metal skewers
- Fresh parsley, chopped (for garnish)
Cooking Instructions:
- Prepare the Chicken: Cut the chicken breasts into 1-inch cubes. This size guarantees even cooking and makes it easier to skewer.
- Make the Marinade: In a large bowl, whisk together the olive oil, lemon juice, minced garlic, lemon zest, oregano, thyme, rosemary, salt, and pepper. This mixture will be the marinade that flavors the chicken.
- Marinate the Chicken: Add the chicken cubes to the marinade, ensuring they’re well-coated. Cover the bowl with plastic wrap or a lid and refrigerate for at least 1 hour, or up to 4 hours for maximum flavor infusion.
- Preheat the Grill: Preheat your grill to medium-high heat. If using wooden skewers, soak them in water for at least 30 minutes to prevent burning.
- Assemble the Skewers: Thread the marinated chicken pieces onto the skewers, leaving a small space between each piece for even cooking.
- Grill the Skewers: Place the chicken skewers on the preheated grill. Cook for about 10-12 minutes, turning occasionally, until the chicken is cooked through and has a nice char. The internal temperature should reach 165°F (75°C).
- Serve: Transfer the grilled chicken skewers to a serving platter. Garnish with chopped fresh parsley before serving to add a pop of color and fresh flavor.
Extra Tips: To guarantee the chicken remains juicy, avoid overcooking it on the grill. Use a meat thermometer to check for doneness, as chicken breasts can dry out quickly. For an extra layer of flavor, consider adding a splash of white wine to the marinade. If you prefer a spicier dish, a pinch of red pepper flakes can be mixed into the marinade. Pair these skewers with a light cucumber yogurt sauce or tzatziki for an invigorating accompaniment.
Summer Vegetable Pasta Salad
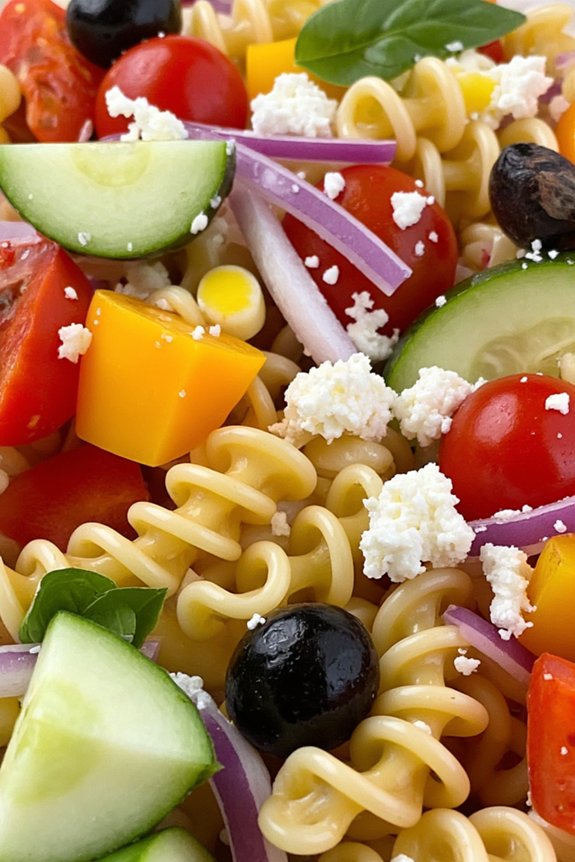
Summer Vegetable Pasta Salad is a revitalizing and vibrant dish that combines the bounty of summer’s freshest vegetables with the comforting texture of pasta. Perfect as a side dish at barbecues or as a light main course, this salad is both healthy and satisfying.
The beauty of this dish lies in its versatility; you can mix and match your favorite vegetables, or use whatever you have on hand, making it a great way to utilize the season’s produce. The salad is enhanced with a tangy vinaigrette that ties all the flavors together, providing a zesty contrast to the sweetness of the vegetables.
The combination of colors and textures not only makes this salad a feast for the taste buds but also a delight for the eyes. Whether you’re serving it at a summer gathering or enjoying it as a mid-week meal, this Summer Vegetable Pasta Salad is sure to be a hit.
Ingredients (serves 4-6):
- 12 oz (340g) pasta (fusilli or penne)
- 1 cup cherry tomatoes, halved
- 1 medium cucumber, diced
- 1 red bell pepper, diced
- 1 yellow bell pepper, diced
- 1 cup corn kernels (fresh or frozen)
- 1/2 red onion, finely chopped
- 1/2 cup black olives, sliced
- 1/4 cup fresh basil leaves, chopped
- 1/4 cup fresh parsley, chopped
- 1/2 cup feta cheese, crumbled
For the Vinaigrette:
- 1/4 cup olive oil
- 3 tbsp red wine vinegar
- 1 tsp Dijon mustard
- 1 clove garlic, minced
- Salt and freshly ground black pepper, to taste
Cooking Instructions:
- Cook the pasta: Bring a large pot of salted water to a boil. Add the pasta and cook according to package instructions until al dente. Once cooked, drain the pasta and rinse it under cold water to stop the cooking process. Set aside to cool completely.
- Prepare the vegetables: While the pasta is cooling, prepare the vegetables. Halve the cherry tomatoes, dice the cucumber and bell peppers, and chop the red onion. If using fresh corn, cut the kernels off the cob. Combine all the vegetables in a large mixing bowl.
- Make the vinaigrette: In a small bowl or jar, whisk together the olive oil, red wine vinegar, Dijon mustard, and minced garlic. Season with salt and freshly ground black pepper to taste. Confirm the dressing is well mixed.
- Combine salad ingredients: Add the cooled pasta to the bowl with the vegetables. Pour the vinaigrette over the pasta and veggies and toss everything together until well coated.
- Add cheese and herbs: Gently fold in the crumbled feta cheese, chopped basil, and parsley. Toss the salad lightly to distribute the cheese and herbs throughout.
- Chill and serve: Cover the salad and refrigerate for at least 30 minutes to allow the flavors to meld. Serve chilled or at room temperature.
Extra Tips:
For a more robust flavor, consider roasting the vegetables before adding them to the salad. This will enhance their natural sweetness and add a slightly smoky depth to the dish.
If you’re preparing the salad in advance, keep the dressing separate until just before serving to confirm the pasta maintains its texture. You can also experiment with different herbs such as mint or dill for a unique twist.
Easy Shrimp Tacos With Mango Salsa
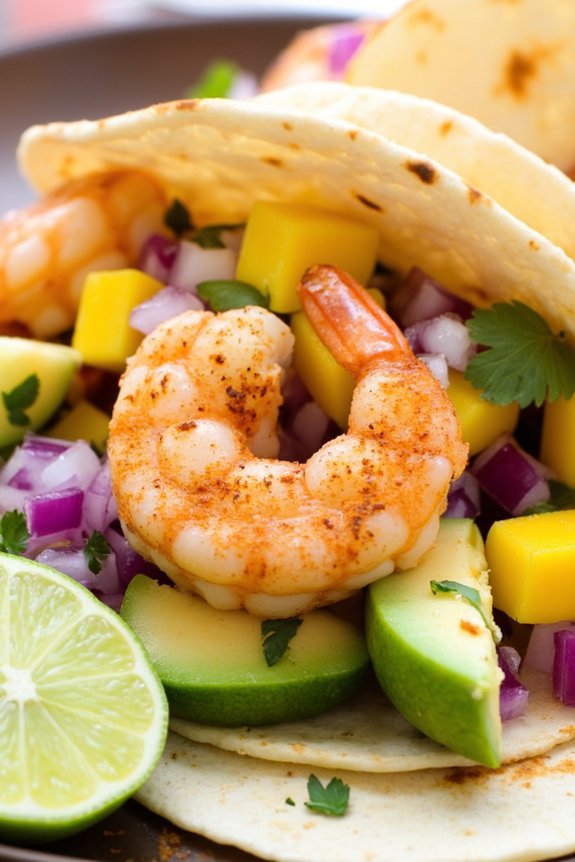
These Easy Shrimp Tacos With Mango Salsa are a delightful summer meal that brings a burst of fresh and zesty flavors to your table. Perfect for a casual dinner, this recipe combines succulent shrimp with a sweet and tangy mango salsa, all wrapped up in a warm tortilla.
The invigorating taste of mango, coupled with the slight kick from jalapeños, complements the savory shrimp perfectly, creating a harmonious blend of flavors that’s both satisfying and invigorating.
Ideal for a serving size of 4-6 people, these shrimp tacos aren’t only easy to prepare but also quick to cook, making them an excellent choice for a last-minute dinner or a spontaneous gathering with friends.
The use of fresh ingredients guarantees a nutritious meal that pleases both the eyes and the palate. Prepare to enjoy a delightful culinary experience that will transport you to a tropical paradise with every bite.
Ingredients:
- 1 ½ pounds large shrimp, peeled and deveined
- 1 tablespoon olive oil
- 1 teaspoon chili powder
- ½ teaspoon cumin
- ½ teaspoon paprika
- Salt and pepper to taste
- 8-12 small corn tortillas
- 1 ripe mango, peeled and diced
- 1 small red onion, finely chopped
- 1 jalapeño, finely chopped
- Juice of 1 lime
- ¼ cup fresh cilantro, chopped
- 1 avocado, sliced (optional)
- Lime wedges for serving
Cooking Instructions:
- Prepare the Shrimp: In a large bowl, combine the shrimp with olive oil, chili powder, cumin, paprika, salt, and pepper. Mix well to guarantee all the shrimp are evenly coated with the spices.
- Cook the Shrimp: Heat a large skillet over medium-high heat. Add the seasoned shrimp to the skillet in a single layer. Cook for about 2-3 minutes on each side, or until they turn pink and opaque. Remove from heat and set aside.
- Make the Mango Salsa: In a medium-sized bowl, combine the diced mango, red onion, jalapeño, lime juice, and cilantro. Mix well to combine all the flavors. Adjust seasoning as needed with salt and pepper.
- Warm the Tortillas: Heat the tortillas in a dry skillet over medium heat for about 30 seconds on each side, or until they’re warm and pliable. Alternatively, wrap them in a damp paper towel and microwave for about 20 seconds.
- Assemble the Tacos: Place a few shrimp on each tortilla, top with a generous spoonful of mango salsa, and add slices of avocado if desired. Serve with lime wedges on the side.
Extra Tips:
For the best flavor, let the shrimp marinate in the spices for about 15-30 minutes before cooking. If you prefer a bit more heat, consider adding extra jalapeño or a sprinkle of cayenne pepper.
Be sure to use ripe mango for the salsa to achieve the perfect balance of sweetness and acidity. If you want a more charred flavor, consider grilling the shrimp instead of cooking them in a skillet.
Enjoy these tacos with a side of black beans or a fresh green salad for a complete meal.
Caprese Stuffed Avocados
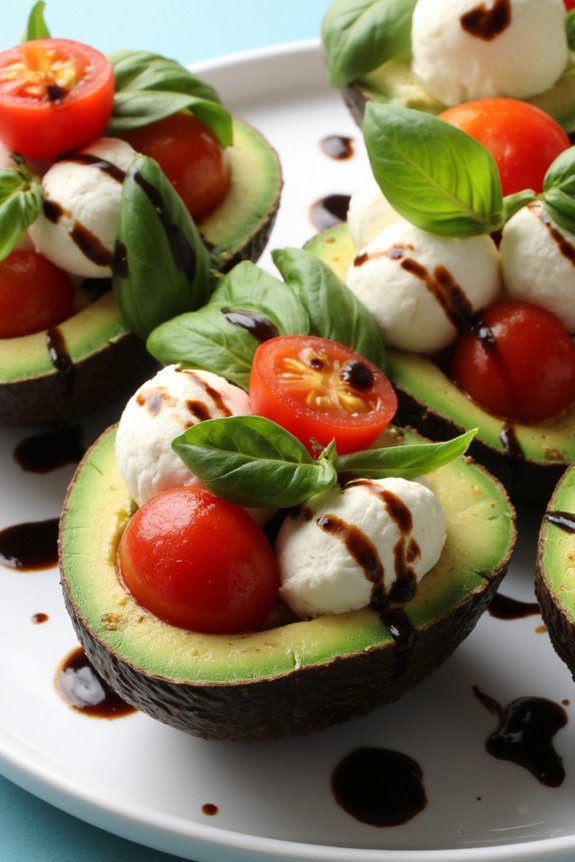
Caprese Stuffed Avocados are a delightful summer dish that combines the creamy texture of ripe avocados with the fresh, vibrant flavors of a classic Caprese salad. This recipe is perfect for those warm summer evenings when you crave something light yet satisfying. The combination of juicy tomatoes, fresh mozzarella, and fragrant basil drizzled with balsamic glaze isn’t only visually appealing but also tantalizes your taste buds with its invigorating and tangy notes.
This dish is ideal for a serving size of 4-6 people and can be served as an appetizer or a light main course. The simplicity of the ingredients allows each flavor to shine, making it a perfect choice for a summer dinner party or a casual family meal. The avocados serve as natural bowls, making the presentation both elegant and practical, while the balsamic glaze adds a touch of gourmet flair.
Ingredients:
- 3 large ripe avocados
- 1 pint cherry tomatoes, halved
- 8 oz fresh mozzarella balls (ciliegine), halved
- 1/4 cup fresh basil leaves, thinly sliced
- 2 tablespoons extra-virgin olive oil
- Salt and pepper to taste
- Balsamic glaze for drizzling
Cooking Instructions:
- Prepare the Avocados: Slice the avocados in half lengthwise and remove the pits. Using a spoon, gently scoop out a small portion of the flesh to create a larger cavity for the filling. Set the scooped-out avocado aside.
- Prepare the Filling: In a medium bowl, combine the cherry tomatoes, mozzarella balls, and sliced basil leaves. Drizzle the mixture with extra-virgin olive oil and season with salt and pepper. Stir gently to combine all the ingredients, making sure the tomatoes and mozzarella are well-coated with the oil and seasoning.
- Fill the Avocados: Spoon the Caprese mixture generously into each avocado half, filling the cavity completely. Use the reserved avocado flesh to add additional filling if desired, or dice it and mix it into the Caprese salad for added creaminess.
- Drizzle with Balsamic Glaze: Just before serving, drizzle the filled avocados with balsamic glaze. This adds a sweet and tangy flavor that complements the creamy avocado and fresh salad.
- Serve Immediately: Arrange the Caprese Stuffed Avocados on a serving platter and serve immediately. Enjoy them on their own or pair them with crusty bread or grilled chicken for a more substantial meal.
Extra Tips: For the best results, use ripe but firm avocados to make sure they hold their shape while being stuffed. If you prefer a little more zing in your dish, consider adding a splash of lemon juice to the Caprese filling. This not only enhances the flavor but also helps to keep the avocados from browning too quickly.
Additionally, if you don’t have balsamic glaze, you can easily make your own by simmering balsamic vinegar with a touch of honey until it thickens to your desired consistency.
Zucchini and Corn Fritters

Zucchini and Corn Fritters are a delightful and versatile dish that perfectly captures the essence of summer flavors. These fritters are crispy on the outside and tender on the inside, offering a wonderful combination of juicy corn and fresh zucchini. Ideal as an appetizer, side dish, or light main course, they’re sure to be a hit at any summer gathering. The recipe is simple, allowing the natural sweetness of the corn and the subtle flavor of the zucchini to shine through.
The key to making these fritters irresistible lies in their texture and seasoning. By grating the zucchini and combining it with sweet corn, aromatic herbs, and a touch of cheese, you create a batter that fries up to golden perfection. Whether you choose to pair them with a tangy dipping sauce or a fresh salad, Zucchini and Corn Fritters can easily adapt to any meal setting. This recipe serves 4-6 people, making it perfect for family dinners or small gatherings.
Ingredients:
- 3 medium zucchinis
- 1 cup corn kernels (fresh or canned)
- 2 large eggs
- 1 cup all-purpose flour
- 1/4 cup grated Parmesan cheese
- 1/4 cup chopped fresh parsley
- 2 cloves garlic, minced
- 1/2 teaspoon baking powder
- Salt and pepper to taste
- Olive oil for frying
Instructions:
- Prepare the Zucchini: Begin by grating the zucchinis using a box grater. Once grated, place the zucchini in a clean kitchen towel and squeeze out as much excess moisture as possible. This step is vital to guarantee that the fritters hold together and fry up crispy.
- Mix the Batter: In a large mixing bowl, combine the grated zucchini, corn kernels, eggs, flour, Parmesan cheese, chopped parsley, minced garlic, baking powder, salt, and pepper. Mix well until all the ingredients are thoroughly combined and form a batter.
- Heat the Oil: In a large skillet, heat a generous amount of olive oil over medium heat. The oil should be hot enough that a small drop of batter sizzles upon contact.
- Fry the Fritters: Using a spoon or small ice cream scoop, drop portions of the batter into the hot oil, flattening them slightly with the back of the spoon. Fry the fritters in batches to avoid overcrowding the pan. Cook each fritter for about 3-4 minutes on each side, or until they’re golden brown and cooked through.
- Drain and Serve: Once cooked, transfer the fritters to a paper towel-lined plate to drain any excess oil. Serve the fritters warm with your choice of dipping sauce or alongside a fresh salad.
Extra Tips:
For the best results, make sure to remove as much moisture as possible from the grated zucchini to prevent soggy fritters. If you prefer a spicier version, consider adding a pinch of cayenne pepper or some finely chopped jalapeños to the batter.
If using frozen corn, confirm it’s fully thawed and drained to avoid adding extra moisture to the batter. Finally, for a lighter version, you can bake the fritters on a greased baking sheet at 400°F (200°C) for about 15-20 minutes, flipping halfway through.
One-Pan Lemon Garlic Salmon
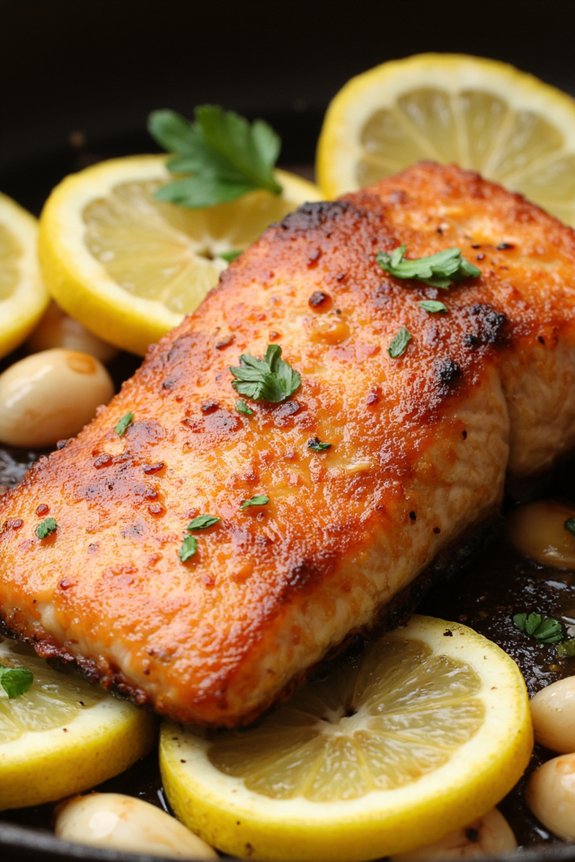
Bright and zesty, One-Pan Lemon Garlic Salmon is a delicious and easy dinner option perfect for summer evenings. This dish combines the rich, buttery flavor of salmon with the fresh tanginess of lemon and the aromatic allure of garlic. By cooking everything in one pan, cleanup is a breeze, leaving you more time to enjoy the warm, sunny days.
This recipe pairs well with a fresh salad or some roasted vegetables, making it a wholesome meal that everyone will love. The beauty of this recipe lies in its simplicity and the way it allows the natural flavors of the ingredients to shine through.
The salmon is perfectly cooked with a crisp exterior and a tender, flaky interior, while the lemon and garlic infuse it with a delightful depth of flavor. Whether you’re hosting a summer dinner party or just preparing a quick weeknight meal, this One-Pan Lemon Garlic Salmon is sure to captivate.
Ingredients (serves 4-6 people):
- 4-6 salmon fillets (about 6 oz each)
- 2 tablespoons olive oil
- 4 cloves garlic, minced
- 1 lemon, sliced into rounds
- Juice of 1 lemon
- 1 teaspoon salt
- 1/2 teaspoon black pepper
- 1 teaspoon dried oregano
- 1 teaspoon dried thyme
- Fresh parsley, chopped (for garnish)
Cooking Instructions:
- Preheat the Oven: Preheat your oven to 400°F (200°C). This guarantees that the oven is hot enough to cook the salmon evenly and give it a nice, crispy finish.
- Prepare the Salmon: Pat the salmon fillets dry with a paper towel. This helps the seasoning stick better and guarantees a good sear.
- Season the Salmon: In a small bowl, combine salt, black pepper, oregano, and thyme. Rub this mixture evenly over both sides of the salmon fillets.
- Sear the Salmon: Heat the olive oil in a large oven-safe skillet over medium-high heat. Once hot, add the salmon fillets, skin-side up, and sear for about 3-4 minutes until golden brown. Flip the fillets and sear the other side for another 2 minutes.
- Add Garlic and Lemon: Add the minced garlic to the pan, stirring it around the salmon for about 30 seconds until fragrant. Then, add the lemon juice and lemon slices, arranging them around the salmon fillets.
- Bake: Transfer the skillet to the preheated oven and bake for 10-12 minutes or until the salmon is opaque and flakes easily with a fork.
- Garnish and Serve: Remove the pan from the oven, sprinkle fresh parsley over the salmon, and serve immediately with the lemon slices from the pan.
Extra Tips:
When choosing your salmon fillets, opt for ones that are uniform in size to guarantee even cooking. If your fillets are particularly thick, you might need to adjust the baking time slightly.
Feel free to experiment with fresh herbs such as dill or basil for added flavor. For a complete meal, consider serving with a side of roasted asparagus or a quinoa salad. Additionally, always check the doneness of the salmon by gently pressing it with a fork; it should flake easily when done.
BBQ Chicken and Pineapple Flatbreads
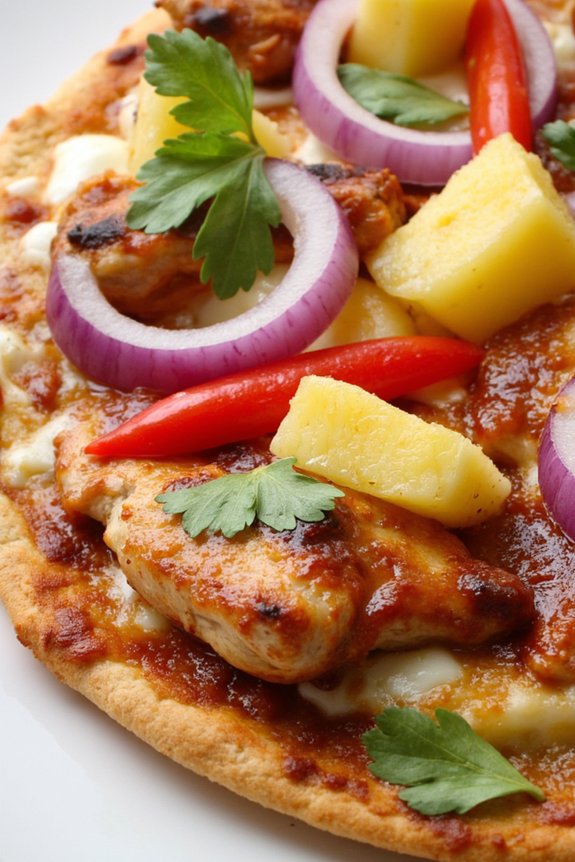
BBQ Chicken and Pineapple Flatbreads are a delightful take on traditional flatbreads, combining the savory flavors of grilled chicken with the sweetness of pineapple. This dish is perfect for a summer dinner, bringing a taste of the tropics to your table. The combination of BBQ sauce, fresh vegetables, and melted cheese makes this flatbread not only visually appealing but also bursting with flavor.
It’s a great option for a casual family meal or a gathering with friends, offering a hearty yet invigorating dish that’s sure to please everyone. This recipe is designed to serve 4-6 people and is relatively simple to prepare, making it ideal for those warm summer evenings when you want something quick yet satisfying.
The flatbreads can be cooked on a grill or in the oven, giving you flexibility depending on your preference and available equipment. The prep work involves marinating the chicken and chopping some vegetables, but the cooking process is straightforward, allowing you to enjoy the process and the delicious results.
Ingredients (serves 4-6):
- 2 boneless, skinless chicken breasts
- 1 cup BBQ sauce
- 1 cup fresh pineapple chunks
- 1 red onion, thinly sliced
- 1 red bell pepper, thinly sliced
- 1 cup shredded mozzarella cheese
- 4-6 flatbreads or naan
- 2 tablespoons olive oil
- Salt and pepper to taste
- Fresh cilantro leaves for garnish (optional)
Cooking Instructions:
- Marinate the Chicken: Place the chicken breasts in a shallow dish and coat them with half a cup of BBQ sauce. Verify the chicken is well covered, then cover the dish with plastic wrap and refrigerate for at least 30 minutes to allow the flavors to penetrate the meat.
- Preheat the Grill or Oven: If using a grill, preheat it to medium-high heat. Alternatively, preheat your oven to 400°F (200°C).
- Cook the Chicken: Remove the chicken from the marinade and grill it for about 6-7 minutes on each side, or until fully cooked. If using an oven, bake the chicken on a baking sheet for about 20-25 minutes. Once done, let it rest for a few minutes before slicing it into thin strips.
- Prepare the Flatbreads: Brush each flatbread with olive oil and place them on a baking sheet or directly on the grill. Toast for about 2-3 minutes per side until they’re slightly crisp and warm.
- Assemble the Flatbreads: Spread a layer of the remaining BBQ sauce over each toasted flatbread. Top with slices of grilled chicken, pineapple chunks, red onion, red bell pepper, and a generous sprinkle of mozzarella cheese.
- Bake or Grill the Flatbreads: If using an oven, return the flatbreads to the oven and bake for about 8-10 minutes, or until the cheese is melted and bubbly. If grilling, carefully place them back on the grill and cook with the lid closed for about 5-7 minutes.
- Garnish and Serve: Once cooked, remove the flatbreads from the heat and garnish with fresh cilantro leaves if desired. Slice and serve immediately while warm.
Extra Tips: For a more intense flavor, consider marinating the chicken overnight in the refrigerator. If you prefer a spicier kick, add sliced jalapeños or a dash of hot sauce to the BBQ sauce.
Additionally, feel free to experiment with different cheeses like cheddar or gouda for a unique twist. When selecting flatbreads, verify they’re sturdy enough to hold the toppings without becoming soggy. Enjoy these flatbreads as a main course or slice them into smaller pieces for a delicious appetizer.
Spinach and Strawberry Salad With Balsamic Glaze
Spinach and Strawberry Salad With Balsamic Glaze is a revitalizing and vibrant dish perfect for summer dinners. This salad combines the rich, earthy flavors of fresh spinach with the sweet, juicy taste of ripe strawberries, all brought together with a tangy balsamic glaze. The dish isn’t only delicious but also visually appealing, making it an ideal choice for entertaining guests or enjoying a light, yet satisfying meal on a warm evening.
This salad is easy to prepare and doesn’t require any cooking, making it a quick option for busy summer days. The combination of ingredients provides a balance of textures and flavors – the crunch of almonds, the creaminess of goat cheese, and the subtle bite of red onions. Finished with a homemade balsamic glaze, this salad offers a delightful harmony of sweet and savory notes. Below you’ll find the ingredients and step-by-step instructions to make this salad for a serving size of 4-6 people.
Ingredients:
- 10 ounces fresh baby spinach
- 1 pint fresh strawberries, hulled and sliced
- 1/2 cup sliced almonds
- 1/2 small red onion, thinly sliced
- 4 ounces goat cheese, crumbled
- 1/2 cup balsamic vinegar
- 2 tablespoons honey
- Salt and pepper to taste
Instructions:
- Prepare the Balsamic Glaze: In a small saucepan over medium heat, combine the balsamic vinegar and honey. Stir occasionally and let it simmer until the mixture reduces by half and thickens to a syrupy consistency, about 10-15 minutes. Remove from heat and let it cool.
- Toast the Almonds: Meanwhile, in a dry skillet over medium heat, add the sliced almonds. Stir frequently until they’re lightly golden and fragrant, about 3-5 minutes. Remove from heat and set aside to cool.
- Prepare the Salad Base: In a large salad bowl, add the baby spinach. Top the spinach with the sliced strawberries, red onion, and toasted almonds.
- Add the Cheese: Crumble the goat cheese on top of the salad. Confirm the cheese is evenly distributed to provide a creamy texture in each bite.
- Dress the Salad: Drizzle the cooled balsamic glaze over the entire salad. Start with a small amount and add more to taste, confirming the salad is evenly coated.
- Season and Serve: Add salt and pepper to taste. Gently toss the salad to combine all the ingredients just before serving. Serve immediately for the best flavor and texture.
Extra Tips:
For an added touch, consider using a variety of berries such as blueberries or raspberries for more color and flavor diversity. If you prefer a less tangy taste, you can use a store-bought balsamic reduction or dressing.
To keep the salad fresh, prepare the ingredients ahead of time and assemble just before serving. This will also prevent the spinach from wilting and the strawberries from becoming mushy. Always taste the salad before serving and adjust the seasoning as needed to suit your preference.
Enjoy this delightful summer dish as a standalone meal or pair it with grilled chicken or fish for a more substantial dinner.
Quick Mediterranean Couscous Bowl
Quick Mediterranean Couscous Bowl is the perfect summer dinner recipe for those who crave a light yet satisfying meal packed with fresh flavors. This dish is a delightful medley of fluffy couscous, vibrant vegetables, and savory herbs, all brought together with a zesty lemon dressing.
It’s a versatile meal that can be served warm or cold, making it ideal for picnics, barbecues, or a simple family dinner on a balmy evening.
What makes this couscous bowl particularly appealing is its simplicity and the speed at which it can be prepared. With minimal cooking required, you can have a delicious dish ready in just about 20 minutes.
The Mediterranean-inspired ingredients such as olives, cherry tomatoes, and feta cheese offer a burst of flavors and a touch of elegance to this quick and easy dish. Perfect for serving 4-6 people, this couscous bowl is sure to be a hit at your next summer gathering.
Ingredients:
- 2 cups of couscous
- 2 1/2 cups of boiling water
- 1 cup of cherry tomatoes, halved
- 1 cucumber, diced
- 1 red bell pepper, diced
- 1/2 cup of Kalamata olives, pitted and sliced
- 1/2 cup of crumbled feta cheese
- 1/4 cup of red onion, finely chopped
- 1/4 cup of fresh parsley, chopped
- 1/4 cup of fresh mint, chopped
- 1/4 cup of olive oil
- Juice of 1 lemon
- Salt and pepper to taste
Cooking Instructions:
- Prepare the Couscous: In a large bowl, place the couscous. Pour the boiling water over the couscous, cover the bowl with a lid or plastic wrap, and let it sit for about 5 minutes. Fluff the couscous with a fork and set aside to cool slightly.
- Prepare the Vegetables: While the couscous is absorbing the water, prepare your vegetables. Halve the cherry tomatoes, dice the cucumber and red bell pepper, and finely chop the red onion. Place all the prepared vegetables into a large mixing bowl.
- Combine Ingredients: Add the sliced olives, crumbled feta cheese, chopped parsley, and mint to the vegetable mixture. Once the couscous has cooled, add it to the bowl with the vegetables.
- Make the Dressing: In a small bowl, whisk together the olive oil, lemon juice, salt, and pepper until well combined.
- Toss the Salad: Pour the dressing over the couscous and vegetable mixture. Toss everything together gently to guarantee the couscous and vegetables are evenly coated with the dressing. Adjust seasoning with additional salt and pepper if needed.
- Serve: Transfer the couscous bowl to a serving dish and garnish with extra parsley or mint if desired. Serve immediately, or refrigerate for up to an hour for a chilled salad experience.
Extra Tips:
For the best flavor, use fresh herbs rather than dried ones, as this will enhance the Mediterranean essence of the dish.
Feel free to get creative with the ingredients; adding grilled chicken, shrimp, or chickpeas can turn this side dish into a hearty main course.
Also, when fluffing the couscous, verify it’s not clumped together, as this will help the dressing distribute evenly.
If you prefer a more tangy flavor, add a bit more lemon juice or a splash of balsamic vinegar to the dressing.
Tomato and Basil Flatbread Pizza
Tomato and Basil Flatbread Pizza is a delightful and invigorating dish perfect for those warm summer evenings. This pizza is a harmonious blend of ripe tomatoes, fresh basil, and creamy mozzarella, all layered on a crisp flatbread crust. It’s a simple yet flavorful dish that captures the essence of summer, making it a great choice for a casual dinner with family and friends.
The balance of fresh ingredients guarantees that each bite is bursting with flavor, while the ease of preparation makes it a go-to recipe when you want something delicious without spending hours in the kitchen.
This recipe caters to a serving size of 4-6 people, making it perfect for small gatherings or a family meal. The flatbread serves as a quick alternative to traditional pizza dough, allowing you to enjoy homemade pizza without the hassle of kneading and waiting for dough to rise.
By using a pre-made flatbread, you can focus on the toppings, guaranteeing every slice is packed with fresh, seasonal flavors. The combination of juicy tomatoes and fragrant basil is complemented by the richness of mozzarella, creating a delightful culinary experience that everyone will enjoy.
Ingredients:
- 2 large flatbreads or naan
- 4 medium ripe tomatoes
- 1 cup fresh basil leaves
- 2 cups shredded mozzarella cheese
- 2 tablespoons olive oil
- 1 teaspoon garlic powder
- Salt and pepper to taste
- Balsamic glaze (optional)
Instructions:
- Preheat the Oven: Preheat your oven to 400°F (200°C). This guarantees the flatbread will cook evenly and the cheese will melt perfectly.
- Prepare the Tomatoes: Slice the tomatoes into thin rounds. Lay them on a paper towel to absorb excess moisture, which prevents the flatbread from becoming soggy.
- Assemble the Flatbread: Place the flatbreads on a baking sheet. Drizzle olive oil evenly over the surface of each flatbread. Sprinkle garlic powder, salt, and pepper to taste.
- Add the Toppings: Evenly distribute the tomato slices over the flatbreads. Tear the basil leaves into smaller pieces and scatter them on top. Generously cover with shredded mozzarella cheese.
- Bake: Place the baking sheet in the preheated oven and bake for 12-15 minutes, or until the cheese is bubbly and golden brown.
- Finish and Serve: Remove the pizzas from the oven and let them cool for a few minutes. Drizzle with balsamic glaze if desired, slice, and serve immediately.
Extra Tips: When selecting your tomatoes, opt for ones that are firm yet ripe to guarantee they hold their shape during baking. If you prefer a more robust flavor, consider adding a sprinkle of red pepper flakes or a drizzle of pesto before baking.
Additionally, if you’re using a thicker flatbread, you may need to adjust the baking time to ensure the crust is crispy. Flatbread pizzas are highly customizable, so feel free to experiment with additional toppings such as olives, roasted peppers, or artichokes to suit your taste.