

Life can get pretty hectic, and finding time to whip up a nutritious dinner for the family often feels like a challenge. That’s why I’ve put together a list of 12 warm, healthy baked dinner ideas that are not only simple to make but also comforting and satisfying. Think cheesy spinach and mushroom stuffed shells or baked lemon herb chicken with roasted veggies. These recipes will make your dinner table both delicious and healthy. Let’s make dinner a little easier and a lot more enjoyable!
Cheesy Spinach and Mushroom Stuffed Shells
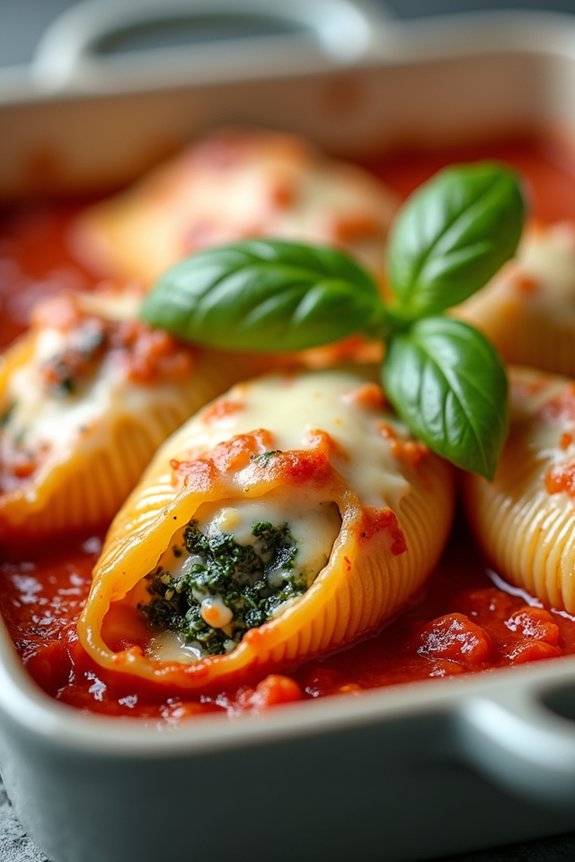
Cheesy Spinach and Mushroom Stuffed Shells is a delightful dish that’s perfect for a family dinner. These jumbo pasta shells are generously filled with a creamy mixture of spinach, mushrooms, and a blend of cheeses, then baked to perfection in a rich tomato sauce. This dish not only satisfies with its cheesy goodness but also offers a serving of vegetables, making it a balanced meal for your family.
It’s a wonderful way to introduce more greens into your family’s diet without compromising on flavor, and it’s sure to be a hit with both kids and adults alike.
The preparation of Cheesy Spinach and Mushroom Stuffed Shells is straightforward and enjoyable, allowing you to spend more time with your loved ones around the dinner table. The combination of ricotta, mozzarella, and parmesan cheeses creates a creamy and flavorful filling that complements the earthiness of the mushrooms and the freshness of the spinach.
Baking the shells in a tomato sauce keeps them moist and infuses them with savory flavors. This recipe serves 4-6 people, making it ideal for a family dinner or a small gathering with friends.
Ingredients for 4-6 servings:
- 20 jumbo pasta shells
- 2 tablespoons olive oil
- 1 medium onion, diced
- 2 cloves garlic, minced
- 2 cups fresh spinach, chopped
- 2 cups mushrooms, chopped
- 1 cup ricotta cheese
- 1 cup mozzarella cheese, shredded
- 1/2 cup parmesan cheese, grated
- 1 egg
- 1 teaspoon dried Italian herbs
- Salt and pepper to taste
- 3 cups marinara or tomato sauce
- Fresh basil leaves for garnish (optional)
Instructions:
- Preheat and Prepare: Preheat your oven to 375°F (190°C). Cook the jumbo pasta shells according to the package instructions until al dente. Drain and set aside to cool slightly.
- Sauté Vegetables: In a large skillet, heat the olive oil over medium heat. Add the diced onion and sauté until translucent, about 3-4 minutes. Add the minced garlic and cook for another minute.
- Cook Spinach and Mushrooms: Add the chopped mushrooms to the skillet and cook for about 5-7 minutes, or until they release their moisture and begin to brown. Stir in the chopped spinach and cook until wilted. Remove from heat and let the mixture cool slightly.
- Make the Filling: In a large mixing bowl, combine the ricotta cheese, half of the mozzarella cheese, half of the parmesan cheese, the egg, and dried Italian herbs. Stir in the cooled mushroom and spinach mixture. Season with salt and pepper to taste.
- Stuff the Shells: Spread 1 cup of marinara sauce in the bottom of a 9×13 inch baking dish. Carefully fill each cooked pasta shell with the cheese and vegetable mixture and place them in the baking dish.
- Add Sauce and Cheese: Pour the remaining marinara sauce over the stuffed shells. Sprinkle the rest of the mozzarella and parmesan cheeses over the top.
- Bake: Cover the baking dish with aluminum foil and bake in the preheated oven for 25 minutes. Remove the foil and bake for an additional 10-15 minutes, or until the cheese is bubbly and golden brown.
- Serve and Garnish: Remove from the oven and let it cool for a few minutes before serving. Garnish with fresh basil leaves if desired.
Extra Tips:
For an even richer flavor, consider using a mixture of wild mushrooms, such as cremini or shiitake, in place of regular white mushrooms. You can also add a pinch of red pepper flakes to the filling for a bit of heat.
If you have extra filling, it can be used to stuff more shells or serve as a delicious dip with crusty bread. When reheating leftovers, cover the dish with foil to prevent the cheese from drying out. Enjoy this delightful and comforting family meal!
Baked Lemon Herb Chicken With Roasted Vegetables
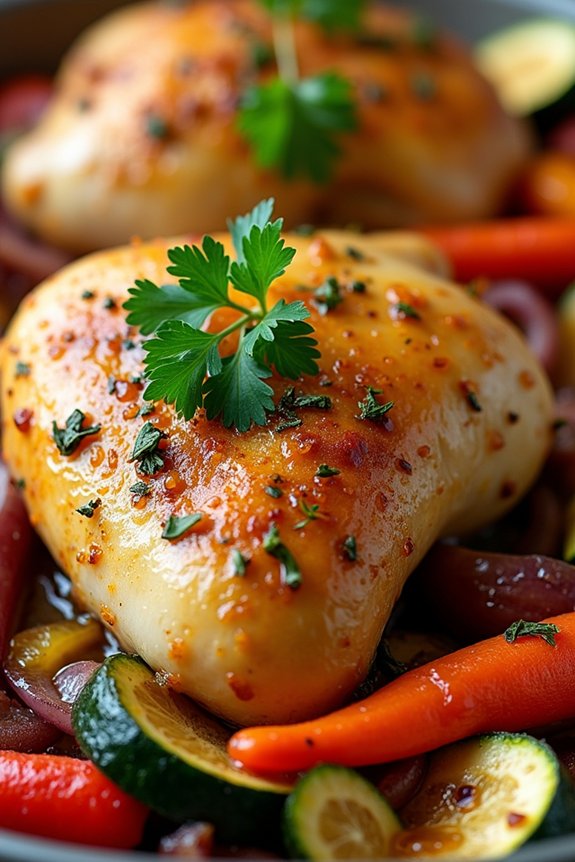
Baked Lemon Herb Chicken with Roasted Vegetables is a delightful and nutritious meal that’s perfect for a family dinner. This dish combines the zesty flavors of lemon and the aromatic freshness of herbs with tender, juicy chicken. Paired with a selection of roasted vegetables, it offers a well-rounded meal that’s both satisfying and healthy.
The beauty of this recipe lies in its simplicity and the way the flavors meld together during the baking process, making it a great option for busy weeknights or a relaxed weekend dinner.
The vegetables in this dish can be customized based on your family’s preferences, allowing you to use seasonal produce or whatever you have on hand. The key is to guarantee all components are evenly coated with the flavorful lemon herb marinade and roasted to perfection. The result is a vibrant, colorful dish that not only looks appealing but also tastes delicious, with the vegetables soaking up the savory juices from the chicken as they bake together in the oven.
Ingredients (Serves 4-6):
- 4-6 chicken thighs or breasts, bone-in and skin-on
- 2 lemons
- 4 cloves garlic, minced
- 1 teaspoon dried thyme
- 1 teaspoon dried rosemary
- 1 teaspoon dried oregano
- Salt and freshly ground black pepper, to taste
- 3 tablespoons olive oil
- 4 cups mixed vegetables (such as carrots, bell peppers, zucchini, and red onions), chopped into bite-sized pieces
- Fresh parsley, chopped (for garnish)
Cooking Instructions:
- Preheat the Oven: Start by preheating your oven to 400°F (200°C). This guarantees that the chicken and vegetables will cook evenly and develop a nice roasted flavor.
- Prepare the Marinade: In a large bowl, combine the juice of two lemons, minced garlic, dried thyme, rosemary, oregano, salt, pepper, and olive oil. Mix well to combine all the ingredients.
- Marinate the Chicken: Place the chicken thighs in the marinade, ensuring each piece is well-coated. Allow the chicken to marinate for at least 30 minutes in the refrigerator for maximum flavor, or longer if time permits.
- Prepare the Vegetables: While the chicken is marinating, chop your selection of vegetables into bite-sized pieces. Place them in a separate bowl and toss with a little olive oil, salt, and pepper.
- Assemble the Dish: In a large baking dish or sheet pan, arrange the marinated chicken pieces. Surround them with the chopped vegetables, ensuring everything is evenly spread out to allow for even cooking.
- Bake the Dish: Place the baking dish in the preheated oven and bake for approximately 35-45 minutes, or until the chicken is cooked through (internal temperature should reach 165°F) and the vegetables are tender and slightly caramelized.
- Garnish and Serve: Remove the dish from the oven and let it rest for a few minutes. Garnish with freshly chopped parsley before serving. Enjoy the Baked Lemon Herb Chicken with Roasted Vegetables with your family!
Extra Tips:
For an enhanced flavor, consider adding a splash of white wine or chicken broth to the baking dish before placing it in the oven. This will create a delightful sauce that can be spooned over the chicken and vegetables just before serving.
If you prefer a bit of heat, add a pinch of red pepper flakes to the marinade. Finally, remember to adjust the seasoning according to your taste, as the natural flavors of the ingredients can vary.
Hearty Vegetable and Lentil Casserole
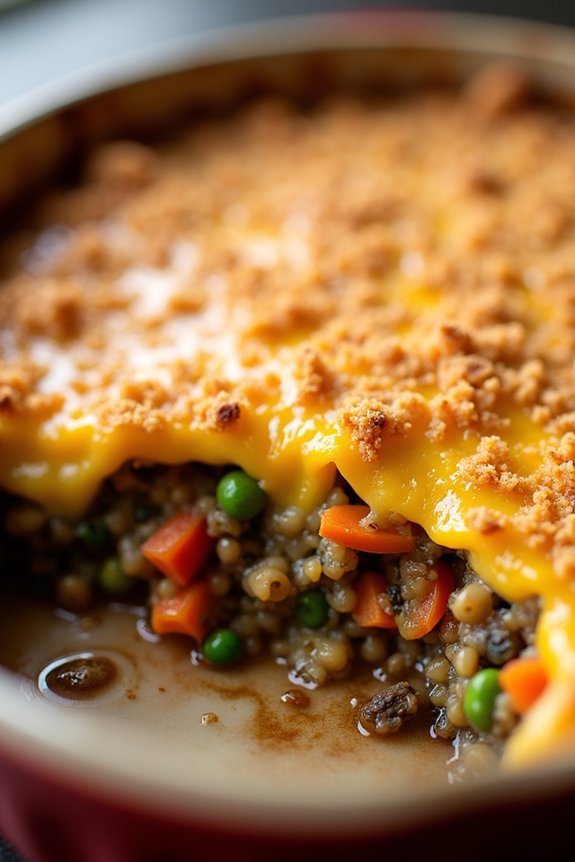
This Hearty Vegetable and Lentil Casserole is a perfect baked dinner idea for families seeking a nutritious and comforting meal. Combining the earthy flavors of lentils with a medley of fresh vegetables, this casserole isn’t only delicious but also packed with protein, fiber, and essential nutrients. It’s a dish that’s certain to satisfy everyone at the table, while also providing a wholesome alternative to meat-based casseroles.
Ideal for serving 4-6 people, this casserole is easy to prepare and requires minimal active cooking time, making it perfect for busy weeknights. The oven does most of the work, allowing the flavors to meld together and develop a rich, satisfying taste. Whether you’re a seasoned cook or a kitchen novice, this recipe is straightforward and rewarding, promising a warm, filling meal that even the pickiest eaters will enjoy.
Ingredients (serves 4-6):
- 1 cup dried green or brown lentils
- 1 tablespoon olive oil
- 1 large onion, chopped
- 2 cloves garlic, minced
- 2 carrots, sliced
- 1 red bell pepper, chopped
- 1 zucchini, chopped
- 1 teaspoon dried thyme
- 1 teaspoon dried rosemary
- 1 teaspoon smoked paprika
- Salt and pepper to taste
- 4 cups vegetable broth
- 1 can (14 oz) diced tomatoes
- 1 cup frozen peas
- 1 cup shredded cheddar cheese
- 1/2 cup breadcrumbs
Instructions:
- Preheat the Oven: Begin by preheating your oven to 375°F (190°C). This guarantees that the casserole cooks evenly and is ready to bake once all the ingredients are prepared.
- Prepare the Lentils: Rinse the lentils under cold water and pick out any debris. Set aside to drain while you prepare the vegetables.
- Sauté the Vegetables: In a large oven-safe skillet or casserole dish, heat the olive oil over medium heat. Add the chopped onion and minced garlic, sautéing for about 3 minutes until the onion becomes translucent and fragrant.
- Add the Vegetables and Spices: Stir in the sliced carrots, chopped red bell pepper, and chopped zucchini. Cook for an additional 5 minutes, allowing the vegetables to soften slightly. Sprinkle in the dried thyme, rosemary, smoked paprika, salt, and pepper, stirring to coat the vegetables evenly.
- Combine Lentils and Liquids: Add the rinsed lentils to the skillet, followed by the vegetable broth and canned diced tomatoes (with juices). Stir well to combine all the ingredients.
- Simmer the Mixture: Bring the mixture to a gentle simmer. Cover the skillet and let it cook for about 20 minutes, or until the lentils are tender and have absorbed most of the liquid.
- Add Peas and Cheese: Uncover the skillet and stir in the frozen peas, distributing them evenly throughout the mixture. Sprinkle the shredded cheddar cheese over the top of the casserole.
- Top with Breadcrumbs: Evenly spread the breadcrumbs over the cheese layer to create a crispy topping when baked.
- Bake the Casserole: Transfer the skillet to the preheated oven. Bake for 20-25 minutes, or until the cheese is melted, bubbly, and golden brown, and the breadcrumbs are crisp.
- Serve: Remove the casserole from the oven and let it cool for a few minutes before serving. Enjoy your hearty vegetable and lentil casserole warm.
Extra Tips: For added flavor, consider incorporating a splash of balsamic vinegar or a dash of hot sauce into the lentil mixture before baking. You can also customize this casserole by adding your favorite seasonal vegetables or substituting different types of cheese. If you prefer a vegan version, simply omit the cheese or use a plant-based cheese alternative. Leftovers can be stored in an airtight container in the refrigerator for up to three days and make for a great reheated lunch.
Easy Baked Salmon With Asparagus
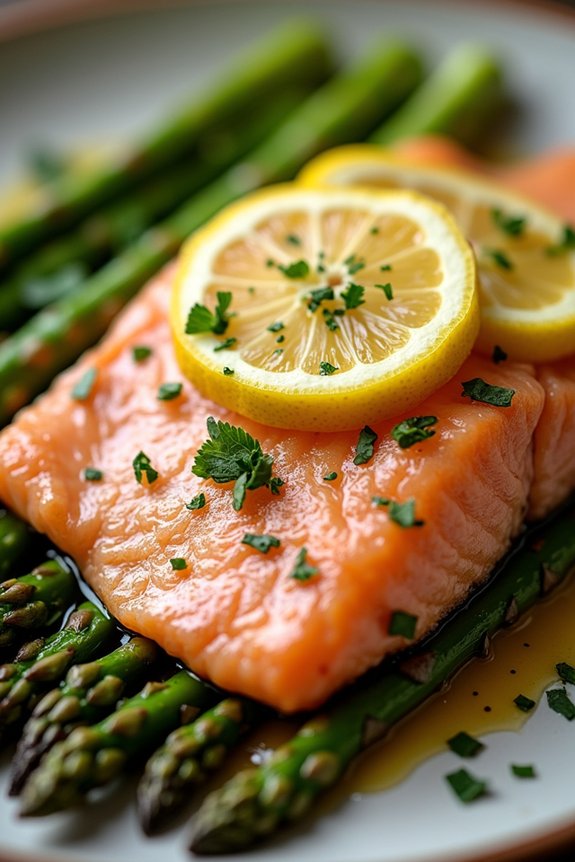
Baked salmon with asparagus is a delightful and nutritious dish that brings together the rich flavors of tender salmon and crispy asparagus. This easy-to-make recipe is perfect for a family dinner, providing a well-balanced meal that’s both satisfying and healthy.
Whether you’re an experienced cook or just starting, this dish is simple to prepare and will impress your family with its enticing aroma and delicious taste. The secret to this dish lies in the combination of fresh ingredients and the careful baking process that locks in the natural flavors.
The salmon is marinated in a light lemon and garlic sauce, which complements the fresh asparagus perfectly. Baking the salmon and asparagus together allows the flavors to meld, resulting in a harmonious blend that’s sure to please. This recipe serves 4-6 people, making it an ideal choice for a family meal.
Ingredients:
- 4-6 salmon fillets (about 6 oz each)
- 1 bunch of fresh asparagus, trimmed
- 3 tablespoons olive oil
- 2 lemons (one for juice, one sliced)
- 4 cloves garlic, minced
- 1 teaspoon salt
- 1/2 teaspoon black pepper
- 1 teaspoon dried dill
- 1/2 teaspoon paprika (optional)
- Fresh parsley, chopped (for garnish)
Cooking Instructions:
- Preparation: Preheat your oven to 400°F (200°C). Line a large baking sheet with parchment paper or lightly grease it with olive oil.
- Marinate the Salmon: In a small bowl, mix together the olive oil, lemon juice, minced garlic, salt, black pepper, dill, and paprika. Place the salmon fillets in a shallow dish and pour the marinade over them. Let them marinate for about 15 minutes while you prepare the asparagus.
- Prepare the Asparagus: Trim the woody ends off the asparagus spears. Arrange the asparagus in a single layer on one side of the prepared baking sheet.
- Combine on Baking Sheet: Place the marinated salmon fillets on the other side of the baking sheet. Distribute the lemon slices over the salmon and asparagus.
- Bake the Dish: Bake in the preheated oven for 12-15 minutes, or until the salmon is cooked through and flakes easily with a fork, and the asparagus is tender-crisp.
- Finish and Serve: Remove from the oven and let it rest for a couple of minutes. Garnish with fresh parsley before serving. Enjoy your Easy Baked Salmon With Asparagus while it’s hot.
Extra Tips:
When selecting salmon, opt for wild-caught if possible, as it tends to have a better flavor and is healthier. If you have extra time, marinate the salmon for up to an hour to enhance the taste further.
Make sure not to overbake the salmon to prevent it from becoming dry; it should remain moist and tender. For an added touch of flavor, consider sprinkling a bit of Parmesan cheese over the asparagus before baking.
This recipe can also be adapted by adding other vegetables like cherry tomatoes or sliced bell peppers for additional color and flavor.
Quinoa and Black Bean Enchilada Bake
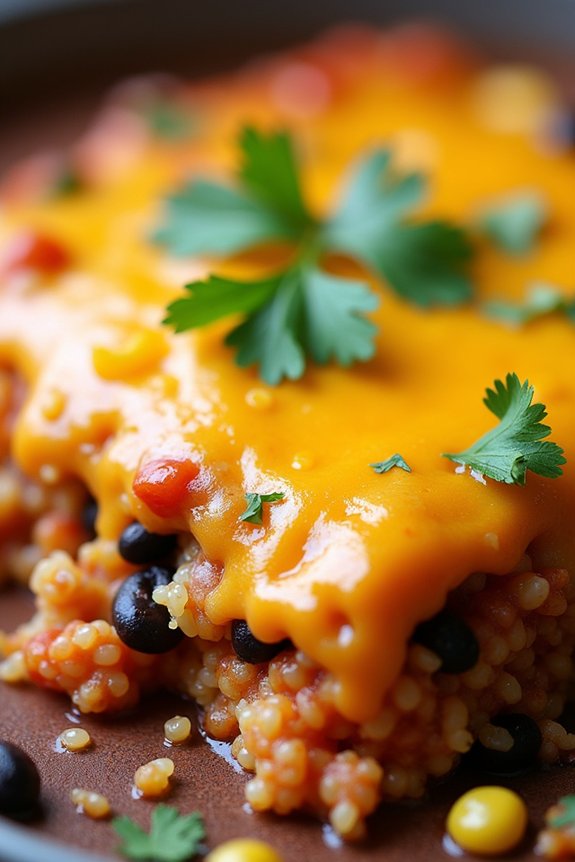
Quinoa and Black Bean Enchilada Bake is a hearty and delicious meal that’s perfect for family dinners. This dish combines the nutty flavor of quinoa with the rich, savory taste of black beans, all enveloped in a spicy enchilada sauce.
It’s not only a delight for the taste buds but also packed with protein and fiber, making it a healthy choice for feeding a crowd. With its vibrant colors and tantalizing aroma, this bake is sure to become a family favorite.
This recipe serves 4-6 people and is ideal for weeknight dinners or gatherings. It’s easy to prepare and can be made ahead of time, leaving you more time to enjoy with family and friends.
The combination of ingredients creates a satisfying and comforting meal that’s perfect for any occasion. Whether you’re a seasoned cook or a beginner, this dish is straightforward to make and promised to impress your loved ones.
Ingredients:
- 1 cup quinoa
- 2 cups vegetable or chicken broth
- 1 tablespoon olive oil
- 1 medium onion, diced
- 2 cloves garlic, minced
- 1 bell pepper, diced
- 1 can (15 oz) black beans, drained and rinsed
- 1 can (15 oz) corn kernels, drained
- 1 can (10 oz) enchilada sauce
- 1 teaspoon cumin
- 1 teaspoon chili powder
- 1 cup shredded cheddar cheese
- 1/4 cup chopped fresh cilantro
- Salt and pepper to taste
Instructions:
- Preheat the Oven: Start by preheating your oven to 375°F (190°C) to guarantee it’s ready for baking.
- Cook the Quinoa: Rinse the quinoa under cold water. In a medium saucepan, combine the quinoa and broth. Bring to a boil, then reduce the heat to low. Cover and simmer for about 15 minutes, or until the quinoa is cooked and the liquid is absorbed. Set aside.
- Saute the Vegetables: In a large skillet, heat the olive oil over medium heat. Add the diced onion and minced garlic, cooking for about 2 minutes until the onion becomes translucent. Add the bell pepper and continue to sauté for another 3 minutes until the pepper is tender.
- Combine Ingredients: In a large mixing bowl, combine the cooked quinoa, sautéed vegetables, black beans, corn, enchilada sauce, cumin, chili powder, salt, and pepper. Mix well to combine all the ingredients thoroughly.
- Assemble the Bake: Transfer the mixture into a greased 9×13 inch baking dish. Spread it evenly, then sprinkle the shredded cheddar cheese on top.
- Bake the Dish: Place the baking dish in the preheated oven and bake for 20-25 minutes, or until the cheese is melted and bubbly.
- Garnish and Serve: Remove from the oven and let it cool for a few minutes. Garnish with chopped cilantro before serving.
Extra Tips:
For an extra flavor boost, consider adding some sliced jalapeños or a dash of hot sauce to spice up the dish. If you’re serving this dish to kids or those who prefer a milder taste, you can adjust the amount of chili powder and cumin accordingly.
This bake can also be made vegetarian by using vegetable broth and can be stored in the refrigerator for up to three days, making it a great make-ahead meal. Additionally, feel free to experiment with other beans or vegetables you have on hand to customize the dish to your liking.
Greek-Style Stuffed Bell Peppers
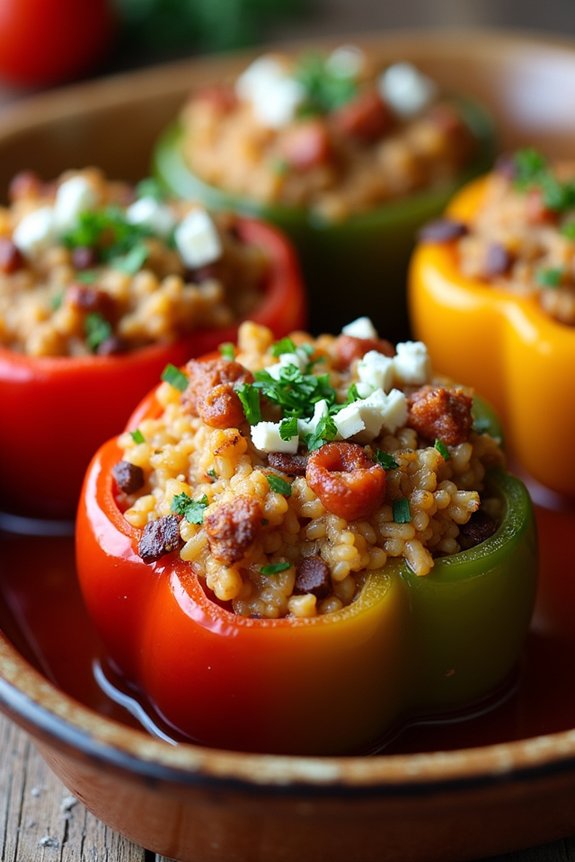
Greek-Style Stuffed Bell Peppers bring together the vibrant flavors of Mediterranean cuisine into a wholesome and satisfying meal that’s perfect for family dinners. This dish features colorful bell peppers filled to the brim with a savory mixture of seasoned ground meat, rice, herbs, and feta cheese, all baked to perfection. The sweetness of the peppers complements the savory stuffing, creating a delightful balance of flavors that’s both comforting and nutritious.
This recipe is designed to serve 4-6 people, making it ideal for a family gathering or a cozy dinner at home. These stuffed bell peppers not only look stunning with their bright colors but also pack a punch of flavor and nutrients. Whether you’re a fan of Greek cuisine or just looking for a hearty meal to share with loved ones, these stuffed peppers are sure to please everyone’s palate.
Ingredients (serves 4-6 people):
- 6 large bell peppers (any color)
- 1 pound ground beef or lamb
- 1 cup cooked rice
- 1 medium onion, finely chopped
- 2 cloves garlic, minced
- 1 cup diced tomatoes (canned or fresh)
- 1 tablespoon tomato paste
- 1 teaspoon dried oregano
- 1 teaspoon dried mint
- 1/2 teaspoon ground cinnamon
- Salt and pepper to taste
- 1/2 cup crumbled feta cheese
- 2 tablespoons olive oil
- 1/4 cup chopped fresh parsley
- 1 cup chicken or vegetable broth
Instructions:
- Preheat the Oven: Start by preheating your oven to 375°F (190°C) to make sure it’s ready when it’s time to bake the stuffed peppers.
- Prepare the Peppers: Slice the tops off the bell peppers and remove the seeds and membranes from inside. Be careful not to tear the peppers. Set the tops aside for later use.
- Cook the Filling: In a large skillet over medium heat, heat the olive oil. Add the chopped onion and garlic, sautéing until soft and translucent, about 3-4 minutes.
- Add the Meat: Add the ground beef or lamb to the skillet. Cook until the meat is browned, breaking it up with a wooden spoon to confirm it’s evenly cooked.
- Mix in Other Ingredients: Stir in the diced tomatoes, tomato paste, oregano, mint, cinnamon, salt, and pepper. Allow the mixture to cook for 5 minutes, letting the flavors combine.
- Incorporate Rice and Cheese: Remove the skillet from the heat. Stir in the cooked rice, crumbled feta cheese, and fresh parsley, mixing until everything is well combined.
- Stuff the Peppers: Fill each bell pepper with the meat and rice mixture, pressing down gently to pack it in. Place the filled peppers upright in a baking dish.
- Add Broth and Bake: Pour the chicken or vegetable broth into the bottom of the baking dish. This will help steam the peppers and keep them moist during baking. Replace the tops on the stuffed peppers.
- Bake the Peppers: Cover the dish with aluminum foil and bake in the preheated oven for 35-40 minutes. Remove the foil in the last 10 minutes of baking to allow the tops to brown slightly.
- Serve and Enjoy: Once done, remove the peppers from the oven and let them cool slightly before serving. Garnish with additional parsley if desired.
Extra Tips:
For a more robust flavor, consider adding a pinch of nutmeg to the filling. If you’re vegetarian, you can easily substitute the meat with chickpeas or lentils.
When selecting bell peppers, choose ones that can stand upright to prevent spilling during cooking. Additionally, if you prefer a softer texture for the peppers, blanch them in boiling water for a few minutes before stuffing.
This dish pairs wonderfully with a simple Greek salad or warm pita bread on the side.
Creamy Cauliflower and Broccoli Gratin
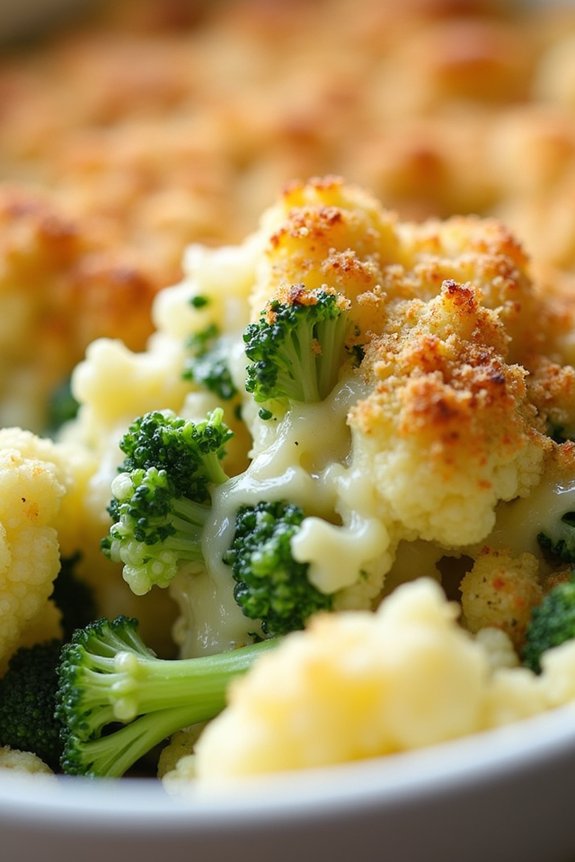
If you’re looking for a comforting and nutritious baked dinner idea for your family, the Creamy Cauliflower and Broccoli Gratin is a perfect choice. This dish combines tender florets of cauliflower and broccoli with a rich, cheesy sauce, making it a delightful addition to any meal. The creamy texture and savory flavors are sure to please both kids and adults alike, offering a delicious way to enjoy these healthy vegetables.
Not only is this gratin satisfying, but it’s also easy to prepare, making it ideal for busy weeknights. The preparation involves simple steps and common ingredients, ensuring that you can whip up a wholesome meal without too much fuss. Whether served as a main or a side dish, this gratin is sure to become a family favorite.
Ingredients (serves 4-6 people):
- 1 medium head of cauliflower, cut into florets
- 1 medium head of broccoli, cut into florets
- 3 tablespoons unsalted butter
- 3 tablespoons all-purpose flour
- 2 cups whole milk
- 1 cup grated cheddar cheese
- 1/4 cup grated Parmesan cheese
- 1 teaspoon Dijon mustard
- Salt and pepper to taste
- 1/4 teaspoon nutmeg
- 1/2 cup breadcrumbs
- 2 tablespoons olive oil
Cooking Instructions:
- Preheat Oven: Preheat your oven to 375°F (190°C) to prepare for baking the gratin.
- Boil Vegetables: In a large pot of boiling, salted water, cook the cauliflower and broccoli florets for about 5 minutes until they’re just tender. Drain them and set aside.
- Prepare Cheese Sauce: In a medium saucepan, melt the butter over medium heat. Add the flour and whisk continuously for about 2 minutes until a smooth paste forms. Gradually add the milk while continuing to whisk until the sauce thickens and comes to a simmer.
- Add Cheese and Seasonings: Remove the saucepan from heat and stir in the cheddar cheese, Parmesan cheese, Dijon mustard, nutmeg, salt, and pepper. Mix until the cheese has melted and the sauce is smooth.
- Assemble Gratin: In a large baking dish, arrange the cooked cauliflower and broccoli florets in an even layer. Pour the cheese sauce over the vegetables, ensuring they’re fully covered.
- Add Breadcrumb Topping: In a small bowl, combine the breadcrumbs with olive oil and mix until the breadcrumbs are evenly coated. Sprinkle this mixture over the top of the cheese-covered vegetables.
- Bake: Place the baking dish in the preheated oven and bake for about 25-30 minutes, or until the top is golden brown and the sauce is bubbling.
- Serve: Allow the gratin to cool for a few minutes before serving. This will make it easier to portion and enjoy.
Extra Tips:
For a crispy topping, you can broil the gratin for the last 2-3 minutes of baking. Just keep a close eye to prevent burning.
Feel free to experiment with different types of cheese for varied flavors, such as Gruyère or mozzarella. If you prefer a lower-calorie version, substitute whole milk with skim milk or a plant-based milk of your choice.
Enjoy your Creamy Cauliflower and Broccoli Gratin alongside grilled chicken or as a standalone vegetarian dish.
Savory Sweet Potato and Turkey Meatloaf

Savory Sweet Potato and Turkey Meatloaf is a delightful twist on the traditional meatloaf, infusing it with the natural sweetness of sweet potatoes and the lean protein of ground turkey. This dish is both satisfying and healthy, making it a perfect choice for a family dinner.
The combination of sweet potatoes and turkey creates a moist and flavorful meatloaf that appeals to both kids and adults. It’s an ideal dish for when you want to serve something comforting yet nutritious.
The addition of sweet potatoes not only enhances the flavor but also adds a nutritional boost, providing a good source of vitamins and fiber. This recipe is designed to serve 4-6 people, making it an excellent choice for families or a small gathering. By following these simple steps, you can prepare a hearty meal that’s perfect for any night of the week.
Ingredients (serves 4-6):
- 1 1/2 lbs ground turkey
- 1 cup cooked and mashed sweet potatoes
- 1/2 cup breadcrumbs
- 1/4 cup milk
- 1/4 cup finely chopped onion
- 1 egg
- 2 cloves garlic, minced
- 1 tablespoon Worcestershire sauce
- 1 teaspoon salt
- 1/2 teaspoon black pepper
- 1/2 teaspoon dried thyme
- 1/2 teaspoon paprika
- 1/3 cup ketchup (for topping)
- 1 tablespoon brown sugar (for topping)
- 1 teaspoon mustard (for topping)
Instructions:
- Preheat the Oven: Preheat your oven to 375°F (190°C) to guarantee it’s ready for baking the meatloaf.
- Prepare the Sweet Potatoes: Peel and cube the sweet potatoes. Boil them in a pot of water until tender, about 15 minutes. Drain and mash them until smooth. Let them cool slightly.
- Mix Ingredients: In a large bowl, combine the ground turkey, mashed sweet potatoes, breadcrumbs, milk, chopped onion, egg, minced garlic, Worcestershire sauce, salt, black pepper, thyme, and paprika. Mix everything until well combined, but don’t overmix, as it can make the meatloaf tough.
- Shape the Meatloaf: Place the mixture into a greased loaf pan or shape it into a loaf on a foil-lined baking sheet. Make sure it’s compact and evenly shaped for even cooking.
- Prepare the Topping: In a small bowl, mix the ketchup, brown sugar, and mustard. Spread this mixture evenly over the top of the meatloaf.
- Bake the Meatloaf: Place the meatloaf in the preheated oven and bake for 45-50 minutes, or until the internal temperature reaches 165°F (74°C).
- Rest and Serve: Once cooked, remove the meatloaf from the oven and let it rest for about 10 minutes before slicing. This helps it hold its shape and makes it easier to serve.
Extra Tips:
For a more flavorful meatloaf, consider adding finely chopped bell peppers or mushrooms to the mixture. If you prefer a spicier kick, a pinch of cayenne pepper can be added to the seasoning.
Leftovers can be refrigerated and make delicious sandwiches the next day. Be sure not to skip letting the meatloaf rest before serving, as this step is essential in maintaining its structure and juiciness.
Baked Eggplant Parmesan

Baked Eggplant Parmesan is a delightful, hearty dish that’s perfect for family dinners. This Italian-inspired recipe combines the rich flavors of tomato sauce, gooey mozzarella cheese, and crispy breaded eggplant slices. It’s a comforting meal that can be enjoyed by vegetarians and meat lovers alike. Not only is it delicious, but it’s also relatively easy to prepare, making it a great option for busy weeknights or a special weekend dinner.
The beauty of Baked Eggplant Parmesan lies in its layers of flavor and texture. The eggplant is first coated in breadcrumbs and baked until golden brown, providing a satisfying crunch. This is then layered with a rich tomato sauce and mozzarella cheese, all baked together until bubbly and perfectly cooked. It’s a dish that’s sure to please both kids and adults, and it pairs beautifully with a simple green salad or a side of pasta.
Ingredients (Serves 4-6):
- 2 large eggplants
- Salt
- 1 cup all-purpose flour
- 3 large eggs
- 2 cups Italian breadcrumbs
- 1 cup grated Parmesan cheese
- 4 cups marinara sauce
- 3 cups shredded mozzarella cheese
- 1/4 cup olive oil
- Fresh basil leaves for garnish
Instructions:
- Prepare the Eggplant: Start by slicing the eggplants into 1/4-inch thick rounds. Sprinkle salt on both sides of each slice and let them sit for about 30 minutes to draw out excess moisture. This step helps to remove any bitterness and guarantees a crispier texture.
- Preheat the Oven: While the eggplant is sitting, preheat your oven to 400°F (200°C). Line two large baking sheets with parchment paper for easy cleanup.
- Bread the Eggplant: Set up a breading station with three shallow dishes. Place the flour in the first dish, beaten eggs in the second, and mix the breadcrumbs with Parmesan cheese in the third. Dredge each eggplant slice in flour, dip in the egg, and coat with the breadcrumb mixture. Press the breadcrumbs firmly to confirm they adhere.
- Bake the Eggplant: Arrange the breaded eggplant slices in a single layer on the prepared baking sheets. Drizzle or brush a small amount of olive oil over each slice to help them brown. Bake in the preheated oven for about 20-25 minutes, flipping halfway through, until both sides are golden and crispy.
- Assemble the Dish: In a large baking dish, spread a layer of marinara sauce at the bottom. Arrange a layer of baked eggplant slices over the sauce, then spoon more marinara sauce over the eggplant. Sprinkle with mozzarella cheese. Repeat these layers until all ingredients are used, finishing with a generous layer of mozzarella on top.
- Bake the Eggplant Parmesan: Reduce oven temperature to 375°F (190°C). Cover the dish with foil and bake for 25 minutes. Remove the foil and continue baking for another 15 minutes, or until the cheese is melted and bubbly.
- Garnish and Serve: Once baked, allow the dish to cool for a few minutes. Garnish with fresh basil leaves before serving.
Extra Tips: It’s important to let the eggplant sit with salt to draw out moisture and enhance its flavor. If you prefer a lighter version, you can substitute part of the mozzarella with a lower-fat cheese option. Additionally, homemade marinara sauce can elevate the dish, but store-bought works fine if you’re short on time. For an added twist, consider adding a layer of sautéed mushrooms or spinach between the eggplant layers for extra nutrition and flavor.
Chicken and Wild Rice Bake
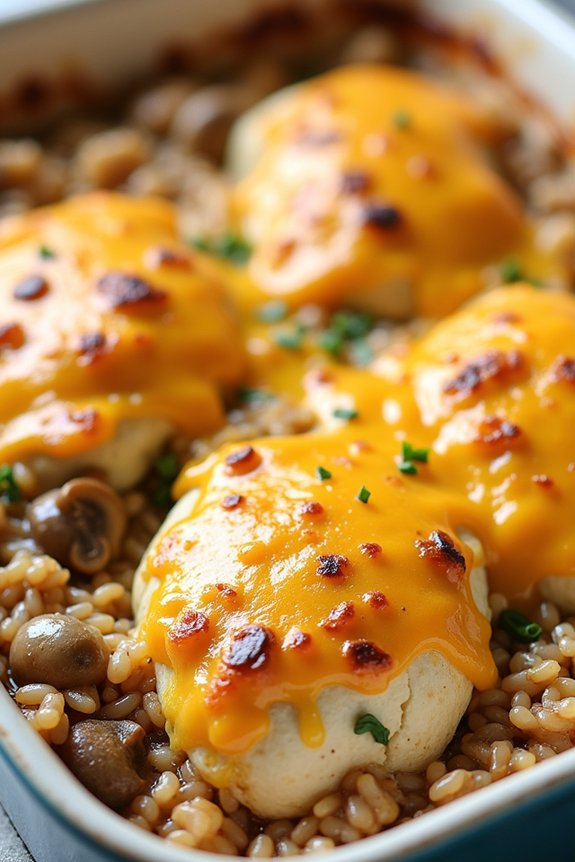
Looking for a comforting, one-dish dinner that brings warmth and flavor to your family table? This Chicken and Wild Rice Bake is a perfect choice! With tender chicken pieces, fragrant wild rice, and a creamy, savory sauce, this dish is sure to please both kids and adults alike.
It’s an ideal recipe for busy weeknights or relaxed weekends when you want something delicious without too much fuss. The combination of chicken and wild rice isn’t only nutritious but also incredibly satisfying. The rice absorbs the flavors of the chicken and the creamy sauce, making every bite a delight.
This dish is hearty enough to serve as a standalone meal, or you can pair it with a simple green salad or steamed vegetables for a more complete dinner. Plus, with its easy preparation and minimal cleanup, it’s a winner for any home cook.
Ingredients for 4-6 servings:
- 4 boneless, skinless chicken breasts
- 1 cup wild rice
- 2 cups chicken broth
- 1 cup heavy cream
- 1 medium onion, chopped
- 2 cloves garlic, minced
- 1 cup mushrooms, sliced
- 1 teaspoon dried thyme
- 1 teaspoon dried rosemary
- Salt and pepper to taste
- 1 cup shredded cheddar cheese
- 2 tablespoons olive oil
- Cooking spray
Cooking Instructions:
- Preheat and Prepare Baking Dish: Preheat your oven to 375°F (190°C). Lightly grease a 9×13 inch baking dish with cooking spray to prevent sticking.
- Cook the Wild Rice: In a medium-sized pot, combine the wild rice and chicken broth. Bring to a boil, then reduce the heat to low and cover. Let it simmer for about 40-45 minutes or until the rice is tender and has absorbed most of the liquid. Set aside.
- Sauté Aromatics: In a large skillet, heat the olive oil over medium heat. Add the chopped onion and minced garlic, and sauté until the onion becomes translucent, about 3-4 minutes.
- Add Mushrooms and Herbs: Add the sliced mushrooms to the skillet and cook until they release their moisture and become golden brown, about 5 minutes. Stir in the dried thyme, rosemary, salt, and pepper.
- Combine Ingredients: In the prepared baking dish, mix together the cooked wild rice, sautéed vegetables, and heavy cream. Spread the mixture evenly in the dish.
- Prepare the Chicken: Season the chicken breasts with salt and pepper on both sides. Place them on top of the rice mixture in the baking dish.
- Bake the Dish: Cover the dish with aluminum foil and bake in the preheated oven for 25-30 minutes. Remove the foil, sprinkle the shredded cheddar cheese over the top, and bake for an additional 10-15 minutes, or until the chicken is cooked through and the cheese is bubbly and golden.
- Serve: Let the dish cool for a few minutes before serving. Slice the chicken and serve it with the creamy rice mixture.
Extra Tips:
For extra flavor, you can marinate the chicken in advance with a bit of lemon juice and herbs. If you prefer a bit of crunch, consider adding a breadcrumb topping mixed with a little melted butter for the last 10 minutes of baking.
Additionally, you can adjust the creaminess by using half-and-half instead of heavy cream, or add vegetables like peas or carrots for more color and nutrition. This dish is also great for meal prep and can be stored in the refrigerator for up to 3 days in an airtight container.
Zucchini and Tomato Casserole

Zucchini and Tomato Casserole is a delightful dish that combines fresh garden vegetables with rich cheese for a comforting meal that the whole family will love. This baked dinner idea isn’t only flavorful but also a great way to incorporate more vegetables into your diet.
The zucchini provides a mild, slightly sweet taste that pairs perfectly with the tangy tomatoes, all brought together with a creamy cheese layer. This casserole is easy to prepare and makes for a perfect weeknight meal when you want something hearty yet simple.
Ideal for serving 4-6 people, this Zucchini and Tomato Casserole can be a stand-alone dish or a side to grilled meats or fish. The layers of fresh zucchini, ripe tomatoes, and gooey cheese make every bite a satisfying experience.
Whether you’re a seasoned cook or just starting in the kitchen, this dish is straightforward to prepare and requires only a few key ingredients. The result is a colorful, nutritious casserole that’s sure to be a hit at the dinner table.
Ingredients:
- 3 medium zucchinis, thinly sliced
- 4 medium tomatoes, sliced
- 1 onion, finely chopped
- 2 cloves of garlic, minced
- 1 cup shredded mozzarella cheese
- 1/2 cup grated Parmesan cheese
- 2 tablespoons olive oil
- 1 teaspoon dried oregano
- 1 teaspoon dried basil
- Salt and pepper to taste
Cooking Instructions:
- Preheat the Oven: Begin by preheating your oven to 375°F (190°C). This will guarantee your casserole cooks evenly.
- Prepare the Vegetables: Slice the zucchinis and tomatoes into thin, even slices. Finely chop the onion and mince the garlic cloves.
- Sauté the Onion and Garlic: In a skillet over medium heat, add the olive oil. Once hot, add the chopped onions and minced garlic. Sauté until the onions are translucent and fragrant, about 3-4 minutes. Remove from heat and set aside.
- Layer the Ingredients: In a large baking dish, start by layering half of the sliced zucchinis, followed by half of the sliced tomatoes. Sprinkle half of the sautéed onion and garlic mixture over the top, then season with salt, pepper, oregano, and basil.
- Add Cheese: Sprinkle half of the mozzarella and Parmesan cheese over the vegetables. Repeat the layers with the remaining zucchinis, tomatoes, onion mixture, and top with the remaining cheese.
- Bake the Casserole: Cover the baking dish with foil and place it in the preheated oven. Bake for 25 minutes, then remove the foil and bake for an additional 10-15 minutes, or until the cheese is golden and bubbly.
- Serve: Allow the casserole to cool for a few minutes before serving. This will make it easier to cut and serve.
Extra Tips:
For a richer flavor, consider adding a layer of cooked ground beef or sausage between the vegetable layers. You can also experiment with different cheeses like cheddar or Gruyère for a unique taste.
If you prefer a little heat, add a pinch of red pepper flakes to the seasoning. This casserole can be prepared ahead of time; simply assemble it and store it in the refrigerator until ready to bake.
Enjoy your delicious Zucchini and Tomato Casserole as a cozy family meal!
Spinach and Ricotta Stuffed Pasta Shells

Spinach and Ricotta Stuffed Pasta Shells are a delightful and hearty baked dish perfect for family dinners. This Italian-inspired meal combines the creamy goodness of ricotta cheese with the earthy flavors of spinach, all neatly tucked inside tender pasta shells. Topped with a rich tomato sauce and melted cheese, this dish isn’t only delicious but also visually appealing, making it a great choice for impressing guests or treating your family to something special.
The preparation is simple, allowing you to enjoy more time with your loved ones rather than spending hours in the kitchen. The stuffed shells can be made ahead of time, making it a convenient option for busy weeknights. This recipe serves 4-6 people, ensuring everyone has their fill of this comforting classic. Whether you’re a seasoned cook or a beginner, you’ll find this dish easy to prepare and incredibly satisfying.
Ingredients (Serves 4-6)
- 20-24 large pasta shells
- 15 oz (about 425g) ricotta cheese
- 1 cup packed fresh spinach, chopped
- 1 egg
- 1 cup grated Parmesan cheese, divided
- 2 cups shredded mozzarella cheese, divided
- 2 cups marinara sauce
- 2 cloves garlic, minced
- 1 tablespoon olive oil
- Salt and pepper to taste
- 1 teaspoon dried Italian herbs (optional)
- Fresh basil leaves for garnish (optional)
Cooking Instructions
- Preheat and Prepare: Preheat your oven to 375°F (190°C). Cook the pasta shells according to the package instructions until al dente. Drain and rinse them under cold water to stop the cooking process. Set aside.
- Prepare the Filling: In a large mixing bowl, combine ricotta cheese, chopped spinach, egg, half of the Parmesan cheese, half of the mozzarella cheese, and a pinch of salt and pepper. Mix until well combined.
- Stuff the Shells: Carefully fill each cooked pasta shell with the ricotta and spinach mixture, making sure not to overfill them. Place the stuffed shells in a single layer in a baking dish.
- Make the Sauce: In a saucepan, heat olive oil over medium heat. Add the minced garlic and sauté for about 1 minute until fragrant. Pour in the marinara sauce and add the Italian herbs if using. Simmer for 5 minutes.
- Assemble the Dish: Pour the marinara sauce evenly over the stuffed shells in the baking dish. Sprinkle the remaining Parmesan and mozzarella cheeses over the top.
- Bake: Cover the baking dish with aluminum foil and bake in the preheated oven for 25 minutes. Remove the foil and bake for another 10 minutes or until the cheese is bubbly and golden brown.
- Garnish and Serve: Let the dish cool for a few minutes before serving. Garnish with fresh basil leaves if desired. Serve warm and enjoy!
Extra Tips
For a richer flavor, consider using a mixture of ricotta and cottage cheese in the filling. You can also add a pinch of nutmeg to the ricotta mixture for a subtle depth of flavor. If you prefer a bit of heat, sprinkle some red pepper flakes over the marinara sauce before baking.
This dish is versatile and can easily be adapted to include other ingredients such as sautéed mushrooms or cooked sausage for added variety. If making ahead, you can assemble the dish and refrigerate it for up to a day before baking. Just remember to add a few extra minutes to the baking time if starting from cold.