

Creating delicious low sodium dinners for my family has become a passion of mine. I remember the first time I made lemon herb grilled chicken; the house smelled amazing, and everyone couldn’t wait to eat. Since then, I’ve discovered so many tasty recipes that don’t skimp on flavor. From zucchini noodles with fresh pesto to a hearty quinoa and black bean salad, these dishes have become our go-to meals. I’m excited to share this list of my favorite quick and easy low sodium recipes with you.
Lemon Herb Grilled Chicken
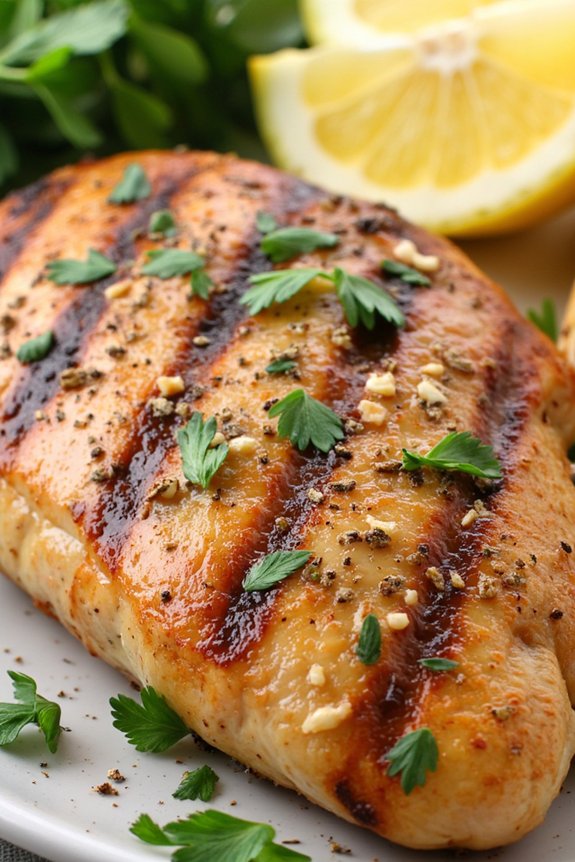
Grilling the chicken not only infuses it with a smoky flavor but also helps to lock in the juices, making it a perfect choice for a nutritious meal. The marinade, made from fresh lemon juice, a medley of herbs, and a touch of olive oil, imparts a vibrant taste without the need for added salt. This recipe serves 4-6 people, making it ideal for family dinners or small gatherings.
Ingredients:
- 4-6 boneless, skinless chicken breasts
- 1/4 cup fresh lemon juice
- 3 tablespoons olive oil
- 2 cloves garlic, minced
- 1 teaspoon dried oregano
- 1 teaspoon dried thyme
- 1 teaspoon dried rosemary
- 1/2 teaspoon black pepper
- 1/4 cup fresh parsley, chopped (for garnish)
- Lemon wedges (for serving)
Cooking Instructions:
- Prepare the Marinade: In a medium-sized bowl, combine the lemon juice, olive oil, minced garlic, dried oregano, thyme, rosemary, and black pepper. Whisk together until the ingredients are well mixed.
- Marinate the Chicken: Place the chicken breasts in a large resealable plastic bag or a shallow dish. Pour the marinade over the chicken, guaranteeing each piece is well coated. Seal the bag or cover the dish, and refrigerate for at least 1 hour, or up to 4 hours for more intense flavor.
- Preheat the Grill: Preheat your grill to medium-high heat. If using a charcoal grill, prepare enough coals to maintain a steady heat.
- Grill the Chicken: Remove the chicken from the marinade, allowing any excess to drip off. Place the chicken on the grill and cook for about 6-7 minutes on each side, or until the internal temperature reaches 165°F (75°C) and the chicken is cooked through.
- Rest the Chicken: Once cooked, transfer the chicken to a plate and let it rest for a few minutes. This allows the juices to redistribute, keeping the chicken moist.
- Garnish and Serve: Before serving, sprinkle the chopped parsley over the chicken for added freshness. Serve with lemon wedges on the side for an extra burst of citrus flavor.
Extra Tips:
When grilling, it’s important to monitor the heat to prevent the chicken from burning or drying out. If your grill tends to run hot, consider using indirect heat by placing the chicken away from the direct flame.
Additionally, if you prefer, fresh herbs can be used in place of dried ones for a more intense flavor. Also, remember to let the chicken rest after grilling to guarantee it remains juicy.
This dish pairs beautifully with a fresh salad or steamed vegetables for a complete low sodium meal.
Low Sodium Veggie Stir-Fry
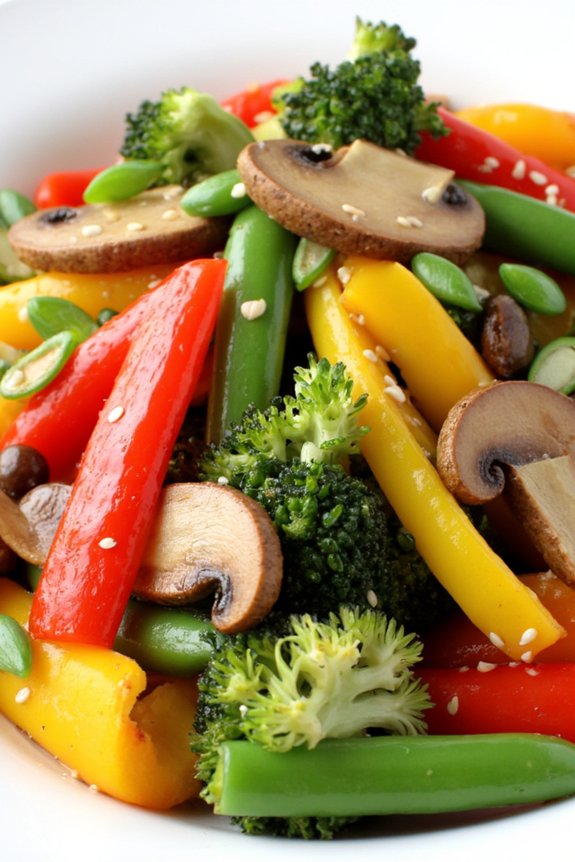
Creating a delicious and healthy low sodium veggie stir-fry is a fantastic way to enjoy a flavorful meal without the excessive salt content often found in traditional stir-fry dishes. This recipe focuses on fresh vegetables, aromatic herbs, and a hint of citrus to create a vibrant and satisfying meal that’s perfect for lunch or dinner.
By using low sodium soy sauce and a variety of colorful vegetables, this dish becomes a nutrient-rich option that doesn’t compromise on taste. Low sodium veggie stir-fry isn’t only quick and easy to prepare but also highly customizable. You can use any combination of your favorite vegetables, making it a versatile dish suitable for various dietary preferences.
With a few simple ingredients and minimal preparation, you can enjoy a healthy and delightful meal with your family or friends, serving approximately 4-6 people.
Ingredients:
- 2 tablespoons olive oil
- 1 red bell pepper, sliced
- 1 yellow bell pepper, sliced
- 1 cup broccoli florets
- 1 cup snap peas
- 1 cup sliced mushrooms
- 2 cloves garlic, minced
- 1 tablespoon fresh ginger, grated
- 1/4 cup low sodium soy sauce
- 1 tablespoon rice vinegar
- 1 tablespoon fresh lime juice
- 1/4 teaspoon black pepper
- 1/4 teaspoon red pepper flakes (optional)
- 1/4 cup chopped green onions
- 2 tablespoons toasted sesame seeds
- Cooked brown rice or quinoa for serving
Instructions:
- Prepare the Vegetables: Begin by washing all the vegetables thoroughly. Slice the red and yellow bell peppers into thin strips, cut the broccoli into small florets, and slice the mushrooms. Trim the ends of the snap peas if necessary.
- Heat the Oil: In a large skillet or wok, heat the olive oil over medium-high heat. Allow the oil to warm up for about a minute until it shimmers.
- Sauté Aromatics: Add the minced garlic and grated ginger to the pan, stirring constantly for about 30 seconds until they become fragrant.
- Cook Vegetables: Add the sliced bell peppers, broccoli florets, snap peas, and mushrooms to the pan. Stir-fry the vegetables for 5-7 minutes, or until they’re tender-crisp.
- Add Sauce Ingredients: Pour in the low sodium soy sauce, rice vinegar, and fresh lime juice. Sprinkle in the black pepper and red pepper flakes (if using). Toss the vegetables in the sauce to make sure they’re evenly coated.
- Finish Cooking: Continue to stir-fry for another 2-3 minutes, allowing the sauce to heat through and slightly reduce.
- Garnish and Serve: Remove the stir-fry from the heat. Sprinkle the chopped green onions and toasted sesame seeds over the top. Serve immediately with cooked brown rice or quinoa on the side.
Extra Tips:
For the best results, make sure to keep the vegetables slightly crisp to preserve their nutrients and vibrant colors.
Feel free to experiment with other vegetables such as carrots, zucchini, or baby corn for added variety. If you prefer a bit more protein, consider adding tofu or a handful of cooked edamame to the stir-fry.
Remember that the key to a great stir-fry is high heat and quick cooking, so keep your ingredients prepped and ready before you start cooking. Enjoy your flavorful, low sodium meal!
Garlic and Herb Baked Salmon
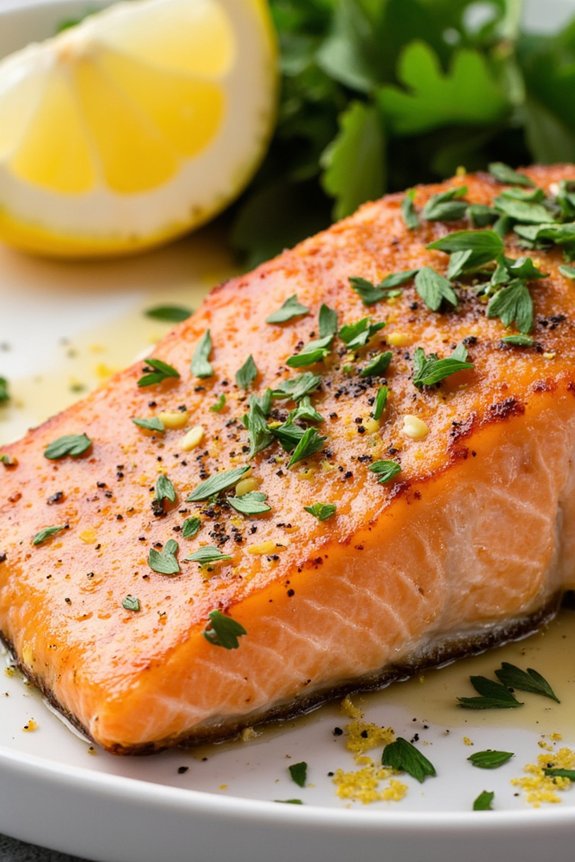
Garlic and Herb Baked Salmon is a flavorful and nutritious dish that makes for a delightful low sodium dinner option. This recipe combines the rich taste of salmon with the aromatic essence of garlic and a blend of fresh herbs, creating a moist and savory meal that’s perfect for family dinners or special occasions.
The natural flavors of the salmon are enhanced by the herbs, offering a satisfying and health-conscious choice that doesn’t compromise on taste. Baking the salmon guarantees it retains its natural juices and tenderness, while the garlic and herbs infuse into the fish, resulting in a dish that’s both delectable and heart-healthy.
Perfect for a serving size of 4-6 people, this recipe is easy to prepare and can be paired with a variety of side dishes like steamed vegetables or a fresh green salad, making it a versatile addition to your dinner repertoire.
Ingredients (for 4-6 servings):
- 4 salmon fillets (6 ounces each)
- 3 tablespoons olive oil
- 4 cloves garlic, minced
- 2 tablespoons fresh lemon juice
- 1 tablespoon lemon zest
- 2 tablespoons chopped fresh parsley
- 1 tablespoon chopped fresh dill
- 1 teaspoon ground black pepper
- Lemon slices for garnish
Cooking Instructions:
- Preheat the Oven: Begin by preheating your oven to 375°F (190°C). This guarantees that it reaches the right temperature for even cooking of the salmon.
- Prepare the Marinade: In a small mixing bowl, combine the olive oil, minced garlic, lemon juice, lemon zest, chopped parsley, chopped dill, and ground black pepper. Stir these ingredients together until well mixed to create a flavorful marinade.
- Marinate the Salmon: Place the salmon fillets on a baking sheet lined with parchment paper. Brush each fillet generously with the prepared marinade, making sure they’re well coated. Let the salmon marinate at room temperature for about 15 minutes to allow the flavors to infuse.
- Bake the Salmon: Transfer the baking sheet with the salmon to the preheated oven. Bake for 15-20 minutes, or until the salmon is cooked through and flakes easily with a fork. The internal temperature should reach 145°F (63°C) for safe consumption.
- Garnish and Serve: Once baked, remove the salmon from the oven and let it rest for a few minutes. Garnish with fresh lemon slices and additional fresh herbs if desired. Serve warm alongside your choice of side dishes.
Extra Tips:
When selecting salmon fillets, opt for wild-caught varieties when possible as they tend to have a richer flavor.
Be mindful of the cooking time; overcooked salmon can become dry, so it’s crucial to check for doneness a few minutes before the estimated cooking time.
For added flavor, consider incorporating other herbs such as thyme or basil according to your preference.
Finally, if you prefer a more intense garlic flavor, increase the amount of minced garlic in the marinade.
Quinoa and Black Bean Salad
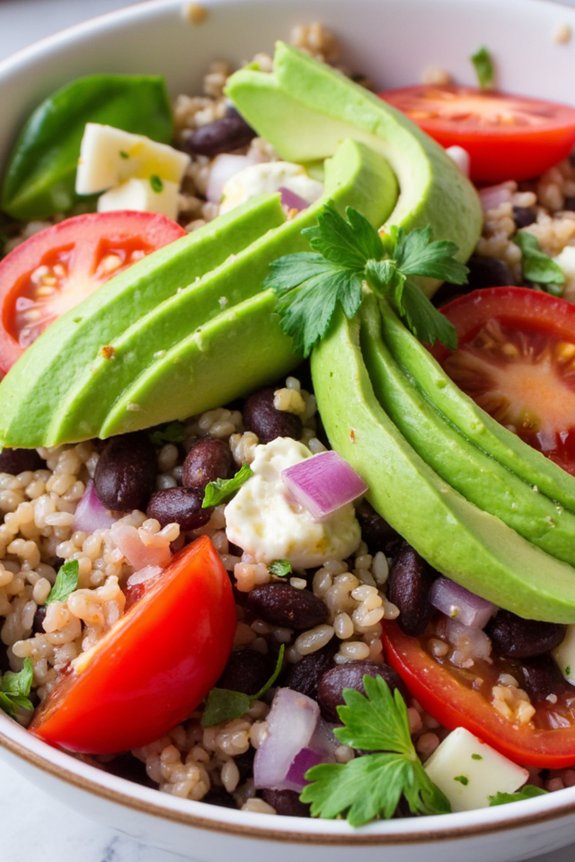
Quinoa and Black Bean Salad is a delicious and nutritious low sodium dinner option that’s both satisfying and easy to prepare. This vibrant salad combines the earthy flavors of quinoa with the hearty texture of black beans, complemented by a mix of fresh vegetables and a zesty lime dressing.
Perfect for a light dinner or as a side dish, this salad is packed with protein and fiber, making it a healthy choice for anyone looking to reduce their sodium intake without compromising on flavor.
This recipe is designed to serve 4-6 people, making it an ideal choice for family dinners or small gatherings. The combination of ingredients guarantees a balanced meal that’s as visually appealing as it’s tasty.
With simple preparation and a short cooking time, Quinoa and Black Bean Salad is perfect for those busy weeknight dinners when you want something quick and healthy.
Ingredients:
- 1 cup quinoa
- 2 cups water
- 1 can (15 ounces) black beans, drained and rinsed
- 1 cup cherry tomatoes, halved
- 1 red bell pepper, diced
- 1/2 cup cilantro, chopped
- 1/4 cup red onion, finely chopped
- 1 avocado, diced
- 1/4 cup lime juice (about 2 limes)
- 2 tablespoons olive oil
- 1 teaspoon cumin
- 1/4 teaspoon black pepper
- Optional: 1 jalapeño, seeds removed and finely chopped
Cooking Instructions:
- Cook the Quinoa:
- Rinse the quinoa under cold water using a fine mesh strainer to remove any bitterness. In a medium saucepan, combine the quinoa with 2 cups of water. Bring to a boil over medium-high heat, then reduce the heat to low, cover, and simmer for 15 minutes or until the water is absorbed and the quinoa is tender. Fluff with a fork and set aside to cool.
- Prepare the Dressing:
- In a small bowl, whisk together the lime juice, olive oil, cumin, and black pepper. Adjust seasoning to taste, if necessary.
- Combine Ingredients:
- In a large mixing bowl, combine the cooked quinoa, black beans, cherry tomatoes, red bell pepper, cilantro, red onion, and jalapeño (if using). Pour the dressing over the salad and toss gently to combine.
- Add Avocado:
- Just before serving, gently fold in the diced avocado to avoid mashing it. This will add creaminess and a delicious texture to the salad.
- Serve:
- Transfer the salad to a serving platter or individual plates. Garnish with extra cilantro, if desired, and serve immediately.
Extra Tips:
To enhance the flavors of this Quinoa and Black Bean Salad, consider making the salad ahead of time and allowing it to chill in the refrigerator for an hour before serving. This will enable the flavors to meld together beautifully.
Additionally, if you prefer a bit more spice, you can leave the seeds in the jalapeño or add a pinch of chili powder to the dressing. This dish is versatile, so feel free to add other vegetables or herbs you have on hand, such as corn or parsley, for added flavor and nutrition.
Zucchini Noodles With Pesto
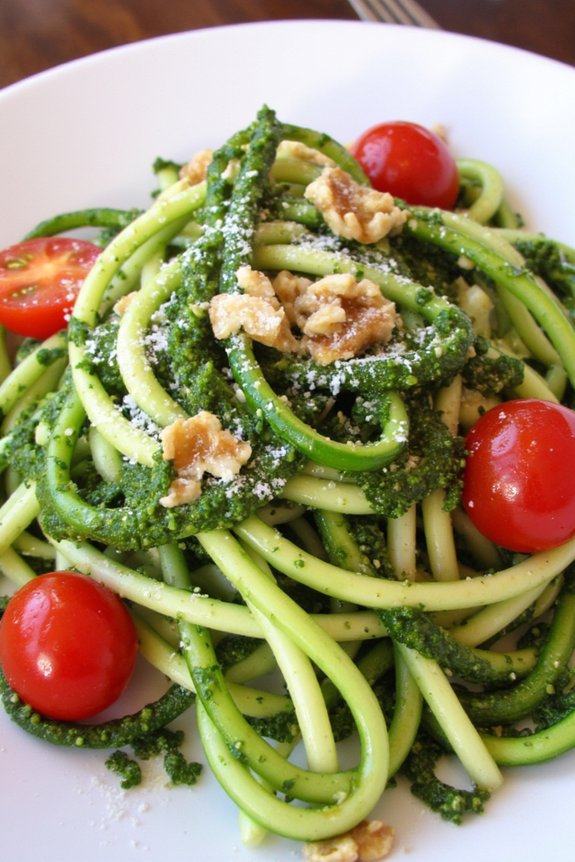
Zucchini Noodles With Pesto is a delightful, low sodium dinner option that brings together fresh, vibrant flavors in a healthy, satisfying dish. Perfect for those looking to reduce their sodium intake without sacrificing taste, this recipe utilizes the natural goodness of zucchini, which serves as a nutritious alternative to traditional pasta.
The homemade pesto sauce, made from fresh basil, garlic, and unsalted nuts, adds a rich and aromatic taste, making this meal both delicious and wholesome. This recipe is ideal for a light dinner or lunch, and it’s particularly convenient for those who are gluten-free or aiming to incorporate more vegetables into their diet.
Zucchini noodles, or “zoodles,” are a fun and versatile ingredient that holds the pesto sauce beautifully, guaranteeing each bite is flavorful. With minimal ingredients and quick preparation, Zucchini Noodles With Pesto is an excellent choice for busy weeknights or when you’re in the mood for something fresh and healthy.
Ingredients for 4-6 servings:
- 4 medium zucchinis
- 2 cups fresh basil leaves
- 1/2 cup unsalted walnuts or pine nuts
- 1/2 cup grated Parmesan cheese
- 2 cloves garlic
- 1/2 cup extra-virgin olive oil
- 1 tablespoon lemon juice
- Freshly ground black pepper to taste
- Optional: cherry tomatoes or roasted red peppers for garnish
Cooking Instructions:
- Prepare the Zucchini Noodles: Begin by washing the zucchinis thoroughly. Use a spiralizer to cut the zucchinis into noodle-like strands. If you don’t have a spiralizer, a vegetable peeler or julienne peeler can also be used to slice them into long, thin strips.
- Make the Pesto: In a food processor, combine the fresh basil leaves, unsalted walnuts or pine nuts, grated Parmesan cheese, and garlic cloves. Pulse until the ingredients are finely chopped. Slowly add the extra-virgin olive oil while the processor is running to achieve a smooth consistency. Add lemon juice and freshly ground black pepper to taste, then pulse a few more times to combine.
- Combine the Noodles and Pesto: In a large mixing bowl, gently toss the zucchini noodles with the prepared pesto sauce until the noodles are well coated. Confirm that the sauce is evenly distributed throughout the noodles.
- Serve: Transfer the pesto-coated zucchini noodles to serving plates. For an extra touch of flavor and color, garnish with optional cherry tomatoes or roasted red peppers. Serve immediately to enjoy the freshness.
Extra Tips:
When preparing zucchini noodles, aim to use zucchinis that are firm and have smooth skin for the best texture. Spiralizing the zucchini just before serving helps maintain their crispness.
If you find the noodles too watery, lightly sauté them in a dry pan for 1-2 minutes before adding the pesto. Also, feel free to adjust the consistency of the pesto by adding more olive oil if necessary, especially if you prefer a creamier sauce. Enjoy experimenting with different nuts or adding extra vegetables to personalize your dish!
Turkey and Spinach Stuffed Peppers
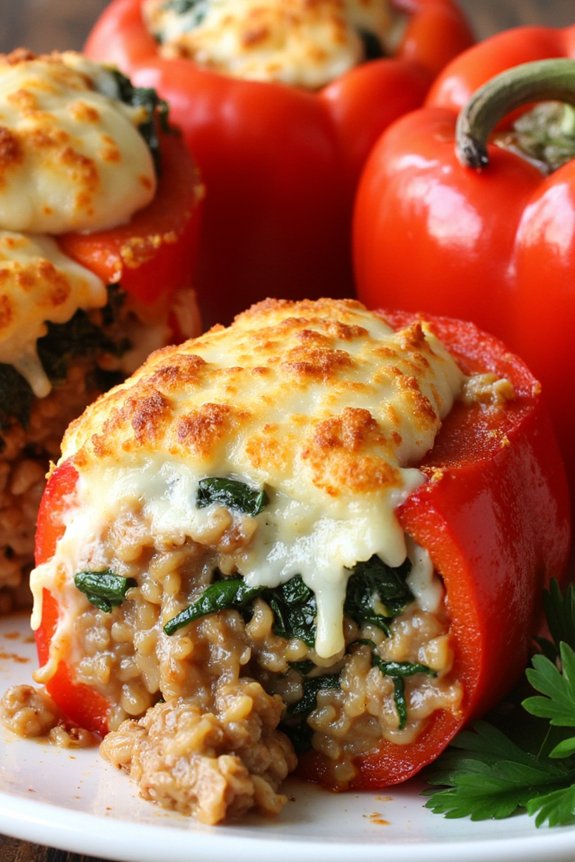
Turkey and Spinach Stuffed Peppers are a delicious and health-conscious choice for a low sodium dinner. The combination of lean ground turkey and nutritious spinach not only provides a flavorful meal but also guarantees you’re making a heart-healthy choice. This recipe is perfect for those looking to reduce their sodium intake without sacrificing taste. By using fresh ingredients and natural seasonings, you can enjoy a savory dish that’s both satisfying and easy to prepare.
Stuffed peppers are versatile and can be adapted to suit different tastes and dietary needs. This particular recipe focuses on maintaining low sodium levels while still delivering a burst of flavor in every bite. The sweetness of the bell peppers combined with the savory turkey and spinach filling creates a delightful contrast that will please your palate. This dish is an excellent choice for family dinners or meal prep, as it can be made ahead and reheated when needed.
Ingredients for 4-6 servings:
- 6 large bell peppers (any color)
- 1 lb ground turkey
- 2 cups fresh spinach, chopped
- 1 cup cooked brown rice
- 1 small onion, finely chopped
- 2 cloves garlic, minced
- 1 cup low sodium tomato sauce
- 1 teaspoon dried oregano
- 1 teaspoon dried basil
- 1 teaspoon black pepper
- 1 tablespoon olive oil
- ½ cup shredded mozzarella cheese (optional)
- Fresh parsley for garnish (optional)
Cooking Instructions:
- Prepare the Peppers: Preheat your oven to 375°F (190°C). Cut the tops off the bell peppers and remove the seeds and membranes. Place the peppers cut side up in a baking dish.
- Cook the Filling: In a large skillet, heat olive oil over medium heat. Add the chopped onion and garlic, sautéing until the onion becomes translucent. Add the ground turkey, cooking until browned and fully cooked.
- Add Spinach and Rice: Stir in the chopped spinach, cooking until wilted. Then, add the cooked brown rice, incorporating it evenly into the turkey mixture.
- Season the Mixture: Pour in the low sodium tomato sauce and sprinkle in the oregano, basil, and black pepper. Mix well, making sure the spices are evenly distributed throughout the filling.
- Stuff the Peppers: Generously spoon the turkey and spinach mixture into each bell pepper, packing it down slightly to fit as much filling as possible.
- Bake the Peppers: Cover the baking dish with aluminum foil and bake in the preheated oven for 30 minutes. Remove the foil and, if desired, sprinkle mozzarella cheese over the stuffed peppers. Return to the oven for an additional 10 minutes, or until the cheese is melted and bubbly.
- Serve: Once cooked, let the stuffed peppers cool slightly. Garnish with fresh parsley before serving, if using.
Extra Tips:
When preparing Turkey and Spinach Stuffed Peppers, make sure to choose firm and evenly sized bell peppers to guarantee even cooking. If you prefer a bit of heat, consider adding a pinch of red pepper flakes to the turkey mixture.
For added convenience, the filling can be prepared in advance and stored in the refrigerator for up to two days before stuffing the peppers. Additionally, feel free to experiment with different grains such as quinoa instead of brown rice for a twist on the traditional recipe.
Spaghetti Squash Primavera
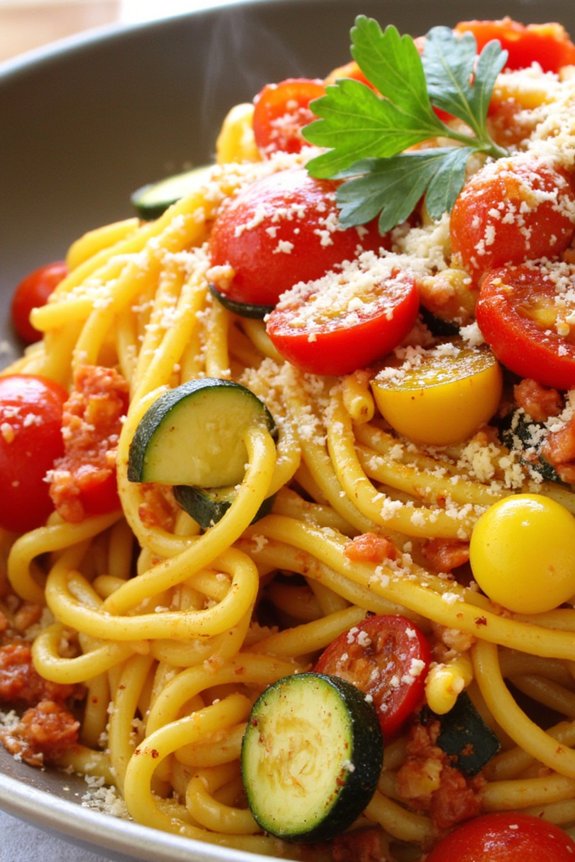
Spaghetti Squash Primavera is a delightful and healthy low-sodium dinner option that’s both delicious and satisfying. This dish is a twist on the classic Italian primavera, substituting traditional pasta with spaghetti squash, which is an excellent low-carb alternative. The vibrant medley of fresh vegetables such as bell peppers, zucchini, and cherry tomatoes combined with aromatic herbs offers a burst of flavors without the need for added salt.
It’s a perfect meal for those who are mindful of their sodium intake while still craving something hearty and flavorful. This recipe serves 4-6 people and can easily be adjusted to cater to a larger group or to accommodate leftovers for the next day. The preparation involves roasting the spaghetti squash until it’s tender enough to pull apart into strands that mimic spaghetti, and then sautéing a colorful array of vegetables to create a wholesome and nutritious meal.
The minimal use of salt allows the natural flavors of the ingredients to shine through, making it an ideal choice for anyone looking to enjoy a balanced and tasty low-sodium meal.
Ingredients:
- 2 medium spaghetti squash
- 2 tablespoons olive oil
- 1 red bell pepper, sliced
- 1 yellow bell pepper, sliced
- 1 zucchini, sliced
- 1 cup cherry tomatoes, halved
- 3 cloves garlic, minced
- 1 teaspoon dried oregano
- 1 teaspoon dried basil
- 1/4 teaspoon black pepper
- 1/2 cup grated Parmesan cheese (optional)
- Fresh parsley, chopped (for garnish)
Cooking Instructions:
- Preheat the oven: Start by preheating your oven to 400°F (200°C). This will guarantee it’s hot enough to roast the spaghetti squash and bring out its natural sweetness.
- Prepare the spaghetti squash: Cut each spaghetti squash in half lengthwise. Scoop out the seeds and stringy bits from the center using a spoon. Brush the inside of each half with olive oil and place them cut-side down on a baking sheet lined with parchment paper.
- Roast the squash: Place the baking sheet in the preheated oven and roast the squash for about 35-40 minutes, or until the flesh is tender and easily shredded with a fork. Once done, remove from the oven and allow to cool slightly.
- Cook the vegetables: While the squash is roasting, heat a tablespoon of olive oil in a large skillet over medium heat. Add the sliced bell peppers, zucchini, and cherry tomatoes. Sauté for about 5-7 minutes until the vegetables are tender but still vibrant.
- Add garlic and herbs: Stir in the minced garlic, oregano, basil, and black pepper. Cook for an additional 2 minutes, allowing the flavors to meld together.
- Combine squash and vegetables: Once the spaghetti squash is cool enough to handle, use a fork to scrape out the strands into the skillet with the vegetables. Toss everything together to combine and heat through.
- Serve the dish: Transfer the Spaghetti Squash Primavera to a serving platter or individual plates. Sprinkle with grated Parmesan cheese, if using, and garnish with fresh parsley. Serve immediately.
Extra Tips:
For an added depth of flavor, consider roasting the vegetables alongside the squash for the last 10 minutes of baking. This will enhance their sweetness and add a slight caramelization.
If you’re looking to add protein, grilled chicken or shrimp can be a great addition to this dish. Also, feel free to customize the vegetables based on what’s in season or your personal preferences. Reducing the cooking time slightly for the veggies will keep them crisper, adding a nice texture contrast to the tender squash.
Baked Cod With Lemon and Dill
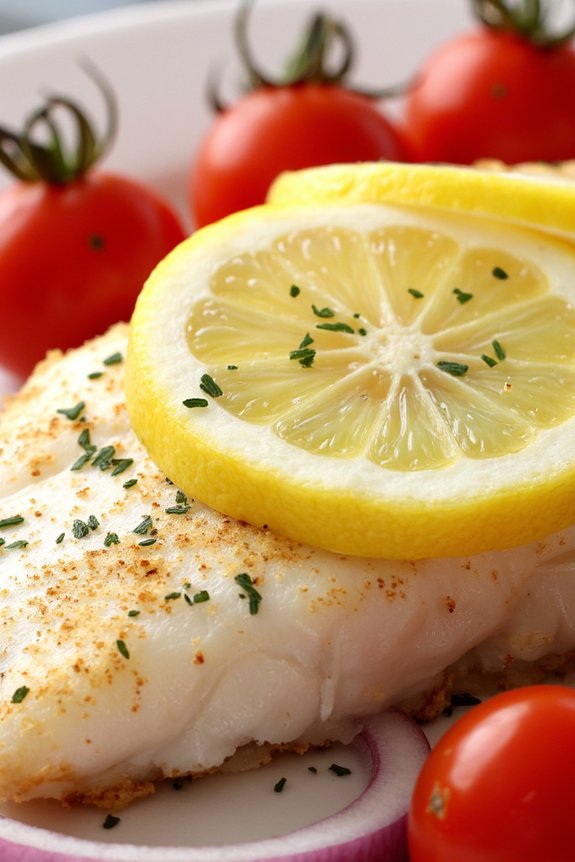
Baked Cod With Lemon and Dill is a delicious and healthy low sodium dinner option that’s perfect for those who are looking to maintain a balanced diet. This dish combines the mild, flaky texture of cod with the bright and zesty flavors of lemon and fresh dill, creating a meal that’s both satisfying and revitalizing. Not only is it low in sodium, but it’s also packed with essential nutrients, making it an excellent choice for a wholesome dinner.
The preparation of this dish is straightforward and quick, making it ideal for busy weeknights. The cod fillets are baked to perfection, absorbing the aromatic flavors of lemon and dill without the need for excessive seasoning. With minimal ingredients and simple instructions, this recipe guarantees that you can enjoy a delicious, health-conscious meal with minimal effort.
Ingredients for 4-6 servings:
- 4-6 cod fillets (5-6 ounces each)
- 2 tablespoons olive oil
- 2 lemons (one for zest and juice, one sliced)
- 1 bunch fresh dill, chopped
- 1 teaspoon garlic powder
- 1 teaspoon black pepper
- 1 teaspoon paprika
- 1 cup cherry tomatoes, halved
- 1 small red onion, thinly sliced
Cooking Instructions:
- Preheat the Oven: Preheat your oven to 400°F (200°C). This will guarantee that your cod cooks evenly and thoroughly.
- Prepare the Baking Dish: Lightly grease a baking dish with olive oil. Arrange the cod fillets in the dish, leaving some space between each piece for even cooking.
- Season the Cod: In a small bowl, mix together the olive oil, garlic powder, black pepper, and paprika. Brush this mixture over the cod fillets, guaranteeing each piece is well-coated.
- Add Lemon and Dill: Zest one lemon over the cod, then cut it in half and squeeze the juice over the fish. Scatter the chopped dill generously on top of the fillets to infuse them with flavor.
- Add Vegetables: Place the sliced red onion and halved cherry tomatoes around the cod in the baking dish. Top the cod with lemon slices for additional flavor and presentation.
- Bake the Cod: Cover the baking dish with foil and bake in the preheated oven for 15-20 minutes, or until the fish flakes easily with a fork. Remove the foil in the last 5 minutes of cooking for a slight golden crust.
- Serve: Once baked, remove the dish from the oven and let it sit for a few minutes. Serve the baked cod with a side of steamed vegetables or a fresh salad for a complete meal.
Extra Tips:
For the best results, use fresh cod fillets and fresh dill to enhance the flavor profile of the dish. If fresh cod isn’t available, frozen fillets can be used; just make sure they’re fully thawed before cooking.
Adjust the amount of lemon and dill according to your taste preference, and consider adding a dash of cayenne pepper if you prefer a bit of heat.
Finally, if you want to add more variety, consider including other vegetables like zucchini or bell peppers in the baking dish.
Slow Cooker Chicken Tortilla Soup

Slow Cooker Chicken Tortilla Soup is a comforting and flavorful dish perfect for a low sodium diet. By using fresh ingredients and a slow cooker, you can achieve a rich and savory soup without the need for excess salt. This recipe is a great option for busy weeknights or when you want to enjoy a healthy meal with minimal effort. The slow cooking process allows the flavors to meld beautifully, creating a delightful and satisfying soup that warms you from the inside out.
The beauty of this recipe lies in its simplicity and adaptability. You can customize it with your favorite low sodium ingredients or add more veggies to increase the nutritional value. With juicy chicken, a medley of vegetables, and aromatic spices, this slow cooker chicken tortilla soup becomes a household favorite. It’s also a great way to use up any leftover chicken or vegetables you have on hand. Serve it with a side of low sodium tortilla chips or fresh avocado slices for a complete meal that everyone will enjoy.
Ingredients (Serves 4-6):
- 1 pound boneless, skinless chicken breasts
- 1 can (14.5 ounces) low sodium diced tomatoes
- 1 can (4 ounces) diced green chilies
- 1 medium onion, chopped
- 3 cloves garlic, minced
- 1 teaspoon ground cumin
- 1 teaspoon chili powder
- 1/2 teaspoon smoked paprika
- 4 cups low sodium chicken broth
- 1 cup frozen corn
- 1 can (15 ounces) no-salt-added black beans, rinsed and drained
- 1 tablespoon fresh lime juice
- 1/4 cup fresh cilantro, chopped
- Freshly ground black pepper, to taste
- Optional garnish: avocado slices, shredded cheese, tortilla strips, or lime wedges
Cooking Instructions:
- Prepare the Ingredients: Begin by washing and chopping all your vegetables. Mince the garlic and chop the onion finely. Rinse and drain the black beans to remove any excess sodium.
- Layer the Ingredients: In the slow cooker, place the chicken breasts at the bottom. Add the chopped onion, minced garlic, diced tomatoes, green chilies, cumin, chili powder, and smoked paprika. Pour the chicken broth over the mixture, ensuring everything is covered.
- Cook in the Slow Cooker: Set your slow cooker to low and cook for 6-7 hours, or on high for 3-4 hours. This will allow the chicken to become tender and the flavors to meld together.
- Shred the Chicken: Once the cooking time is complete, carefully remove the chicken breasts from the slow cooker and shred them using two forks. Return the shredded chicken to the slow cooker.
- Add Final Ingredients: Stir in the frozen corn and black beans, cover, and cook for an additional 30 minutes on high to heat through the corn and beans.
- Finish and Serve: Before serving, stir in the fresh lime juice and chopped cilantro. Taste the soup and adjust with freshly ground black pepper as needed. Serve hot, garnished with optional toppings such as avocado slices, shredded cheese, tortilla strips, or lime wedges.
Extra Tips:
When preparing this Slow Cooker Chicken Tortilla Soup, consider using fresh or homemade chicken broth to further reduce sodium levels. For extra flavor, you can roast the vegetables before adding them to the slow cooker.
If you prefer thicker soup, you can blend a portion of it before adding the chicken back in. Feel free to adjust the level of spices to your taste, and remember that the longer the soup sits, the more the flavors will develop.
This soup also stores well; simply keep it in an airtight container in the refrigerator for up to 3 days or freeze it for up to 3 months.
Cauliflower Fried Rice
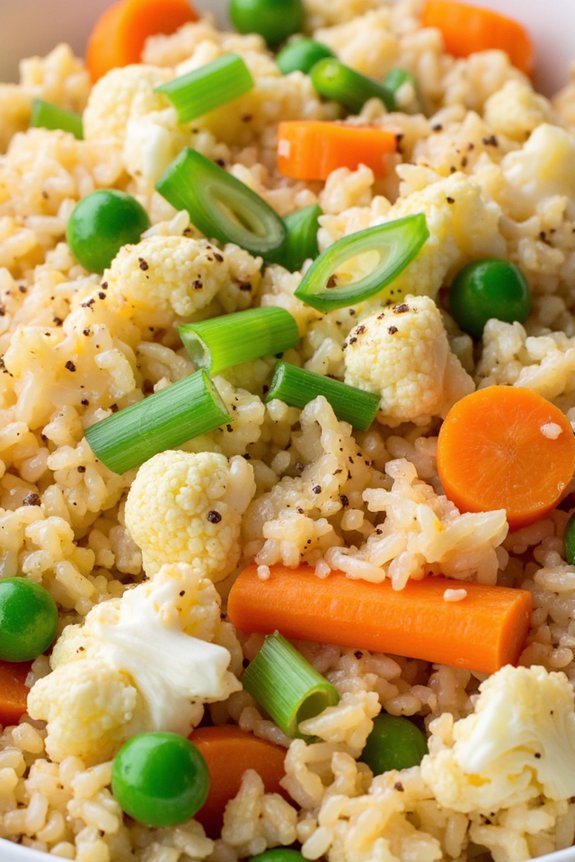
Cauliflower Fried Rice is a delightful, low-sodium alternative to traditional fried rice, perfect for those looking to maintain a healthy lifestyle without compromising on flavor. This dish swaps out white rice for finely chopped cauliflower, which not only reduces sodium content but also lowers the carbohydrate count, making it an excellent choice for those on a low-carb diet.
The natural flavors of fresh vegetables and seasonings come together to create a satisfying meal that can be enjoyed by the whole family. This recipe serves 4-6 people and is ideal for a quick weeknight dinner or a light lunch. The ingredients are simple, yet they bring a burst of flavor and texture to the dish.
With a little bit of preparation and the right cooking techniques, this Cauliflower Fried Rice can become a staple in your low-sodium meal rotation.
Ingredients:
- 1 large head of cauliflower
- 2 tablespoons olive oil
- 1 cup frozen peas and carrots mix
- 1 medium onion, diced
- 2 cloves garlic, minced
- 3 large eggs, beaten
- 1 tablespoon low-sodium soy sauce
- 1/2 teaspoon ground black pepper
- 2 green onions, chopped
- Optional: 1 tablespoon sesame oil for extra flavor
Cooking Instructions:
- Prepare the Cauliflower: Remove the leaves and stem from the cauliflower. Cut it into smaller florets, and then pulse in a food processor until the texture resembles rice grains. Be cautious not to over-process to avoid mushiness.
- Cook the Vegetables: Heat 1 tablespoon of olive oil in a large pan over medium heat. Add the diced onion and cook for about 2-3 minutes until translucent. Then, add the garlic and cook for another minute, making sure it doesn’t burn.
- Add Peas and Carrots: Stir in the frozen peas and carrots mix, and cook for about 5 minutes until they’re heated through and tender.
- Scramble the Eggs: Push the vegetables to one side of the pan and pour the beaten eggs into the other side. Scramble the eggs until they’re fully cooked, then mix them with the vegetables.
- Add Cauliflower: Increase the heat to medium-high and add the processed cauliflower to the pan. Drizzle with the remaining tablespoon of olive oil and stir well to combine with the vegetables and eggs.
- Season the Dish: Pour in the low-sodium soy sauce and sprinkle with ground black pepper. Stir-fry for another 5-7 minutes until the cauliflower is tender but not mushy.
- Finish with Green Onions: Remove the pan from heat and fold in the chopped green onions. If using, drizzle sesame oil over the top for additional flavor.
Extra Tips:
When preparing Cauliflower Fried Rice, verify that the cauliflower is thoroughly dried after washing to prevent it from becoming soggy during cooking. If you don’t have a food processor, you can use a box grater to achieve the rice-like texture.
Feel free to customize your Cauliflower Fried Rice with additional vegetables like bell peppers or mushrooms. For those who prefer a bit more protein, consider adding cooked chicken, shrimp, or tofu. Always taste and adjust the seasoning to your preference, keeping in mind that low-sodium soy sauce is less salty than regular soy sauce.
Chickpea and Vegetable Curry
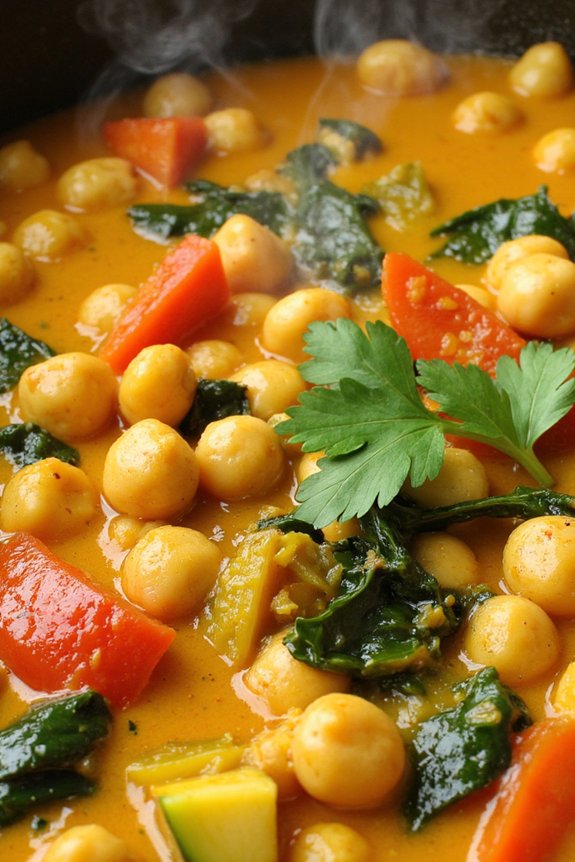
Chickpea and Vegetable Curry is a delightful and nutritious choice for a low sodium dinner. This vibrant dish combines the earthy flavors of chickpeas with a medley of fresh vegetables, all simmered in a rich, aromatic curry sauce. Perfect for those looking to enjoy a flavorful meal without the excess salt, this curry is both hearty and satisfying, making it a great option for a family dinner or meal prep for the week.
This recipe not only provides a delicious meal but also offers a nutritional boost with its array of vegetables and protein-rich chickpeas. The curry is infused with spices that aren’t only aromatic but also contribute to the dish’s depth of flavor, ensuring you won’t miss the salt. It serves 4-6 people, making it a perfect dish for gatherings or to enjoy leftovers.
Ingredients for 4-6 servings:
- 2 tablespoons olive oil
- 1 large onion, diced
- 3 cloves garlic, minced
- 1 tablespoon fresh ginger, grated
- 1 teaspoon ground cumin
- 1 teaspoon ground coriander
- 1 teaspoon turmeric
- 1 teaspoon smoked paprika
- 1/2 teaspoon cayenne pepper (optional, adjust to taste)
- 1 can (14 oz) low-sodium diced tomatoes
- 1 can (14 oz) unsweetened coconut milk
- 1 can (14 oz) low-sodium chickpeas, drained and rinsed
- 2 cups mixed vegetables (e.g., bell peppers, carrots, zucchini), chopped
- 1 cup fresh spinach leaves
- 1 tablespoon lemon juice
- 1/4 cup fresh cilantro, chopped
- Black pepper to taste
Cooking Instructions:
- Heat the Oil: In a large pot or deep skillet, heat the olive oil over medium heat until it shimmers. This provides a base for sautéing, enhancing the flavors of the spices and aromatics.
- Sauté Aromatics: Add the diced onion and sauté until translucent, about 5 minutes. Stir in the minced garlic and grated ginger, cooking for an additional 1-2 minutes until fragrant.
- Add Spices: Sprinkle in the cumin, coriander, turmeric, smoked paprika, and cayenne pepper. Stir well to coat the onion mixture, allowing the spices to toast slightly, releasing their natural oils and aromas.
- Incorporate Liquids: Pour in the diced tomatoes and coconut milk, stirring to combine. Bring the mixture to a gentle simmer, letting it cook for about 5 minutes to meld the flavors.
- Add Chickpeas and Vegetables: Stir in the chickpeas and mixed vegetables. Cover and let the curry simmer for 15-20 minutes, or until the vegetables are tender and the sauce has thickened.
- Finish with Greens: Add the spinach and cook for 2-3 minutes until wilted. Stir in the lemon juice and adjust the seasoning with black pepper to taste.
- Garnish and Serve: Remove from heat and sprinkle with fresh cilantro. Serve hot over rice or with naan bread.
Extra Tips:
For added flavor, consider toasting the spices in a dry pan before adding them to the curry. This can enhance their natural oils and aromas, providing a deeper flavor profile.
Also, feel free to customize the vegetable selection based on seasonal availability or personal preference. If you prefer a thicker curry, simply simmer for a longer period to reduce the liquid.
Mushroom and Spinach Frittata

Frittatas are a versatile dish perfect for any meal of the day, and this Mushroom and Spinach Frittata is no exception. This recipe isn’t only delicious but also low in sodium, making it a healthy choice for those looking to reduce their salt intake. The combination of earthy mushrooms and nutrient-rich spinach gives this frittata a delightful flavor, while the eggs provide a satisfying protein punch.
Whether you’re serving it for breakfast, brunch, or dinner, this frittata is sure to be a hit. This Mushroom and Spinach Frittata is light yet hearty, with the mushrooms adding a savory depth and the spinach contributing freshness and color. The dish comes together quickly and easily, making it perfect for busy weeknights or leisurely weekend breakfasts.
Serve it warm with a side salad or a slice of whole-grain bread for a complete and balanced meal. This recipe serves 4-6 people, making it ideal for family meals or small gatherings.
Ingredients:
- 8 large eggs
- 1/4 cup milk (low-fat or plant-based)
- 1 cup fresh mushrooms, sliced
- 1 cup fresh spinach, roughly chopped
- 1 small onion, finely chopped
- 1 tablespoon olive oil
- 1/4 teaspoon ground black pepper
- 1/4 teaspoon garlic powder
- 1/2 cup shredded low-sodium cheese (optional)
- Fresh parsley for garnish (optional)
Instructions:
1. Preheat the Oven: Start by preheating your oven to 350°F (175°C). This will guarantee that your frittata cooks evenly and achieves the perfect texture.
2. Prepare the Egg Mixture: In a large bowl, whisk together the eggs, milk, ground black pepper, and garlic powder until well combined. The milk will add a bit of creaminess to the eggs and help the frittata puff up nicely while baking.
3. Sauté the Vegetables: Heat the olive oil in an ovenproof skillet over medium heat. Add the chopped onion and sauté for about 2-3 minutes until it becomes translucent.
Next, add the sliced mushrooms and cook for an additional 5 minutes until they’re tender and any liquid has evaporated. Stir in the spinach and cook for another 1-2 minutes until wilted.
4. Combine and Cook: Pour the egg mixture over the sautéed vegetables in the skillet. Gently stir to guarantee the vegetables are evenly distributed. If using cheese, sprinkle it over the top. Allow the frittata to cook on the stovetop for about 3-4 minutes until the edges begin to set.
5. Bake the Frittata: Transfer the skillet to the preheated oven and bake for 15-20 minutes or until the frittata is fully set and the top is lightly golden. You can check for doneness by inserting a toothpick in the center – it should come out clean.
6. Serve: Once cooked, remove the frittata from the oven and let it cool slightly before slicing. Garnish with fresh parsley if desired and serve warm.
Extra Tips:
When cooking the Mushroom and Spinach Frittata, feel free to customize it with your favorite vegetables or herbs. Bell peppers, zucchini, or tomatoes can be excellent additions.
If you don’t have an ovenproof skillet, you can transfer the cooked vegetable mixture to a greased baking dish before adding the egg mixture and baking. Remember, the key to a great frittata isn’t overcooking it; keep an eye on it in the oven to guarantee it remains tender and moist.