

I’ve always been a fan of cozy sandwich nights for dinner, especially when they’re warm and bursting with flavors. There’s something so comforting about sinking your teeth into a gooey grilled cheese or enjoying a hearty meatball sub. These meals are not only easy on the budget but also always a family favorite. Have you ever tried BBQ pulled pork that literally melts in your mouth? Let me share more delicious and easy-to-make recipes that will refresh your dinner routine.
Classic Grilled Cheese With a Twist

There’s something incredibly comforting about a classic grilled cheese sandwich. But what if you could take that comfort and elevate it to a whole new level? Enter the Classic Grilled Cheese With a Twist. This version takes the beloved traditional grilled cheese and adds a delightful spin by incorporating ingredients that pack a punch of flavor.
By adding a combination of different cheeses, fresh herbs, and a hint of spice, this grilled cheese promises to tantalize your taste buds and transform an ordinary meal into a gourmet experience. Perfect for a cozy dinner or a quick lunch, this recipe serves 4-6 people and is ideal for those who love experimenting with flavors while enjoying the simplicity of a classic dish.
The magic lies in the details: the right bread, the perfect cheese blend, and a few unexpected additions that bring out the best in every bite. Whether you’re a grilled cheese purist or someone who loves to try new things, this recipe is sure to become a staple in your kitchen.
Ingredients:
- 12 slices of sourdough or artisan bread
- 1 cup shredded sharp cheddar cheese
- 1 cup shredded mozzarella cheese
- 1 cup crumbled feta cheese
- 1/2 cup sun-dried tomatoes, julienned
- 1/4 cup fresh basil leaves, chopped
- 1 teaspoon red pepper flakes
- 1/2 cup unsalted butter, softened
- 1 tablespoon olive oil
- Salt and pepper to taste
Cooking Instructions:
- Prepare the Cheese Mixture: In a large bowl, combine the shredded cheddar, mozzarella, and crumbled feta cheese. Mix well to guarantee an even distribution of all cheeses. Add the sun-dried tomatoes, chopped basil, and red pepper flakes to the cheese mix, stirring until all ingredients are well incorporated.
- Butter the Bread: Spread a thin layer of softened butter on one side of each bread slice. Confirm the buttered side is evenly coated to achieve a perfect golden-brown crust during grilling.
- Assemble the Sandwiches: Lay six slices of bread, buttered side down, on a clean surface. Evenly distribute the cheese and herb mixture onto each slice. Season with a pinch of salt and pepper to enhance flavors. Top each with another slice of bread, buttered side up.
- Preheat the Pan: Heat a large skillet or griddle over medium heat. Add a tablespoon of olive oil to the pan, swirling to coat the surface evenly.
- Grill the Sandwiches: Place the assembled sandwiches in the skillet, cooking in batches if necessary. Press down gently with a spatula to guarantee contact with the pan. Grill for about 3-4 minutes on each side or until the bread is golden brown and the cheese has melted thoroughly.
- Serve Warm: Remove the sandwiches from the skillet and let them rest for a minute before slicing. Serve warm with your choice of dipping sauce or a simple bowl of tomato soup.
Extra Tips:
For the best results, verify that the butter is at room temperature for easy spreading. If possible, use freshly grated cheese for a smoother melting process and enhanced flavor. Adjust the spice level by varying the amount of red pepper flakes according to your preference.
Additionally, using a panini press can also provide an evenly cooked sandwich with beautiful grill marks, eliminating the need to flip the sandwiches manually. Enjoy your gourmet twist on a classic favorite!
Hearty Meatball Subs

There’s nothing quite like sinking your teeth into a hearty meatball sub that’s bursting with flavor. This classic sandwich, beloved by many, features juicy, flavorful meatballs nestled inside a fresh, toasty sub roll, all smothered in rich marinara sauce and topped with gooey melted cheese.
Whether you’re serving this dish for a casual family dinner or a game-day feast, these hearty meatball subs are certain to satisfy even the hungriest of appetites.
The key to the perfect meatball sub lies in the quality of each component. Homemade meatballs seasoned with a blend of herbs and spices are crucial to achieving that authentic Italian taste. Pair these with freshly baked sub rolls and a robust marinara sauce, and you have a sandwich that’s both comforting and indulgent.
The cheese, melted to perfection, adds the finishing touch that makes this dish irresistible. Let’s get started on crafting these delicious subs for 4-6 people.
Ingredients:
- 1 1/2 pounds ground beef
- 1/2 cup breadcrumbs
- 1/4 cup grated Parmesan cheese
- 1/4 cup milk
- 1 large egg
- 2 cloves garlic, minced
- 1 tablespoon Italian seasoning
- Salt and pepper to taste
- 2 cups marinara sauce
- 6 sub rolls
- 2 cups shredded mozzarella cheese
- 2 tablespoons olive oil
- Fresh basil for garnish (optional)
Cooking Instructions:
- Prepare the Meatballs: In a large mixing bowl, combine the ground beef, breadcrumbs, Parmesan cheese, milk, egg, minced garlic, Italian seasoning, salt, and pepper. Mix well until all ingredients are thoroughly combined, but don’t overmix to keep the meatballs tender.
- Shape the Meatballs: Using your hands, form the mixture into golf ball-sized meatballs. You should be able to make about 18-24 meatballs, depending on the size.
- Cook the Meatballs: In a large skillet, heat the olive oil over medium heat. Add the meatballs in batches and cook until they’re browned on all sides, about 8-10 minutes. Ascertain they’re cooked through by checking that the internal temperature reaches 160°F (71°C).
- Simmer with Sauce: Once all the meatballs are browned, reduce the skillet’s heat to low and add the marinara sauce. Gently stir to coat the meatballs evenly with the sauce. Cover and let them simmer in the sauce for about 10-15 minutes to absorb the flavors.
- Prepare the Sub Rolls: While the meatballs are simmering, preheat your oven to 375°F (190°C). Slice the sub rolls lengthwise, being careful not to cut all the way through. Place them on a baking sheet.
- Assemble the Subs: Fill each sub roll with the meatballs and sauce, then sprinkle generously with shredded mozzarella cheese.
- Melt the Cheese: Place the assembled subs in the preheated oven and bake for about 5-7 minutes, or until the cheese is melted and bubbly.
- Garnish and Serve: Remove the subs from the oven, garnish with fresh basil if desired, and serve hot.
Extra Tips: For an even more flavorful experience, consider making your own marinara sauce using fresh tomatoes, garlic, onions, and herbs. If you prefer a spicier kick, add a pinch of red pepper flakes to the meatball mixture.
To prevent the sub rolls from becoming soggy, lightly toast them before adding the meatballs and sauce. Finally, you can experiment with different cheeses, such as provolone or a blend of Italian cheeses, for a unique twist on this classic dish.
BBQ Pulled Pork Sandwiches
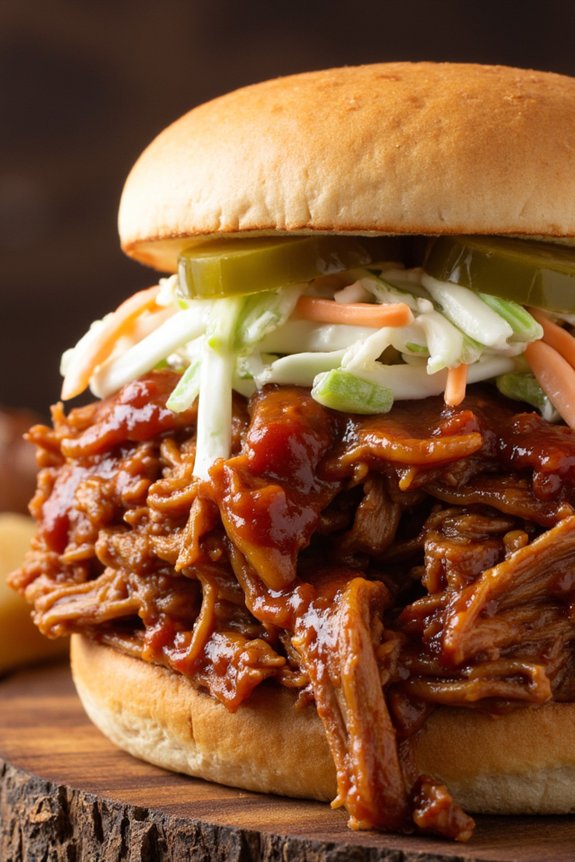
There’s nothing quite like a hearty BBQ pulled pork sandwich to satisfy your craving for something smoky, sweet, and delicious. This classic sandwich combines tender, slow-cooked pork with a rich barbecue sauce, all nestled between soft buns. Perfect for a casual family dinner or a summer cookout, BBQ pulled pork sandwiches are a crowd-pleaser that’s simple to make and full of flavor.
To achieve that melt-in-your-mouth texture, the pork shoulder is slow-cooked until it falls apart, then mixed with a tangy barbecue sauce. The key to a great sandwich isn’t just the pork, but also the toppings. Consider adding coleslaw for a crunchy contrast or pickles for a bit of tang. Here’s how you can make these savory sandwiches for 4-6 people.
Ingredients:
- 3-4 lbs pork shoulder (also known as pork butt)
- 1 tablespoon olive oil
- 1 large onion, sliced
- 4 cloves garlic, minced
- 1 cup barbecue sauce
- 1 cup chicken broth
- 1 tablespoon brown sugar
- 1 tablespoon smoked paprika
- 1 teaspoon chili powder
- Salt and pepper to taste
- 6 sandwich buns
- Optional toppings: coleslaw, pickles, additional barbecue sauce
Instructions:
- Prepare the Pork: Preheat your oven to 300°F (150°C). Rub the pork shoulder with olive oil, smoked paprika, chili powder, salt, and pepper, ensuring it’s evenly coated.
- Sear the Pork: Heat a large oven-proof pot or Dutch oven over medium-high heat. Add the pork shoulder and sear each side until browned, about 3-4 minutes per side. Remove the pork and set aside.
- Cook Onion and Garlic: In the same pot, add the sliced onion and minced garlic. Cook until the onions are soft and translucent, about 5 minutes.
- Combine Ingredients: Return the pork to the pot. Pour in the chicken broth and add the barbecue sauce and brown sugar. Stir to combine all ingredients.
- Slow Cook: Cover the pot with a lid and place it in the preheated oven. Cook for 3-4 hours, or until the pork is very tender and easily shredded with a fork.
- Shred the Pork: Remove the pork from the pot and shred it using two forks. Return the shredded pork to the pot and stir to coat with the sauce.
- Assemble the Sandwiches: Toast the sandwich buns if desired. Spoon the pulled pork onto the bottom half of each bun. Add your choice of toppings, such as coleslaw or pickles, and finish with the top half of the bun.
Extra Tips:
For the best flavor, consider marinating the pork shoulder with the dry rub overnight in the refrigerator before cooking. This allows the spices to penetrate the meat deeply.
If you’re short on time, you can also prepare the pork in a slow cooker instead of the oven. Simply follow the same instructions and cook on low for 6-8 hours.
Finally, if you like a spicier kick, feel free to add a pinch of cayenne pepper to the spice mix. Enjoy your delicious BBQ pulled pork sandwiches with a side of chips or a fresh salad!
Spicy Buffalo Chicken Wraps
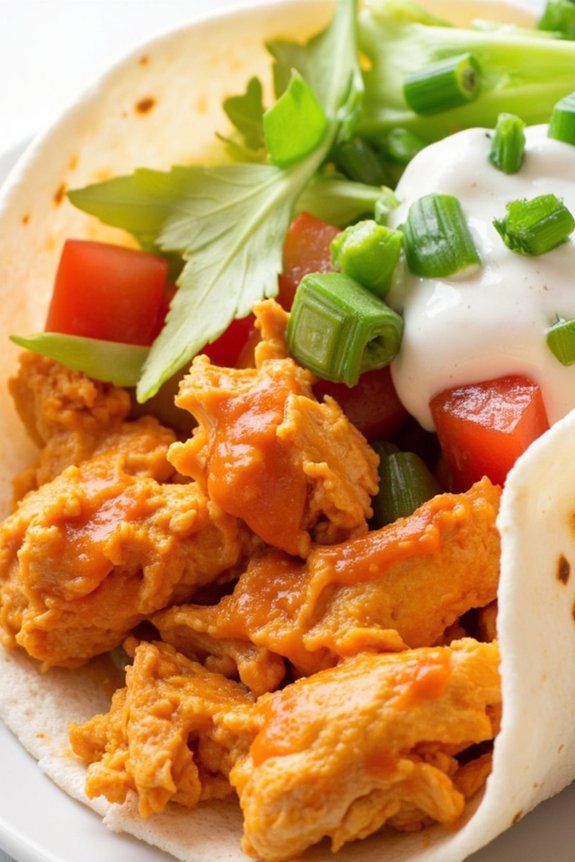
Spicy Buffalo Chicken Wraps are a delightful and zesty twist on the classic chicken sandwich, perfect for dinner or a satisfying lunch. This dish combines tender chicken with bold buffalo sauce, crisp veggies, and creamy dressing, all wrapped in a soft tortilla.
It’s a crowd-pleaser that packs a punch of flavor in every bite. Whether you’re serving it to spice lovers or those who enjoy a bit of heat, these wraps are sure to become a favorite in your dinner rotation.
Ideal for a serving size of 4-6 people, these wraps aren’t only easy to prepare but also customizable to fit individual taste preferences. The balance of spicy, tangy, and creamy flavors, along with the fresh crunch from the vegetables, makes this dish both delicious and exciting.
Let’s explore the ingredients and steps needed to create this mouthwatering meal.
Ingredients:
- 1.5 lbs boneless, skinless chicken breasts
- 1 cup buffalo sauce
- 1 tablespoon olive oil
- 1 teaspoon garlic powder
- 1 teaspoon onion powder
- 1/2 teaspoon salt
- 1/2 teaspoon black pepper
- 6 large flour tortillas
- 1 cup shredded lettuce
- 1 cup diced tomatoes
- 1/2 cup chopped celery
- 1 cup crumbled blue cheese or ranch dressing
- 1/4 cup chopped green onions
Cooking Instructions:
- Prepare the Chicken: Start by seasoning the chicken breasts with garlic powder, onion powder, salt, and black pepper. Heat olive oil in a large skillet over medium heat. Add the seasoned chicken breasts and cook for 6-7 minutes on each side, or until fully cooked and golden brown.
- Make the Buffalo Sauce: Once the chicken is cooked, reduce the heat to low and pour the buffalo sauce into the skillet. Turn the chicken breasts in the sauce until they’re fully coated. Let them simmer for about 2-3 minutes, allowing the flavors to meld together.
- Shred the Chicken: Remove the chicken from the skillet and place it on a cutting board. Use two forks to shred the chicken into bite-sized pieces. Return the shredded chicken to the skillet and mix it thoroughly with the remaining sauce.
- Assemble the Wraps: Lay out the flour tortillas on a clean surface. Evenly distribute the shredded buffalo chicken onto each tortilla. Top each with shredded lettuce, diced tomatoes, chopped celery, and green onions. Add a generous amount of crumbled blue cheese or a drizzle of ranch dressing.
- Wrap and Serve: Carefully roll each tortilla tightly, tucking in the ends as you go to create a secure wrap. Slice each wrap in half if desired, and serve immediately while warm.
Extra Tips: For an extra burst of flavor, you can marinate the chicken in buffalo sauce for a few hours before cooking. If you prefer a milder version, reduce the amount of buffalo sauce or opt for a milder sauce variety.
To make the wraps even healthier, consider using whole-wheat tortillas and adding more fresh veggies like bell peppers or cucumbers. Finally, if you’re serving these wraps to guests, consider setting up a wrap assembly station so everyone can customize their own.
Veggie Delight Paninis
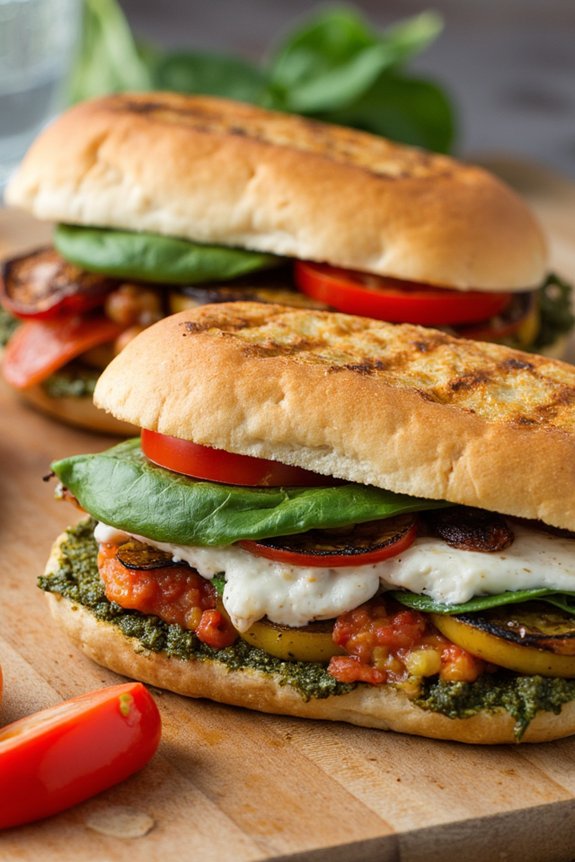
To make these paninis, you start by selecting a mix of your favorite vegetables. Common choices include bell peppers, zucchini, and mushrooms, which are roasted to bring out their natural sweetness and enhance their flavor.
The roasted vegetables are then layered with fresh spinach, slices of mozzarella cheese, and a generous spread of pesto sauce on artisan bread. Once assembled, the paninis are pressed and grilled to perfection, resulting in a crispy exterior and a warm, melty interior that’s simply irresistible.
Ingredients (Serves 4-6):
- 2 red bell peppers
- 1 zucchini
- 1 cup mushrooms
- 1 tablespoon olive oil
- Salt and pepper to taste
- 1 loaf of artisan bread
- 1 cup fresh spinach
- 1 cup mozzarella cheese, sliced
- 1/2 cup pesto sauce
- Butter for grilling
Cooking Instructions:
- Prepare the Vegetables: Preheat your oven to 400°F (200°C). Slice the red bell peppers, zucchini, and mushrooms into even pieces. Toss them with olive oil, salt, and pepper, then spread them out on a baking sheet. Roast in the oven for 15-20 minutes, or until they’re tender and slightly charred.
- Slice the Bread: While the vegetables are roasting, slice the artisan bread into 1/2-inch thick pieces. Aim for 8-12 slices, enough to create 4-6 paninis.
- Assemble the Paninis: Spread a generous layer of pesto sauce on one side of each bread slice. On half of the slices, layer the roasted vegetables, fresh spinach, and mozzarella cheese. Top with the remaining slices of bread, pesto side down, to form a sandwich.
- Grill the Paninis: Preheat a panini press or a grill pan over medium heat. Lightly butter the outside of each sandwich. Place the paninis on the press or pan and grill for 3-5 minutes, or until the bread is golden brown and the cheese is melted. If using a grill pan, press down with a heavy lid or spatula for even grilling.
- Serve: Once grilled, remove the paninis from the heat and let them cool slightly. Cut each panini in half and serve warm.
Extra Tips: For an extra layer of flavor, consider adding a few slices of avocado or a sprinkle of feta cheese to the paninis before grilling. If you don’t have a panini press, you can use a regular skillet and weigh the sandwiches down with a heavy pot or another skillet.
Be sure to check the paninis as they cook to prevent burning, and adjust the heat as necessary to achieve the perfect level of crispness without overcooking the bread.
Ham and Swiss Sliders

Ham and Swiss Sliders are the perfect combination of savory, melty goodness packed into a mini sandwich. Ideal for dinner parties, game days, or a cozy family meal, these sliders are a crowd-pleasing favorite. The tender slices of ham paired with the creamy, nutty flavor of Swiss cheese, all encased in soft, buttery rolls, create a flavor profile that’s both rich and satisfying.
Additionally, the sliders are easy to assemble and bake, making them a great choice for a quick and delicious meal. These sliders aren’t just tasty but also versatile. You can prepare them with your favorite type of ham, be it honey-glazed, smoked, or black forest, to suit your personal taste.
The addition of a mustard glaze on top adds a tangy twist, enhancing the overall flavor of the dish. Whether you’re serving them as an appetizer or a main course, these Ham and Swiss Sliders are sure to be a hit with everyone around the table.
Ingredients for 4-6 servings:
- 12 slider rolls (Hawaiian rolls recommended)
- 12 slices of deli ham
- 12 slices of Swiss cheese
- 1/2 cup unsalted butter, melted
- 1 tablespoon Dijon mustard
- 1 tablespoon Worcestershire sauce
- 1 tablespoon poppy seeds
- 1/2 teaspoon garlic powder
- 1/2 teaspoon onion powder
- Salt and pepper to taste
Cooking Instructions:
- Prepare the Baking Dish: Preheat your oven to 350°F (175°C). Lightly grease a 9×13-inch baking dish to prevent the sliders from sticking during baking.
- Assemble the Sliders: Without separating the rolls, slice them horizontally in half. Place the bottom halves in the prepared baking dish. Layer the ham slices evenly over the bottom halves, followed by the Swiss cheese slices. Top with the upper halves of the rolls.
- Make the Glaze: In a small bowl, combine the melted butter, Dijon mustard, Worcestershire sauce, poppy seeds, garlic powder, onion powder, salt, and pepper. Whisk until well combined.
- Apply the Glaze: Pour the glaze evenly over the assembled sliders, ensuring each roll is covered with the buttery mixture. Use a brush if necessary to spread the glaze over any missed areas.
- Bake the Sliders: Cover the baking dish with aluminum foil and bake in the preheated oven for about 15 minutes. Remove the foil and continue baking for an additional 5-10 minutes, or until the cheese is fully melted and the tops of the rolls are golden brown.
- Serve: Once baked, remove the sliders from the oven and let them cool for a few minutes before serving. Use a sharp knife to separate the sliders for easy serving.
Extra Tips:
For an extra kick, consider adding a layer of pickles or a thin spread of mayonnaise under the ham before baking. If you prefer your sliders a bit spicier, you can add a pinch of cayenne pepper to the glaze.
Always verify the butter is fully melted and mixed with the other glaze ingredients to avoid uneven flavor distribution. Finally, if you’re making these in advance, assemble the sliders without the glaze and refrigerate. When ready to serve, apply the glaze and bake as directed.
Italian Sausage and Peppers Hoagies

Italian Sausage and Peppers Hoagies are a classic and hearty meal that brings the bold flavors of Italy right into your kitchen. Perfect for a cozy family dinner or a casual gathering with friends, this dish combines savory Italian sausages with sweet bell peppers and onions, all nestled in a warm, crusty hoagie roll. It’s a satisfying meal that’s sure to please a crowd, and it’s surprisingly simple to make.
To create the perfect Italian Sausage and Peppers Hoagies, you’ll need to balance the flavors of the sausages and vegetables with just the right amount of seasoning. The key is to allow the sausages to caramelize and the peppers and onions to soften and meld together, creating a deliciously savory filling that’s perfect for stuffing into hoagie rolls. This recipe is designed to serve 4-6 people, making it ideal for a family meal or a small party.
Ingredients (Serves 4-6):
- 6 Italian sausage links
- 2 tablespoons olive oil
- 1 large red bell pepper, sliced
- 1 large green bell pepper, sliced
- 1 large yellow onion, sliced
- 3 cloves garlic, minced
- 1 teaspoon dried oregano
- 1 teaspoon dried basil
- Salt and pepper, to taste
- 1/2 cup marinara sauce (optional)
- 4-6 hoagie rolls
- 1 cup shredded mozzarella cheese (optional)
Cooking Instructions:
- Prepare the Sausages: Begin by heating 1 tablespoon of olive oil in a large skillet over medium heat. Add the Italian sausage links and cook them for about 8-10 minutes, turning occasionally, until they’re browned on all sides. Remove the sausages from the skillet and set them aside.
- Cook the Vegetables: In the same skillet, add the remaining tablespoon of olive oil. Add the sliced bell peppers and onions to the skillet and cook for about 5-7 minutes, stirring occasionally, until they’re softened and starting to caramelize. Add the minced garlic and cook for an additional 1-2 minutes until fragrant.
- Combine Ingredients: Slice the cooked sausages into 1-inch pieces and return them to the skillet with the vegetables. Season with dried oregano, dried basil, salt, and pepper. Stir to combine thoroughly. If desired, add the marinara sauce and stir to coat the sausage and vegetables evenly.
- Assemble the Hoagies: Preheat your oven to 350°F (175°C). Slice the hoagie rolls lengthwise and place them on a baking sheet. Fill each roll with the sausage and pepper mixture. If using, sprinkle shredded mozzarella cheese on top of the filling.
- Bake the Hoagies: Place the baking sheet in the preheated oven and bake for about 10 minutes, or until the cheese is melted and bubbly and the hoagie rolls are slightly toasted.
- Serve: Remove from the oven and serve the Italian Sausage and Peppers Hoagies hot. Enjoy them with a side salad or some crispy fries for a complete meal.
Extra Tips:
For an extra kick, consider adding a pinch of crushed red pepper flakes when cooking the vegetables. If you prefer a spicier sausage, opt for hot Italian sausages instead of mild.
Toasting the hoagie rolls before assembling the sandwiches can add an additional layer of texture and flavor. Finally, if you love cheese, feel free to add more mozzarella or even some provolone slices for an extra cheesy hoagie experience.
Tuna Melt Supreme
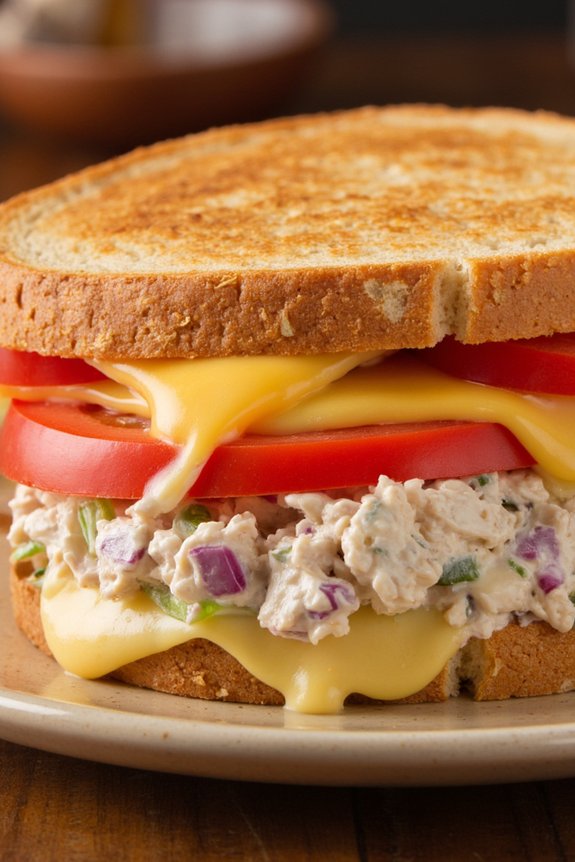
Tuna Melt Supreme is a classic comfort food dish that combines the savory and creamy flavors of tuna salad with the melty goodness of cheese, all sandwiched between slices of your favorite bread. Perfect for dinner, this sandwich isn’t only delicious but also incredibly easy to prepare.
The combination of tuna, crisp vegetables, and melted cheese creates a satisfying meal that will please both kids and adults alike. Whether you’re looking for a quick weeknight dinner or a hearty lunch option, the Tuna Melt Supreme is sure to become a family favorite.
This dish is versatile and can be easily customized to suit your taste preferences. You can experiment with different types of bread, such as sourdough or rye, and choose your favorite type of cheese for melting. The addition of vegetables such as tomatoes and onions provides a revitalizing contrast to the rich tuna filling.
With this recipe, you can prepare a satisfying meal for 4-6 people in under 30 minutes. So, gather your ingredients and get ready to indulge in a delicious Tuna Melt Supreme that will leave everyone asking for seconds.
Ingredients for 4-6 servings:
- 2 cans of tuna, drained
- 1/2 cup mayonnaise
- 1 tablespoon Dijon mustard
- 1/4 cup finely chopped red onion
- 1/4 cup chopped celery
- Salt and pepper to taste
- 8 slices of bread (sourdough, rye, or your choice)
- 8 slices of cheese (cheddar, Swiss, or your choice)
- 2 tablespoons butter
- 1 large tomato, sliced
Cooking Instructions:
- Prepare the Tuna Salad: In a medium-sized mixing bowl, combine the drained tuna, mayonnaise, Dijon mustard, chopped red onion, and chopped celery. Mix well until all the ingredients are evenly distributed. Season the mixture with salt and pepper to taste.
- Assemble the Sandwiches: Lay out the slices of bread on a clean surface. Evenly distribute the tuna salad mixture onto half of the bread slices. Place a slice of cheese over the tuna salad on each slice of bread. Add a couple of slices of tomato on top of the cheese.
- Top and Butter the Sandwiches: Place the remaining slices of bread on top of the tomato slices to form sandwiches. Lightly butter the outside of each sandwich, on both sides, to guarantee a golden brown crust when cooked.
- Cook the Sandwiches: Heat a large non-stick skillet or griddle over medium heat. Place the sandwiches in the skillet and cook for about 3-4 minutes on each side, or until the bread is golden brown and the cheese has melted. You may need to cook the sandwiches in batches depending on the size of your skillet.
- Serve the Sandwiches: Once cooked, remove the sandwiches from the skillet and let them cool for a minute before slicing them in half. Serve warm with your choice of sides, such as a salad or chips.
Extra Tips:
To enhance the flavor of your Tuna Melt Supreme, consider adding a pinch of garlic powder or a squeeze of lemon juice to the tuna salad mixture. If you prefer a spicier kick, you can also incorporate a dash of hot sauce or some chopped jalapeños.
For an extra crispy texture, you can toast the bread lightly before assembling the sandwiches. Remember to keep an eye on the sandwiches as they cook, adjusting the heat if necessary to prevent burning. Enjoy your meal with a revitalizing beverage to complement the rich flavors of the Tuna Melt Supreme.
Philly Cheesesteak on a Budget

The Philly Cheesesteak is a classic American sandwich that’s beloved for its savory flavors and satisfying textures. Traditionally made with thinly sliced beef, melted cheese, and sautéed onions, it’s a hearty meal that doesn’t have to break the bank. This budget-friendly version uses cost-effective ingredients without compromising on taste, making it perfect for a family dinner or a casual get-together.
With some clever tweaks, you can enjoy the rich flavors of a Philly Cheesesteak at a fraction of the usual cost. Our recipe serves 4-6 people, ideal for a small dinner party or a cozy family night. Using budget-conscious ingredients like ground beef instead of ribeye and selecting affordable cheese options will help keep costs down.
Additionally, employing vegetables like bell peppers and onions adds volume and flavor, making this version a hit with everyone at the table. Let’s explore the ingredients and steps to create this delicious, budget-friendly Philly Cheesesteak.
Ingredients (Serves 4-6):
- 1 pound ground beef
- 1 large onion, thinly sliced
- 1 large green bell pepper, thinly sliced
- 1 tablespoon vegetable oil
- 1 teaspoon salt
- 1/2 teaspoon black pepper
- 1/2 teaspoon garlic powder
- 6 slices of provolone cheese
- 6 hoagie rolls or sub rolls
- 2 tablespoons mayonnaise (optional)
Cooking Instructions:
- Prepare the Vegetables: Start by heating the vegetable oil in a large skillet over medium heat. Add the sliced onions and bell peppers to the pan, cooking until the vegetables are soft and the onions are translucent. This should take about 5-7 minutes. Stir occasionally to guarantee even cooking.
- Cook the Beef: Push the cooked vegetables to one side of the skillet and add the ground beef to the other side. Season the beef with salt, black pepper, and garlic powder. Use a spatula to break the beef into small pieces as it cooks. Cook until the beef is browned and fully cooked through, about 8-10 minutes.
- Combine Ingredients: Mix the cooked vegetables and beef together in the skillet, ensuring the flavors meld well. Lower the heat to a simmer.
- Add Cheese: Lay the slices of provolone cheese over the beef and vegetable mixture. Cover the skillet with a lid or a large piece of aluminum foil to allow the cheese to melt. This should take about 2-3 minutes.
- Prepare the Rolls: While the cheese is melting, slice the hoagie rolls and, if desired, spread a thin layer of mayonnaise on the inside of each roll.
- Assemble the Sandwiches: Once the cheese is melted, divide the beef and vegetable mixture evenly among the hoagie rolls. Serve immediately while hot.
Extra Tips:
For an extra kick of flavor, consider adding a splash of Worcestershire sauce to the beef while it cooks. If you want a spicier version, include sliced jalapeños with the bell peppers.
To save even more money, look for sales on ground beef or buy in bulk. Additionally, you can substitute the provolone cheese with mozzarella or American cheese, depending on your preference or what you have on hand.
Breakfast-for-Dinner Egg Sandwiches
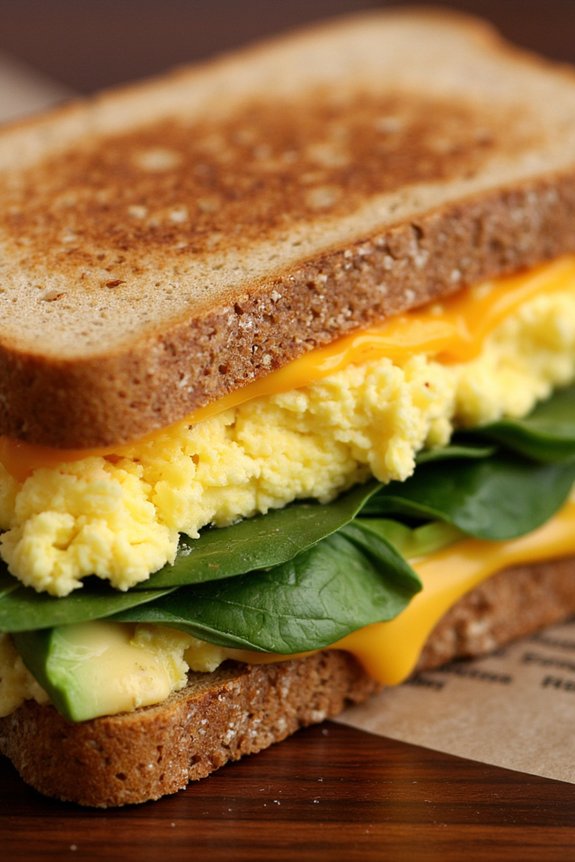
Breakfast-for-dinner is a delightful way to shake up your evening meal routine, and these egg sandwiches are the perfect choice for a comforting, satisfying dish. Combining the classic flavors of breakfast with the heartiness of a sandwich, this dish serves as a quick yet fulfilling dinner option that everyone will love.
With just the right balance of protein, carbs, and a touch of greens, these sandwiches are perfect for a family meal or a casual dinner with friends.
The beauty of Breakfast-for-Dinner Egg Sandwiches lies in their versatility. You can easily customize this recipe to fit your taste preferences or dietary restrictions. Add some bacon or sausage for meat lovers, or pile on extra veggies for a healthier twist.
Ready in just under 30 minutes, this recipe serves 4-6 people and can be doubled if you’re feeding a larger crowd. Let’s explore the ingredients and steps to create this flavor-packed dish.
Ingredients for 4-6 servings:
- 8 large eggs
- 6 slices of whole-grain bread
- 6 slices of cheddar cheese
- 1 ripe avocado
- 1 cup of baby spinach leaves
- 1 tablespoon of butter
- Salt and pepper to taste
- Optional: cooked bacon slices or sausage patties
- Optional: hot sauce or ketchup for serving
Cooking Instructions:
- Prepare the Ingredients: Begin by slicing the avocado and washing the baby spinach leaves. Set them aside for later use.
- Cook the Eggs: In a large skillet, melt the tablespoon of butter over medium heat. Crack the eggs into a bowl, season with salt and pepper, and beat them lightly. Pour the eggs into the skillet and scramble them gently, cooking until just set. Remove from heat.
- Toast the Bread: While the eggs are cooking, toast the slices of whole-grain bread until golden brown. You can use a toaster or an oven set to broil, watching carefully to avoid burning.
- Assemble the Sandwiches: On each slice of toasted bread, place a slice of cheddar cheese, followed by a generous portion of scrambled eggs. Top with sliced avocado and a handful of baby spinach. If using, add bacon slices or sausage patties as desired.
- Finish and Serve: Place the top slice of bread on each sandwich. Cut them in half if preferred, and serve with optional hot sauce or ketchup on the side.
Extra Tips:
To guarantee your Breakfast-for-Dinner Egg Sandwiches are a hit, consider lightly toasting the bread first to avoid sogginess once the sandwich is assembled.
If you’re a fan of spicy flavors, try adding a dash of hot sauce to the eggs while scrambling. For a vegetarian version, simply omit the bacon or sausage and add more vegetables like sautéed mushrooms or bell peppers.